1
All-Bottle 744/1544
Installation/Service and
User Manual
June 1997
BERG COMPANY, LLC
FCC Information:
This device complies with Part 15 of FCC rules. Operation is subject to the following two conditions:
(1) This device may not cause harmful interference and, (2) this device must accept any interference
received including interference that may cause undesired operation.
Note: The user is cautioned that any changes or modifications not expressly approved by the party
responsible for FCC compliance could void the user’s authority to operate the equipment.
Copyright © 1996, 1997 by Berg Company. All rights reserved.
No part of this publication may be reproduced, transmitted, transcribed, stored in a retrieval system, or
translated into any language in any form by any means without the written permission of Berg
Company, Madison, Wisconsin.
Trademarks
All-Bottle 744 and All-Bottle 1544 are registered trademarks of Berg Company, LLC.
Other brand and product names may be trademarks or registered trademarks of their respective
companies.
Berg Part Number: 5201438
Revision 1.00
Printed in U.S.A.
B.M.P.N. 5201437
Disclaimer of Limited One Year Warranty
Warranties and
Berg Company, a Wisconsin Limited Liability Corporation (BERG), warrants that all
Liabilities its Control Systems (SYSTEMS) will remain free from defects in materials
and workmanship for a period of one (1) year from the date of original
installation. BERG’S obligation under this Warranty shall be limited to the
repair or replacement (at BERG’S option) of the SYSTEM or its defective
part(s) during the warranty period. This Warranty is not assignable and is for
the benefit of the original end-user purchaser only. BERG neither assumes nor
authorizes anyone to assume on its behalf any obligations not covered by the
Warranty.
THIS WARRANTY IS EXCLUSIVE AND IS IN LIEU OF ALL OTHER
WARRANTIES, ORAL OR WRITTEN, EXPRESS OR IMPLIED, INCLUDING THE WARRANTIES OF MERCHANTABILITY AND FITNESS FOR
ANY PARTICULAR PURPOSE.
CONDITION AND EXCLUSIONS
No defect (failure) caused by misuse, abuse, improper installation, lack of
normal care or maintenance, accident or Act of God is covered by the
foregoing Warranty. Said Warranty is limited to repair or replacement (at
BERG’S option) only and does not include any labor or transportation charges
or compliance with any Federal, State or local laws, codes or regulation.
Notice of any claimed breach of said Warranty must be promptly given to the
authorized dealer from whom the System was purchased or leased. Upon
request, all Systems or parts which are claimed to be defective must be made
available for inspection by and/or return to (at BERG’S option) such authorized dealer and/or BERG. No repair or replacement under said warranty will
extend the original warranty period.
LIMITATION OF LIABILITY
IN NO EVENT SHALL BERG BE LIABLE UNDER ANY TORT, CONTRACT OR OTHER LEGAL THEORY FOR ANY LOSS, COST, EXPENSE
OR INCIDENTAL OR CONSEQUENTIAL DAMAGES OF ANY KIND IN
CONNECTION WITH THE DESIGN, SALE, USE, REPAIR AND/OR
REPLACEMENT OF ANY SYSTEM OR PART THEREOF, EXCEPT AS
SPECIFICALLY NOTED ABOVE.
BERG COMPANY
Disclaimer of Other Warranties and Liabilities
While all reasonable care has been taken in preparation of this product, it is
provided “as is,” without warranty as to performance or fitness except as
expressly stated above. The entire risk as to the quality of output developed
with this product is assumed by the user.
Berg Company does not warrant that the software or system will meet any
particular requirements of the user, other than as expressly stated above, and
specifically denies any liability for incidental or consequential damages
resulting from the use of this software or system.
Berg Company also specifically denies all liability for any technical or
editorial omissions in its product documentation, and for any incidental or
consequential damages resulting from the furnishing, performance or use of its
documentation.
Contents
Safety
General Safety Precautions ........................................................................... vi
Safety Terms and Symbols............................................................................ vii
Getting Started
1-1
Option Packages ..........................................................................................1-2
System Components .................................................................................... 1-4
Installation Game Plan ................................................................................. 1-6
Gather Customer Setup Information ............................................................ 1-7
Accessing the ECU Dealer Menu ................................................................ 1-8
Accessing the ECU Manager Menu............................................................. 1-9
Accessing the ECU Server Menu ............................................................. 1-10
Navigating the ECU Menus ....................................................................... 1-11
Tools and Materials Required ................................................................... 1-14
Hardware Installation
2-1
Install the ECU ............................................................................................. 2-2
Install the All-Bottle Coded Pourers ............................................................. 2-4
Interface the ECU to an Electronic Cash Register ...................................... 2-6
Interface the ECU to a Parallel Printer ......................................................... 2-8
Interface the ECU to a Serial Printer or Computer ................................... 2-10
Install Flow Meters .................................................................................... 2-12
Install a Remote Server Access Box ........................................................ 2-14
Connect an External Solenoid Output ...................................................... 2-16
Install a Switchbox with a Serial Printer or Computer Interface ............... 2-18
Test the System ......................................................................................... 2-20
ECU Setup
3-1
Country Setup ..............................................................................................3-2
Volume Units ................................................................................................ 3-3
Price Format .................................................................................................3-4
Decimal Character .......................................................................................3-5
Time Format .................................................................................................3-6
Date Format .................................................................................................3-7
Return to Factory Setup ............................................................................... 3-8
Cumulative Sales Password ...................................................................... 3-10
Diagnostic Messages ................................................................................ 3-11
Default Messages ..................................................................................... 3-12
Set Time and Date .................................................................................... 3-13
ii
All-Bottle 744/1544 Installation/Service/User Manual
Serial Port Setup .......................................................................................
Set Station Number ...................................................................................
Linefeeds to Printer ...................................................................................
Enable OFF Signal ....................................................................................
Access Keys
3-14
3-15
3-16
3-17
4-1
Read an Access Key .................................................................................... 4-2
Read a Remote Server Access Key ............................................................ 4-3
Make a Manager Key ...................................................................................4-4
Make a Server Key .......................................................................................4-5
Key Assignment List ..................................................................................... 4-6
Pouring Control
5-1
Disable Unit .................................................................................................. 5-2
Enable Computer Communication ...............................................................5-3
Enable Price Level Change .........................................................................5-4
Reset After Pour ........................................................................................... 5-5
Server Menu Active ...................................................................................... 5-6
Restart Pour Delay .......................................................................................5-7
Calibration, Prices, Portions and PLUs
6-1
Calibrate Coded Pourers .............................................................................. 6-2
Define Portion Sizes ..................................................................................... 6-4
Define Prices ................................................................................................ 6-5
Define PLUs .................................................................................................6-6
Define Flow Meter Price per Unit ................................................................. 6-7
Set Flow Meter Counts................................................................................. 6-8
Clear All-Bottle Prices, Portions and PLUs ............................................... 6-10
Clear Flow Meter Prices ............................................................................ 6-11
Clear All Prices, Portions and PLUs ......................................................... 6-12
Portion Change Lockout ........................................................................... 6-13
All-Bottle Pouring
7-1
Pour a Drink .................................................................................................7-2
Repeat a Pour ..............................................................................................7-3
Pour with Server ID ...................................................................................... 7-4
Pour with Flow Meters and Server ID .......................................................... 7-6
Contents
iii
Reports
8-1
Summary Reports (X and Z) ........................................................................ 8-2
Detailed Reports (X and Z) .......................................................................... 8-4
Last Z Report ............................................................................................... 8-6
Hourly Sales Report ..................................................................................... 8-8
Price Level Change Report ....................................................................... 8-10
Configuration Report ................................................................................. 8-12
Price/Portion Report ................................................................................. 8-14
PLU Report ............................................................................................... 8-16
All Server Summary Reports (X and Z) .................................................... 8-18
Individual Server Summary Reports (X and Z)......................................... 8-20
Individual Server Reports Using the Server Menu ................................... 8-22
Clear Cumulative Sales ............................................................................. 8-24
Maintenance and Upgrading
9-1
Clean the ECU ............................................................................................. 9-2
Clean the Coded Pourers ............................................................................9-3
Replace the ECU Battery .............................................................................9-4
Change the EPROM .................................................................................... 9-6
Install an Option Board ................................................................................9-8
All-Bottle Manager Software
10-1
Install the Software ................................................................................... 10-2
Communication Settings ........................................................................... 10-4
Price and Volume Units ............................................................................. 10-5
Select an ECU Type .................................................................................. 10-6
Transfer Data between the ECU and the Computer ................................. 10-8
Define Portion Sizes and Prices ............................................................. 10-10
Define PLUs ............................................................................................ 10-12
Set Flow Meter Counts and Price per Unit ............................................. 10-14
Print Setup Data ...................................................................................... 10-16
Key Assignment List ................................................................................ 10-18
Generate Reports ................................................................................... 10-20
Perform a Loopback Test ......................................................................... 10-22
Perform a Communication Test ............................................................... 10-23
Check Option Package ........................................................................... 10-24
Diagnostic Mode ..................................................................................... 10-25
All-Bottle Manager Files .......................................................................... 10-26
iv
All-Bottle 744/1544 Installation/Service/User Manual
All-Bottle 744/1544 Specifications
11-1
Basic System Specifications ..................................................................... 11-2
Option Package Specifications ................................................................. 11-2
Technical Specifications ............................................................................ 11-3
Troubleshooting
12-1
Bar Management Tips
13-1
Coded Pourer Assignment ........................................................................ 13-2
Portioning Guidelines ................................................................................ 13-8
Pricing Guidelines ................................................................................... 13-10
Index
Contents
v
General Safety Precautions
Review the following precautions to avoid injury and to prevent damage to the product.
Precautions
n To reduce the risk of electric shock, use only in a dry indoor
location.
n To prevent the risk of electric shock connect the unit to a
properly grounded power source using an IEC approved 3pronged power cord. After installation of this equipment,
access to the power cord and the mains power source
receptacle must not be blocked or restricted.
n To avoid damage to the unit, be sure that the alternating
current (AC) power supply in your area is appropriate for
this equipment. Power requirements are detailed under
Technical Specifications in the All-Bottle 744/1544
Specifications section of this manual.
n For technical information about this product contact your
local Berg dealer or call the Berg Company at (608) 2214281 between the hours of 8:00 A.M. and 4:30 P.M. C.S.T.
vi
All-Bottle 744/1544 Installation/Service/User Manual
Safety Terms and Symbols
Review the following terms and symbols to avoid injury and to prevent damage to the product.
Terms in This Manual
These terms may appear in this manual:
Warning. Warning statements identify conditions or practices
that could result in injury or loss of life.
Caution. Caution statements identify conditions or practices that
could result in damage to this product or other property.
Terms on the Product
These terms may appear on the product:
Caution indicates a hazard to property including this product.
Symbols on the Product
The following symbols may appear on the product:
Attention. Consult accompanying documents.
Contents
vii
SECTION
1
Getting Started
The general guidelines provided in this section can help you take the necessary
steps to make each All-Bottle 744 or 1544 installation run as smoothly as
possible.
Option Packages .............................................................................. 1-2
System Components ........................................................................ 1-4
Installation Game Plan .................................................................... 1-6
Gather Customer Setup Information................................................ 1-7
Accessing the ECU Dealer Menu .................................................... 1-8
Accessing the ECU Manager Menu ................................................ 1-9
Accessing the ECU Server Menu .................................................. 1-10
Navigating the ECU Menus........................................................... 1-11
Tools and Materials Required ........................................................ 1-14
Option Packages
The All-Bottle 744 or 1544 is a multi-beverage system that provides liquor control using seven
(744) or fifteen (1544) different price codes. The system’s multiple features come in different
option packages which are defined by the hardware and firmware (EPROM) installed in the ECU.
An authorized Berg dealer can upgrade a system with a new option package at any time. This
manual provides the necessary detail to successfully install an All-Bottle 744 or 1544 as well as
upgrade the ECU to any option package. The All-Bottle 744 or 1544 option packages are:
744-Basic
Provides liquor control using Berg’s patented coded pourers.
Different price codes can be programmed to pour four portion
sizes at each of four price levels. Can be linked to a computer
with the optional Berg software package All-Bottle Manager for
ease of ECU programming.
744-CR
Offers communication between the ECU and an electronic cash
register in addition to the Basic functions. With this capability,
sales are tallied automatically at the cash register as they occur at
the bar.
744-AR
1544-AR
Provides a full range of detailed sales reports in addition to a cash
register interface and the Basic functions. The reports can be sent
directly to a printer or computer.
744-FM
1544-FM
Offers tracking of pulse output meters that monitor total sales and
volume poured from beer, wine or soda lines in addition to sales
reports, a cash register interface and the Basic functions.
744-ID
1544-ID
Offers security and server accountability in addition to sales
reports, a cash register interface and the Basic functions. The
ECU can only be “unlocked” for dispensing when an active server
or bartender access key is inserted. An optional remote server
access box provides easy access to all servers.
744-DX
1544-DX
Provides flow meter monitoring, server ID, advanced reporting
and an electronic cash register interface in addition to the Basic
functions.
1-2 All-Bottle 744/1544 Installation/Service/User Manual
Server
Optional server ID
capability provides
accountability and
complete security.
(option package
ID, DX)
Optional All-Bottle Manager software
resides on a PC and works with any
option package.
All-Bottle 744 ECU
Optional flow meters
can be installed to
monitor beer, wine,
soda or juice lines.
(option package FM,
DX)
Activator Ring
Coded Pourer
744-Basic
An optional ECR interface provides direct sales
communication between All-Bottle 744 or 1544
and an electronic cash register. (option package
AR, FM, ID, DX and 744-CR)
The optional advanced reporting
package supports 80 column printer
output of sales reports. (option
package AR, FM, ID, DX)
Getting Started 1-3
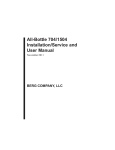
System Components
The All Bottle 744 or 1544 Multi-Beverage System offers basic features and several options from
one compact, cost-effective unit. You can customize your system using the following components.
ECU (Electronic Control Unit)
The compact, lightweight console that controls pouring
operations. One unit provides free-pouring style control for an
unlimited number of brands.
Activator Ring
A circular receiver attached to the ECU that reads the electronic
price information on coded pourers. It sits in a holder when not in
use and easily slips over the top of a bottle for pouring.
Coded Pourer
Specially designed pourers inserted and sealed into each liquor
bottle. Metal coding bands in seven (744) or fifteen (1544)
different combinations electronically identify price and portion
information to the ECU. Two types of pourers are available–
standard flow and high flow.
Access Key
A small, electronically-coded key that must be inserted in a slot in
the ECU to access the ECU menus. In option packages ID and
DX, an access key must be inserted to pour drinks.
Flow Meter
Pulse output meter installed in beer, wine, soda or juice lines that
transmits information to the ECU to calculate the volume of
beverage poured. One ECU can monitor up to three flow meters.
Remote Server Access Box
A small key-slot box that can be used with option package ID or
DX to provide easy access to the system for servers placing drink
orders at the bar.
Battery Power Supply
All-Bottle
Manager Software
An optional battery based power supply for use in portable or
temporary installations where an AC outlet is not available.
Provides the option of entering All-Bottle setup information and
generating reports at a computer rather than the ECU.
Caution
Operating Environment
The components that comprise the All-Bottle 744 or 1544
system have been designed to perform well in a typical bar,
restaurant, or stadium environment. However, as with all
electronic equipment, certain guidelines should be followed in
locating the components. For the ECU, Power Supply and
Remote Server Access Box, a protected, dry and clean
location is required. The operating temperature range for
these components is from 5° C to 40° C (41° F to 104° F).
1-4 All-Bottle 744/1544 Installation/Service/User Manual
Access
Keys
Printer
RS232/485
Converter
ECR
Mike
Ron
Julie
Power
Supply
Activator
Ring
Remote Server
Access Box
All-Bottle
Coded Pourers
Flow
Meter
Beer Kegs
Taps
Equipment
Height
Width
Flow meter
1.2 in (30 mm) 1.0 in (25 mm)
744 or 1544 ECU
3.75 in (96 mm) 10.25 in (261 mm)
Power Supply
1.5 in (38 mm) 2.5 in (64 mm)
Remote Server Access Box 2.5 in (64 mm) 5.0 in (127 mm)
Battery Power Supply
4 in (102 mm)
6 in (152 mm)
with Charger
744 or 1544 System (ECU, power supply, manual, cable, etc.)
Depth
2.4 in (61 mm)
5.25 in (134 mm)
4.5 in (115 mm)
4.5 in (115 mm)
2.5 in (64 mm)
Cable
Flow meter to ECU
Power supply to ECU
Remote Server Access Box to ECU
Computer to ECU (RS-485)
Electrical Requirement
100 - 240 VAC, 50-60Hz., or 12 VDC
Power Consumption
0.7 amps peak
88.5 milliamps average (300 drinks/hr)
Battery
12V 7Ah Sealed re-chargeable lead acid
Length
500 feet (152.4 meters)
3 feet (.91 meters)
6 feet (1.83 meters)
4000 feet
Shipping Weight
13 oz (.4 kg)
6 lb (2.7 kg)
2 lb (.9 kg)
1lb 2oz (.5 kg)
7 lb 8 oz (3.4 kg)
9 lb (4.1 kg)
Getting Started 1-5
Installation Game Plan
Berg offers the following checklist to expedite your installation of the All-Bottle 744 or 1544.
Available in Option Package(s):
All-Bottle 744 or
1544 Installation
þ 744-Basic þ 744-CR
þ AR
þ FM
þ ID
þ DX
The sequence of steps used to install an All-Bottle 744 or 1544
system follows the order tasks appear in this manual. To help you
locate information quickly and easily, related tasks are grouped
throughout the manual.
Getting Started q 1.
Gather customer setup information and submit order for
All-Bottle 744 or 1544 to Berg.
q 2. Record the customer’s price and portion information.
q 3. Set an installation date and assemble required tools and
materials.
q 4. Perform any pre-installation programming of the All-Bottle
744 or 1544 ECU.
Hardware Installation q 5.
Install the All Bottle 744 or 1544 ECU.
q 6. Install the All-Bottle coded pourers.
q 7. Interface the 744 or 1544 to an ECR (CR, AR, FM, ID, DX).
q 8. Interface the 744 or 1544 to a printer/PC (Manager
software, AR, FM, ID, DX only).
q 9. Install a Remote Server Access Box (ID, DX only).
q 10. Install flow meters (FM, DX only).
System Configuration q 11. Perform one-time ECU setup tasks.
q 12. Select pouring control features and enter into the ECU.
q 13. Calibrate the coded pourers.
q 14. Install All-Bottle Manager software (optional).
q 15. Enter brands, prices, portion sizes and PLUs into the ECU
using the ECU keypad or Manager software.
q 16. Make server keys (ID, DX only). Enter valid server names
into the ECU using the ECU keypad or Manager software.
q 17. Enter flow meter counts and price per unit using the ECU
keypad or Manager software (FM, DX only).
1-6 All-Bottle 744/1544 Installation/Service/User Manual
Gather Customer Setup Information
As you make ordering plans for an All-Bottle 744 or 1544 system, gather specific information
from each customer.
Available in Option Package(s):
Assess the site and the
customer’s needs
þ 744-Basic þ 744-CR
þ AR
þ FM
þ ID
þ DX
Which version of All-Bottle 744 or 1544 best meets the
customer’s needs? Once you’ve determined which option package
to order, consider the following questions.
All option packages: Where will the ECU be installed? Will the
All-Bottle Manager software be part of the system? If so, where
is the computer located? How will you connect it to the ECU?
Option package CR, AR, ID, FM, DX: Does hardware need to
be ordered from the cash register company?
Option package AR, ID, FM, DX: Will reports go to a printer
or computer? What cables are needed? How long must they be?
Option package ID, DX: Does the customer want a remote
server access box? Where will it be installed? How many servers
will use the equipment?
Option package FM, DX: Where will the flow meters be
installed? Where will the cables run?
With the answers to these questions, you can sketch out a rough
map of the proposed system and clarify any important points with
the customer.
Assess the size of
the system
How many coded pourers of each price code do you need to
order? See Coded Pourer Assignment in the Bar Management
Tips section.
How many different sized inserts do you need for the pourers?
How many boxes of security seals?
Learn the customer’s
formatting preferences
and price structure
Record the customer’s formatting and pouring control
preferences so they can be entered into the ECU. See the ECU
Setup and Pouring Control sections for details regarding these
choices.
Record the customer’s portion sizes, prices and PLUs (if
applicable).
Getting Started 1-7
Accessing the ECU Dealer Menu
The All-Bottle 744 or 1544 ECU has several features that can be customized according to the
needs of each owner. At the time of installation, an authorized Berg dealer performs these
installation, setup and diagnostic tasks using the ECU’s Dealer Menu. You can only access this
menu with a valid Dealer access key inserted in the ECU’s front key slot.
Available in Option Package(s):
þ 744-Basic þ 744-CR
þ AR
þ FM
þ ID
þ DX
n To access the Dealer Menu:
Dealer
Use↑↓ and ENTER
Dealer Menu
↵
Use↑↓ and ENTER
Exit This Menu
↵
1. Insert a Dealer access key in the ECU’s front key slot.
2. Press the ENTER (↵) button on the ECU keypad.
The Dealer Menu option is displayed.
3. Press ENTER to select this menu.
You are now inside the Dealer Menu. Exit This Menu
is the first option in the menu. Use the up and down arrow
keys to view other options.
1-8 All-Bottle 744/1544 Installation/Service/User Manual
Accessing the ECU Manager Menu
For your All-Bottle 744 or 1544 system to operate, the ECU must be programmed with the
various options available for pouring. In the ECU’s Manager Menu, you perform a variety of
manager functions including assigning portion sizes and prices, setting pouring controls and
generating reports. You can access this menu with a Dealer or Manager access key.
Available in Option Package(s):
þ 744-Basic þ 744-CR
þ AR
þ FM
þ ID
þ DX
n To access the Manager Menu (Dealer key):
1. Insert a Dealer access key in the ECU’s front key slot.
Dealer
Use↑↓ and ENTER
Dealer Menu
↵
Use↑↓ and ENTER
Manager Menu
↵
Use↑↓ and ENTER
Exit This Menu
↵
2. Press the ENTER (↵) button on the ECU keypad.
The Dealer Menu option is displayed.
3. Use the down arrow to select the Manager Menu option
and press ENTER.
You are now inside the Manager Menu. Exit This
Menu is the first option in the menu. Use the up and down
arrow keys to view other options.
n To access the Manager Menu (Manager key):
1. Insert a Manager access key in the ECU’s front key slot.
Manager
Use↑↓ and ENTER
Manager Menu
↵
Use↑↓ and ENTER
Exit This Menu
↵
2. Press the ENTER (↵) button on the ECU keypad.
The Manager Menu option is displayed.
3.
Press ENTER to select this menu.
You are now inside the Manager Menu. Exit This
Menu is the first option in the menu. Use the up and down
arrow keys to view other options.
Getting Started 1-9
Accessing the ECU Server Menu
If you have option package ID or DX, the ECU’s Server Menu allows each server access to his or
her own sales reports. You can access this menu with a Dealer, Manager or Server key.
Available in Option Package(s):
þ 744-Basic þ 744-CR
þ AR
þ FM
þ ID
þ DX
n To access the Server Menu (Dealer/Manager key):
Dealer or
Manager
1. Insert a Dealer or Manager access key in the ECU’s front
key slot.
2. Press the ENTER (↵) button on the ECU keypad.
Use↑↓ and ENTER
Manager Menu
↵
Use↑↓ and ENTER
Server Menu
↵
Use↑↓ and ENTER
Exit This Menu
↵
The Dealer Menu option or the Manager Menu
option is displayed.
3. Use the down arrow to select the Server Menu option
and press ENTER.
You are now inside the Server Menu. Exit This Menu
is the first option in the menu. Use the up and down arrow
keys to view other options.
n To access the Server Menu (Server key):
1. Insert a Server access key in the ECU’s front key slot.
Server
2. Press the ENTER (↵) button on the ECU keypad.
The Server Menu option is displayed.
Use↑↓ and ENTER
Server Menu
↵
Use↑↓ and ENTER
Exit This Menu
↵
3. Press ENTER to select this menu.
You are now inside the Server Menu. Exit This Menu
is the first option in the menu. Use the up and down arrow
keys to view other options.
1-10 All-Bottle 744/1544 Installation/Service/User Manual
Navigating the ECU Menus
The LCD display on the ECU functions like a narrow window, highlighting your current position
in a menu. The ECU keypad is your steering device; you use it to control your movement through
the menus and to select your options.
Available in Option Package(s):
Reading the Display
þ 744-Basic þ 744-CR
þ AR
þ FM
þ ID
þ DX
The display window on the ECU shows two lines of text at a
time. The first line is normally a prompt asking you to take some
action. For instance, Use↑↓ and ENTER ↵ means use the up
and down arrow keys to change your position in the menu and
ENTER to select an option.
The second line in the display window marks your current
position in the menu. This second line is also used to receive user
input for a selected menu option.
Using the Keypad
The ECU keypad is very easy to use. The down arrow (↓) moves
you forward or “down” the menu while the up arrow (↑) takes you
back “up” the menu. Use the left (←
(←) and right (→) arrow keys
to change the position of the edit cursor.
Getting Where You
Want to Go
The up and down arrow keys take you “up” or “down” the menu;
they do not cycle through the choices in a continuous loop. (If
you are at the bottom of the menu, the down arrow does not put
you back at the top.)
If you are in a sub-menu, use the up arrow to select the Exit
This Menu option to return to the main menu.
ENTER Key: Selects
menu options and/or
enters keyed input
LEFT Arrow: Moves the edit cursor to the left in
the display window
UP Arrow: Moves the display window to the
previous menu option
RIGHT Arrow: Moves the edit cursor to the right
in the display window
DOWN Arrow: Moves the display window to the
next menu option
Getting Started 1-11
Dealer Menu Options
Available in Option Package(s)
Basic
CR
AR
FM
ID
DX
Exit this Menu
ü
ü
ü
ü
ü
ü
Access Keys
ü
ü
ü
ü
ü
ü
Exit this Menu
ü
ü
ü
ü
ü
ü
Read First Key
ü
ü
ü
ü
ü
ü
Read Second Key
ü
ü
Make Manager Key
ü
ü
Make Server Key
ü
ü
ü
ü
ü
ü
ü
ü
Exit this Menu
ü
ü
ü
ü
ü
ü
Set Volume Units
ü
ü
ü
ü
ü
ü
ü
ü
ü
ü
Country Setup
Set Price Format
ü
ü
ü
ü
Set Time Format
ü
ü
ü
ü
ü
Set Date Format
ü
ü
ü
ü
ü
ü
ü
ü
Set Decimal Char.
ü
ü
ü
ü
ü
ü
ü
Diagnostic Messages
ü
ü
ü
ü
ü
ü
Default Messages
ü
ü
ü
ü
ü
ü
Rtn to factory setup
Cum Sales Password
The first line in the display
window tells you to use the
arrow keys to move up or
down the list or the ENTER
key to select this option.
Use↑↓ and ENTER ↵
Set Price Format
The second line in the display
window marks your current
position in the ECU menus.
Manager Menu Options
Exit this Menu
Disable Unit
Access Keys
Exit this Menu
Read First Key
Read Second Key
Make Server Key
Communications
View Reports
Exit this Menu
Summary Z
Detailed Z
Summary X
Detailed X
All Server Summary Z
All Server Summary X
Summary Z by Server
Summary X by Server
1-12 All-Bottle 744/1544 Installation/Service/User Manual
Available in Option Package(s)
Basic
CR
AR
FM
ID
DX
ü
ü
ü
ü
ü
ü
ü
ü
ü
ü
ü
ü
ü
ü
ü
ü
ü
ü
ü
ü
ü
ü
ü
ü
ü
ü
ü
ü
ü
ü
ü
ü
ü
ü
ü
ü
ü
ü
ü
ü
ü
ü
ü
ü
ü
ü
ü
ü
ü
ü
ü
ü
ü
ü
ü
ü
ü
ü
ü
ü
ü
ü
ü
ü
ü
ü
ü
ü
ü
ü
ü
ü
ü
ü
ü
ü
ü
ü
ü
ü
ü
ü
ü
ü
Manager Menu Options (cont.)
Last Z
Hourly Sales
Price Level Change
Configuration
Price/Portion
PLU
Key Assignment
Exit this Menu
01 (through 15)-includes Make Key option
Price Level Change (by manager only)
Reset After Pour
Server Menu Active
Restart Pour Delay
Set Time and Date
Serial Port Setup
Exit this Menu
Set Baud Rate
Set Word Length
Set Parity
Set Stop Bits
Set Station Number
All- Bottle Setup
Exit this Menu
Code 1 (through 7) or (through 15)
Exit this Menu
Set Portion
Set Price
Set PLU
Flow Meter Setup
Exit this Menu
Flow Meter 1 (through 3)
Exit this Menu
Meter Count
Set Price/Unit (levels A through D)
Clear Price/Por/PLUs
Exit this Menu
All-Bottle Data
Flow Meter Prices
All Price/Por/PLUs
Printer Config
Exit this Menu
Linefeeds to Printer
Enable OFF signal
Clear Cum Sales
Calibrate
Exit this Menu
Code 1 (through 7) or (through 15)
Server Menu Options
Available in Option Package(s)
Basic
CR
AR
FM
ID
DX
ü
ü
ü
ü
ü
ü
ü
ü
ü
ü
ü
ü
ü
ü
ü
ü
ü
ü
ü
ü
ü
ü
ü
ü
ü
ü
ü
ü
ü
ü
ü
ü
ü
ü
ü
ü
ü
ü
ü
ü
ü
ü
ü
ü
ü
ü
ü
ü
ü
ü
ü
ü
ü
ü
ü
ü
ü
ü
ü
ü
ü
ü
ü
ü
ü
ü
ü
ü
ü
ü
ü
ü
ü
ü
ü
ü
ü
ü
ü
ü
ü
ü
ü
ü
ü
ü
ü
ü
ü
ü
ü
ü
ü
ü
ü
ü
ü
ü
ü
ü
ü
ü
ü
ü
ü
ü
ü
ü
ü
ü
ü
ü
ü
ü
ü
ü
ü
ü
ü
ü
ü
ü
ü
ü
ü
ü
ü
ü
ü
ü
ü
ü
ü
ü
ü
ü
ü
ü
ü
ü
ü
ü
ü
ü
ü
ü
ü
ü
ü
ü
ü
ü
ü
ü
ü
ü
ü
ü
ü
ü
ü
ü
ü
ü
ü
ü
ü
ü
ü
ü
ü
ü
ü
ü
ü
ü
ü
ü
ü
ü
ü
ü
ü
ü
ü
ü
ü
ü
ü
ü
ü
ü
ü
ü
ü
ü
ü
ü
ü
ü
ü
ü
ü
ü
ü
ü
ü
ü
ü
ü
ü
ü
ü
ü
Available in Option Package(s)
ID
DX
Exit this Menu
Basic
CR
AR
FM
ü
ü
Summary X by Server
ü
ü
Getting Started 1-13
Tools and Materials Required
Berg offers the following list to help in your preparation for an All-Bottle 744 or 1544
installation.
Available in Option Package(s):
Tools Required
þ
þ
þ
þ
þ
þ
þ
þ
þ
þ
þ
þ
þ 744-Basic þ 744-CR
þ AR
þ FM
þ ID
þ DX
Small slotted screwdriver
Small Phillips (#2 pt.) screwdriver
Small jeweler’s screwdriver
Nut driver (3/16 in)
Hex wrench (1/16 in)
PROM remover
Measuring cup or graduated cylinder (for calibration)
Tubing cutter (if installing flow meters)
Tubing clamps (if installing flow meters)
Diagonal cutters
Jacket for working in cooler (if installing flow meters)
Loop back tester
You may also need drills, holesaws and possibly other power
tools if you are installing flow meters or other extensive cabling.
Materials Required
Equipment Preparation
þ Various flow meter fittings (if installing flow meters)
þ Cable hold-downs
Make sure the All-Bottle 744 or 1544 equipment arrives at your
shop a few days before you plan to install the system. Open the
boxes and check to see you have everything you need. Also,
verify nothing was damaged during shipping.
1-14 All-Bottle 744/1544 Installation/Service/User Manual
SECTION
2
Hardware Installation
Installing the hardware of an All-Bottle 744 or 1544 system is not a difficult
process. Each task can be broken down into simple procedures that are easily
accomplished.
It is best to install the system early in the week, giving the bartenders a few days
to operate the system before a busy weekend. It is also best to install the system
early in the morning, before any bartenders arrive. Refer to this section for help
with the following tasks:
Install the ECU ................................................................................ 2-2
Install the All-Bottle Coded Pourers ................................................ 2-4
Interface the ECU to an Electronic Cash Register ........................... 2-6
Interface the ECU to a Parallel Printer ............................................ 2-8
Interface the ECU to a Serial Printer or Computer ....................... 2-10
Install Flow Meters ........................................................................ 2-12
Install a Remote Server Access Box .............................................. 2-14
Connect an External Solenoid Output ........................................... 2-16
Install a Switchbox with a Serial Printer or Computer Interface ... 2-18
Test the System .............................................................................. 2-20
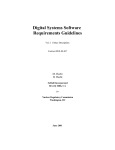
Install the ECU
The All-Bottle 744 or 1544 ECU is designed for easy installation under the bar top at the
bartender's work station. It should be mounted 1/4 inch to 3/4 inch (.6 cm to 1.6 cm) back from the
front edge of the bar to help protect it from liquid damage. Install the ECU and power supply as
far away from sinks, dishwashers and other sources of water or steam as is practical.
Available in Option Package(s):
þ 744-Basic þ 744-CR
þ AR
þ FM
þ ID
þ DX
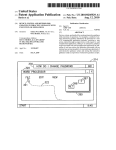
n To install the ECU:
1. Attach the cable that connects the power supply (AC adaptor)
to the ECU. Use the 3-pin J8A port on the back of the ECU.
Tighten the connecting screws.
2. Mount the power supply in a secure, dry location with the 2
wood screws provided. Select a location within 3 feet (.9
meters) of the ECU and within 5 1/2 feet (1.7 meters) of a
properly grounded 110 VAC (or 220 VAC) electrical outlet.
3. Attach any flow meter, printer/PC, ECR, or remote server
access box cables to the back of the ECU before mounting the
ECU to insure ease of access. See the appropriate tasks in
this section.
4. Secure the activator ring cable to either the right or left side
of the ECU using the cable clamp and an existing screw on
the ECU.
5. Mount the ECU securely under the bar using the four wood
screw provided.
6. Mount the activator ring holder to the right or left of the ECU
using 4 wood screws. Mount the holder to a secure surface
where it will be within the bartender's convenient reach.
Note
q The connector for the power supply will fit in the J8A port or
the J4B port. If it is inserted into the J4B port by mistake, the
unit will not operate.
q An optional battery based power supply is available for
portable ECU installations. Order Berg PN 8005700 for the
battery power supply or Berg PN 8005708 for the battery and
a charger.
2-2 All-Bottle 744/1544 Installation/Service/User Manual
All-Bottle 744 ECU
Activator ring holder
Activator ring
Connect the power supply to
the back of the ECU
Caution
Operating Environment
The components that comprise the All-Bottle 744 or 1544
system have been designed to perform well in a typical bar,
restaurant, or stadium environment. However, as with all
electronic equipment, certain guidelines should be followed in
locating the components. For the ECU, Power Supply and
Remote Server Access Box, a protected, dry and clean
location is required. The operating temperature range for these
components is from 5° C to 40° C (41° F to 104° F).
Hardware Installation 2-3
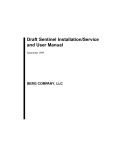
Install the All-Bottle Coded Pourers
To insure a perfect fit in each liquor bottle, Berg offers inserts (the part of the coded pourer that
fits in the bottle) in four sizes. To complete an All-Bottle 744 or 1544 installation, be sure to have
an ample supply of varying sizes of inserts, an appropriate number of each of the seven or fifteen
price coded pourers and a box of security seals.
Available in Option Package(s):
þ 744-Basic þ 744-CR
þ AR
þ FM
þ ID
þ DX
n To install the All-Bottle coded pourers:
1. Select the appropriately coded pourer for the liquor bottle and
attach the right size insert. Remove a numbered seal and
mylar tab from the box of security seals.
2. Firmly insert the pourer into the bottle.
3. Slide the opening in the mylar tab over the top of the pourer
with the adhesive side down. Align the notch in the mylar tab
with the notch in the pourer. Pull both tab ends down tight
onto the neck of the bottle.
4. Wrap a numbered seal around the neck of the bottle and the
mylar tab ends. Make sure you can still read the number on
the seal. The lower edge of the seal should be even with the
lower edge of the mylar tab ends.
5. Repeat steps 1-4 for each liquor bottle.
n To change an insert on the All-Bottle coded
pourers:
1. Remove the current insert by pulling and twisting it from the
coded pourer.
2. Select a new size insert. Choose from an undersize insert
(Berg PN 9007281), a standard size insert (Berg PN
9007122), an oversize insert (Berg PN 9007282) or an extra
large insert (Berg PN 9008799).
3. Push the new insert onto the coded pourer.
Note
q Standard flow pourers and high flow pourers calibrate at
different rates. If you are installing high flow coded pourers
in an existing system with EPROM version lower than 1.09,
or if you are using standard flow pourers in a system with
EPROM version 1.09 or higher, see the Notes in Calibrate
Coded Pourers in the Calibration, Prices, Portions and
PLUs section.
2-4 All-Bottle 744/1544 Installation/Service/User Manual
Notch in tab
Mylar tab
Coded pourer
Plastic insert
Numbered security seal
Hardware Installation 2-5
Interface the ECU to an Electronic Cash Register
If you want to take advantage of the ECR interface capability in option packages CR, AR, FM, ID
or DX, you need to make the necessary hardware connections for communication between the ECU
and cash register to take place.
Available in Option Package(s):
o 744-Basic þ 744-CR
þ AR
þ FM
þ ID
þ DX
n To interface the ECU to an ECR:
1. Find out what the cash register needs to communicate with
the ECU. You may have to order a specific board to install in
the cash register. At the very least, you need a cable to
connect the ECU to the cash register. Order these parts from
the cash register company well in advance of the install date.
If your cash register representative is not familiar with the
Berg ECR interface, contact your Berg dealer for more details
about obtaining the required interface hardware.
2. Make sure any necessary hardware is installed in the cash
register. Connect one end of the cable to the cash register.
3. Connect the other end of the cable to the back of the ECU
using the 15-pin J5A port. Tighten the connecting screws.
4. Get a list of the PLUs assigned to each drink at the cash
register. You will need to enter these at the ECU. See Define
PLUs in the Calibration, Prices, Portions and PLUs section.
Note
q If you are installing option package CR, AR, FM, ID or DX
as an upgrade to an existing All-Bottle 744 or 1544 system,
you need to change the EPROM in the ECU. See Change the
EPROM in the Maintenance and Upgrading section.
2-6 All-Bottle 744/1544 Installation/Service/User Manual
All-Bottle 744 ECU
Electronic cash register
Connect the ECR cable to the J5A
port on the back of the ECU
Hardware Installation 2-7
Interface the ECU to a Parallel Printer
If you are installing option package AR, FM, ID, or DX, you need to provide a connection
between a printer and the ECU for printing reports. You can connect to a printer directly or
connect to a computer and use the All-Bottle Manager software to print reports. See Interface the
ECU to a Serial Printer or Computer in this section.
Available in Option Package(s):
o 744-Basic o 744-CR
þ AR
þ FM
þ ID
þ DX
n To interface the ECU to a parallel (Centronics)
printer:
1. Connect a parallel printer cable to the back of the ECU using
the 25-pin J3B port.
2. Connect the other end of the cable to your printer.
Note
q If you are installing option package AR, FM, ID or DX as
an upgrade to an existing All-Bottle 744 or 1544 system, you
need to install an option board and change the EPROM in the
ECU. See Install an Option Board and Change the EPROM
in the Maintenance and Upgrading section.
2-8 All-Bottle 744/1544 Installation/Service/User Manual
Printer
All-Bottle 744 ECU
Connect the parallel printer
cable to the J3B port
Hardware Installation 2-9
Interface the ECU to a Serial Printer or Computer
If you are installing All-Bottle Manager software (with any option package), you need to provide
a connection between a computer and the ECU. If you are installing option package AR, FM, ID
or DX, and not using the software, you have the option of connecting directly to a printer for
reports. Connecting to a serial printer or a computer requires the RS-232 / RS-485 converter. If
you are connecting the ECU directly to a parallel printer, see Interface the ECU to a Parallel
Printer in this section.
Available in Option Package(s):
þ 744-Basic þ 744-CR
þ AR
þ FM
þ ID
þ DX
n To interface the ECU to a serial printer (AR, FM, ID,
DX only) or computer:
1. Plug the connector from the power transformer into the side
of the RS-232 / RS-485 converter (Berg PN 8009344).
2. Plug the power transformer into the same buffered power
strip used by the printer or computer.
3. Insert the RS-232 / RS-485 converter into a serial port of the
printer or computer and secure it with the captive screws in
the connector flanges.
If the converter does not fit in the serial port, insert a 9-to25pin adapter cable.
4. Insert the communication cable plug into the RJ-11 socket on
the converter.
5. Insert the other end of the communication cable into the J6A
port on the back of the ECU.
Notes
q If you have option package 744-Basic or 744-CR, you won't
be able to interface to a printer, but you may want to interface
to a computer to use the All-Bottle Manager software to
load portion sizes or PLUs.
q To connect more than one ECU to one printer or computer
see Install a Switchbox with a Serial Printer or Computer
Interface.
q A serial printer package (Berg PN 8005546) is available from
Berg which includes an Epson 300 printer, 3 ft cable and the
RS-232 to RS-485 converter.
2-10 All-Bottle 744/1544 Installation/Service/User Manual
Power
transformer
Insert in computer or
printer serial port
Communication cable
plug from ECU
RS-232 / RS-485
converter
RS-232 / RS-485
converter
All-Bottle 744 ECU
Computer
Connect the communication
cable to the J6A port
Hardware Installation 2-11
Install Flow Meters
Before installing flow meters make sure the taps are closed and the door to the cooler is closed. If
you leave the cooler door open, the temperature of the beverage will rise which causes excess
foaming and makes calibration difficult.
Available in Option Package(s):
o 744-Basic o 744-CR
o AR
þ FM
o ID
þ DX
n To install flow meters:
1. Record and save the flow meter count number stamped on the
flow meter(s). (You use this number later in the calibration
process.)
2. Turn off pressure to the beverage line(s) and disconnect any
kegs.
3. Determine where to insert the flow meter(s) in the line(s).
Plan enough length in the line to secure the flow meter(s) to
the wall or other surface.
4. Cut the beverage line.
5. Install the flow meter(s) into the line(s). First slide clamps
around each end of the line, then insert the flow meter and
tighten the clamps. Make sure the flow meter is installed with
the “flow” arrow pointing toward the end of the tube that
goes to the faucet.
6. Secure the flow meter(s) to the cooler wall (or other place)
with #6 wood or sheet metal screws. You can mount the flow
meter vertically on the wall or horizontally on a shelf. Do not
mount the flow meter at a diagonal or any other angle. If you
mount it horizontally, be sure the bracket is on the bottom or
top of the flow meter and not the side. The flow meter is
originally calibrated in a vertical position, so this is the
preferred position for mounting.
7. Carefully strip about 3 in (7.6 cm) of outer insulation from
the flow meter cable(s) going to the ECU and about 3/16 in
(.5 cm) of insulation from each individual wire in the flow
meter cable(s).
8. Connect the individual wires of the flow meter cable(s) to the
flow meter cable terminal block. Loosen the screws on the
terminal block and match each wire to the appropriate pin
using the accompanying pin/signal diagram.
9. Connect the flow meter cable terminal block to the back of
the ECU using the 10-pin J2B port. Tighten the connecting
screws.
2-12 All-Bottle 744/1544 Installation/Service/User Manual
Beverage line from keg
Flow meter
Beverage line to tap
Flow meter count
written on the label
Mounting bracket
3 conductor cable to ECU
Pin 10
Pin 1
Connect the flow meter cable
terminal block to the J2B
port on the back of the ECU
Flow meter cable terminal
block and pin/signal
diagram (Color names in
parentheses denote wire
colors of the 3 conductor
flow meter cable)
Pin
Signal
1
Chassis
2
+12V
(RED)
3
FM1
(WHT)
4
GND
(BLK)
5
+12V
(RED)
6
FM2
(WHT)
7
GND
(BLK)
8
+12V
(RED)
9
FM3
(WHT)
10
GND
(BLK)
Flow meter 1
Flow meter 2
Flow meter 3
Hardware Installation 2-13
Install a Remote Server Access Box
If you are installing option package ID or DX, you may use either the key slot on the front of the
ECU or a key slot in an optional remote server access box to control access to pouring. The remote
server access box is usually installed on the front of the bar so servers can have access to the
system without having to walk around the bar.
Available in Option Package(s):
o 744-Basic o 744-CR
o AR
o FM
þ ID
þ DX
n To install a remote server access box:
1. Mount the remote server access box underneath the bar with
the 4 wood screws provided. Select a convenient location
within 6 feet of the ECU.
2. Attach the cable from the remote server access box to the
back of the ECU using the 9-pin J5B port. Tighten the
connecting screws.
Note
q If you are installing option package ID as an upgrade to an
existing All-Bottle 744 or 1544 system, you need to install an
option board and change the EPROM in the ECU. See Install
an Option Board and Change the EPROM in the
Maintenance and Upgrading section.
2-14 All-Bottle 744/1544 Installation/Service/User Manual
All-Bottle 744 ECU
Remote Server
Access Box
Connect the remote
server access box cable
to the J5B port on the
back of the ECU
Hardware Installation 2-15
Connect an External Solenoid Output
Although Berg does not supply or even recommend a manufacturer for a solenoid valve, there may
be solenoid valves installed in the system's beverage lines. If you have option package ID or DX,
these valves can be used to prevent the pouring of drinks from the lines without a valid server key.
The valves may be installed in lines with or without a flow meter. When used with flow meters, the
valves can prevent "unassigned sales" on system reports.
Available in Option Package(s):
How it works
o 744-Basic o 744-CR
o AR
o FM
þ ID
þ DX
When a valid server key is inserted in the ECU's key slot, a signal
from the ECU travels through a relay to the solenoid valve and
opens the valve. The valve stays open as long as the server key is
in the key slot. If there is a flow meter in the line, it monitors the
quantity dispensed and the sales are assigned to the server whose
key is in the key slot. Removing the server key sends a signal to
close the solenoid valve and any pouring from the line is
prevented.
n To connect an external solenoid output:
1. Install the solenoid valve(s) in the beverage line(s) using the
manufacturer's instructions if they are not already installed.
2. Connect the solenoid valve(s) to a relay.
(Since many solenoid valves operate on voltages other than
12 VDC, such as 24 VDC or 110 VAC, a relay is needed to
isolate the All-Bottle 744 or 1544 from those higher
voltages. The ECU provides 12 VDC to the input side of the
relay and the output side of the relay switches to the higher
voltage needed to open the solenoid valves. Berg recommends
that you always use a relay to protect the ECU even if you're
using a 12 VDC solenoid valve.)
3. Connect the cable from the relay to the back of the ECU
using the 3-pin J4B port. Tighten the connecting screws.
You may use this port to control almost any number of
solenoid valves installed in the system.
Note
q Berg does not provide or even recommend a manufacturer for
the solenoid valve or relay. This option is offered for
customers that already have a beverage system with an inline
solenoid.
2-16 All-Bottle 744/1544 Installation/Service/User Manual
Hardware Installation 2-17
Install a Switchbox with a Serial Printer or Computer
Interface
If you have more than one All-Bottle 744 or 1544 ECU and want to interface those ECUs to one
serial printer or computer, you can create a switchbox "network". The switchbox lets you control
which ECU's output goes to the printer or computer. If you have option package 744-Basic or 744CR, you won't be able to interface to a printer, but you may want to interface to a computer to use
the All-Bottle Manager software to load portion sizes or PLUs.
Available in Option Package(s):
þ 744-Basic þ 744-CR
þ AR
þ FM
þ ID
þ DX
n To install a switchbox:
1. Choose a switchbox that has RJ-11/RJ-12 connections. Make
sure you have enough communication cable to run between
the ECUs and the switchbox.
2. Connect each ECU to the inputs of the switchbox using the
communication cable and RJ-12 plug connectors. Use the
J6A port on the back of the ECUs.
3. Attach the RS-232 to RS 485 converter (Berg PN 8009344)
to a 25-pin serial port on the computer or the printer.
4. Connect the output communication cable from the switchbox
to the end of the converter with an RJ-12 plug connector.
5. Connect the transformer to the side of the converter and plug
the transformer into a power source.
Notes
q A serial printer (RS-232C interface) must be used if you
install a switchbox. Since the most common printers on the
market today use the Centronics parallel interface, a special
printer may need to be ordered to implement the network as
described above. A serial printer package (Berg PN 8005546)
is available from Berg which includes an Epson 300 printer, 3
ft cable and the RS-232 to RS-485 converter.
2-18 All-Bottle 744/1544 Installation/Service/User Manual
RS 232 / RS 485
converter
Switchbox
Printer
All-Bottle 744 ECUs
RS 232 / RS 485
converter
Switchbox
Computer
All-Bottle 744 ECUs
n To use a switchbox:
1. Select an ECU with the switch on the switchbox.
2. If the switchbox is connected to a printer, generate reports
for the selected ECU as described in the Reports section.
OR
If the switchbox is connected to a computer, use the AllBottle Manager software to access data from the selected
ECU as described in the All-Bottle Manager Software
section.
Hardware Installation 2-19
Test the System
Now that you've installed an entire All-Bottle 744 or 1544 system, it's time to plug in the power
and make sure everything works. Do not plug in the power supply until you have completed all
wiring tasks.
Available in Option Package(s):
þ 744-Basic þ 744-CR
þ AR
þ FM
þ ID
þ DX
n To test a newly installed All-Bottle 744 or 1544
system:
1. Make sure you’ve installed each component and made all
cable connections.
2. Plug in the power cord coming from the power supply.
3. Pour a drink with a coded pourer using the default portion
sizes if you have not pre-programmed the ECU. If you have
programmed the ECU, check to see that the portion size is
correct.
4. If you have an electronic cash register connected to the ECU,
check to see that the correct PLU (and price) are rung up on
the register.
5. Pour a drink using flow meters (if you've installed them) and
record the volume of drink poured.
6. Pour a drink with a coded pourer using the remote server
access box (if you've installed one).
7. Print a detailed report using the printer interface or the
Manager software. Check the report to see that the All-Bottle
portions poured in steps 3 and 6 above were recorded
correctly. If flow meters are installed, check to see that the
volume of the portion poured in step 5 was recorded
correctly.
8. If you encounter a problem with any of these steps refer to the
Troubleshooting section.
2-20 All-Bottle 744/1544 Installation/Service/User Manual
SECTION
3
ECU Setup
Most of the ECU setup tasks described in this section can be performed prior to
installation. As soon as you find out your customer’s formatting preferences you
can begin programming the All-Bottle 744 or 1544 ECU.
Country Setup ................................................................................. 3-2
Volume Units ................................................................................... 3-3
Price Format .................................................................................... 3-4
Decimal Character ........................................................................... 3-5
Time Format .................................................................................... 3-6
Date Format..................................................................................... 3-7
Return to Factory Setup .................................................................. 3-8
Cumulative Sales Password .......................................................... 3-10
Diagnostic Messages ..................................................................... 3-11
Default Messages .......................................................................... 3-12
Set Time and Date ......................................................................... 3-13
Serial Port Setup ........................................................................... 3-14
Set Station Number ....................................................................... 3-15
Linefeeds to Printer ....................................................................... 3-16
Enable OFF Signal ........................................................................ 3-17
Country Setup
It’s in the Country Setup portion of the Dealer Menu that you define the date, time, price, and
measurement formats All-Bottle 744 or 1544 uses to record data. The ECU comes with default
values you can use without making any changes to Country Setup.
Available in Option Package(s):
Country Setup
Default Values
þ 744-Basic þ 744-CR
þ AR
þ FM
þ ID
þ DX
Decimal Character: . (period)
Price Format:
999.99
Volume Units:
oz
Time Format:
02:45:00 PM (12 hour)
Date Format:
01/31/97
If you want to change any of these default values see the specific
task headings that follow.
3-2 All-Bottle 744/1544 Installation/Service/User Manual
Volume Units
You can measure the drinks poured with an All-Bottle 744 or 1544 system in various units. If your
customer prefers metric measurements you can easily enter this format using the Volume Units
feature.
Available in Option Package(s):
þ 744-Basic þ 744-CR
þ AR
þ FM
þ ID
þ DX
n To change the volume units:
1. Access the Dealer Menu. (Insert your key, press ENTER,
select the Dealer Menu option and press ENTER.)
Dealer
Use↑↓ and ENTER
Dealer Menu
Use↑↓ and ENTER
Country Setup
↵
Use↑↓ and ENTER ↵
Set Volume Units
Use↑↓ and ENTER
oz
↵
↵
2. Use the up and down arrow keys to display the Country
Setup option and press ENTER.
3. Use the up and down arrow keys to display the Set
Volume Units option and press ENTER.
4. Use the up and down arrow keys to select ounces (oz),
milliliters (ml), cubic centimeters (cc), centiliters (cl) or liters
(L) and press ENTER.
The display returns to the Set Volume Units option.
Note
q If you have sales data stored in the ECU when you change
the volume units, the reports will not reflect the actual sales.
Before changing volume units run a Z report on the ECU to
clear sales data.
ECU Setup 3-3
Price Format
Different countries use the decimal character in different positions to denote prices. You can
change the placement of the decimal character in your All-Bottle 744 or 1544 system using the
Price Format feature.
Available in Option Package(s):
o 744-Basic o 744-CR
þ AR
þ FM
þ ID
þ DX
n To change the price format:
1. Access the Dealer Menu. (Insert your key, press ENTER,
select the Dealer Menu option and press ENTER.)
Dealer
Use↑↓ and ENTER
Dealer Menu
↵
Use↑↓ and ENTER
Country Setup
↵
2. Use the up and down arrow keys to display the Country
Setup option and press ENTER.
Use↑↓ and ENTER
↵
3. Use the up and down arrow keys to display the Set
Price Format option and press ENTER.
Use↑↓ and ENTER
999.99
↵
4. Use the up arrow key to move the decimal character to the
right or the down arrow key to move the decimal character to
the left and press ENTER.
The display returns to the Set Price Format option.
3-4 All-Bottle 744/1544 Installation/Service/User Manual
Decimal Character
Some countries use a period (.) to denote a decimal character. Others use a comma (,) for this
purpose. You can enter whichever character your customer prefers and All-Bottle 744 or 1544
prints system reports with the chosen character.
Available in Option Package(s):
þ 744-Basic þ 744-CR
þ AR
þ FM
þ ID
þ DX
n To change the decimal character:
1. Access the Dealer Menu. (Insert your key, press ENTER,
select the Dealer Menu option and press ENTER.)
Dealer
Use↑↓ and ENTER
Dealer Menu
Use↑↓ and ENTER
Country Setup
↵
Use↑↓ and ENTER ↵
Set Decimal Char.
Use↑↓ and ENTER
period
↵
↵
2. Use the up and down arrow keys to display the Country
Setup option and press ENTER.
3. Use the up and down arrow keys to display the Set
Decimal Char. option and press ENTER.
4. Use the down arrow to select comma (,) or the up arrow to
select period (.) and press ENTER.
The display returns to the Set Decimal Char. option.
ECU Setup 3-5
Time Format
All-Bottle 744 or 1544 can print the time on system reports using 24 hour (military) or 12 hour
(standard AM/PM) notation. The default format is 12 hour notation, but you can easily change the
format.
Available in Option Package(s):
o 744-Basic o 744-CR
þ AR
þ FM
þ ID
þ DX
n To change the time format:
1. Access the Dealer Menu. (Insert your key, press ENTER,
select the Dealer Menu option and press ENTER.)
Dealer
Use↑↓ and ENTER
Dealer Menu
Use↑↓ and ENTER
Country Setup
↵
Use↑↓ and ENTER ↵
Set Time Format
Use↑↓ and ENTER
12 hour
↵
↵
2. Use the up and down arrow keys to display the Country
Setup option and press ENTER.
3. Use the up and down arrow keys to display the Set Time
Format option and press ENTER.
4. Use the down arrow key to select 24 hour notation or the up
arrow key to select 12 hour notation and press ENTER.
The display returns to the Set Time Format option.
3-6 All-Bottle 744/1544 Installation/Service/User Manual
Date Format
Your customer can choose to display the date on system reports using a month/day/year or
day.month.year notation. The default format is month/day/year.
Available in Option Package(s):
o 744-Basic o 744-CR
þ AR
þ FM
þ ID
þ DX
n To change the date format:
1. Access the Dealer Menu. (Insert your key, press ENTER,
select the Dealer Menu option and press ENTER.)
Dealer
Use↑↓ and ENTER
Dealer Menu
Use↑↓ and ENTER
Country Setup
↵
Use↑↓ and ENTER ↵
Set Date Format
Use↑↓ and ENTER
MM/DD/YY
↵
↵
2. Use the up and down arrow keys to display the Country
Setup option and press ENTER.
3. Use the up and down arrow keys to display the Set Date
Format option and press ENTER.
4. Use the down arrow key to select DD.MM.YY
(day.month.year) notation or the up arrow to select MM/DD/
YY (month/day/year) notation and press ENTER.
The display returns to the Set Date Format option.
ECU Setup 3-7
Return to Factory Setup
If you need to quickly erase all the values you've entered at the ECU use Return to Factory Setup.
This feature restores default values to price, portion, PLU and flow meter tables, server ID names,
calibration entries and other options entered at the ECU. It also clears accumulated sales data. See
the accompanying chart for a complete listing of default values that are reset if you use Return to
Factory Setup.
Available in Option Package(s):
þ 744-Basic þ 744-CR
þ AR
þ FM
þ ID
þ DX
n To return to factory setup:
1. Access the Dealer Menu. (Insert your key, press ENTER,
select the Dealer Menu option and press ENTER.)
Dealer
Use↑↓ and ENTER
Dealer Menu
Use↑↓ and ENTER ↵
Rtn to factory setup
Use↑↓ and ENTER ↵
Are you sure ? : N
↵
2. Use the up and down arrow keys to display the Rtn to
factory setup option and press ENTER.
3. Use the down arrow to select Y (to return to factory setup)
or the up arrow to select N (to keep the current setup) and
press ENTER.
If you select Y the display informs you when the return to
factory setup values is complete.
Station Reconfigured
The display returns to the Rtn to factory setup
option.
Notes
q Since this feature clears sales data, be sure to run a Z report
first if you have accumulated sales.
q If you have All-Bottle Manager, save a file at the computer
with current ECU setup data before doing a Return to
Factory Setup.
3-8 All-Bottle 744/1544 Installation/Service/User Manual
Default Values After
Return to Factory Setup
Dealer and Manager Menu Options
Affected by Return to Factory Setup
Country Setup
Set Price Format
Set Price Format
Set Decimal Char.
Set Time Format
Set Date Format
Cum Sales Password
Diagnostic Messages
Default Messages
Disable Unit
View Reports
Summary Z
Detailed Z
Summary X
Detailed X
All Server Summary Z
All Server Summary X
Summary Z by Server
Summary X by Server
Last Z
Hourly Sales
Price Level Change
Key Assignment
Price Level Change (by manager only)
Reset After Pour
Server Menu Active
Restart Pour Delay
Serial Port Setup
Set Baud Rate
Set Word Length
Set Parity
Set Stop Bits
Set Station Number
All- Bottle Setup
Set Portion
Set Price
Set PLU
Flow Meter Setup
Meter Count
Set Price/Unit (levels A through D)
Printer Config
Linefeeds to Printer
Enable OFF signal
Calibrate
Code 1 (through 7) or (through 15)
oz
999.99
period
12 hour (AM/PM)
MM/DD/YY
(none)
N
N
N
cleared, Z number 0
cleared, Z number 0
cleared
cleared
cleared, Z number 0
cleared
cleared, Z number 0
cleared
cleared
cleared
cleared
blank except Dealer
Y
Y
Y
0 seconds
19200
8-bits
No Parity
1 Stop Bit
0
(Small)
(Regular)
1.00
1.25
1.00
1.25
all set to 0
(Large)
1.50
1.50
(Special)
2.00
2.00
3614
all set to 1.00
Y
Y
670 (if EPROM 1.09 or higher) 1000 (if
EPROM lower than 1.09)
ECU Setup 3-9
Cumulative Sales Password
The All-Bottle 744 or 1544 ECU keeps a running total of all sales separate from any other sales
totals. These cumulative sales are not cleared when you run Z reports. They can only be cleared by
a manager. For additional security, a unique password can be defined at the ECU that must be
entered to clear cumulative sales. If the manager doesn't want to password protect deletion of
cumulative sales, you don't need to perform this task.
Available in Option Package(s):
o 744-Basic o 744-CR
þ AR
þ FM
þ ID
þ DX
n To enter a cumulative sales password:
1. Access the Dealer Menu. (Insert your key, press ENTER,
select the Dealer Menu option and press ENTER.)
Dealer
Use↑↓ and ENTER
Dealer Menu
2. Use the up and down arrow keys to display the Cum
Sales Password option and press ENTER.
Use↑↓ and ENTER ↵
Cum Sales Password
Use←↑↓ →and ENTER
Password _
↵
↵
3. Key in the password and press ENTER.
Use the left and right arrow keys to move the cursor through
the five password fields.
Use the up and down arrow keys to select characters from the
following list: ! " # $ % & ' ( ) * + , - . / 0-9 : ; < = > ? @ AZ [ (yen character) ] ^ _ ` a-z { | }right arrow and space in
that order.
The display returns to the Cum Sales Password
option.
3-10 All-Bottle 744/1544 Installation/Service/User Manual
Diagnostic Messages
Enabling Diagnostic Messages turns on an ECU internal diagnostic feature used by Berg service
engineers. This feature sends diagnostic information through the diagnostic port to test pouring
capabilities or access key insertion. For normal operations, you should disable Diagnostic
Messages.
Available in Option Package(s):
þ 744-Basic þ 744-CR
þ AR
þ FM
þ ID
þ DX
n To enable or disable diagnostic messages:
1. Access the Dealer Menu. (Insert your key, press ENTER,
select the Dealer Menu option and press ENTER.)
Dealer
Use↑↓ and ENTER
Dealer Menu
Use↑↓ and ENTER ↵
Diagnostic Messages
Use↑↓ and ENTER ↵
Diagnostics ? : N
↵
2. Use the up and down arrow keys to display the
Diagnostic Messages option and press ENTER.
3. Use the up arrow to select N (to disable diagnostics) or the
down arrow to select Y (to enable diagnostics) and press
ENTER.
The display returns to the Diagnostic Messages
option.
ECU Setup 3-11
Default Messages
If you need to customize the text in the ECU display window for a non-English language, you can
disable the default messages that come with the ECU and define your own messages. Check with
The Berg Company to use this option. Otherwise, this option should always be enabled.
Available in Option Package(s):
þ 744-Basic þ 744-CR
þ AR
þ FM
þ ID
þ DX
n To enable default messages:
1. Access the Dealer Menu. (Insert your key, press ENTER,
select the Dealer Menu option and press ENTER.)
Dealer
Use↑↓ and ENTER
Dealer Menu
Use↑↓ and ENTER ↵
Default Messages
Use↑↓ and ENTER ↵
Default Messages: Y
↵
2. Use the up and down arrow keys to display the Default
Messages option and press ENTER.
3. Use the up arrow key to select N (to disable default
messages), or the down arrow key to select Y (to enable
default messages) and press ENTER.
The display returns to the Default Messages option.
3-12 All-Bottle 744/1544 Installation/Service/User Manual
Set Time and Date
You want to be sure your All-Bottle 744 or 1544 is programmed to reflect the current time and
date. This information appears at the top of every report generated by the system. Correcting the
system time and date is easily accomplished at the ECU.
Available in Option Package(s):
o 744-Basic o 744-CR
þ AR
þ FM
þ ID
þ DX
n To set the All-Bottle 744 or 1544 system time and
date:
Dealer or
Manager
1. Access the Manager Menu. (Insert your key, press ENTER,
select the Manager Menu option and press ENTER.)
Use↑↓ and ENTER
Manager Menu
Use↑↓ and ENTER ↵
Set Time and Date
↵
2. Use the up and down arrow keys to display the Set Time
and Date option and press ENTER.
3. Key in the correct date and press ENTER.
Use↑↓ and ENTER
Date 02/16/96
↵
Use↑↓ and ENTER
Time 03:07:12
↵
Use the up and down arrow keys to select the numbers and
the left and right arrow keys to move the cursor through the
date fields.
Use↑↓ and ENTER ↵
Time 03:07:12 PM
4. Key in the correct time and press ENTER.
Use the up and down arrow keys to select the numbers and
the left and right arrow keys to move the cursor through the
time fields (HH/MM/SS) and press ENTER.
If the time format is 12 hour, use the up and down arrow keys
to move the numbers in the hour fields through 12 to switch
from AM to PM.
The display returns to the Set Time and Date
option.
Notes
q To set time and date formats, see the ECU Setup section.
q If you are in 12 hour mode, note that AM/PM does not get
highlighted with the cursor.
ECU Setup 3-13
Serial Port Setup
If you want to set up your All-Bottle 744 or 1544 to communicate with an IBM-compatible
computer or with a serial printer you need to set the communication variables of your ECU to
match those of your PC or printer. For more information about these settings, consult your printer
or computer manual.
Available in Option Package(s):
þ 744-Basic þ 744-CR
þ AR
þ FM
þ ID
þ DX
n To change serial port settings:
1. Access the Manager Menu. (Insert your key, press ENTER,
select the Manager Menu option and press ENTER.)
Dealer or
Manager
Use↑↓ and ENTER
Manager Menu
↵
Use↑↓
↵
2. Use the up and down arrow keys to display the Serial
Port Setup option and press ENTER.
Use↑↓ and ENTER
Set Baud Rate
↵
3. Use the up and down arrow keys to display the serial port
setting you want to change and press ENTER.
Use↑↓ and ENTER
19200
↵
4. Use the up and down arrow keys to select the new setting and
press ENTER.
and ENTER
Serial Port Setup
Note
q The ECU comes with the following serial port default
settings:
Baud Rate: 19200
Word Length: 8-bits
Parity: No parity
Stop Bits: 1 Stop Bit
3-14 All-Bottle 744/1544 Installation/Service/User Manual
Set Station Number
A station number is a unique number you assign to an All-Bottle 744 or 1544 ECU to identify
reports from that ECU. All reports show this station number at the top.
Available in Option Package(s):
þ 744-Basic þ 744-CR
þ AR
þ FM
þ ID
þ DX
n To set a station number:
1. Access the Manager Menu. (Insert your key, press ENTER,
select the Manager Menu option and press ENTER.)
Dealer or
Manager
Use↑↓ and ENTER ↵
Set Station Number
Use↑↓ and ENTER
Number
000
↵
Use↑↓ and ENTER
Manager Menu
↵
2. Use the up and down arrow keys to display the Set
Station Number option and press ENTER.
3. Use the up and down arrow keys to select a number. Use the
left and right arrow keys to move the cursor through the
number fields. (The valid range of station numbers is 000255.)
The display returns to the Set Station Number
option.
ECU Setup 3-15
Linefeeds to Printer
If you are sending reports to a printer, unwanted linefeeds may be a problem. Unwanted linefeeds
insert extra blank lines between the printed lines of the report. If you cannot disable the automatic
linefeeds at the printer, use this feature to disable them at the ECU.
Available in Option Package(s):
o 744-Basic o 744-CR
þ AR
þ FM
þ ID
þ DX
n To send/not send linefeeds to a printer:
1. Access the Manager Menu. (Insert your key, press ENTER,
select the Manager Menu option and press ENTER.)
Dealer or
Manager
Use↑↓ and ENTER
Manager Menu
Use↑↓ and ENTER
Printer Config
↵
Use↑↓ and ENTER ↵
Linefeeds to Printer
Use↑↓ and ENTER ↵
Send Linefeeds ? : Y
↵
2. Use the up and down arrow keys to display the Printer
Config option and press ENTER.
3. Use the up and down arrow keys to display the
Linefeeds to Printer option and press ENTER.
4. Use the down arrow key to select Y (send linefeeds to printer)
or the up arrow key to select N (don't send linefeeds to
printer) and press ENTER.
The display returns to the Linefeeds to Printer
option.
3-16 All-Bottle 744/1544 Installation/Service/User Manual
Enable OFF Signal
The signal referred to in this menu option is the "online" signal the ECU checks for before sending
a report to a printer. If the ECU checks and doesn't find an online parallel printer, it displays an
error message. If you are using a parallel printer, that's helpful. If you are using a serial printer, it
doesn't matter that the ECU detected an "OFF" (or absence of online) signal for a parallel printer;
your report goes to the serial printer regardless of the error message. You can choose to have the
ECU ignore the OFF signal and you'll no longer see error messages.
Available in Option Package(s):
o 744-Basic o 744-CR
þ AR
þ FM
þ ID
þ DX
n To enable the OFF signal of a printer:
1. Access the Manager Menu. (Insert your key, press ENTER,
select the Manager Menu option and press ENTER.)
Dealer or
Manager
Use↑↓ and ENTER
Printer Config
↵
Use↑↓ and ENTER ↵
Enable OFF signal
Use↑↓ and ENTER ↵
Enable OFF signal: Y
Use↑↓ and ENTER
Manager Menu
↵
2. Use the up and down arrow keys to display the Printer
Config option and press ENTER.
3. Use the up and down arrow keys to display the Enable
OFF signal option and press ENTER.
4. Use the down arrow key to select Y (enable OFF signal and
display OFF signal error messages) or the up arrow key to
select N (ignore OFF signal and remove OFF signal error
messages) and press ENTER.
The display returns to the Enable OFF signal
option.
ECU Setup 3-17
SECTION
4
Access Keys
Access keys provide convenient and secure access to the All-Bottle 744 or 1544
ECU menus. Each Dealer or Manager key is programmed with a two character
access code that determines which menu(s) can be used. These keys can also be
programmed with a user name for identification purposes. If you have option
package ID or DX, Server access keys offer complete security and
accountability for all pouring operations. Each server is assigned a key
programmed to permit pouring and access to a Server Menu. Server keys must
be programmed with unique names that identify the user at the time of pouring.
These names must also be entered in the Key Assignment List or pouring access
will be denied.
Read an Access Key ........................................................................ 4-2
Read a Remote Server Access Key ................................................. 4-3
Make a Manager Key ...................................................................... 4-4
Make a Server Key .......................................................................... 4-5
Key Assignment List ....................................................................... 4-6
Read an Access Key
You can determine the assignment of your access keys with this feature in the Dealer Menu or the
Manager Menu.
Available in Option Package(s):
þ 744-Basic þ 744-CR
þ AR
þ FM
þ ID
þ DX
n To read an access key:
Dealer
or
Manager
1. Access the Dealer or Manager Menu. (Insert your key, press
ENTER, select a Menu option and press ENTER.)
Use↑↓ and ENTER
Dealer Menu
↵
Use↑↓ and ENTER
Manager Menu
↵
Use↑↓ and ENTER
Access Keys
↵
2. Use the up and down arrow keys to display the Access
Keys option and press ENTER.
Use↑↓ and ENTER
Read First Key
↵
3. Use the up and down arrow keys to display the Read
First Key option and press ENTER.
Use ENTER
MG Jim
↵
The two character code (DL, MG) and name assigned to the
access key in the ECU's key slot appears in the display
window.
4. Press ENTER to return to the Read First Key option.
Note
q DL, MG and WT are codes designating access keys as dealer
(DL), manager (MG), or server/waiter (WT) keys.
4-2 All-Bottle 744/1544 Installation/Service/User Manual
Read a Remote Server Access Key
You can determine the name assigned to a server key using this feature.
Available in Option Package(s):
o 744-Basic o 744-CR
o AR
o FM
þ ID
þ DX
n To read a remote server access key:
Dealer
or
Manager
1. Access the Dealer or Manager Menu. (Insert your key, press
ENTER, select a Menu option and press ENTER.)
Use↑↓ and ENTER
Dealer Menu
↵
Use↑↓ and ENTER
Manager Menu
Use↑↓ and ENTER
Access Keys
↵
↵
2. Use the up and down arrow keys to display the Access
Keys option and press ENTER.
3. Insert an access key in the remote server access box.
Server
Use↑↓ and ENTER ↵
Read Second Key
Use ENTER
WT Don
↵
4. Use the up and down arrow keys to display the Read
Second Key option and press ENTER.
The two character code (DL, MG, WT) and name assigned to
the access key in the remote server access box appears in the
display window.
5. If you have more than one key to read, remove the key in the
box and insert the next one.
6. Press ENTER to return to the Read Second Key
option.
Note
q If there is no access key in the remote server access box, the
two character code and name assigned to the last key inserted
in the box appears in the display window.
Access Keys 4-3
Make a Manager Key
You can turn an access key (new or previously programmed) into a manager key using this feature
in the Dealer Menu at the ECU. If the customer does not have a remote server access box, you
need to connect one to perform this task.
Available in Option Package(s):
þ 744-Basic þ 744-CR
þ AR
þ FM
þ ID
þ DX
n To make a Manager key:
1. Access the Dealer Menu. (Insert your key, press ENTER,
select the Dealer Menu option and press ENTER.)
Dealer
Use↑↓ and ENTER
Dealer Menu
Use↑↓ and ENTER
Access Keys
↵
2. Use the up and down arrow keys to display the Access
Keys option and press ENTER.
↵
3. Insert your new access key in the remote server access box.
Manager
4. Use the up and down arrow keys to display the Make
Manager Key option and press ENTER.
Use↑↓ and ENTER ↵
Make Manager Key
Use←↑↓ →and ENTER
ID: _
↵
5. Key in the name you want to assign to the new manager key
and press ENTER.
Use the left and right arrow keys to move the cursor through
the ID fields. Use the up and down arrow keys to select
characters from the following list: ! " # $ % & ' ( ) * + , - . /
0-9 : ; < = > ? @ A-Z [ (yen character) ] ^ _ ` a-z { | }right
arrow and space in that order.
Note
q After making a manager key, you must pull it from the box
and reinsert it to read it.
4-4 All-Bottle 744/1544 Installation/Service/User Manual
Make a Server Key
Once you have a remote server access box installed with your All-Bottle 744 or 1544, you can
make an access key with a unique identifying code for each server. At any time you can change the
name identifying the server key by simply reinserting the key and repeating the procedure. For the
server key to be accepted at the ECU, the name assigned to the key must also be entered on the key
assignment list. See Key Assignment List in this section.
Available in Option Package(s):
o 744-Basic o 744-CR
o AR
o FM
þ ID
n To make a Server key:
Dealer
or
Manager
1. Access the Dealer or Manager Menu. (Insert your key, press
ENTER, select a Menu option and press ENTER.)
Use↑↓ and ENTER
Dealer Menu
↵
Use↑↓ and ENTER
Manager Menu
Use↑↓ and ENTER
Access Keys
þ DX
↵
2. Use the up and down arrow keys to display the Access
Keys option and press ENTER.
↵
3. Insert an access key in the remote server access box.
Server
4. Use the up and down arrow keys to display the Make
Server Key option and press ENTER.
Use↑↓ and ENTER ↵
Make Server Key
Use←↑↓ →and ENTER
ID: _
↵
5. Key in the name you want to assign to the new server key and
press ENTER.
Use the left and right arrow keys to move the cursor through
the ID fields. Use the up and down arrow keys to select
characters from the following list: ! " # $ % & ' ( ) * + , - . /
0-9 : ; < = > ? @ A-Z [ (yen character) ] ^ _ ` a-z { | }right
arrow and space in that order.
Note
q After making a server key, you must pull it from the box and
reinsert it to read it.
q You can also make a server key at the time you add a server's
name to the key assignment list. See Key Assignment List in
this section.
Access Keys 4-5
Key Assignment List
If you have server ID, you must enter a valid server name at the ECU for each server key you want
to activate. For a server to be allowed to pour, the name on the server key must match a name in
the key assignment list stored in the ECU. When you add a server name to the key assignment list,
you can also choose to make a server key in that name at the same time.
Available in Option Package(s):
o 744-Basic o 744-CR
o AR
o FM
þ ID
þ DX
n To list servers in the Key Assignment list:
1. Access the Manager Menu. (Insert your key, press ENTER,
select the Manager Menu option and press ENTER.)
Dealer or
Manager
Use↑↓ and ENTER
Manager Menu
Use↑↓ and ENTER
Key Assignment
Use↑↓ and ENTER
01
↵
↵
2. Use the up and down arrow keys to display the Key
Assignment option and press ENTER.
↵
3. Use the up and down arrow keys to select one of the numbers
(up to 15) that make up the list of server key assignments and
press ENTER.
The order in which servers appear in the list is not significant.
Use←↑↓ →and ENTER
ID: Don
↵
4. Use the up and down arrow keys to enter the identifying name
assigned to the key and press ENTER.
Use the left and right arrow keys to move the cursor through
the ID fields (up to 16 spaces).
Use the up and down arrow keys to select the characters
from the following list: ! " # $ % & ' ( ) * + , - . / 0-9 : ; < = >
? @ A-Z [ (yen character) ] ^ _ ` a-z { | }right arrow and
space in that order. The key assignment list is case sensitive.
The display prompts you to make a server key for the name
you just added to the list.
Use↑↓ and ENTER
Make Key ? : Y
Server
↵
5. If you want to make a server key, insert an access key in the
remote server access box.
4-6 All-Bottle 744/1544 Installation/Service/User Manual
Use↑↓ and ENTER
Make Key ? : Y
↵
6. Use the down arrow to select Y (to make a server key) or the
up arrow to select N (not to make a server key) and press
ENTER.
The display returns to the name you added to the key
assignment list.
Use←↑↓ →and ENTER
ID: Don
↵
7. If you made a server key, remove it from the remote server
access box.
Server
8. Repeat steps 3 through 7 for each server in the key
assignment list.
Access Keys 4-7
SECTION
5
Pouring Control
You can enable or disable several features of your All-Bottle 744 or 1544
ECU. These features include such options as resetting the portion size after a
pour and determining the time delay between identical pours.
Disable Unit ..................................................................................... 5-2
Enable Computer Communication ................................................... 5-3
Enable Price Level Change .............................................................. 5-4
Reset After Pour .............................................................................. 5-5
Server Menu Active ......................................................................... 5-6
Restart Pour Delay .......................................................................... 5-7
Disable Unit
To maintain system security, use this feature to prevent the pouring of any All-Bottle drinks. If you
have flow meters, this feature does not prevent their use. However, while the ECU is disabled it
continues to track any flow meter activity.
Available in Option Package(s):
þ 744-Basic þ 744-CR
þ AR
þ FM
þ ID
þ DX
n To disable a unit:
1. Access the Manager Menu. (Insert your key, press ENTER,
select the Manager Menu option and press ENTER.)
Dealer or
Manager
Use↑↓ and ENTER
Disable Unit
↵
Use↑↓ and ENTER ↵
Disable Unit ? : N
Use↑↓ and ENTER
Manager Menu
↵
2. Use the up and down arrow keys to display the Disable
Unit option and press ENTER.
3. Use the down arrow to select Y (to disable the unit)) or the up
arrow to select N (to keep the unit enabled) and press
ENTER.
The display returns to the Disable Unit option.
If you select Y, as soon as you remove the Manager Key the
display confirms the unit is disabled.
BERG 744-DX
Disabled
5-2 All-Bottle 744/1544 Installation/Service/User Manual
Enable Computer Communication
This feature enables communication between an All-Bottle 744 or 1544 ECU and a computer
using the All-Bottle Manager software. You must enable this feature at the ECU to use the
software.
Available in Option Package(s):
þ 744-Basic þ 744-CR
þ AR
þ FM
þ ID
þ DX
n To enable computer communication:
1. Access the Manager Menu. (Insert your key, press ENTER,
select the Manager Menu option and press ENTER.)
Dealer or
Manager
Use↑↓ and ENTER
Communications
↵
Use↑↓ and ENTER ↵
Comm Option Active N
Use↑↓ and ENTER
Manager Menu
↵
2. Use the up and down arrow keys to display the
Communications option and press ENTER.
3. Use the down arrow to select Y (to enable communication) or
the up arrow to select N (to disable communication) and press
ENTER.
The display returns to the Communications option.
Notes
q If you select Y, no further Manager Menu or Server Menu
options appear at the ECU to prevent internal conflicts while
communicating with the computer.
q Pouring operations are not affected by enabling computer
communication.
Pouring Control 5-3
Enable Price Level Change
If you want to let any bartender or server change the price level at the ECU you must enable this
feature. Otherwise the price level can only be changed with a manager key in the ECU’s key slot.
Available in Option Package(s):
þ 744-Basic þ 744-CR
þ AR
þ FM
þ ID
þ DX
n To enable price level change:
Dealer or
Manager
Use↑↓ and ENTER ↵
Price Level Change
Use↑↓ and ENTER ↵
Manager Only ? : Y
1. Access the Manager Menu. (Insert your key, press ENTER,
select the Manager Menu option and press ENTER.)
Use↑↓ and ENTER
Manager Menu
↵
2. Use the up and down arrow keys to display the Price
Level Change option and press ENTER.
3. Use the down arrow to select Y (to enable price level change
only by a manager) or the up arrow to select N (to enable
price level change by any server) and press ENTER.
The display returns to the Price Level Change
option.
5-4 All-Bottle 744/1544 Installation/Service/User Manual
Reset After Pour
If you enable the Reset After Pour feature, the portion size selected at the ECU resets to Regular
after every pour. If you do not enable this feature, portion size is determined by the currently
selected size until you choose a different one.
Available in Option Package(s):
þ 744-Basic þ 744-CR
þ AR
þ FM
þ ID
þ DX
n To enable reset after pour:
1. Access the Manager Menu. (Insert your key, press ENTER,
select the Manager Menu option and press ENTER.)
Dealer or
Manager
Use↑↓ and ENTER ↵
Reset After Pour
Use↑↓ and ENTER
Reset ? : N
↵
Use↑↓ and ENTER
Manager Menu
↵
2. Use the up and down arrow keys to display the Reset
After Pour option and press ENTER.
3. Use the down arrow to select Y (to reset portion size to
Regular after every pour) or the up arrow to select N (to keep
the current portion size after every pour) and press ENTER.
The display returns to the Reset After Pour option.
Pouring Control 5-5
Server Menu Active
You can specify whether or not to give servers access to the Server Menu at the ECU. If the Server
Menu is disabled, servers will not be able to view or print the X report which details their sales
activities.
Available in Option Package(s):
o 744-Basic o 744-CR
o AR
o FM
þ ID
þ DX
n To enable or disable access to the Server Menu:
Dealer or
Manager
Use↑↓ and ENTER ↵
Server Menu Active
Use↑↓ and ENTER ↵
Server Menu Active Y
1. Access the Manager Menu. (Insert your key, press ENTER,
select the Manager Menu option and press ENTER.)
Use↑↓ and ENTER
Manager Menu
↵
2. Use the up and down arrow keys to display the Server
Menu Active option and press ENTER.
3. Use the down arrow to select Y (to enable access to the
Server Menu) or the up arrow to select N (to disable access to
the Server Menu) and press ENTER.
The display returns to the Server Menu Active
option.
Note
q Even if Server Menu Active is set to Y, you will not
be able to access the Server Menu if Comm Option
Active (in the Manager Menu) is also set to Y.
5-6 All-Bottle 744/1544 Installation/Service/User Manual
Restart Pour Delay
You can pour repeated drinks with an All-Bottle pourer without tipping the bottle back. Restart
Pour Delay specifies the number of seconds the All-Bottle pourer pauses between the end of one
pour and the start of another identical one.
Available in Option Package(s):
þ 744-Basic þ 744-CR
þ AR
þ FM
þ ID
þ DX
n To set restart pour delay:
1. Access the Manager Menu. (Insert your key, press ENTER,
select the Manager Menu option and press ENTER.)
Dealer or
Manager
Use↑↓ and ENTER ↵
Restart Pour Delay
Use↑↓ and ENTER
Seconds 0
↵
Use↑↓ and ENTER
Manager Menu
↵
2. Use the up and down arrow keys to display the Restart
Pour Delay option and press ENTER.
3. Use the up and down arrow keys to select the number of
seconds (0 through 9) you wish the pourer to delay between
repeated drinks and press ENTER.
The display returns to the Restart Pour Delay
option.
Note
q If you select 0 seconds, no pours will repeat.
Pouring Control 5-7
SECTION
6
Calibration, Prices,
Portions and PLUs
Each newly installed All-Bottle 744 or 1544 pourer needs to be checked and
adjusted for pouring accuracy. This process is called calibration. In addition,
portion sizes and, depending on your option package, prices and PLUs must be
entered at the ECU for each coded pourer. If your system includes flow meters,
you must also enter a meter count and price per unit for each flow meter to ensure
pouring accuracy.
Calibrate Coded Pourers ................................................................. 6-2
Define Portion Sizes ........................................................................ 6-4
Define Prices ................................................................................... 6-5
Define PLUs .................................................................................... 6-6
Define Flow Meter Prices per Unit .................................................. 6-7
Set Flow Meter Counts .................................................................... 6-8
Clear All-Bottle Prices, Portions and PLUs .................................. 6-10
Clear Flow Meter Prices ................................................................ 6-11
Clear All Prices, Portions and PLUs ............................................. 6-12
Portion Change Lockout ................................................................ 6-13
Calibration, Prices, Portions and PLUs 6-1
Calibrate Coded Pourers
You want to be sure the amount of beverage actually poured with an All-Bottle pourer matches the
amount recorded for the pour at the ECU. Calibration (checking the accuracy of the measuring
process and making any necessary adjustments) needs to be performed for each of the seven or
fifteen coded pourers.
Available in Option Package(s):
þ 744-Basic þ 744-CR
þ AR
þ FM
þ ID
þ DX
n To calibrate a coded pourer:
Dealer or
Manager
1. Access the Manager Menu. (Insert your key, press ENTER,
select the Manager Menu option and press ENTER.)
Use↑↓ and ENTER
Manager Menu
↵
Use↑↓ and ENTER
Calibrate
↵
2. Use the up and down arrow keys to display the
Calibrate option and press ENTER.
Use↑↓ and ENTER
Code 1
↵
3. Use the up and down arrow keys to select the number of the
coded pourer you want to calibrate and press ENTER.
Use ↑↓ and ENTER ↵
Code 1
1000 1000
You are now in calibration mode for the selected pourer. The
first number listed is the current calibration number for the
pourer (factory default is 670 for EPROM ver. 1.09 or
higher, 1000 for EPROM ver. lower than 1.09). The second
number is an entry field for you to enter a new calibration
number.
4. Pour a drink with the selected pourer into a graduated
cylinder.
5. Carefully measure the volume of drink poured. If the pourer
is calibrated accurately, the volume poured should be 1 ounce
or 30 milliliters.
If you are not satisfied with the accuracy of the pour (the
volume is not close enough to 1 ounce or 30 milliliters),
proceed with step 6.
OR
If you are satisfied with the accuracy of the pour and the
current calibration number, proceed with step 9.
6-2 All-Bottle 744/1544 Installation/Service/User Manual
6. Calculate a new calibration number.
Divide 1 ounce or 30 milliliters (whichever is your target
volume) by the amount of your test pour.
Example: 1 ounce divided by .81 ounce = 1.23
Multiply your answer by the current calibration number
(the first of the two numbers on the display).
Example: 1.23 X 1000 = 1230
This is your new calibration number.
Use ↑↓ and ENTER ↵
Code 1
1000 1230
7. Key in the new calibration number using the up and down
arrow keys to select the numbers and the left and right arrow
keys to move through the number fields and press ENTER.
The first number on the display changes to match the second
number.
Use ↑↓ and ENTER ↵
Code 1
1230 1230
8. Repeat steps 4-7 (pouring, measuring, recalculating) until
you are satisfied with the accuracy of the selected pourer.
9. Press ENTER to save the calibration number that gave you
the most accuracy.
The display returns to the Code option.
Use↑↓ and ENTER
Code 1
↵
10. Repeat steps 3-9 for each coded pourer you want to calibrate.
Notes
q All other pourers are temporarily disabled once you are in
calibration mode for a selected pourer.
q The calibration numbers for all pourers are listed at the end
of the Configuration report.
q The default calibration number for high flow pourers is 670.
If you use high flow pourers with EPROM ver. lower than
1.09, the default calibration number of 1000 (on the ECU
display) is too high. Enter 670 as a calibration number before
pouring to get a more accurate pour.
q The default calibration number for standard flow pourers is
1000. If you use standard flow pourers with EPROM ver.
1.09 or higher, the default calibration number of 670 (on the
ECU display) is too low. Enter 1000 as a calibration number
before pouring to get a more accurate pour.
Calibration, Prices, Portions and PLUs 6-3
Define Portion Sizes
You can preset four portion sizes for each price level of each coded pourer in your All-Bottle 744
or 1544 system. Portion sizes can be as small as 1/8 ounce and as large as 10 ounces.
Available in Option Package(s):
þ 744-Basic þ 744-CR
þ AR
þ FM
þ ID
þ DX
n To define portion sizes:
1. Access the Manager Menu. (Insert your key, press ENTER,
select the Manager Menu option and press ENTER.)
Dealer or
Manager
Manager
Use↑↓ and ENTER
Manager Menu
↵
2. On the front panel of the ECU select a price level (A, B, C or
D) and a size (S, R, L or SP).
3. Use the up and down arrow keys to display the AllBottle Setup option and press ENTER.
Use↑↓ and ENTER ↵
All-Bottle Setup
Use↑↓ and ENTER
Code 1
Use↑↓ and ENTER
Set Portion
4. Use the up and down arrow keys to select the pourer code for
which you are defining portion sizes and press ENTER.
↵
5. Use the up and down arrow keys to display the Set
Portion option and press ENTER.
↵
Use←↑↓ →and ENTER
Portion 006.00
↵
6. Key in the portion size using the up and down arrow keys (to
select the numbers) and the left and right arrow keys (to move
through the number fields) and press ENTER.
The display returns to the Set Portion option.
7. Select a new size and/or price level on the front panel of the
ECU and repeat steps 5 and 6 for each portion size.
Note
q If you try to enter a portion size greater than 10 ounces
(295.7 ml), or greater than 0 but less than 1/8 ounce (3.7 ml),
the ECU does not accept the entry when you press the
ENTER key. Select a new amount.
6-4 All-Bottle 744/1544 Installation/Service/User Manual
Define Prices
You can preset four price levels for each coded pourer in your All-Bottle 744 or 1544 system.
Available in Option Package(s):
o 744-Basic o 744-CR
þ AR
þ FM
þ ID
þ DX
n To define prices:
1. Access the Manager Menu. (Insert your key, press ENTER,
select the Manager Menu option and press ENTER.)
Dealer or
Manager
Use↑↓ and ENTER
Manager Menu
↵
2. On the front panel of the ECU select a price level (A, B, C or
D) and a size (S, R, L or SP).
3. Use the up and down arrow keys to display the AllBottle Setup option and press ENTER.
Use↑↓ and ENTER ↵
All-Bottle Setup
Use↑↓ and ENTER
Code 1
↵
4. Use the up and down arrow keys to select the pourer code for
which you are defining prices and press ENTER.
Use↑↓ and ENTER
Set Price
↵
5. Use the up and down arrow keys to display the Set
Price option and press ENTER.
Use←↑↓ →and ENTER
Price 002.25
↵
6. Key in the price using the up and down arrow keys (to select
the numbers) and the left and right arrow keys (to move
through the number fields) and press ENTER.
The display returns to the Set Price option.
7. Select a new size and/or price level on the front panel of the
ECU and repeat steps 5 and 6 for each price you want to
define.
Calibration, Prices, Portions and PLUs 6-5
Define PLUs
If you are using the ECR interface with your All-Bottle 744 or 1544, you must enter sales
information at the ECU that the cash register needs to ring up each drink. Determine the correct
PLU (price look up) for each size of drink poured at each price level by each coded pourer. These
PLUs are already defined at the cash register; you just need to enter them at the ECU.
Available in Option Package(s):
o 744-Basic þ 744-CR
þ AR
þ FM
þ ID
þ DX
n To define PLUs:
1. Access the Manager Menu. (Insert your key, press ENTER,
select the Manager Menu option and press ENTER.)
Dealer or
Manager
Use↑↓ and ENTER
Manager Menu
↵
2. On the front panel of the ECU select a price level (A, B, C or
D) and a size (S, R, L or SP).
3. Use the up and down arrow keys to display the AllBottle Setup option and press ENTER.
Use↑↓ and ENTER ↵
All-Bottle Setup
Use↑↓ and ENTER
Code 1
↵
4. Use the up and down arrow keys to select the pourer code for
which you are defining PLUs and press ENTER.
Use↑↓ and ENTER
Set PLU
↵
5. Use the up and down arrow keys to display the Set PLU
option and press ENTER.
Use←↑↓ →and ENTER
PLU 0018
↵
6. Key in the PLU using the up and down arrow keys (to select
the numbers) and the left and right arrow keys (to move
through the number fields) and press ENTER. The valid
range of PLUs is 0 to 9999.
The display returns to the Set PLU option.
7. Select a new size and/or price level on the front panel of the
ECU and repeat steps 5 and 6 for each PLU you want to
define.
6-6 All-Bottle 744/1544 Installation/Service/User Manual
Define Flow Meter Price per Unit
If you are using flow meters, the sales for each flow meter appear on designated reports. You need
to enter the price per unit of volume for each price level of each flow meter for this sales data to be
calculated. The price per unit is multiplied by the total units poured by the flow meter to determine
the total sales.
Available in Option Package(s):
o 744-Basic o 744-CR
o AR
þ FM
o ID
þ DX
n To define flow meter prices per unit:
1. Access the Manager Menu. (Insert your key, press ENTER,
select the Manager Menu option and press ENTER.)
Dealer or
Manager
Use↑↓ and ENTER
Manager Menu
2. Use the up and down arrow keys to display the Flow
Meter Setup option and press ENTER.
Use↑↓ and ENTER ↵
Flow Meter Setup
Use↑↓ and ENTER
Flow Meter #1
↵
3. Use the up and down arrow keys to select the flow meter you
want to enter a price per unit for and press ENTER.
↵
Use↑↓ and ENTER ↵
Set Price/Unit Lvl A
4. Use the up and down arrow keys to display the Set
Price/Unit option.
Use↑↓ and ENTER ↵
Set Price/Unit Lvl B
5. Use the down arrow key to select the price level (Lvl A, B, C
or D) for which you're defining a price per unit and press
ENTER.
Use←↑↓ →and ENTER
Price/Unit 001.00
6. Key in the price per unit using the up and down arrow keys
(to select the numbers) and the left and right arrow keys (to
move through the number fields) and press ENTER.
↵
The display returns to the Set Price/Unit option.
7. Repeat steps 5 and 6 for each price level of a selected flow
meter.
8. Use the up arrow to select the Exit This Menu option
and press ENTER. Repeat steps 3-7 for each additional flow
meter.
Note
q The volume unit (oz, ml, cc, cl or L) you are defining a price
for is the one currently selected at the ECU.
Calibration, Prices, Portions and PLUs 6-7
Set Flow Meter Counts
If you are using flow meters with your All-Bottle 744 or 1544, you must check the accuracy of
their measurements and adjust the flow meter counts if necessary. (The flow meter count is the
number of counts from the flow meter per ounce of beverage multiplied by 100.) It's the number
you recorded and saved at the time of flow meter installation.
Available in Option Package(s):
o 744-Basic o 744-CR
o AR
þ FM
o ID
þ DX
n To set flow meter counts:
1. Access the Manager Menu. (Insert your key, press ENTER,
select the Manager Menu option and press ENTER.)
Dealer or
Manager
Use↑↓ and ENTER
Manager Menu
↵
2. Run a Z report to clear all sales. See the Reports section.
3. Use the up and down arrow keys to display the Flow
Meter Setup option and press ENTER.
Use↑↓ and ENTER ↵
Flow Meter Setup
Use ↑↓ and ENTER
Flow Meter #1
Use↑↓ and ENTER
Meter Count
↵
5. Use the up and down arrow keys to display the Meter
Count option and press ENTER.
↵
Use←↑↓ →and ENTER
3614
4. Use the up and down arrow keys to select the number of the
flow meter for which you'll enter a meter count and press
ENTER.
↵
6. Key in the meter count using the up and down arrow keys (to
select the numbers) and the left and right arrow keys (to move
through the number fields) and press ENTER.
Use the number you recorded from the flow meter at the time
of installation or a default meter count of 3614.
The display returns to the Meter Count option.
7. Pour a drink (using the selected flow meter) of approximately
16 ounces and measure the exact amount poured. Be as
accurate as possible.
8. Run a sales report (Detailed X or Z is probably best) to learn
the recorded volume of the test pour.
6-8 All-Bottle 744/1544 Installation/Service/User Manual
If you are not satisfied with the accuracy of the pour (the
volume you measured is not close enough to the volume
recorded on the report), proceed with step 9.
OR
If you are satisfied with the accuracy of the pour and the
current flow meter count, proceed with step 11.
9. Calculate a new flow meter count to enter.
Divide the amount of the test pour given in the report by
the amount you measured.
Example: 16.65 ounces divided by 17.2 ounces = .968
Multiply your answer by the current meter count.
Example: .968 X 3614 = 3498
This is your new flow meter count.
10. Repeat steps 2-10 (clearing sales or choosing a new price
level with no sales, entering a meter count, pouring,
measuring) until you are satisfied with the accuracy of the
selected flow meter.
11. Perform all the steps of this task for each flow meter installed
in your system.
Calibration, Prices, Portions and PLUs 6-9
Clear All-Bottle Prices, Portions and PLUs
When you need to reassign All-Bottle prices, portion sizes and PLUs, use this feature to quickly
clear the current settings.
Available in Option Package(s):
þ 744-Basic þ 744-CR
þ AR
þ FM
þ ID
þ DX
n To clear prices, portions and PLUs:
Dealer or
Manager
1. Access the Manager Menu. (Insert your key, press ENTER,
select the Manager Menu option and press ENTER.)
Use↑↓ and ENTER
Manager Menu
Use↑↓ and ENTER ↵
Clear Price/Por/PLUs
Use↑↓ and ENTER ↵
All-Bottle Data
Use↑↓ and ENTER ↵
Clear Settings ? : Y
↵
2. Use the up and down arrow keys to display the Clear
Price/Por/PLUs option and press ENTER.
3. Use the up and down arrow keys to display the AllBottle Data option and press ENTER.
4. Use the down arrow key to select Y (to clear prices, portion
sizes and PLUs) or use the up arrow key to select N (to keep
the current prices, portion sizes and PLUs) and press
ENTER.
The display returns to the All-Bottle Data option.
Note
q If you have option package FM or DX, you can choose to
clear your All-Bottle settings (price, portion and PLU) or
your flow meter settings (price per unit) or both. See Clear
Flow Meter Prices and Clear All Prices, Portions and PLUs
in this section.
6-10 All-Bottle 744/1544 Installation/Service/User Manual
Clear Flow Meter Prices
If you have flow meters, you can quickly reset the price per unit to zero for all flow meters at the
same time.
Available in Option Package(s):
o 744-Basic o 744-CR
o AR
þ FM
o ID
þ DX
n To clear flow meter prices:
1. Access the Manager Menu. (Insert your key, press ENTER,
select the Manager Menu option and press ENTER.)
Dealer or
Manager
Use↑↓ and ENTER ↵
Clear Price/Por/PLUs
Use↑↓ and ENTER ↵
Flow Meter Prices
Use↑↓ and ENTER ↵
Clear Prices? : Y
Use↑↓ and ENTER
Manager Menu
↵
2. Use the up and down arrow keys to display the Clear
Price/Por/PLUs option and press ENTER.
3. Use the up and down arrow keys to display the Flow
Meter Prices option and press ENTER.
4. Use the down arrow key to select Y (to clear flow meter
prices) or use the up arrow key to select N (to keep the
current flow meter prices) and press ENTER.
The display returns to the Flow Meter Prices
option.
Note
q If you have option package FM or DX, you can choose to
clear your All-Bottle settings (price, portion and PLU) or
your flow meter settings (price per unit) or both. See Clear
All-Bottle Prices, Portions and PLUs and Clear All Prices,
Portions and PLUs in this section.
Calibration, Prices, Portions and PLUs 6-11
Clear All Prices, Portions and PLUs
If you have flow meters, you can quickly clear both your All-Bottle settings and your flow meter
prices using this feature.
Available in Option Package(s):
o 744-Basic o 744-CR
o AR
þ FM
o ID
þ DX
n To clear all prices, portions and PLUs:
1. Access the Manager Menu. (Insert your key, press ENTER,
select the Manager Menu option and press ENTER.)
Dealer or
Manager
Use↑↓ and ENTER ↵
Clear Price/Por/PLUs
Use↑↓ and ENTER ↵
All Price/Por/PLUs
Use↑↓ and ENTER ↵
Clear All Data? : Y
Use↑↓ and ENTER
Manager Menu
↵
2. Use the up and down arrow keys to display the Clear
Price/Por/PLUs option and press ENTER.
3. Use the up and down arrow keys to display the All
Price/Por/PLUs option and press ENTER.
4. Use the down arrow key to select Y (to clear all price,
portion and PLU data) or use the up arrow key to select N
(to keep the current data) and press ENTER.
The display returns to the All Price/Por/PLUs
option.
Note
q If you have option package FM or DX, you can choose to
clear your All-Bottle settings (price, portion and PLU) or
your flow meter settings (price per unit) or both. See Clear
All-Bottle Prices, Portions and PLUs and Clear Flow Meter
Prices in this section.
6-12 All-Bottle 744/1544 Installation/Service/User Manual
Portion Change Lockout
A jumper can be installed in the ECU to disable any portion size changes once measurements have
been inspected. After the jumper is installed, no one can clear or change portion sizes until the
jumper is removed.
Available in Option Package(s):
þ 744-Basic þ 744-CR
þ AR
þ FM
þ ID
þ DX
n To install a portion change lockout jumper:
1. Set up and program the desired portion sizes, but do not
mount the ECU at this time.
2. Check the portion sizes by pouring a portion from each
pourer price category and verify that the correct amount was
dispensed.
3. Unplug and disconnect all cables to the back of the ECU.
4. Loosen the two screws on each side of the ECU with a hex
wrench. Loosen the stand off nuts on the back of the ECU
with a nut driver. Open the bottom of the ECU.
5. Locate connector J9 on the system board. Install the portion
change lockout jumper (Berg PN 8007294) so that the two
pins are shorted together.
6. Replace the cover on the ECU and tighten the four screws
that secure it and the stand off nuts on the back of the ECU.
7. Reconnect all cables and plug in the ECU.
8. Mount the ECU in the desired location.
Note
q See the diagram of the ECU on the next page.
Calibration, Prices, Portions and PLUs 6-13
Standoff nuts
Portion change
lockout jumper (J9)
Two screws on
each side of the
ECU
Caution:
Electronic components are sensitive to static electricity. If
possible, avoid working on the 744 or 1544 ECU while standing
on a carpeted surface. Before you open the 744 or 1544 ECU,
discharge any static electricity from your body by touching any
known grounded metal surface. Also discharge the static
repeatedly in like manner while working on the ECU.
6-14 All-Bottle 744/1544 Installation/Service/User Manual
SECTION
7
All-Bottle Pouring
Once your All-Bottle 744 or 1544 system is installed, you're ready to begin
pouring. This section provides help with the following tasks:
Pour a Drink .................................................................................... 7-2
Repeat a Pour .................................................................................. 7-3
Pour with Server ID ........................................................................ 7-4
Pour with Flow Meters and Server ID ............................................. 7-6
Pour a Drink
You can pour four different portion sizes at four price levels for each of the seven or fifteen AllBottle 744 or 1544 coded pourers.
Available in Option Package(s):
þ 744-Basic þ 744-CR
þ AR
þ FM
þ ID
þ DX
n To pour a drink:
1. Verify the correct price level button (A, B, C or D) is lit on
the front panel of the ECU.
If you need to change the price level, press a new button (A,
B, C or D).
If you have enabled "manager only" price level change, you
must insert a manager key in the ECU key slot to change the
price level. (See Enable Price Level Change in the Pouring
Control section.)
2. Select the desired portion size by pressing the S (small), R
(regular), L (large) or SP (special) button on the ECU's front
panel. Verify the correct portion size button is lit.
3. Pick up a bottle with a secured pourer and insert the pourer
into the activator ring (located in the ring holder).
4. Grasp the finger grip on the activator ring with your index
finger and quickly invert the bottle to a near vertical pouring
position over a glass.
S
R
L
A
B
C
The pour commences. The ECU window displays the code
number of the pourer.
Berg 744-DX
Code 1
5. When the pour ends, tip the bottle back to an upright
position. Return the activator ring to the ring holder and the
bottle to its prior location.
Notes
q If the pour does not immediately begin, quickly tip the bottle
and activator ring to an upright position and then back to a
vertical pouring position over the glass.
q If the pour splashes sideways and misses the glass, you may
not have tipped the bottle to a vertical position quickly
enough.
7-2 All-Bottle 744/1544 Installation/Service/User Manual
Repeat a Pour
If you need to pour identical drinks, the All-Bottle 744 or 1544 pourers can be enabled to restart
pouring without tipping them back.
Available in Option Package(s):
þ 744-Basic þ 744-CR
þ AR
þ FM
þ ID
þ DX
n To pour two or more identical drinks:
1. Verify the correct price level button (A, B, C or D) is lit on
the front panel of the ECU.
If you need to change the price level, press a new button.
If you have enabled "manager only" price level change, you
must insert a manager key to change the price level. (See
Enable Price Level Change in the Pouring Control section.)
2. Select the desired portion size by pressing the S (small), R
(regular), L (large) or SP (special) button on the ECU's front
panel. Verify the correct portion size button is lit.
3. Pick up a bottle with a secured pourer and insert the pourer
into the activator ring (located in the ring holder).
4. Grasp the finger grip on the activator ring with your index
finger and quickly invert the bottle to a near vertical pouring
position over a glass.
The pour commences. The ECU window displays the code
number of the pourer.
S
R
L
A
B
C
Berg 744-DX
Code 1
5. When the pour ends, quickly position the bottle over a new
glass (still holding the bottle in a vertical pouring position).
You have 1-9 seconds before a new pour commences.
6. Repeat step 5 for as many identical drinks as you need.
7. Tip the bottle back to an upright position. Return the
activator ring to the ring holder and the bottle to its prior
location.
Note
q The restart pour delay is determined in the Manager Menu at
the ECU. See Restart Pour Delay in the Pouring Control
section.
All-Bottle Pouring 7-3
Pour with Server ID
If you have installed option package ID or DX, pouring can not take place without a server key in
either the ECU's key slot or the remote server access box. The name assigned to the key in the slot
must also match a name in the current Key Assignment list.
Available in Option Package(s):
o 744-Basic o 744-CR
o AR
o FM
þ ID
þ DX
n To pour with server ID:
1. Verify the correct price level button (A, B, C or D) is lit on
the front panel of the ECU.
If you need to change the price level, press a new button (A,
B, C or D).
If you have enabled "manager only" price level change, you
must insert a manager key in the ECU key slot to change the
price level. (See Enable Price Level Change in the Pouring
Control section.)
2. Insert your server key in the ECU or the remote server access
box.
Server
The name assigned to the key appears in the ECU display
window.
Berg 744-ID
MIKE
3. Select the desired portion size by pressing the S (small), R
(regular), L (large) or SP (special) button on the ECU's front
panel. Verify the correct portion size button is lit.
4. Pick up a bottle with a secured pourer and insert the pourer
into the activator ring (located in the ring holder).
5. Grasp the finger grip on the activator ring with your index
finger and quickly invert the bottle to a near vertical pouring
position over a glass.
S
R
L
A
B
C
The pour commences and the ECU window displays the code
number of the pourer in addition to the name assigned to the
server key.
Berg 744-ID
Code 1
MIKE
7-4 All-Bottle 744/1544 Installation/Service/User Manual
5. Wait for the pour to end.
8. Tip the bottle back to an upright position. Return the
activator ring to the ring holder and the bottle to its prior
location.
9. Remove your server key from the key slot.
Server
Note
q If another key is in the ECU front key slot, the ECU reads
"Both Keys" and pouring is disabled.
Berg 744-ID
Both Keys
All-Bottle Pouring 7-5
Pour with Flow Meters and Server ID
If you have installed option package DX with both flow meters and server ID, all pours with the
flow meters will be assigned to the server whose key is in either the ECU or the remote server
access box at the time of pouring.
Available in Option Package(s):
o 744-Basic o 744-CR
o AR
o FM
o ID
þ DX
n To pour with flow meters and server ID:
1. Verify the correct price level button (A, B, C or D) is lit on
the front panel of the ECU.
If you need to change the price level, press a new button (A,
B, C or D).
If you have enabled "manager only" price level change, you
must insert a manager key in the ECU key slot to change the
price level. (See Enable Price Level Change in the Pouring
Control section.)
Server
2. Insert your server key in the ECU or the remote server access
box.
The name assigned to the key appears in the ECU display
window.
Berg 744-ID
MIKE
3. Pour a drink from the faucet or tap connected to the flow
meter line.
4. Remove your server key from the key slot.
Server
Notes
q If there is a server key in both key slots (ECU and remote
server access box), any flow meter pours are assigned to the
server whose key is in the remote server access box.
q If there are no keys in either slot at the time of a flow meter
pour, the sales are listed on reports as "unassigned flow meter
sales". To prevent flow meter pouring without a key in the
system, see Connect an External Solenoid Output in the
Hardware Installation section.
7-6 All-Bottle 744/1544 Installation/Service/User Manual
SECTION
8
Reports
If you are using Advanced Reporting with your All-Bottle 744 or 1544, a
variety of reports are available for your use. These reports can be sent directly
from the ECU to a printer or computer. If you are also using Server ID, you
can generate specific reports on the activity of each server in addition to total
sales reports.
Summary Reports (X and Z) ........................................................... 8-2
Detailed Reports (X and Z) ............................................................. 8-4
Last Z Report .................................................................................. 8-6
Hourly Sales Report ........................................................................ 8-8
Price Level Change Report ............................................................ 8-10
Configuration Report ..................................................................... 8-12
Price/Portion Report ...................................................................... 8-14
PLU Report ................................................................................... 8-16
All Server Summary Reports (X and Z) ........................................ 8-18
Individual Server Summary Reports (X and Z) ............................. 8-20
Individual Server Reports Using the Server Menu ........................ 8-22
Clear Cumulative Sales ................................................................. 8-24
Summary Reports (X and Z)
Summary reports provide the total number of pours and the total sales for each price level. (The
sales from all seven or fifteen bottle codes are combined.) If you have flow meters, the total volume
and total sales for three flow meters at all four price levels is provided. Summary X and Z reports
are exactly the same–but a Z report zeros out your sales totals.
Available in Option Package(s):
þ 744-Basic þ 744-CR
þ AR
þ FM
þ ID
þ DX
n To generate a summary X or Z report
Dealer or
Manager
1. Access the Manager Menu. (Insert your key, press ENTER,
select the Manager Menu option and press ENTER.)
Use↑↓ and ENTER
Manager Menu
↵
Use↑↓ and ENTER
View Reports
↵
2. Use the up and down arrow keys to display the View
Reports option and press ENTER.
Use↑↓ and ENTER
Summary X
↵
3. Use the up and down arrow keys to select the Summary Z
option or the Summary X option and press ENTER.
Creating Report,
Please Wait
←=Exit
Use↑ and ↓
→=Print
to view
4. Wait for the report to be generated.
5. View the report from the display using the up and down
arrow keys. Press ENTER to quit viewing.
If you have option package AR, FM, ID or DX, use the right
arrow key to print the report.
6. Use the left arrow key to exit the report.
Notes
q If you have option package Basic or CR, summary reports
show the number of portions poured without any sales data.
q If you have option package ID or DX, a Z report clears all
individual server sales data. A warning reminds you. (Run a
server report first if you want to save the server data.)
q The Z number is the number of summary Z or detailed Z
reports that have been run. You can detect any unauthorized
use of Z reports if you know what this number should be.
8-2 All-Bottle 744/1544 Installation/Service/User Manual
Berg All-Bottle 744 Summary X Report
Station
1
Date: 04/23/96
Time: 09:49:00 PM
All-Bottle Sales
Price
Price
Price
Price
Level
Level
Level
Level
A
B
C
D
Totals
Portions
52
114
88
160
Sales
143.50
329.75
266.25
387.50
414
1127.00
Volume (oz)
2352.57
918.86
2795.16
5651.73
Sales
159.00
81.00
166.00
332.00
Flow Meter Sales
Price
Price
Price
Price
Level
Level
Level
Level
A
B
C
D
Totals
11718.32
738.00
Report Total Sales
1865.00
Cumulative Sales
3349.75
Reports 8-3
Detailed Reports (X and Z)
Detailed X and Z reports provide the total number of pours and the total sales for each of the seven
or fifteen price codes at four price levels and four portion sizes. If you have flow meters, the total
volume and total sales for three flow meters at all four price levels is provided. Detailed X and Z
reports are exactly the same--but a Z report zeros out your sales totals.
Available in Option Package(s):
þ 744-Basic þ 744-CR
þ AR
þ FM
þ ID
þ DX
n To generate a detailed X or Z report
Dealer or
Manager
1. Access the Manager Menu. (Insert your key, press ENTER,
select the Manager Menu option and press ENTER.)
Use↑↓ and ENTER
Manager Menu
↵
Use↑↓ and ENTER
View Reports
↵
2. Use the up and down arrow keys to display the View
Reports option and press ENTER.
Use↑↓ and ENTER
Detailed Z
↵
3. Use the up and down arrow keys to select the Detailed
Z option or the Detailed X option and press ENTER.
Creating Report,
Please Wait
←=Exit
Use↑ and ↓
→=Print
to view
4. Wait for the report to be generated.
5. If you have option package Basic or CR, view the report
from the display using the up and down arrow keys. Press
ENTER to quit viewing.
If you have option package AR, FM, ID or DX, use the right
arrow key to print the report.
Detailed Z Report
Printer-Only Report
6. Use the left arrow key to exit the report.
Notes
q If you have option package Basic or CR, detailed reports
show the number of portions poured without any sales data.
q If you have option package ID or DX, a Z report clears all
individual server sales data. A warning reminds you. (Run a
server report first if you want to save the server data.)
q The Z number is the number of summary Z or detailed Z
reports that have been run. You can detect any unauthorized
use of Z reports if you know what this number should be.
8-4 All-Bottle 744/1544 Installation/Service/User Manual
Berg All-Bottle 744 Detailed Z Report
Station
1
Z Number
Date: 05/16/97
Time: 10:57:06 PM
5
Price Level A
Small
Regular
Large
Special
Portions
Sales Portions
Sales Portions
Sales Portions
Sales
1
7
12.00
23
46.00
15
33.75
10
30.00
2
3
7.50
16
36.00
8
20.00
5
15.00
3
3
8.25
8
24.00
5
15.00
3
9.00
4
6
12.00
10
22.50
4
10.00
6
18.00
5
3
7.50
5
10.00
3
6.75
4
12.00
6
2
5.50
4
10.00
5
15.00
2
6.00
7
1
2.00
2
4.50
3
7.50
3
9.00
Totals
25
54.75
68
153.00
43
108.00
33
Code
Code
Code
Code
Code
Code
Code
Code
99.00
Total Sales
Price Level A
414.75
Price Level B
Small
Regular
Large
Special
Portions
Sales Portions
Sales Portions
Sales Portions
Sales
1
8
14.00
25
56.00
15
33.75
13
39.00
2
6
15.00
16
36.00
9
22.50
4
12.00
3
5
12.25
8
24.00
7
21.00
3
9.00
4
6
12.00
11
25.00
4
10.00
5
15.00
5
4
10.00
6
12.00
4
9.75
4
12.00
6
2
5.50
4
10.00
6
18.00
5
15.00
7
3
6.00
3
6.75
5
12.50
6
18.00
Totals
34
74.75
73
169.75
50
127.50
40
120.00
Code
Code
Code
Code
Code
Code
Code
Code
Flow Meter #1 Totals
Flow Meter #2 Totals
Flow Meter #3 Totals
oz
oz
oz
132.08
257.06
489.08
Total Sales
Sales
Sales
Sales
Price Level B
Report Total Sales
1301.59
Cumulative Sales
7883.24
46.23
128.53
220.08
886.84
Unassigned Flow Meter Sales
Price Level A
No Activity
Price Level B
Flow Meter #1 Totals
Flow Meter #3 Totals
oz
oz
32.08
48.32
Sales
Sales
11.23
21.75
Price Level C
No Activity
Price Level D
No Activity
Reports 8-5
Last Z Report
A last Z report is a backup copy of the most recent Z report generated. This includes summary Z,
detailed Z, all server summary Z and individual server summary Z reports. A last Z report does not
clear any sales totals because it is not a current Z report.
Available in Option Package(s):
þ 744-Basic þ 744-CR
þ AR
þ FM
þ ID
þ DX
n To generate a last Z report
Dealer or
Manager
1. Access the Manager Menu. (Insert your key, press ENTER,
select the Manager Menu option and press ENTER.)
Use↑↓ and ENTER
Manager Menu
↵
Use↑↓ and ENTER
View Reports
↵
2. Use the up and down arrow keys to display the View
Reports option and press ENTER.
Use↑↓ and ENTER
Last Z
↵
3. Use the up and down arrow keys to select the Last Z
option and press ENTER.
Creating Report,
Please Wait
←=Exit
Use↑ and ↓
→=Print
to view
4. Wait for the report to be generated.
5. If you have option package Basic or CR, view the report
from the display using the up and down arrow keys. Press
ENTER to quit viewing.
If you have option package AR, FM, ID or DX, view a
summary Z or individual server summary Z report from the
display using the up and down arrow keys. Use the right
arrow key to print the report. Detailed Z and all server
summary Z reports are printer only reports.
Detailed Z
Printer-Only Report
6. Use the left arrow key to exit the report.
8-6 All-Bottle 744/1544 Installation/Service/User Manual
Berg All-Bottle 744 Summary Z Report
Station
1
Date: 05/16/97
Z Number
Time: 10:56:11 PM
5
All-Bottle Sales
Price
Price
Price
Price
Level
Level
Level
Level
A
B
C
D
Portions
169
197
0
0
Sales
414.75
886.84
0.00
0.00
366
1301.59
Totals
Flow Meter Sales
Price
Price
Price
Price
Level
Level
Level
Level
Volume (oz)
0.00
80.40
0.00
0.00
A
B
C
D
Totals
80.40
Sales
0.00
32.98
0.00
0.00
32.98
Report Total Sales
1301.59
Cumulative Sales
7883.24
Unassigned Flow Meter Sales
Price
Price
Price
Price
Totals
Level
Level
Level
Level
A
B
C
D
Volume (oz)
0.00
80.40
0.00
0.00
80.40
Sales
0.00
32.98
0.00
0.00
32.98
Reports 8-7
Hourly Sales Report
The hourly sales report shows the sales activity for each of the previous forty-eight hours with
pouring activity, including the current hour. It provides the total number of All-Bottle pours and a
sales total for each hour. If you have flow meters, the hourly sales report provides the total flow
meter volume and sales for each hour. The hourly sales data is cleared whenever a summary Z or
detailed Z report is generated.
Available in Option Package(s):
o 744-Basic o 744-CR
þ AR
þ FM
þ ID
þ DX
n To generate an hourly sales report
Dealer or
Manager
1. Access the Manager Menu. (Insert your key, press ENTER,
select the Manager Menu option and press ENTER.)
Use↑↓ and ENTER
Manager Menu
↵
Use↑↓ and ENTER
View Reports
↵
2. Use the up and down arrow keys to display the View
Reports option and press ENTER.
Use↑↓ and ENTER
Hourly Sales
↵
3. Use the up and down arrow keys to select the Hourly
Sales option and press ENTER.
Creating Report,
Please Wait
←=Exit
Use↑ and ↓
→=Print
to view
4. Wait for the report to be generated.
5. Use the right arrow key to print the report or the left arrow
key to exit the report. The hourly sales report is a printer only
report.
Hourly Sales Report
Printer-Only Report
8-8 All-Bottle 744/1544 Installation/Service/User Manual
Berg All-Bottle 744 Hourly Sales Report
Station
1
Date: 11/12/96
All-Bottle
Portions
Sales
Start Time
11/11/96 08:00:00 PM
11/11/96 09:00:00 PM
11/11/96 10:00:00 PM
Total Sales
Time: 12:07:53 AM
Flow Meter
oz
Sales
Total
Sales
43
83
59
53.75
231.88
115.32
0.00
0.00
0.00
0.00
0.00
0.00
53.75
231.88
115.32
126
285.63
0.00
0.00
400.95
Reports 8-9
Price Level Change Report
The price level change report shows the ten most recent price level changes made at the ECU. The
exact time of each price level change is listed along with a record of the old and new price levels.
Available in Option Package(s):
o 744-Basic o 744-CR
þ AR
þ FM
þ ID
þ DX
n To generate a price level change report
Dealer or
Manager
Use↑↓ and ENTER
View Reports
↵
Use↑↓ and ENTER ↵
Price Level Change
1. Access the Manager Menu. (Insert your key, press ENTER,
select the Manager Menu option and press ENTER.)
Use↑↓ and ENTER
Manager Menu
↵
2. Use the up and down arrow keys to display the View
Reports option and press ENTER.
3. Use the up and down arrow keys to select the Price
Level Change option and press ENTER.
4. Wait for the report to be generated.
Creating Report,
Please Wait
←=Exit
Use↑ and ↓
→=Print
to view
5. Use the right arrow key to print the report or the left arrow
key to exit the report. The price level change report is a
printer only report.
Price Level Change
Printer-Only Report
8-10 All-Bottle 744/1544 Installation/Service/User Manual
Berg All-Bottle 744 Price Level Change Report
Station
1
Date
Time
04/26/96
04/26/96
04/27/96
04/28/96
04/28/96
04/28/96
04/30/96
05/01/96
05/01/96
05/01/96
04:03:52
06:00:02
05:01:23
01:30:44
04:00:13
06:30:55
09:06:12
11:03:42
05:02:38
07:10:29
Date: 05/01/96
Time: 08:04:26 PM
Old Price Level
PM
PM
PM
PM
PM
PM
PM
AM
PM
PM
Price
Price
Price
Price
Price
Price
Price
Price
Price
Price
Level
Level
Level
Level
Level
Level
Level
Level
Level
Level
D
A
B
C
D
A
B
C
D
A
New Price Level
Price
Price
Price
Price
Price
Price
Price
Price
Price
Price
Level
Level
Level
Level
Level
Level
Level
Level
Level
Level
A
B
C
D
A
B
C
D
A
B
Reports 8-11
Configuration Report
The configuration report provides a list of the current settings for several options available at the
ECU. It shows which pouring control options are currently enabled, the Z number, price, time and
date formats, serial port settings and the calibration counts for the seven or fifteen coded pourers.
If you have option package ID or DX, it lists the current servers and the number of times each
server’s sales data has been cleared.
Available in Option Package(s):
þ 744-Basic þ 744-CR
þ AR
þ FM
þ ID
þ DX
n To generate a configuration report
Dealer or
Manager
1. Access the Manager Menu. (Insert your key, press ENTER,
select the Manager Menu option and press ENTER.)
Use↑↓ and ENTER
Manager Menu
↵
Use↑↓ and ENTER
View Reports
↵
2. Use the up and down arrow keys to display the View
Reports option and press ENTER.
Use↑↓ and ENTER
Configuration
↵
3. Use the up and down arrow keys to select the
Configuration option and press ENTER.
4. Wait for the report to be generated.
Creating Report,
Please Wait
←=Exit
Use↑ and ↓
→=Print
to view
5. Use the up and down arrow keys to view the report from the
display. Press ENTER to quit viewing.
If you have option package AR, FM, ID or DX, use the right
arrow key to print the report.
6. Use the left arrow key to exit the report.
Note
q It’s a good idea to keep a copy of the current configuration
report in a safe place.
8-12 All-Bottle 744/1544 Installation/Service/User Manual
Berg All-Bottle 744 Configuration Report
Station
1
Date: 04/23/96
Time: 09:05:47 PM
EPROM Version
1.09
Disable Unit
N
Price Level Change Manager Only
Y
Reset After Pour
Y
Server Menu Active
Y
Linefeeds to Printer
Y
Enable OFF Signal
Y
Restart Pour Delay (seconds)
2
Current Price Level
Price Level B
Z Number
4
Price Format
999.99
Decimal Char.
Period
Volume Units
oz
Date Format
MM/DD/YY
Time Format
12 hour
Baud Rate
19200
Parity
No Parity
Word Length
8-bits
Stop Bits
1 Stop Bit
Servers
Alice
Mike
3
Julie
Calibration Data
Code 1
Code 2
Code 3
Code 4
Code 5
Code 6
Code 7
Z Number
Z Number
3
3
Z Number
3
Ron
Z Number
959
1028
1107
989
1056
971
1036
Reports 8-13
Price/Portion Report
The price/portion report provides a copy of the current portion sizes and price settings for each of
the seven or fifteen coded pourers at all four price levels. If you have flow meters, it also provides
the flow meter count number and the price per unit of volume.
Available in Option Package(s):
þ 744-Basic þ 744-CR
þ AR
þ FM
þ ID
þ DX
n To generate a price/portion report
Dealer or
Manager
1. Access the Manager Menu. (Insert your key, press ENTER,
select the Manager Menu option and press ENTER.)
Use↑↓ and ENTER
Manager Menu
↵
Use↑↓ and ENTER
View Reports
↵
2. Use the up and down arrow keys to display the View
Reports option and press ENTER.
Use↑↓ and ENTER
Price/Portion
↵
3. Use the up and down arrow keys to select the Price/
Portion option and press ENTER.
Creating Report,
Please Wait
←=Exit
Use↑ and ↓
→=Print
to view
4. Wait for the report to be generated.
5. If you have option package Basic or CR, view the report
from the display using the up and down arrow keys. Press
ENTER to quit viewing.
If you have option package AR, FM, ID or DX, use the right
arrow key to print the report. The price/portion report is a
printer only report.
Price/Portion Report
Printer-Only Report
6. Use the left arrow key to exit the report.
Notes
q If you have option package Basic or CR, the price/portion
report lists only portion sizes.
q It’s a good idea to keep a copy of the current price/portion
report in a safe place.
8-14 All-Bottle 744/1544 Installation/Service/User Manual
Berg All-Bottle 744 Price/Portion Report
Station
1
Date: 07/18/96
Time: 10:47:50 PM
Price Level A
Code
Code
Code
Code
Code
Code
Code
Code
1
2
3
4
5
6
7
Small
Price
1.00
1.25
1.50
1.00
1.25
1.25
1.25
Size
2.00
2.00
2.00
2.00
2.00
2.00
2.00
Regular
Size
Price
4.00
1.75
4.00
2.00
4.00
2.25
4.00
1.75
4.00
2.25
4.00
2.25
4.00
2.25
Flow Meter #1 Price/oz Price Level A
Flow Meter #2 Price/oz Price Level A
Flow Meter #3 Price/oz Price Level A
Large
Price
2.75
3.00
3.25
2.75
3.00
3.00
3.00
Special
Size
Price
3.50
1.50
3.50
1.75
3.50
2.00
3.50
1.50
3.50
1.75
3.50
2.00
3.50
2.00
Large
Price
3.00
3.25
3.50
3.00
3.25
3.25
3.25
Special
Size
Price
3.50
1.75
3.50
2.00
3.50
2.25
3.50
1.75
3.50
2.00
3.50
2.00
3.50
2.00
Large
Price
3.25
3.50
3.75
3.25
Special
Size
Price
3.50
2.00
3.50
2.25
3.50
2.50
3.50
2.00
Large
Price
2.50
2.75
3.00
2.50
2.75
2.75
2.75
Special
Size
Price
3.50
1.25
3.50
1.50
3.50
1.75
3.50
1.25
3.50
1.50
3.50
1.50
3.50
1.50
Size
6.00
6.00
6.00
6.00
6.00
6.00
6.00
0.30
0.25
1.00
Price Level B
Code
Code
Code
Code
Code
Code
Code
Code
1
2
3
4
5
6
7
Small
Price
1.00
1.25
1.50
1.00
1.25
1.25
1.25
Size
2.00
2.00
2.00
2.00
2.00
2.00
2.00
Regular
Size
Price
4.00
2.00
4.00
2.25
4.00
2.50
4.00
2.00
4.00
2.25
4.00
2.25
4.00
2.25
Flow Meter #1 Price/oz Price Level B
Flow Meter #2 Price/oz Price Level B
Flow Meter #3 Price/oz Price Level B
Size
6.00
6.00
6.00
6.00
6.00
6.00
6.00
0.40
0.35
1.25
Price Level C
Code
Code
Code
Code
Code
1
2
3
4
Small
Price
1.25
1.50
1.75
1.25
Regular
Size
Price
4.00
2.25
4.00
2.50
4.00
2.75
4.00
2.25
Size
6.00
6.00
6.00
6.00
Small
Price
0.75
1.00
1.25
0.75
1.00
1.00
1.00
Regular
Size
Price
4.00
1.50
4.00
1.75
4.00
2.00
4.00
1.50
4.00
1.75
4.00
1.75
4.00
1.75
Size
6.00
6.00
6.00
6.00
6.00
6.00
6.00
Size
2.00
2.00
2.00
2.00
Price Level D
Code
Code
Code
Code
Code
Code
Code
Code
1
2
3
4
5
6
7
Size
2.00
2.00
2.00
2.00
2.00
2.00
2.00
Flow Meter #1 Price/oz Price Level C
Flow Meter #2 Price/oz Price Level C
Flow Meter #3 Price/oz Price Level C
0.50
0.45
1.50
Reports 8-15
PLU Report
If you have entered PLUs at the ECU for communication with a cash register, the PLU report lists
the PLU assigned to each price code at every portion size and price level.
Available in Option Package(s):
o 744-Basic þ 744-CR
þ AR
þ FM
þ ID
þ DX
n To generate a PLU report
Dealer or
Manager
1. Access the Manager Menu. (Insert your key, press ENTER,
select the Manager Menu option and press ENTER.)
Use↑↓ and ENTER
Manager Menu
↵
Use↑↓ and ENTER
View Reports
↵
2. Use the up and down arrow keys to display the View
Reports option and press ENTER.
Use↑↓ and ENTER
PLU
↵
3. Use the up and down arrow keys to select the PLU option
and press ENTER.
Creating Report,
Please Wait
←=Exit
Use↑ and ↓
→=Print
to view
4. Wait for the report to be generated.
5. If you have option package CR, view the report from the
display using the up and down arrow keys. Press ENTER to
quit viewing.
If you have option package AR, FM, ID or DX, use the right
arrow key to print the report. The PLU report is a printer
only report.
PLU Report
Printer-Only Report
6. Use the left arrow key to exit the report.
Note
q It’s a good idea to keep a copy of the current PLU report in a
safe place.
8-16 All-Bottle 744/1544 Installation/Service/User Manual
Berg All-Bottle 744 PLU Report
Station
1
Date: 01/31/97
Time: 08:23:46 PM
Price Level A
Small
Code
PLU
Code 1
1
Code 2
5
Code 3
9
Code 4
13
Code 5
17
Code 6
21
Code 7
25
Regular
PLU
2
6
10
14
18
22
26
Large
PLU
3
7
11
15
19
23
27
Special
PLU
4
8
12
16
20
24
28
Price Level B
Small
Code
PLU
Code 1
29
Code 2
33
Code 3
37
Code 4
41
Code 5
45
Code 6
49
Code 7
53
Regular
PLU
30
34
38
42
46
50
54
Large
PLU
31
35
39
43
47
51
55
Special
PLU
32
36
40
44
48
52
56
Price Level C
Small
Code
PLU
Code 1
57
Code 2
61
Code 3
65
Code 4
69
Code 5
73
Code 6
77
Code 7
81
Regular
PLU
58
62
66
70
74
78
82
Large
PLU
59
63
67
71
75
79
83
Special
PLU
60
64
68
72
76
80
84
Price Level D
Small
Code
PLU
Code 1
85
Code 2
89
Code 3
93
Code 4
97
Code 5
101
Code 6
105
Code 7
109
Regular
PLU
86
90
94
98
102
106
110
Large
PLU
87
91
95
99
103
107
111
Special
PLU
88
92
96
100
104
108
112
Reports 8-17
All Server Summary Reports (X and Z)
If you have option package ID, an all server summary Z or X report provides the total All-Bottle
pours and sales for each server at each price level. If you have option package DX, the all-server
report also shows the total flow meter volume and sales and total combined sales for each server at
all four price levels. The all-server summary Z report zeros out all server sales data, but leaves all
other sales data intact.
Available in Option Package(s):
o 744-Basic o 744-CR
o AR
o FM
þ ID
þ DX
n To generate an all server summary Z or X report
Dealer or
Manager
Use↑↓ and ENTER
View Reports
↵
Use↑↓ and ENTER ↵
All Server Summary X
Creating Report,
Please Wait
←=Exit
Use↑ and ↓
→=Print
to view
1. Access the Manager Menu. (Insert your key, press ENTER,
select the Manager Menu option and press ENTER.)
Use↑↓ and ENTER
Manager Menu
↵
2. Use the up and down arrow keys to display the View
Reports option and press ENTER.
3. Use the up and down arrow keys to select the All
Server Summary Z option or the All Server
Summary X option and press ENTER.
4. Wait for the report to be generated.
5. Use the right arrow key to print the report or the left arrow
key to exit the report. All server reports are printer only
reports.
All Server Summary X
Printer-Only Report
Note
q The all server summary reports provide sales information for
all servers in the current key assignment list.
q The Z number is the number of summary Z reports that have
been run for that server. You can detect any unauthorized use
of Z reports if you know what this number should be. (This Z
number is separate from the ECU’s Z number.)
8-18 All-Bottle 744/1544 Installation/Service/User Manual
Berg All-Bottle 744 All Server Summary Z Report
Station
1
Servers
Alice
Mike
Julie
Price Level/
Server Name
Date: 02/21/97
Z Number
3
3
Ron
3
Time: 07:00:29 PM
3
All-Bottle
Portions
Sales
Flow Meter
oz
Sales
Total
Sales
Price Level A
Alice
Mike
33
18
87.00
25.75
96.13
169.00
74.00
51.00
161.00
76.75
Price Level B
Alice
Mike
27
17
74.75
45.38
158.03
144.07
101.00
42.50
175.75
87.88
Price Level C
Ron
Julie
35
29
90.00
73.50
0.00
0.00
0.00
0.00
90.00
73.50
159
396.38
567.23
268.50
664.88
Price Level D
No Activity
Report Totals
Reports 8-19
Individual Server Summary Reports (X and Z)
If you have option package ID, an individual server summary Z or X report provides the total AllBottle pours and sales for a selected server at each price level. If you have option package DX, the
server report also shows the total flow meter volume and sales and total combined sales for that
server at all four price levels. The individual server summary Z report zeros out all sales data for
that server, but leaves all other sales data intact. You can only generate an individual server
summary Z report in the Manager Menu. You can generate a summary X report in either the
Manager or Server Menu. To generate a report using the Server Menu see Individual Server
Reports Using the Server Menu in this section.
Available in Option Package(s):
o 744-Basic o 744-CR
o AR
o FM
þ ID
þ DX
n To generate an individual server summary Z or X
report using the Manager menu:
1. Access the Manager Menu. (Insert your key, press ENTER,
select the Manager Menu option and press ENTER.)
Dealer or
Manager
Use↑↓ and ENTER
View Reports
↵
Use↑↓ and ENTER
Manager Menu
↵
2. Use the up and down arrow keys to display the View
Reports option and press ENTER.
Use↑↓ and ENTER ↵
Summary Z by Server
3. Use the up and down arrow keys to select the Summary Z
by Server or the Summary X by Server
option and press ENTER.
Use↑↓ and ENTER
04 Don
4. Use the up and down arrow keys to select the name of the
individual server and press ENTER.
↵
Creating Report,
Please Wait
←=Exit
Use↑ and ↓
→=Print
to view
5. Wait for the report to be generated.
6. Use the right arrow key to print the report or the left arrow
key to exit the report.
Use the up and down arrow keys to view the report. Press
ENTER to quit viewing.
Note
q The Z number is the number of summary Z reports run for
that server. You can detect any unauthorized use of Z reports
if you know what this number should be. (This Z number is
separate from the ECU’s Z number.)
8-20 All-Bottle 744/1544 Installation/Service/User Manual
Berg All-Bottle 744 Summary Z by Server Report
Station
1
Date: 08/26/96
Z Number
Server:
Time: 06:47:18 PM
3
MIKE
All-Bottle Sales
Price
Price
Price
Price
Level
Level
Level
Level
A
B
C
D
Totals
Portions
18
17
13
17
Sales
25.75
145.38
15.75
21.25
65
208.13
Volume (oz)
169.00
144.07
0.00
0.00
Sales
51.00
42.50
0.00
0.00
313.07
93.50
Flow Meter Sales
Price
Price
Price
Price
Level
Level
Level
Level
A
B
C
D
Totals
Total Sales MIKE
301.63
Reports 8-21
Individual Server Reports Using the Server Menu
If you have option package ID, individual servers can view their own summary X reports if you
enable this feature. Summary X reports show the total number of pours and the total sales for each
price level. If you have option package DX, the server report also shows the total flow meter
volume and sales and total combined sales for that server at all four price levels.
Available in Option Package(s):
o 744-Basic o 744-CR
o AR
o FM
þ ID
þ DX
n To generate an individual server summary X
report using the Server Menu:
1. Access the Server Menu. (Insert your key, press ENTER,
select the Server Menu option and press ENTER.)
Server
Use↑↓ and ENTER
Server Menu
Use↑↓ and ENTER ↵
Summary X by Server
↵
2. Use the up and down arrow keys to select the Summary X
by Server option and press ENTER.
3. Wait for the report to be generated.
Creating Report,
Please Wait
←=Exit
Use↑ and ↓
→=Print
to view
4. Use the left arrow key to exit the report or the right arrow
key to print the report.
Use the up and down arrow keys to view the report. Press
ENTER to quit viewing.
Notes
q Individual servers can only access reports through the Server
Menu if you have enabled this option in the Manager Menu.
See Enable Server Menu in the Pouring Control section.
q The server key inserted to access the Server Menu must be
listed in the current Key Assignment list to access reports.
8-22 All-Bottle 744/1544 Installation/Service/User Manual
Berg All-Bottle 744 Summary X by Server Report
Station
1
Date: 08/26/96
Server:
MIKE
Time: 06:47:18 PM
All-Bottle Sales
Price
Price
Price
Price
Level
Level
Level
Level
A
B
C
D
Totals
Portions
18
17
13
17
Sales
25.75
145.38
15.75
21.25
65
208.13
Volume (oz)
169.00
144.07
0.00
0.00
Sales
51.00
42.50
0.00
0.00
313.07
93.50
Flow Meter Sales
Price
Price
Price
Price
Level
Level
Level
Level
A
B
C
D
Totals
Total Sales MIKE
301.63
Reports 8-23
Clear Cumulative Sales
The All-Bottle 744 or 1544 ECU keeps a running total of all sales separate from the sales totals
cleared in Z reports. The cumulative sales total appears on both the summary and detailed X and Z
reports (but not server summary reports). To clear these cumulative sales, you must have a dealer
or manager key and use a password (if you’ve defined a password).
Available in Option Package(s):
o 744-Basic o 744-CR
þ AR
þ FM
þ ID
þ DX
n To clear cumulative sales
1. Insert your Manager access key in the ECU's key slot and
press ENTER.
Dealer or
Manager
Use↑↓ and ENTER
Manager Menu
2. Use the up and down arrow keys to display the Clear
Cum Sales option and press ENTER.
Use↑↓ and ENTER ↵
Clear Cum Sales
Use←↑↓ →and ENTER
Password _
↵
3. Key in the password and press ENTER.
↵
Use the left and right arrow keys to move the cursor through
the five fields. Use the up and down arrow keys to select
characters from the following list: ! " # $ % & ' ( ) * + , - . /
0-9 : ; < = > ? @ A-Z [ (yen character) ] ^ _ ` a-z { | }→ and
space in that order.
If you haven’t defined a password, press ENTER.
If you successfully match the defined password, the display
tells you when the sales are cleared.
Cum Sales Cleared
The display returns to the Clear Cum Sales option.
Notes
q The cumulative sales password is case sensitive, and is
defined in the Dealer Menu. See Cumulative Sales Password
in the ECU Setup section.
q You typically clear cumulative sales after running a Z report.
If you clear cumulative sales with active sales data still in the
ECU, your first Z report after clearing cumulative sales will
show higher totals than the cumulative sales.
8-24 All-Bottle 744/1544 Installation/Service/User Manual
Berg All-Bottle 744 Summary X Report
Station
1
Date: 06/23/96
Time: 09:49:00 PM
All-Bottle Sales
Price
Price
Price
Price
Level
Level
Level
Level
A
B
C
D
Totals
Report Total Sales
Cumulative Sales
Portions
35
21
34
36
Sales
48.75
150.88
41.75
44.25
126
285.63
285.63
0.00
Clearing cumulative sales
resets the running total to 0.
Reports 8-25
SECTION
9
Maintenance and
Upgrading
Proper cleaning and maintenance of the All-Bottle 744 or 1544 system is essential.
Refer to information in this section for the following tasks:
Clean the All-Bottle 744 or 1544 ECU ........................................... 9-2
Clean the All-Bottle Coded Pourers ................................................ 9-3
Replace the ECU Battery ................................................................ 9-4
Change the EPROM ........................................................................ 9-6
Install an Option Board ................................................................... 9-8
Clean the ECU
Clean the ECU and activator ring about once a week. The ECU is designed to protect the
electronics inside from moisture, but bartenders should still be cautioned to avoid splashing water
or drinks on the ECU.
Available in Option Package(s):
þ 744-Basic þ 744-CR
þ AR
þ FM
þ ID
þ DX
n To clean the All-Bottle 744 or 1544 ECU:
1. Wipe the front of the ECU with a damp (not dripping) cloth
or sponge.
2. Wipe the activator ring and activator ring holder with a damp
(not dripping) cloth or sponge.
Note
q Do not attempt any more thorough cleaning of an ECU, and
absolutely do not attempt to clean any internal circuit boards
or surfaces.
All-Bottle 744 ECU
9-2 All-Bottle 744/1544 Installation/Service/User Manual
Clean the Coded Pourers
The All-Bottle coded pourers are carefully designed for liquor dispensing applications. They
impart no taste or odor to liquor and should only be cleaned with clear water. Each pourer should
be cleaned every time it is removed from a bottle. Berg provides a pourer washing fixture for this
purpose.
Available in Option Package(s):
Water faucet
þ 744-Basic þ 744-CR
þ AR
þ FM
þ ID
þ DX
n To clean an All-Bottle 744 or 1544 coded pourer:
1. Attach the smaller end of the pourer washing fixture (Berg
PN 9007191) to your faucet. Turn on a gentle flow of warm
water.
2. Insert a coded pourer into the pourer washing fixture with the
tip of the pourer pointed slightly away from you.
3. Snap the flange of the coded pourer into the washing fixture
and hold it there for a few seconds.
Pourer washing
fixture
Pourer
Two streams of water (one from the end of the breather tube
and the other from inside the plastic insert) flow from the
coded pourer when all passages are clear. Especially gummy
pourers may need to be held in the washing fixture a little
longer until both streams of water are running freely.
Notes
q Never clean your pourers in a dishwasher.
q Never use soap to clean a pourer. Unless removed completely,
Flange
Plastic
insert
Breather
tube
soap can get into your liquor. It can also react chemically
with the specially formulated plastics and make them brittle,
shortening the useful life of your pourers.
q If a pourer is removed from a bottle and allowed to dry
without being cleaned, soak it for several minutes in clear,
warm water to loosen the dried liquor before inserting the
pourer in the washing fixture. Repeat the soaking and rinsing
if necessary.
q Check the plastic insert of a pourer when cleaning. Liquor
drying on the plastic may remove some of the plastic's
elasticity. If the plastic insert remains stiff after cleaning,
replace it.
Maintenance and Upgrading 9-3
Replace the ECU Battery
If AC power to the ECU is constantly maintained, the lithium battery inside the ECU should
provide years of service. The symptoms of a dying battery may include loss of setup data or sales
records when the ECU is unplugged.
Available in Option Package(s):
þ 744-Basic þ 744-CR
þ AR
þ FM
þ ID
þ DX
n To replace the battery in a 744 or 1544 ECU:
1. Run a Z report on the system to save the latest sales
information. If you do not already have copies, run a
configuration report to save all the setup and calibration data,
a price/portion report and a PLU report.
2. Unplug the ECU and disconnect all cables to the back of the
ECU.
3. Loosen the two screws on each side of the ECU with a hex
wrench. Loosen the stand off nuts on the back of the ECU
with a nut driver. Open the bottom of the ECU.
4. Remove the old battery by inserting the tip of a small
screwdriver under it and gently prying it from its socket.
5. Insert the new battery into the battery socket, being sure to
align the positive “+” side of the battery with the positive “+”
side of the socket. When fully inserted, the battery will be
level with the ends of the socket.
6. Replace the bottom of the ECU by tightening the four screws
that secure it on the sides and the two stand off nuts on the
back.
7. Plug in the ECU.
8. Using the configuration, price/portion and PLU reports,
reenter the setup, calibration and portion size data for the
system.
9-4 All-Bottle 744/1544 Installation/Service/User Manual
Standoff nuts
ECU battery
Two screws on
each side of the
ECU
Warning:
Lithium is poisonous if swallowed. Be careful not to puncture the
battery case when removing an old battery or inserting a new one.
Lithium batteries are not rechargeable and should be properly
disposed of upon removal. Replace an old battery with Berg PN
8007776, a Duracell type DL1/3N, or an equivalent replacement
battery.
Caution:
Electronic components are sensitive to static electricity. If
possible, avoid working on the 744 or 1544 ECU while standing
on a carpeted surface. Before you open the ECU, discharge any
static electricity from your body by touching any known grounded
metal surface. Also discharge the static repeatedly in like manner
while working on the ECU.
Maintenance and Upgrading 9-5
Change the EPROM
If you upgrade your All-Bottle 744 or 1544 system, you need to replace the EPROM chip in the
ECU. Replacing the chip is not difficult–it just requires a certain amount of care to protect the
fragile pins on the sides of the chip.
Available in Option Package(s):
þ 744-Basic þ 744-CR
þ AR
þ FM
þ ID
þ DX
n To change the EPROM in a 744 or 1544 ECU:
1. Run a Z report on the system to save the latest sales
information. If you do not already have copies, run a
configuration report to save all the setup and calibration data,
a price/portion report and a PLU report. This is necessary
because changing EPROMs clears all setup and sales data in
the ECU.
2. Unplug the ECU and disconnect all cables to the back of the
ECU.
3. Loosen the two screws on each side of the ECU with a hex
wrench. Loosen the stand off nuts on the back of the ECU
with a nut driver. Open the bottom of the ECU.
4. Remove the old EPROM with the PROM remover tool (Berg
PN 8004798). Follow the instructions accompanying the tool.
Note the orientation of the chip.
5. Insert the new EPROM into the socket by aligning the angled
corner of the chip with the angled corner of the socket. (It
should match the orientation of the old chip.)
Be sure all EPROM pins are aligned with the socket. Take
care not to bend or damage any of the pins. Gently press
straight down on the EPROM until it locks into position.
6. Replace the bottom of the ECU by tightening the four screws
that secure it on the sides and the two stand off nuts on the
back.
7. Plug in the ECU.
8. Using the configuration, price/portion and PLU reports,
reenter the setup, calibration and portion size data for the
system.
Note
q If you have All-Bottle Manager, save a file with current
setup data before changing the EPROM. You can then use
this file to easily restore the data to the ECU.
9-6 All-Bottle 744/1544 Installation/Service/User Manual
Standoff nuts
EPROM
Two screws on
each side of the
ECU
Caution:
Electronic components are sensitive to static electricity. To
prevent damage, the All-Bottle 744 or 1544 option card and
EPROM are shipped in protective anti-static packaging. Before
removing these components from their protective packaging
discharge any static electricity from your body by touching any
known grounded metal surface. Also, if possible, avoid working
on the 744 or 1544 ECU while standing on a carpeted surface.
Similarly, before you open the ECU, discharge any static
electricity from your body by touching any known grounded
metal surface. Discharge the static repeatedly in like manner
while working on the ECU.
Maintenance and Upgrading 9-7
Install an Option Board
If you upgrade your All-Bottle 744 or 1544 system, you need to install an option board in the
ECU for option packages AR, FM, ID or DX. The option board provides the ports to connect a
printer, remote server access box and flow meters.
Available in Option Package(s):
o 744-Basic o 744-CR
þ AR
þ FM
þ ID
þ DX
n To install an option board in a 744 or 1544 ECU:
1. Run a Z report on the system to save the latest sales
information. If you do not already have copies, run a
configuration report to save all the setup and calibration data,
a price/portion report and a PLU report. This is necessary
because installing an option board clears all setup and sales
data in the ECU.
2. Unplug the ECU and disconnect all cables to the back of the
ECU.
3. Loosen the two screws on each side of the ECU with a hex
wrench. Loosen the stand off nuts on the back of the ECU
with a nut driver. Open the bottom of the ECU.
4. Locate the 34-pin header on the ECU system board.
5. Match the 34-pin connector on the bottom of the option board
with the 34-pin header on the system board. (Two standoff
screws protrude through two holes in the option board when
it is aligned correctly.)
6. Press down gently to lock the option board into position. The
ports attached to the option board should be facing the back
of the ECU.
7. Secure the option board. Use a washer and nut on each
standoff screw and tighten with a nut driver.
6. Replace the cover on the ECU. Tighten the two screws on
each side of the ECU with a hex wrench. Tighten the hold
down nuts that secure the option board to the back of the
ECU with a nut driver.
7. Plug in the ECU.
8. Using the configuration, price/portion and PLU reports,
reenter the setup, calibration and portion size data for the
system.
9-8 All-Bottle 744/1544 Installation/Service/User Manual
Standoff nuts
34-pin header
Two screws on
each side of the
ECU
Caution:
Electronic components are sensitive to static electricity. To
prevent damage, the All-Bottle 744 or 1544 option card and
EPROM are shipped in protective anti-static packaging. Before
removing these components from their protective packaging
discharge any static electricity from your body by touching any
known grounded metal surface. Also, if possible, avoid working
on the 744 or 1544 ECU while standing on a carpeted surface.
Similarly, before you open the ECU, discharge any static
electricity from your body by touching any known grounded
metal surface. Discharge the static repeatedly in like manner
while working on the ECU.
Maintenance and Upgrading 9-9
SECTION
10
All-Bottle Manager
Software
The All-Bottle Manager software is a convenient alternative to data entry at the
ECU. It does not offer any additional liquor control features; it simply provides a
computer format for entering portion, price and PLU data and for generating
reports. To use the software, be sure you've installed a connection from the ECU
to your computer. See Interface the ECU to a Serial Printer or Computer in the
Hardware Installation section. See the online help accompanying the software or
use this section for help with the following tasks:
Install the Software ........................................................................ 10-2
Communication Settings ................................................................ 10-4
Price and Volume Units ................................................................. 10-5
Select an ECU Type ...................................................................... 10-6
Transfer Data between the ECU and the Computer ...................... 10-8
Define Prices and Portion Sizes ................................................... 10-10
Define PLUs ................................................................................ 10-12
Set Flow Meter Counts and Price per Unit .................................. 10-14
Print Setup Data .......................................................................... 10-16
Key Assignment List ................................................................... 10-18
Generate Reports ......................................................................... 10-20
Perform a Loopback Test ............................................................ 10-22
Perform a Communication Test ................................................... 10-23
Check Option Package ................................................................ 10-24
Diagnostic Mode ......................................................................... 10-25
All-Bottle Manager Files ............................................................. 10-26
Install the Software
The All-Bottle Manager software comes with its own install program. Simply respond to its
prompts for an easy software installation.
Available in Option Package(s):
þ 744-Basic þ 744-CR
þ AR
þ FM
þ ID
þ DX
n To install the All-Bottle Manager software:
1. Launch Windows.
2. Insert the All-Bottle Manager disk into drive A.
3. Select File from the Program Manager menu bar
(Windows 3.1), or select Start (Windows 95).
4. Select Run from the menu.
5. Type a:\setup and press Enter.
6. When prompted, enter the dealer's name and phone number
for technical support and click Next. (The default technical
support is Berg Company.)
7. When prompted, click Next to accept the default destination
directory (C:\BergAB\) for the software. If you prefer a
different destination, enter a new directory.
8. When the installation is complete, double-click on the AllBottle Manager icon in the Berg All-Bottle program group
(Windows 3.1) or click on the All-Bottle Manager icon in
the Berg All-Bottle folder (Windows 95) to use the software.
Notes
q To communicate with the All-Bottle 744 or 1544 ECU, your
computer must be linked to the ECU using the converter
assembly that comes with the software. See Interface the 744
or 1544 to a Printer or Computer in the Hardware
Installation section.
q To communicate with more than one ECU, see Install a
Switch Box with a Serial Printer or Computer Interface in
the Hardware Installation section.
10-2 All-Bottle 744/1544 Installation/Service/User Manual
Enter the dealer's
name and phone
number for
technical support.
Menu bar
All-Bottle Manager Software 10-3
Communication Settings
The communication settings in your ECU and computer must match for data to be transferred.
Available in Option Package(s):
þ 744-Basic þ 744-CR
þ AR
þ FM
þ ID
þ DX
n To change communication settings:
1. Select Setup from the All-Bottle Manager menu bar.
2. Select Communications... from the Setup menu.
3. Select the COM port your computer uses to communicate
with the ECU.
4. Select the baud rate used for communication. This rate must
match the baud rate entered at the ECU.
5. Click OK to save your selections. The software stores your
selections, so you don't have to reset them each time you start
the program.
Note
q The default baud rate in the ECU is 19200. Generally
speaking, you should use the fastest rate at which you can
successfully communicate with the ECU.
Click OK to save
your choice and
return to the
main menu.
Click Cancel to return
to the main menu
without saving any
changes.
10-4 All-Bottle 744/1544 Installation/Service/User Manual
Click Help if
you have
questions.
Price and Volume Units
The price and volume unit settings in your ECU and computer must match for price and portion
setup data to be transferred. If the price and volume units do not match at the time you run a report
with the software, the data is sent in the format set at the ECU.
Available in Option Package(s):
þ 744-Basic þ 744-CR
þ AR
þ FM
þ ID
þ DX
n To change price and volume unit settings:
1. Select Setup from the All-Bottle Manager menu bar.
2. Select Price & Volume Units... from the Setup menu.
3. Select the price format used at the ECU to record sales.
4. Select the volume units used at the ECU to measure portions.
5. Click OK to save your selections. The software stores your
selections, so you don't have to reset them each time you start
the program.
Click OK to save
your choice and
return to the
main menu.
Click Cancel to return
to the main menu
without saving any
changes.
Click Help if
you have
questions.
All-Bottle Manager Software 10-5
Select an ECU Type
You must specify which type of ECU you have (744 or 1544) for the software to correctly access
and transfer data to the ECU.
Available in Option Package(s):
þ 744-Basic þ 744-CR
þ AR
þ FM
þ ID
þ DX
n To select an ECU type:
1. Select Setup from the All-Bottle Manager menu bar.
2. Select Select ECU type... from the Setup menu.
3. Select the ECU type.
4. Click OK to save your selection. The software stores your
selection, so you don't have to reset it each time you start the
program.
Click OK to save
your choice and
return to the
main menu.
Click Cancel to return
to the main menu
without saving any
changes.
10-6 All-Bottle 744/1544 Installation/Service/User Manual
Click Help if
you have
questions.
All-Bottle Manager Software 10-7
Transfer Data between the ECU and the Computer
An important part of entering portion, price and other data with All-Bottle Manager software is
getting that information from the computer into the ECU (and back to the computer again if you
want to edit your choices). Transferring data is easy, but it's important to understand which data
you're working with at all times.
Available in Option Package(s):
þ 744-Basic þ 744-CR
þ AR
þ FM
þ ID
þ DX
If you already have price/portion/PLU data entered at the
ECU and you want to edit the data at the computer, perform
these steps to transfer the data.
n To transfer data from the ECU to the computer:
1. Select Setup from the All-Bottle Manager menu bar.
2. Select Prices/Portions/PLUs... from the Setup menu.
The Price/Portion/PLU Setup screen is displayed with the
Prices & Portions tab selected.
3. Click Read ECU.
Data for all three tabs of the Setup screen (Prices &
Portions, PLUs, Flow Meters) is transferred from the ECU
to the computer at the same time.
4. Perform the necessary steps to enter or edit the correct data in
all three tabs (Prices & Portions, PLUs, Flow Meters). See
Define Portion Sizes and Prices, Define PLUs and Set Flow
Meter Counts and Price per Unit in this section.
Notes
q Communication settings, price format and volume units at the
ECU and computer must match. See Communication Settings
and Price and Volume Units in this section.
q You cannot perform other operations while the data is being
transferred.
q If you encounter difficulty communicating with the ECU, see
the Troubleshooting section.
10-8 All-Bottle 744/1544 Installation/Service/User Manual
If you are entering initial setup data at the computer and you
want to send it to the ECU or you've edited data from the
ECU and now you want to send it back, perform these steps
to transfer the data.
n To transfer data from the computer to the ECU:
1. Select Setup from the All-Bottle Manager menu bar.
2. Select Prices/Portions/PLUs... from the Setup menu.
The Price/Portion/PLU Setup screen is displayed with the
Prices & Portions tab selected.
3. Perform the necessary steps to enter or edit the correct data in
all three tabs (Prices & Portions, PLUs, Flow Meters). See
Define Portion Sizes and Prices, Define PLUs and Set Flow
Meter Counts and Price per Unit in this section.
4. When you have completed editing for all three tabs, click
Load ECU.
Data for all three tabs (Prices & Portions, PLUs, Flow
Meters) of the current Setup screen is transferred from the
computer to the ECU at the same time.
This transfer of data to the ECU overwrites any data
previously entered at the ECU or previously sent to the ECU
from the computer.
Lower portion of Price/Portion/PLU Screen
Transfers data for all
three tabs from the
ECU to the computer.
Transfers data for all
three tabs from the
computer to the ECU.
All-Bottle Manager Software 10-9
Define Portion Sizes and Prices
You can enter all portion sizes and prices using one form in the All-Bottle Manager software. You
can then save your entries to a file, print them out and/or download them to the All-Bottle 744 or
1544 ECU.
Available in Option Package(s):
þ 744-Basic þ 744-CR
þ AR
þ FM
þ ID
þ DX
n To define portion sizes and prices:
1. Select Setup from the All-Bottle Manager menu bar.
2. Select Prices/Portions/PLUs... from the Setup menu.
The Price/Portion/PLU Setup screen is displayed with the
Prices & Portions tab selected.
3. To enter portions and prices for the first time: proceed with
step 4.
To edit portions and prices from the ECU: see Transferring
Data between the ECU and Computer in this section. Then
proceed with step 4.
To edit a file you've previously saved at the computer: click
Open and enter the name of the file you want to edit. This
file contains data for all three tabs (Prices & Portions,
PLUs, Flow Meters) of the Setup screen. Proceed with step
4.
4. Select the correct row and column in the table using arrow
keys, the Tab key, the Enter key or a mouse.
5. Enter the correct portion sizes and/or prices. If your entry is a
whole number, you don't need to enter a decimal point.
6. When you've completed your entries, enter or edit the correct
data (if any) in the other tabs (PLUs, Flow Meters). See
Define PLUs and Set Flow Meter Counts and Price per Unit
in this section.
7. To save your entries in the computer file you've opened: click
Save. Data in all three tabs is saved at the same time.
To save your entries in a new computer file: click Save As...,
enter the name you want to give the file and click OK. Data in
all three tabs is saved at the same time.
8. To download prices and portions to the ECU: see Transfer
Data between the ECU and Computer in this section.
9. To print the price and portion entries you've made: see Print
Setup Data in this section.
10-10 All-Bottle 744/1544 Installation/Service/User Manual
The four price levels and seven or
fifteen price codes are denoted
by A1-7 (or 1-15), B1-7 (or 1-15),
C1-7 (or 1-15), etc.
Click Close
to return to
the main menu.
The Prices & Portions tab
Use the arrow keys, the Tab
key, the Enter key or a mouse
to move between rows and
columns.
If your entry is a whole number,
you don't need to enter a
decimal point. If you make a
mistake, use the Delete key to
erase any amount currently
highlighted.
If you have All-Bottle 744
Basic or CR, just enter portion
sizes.
Click Open to view a previously
saved file. The file contains
data for all three tabs.
Click Save to replace
previous data in the file with
the new data. If you have
PLU or flow meter data in
the file it will also be saved.
Click Save As... to
save the file under
a new name.
Click Print Prices &
Portions for a report
listing all prices and
portions.
Click Help if
you have
questions.
Click Read or Load the ECU
to transfer data for all three setup
tables (portion/price, PLU, flow
meter) at the same time. Price
format and volume units at the
ECU and computer must match. You
cannot perform other operations
while the data is being transferred.
All-Bottle Manager Software 10-11
Define PLUs
You can quickly enter PLUs (for the All-Bottle 744 or 1544 ECU to communicate with a cash
register) using the All-Bottle Manager software.
Available in Option Package(s):
o 744-Basic þ 744-CR
þ AR
þ FM
þ ID
þ DX
n To define PLUs:
1. Select Setup from the All-Bottle Manager menu bar.
2. Select Prices/Portions/PLUs... from the Setup menu.
The Price/Portion/PLU Setup screen is displayed with the
Prices & Portions tab selected.
3. Select the PLUs tab.
4. To enter PLUs for the first time: proceed with step 5.
To edit PLUs from the ECU: see Transfer Data between the
ECU and Computer in this section. If you already transferred
the data proceed with step 5.
To edit a file you've previously saved at the computer: click
Open and enter the name of the file you want to edit. This
file contains data for all three tabs (Prices & Portions,
PLUs, Flow Meters) of the Setup screen. If you already
opened a file, proceed with step 5.
5. Select the correct row and column in the table using arrow
keys, the Tab key, the Enter key or a mouse.
6. Enter the PLUs.
7. When you've completed your entries, enter or edit the correct
data (if any) in the other tabs (Prices & Portions, Flow
Meters). See Define Portion Sizes and Prices and Set Flow
Meter Counts and Price per Unit in this section.
8. To save your entries in the computer file you've opened: click
Save. Data is saved for all three tabs.
To save your entries in a new computer file: click Save As...,
enter the name you want to give the file and click OK. Data is
saved for all three tabs.
9. To download PLUs to the ECU: see Transfer Data between
the ECU and Computer in this section.
10. To print the PLU entries you've made: see Print Setup Data
in this section.
10-12 All-Bottle 744/1544 Installation/Service/User Manual
The four price levels and seven or
fifteen price codes are denoted
by A1-7 (or 1-15), B1-7 (or 1-15),
C1-7 (or 1-15), etc.
The PLUs tab
Click Close
to return to
the main menu.
Use the arrow keys, the Tab
key, the Enter key or a
mouse to move between rows
and columns. You can enter
PLUs up to four digits long.
If you make a mistake, use
the Delete key to erase any
amount currently highlighted.
Click Open to view a previously
saved file. The file contains
data for all three tabs.
Click Save to replace previous
data in the file with the new
data. If you have PLU or flow
meter data in the file it will
also be saved.
Click Save As...
to save the file
under a new
name.
Click Help if you
have questions.
Click Print PLUs for a
report listing PLU setup
data.
Click Read or Load the ECU
to transfer data for all three setup
tables (portion/price, PLU, flow
meter) at the same time. Price
format and volume units at the ECU
and computer must match. You
cannot perform other operations
while the data is being transferred.
All-Bottle Manager Software 10-13
Set Flow Meter Counts and Price per Unit
If you have flow meters, the All-Bottle Manager software provides one table for entering all flow
meter data.
Available in Option Package(s):
o 744-Basic o 744-CR
o AR
þ FM
o ID
þ DX
n To set flow meter counts and price per unit:
1. Select Setup from the All-Bottle Manager menu bar.
2. Select Prices/Portions/PLUs... from the Setup menu.
The Price/Portion/PLU Setup screen is displayed with the
Prices & Portions tab selected.
3. Select the Flow Meters tab.
4. To enter data for the first time: proceed with step 5.
To edit flow meter data from the ECU: see Transferring Data
between the ECU and Computer in this section. If you
already transferred the data proceed with step 5.
To edit a file you've previously saved at the computer: click
Open and enter the name of the file you want to edit. This
file contains data for all three tabs (Prices & Portions,
PLUs, Flow Meters) of the Setup screen. If you already
opened a file, proceed with step 5.
5. Select the correct row and column in the table using arrow
keys, the Tab key, the Enter key or a mouse.
6. Enter the correct flow meter data.
7. When you've completed your entries, enter or edit the correct
data (if any) in the other tabs (Prices & Portions, PLUs).
See Define Portion Sizes and Prices and Define PLUs in this
section.
8. To save your entries in the computer file you've opened: click
Save. Data is saved for all three tabs.
To save your entries in a new computer file: click Save As...,
enter the name you want to give the file and click OK. Data is
saved for all three tabs.
9. To download flow meter data to the ECU: see Transfer Data
between the ECU and Computer in this section.
10. To print the flow meter entries you've made: see Print Setup
Data in this section.
10-14 All-Bottle 744/1544 Installation/Service/User Manual
The four price levels are
denoted by A, B, C, D.
Click Close
to return to
the main
menu.
The Flow Meters tab
Use the arrow keys, the Tab
key, the Enter key or a
mouse to move between rows
and columns. If you make a
mistake, use the Delete key
to erase any amount
currently highlighted.
Click Open to view a
previously saved file. The
file contains data for all
three tabs.
Click Save to replace
previous data in the file with
the new data. If you have
PLU or flow meter data in
the file it will also be saved.
Click Save As... to
save the file under
a new name.
Click Print Prices &
Portions for a
report listing flow
meter setup data.
Click Help if
you have
questions.
Click Read or Load the ECU
to transfer data for all three setup
tables (portion/price, PLU, flow
meter) at the same time. Price
format and volume units at the ECU
and computer must match. You
cannot perform other operations
while the data is being transferred.
All-Bottle Manager Software 10-15
Print Setup Data
You can print a copy of portion size, price, PLU and flow meter data entered at the computer.
Available in Option Package(s):
þ 744-Basic þ 744-CR
þ AR
þ FM
þ ID
þ DX
n To print setup data:
1. Select Setup from the All-Bottle Manager menu bar.
2. Select Prices/Portions/PLUs... from the Setup menu.
The Price/Portion/PLU Setup screen is displayed with the
Prices & Portions tab selected.
3. Perform the necessary steps to enter or edit the correct data in
any of the three tabs (Prices & Portions, PLUs, Flow
Meters). See Define Portion Sizes and Prices, Define PLUs
and Set Flow Meter Counts and Price per Unit in this
section.
4. To print price, portion and flow meter data: Click
Print Prices & Portions.
To print PLU data: Click Print PLUs.
The Price and Portion Report or the PLU Report appears in a
Notepad window. You can now treat the report as you would
any other computer file (save, print, delete, etc.).
5. Select File from the menu bar.
6. To print the report: select Print from the File menu.
7. To save a new report: select Save As... from the File menu,
enter the name of the file and click OK.
8. To exit the Notepad window and return to the Price/
Portion/PLU Setup screen: select Exit from the File menu.
Notes
q The setup data printed from the Notepad window shows the
current entries in the Price/Portion/PLU Setup screen. It
does not reflect the current entries in the ECU unless
you just performed a Read ECU or Load ECU and made
no further changes to the Setup screen.
q The setup data reports are distinguished from other
sales or ECU reports by the words "Current Settings"
rather than "Station" at the top of the report.
10-16 All-Bottle 744/1544 Installation/Service/User Manual
The Notepad
window
Select Save
As... to save
the report to
a new file.
Select Print
to send the
report to a
printer.
Select Exit to
return to the
Setup screen.
All-Bottle Manager Software 10-17
Key Assignment List
The key assignment list in the All-Bottle Manager software is identical to the one at the ECU.
Space is provided to list up to fifteen servers giving them active status at the ECU with a proper
access key.
Available in Option Package(s):
o 744-Basic o 744-CR
o AR
o FM
þ ID
þ DX
n To access the key assignment list:
1. Select Setup from the All-Bottle Manager menu bar.
2. Select Server IDs... from the Setup menu.
n To edit the key assignment list from the ECU:
1. Click Read ECU.
n To open a previously saved file:
1. Click Open.
2. Enter the name of the file you want to edit. Click OK.
n To enter or change server names:
1. Select the correct row in the table.
2. Enter the server name.
n To save your entries to a file you've opened:
1. Click Save.
n To save your entries in a new file:
1. Click Save As....
2. Enter the name you want to give your file. Click OK.
n To download the key assignment list to the ECU:
1. Click Load ECU.
n To print the key assignment list:
1. Click Report.
2. View the Server ID report in a Notepad window.
3. Select File from the menu bar.
4. Select Print from the File menu.
10-18 All-Bottle 744/1544 Installation/Service/User Manual
The name in the list must
exactly match the name
assigned to the server key.
Use the arrow keys,
the Tab key, the
Enter key or a
mouse to move
between rows.
If you make a mistake, use
the Delete key to erase any
name currently highlighted.
Click Open to view a
previously saved file.
Click Close
to return to the
main menu.
Click Save to replace previous
data in the file with the new
data.
Click Save As... to save the file
under a new name.
Click Report to print
the list of servers
Click Help if you have
questions.
Click Read or Load the ECU
to transfer data to or from the
ECU. Be sure you've enabled the
communication option at the ECU.
You cannot perform other
operations while the data is being
transferred.
All-Bottle Manager Software 10-19
Generate Reports
Any reports that can be generated from your All-Bottle 744 or 1544 ECU can be generated with
the All-Bottle Manager software. For detailed information on each report see the Reports section.
Available in Option Package(s):
o 744-Basic o 744-CR
þ AR
þ FM
þ ID
þ DX
n To generate reports:
1. Be sure you've enabled the communication option at the ECU.
2. Select Reports... from the All-Bottle Manager menu bar.
3. Highlight the report you want to run from the Reports list.
4. Click OK, or double-click the mouse on the desired report.
5. View the report in a Notepad window.
n To print the report:
1. Select File from the menu bar.
2. Select Print from the File menu.
n To save the report in a new file:
1. Select File from the menu bar.
2. Click Save As....
3. Enter the name you want to give your file.
4. Click OK.
Notes
q If you request a report that is not valid for your option
package, the software displays an error message and you
cannot access the report. Option packages 744-Basic and CR
cannot access any reports with the software.
q If you have option package ID or DX and you run a
Summary Z by Server or Summary X by Server report, you
will see a form listing the current active servers when you
request the report. To run the report, double-click on the
desired server or highlight the server's name and click OK.
10-20 All-Bottle 744/1544 Installation/Service/User Manual
You can only generate
reports with this form if
you have option package
AR, FM, ID or DX.
You can only generate
these reports if you have
option package ID or DX.
Click OK to generate the
highlighted report.
Use the arrow keys, the
Tab key or a mouse to
highlight a report. Use
the Enter key or doubleclick a mouse to run a
highlighted report.
Click Close to return to
the main menu.
Click Help if you have
questions.
The Notepad
window
Click Save As... to
save the report
to a new file.
Click Print to
send the report
to a printer.
Click Exit to
return to the
Reports screen.
All-Bottle Manager Software 10-21
Perform a Loopback Test
The All-Bottle Manager software provides diagnostic tests to verify communication between the
ECU and your computer. The loopback test verifies you have a working, accessible COM port on
your computer. You must have a loopback tester to connect to the port to perform this test.
Available in Option Package(s):
þ 744-Basic þ 744-CR
þ AR
þ FM
þ ID
þ DX
n To perform a loopback test:
1. Attach the loopback tester to the COM port you want to test.
You can connect the tester at various points in the connection
(before or after the converter or cable) to verify a good
connection with the equipment.
2. Select Diagnostics from the All-Bottle Manager menu bar.
3. Select Loopback Test... from the Diagnostics menu.
4. Click Run to begin testing.
5. Click Stop to end the test.
6. Click Close to return to the main menu.
The number of tests run
should increase quickly.
You'll most likely see
100% failures or none
at all.
Click Run to begin
the test.
Click Stop to
stop the test.
10-22 All-Bottle 744/1544 Installation/Service/User Manual
Click Help if you
have questions.
Click Close to
return to the
main menu.
Perform a Communication Test
The communication test verifies the communication link between the ECU and your computer. It is
very useful when you're troubleshooting a communication problem.
Available in Option Package(s):
þ 744-Basic þ 744-CR
þ AR
þ FM
þ ID
þ DX
n To perform a communication test:
1. Make sure the communication settings are correct at the ECU
and the computer.
2. Make sure the communications option is enabled at the ECU.
3. Select Diagnostics from the All-Bottle Manager menu bar.
4. Select Communication Test... from the Diagnostics menu.
5. Click Run to begin testing.
6. Click Stop to end the test.
7. Click Close to return to the main menu.
The number of tests run
should increase quickly.
You'll most likely see
100% failures or none
at all.
Click Run to begin
the test.
Click Stop to
stop the test.
Click Help if you
have questions.
Click Close to
return to the
main menu.
All-Bottle Manager Software 10-23
Check Option Package
If you are unsure which All-Bottle 744 or 1544 option package is installed on your ECU, you can
run this check with the All-Bottle Manager software to verify your package.
Available in Option Package(s):
þ 744-Basic þ 744-CR
þ AR
þ FM
þ ID
þ DX
n To check your option package:
1. Make sure the communication settings are correct at the ECU
and the computer.
2. Make sure the communications option is enabled at the ECU.
3. Select Diagnostics from the All-Bottle Manager menu bar.
4. Select Check Option Package from the Diagnostics menu.
Click OK to return
to the main menu.
10-24 All-Bottle 744/1544 Installation/Service/User Manual
Diagnostic Mode
Diagnostic mode is an option of the All-Bottle Manager software that provides detailed
information whenever errors occur. Berg Company service technicians may ask you to enable it if
they are diagnosing a problem. Otherwise, you should leave this option disabled. By default, it is
always disabled at program startup.
Available in Option Package(s):
þ 744-Basic þ 744-CR
þ AR
þ FM
þ ID
þ DX
n To enable or disable diagnostic mode:
1. Select Diagnostics from the All-Bottle Manager menu bar.
2. Select Diagnostic Mode from the Diagnostics menu.
3. Click in the Diagnostic Mode on box.
An x in the box enables diagnostic mode.
4. Click OK to return to the main menu.
Click OK to save
your choice and
return to the
main menu.
Click Cancel to return
to the main menu
without saving any
changes.
Click Help if
you have
questions.
All-Bottle Manager Software 10-25
All-Bottle Manager Files
This is a list of some of the files used by the All-Bottle Manager Setup program. For information
about deleting the All-Bottle Manager software from your system, see Windows 3.1 online help
for uninstalling programs.
Available in Option Package(s):
þ 744-Basic þ 744-CR
þ AR
þ FM
þ ID
þ DX
n Files installed in the program directory:
These are the main program and help files.
ABMGR.EXE
BRGABC10.DLL
ABMGR.HLP
n Files created by the software:
These files are not installed by the Setup program, but are
created as needed by the All-Bottle Manager software and
saved (by default) in the program directory, except for
BERG.INI.
BERG.INI
This file is used to keep track of your session settings so you
don't need to reset them every time you use the program. The
settings saved are COM Port, Baud Rate, ECU Type, Price
Format and Volume Units. This file is also used by other Berg
software products that may be installed on your computer,
and is stored in the WINDOWS directory.
*.PPN
Price/Portion/PLU file(s). See Define Portion Sizes and
Prices in this section for more details about these files.
*.SRV
Server ID key assignment list file(s). See Key Assignment
List in this section for more details about these files.
DEBUG.INF
Created or updated when running in Diagnostic Mode. This
file contains detailed output which may help a Berg service
representative diagnose a problem with the software. You can
safely delete this file at any time.
10-26 All-Bottle 744/1544 Installation/Service/User Manual
SECTION
11
All-Bottle 744/1544
Specifications
All-Bottle 744/1544 Specifications
Basic System
Electronic Control Unit size :
Dispenser type:
Number of brands:
Number of price codes:
Portion size:
Number of portion sizes:
Number of price levels:
Calibration:
Display type:
3.75 in (95.3 mm) H
10.25 in (260.4 mm) W
5.25 in (133.4 mm) D
Patented bottle pourers and activator ring
Unlimited
Seven for 744, Fifteen for 1544
1/8 to 10 ounces (3.7 to 295.7 ml)
Four (presetable)/code/price level
Four – with unique portion per level
By portion
LCD 2x20
(shows portions dispensed/code and price level)
Options
Interface capabilities:
Advanced reporting:
Server ID:
Remote Server Access Box:
Flow meter input:
Computer
Minimum system requirements:
386 DX IBM compatible PC
Windows 3.1
4 MB RAM
VGA monitor
3 MB available hard drive space
Electronic Cash Register (ECR)
Printer output – Centronics or RS-485 ports
Reports formatted for an 80-column printer
Access keys (Manager & up to 15 Server keys)
Additional access for Server keys
2.5 in (64 mm) H
5.0 in (127 mm) W
4.5 in (115 mm) D
Monitor up to three Berg pulse-output flow meters
1 required per beer, wine, soda or juice line
Uses 29/32 in (23 mm) nuts & tailpieces
1.2 in (30 mm) H
1.0 in (25 mm) W
2.4 in (61 mm) L
11-2 All-Bottle 744/1544 Installation/Service/User Manual
Technical
Electrical Requirements:
Protective Earthing Requirements:
Environmental Conditions:
Fuses used in product:
100-240 VAC, 50-60 Hz
0.7A, 5 VA
Installation category II
Pollution Degree 2
Mains supply voltage fluctuations shall not exceed
10 percent of the nominal supply voltage.
The system must be connected to a properly grounded
mains supply with an IEC approved three pronged
power cord.
Maximum relative humidity 50-80 R.H.
Operating temperature range 5°-40° C (41°-104° F).
Maximum altitude 2,000 m (6,562 ft).
Berg PN 8007422
For North American installations (1/4 x 1, CSA
certified)
Littlefuse 313000
Bussman MDL-3
For European installations (5 x 20 mm, designed to
IEC 127)
Littlefuse 2183.15
Bussman GDL-3.15A
All-Bottle 744/1544 Specifications 11-3
SECTION
12
Troubleshooting
The 744 or 1544 ECU will not power up when plugged in
n
Is the power supply plugged into the J4B (external solenoid)
port instead of the J5A port on the back of the ECU?
n
Is the power supply plugged securely into the J5A port?
The 744 or 1544 does not dispense All-Bottle portions at all
n
Have all the portion sizes been set to 0? (This can happen
with the Clear Prices option in the Manager Menu.)
n
Has the Disable Unit option been set to Y?
Option package ID or DX does not dispense when a Server key is inserted
n
Is there another valid Server key in the other key slot? If so,
the display reads “Both Keys” and pouring is disabled. (The
ECU doesn’t know to which key to assign the pour.)
n
Does the name on the Server key exactly match a name in
the Key Assignment list? The names are case sensitive.
The All-Bottle portions are inaccurate when you pour
n
Are the correct portion sizes defined?
n
Are the correct volume units defined?
n
The All-Bottle calibration values may need to be adjusted.
n
The coded pourers may need to be cleaned.
You can’t access the Dealer Menu at the ECU
n
Are you using a valid Dealer key?
You can’t access the Manager Menu at the ECU
n
Are you using a valid Dealer or Manager key?
The Manager Menu doesn’t work below the Communications option
n
Comm Option Active is set to Y (used to communicate with
a computer). Set to N to access the rest of the Manager
Menu.
Printed reports are double-spaced where they should be single-spaced
n
Reconfigure the printer to suppress linefeeds, or set
Linefeeds to Printer (in the Manager Menu) to N.
12-2 All-Bottle 744/1544 Installation/Service/User Manual
You can’t clear cumulative sales, even with the password
n
Did you enter the password exactly as it is defined? The
password is case sensitive.
You are using an A/B switchbox with multiple ECUs and an active ECU reports all
zeros on a Z report
n
Did you just run a Z report for one ECU and forget to
change the switchbox to another ECU?
You can’t access the Server Menu at the ECU
n
Are you using a valid Dealer, Manager or Server key?
n
Is the name on the key listed in the Key Assignment list?
The names are case sensitive.
n
Is the Server Menu Active option (in the Manager Menu)
set to N? Set it to Y.
n
Is the Communications option (in the Manager Menu) set to
Y? Set it to N.
The flow meters are not generating any sales data at the ECU
n
Check the wiring connection between each flow meter and
the ECU.
The reported flow meter volumes are inaccurate
n
The flow meter count values need to be adjusted.
The 744 or 1544 ECU will not communicate with the All-Bottle Manager software
n
Is the ECU powered up?
n
Are all cable connections between the ECU and computer
secure?
n
Do the serial port settings at the computer and the ECU
match? They must show the same baud rates, word length,
parity and number of stop bits.
n
Has the Communication option (in the Manager Menu) been
set to Y?
n
Use a loopback tester to pinpoint the breakdown in
communication.
n
Perform a communication test with the software. You can
make adjustments while the test is running to see what
solves the problem.
Troubleshooting 12-3
You print Prices/Portions or PLUs from the Manager’s Price/Portion/PLU Setup
screen and the numbers don’t accurately reflect what is in the ECU
n
These two print options only print what is currently in the
Setup screen’s tables, not what is in the ECU. Select Read
ECU before printing (or just run the Price/Portion report or
the PLU report from the Reports...menu of the software).
You get a Version Verify dialog box when running the Manager software
n
You’ll see this when a file needed by the software has been
deleted, moved or overwritten by an earlier version that may
not work. Click on the filename(s) to see the version the
software needs (Reference File) and the one it found on your
system, if any (Actual File). Reinstalling the All-Bottle
Manager software from the installation disk will usually fix
this problem.
12-4 All-Bottle 744/1544 Installation/Service/User Manual
SECTION
13
Bar Management Tips
The suggestions in this section can help you manage your bar using the All-Bottle
744 or 1544 system. They’re proven tips to help you establish a uniform pricing
structure that is consistent, manageable and easily trackable in the event of theft
or breakage.
Coded Pourer Assignment ............................................................. 13-2
Portioning Guidelines .................................................................... 13-8
Pricing Guidelines ....................................................................... 13-10
Coded Pourer Assignment
Categorizing your liquor helps you determine the number of coded pourers needed.
Available in Option Package(s):
Coded Pourers
þ 744-Basic þ 744-CR
þ AR
þ FM
þ ID
þ DX
The price codes on the All-Bottle coded pourers are determined
by the placement of the metal coding bands on the pourers.
13-2 All-Bottle 744/1544 Installation/Service/User Manual
Categories of Liquor
One example of organizing your liquor by price codes is the
following:
Code 1 Well Liquor
Code 2 Call Liquor
Code 3 Premium Liquor
Code 4 Domestic Cordials
Code 5 Premium Cordials
Code 6 Sherry
Code 7 Cognac
Use the All-Bottle 744/1544 Pourer Worksheet to categorize
every type or brand of liquor used at the bar. Make additional
copies of the list if necessary.
Free Poured Brands
Some brands will continue to be free-poured and should not be
entered on the list. They include Bailey’s Irish Cream (and
substitutes), Triple Sec, Galliano, Sweet Vermouth, Dry
Vermouth, Creme de Cassis and Creme de Noya.
These items, with the exception of Bailey’s (which will not work
well on the system), are used like orange juice in a Screwdriver.
They are mixers and have no retail value. However, if your
customers frequently order any of these brands on the rocks or
up, you should plan to lock them up with the appropriate pourers
and enter them on the list.
Number of Pourers Needed
When you’ve listed each brand, use the All-Bottle 744/1544
Pourer Worksheet to determine the quantity of each pourer
needed. List the number of bottles of each brand used in the racks
and reserve cabinets (par stock).
Include enough pourers to avoid having the bar restocked in midshift. Typically, you should have enough liquor locked up with
coded pourers for twenty-four hours of operation.
For example, if there are three speed racks with one bottle of bar
vodka in each plus eight bottles in the par stock for backup, the
quantity of pourers needed for bar vodka would be eleven.
Bar Management Tips 13-3
All-Bottle 744/1544
Pourer Worksheet
1
2
3
4
13-4 All-Bottle 744/1544 Installation/Service/User Manual
All-Bottle 744/1544
Pourer Worksheet
5
6
7
8
Bar Management Tips 13-5
All-Bottle 744/1544
Pourer Worksheet
9
10
11
12
13-6 All-Bottle 744/1544 Installation/Service/User Manual
All-Bottle 744/1544
Pourer Worksheet
13
14
15
Bar Management Tips 13-7
Portioning Guidelines
Once you've categorized your liquor, you can determine which portion sizes are most appropriate
for each category.
Available in Option Package(s):
Small Portions of Liquor
þ 744-Basic þ 744-CR
þ AR
þ FM
þ ID
þ DX
Program the small portion sizes with the amount you’ll use in
mixed drinks.
For instance, if you sell an Ice Tea for $3.00, you’re charging
1.00 each for a small portion (1/2 shot) of Gin, Vodka and Rum.
A four liquor drink (Long Island Ice Tea) would therefore be
priced at $4.00 (1.00 x 4).
If a customer ordered a “call” Long Island Ice Tea using
Beefeater, Smirnoff, Cuervo and Bacardi (call brands), the price
would be $5.00 (1.25 for a small portion of a call brand x 4). The
Triple Sec is normally free poured (like Vermouth) as it has no
retail value.
Regular and Large
Portions of Liquor
Your glassware plays an important role in defining regular or
large portion sizes. This is particularly true with rock drinks. The
overriding factor in choosing between a regular or large portion
size is how each portion looks in the glass.
For example, a 4 ounce Martini glass is typically served with
1 3/4 to 2 ounces of gin. An 8 ounce glass would need
approximately 4 ounces of gin. Vermouth is free poured, so the
difference between a regular Martini and an extra, extra, extra
dry Martini is the amount of Vermouth poured, not more gin. The
price of all well brand Martinis, whether they are regular, dry, up
or on the rocks is the same. If your glassware necessitates your
not pouring rock drinks with the regular portion, pour the large
portion and charge the same price. Alternately, change your
glassware so the regular size shot looks good.
13-8 All-Bottle 744/1544 Installation/Service/User Manual
Small Portions of Cordial
Program this portion size with the amount used for two liquor
drinks.
For example, the recipe for a Black Russian calls for a small
portion of Kahlua and a regular portion of vodka. If your Black
Russian selling price is $3.25 and you charge $2.00 for the
vodka, you are then charging $1.25 for a small portion of Kahlua.
Using these prices, all two liquor drinks using well liquor and
premium cordials are $3.25. If a Smirnoff Black Russian is
ordered, the price is $3.50 ($2.25 for a regular call vodka + 1.25
for a small premium cordial). A Black Russian made with
Absolut is $3.75 ($2.50 for a regular premium vodka and 1.25
for a small premium cordial).
Regular Portions of Cordial
Use this portion size for up cordials as well as on the rocks drinks
if your rock glass accommodates the amount. We strongly
recommend a brandy snifter for up cordials. The presentation is
elegant and you don't have to purchase as many types of
glassware.
Large Portions of Cordial
Use this portion size for rock or cream drinks if your glassware
makes it necessary. Of course, you should charge a higher price
for the large portion. Typically, if you need to define a large
portion for liquor on the rocks, you also need to define a large
portion for a cordial on the rocks.
Bar Management Tips 13-9
Pricing Guidelines
With your liquor categorized and portion sizes defined, it's easier to see your overall price structure
and define the appropriate price for each portion.
Available in Option Package(s):
Defining Prices
o 744-Basic o 744-CR
þ AR
þ FM
þ ID
þ DX
The All-Bottle 744 or 1544 uses the concept of building your
drink prices based on the ingredients used. The more expensive
the liquor, the higher the price that is charged. This practice is
usually standard with highballs, but it will now hold true on all
multi-liquor drinks as well.
Example: The following prices are programmed into the ECU:
Bar Vodka
Regular portion $2.00
Call Vodka (Smirnoff)
Regular portion 2.25
Premium Vodka (Absolut)
Regular portion 2.50
Kahlua (premium cordial)
Small portion
1.25
If a customer orders a Black Russian, the price would be built as
follows:
Using Price Levels
Bar Vodka Black Russian
2.00 + 1.25 = 3.25
Call Vodka Black Russian
2.25 + 1.25 = 3.50
Premium Vodka Black Russian
2.50 + 1.25 = 3.75
One example of four price levels used with the All-Bottle 744 or
1544 is the following :
Happy Hour
price level A
Regular
price level B
Entertainment
price level C
Special and/or Promotion
price level D
In addition to changing the price of a drink for each price level,
you can also change the portion size. For instance, you can
reduce the size of a regular portion of well liquor from 1 1/8
ounce to 1 ounce during Happy Hour.
Some owners of the All-Bottle 744 or 1544 that do not use price
levels use this feature for shift pricing–morning shift (price level
A), afternoon shift (price level B) and so on.
13-10 All-Bottle 744/1544 Installation/Service/User Manual
Index
A
Access key
how to make a manager 4-4
how to make a server 4-5
how to pour with server 7-4, 7-6
how to read 4-2
how to read a remote server 4-3
key assignment list 4-6
key assignment list at the computer 10-18
Activator ring
description of 1-4
how to use 7-2, 7-3, 7-4
Activator ring holder 2-2
Advanced Reporting option package
description of 1-2
how to install a parallel printer interface 2-8
how to install a serial printer or PC interface 2-10
site assessment for 1-7
All Server Summary Reports 8-18
All-Bottle 744/1544Pourer Worksheet 13-4
AR. See Advanced Reporting option package
Arrow keys 1-11
B
Basic option package
description of 1-2
site assessment for 1-7
Battery based power supply 2-2
Baud rate
how to set at the computer 10-4
how to set at the ECU 3-14
C
Calibrate coded pourers 6-2
Change price levels 7-2
Change the EPROM 9-6
Check option package 10-24
Clean the coded pourers 9-3
Clean the ECU 9-2
Clear all prices, portions and PLUs 6-12
Clear All-Bottle prices, portions and PLUs 6-10
Clear cumulative sales 8-24
Clear flow meter prices 6-11
Coded Pourer Worksheet 13-4
Coded pourers
description of 1-4
how to assign to liquor 13-2
how to calibrate 6-2
how to clean 9-3
how to install 2-4
Communication settings at the computer 10-4
Communication test 10-23
Computer communication
how to change settings at the computer 10-4
how to enable at the ECU 5-3
Computer interface 2-10
Configuration report 8-12
Country setup 3-2
CR. See Electronic Cash Register option package
Cumulative sales
how to clear 8-24
how to define a password for 3-10
D
Date format 3-7
Dealer Menu
how to navigate 1-11
list of options 1-12
Decimal character 3-5
Default messages option 3-12
Define flow meter price per unit 6-7
Define PLUs
at the computer 10-12
at the ECU 6-6
Define portion sizes
at the computer 10-10
at the ECU 6-4
tips on 13-8
Define prices
at the computer 10-10
at the ECU 6-5
tips on 13-10
Deluxe option package
description of 1-2
how to install a remote server access box 2-14
how to install flow meters 2-12
how to interface to a parallel printer 2-8
how to interface to a serial printer or computer 2-10
how to interface to an ECR 2-6
site assessment for 1-7
Detailed reports 8-4
Diagnostic messages option 3-11
Diagnostic mode 10-25
Disable unit 5-2
DX. See Deluxe option package
E
ECR (Electronic Cash Register) interface 2-6
ECU (Electronic Control Unit)
description of 1-4
Index-2 All-Bottle 744/1544 Installation/Service/User Manual
how to clean 9-2
how to install 2-2
specifications 11-2
ECU battery 9-4
ECU display window 1-11
ECU menus
how to access 1-8
how to navigate 1-11
Electronic Cash Register option package
description of 1-2
how to install an ECR interface 2-6
site assessment for 1-7
Enable computer communication 5-3
Enable OFF signal 3-17
Enable price level change 5-4
EPROM, how to change 9-6
External solenoid output 2-16
Install a serial printer or computer interface 2-10
Install an ECR interface 2-6
Install an external solenoid output 2-16
Install an option board 9-8
Install flow meters 2-12
Install the coded pourers 2-4
Install the ECU 2-2
Install the software 10-2
Installation game plan 1-6
K
Key assignment list
how to define at the computer 10-18
how to define at the ECU 4-6
L
F
Flow meter
how to clear prices 6-11
how to control with server ID 2-16
how to define price per unit at the ECU 6-7
how to install 2-12
how to set counts and prices at the computer 10-14
how to set counts at the ECU 6-8
how to use with server ID 7-6
specifications 11-2
Flow Meter option package
description of 1-2
how to install flow meters 2-12
site assessment for 1-7
FM. See Flow Meter option package
Last Z report 8-6
Linefeeds to printer option 3-16
Loopback test 10-22
M
Make a manager key 4-4
Make a server key 4-5
Manager Menu
how to access 1-9
how to navigate 1-11
list of options 1-13
Manager software, how to install 10-2
Managing liquor inventory 13-2
N
G
Numbered seals. See Security seals
Gather customer setup information 1-7
O
H
Hourly sales report 8-8
I
ID. See Server ID option package
Individual server summary reports
how to generate with the Manager Menu 8-20
how to generate with the Server Menu 8-22
Install a parallel printer interface 2-8
Install a remote server access box 2-14
Option board, how to install 9-8
Option packages
AR. See Advanced Reporting option package
Basic. See Basic option package
CR. See Electronic Cash Register option package
description of 1-2
DX. See Deluxe option package
FM. See Flow Meter option package
how to check at the computer 10-24
ID. See Server ID option package
site assessment for 1-7
Index-3
P
Plastic insert
how to change 2-4
how to clean 9-3
PLU report 8-16, 10-16
PLUs
how to clear 6-10
how to define at the computer 10-12
how to define at the ECU 6-6
how to generate report 8-16
Portion change lockout 6-13
Portion sizes
how to clear 6-10
how to define at the computer 10-10
how to define at the ECU 6-4
how to generate a report 8-14
how to lockout changes 6-13
how to reset to regular after pour 5-5
tips on how to assign 13-8
Pour a drink 7-2
Pour with flow meters and server ID 7-6
Pour with server ID 7-4
Pourer inserts. See Plastic insert
Pourer Worksheet 13-4
Price format
how to define at the computer 10-5
how to define at the ECU 3-4
Price level change
how to enable 5-4
Price level change report 8-10
Price levels
how to select when pouring 7-2
Price/Portion report 8-14, 10-16
Prices
how to clear 6-10
how to define at the computer 10-10
how to define at the ECU 6-5
how to generate a report 8-14
tips on how to assign 13-10
Printer
interface to a parallel 2-8
interface to a serial 2-10
R
Read a remote server access key 4-3
Read an access key 4-2
Remote server access box 2-14
Repeat a pour
how to 7-3
how to set restart pour delay 5-7
Replace the ECU battery 9-4
Reports
all server summary 8-18
configuration 8-12
detailed 8-4
hourly sales 8-8
how to generate at the computer 10-20
individual server summary 8-20, 8-22
last Z 8-6
PLU 8-16, 10-16
price level change 8-10
price/portion 8-14, 10-16
summary 8-2
Reset after pour 5-5
Restart pour delay 5-7
Return to factory setup option 3-8
RS-232 to RS 485 converter 2-10, 2-18
S
Safety
precautions vi
terms and symbols vii
Security
disable unit 5-2
pour with server ID 7-4
security seals 2-4
Security seals 2-4
Select an ECU type 10-6
Serial port setup 3-14
Serial printer 2-18
Server ID
how to define list at the computer 10-18
how to define list at the ECU 4-6
how to generate report at the computer 10-18
how to pour with 7-4, 7-6
Server ID option package
description of 1-2
how to install a remote server access box 2-14
site assessment for 1-7
Server Menu
how to access 1-10
how to enable or disable 5-6
how to navigate 1-11
list of options 1-12
Set flow meter counts
at the computer 10-14
at the ECU 6-8
Set flow meter price per unit
at the computer 10-14
at the ECU 6-7
Solenoid. See External solenoid output
Index-4 All-Bottle 744/1544 Installation/Service/User Manual
Specifications 1-5, 11-2
Station number 3-15
Summary reports 8-2
System components 1-4
T
Technical specifications 11-3
Test the system 2-20
Time and date
how to set 3-13
how to set date format 3-7
how to set time format 3-6
Time format 3-6
Tools and materials required 1-14
Troubleshooting 12-2
V
Volume units
how to define at the computer 10-5
how to define at the ECU 3-3
X
X reports
all server summary 8-18
detailed 8-4
individual server summary 8-20
summary 8-2
Z
Z reports
all server summary 8-18
detailed 8-4
individual server summary 8-20
summary 8-2
Index-5