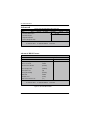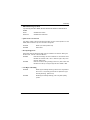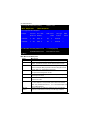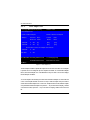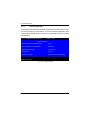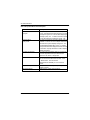
1
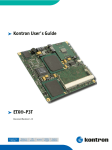
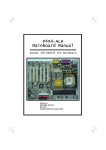
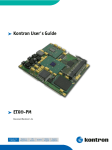
GA-9ILDR
Dual XeonTM (Nocona)
Processor Motherboard
USER’S MANUAL
Dual XeonTM (Nocona)Processor Motherboard
Rev. 1001
English
GA-9ILDR Motherboard
Table of Content
Item Checklist ..................................................................................4
WARNING! .......................................................................................4
Chapter 1 Introduction ......................................................................5
Features Summary................................................................................................ 5
GA-9ILDR Motherboard Layout .......................................................................... 7
Chapter 2 Hardware Installation Process ...........................................9
Step 1: Install the Central Processing Unit (CPU) ......................................... 10
Step 1-2:CPU Heat Sink Installation ................................................................ 11
Step 2: Install memory modules ....................................................................... 13
Step 3: Install expansion cards ......................................................................... 15
Step 4: Connect ribbon cables, cabinet wires, and power supply ............ 16
Step 4-1 : I/O Back Panel Introduction ........................................................... 16
Step 4-2 :Connectors Introduction ................................................................. 18
Step 4-3 : Jumper Setting Introduction ............................................................ 30
Chapter 3 BIOS Setup .................................................................... 33
Main ....................................................................................................................... 35
Advanced ............................................................................................................... 38
Adv anced BIOS Feature .............................................................................
Adv anced Chipset .....................................................................................
Integrated Peripherals .................................................................................
OnChip IDE Dev ice ...................................................................................
Onboard Dev ice ........................................................................................
Super I/O Dev ice ......................................................................................
38
41
42
43
47
49
Boot ........................................................................................................................ 52
Pow er Management Setup .......................................................................... 55
Security .................................................................................................................. 58
PC Health .............................................................................................................. 59
CLK / Voltage ........................................................................................................ 61
Defaults .................................................................................................................. 62
Exit .......................................................................................................................... 63
2
Chapter 4 SCSI BIOS and Configuration Utility .................................. 64
Ov erv iew .................................................................................................
4-1.Main Menu ..........................................................................................
4-1-1.Boot Adapter List ................................................................................
4-1-2.Global Properities ...............................................................................
4-1-3.Adapter Properties Menu .....................................................................
4-2.Ex iting the SCSI Setup Utility ..................................................................
64
64
66
68
70
73
Chapter 5 Technical Reference ........................................................ 74
Block Diagram ..................................................................................................... 74
Chapter 5 Driver Installation ............................................................. 75
A.Intel Chipset Softw are Installation Utilities ....................................................
B.Broadcom BCM5751 Feature Application Installation .....................................
C.SCSI Driv er Installation ............................................................................
D.DirectX 9.0 Driv er Installation ....................................................................
E.If y ou don’t find specific driv ers .................................................................
75
77
79
80
81
Chapter 6 Appendix ........................................................................ 83
Acrony ms ............................................................................................... 83
3
English
Table of Content
English
GA-9ILDR Motherboard
Item Checklist
þ
þ
þ
þ
þ
The GA-9ILDR motherboard
U320 SCSI cable x 1
IDE to SATA HDD Power cable x 2
CD for motherboard driver & utility
I/O Shield x1
þ
þ
þ
þ
Serial ATA cable x 2
PATA (2 cables) & FDD cable set x 1
GA-9ILDR quick installation guide
GA-9ILDR user’s manual
WARNING!
Computer motherboards and expansion cards contain very delicate Integrated Circuit (IC) chips. To
protect them against damage from static electricity, you should follow some precautions whenever you
work on your computer.
1.
Unplug y our computer w hen w orking on the inside.
2.
Use a grounded w rist strap before handling computer components. If y ou do not hav e
one, touch both of y our hands to a safely grounded object or to a metal object, such as
the pow er supply case.
Hold components by the edges and try not touch the IC chips, leads or connectors, or
other components.
Place components on a grounded antistatic pad or on the bag that came w ith the
components w henev er the components are separated from the sy stem.
Ensure that the ATX pow er supply is sw itched off before y ou plug in or remov e the ATX
3.
4.
5.
pow er connector on the motherboard.
Installing the motherboard to the chassis…
If the motherboard has mounting holes, but they don’t line up with the holes on the base and
there are no slots to attach the spacers, do not become alarmed y ou can still attach the spacers to
the mounting holes. Just cut the bottom portion of the spacers (the spacer may be a little hard to
cut off, so be careful of your hands). In this way y ou can still attach the motherboard to the base
without worrying about short circuits. Sometimes you may need to use the plastic springs to isolate
the screw from the motherboard PCB surface, because the circuit wire may be near by the hole. Be
careful, don’t let the screw contact any printed circuit write or parts on the PC B that are near the
fix ing hole, otherwise it may damage the board or cause board malfunctioning.
4
Introduction
Chapter 1 Introduction
Features Summary
Form Factor
Motherboard
— 30.5cm x 33cm Extend ATX size form factor, 8 layers PCB.
— GA-9ILDR Motherboard:
CPU
— Dual socket 604 for Intel® Xeon(Nocona) processor suopprts
4.0 GB and upper
— Intel® Xeon (Nocona) CPUs supports 800 MHz FSB
— 2nd cache depend on CPU
— Intel E7520 Chipset
— ICH5R I/O Controller Hub
— Intel 6700 PXH
— 6 x 184-pin DDR DIMM sockets
— Supports 6 ECC Registered DIMM DDR-266/333
— Supports up to 16GB DRAM (Max) for DDR-333
— Supports up to 24GB DRAM (Max) for DDR-266
— Supports only 2.5V DDR DIMM
— IT8712 F
— 2 PCI-X slot supports 64/100MHz (3.3V)
— 1 PCI-X slot supports 64/133MHz (3.3V)
— 2 PCI-E slot by 4 x 1 and by 4 x 1
— 1 PCI slot support 32/33MHz
— 2 IDE controllers on the Intel ICH5R PCI chipset
provides IDE HDD/CD-ROM (IDE1, IDE2) with PIO, Bus
Master (ATA100) operation modes.
— 1 Floppy port supports 2 FDD with 360K, 720K,1.2M, 1.44M
and 2.88M bytes.
— 1 Parallel port supports Normal/EPP/ECP mode
— 1 Serial port (COM)
— 4 x USB 2.0 (2 X at rear, 2 x by cable)
— 1 x VGA port
— 2 x RJ45 LAN port
— CPU/Power/System Fan Revolution Detect
— CPU shutdown when overheat
— System Voltage Detect
Chipset
Memory
I/O Control
Slots
On-Board IDE
On-Board Peripherals
Hardware Monitor
-5-
English
GA-9ILDR Motherboard
SCSI Controller
—
—
—
—
—
—
On-Board RAID
—
—
—
—
—
—
—
—
—
—
—
—
—
—
—
—
—
—
On-Board LAN
On-Board USB 2.0
PS/2 Connector
BIOS
Additional Features
LSI 1030 chipset
Supports mirroring (RAID 1)
Support ATAPI mode for CD ROM, DVD ROM ..etc.
Supports IDE bus master operation
Mirroring supports automatic background rebuilds
Features LBA and Extended Interrupt 13 drive translation in
controller onboard BIOS
Intel ICH5R chipset supports SATA RAID 0,1
LSI1030 chipset supports Host RAID
Dual Boardcome BCM5721 Chipset
Supports Adapter Fault Tolerance (AFT)
Supports Adaptive Load Balancing (ALB)
Supports Fast EthernetChannel (FEC)
Built in ICH5R Chipset
PS/2 Keyboard interface and PS/2 Mouse interace
Lincensed AWARD on 4MB Flash RAM
Supports multi boot function
User setting for hardware monitoring
Supports PXE
PS/2 Keyboard power on by password
PS/2 Mouse power on
STR(Suspend-To-RAM)
Wake on LAN (WOL)
AC Recovery
Poly fuse for keyboard over-current protection
6
Hardware Installation Process
GA-9ILDR Motherboard Layout
17
3
V
T
5
6
7
8
W
9 10
26
21
22 23
11
12
13
14
15
16
24
D
S
C
27
28
Q
19 20
H
G
U
18
4
1
E
P
O
N
Z
X Y
B
2
F
M
R
K
J
I
L
7
A
25
English
GA-9ILDR Motherboard
A.
CPU0 (Install First)
1.
CPU_FAN0 (CPU FAN)
B.
CPU1
2.
CPU_FAN1 (CPU FAN)
C.
Intel E7520
3.
SYS_FAN1 (System FAN)
D.
Intel 6700 PXH
4.
SYS_FAN2 (System FAN)
E.
LSI 1030 (SCSI Controller)
5.
PCI-6 (Supports 32bit/33MHz)
F.
ICH5R
6.
PCI-5 (Supports 64bit/66~100MHz)
G.
ATI Rage_XL
7.
PCI-4 (Supports 64bit/66~100MHz)
H.
ITE IT8712F
8.
PCIE-3 (Supports PCI Express)
I.
IDE2
9.
PCIE-2 (Supports PCI Express)
J.
IDE1
10.
PCI-1 (Supports 64bit/133MHz)
K.
SATA0
11.
DDRA1
L.
SATA1
12.
DDRB1
M.
USB2
13.
DDRA2
N.
SCSI2 (SCSI connector)
14.
DDRB2
O.
SCSI1 (SCSI connector)
15.
DDRA3
P.
IPMB1
16.
DDRB3
Q.
IPMB2
17.
LAN1(RJ45 LAN connector)
R.
BT1 (Battery)
18.
LAN2(RJ45 LAN connector)
S.
FD1 (Floppy connector)
19.
VGA port
T.
GIGA_FP (Front Panel)
20.
LPT port
U.
COM1
21.
COM port
V.
Broadcom BCM5721
22.
USB connector
W.
Broadcom BCM5721
23.
KB_MS (Keyboard & Mouse)
X.
BIOS
24.
ATX1 (SSI power connector)
Y.
SCSI BIOS
25.
ATX2 (SSI power connector)
Z.
PXH_FAN
26.
295_FP (Foe System Only)
27.
WOL (Wake On LAN)
28.
RI (Ring Input)
8
Hardware Installation Process
Chapter 2 Hardware Installation Process
To set up your computer, you must complete the following steps:
Step 1- Install the Centr al Processing Unit ( CPU)
Step 2- Install memory modules
Step 3- Install expansion cards
Step 4- Connect ribbon cables, cabinet w ires, and power supply
Step 5- Setup BIOS softw are
Step 6- Install supporting software tools
Step3
Step 2
Step4
Step 4
Step 4
Step 5
Step 4
Step 4
Step 4
Step 4
Step1
9
English
GA-9ILDR Motherboard
Step 1: Install the Central Processing Unit (CPU)
Before installing the processor , adhere to the following warning:
If you do not match the CPU socket Pin 1 and CPU cut edge well, it will
cause improper installation. Please change the insert orientation.
Please make sure the CPU type is supported by the motherboard.
Pin1 indicator
1. Angling the rod to 65-degree maybe feel a
kind of tight , and then continue pull the rod to
90-degree when a noise “cough” made.
2. CPU Top View
Pin1 indicator
3. Locate Pin 1 in the socket and look
for a (golden) cut edge on the CPU
upper corner. Then insert the CPU
into the socket.
4. Press down the CPU socket lever
and finish CPU installation.
10
Hardware Installation Process
Step 1-2:CPU Heat Sink Installation
Before installing the CPU Heat Sink , adhere to the following warning:
1.Please use Intel approved cooling fan.
2.We recommend you to apply the thermal tape to provide better heat conduction
between your CPU and heatsink.
(The CPU cooling fan might stick to the CPU due to the hardening of the thermal
paste. During this condition if you try to remove the cooling fan, you might pull the
processor out of the CPU socket alone with the cooling fan, and might damage the
processor. To avoid this from happening, we suggest you to either use thermal tape
instead of thermal paste, or remove the cooling fan with extreme caution.)
3.Make sure the CPU fan power cable is plugged in to the CPU fan connector, this
completes the installation.
Please refer to CPU heat sink user's manual for more detail installation procedure.
1. Heat sink installation kit.
2. Turn the mother bord to the backside. Lock the
retention module on the mother board
Make sure the position of the 4 holes on the
retention module match exactly the position on
the motherboard.
11
English
GA-9ILDR Motherboard
3. Fasten the heatsink supporting-base onto the
CPU socket on the mainboard.
4. Make sure the CPU fan is plugged to
the CPU fan connector, than install
complete.
12
Hardware Installation Process
Step 2: Install memory modules
Before installing the processor and heatsink, adhere to the following warning:
When DIMM LED is ON, do not install/remove DIMM from socket.
Please note that the DIMM module can only fit in one direction due to the one notches. Wrong
orientation will cause improper installation. Please change the insert orientation.
The motherboard has 6 dual inline memory module (DIMM) sockets. The BIOS will automatically detects
memory type and size. To install the memory module, just push it vertically into the DIMM socket .The
DIMM module can only fit in one direction due to the notch. Memory size can vary between sockets.
Notch
DDR
Total Memory Sizes With Registered DDR DIMM
Devices used on DIMM
64 Mbit (4Mx4x4 banks)
64 Mbit (2Mx8x4 banks)
64 Mbit (1Mx16x4 banks)
128 Mbit(8Mx4x4 banks)
128 Mbit(4Mx8x4 banks)
128 Mbit(2Mx16x4 banks)
256 Mbit(16Mx4x4 banks)
256 Mbit(8Mx8x4 banks)
256 Mbit(4Mx16x4 banks)
1 DIMMx64/x72
256 MBytes
128 MBytes
64 MBytes
512 MBytes
256 MBytes
128 MBytes
1 GBytes
512 MBytes
256 MBytes
2 DIMMsx64/x72
512 MBytes
256 MBytes
128 MBytes
1 GBytes
512 MBytes
256 MBytes
2 GBytes
1 GBytes
512 MBytes
3 DIMMsx64/x72
768 MBytes
384 MBytes
192 MBytes
1.5 GBytes
768 MBytes
384 MBytes
3 GBytes
1.5 GBytes
768 MBytes
4 DIMMsx64/x72
1 GBytes
512 MBytes
256 MBytes
2 GBytes
1 GBytes
512 MBytes
4 GBytes
2 GBytes
1 GBytes
512 Mbit(32Mx4x4 banks)
2 GBytes
4 GBytes
4 GBytes
4 GBytes
512 Mbit(16Mx8x4 banks)
512 Mbit(8Mx16x4 banks)
1 GBytes
512 MBytes
2 GBytes
1 GBytes
3 GBytes
1.5 GBytes
4 GBytes
2 GBytes
13
English
GA-9ILDR Motherboard
1. The DIMM slot has a notch, so the DIMM
memory module can only fit in one direction.
2. Insert the DIMM memory module v ertically into
the DIMM slot. Then push it dow n.
Please note that DIMM must be populated
in order starting at the nearest slot from
the ATX power.
Notch
3. Close the plastic clip at both edges of the DIMM
slots to lock the DIMM module.
Rev erse the installation steps w hen y ou w ish
to remov e the DIMM module.
DDR Introduction
DDR memory is a greatevolutionary solution for the PC industry that builds on the existing SDRAM
architecture, yet make the awesome advances in solving the system performance bottleneck by
doubling the memory bandwidth. Nowadays, with the highest bandwidth of 3.2GB/s of DDR400
memory and complete line of DDR400/333/266/200 memory solutions, DDR memory is the best
choice for building high performance and low latency DRAM subsystem that are suitable for servers,
workstations, and full range of desktop PCs.
14
Hardware Installation Process
Step 3: Install expansion cards
1. Read the related expansion card’s instruction document before install the expansion card into
the computer.
2. Remove your server’s chassis cover, necessary screws and slot bracket from the computer.
3. Press the expansion card firmly into expansion slot in motherboard.
4. Be sure the metal contacts on the card are indeed seated in the slot.
5. Replace the screw to secure the slot bracket of the expansion card.
6. Replace your computer’s chassis cover.
7. Power on the computer, if necessary, setup BIOS utility of expansion card from BIOS.
8. Install related driver from the operating system.
15
English
GA-9ILDR Motherboard
Step 4: Connect ribbon cables, cabinet wires, and power
supply
Step 4-1 : I/O Back Panel Introduction
w
u
v
u
x
y
PS/2 Keyboard and PS/2 Mouse Connector
PS/2 Mouse Connector
(6 pin Female)
ØThis connector supports standard PS/2
keyboard and PS/2 mouse.
PS/2 Keyboard Connector
(6 pin Female)
16
Hardware Installation Process
v USB Connectors
USB1
w
Ø Before you connect your device(s) into USB
connector(s), please make sure your device(s)
such as USB keyboard, mouse, scanner, zip,
speaker..etc. Have a standard USB interface.
Also make sure your OS supports USB controller.
If your OS does not support USB controller,
please contact OS vendor for possible patch or
driver upgrade. For more information please
contact your OS or device(s) vendors.
Parallel Port / Serial Port / VGA Port (LPT/COMA/VGA)
Parallel Port
(25 pin Female)
ØThis connector supports 1 standard COM port
and 1 Parallel port. Device like printer can be
connected to Parallel port ; mouse and modem etc
can be connected to Serial port.
COMA
VGA Port
Serial Ports (9 pin Male) (15 pin Female)
x /y LAN Connecotrs
LAN Port
LAN
Status
Yellow LED On
Green LED On
Green LED Blinking
Description
GIGALAN connected
GIGALAN at Speed 10/100MB
Data Transfer
17
English
GA-9ILDR Motherboard
Step 4-2 :Connectors Introduction
Q S
R
P
O
A
N
M
T
W
X
Y
B
J
K
V
I
H
G
FE
C
D
L
U
A) ATX1
N) 295_FP
B) ATX2
O) GIGA_FP
C) IDE1
P) COM1
D) IDE2
Q) SYS_FAN1
E) SATA0
R) SYS_FAN2
F) SATA1
S) IDSW
G) USB2
T) CPU_FAN0
H) SCSI1
U) CPU_FAN1
I) SCSI2
V) PXH_FAN1
J) IPMB1
W) EX_HDLED
K) JP17 (IPMB2)
X) WOL
L) BT1
Y) RI
M) FD1
18
Connector Introduction
A) ATX 1 (ATX Power Connector)
13
24
1
12
Ø AC power cord should only be connected to
your power supply unit after ATX power cable
and other related devices are firmly connected
to the mainboard.
PIN No.
Definition
1
+3.3V
2
+3.3V
3
GND
4
+5V
5
GND
6
+5V
7
GND
8
POK
9
5VSB
10
+12V
11
+12V
12
+3.3V
13
+3.3V
14
-12V
15
GND
16
PSON
17
GND
18
GND
19
GND
20
-5V
21
+5V
22
+5V
23
+5V
24
GND
B ) ATX2 (ATX Power Connector)
1
ØThis connector (ATX +12V) is used only for
CPU1 Core Voltage.
19
Pin No.
1
2
3
4
5
6
7
8
Definition
GND
GND
GND
GND
P12V_CPU1
P12V_CPU1
P12V_CPU0
P12V_CPU0
English
GA-9ILDR Motherboard
C / D) IDE1 / IDE2 Connector(Primary/Secondary]
Please connect first harddisk to IDE1 and connect CDROM to IDE2. The red stripe of the ribbon
cable must be the same side w ith the Pin1.
IDE1
40
39
2
1
IDE2
E / F) SATA0/SATA1 (Serial ATA Connectors)
You can connect the Serial ATA dev ice to this connector, it prov ides y ou high speed transfer rates
(150MB/sec).
7
1
SATA1
SATA0
20
Pin No.
1
2
3
4
5
6
7
Definition
GND
TXP
TXN
GND
RXN
RXP
GND
Connector Introduction
G) USB2 (Front USB Connector )
Be careful w ith the polarity of the front USB connector. Check the pin assignment w hile y ou
connect the front USB cable. Please contact y our nearest dealer for optional front USB
cable.
1 2
9 10
H /I) SCSI1 / SCSI2 (SCSI Connector)
SCSI 2
SCSI 1
21
Pin No.
1
2
3
4
5
6
7
8
9
10
Definition
Power
GND
USB DXNC
USB DX+
USB Dy+
NC
USB DyGND
USB Over Current
English
GA-9ILDR Motherboard
J) IPMB1
1
3
Pin No.
1
2
3
Definition
SDA
GND
SCL
Pin No.
1
2
3
4
Definition
GND
NC
SDA
SCL
K) JP17 (IPMB2 connector)
22
Connector Introduction
L ) BT1 (Battery)
CAUTION
v Danger of explosion if battery is incorrectly
replaced.
v Replace only with the same or equivalent
type recommended by the manufacturer.
v Dispose of used batteries according to the
manufacturer’s instructions.
If you want to erase CM OS...
1.Turn OFF the computer and unplug the power cord.
2.Remove the battery, wait for 30 second.
3.Re-install the battery.
4.Plug the power cord and turn ON the computer.
M) FD1 (Floppy Connector)
Please connect the floppy driv e ribbon cables to FDD. It supports 360K,720K,1.2M,1.44M and
2.88Mby tes floppy disk ty pes. The red stripe of the ribbon cable must be the same side w ith the
Pin1.
23
34
33
2
1
English
GA-9ILDR Motherboard
N) 295_FP (2X13 Pins Front Panel connector, For GS-SR295 System Only)
1 2
CPlease connect the pow er LED,
PC speaker, reset switch and power
switch of your chassis front panel to
the F_PANEL connector according to
the pin assignment above.
13 26
Pin No
1
2
3
4
5
6
7
8
9
10
11
12
13
14
15
16
17
18
19
20
21
22
23
24
25
26
Signal Name
Description
PWRLED+
PWRLEDID_PWR
KEY
PW+
ID_LED1
-SERVICE_SW
SENSOR_SCL
SENSOR_SDA
P1_BUSY_LEDP1_LINK_LEDP2_BUSY_LEDP2_LINK_LEDPINREMOVED
HD+
HD-NMI_SW
F_SYSRDY_LED
RESET_N
SYSTEM_LEDRESET_N
SYSTEM_LEDRESET_N
SYSTEM_LEDVCC3_DUAL
SYSTEM_LED-
Pow er LED Signal anode (+)
Pow er LED Signal cathode(-)
ID Sw itch Pow er button
KEY
Soft Pow er connector anode (+)
ID LED Signal
ID Sw itch LED Signal
Sensor SM Bus Clock Button
Sensor SM Bus Data Button
LAN1 access LED Signal cathode(-)
LAN1 linked LED Signal cathode(-)
LAN2 access LED Signal cathode(-)
LAN2 linked LED Signal cathode(-)
Pin Remov ed
Hard Disk LED anode (+)
Hard Disk LED cathode(-)
NMI Sw itch cathode(-)
TSy stem Fan Fail LED Signal
Reset Button
Sy stem LED Signal cathode(-)
Reset Button
Sy stem LED Signal cathode(-)
Reset Button
Sy stem LED Signal cathode(-)
Standby pow er button
Sy stem LED Signal cathode(-)
24
Connector Introduction
O) GIGA_FP (2X9 Pins Front Panel connector)
Please connect the power LED, PC speaker, reset switch and power switch of your chassis
front panel to the F_PANEL connector according to the pin assignment above.
1 2
17 18
Pin No
1
2
3
4
5
6
7
8
9
10
11
12
13
14
15
16
17
18
Signal Name
Description
HD+
HDPOWERLEDSPKPOWERLED+
NC
P5V_STBY
NC
POWER BUTTONSPK+
POWER BUTTON+
RESET+
KEY
RESETSTR LED+
STR LEDSLEEP BUTTON+
SLEEP BUTTON-
Hard Disk LED anode (+)
Hard Disk LED cathode(-)
Pow er LED Signal cathode(-)
Ex ternal speaker connector cathode(-)
Pow er LED Signal anode (+)
No connect
+5V Standby
No connect
Front Panel Pow er On/Off Button cathode(-)
Ex ternal speaker connector anode (+)
Front Panel Pow er On/Off Button anode (+)
Front Panel Reset Sw itch anode (+)
KEY
Front Panel Reset Sw itch cathode(-)
Green LED anode (+)
Green LED cathode(-)
Front Panel Sleep Button Signal anode (+)
Front Panel Sleep Button Signal cathode(-)
25
English
GA-9ILDR Motherboard
P) COM1
1
Pin No.
1
2
3
4
5
6
7
8
9
10
Definition
NDCDA2NDSRA2NSINA2
NRTS42NSOUTA2NCTSA2NDTRA2NRIA2GND
NC
Q / R) SYS_FAN 1 / 2 (System Fan Connector)
This connector allow s y ou to link w ith the cooling fan on the sy stem case to low er the sy stem
temperature. These connectors are for sy stem use only .
SYS FAN 1
SYS FAN 2
1
SYS FAN1
1
SYS FAN2
26
Pin No.
1
2
3
Definition
GND
12V
Sense
Pin No.
1
2
3
Definition
GND
12V
Sense
Connector Introduction
S) IDSW (ID Switch)
ØTo function this service switch just by pressing the
white button from the back I/O.
T / U) CPU_FAN0 /1 (CPU Fan Connector)
Please note, a proper installation of the CPU cooler is essential to prevent the CPU from running
under abnormal condition or damaged by overheating.The CPU fan connector supports Max. current
up to 1A .
CPU FAN 0
CPU FAN 0
1
1
CPU FAN 1
CPU FAN 1
27
Pin No.
1
2
3
4
Definition
GND
12V
Sense
Contr ol
English
GA-9ILDR Motherboard
V) PXH_FAN (Intel 6700 PXH FAN connector)
If you installed wrong direction, the Chip Fan will not work. Sometimes will damage the Chip Fan.
(Usually black cable is GND)
1
Pin No.
1
2
Definition
VCC
GND
W) EX_LED (HDD LED connector)
1
28
Pin No.
1
2
3
4
Definition
GND
LED
LED
GND
Connector Introduction
X) WOL (Wake on LAN)
This connector allows the remove servers to manage the system that installed this
mainboard via your network adapter which also supports WOL.
1
Pin No.
1
2
3
Definition
+5V SB
GND
Signal
Pin No.
1
2
Definition
Signal
GND
Y) RI (Ring Input)
1
29
English
GA-9ILDR Motherboard
Step 4-3 : Jumper Setting Introduction
1
4
3
2
1 ) PLL0/1
3) CLR_CMOS
2 ) CASEOPEN
4 ) CMOS_Lock
30
Jumper Setting
1) PLL0/1 (DDR-266/333 Speed Adjustment Jumper)
Open: Set memory speed at DDR-266
Close: Set memory speed at DDR-333
2) CASEOPEN (Case Open Function)
Open: Disable this function
Close: Enable Case open function (Default)
31
English
GA-9ILDR Motherboard
3) CLR_CMOS (Clear CMOS Function)
You may clear the CMOS data to its default values by this jumper.
Default value doesn’t include the “Shunter” to prevent from improper use this jumper. To
clear CMOS, temporarily short 1-2 pin.
1
1-2 close: Clear CMOS
1
2-3 close: Normal (Default)
4) CMOS_Lock (CMOS Write Protect Function)
1
1
1
32
1-2 close: Top Block Lock
3-4 close: 2-8 Block Lock
Open: Enable CMOS Write Protection
Function
BIOS Setup
Chapter 3 BIOS Setup
BIOS Setup is an overview of the BIOS Setup Program. The program that allows users to modify the
basic system configuration. This type of information is stored in battery-backed CMOS RAM so that it
retains the Setup information when the power is turned off.
ENTERING SETUP
Power ON the computer and press <F2> immediately will allow you to enter Setup.
CONTROL KEYS
<á>
Move to previous item
<â>
Move to next item
<ß>
Move to the item in the left hand
<à>
Move to the item in the right hand
<Esc>
Main Menu - Quit and not save changes into CMOS Status Page Setup Menu and
Option Page Setup Menu - Exit current page and return to Main Menu
<+/PgUp> Increase the numeric value or make changes
<-/PgDn>
Decrease the numeric value or make changes
<F1>
General help, only for Status Page Setup Menu and Option Page Setup Menu
<F2>
Reserved
<F3>
Reserved
<F4>
Reserved
<F5>
Restore the previous CMOS value from CMOS, only for Option Page Setup Menu
<F6>
Reserved
<F7>
Load the Optimized Defaults
<F8>
Reserved
<F9>
Reserved
<F10>
Save all the CMOS changes, only for Main Menu
33
GA-9ILDR Motherboard
GETTING HELP
Main Menu
The on-line description of the highlighted setup function is displayed at the bottom of the screen.
Status Page Setup Menu / Option Page Setup Menu
Press F1 to pop up a small help window that describes the appropriate keys to use and the possible
selections for the highlighted item. To exit the Help Window press <Esc>.
l
Main
This setup page includes all the items in standard compatible BIOS.
l
Advanced
This setup page includes all the items of AWARD special enhanced features.
(ex: onboard device enable/disable, power management)
l
Boot
This setup page include all the items of first boot function features.
l
PC Health Status
This setup page displays the System auto detect Temperature, voltage, fan speed.
l
Security
Change, set, or disable password. It allows you to limit access to the system and Setup,
or just to Setup.
l
Clk/Voltage
This setup page is control CPU’s clock and frequency ratio.
l
Defaults
Load Optimized Defaults option and loads preset system parameter values to set the system in
its highest performance configurations.
l
Exit
Save CMOS value settings to CMOS and exit setup or abandon all CMOS value changes
and exit setup.
34
BIOS Setup
Main
Once you enter A ward BIOS Setup Utility, the Main Menu (Figure 1) will appear on the screen. Use
arrow keys to select among the items and press <Enter> to accept or enter the sub-menu.
Phoenix -Aw ard WorkstationBIOS CMOS Setup Utility
Main
Adv anced Boot
Seccurity
PC Health
Date (mm:dd:y y )
Thr. Jan. 29 2004
Time (hh:mm:ss)
23:1:52
4IDE Channel 0 Master
[None]
4 IDE Channel 0 Slav e
[IC35L080AVVA07-0]
4IDE Channel 1 Master
[CD-540E]
4IDE Channel 1 Slav e
[None]
Driv e A
Clk/Voltage
Defaults
Ex it
Item Help
[1.44M, 3.51/2]
4Sy stem Information
ø Model Name
[Press Enter]
9ILRD
ø BIOS Version
ø BIOS Date
2004/5/20
higf: Mov e
Enter: Select +/-/PU/PD: Value
F5: Prev ious Values
F10: Sav e
F7: Optimized Defaults
ESC: Ex it F1: General Help
F8: Q-Flash
Figure 1: Main
C Date
The date format is <date> <month>, <day>, <year>.
8Date
The date, Monday to Sunday .
8Month
8Day
The month, Jan. Through Dec.
The day , from 1 to 31 (or the max imum allow ed in the month)
8Year
The y ear, from 1999 through 2098
Note that ø
indicates Display ONLY
35
GA-9ILDR Motherboard
C Time
The times format is setin <hour>, <minute> and <second>. The time is calculated base on the 24hour military-time clock. For example, 1 p.m. is 13:00:00.
C IDE HDD Auto Detection
Press [Enter] to auto-detect the HDD’s size, head, etc on this channel.
C IDE Channel 0 Master, Slave / Channel 1 Master, Slave
The category identifies the ty pes of hard disk from driv e C to F that has been installed in the
computer. There are two types: auto type, and manual type. Manual type is user-definable; Auto
type that will automatically detect HDD type.
Note that the specifications of your drive must match with the drive table. The hard disk will not work
properly if you enter improper information for this category.
If you select User Type, related information will be asked to enter to the following items. Enter the
information directly from the keyboard and press <Enter>. Such information should be provided in the
documentation form your hard disk vendor or the system manufacturer.
4 Access Mode
This option allows user to set hard drive parameters.
Option: CHS, LBA, Large, Auto (Default Value)
8Capacity
Display s the capacity of HDD
8Cy linder
Number of cy linders
8Heads
Number of heads
8Precmp
Write precomp
8Landind Zone
Landing zone
8Sectors
Number of sectors
If a hard disk has not been installed, select NONE and press <Enter>.
36
BIOS Setup
C Drive A
The category identifies the types of floppy disk drive A that has been installed in the computer.
No floppy driv e installed
8None
8360K, 5 in.
5.25 inch PC-ty pe standard driv e; 360K by te capacity .
81.2M, 5 in.
5.25 inch AT-ty pe high-density driv e; 1.2M by te capacity
1/4
1/4
(3.5 inch w hen 3 Mode is Enabled).
8720K, 3 in.
3.5 inch double-sided driv e; 720K by te capacity
81.44M, 3 in.
3.5 inch double-sided driv e; 1.44M by te capacity .
82.88M, 3 in.
3.5 inch double-sided driv e; 2.88M by te capacity .
1/2
1/2
1/2
C System Information
This category includes the information of processor ty pe, speed, total memory and LAN MAC
Address.
37
GA-9ILDR Motherboard
Advanced
Phoenix -Aw ard WorkstationBIOS CMOS Setup Utility
Main
Adv anced Boot
Seccurity
PC Health
Clk/Voltage
4Adv anced BIOS Feature
Defaults
Ex it
Item Help
4Adv anced Chipset
4Integrated Peripherals
4Pow er Management Setup
higf: Mov e
Enter: Select +/-/PU/PD: Value
F5: Prev ious Values
F10: Sav e
F7: Optimized Defaults
ESC: Ex it F1: General Help
F8: Q-Flash
Figure 2: Adv anced
Advanced BIOS Feature
Phoenix -Aw ard WorkstationBIOS CMOS Setup Utility
Adv anced
Adv anced BIOS Features
Item Help
DRAM Data Integrity Mode
[ECC]
ø CPU L1 & 2 Cache
Enabled
Quick Pow er On Self Test
[Enabled]
Boot Up Floppy Seek
[Disabled]
Boot Up Num-Lock
[Off]
CPU Hy per Threading
[Enabled]
x APIC Mode
Enabled
Init Display First
[PCIEx ]
MPS Version Control For OS
[1.4]
higf: Mov e
Enter: Select +/-/PU/PD: Value
F5: Prev ious Values
F10: Sav e
F7: Optimized Defaults
F8: Q-Flash
Figure 2-1: Adv anced BIOS Features
38
ESC: Ex it F1: General Help
BIOS Setup
C DRAM Data Integrity Mode
If you are using a Non-ECC DRAM, the mode should to set to Non-ECC and the function is
disabled.
8ECC
Set DRAM mode at ECC.
8Non-ECC
Set DRAM mode at Non-ECC.
CQuick Power On Self Test
This category speeds up Pow er On Self Test (POST) after y ou pow er on the computer. If it is set to
Enable, BIOS w ill shorten or skip some check items during POST.
8Enabled
Enables quick POST.(Default v alue)
8Disabled
Normal POST.
CBoot Up Fl oppy Seek
During POST, BIOS w ill determine the floppy disk driv e installed is 40 or 80 tracks. 360K ty pe is
40 tracks 720K, 1.2M and 1.44M are all 80 tracks.
8Enabled
BIOS searches for floppy disk driv e to determine it is 40 or 80 tracks. Note
that BIOS can not tell from 720K, 1.2M or 1.44M driv e ty pe as they are all
80 tracks. (Default v alue)
8Disabled
BIOS w ill not search for the ty pe of floppy disk driv e by track number. Note
that there w ill not be any w arning message if the driv e installed is 360K.
CCPU Hyper Threading
8Enabled
Enables Hy per-Threading Technology Feature w hen using Window s
XP and Linux 2.4x operating sy stems that are optimized for Hy perThreading technology . (Default v alue)
8Disabled
Disables Hy per-Threading Technology w hen using other operating
sy stems.
39
GA-9ILDR Motherboard
CInit Display First
This feature allows you to select the first initation of the monitor display from which card, when
you install an AGP VGA card and a PCI VGA card on board.
8PCIEx
Set Init Display First to PCI Express Slot. (Default v alue)
8PCI Slot
Set Init Display First to PCI Slot.
CMPS Version Control For OS
This option allows a user to select MP (Multi Processors) system supported version.
Note: Some old MPS OS support 1.1 version only.
81.4
Support MPS Version 1.4 . (Default Value)
81.1
Support MPS Version 1.1.
40
BIOS Setup
Advanced Chipset
Phoenix -Aw ard WorkstationBIOS CMOS Setup Utility
Adv anced
Adv anced Chipset
Item Help
PCI EXP 2 Dev ice
[Auto]
PCI EXP 3 Dev ice
[Auto]
PCI EXP 4 Dev ice
[Auto]
PCI EXP 5 Dev ice
[Auto]
PCI EXP 6 Dev ice
[Auto]
PCI EXP 7 Dev ice
[Auto]
higf: Mov e
Enter: Select +/-/PU/PD: Value
F5: Prev ious Values
F10: Sav e
F7: Optimized Defaults
Figure 2-2: Adv anced Chipset
41
ESC: Ex it F1: General Help
F8: Q-Flash
BIOS Setup
Integrated Peripherals
Phoenix -Aw ard WorkstationBIOS CMOS Setup Utility
Adv anced
Integrated Peripherals
Item Help
4OnChip IDE Dev ice
4OnBoard Dev ice
4Super I/O Dev ice
higf: Mov e
Enter: Select +/-/PU/PD: Value
F5: Prev ious Values
F10: Sav e
F7: Optimized Defaults
Figure 2-3: Integrated Peripherals
42
ESC: Ex it F1: General Help
F8: Q-Flash
GA-9ILDR Motherboard
OnChip IDE Device
Phoenix -Aw ard WorkstationBIOS CMOS Setup Utility
Adv anced
OnChip IDE Dev ice
Item Help
IDE HDD Block Mode
[Enabled]
IDE DMA transfer access
[Enabled]
OnChip Primary PCI IDE
[Enabled]
IDE Primary Master PIO
[Auto]
IDE Primary Slav e PIO
[Auto]
IDE Primary Master UDMA
[Auto]
IDE Primary Slav e UDMA
[Auto]
OnChip Secondary PCI IDE
[Enabled]
IDE Secondary Master PIO
[Auto]
IDE Secondary Slav e PIO
[Auto]
IDE Secondary Master UDMA
[Auto]
IDE Secondary Slav e UDMA
[Auto]
*** On-Chip Serial ATA ***
SATA Mode
[RAID]
x On-Chip Serial ATA
[Enabled Mode]
x Serial ATA Port 0 Mode
SATA0 master
Serial ATA Port 1 Mode
SATA1 master
higf: Mov e
Enter: Select +/-/PU/PD: Value
F5: Prev ious Values
F10: Sav e
F7: Optimized Defaults
ESC: Ex it F1: General Help
F8: Q-Flash
Figure 2-3-1: OnChip IDE Dev ice
C IDE HDD B lock Mode
If your IDE hard drive supports block mode, select [Enabled] for automatic detection of the
optimal number if block read/writes per sector the drive can supprit.
8Enabled
Hard Drive supports Block Mode.
8Disabled
Disable this function.
43
BIOS Setup
C IDEDMA Transfer Access
8Enabled
Enable IDE DMA transfer access. (Default value)
8Disabled
Disable this function.
COnChip Promary PCI IDE
8Enabled
Enable the function of On-chip primary PCI IDE. (Defualt value)
8Disabled
Disable this function.
CIDE Primary Master PIO
8Auto
Auto detect the IDE primary master PIO. (Default value)
8Mode 0
Select Mode 0 as IDE primary master PIO.
8Mode 1
Select Mode 1 as IDE primary master PIO.
8Mode 2
Select Mode 2 as IDE primary master PIO.
8Mode 3
Select Mode 3 as IDE primary master PIO.
8Mode 4
Select Mode 4 as IDE primary master PIO.
CIDE Primary Slave PIO
8Auto
Auto detect the IDE primary slave PIO. (Default value)
8Mode 0
Select Mode 0 as IDE primary slav e PIO.
8Mode 1
Select Mode 1 as IDE primary slav e PIO.
8Mode 2
Select Mode 2 as IDE primary slav e PIO.
8Mode 3
Select Mode 3 as IDE primary slav e PIO.
8Mode 4
Select Mode 4 as IDE primary slav e PIO.
CIDE Primary UDMA
8Auto
Auto detect the IDE Primary Ultra DMA in the specified IDE channel.
(Default)
8Disabled
Disable this function.
CIDE Primary Slave UDMA
8Auto
Auto detect the IDE Primary Slave Ultra DMA in the specified IDE channel.
(Default)
8Disabled
Disable this function.
44
GA-9ILDR Motherboard
COnChip Secondary PCI IDE
8Enabled
Enabled the function of Oc-chip secondary PCI IDE. (Default value)
8Disabled
Disable this function.
CIDE Secondary Master PIO
8Auto
Auto detect the IDE secondary master PIO. (Default value)
8Mode 0
Select Mode 0 as IDE secondary master PIO.
8Mode 1
Select Mode 1 as IDE secondary master PIO.
8Mode 2
Select Mode 2 as IDE secondary master PIO.
8Mode 3
Select Mode 3 as IDE secondary master PIO.
8Mode 4
Select Mode 4 as IDE secondary master PIO.
CIDE Secondary Slave PIO
8Auto
Auto detect the IDE secondary slave PIO. (Default value)
8Mode 0
Select Mode 0 as IDE secondary slav e PIO.
8Mode 1
Select Mode 1 as IDE secondary slav e PIO.
8Mode 2
Select Mode 2 as IDE secondary slav e PIO.
8Mode 3
Select Mode 3 as IDE secondary slav e PIO.
8Mode 4
Select Mode 4 as IDE secondary slav e PIO.
CIDE Secondary Master UDMA
8Auto
Auto detect the IDE Primary Master Ultra DMA in the specified IDE channel.
(Default value)
8Disabled
Disable this function.
CIDE Secondary Slave UDMA
8Auto
Auto detect the IDE Primary Slave Ultra DMA in the specified IDE channel.
(Default value)
8Disabled
Disable this function.
45
BIOS Setup
C On-Chip Serial ATA Setting
4 SATA Mode
This category can be adjust only when your system is enhanced the SATA controller.
8IDE
SATA as IDE mode. (Default value)
8RAID
SATA as RAID mode.
4 On-Chip Serial ATA
8Auto
Auto arrange by BIOS.
8Combined Mode
PATA and SATA are combined. Max. of 2 IDE drives in each
channel.
8Enhanced Mode
Enable both SATA and PATA. Max. of 6 IDE drives are supported.
(Default value)
8SATA Only
SATA is operating in legacy mode.
8Disabled
Disable this function.
4 Serial ATA Port 0 Mode
8Primary Master
Set Serial ATA Port 0 as Primary Master. (Default)
8Primary Slave
Set Serial ATA Port 0 as Primary Slave.
8SecondaryMaster
Set Serial ATA Port 0 as Secondary Master.
8Secondary Slave
Set Serial ATA Port 0 as Secondary Slave.
8SATA0 Master
Set Serial ATA Port 0 as SATA0 Master.
8SATA1 Master
Set Serial ATA Port 0 as SATA1 Master.
4 Serial ATA Port 1 Mode
8Primary Slave
Set Serial ATA Port 1 as Primary Slave. (Default)
8Primary Slave
Set Serial ATA Port 1 as Primary Slave.
8SecondaryMaster
Set Serial ATA Port 1 as Secondary Master.
8Secondary Slave
Set Serial ATA Port 1 as Secondary Slave.
8SATA0 Master
Set Serial ATA Port 1 as SATA0 Master.
8SATA1 Master
Set Serial ATA Port 1 as SATA1 Master.
46
GA-9ILDR Motherboard
Onboard Device
Phoenix -Aw ard WorkstationBIOS CMOS Setup Utility
Adv anced
Onboard Dev ice
Item Help
USB Controller
[Enabled]
USB 2.0 Controller
[Enabled]
USB Key board Support
[Disabled]
USB Mouse Support
[Disabled]
Onboard H/W LAN
[Enabled]
Onboard LAN Boot ROM
[Enabled]
Onboard SCSI Controller
[Enabled]
higf: Mov e
Enter: Select +/-/PU/PD: Value
F5: Prev ious Values
F10: Sav e
F7: Optimized Defaults
ESC: Ex it F1: General Help
F8: Q-Flash
Figure 2-3-2: Onboard Dev ice
CUSB Controller
8Enabled
Enable USB Controller function. (Default v alue)
8Disabled
Disable USB Controller function.
CUSB 2.0 Controller
This item provide the function for user to enable/disable EHCI controller only. THis BIOS itself
may / may not have high speed USB support built-in, the support will be automatically turn on
when high speed device were attached.
8Enabled
Enable USB 2.0 Controller function. (Default)
8Disabled
Disable USB 2.0 Controller function.
47
BIOS Setup
CUSB Keyboard Support
8Enabled
Enable USB Key board Support.
8Disabled
Disable USB Key board Support. (Default v alue)
CUSB Mouse Support
8Enabled
Enable USB Mouse Support.
8Disabled
Disable USB Mouse Support. (Default v alue)
COnboard H/W LAN
8Enabled
Enable onboard H/W LAN. (Default v alue)
8Disabled
Disable this function.
COnboard LAN Boot ROM
Decide w hether to inv oke the boot ROM of the onboard chip.
8Enabled
Inv oke the boot ROM of the onboard chip.
8Disabled
Disable this function. (Default v alue)
COnboard H/WSCSI Controller
8Enabled
Enable onboard H/W SCSI controller. (Default v alue)
8Disabled
Disable this function.
48
BIOS Setup
Super I/O Device
Phoenix -Aw ard WorkstationBIOS CMOS Setup Utility
Adv anced
Super I/O
Item Help
Onboard FDC Controller
[Disabled]
Onboard Serial Port 1
[3F8/IRQ4]
Onboard Serial Port 2
[2F8/IRQ3]
UART Mode Select
[Normal]
x UR2 Duplex Mode
Half
Onboard Parallel Port
[378/IRQ7]
Parallel Port Mode
[SPP]
x ECP Mode Use DMA
3
higf: Mov e
Enter: Select +/-/PU/PD: Value
F5: Prev ious Values
F10: Sav e
F7: Optimized Defaults
ESC: Ex it F1: General Help
F8: Q-Flash
Figure 2-3-3: Super I/O Dev ice
COnboard FDC Controller
8Enabled
Select “enabled” to activ e Onboard Floppy Controller. (Default v alue)
8Disabled
Disable this function.
COnboard Serial Port 1
8Auto
BIOS w ill automatically setup the port 1 address.
83F8/IRQ4
Enable onboard Serial port 1 and set IO address to 3F8.
82F8/IRQ3
Enable onboard Serial port 1 and set IO address to 2F8.
83E8/IRQ4
Enable onboard Serial port 1 and set IO address to 3E8. (Default v alue)
82E8/IRQ3
Enable onboard Serial port 1 and set IO address to 2E8.
8Disabled
Disable onboard Serial port 1.
49
GA-9ILDR Motherboard
COnboard Serial Port 2
8Auto
BIOS w ill automatically setup the port 2 address.
83F8/IRQ4
Enable onboard Serial port 2 and set IO address to 3F8.
82F8/IRQ3
Enable onboard Serial port 2 and set IO address to 2F8. (Default v alue)
83E8/IRQ4
Enable onboard Serial port 2 and set IO address to 3E8.
82E8/IRQ3
Enable onboard Serial port 2 and set IO address to 2E8.
8Disabled
Disable onboard Serial port 2.
CUART Mode Select
8Normal
Using as standard serial port. (Default v alue)
8IrDA
Using as IR and set to IrDA mode.
8ASKIR
Using as IR and set to ASKIR mode.
8SCR
Using as Smart Card Interface.
CUR2 Dupl ex Mode
This entry can be adjust w hen user select [IrDA] in UART Mode Selection.
8Full
IR function Duplex Full.
8Half
IR function Duplex Half.
COnboard Parallel Port
8378/IRQ7
Enable onboard LPT port and set address to 378/IRQ7. (Default v alue)
8278/IRQ5
Enable onboard LPT port and set address to 278/IRQ5.
83BC/IRQ7
Enable onboard LPT port and set address to 3BC/IRQ7.
8Disabled
Disable onboard LPT port.
50
BIOS Setup
CParallel Port Mode
8SPP
Using Parallel port as Standard Parallel Port. (Default v alue)
8EPP
Using Parallel port as Enhanced Parallel Port.
8ECP
Using Parallel port as Ex tended Capabilities Port.
8ECP+EPP
Using Parallel port as ECP & EPP mode.
8Normal
Using Parallel port as Normal.
CECP Mode Use DMA
This option is only available if the setting for the Parallel Port Mode option is ECP. This option
sets the DMA channel used by parallel port.
The options: 0,1,2,3 (Default value)
51
GA-9ILDR Motherboard
Boot
Phoenix -Aw ard WorkstationBIOS CMOS Setup Utility
Main
Adv anced Boot
Seccurity
PC Health
Clk/Voltage
4Hard Disk Boot Priority
Defaults
Ex it
Item Help
First Boot Dev ice
[Floppy ]
Second Boot Dev ice
[Hard Disk]
Third Boot Dev ice
[CD-ROM]
Boot Other Dev ice
[Enabled]
Console Redirection
x Baud Rate
19200
Agent connect v ia
NULL
Agent w ait time (min)
1
Agent after boot
[Disabled]
higf: Mov e
Enter: Select +/-/PU/PD: Value
F5: Prev ious Values
F10: Sav e
F7: Optimized Defaults
ESC: Ex it F1: General Help
F8: Q-Flash
Figure 3: Boot
C Hard Disk Boot Priority
These three fields determines which type of device the system attempt to boot from after
BIOS Post completed. Specifies the boot sequence from the available devices. If the first
device is not a bootable device, the system will seek for next available device.
52
BIOS Setup
C First / S econd/ Third Boot Device
Selec t the first/second/t\hird boot dev ice
8Floppy
Select your boot device priority by Floppy.
8LS120
Select y our boot dev ice priority by LS120.
8Hard Disk
Select y our boot dev ice priority by Hard Disk.
8CDROM
Select y our boot dev ice priority by CDROM.
8ZIP100
Select y our boot dev ice priority by ZIP100.
8USB-FDD
Select y our boot dev ice priority by USB-FDD.
8USB-ZIP
Select y our boot dev ice priority by USB-ZIP.
8USB-CDROM
Select y our boot dev ice priority by USB-CDROM.
8LAN
Select y our boot dev ice priority by LAN.
8Disabled
Select y our boot dev ice priority by Disabled.
C Boot Other Device
Selec t the specified boot dev ice priority .
8Enabled
Enable the specified boot device.
8Disabled
Disable the specified boot dev ice.
CConsole Redirection
8Enabled
Attempt the redirect console via COM port.
8Disabled
Attempt to redirect console w hen key board absent. (Default v aule)
CBaud Rate
Enable the specified of C. R Port Baud Rate.
8300
Enable the specific baud rate at 300.
81200
Enable the specific baud rate at 1200.
89600
Enable the specific baud rate at 9600.
819200
Enable the specific baud rate at 19.2K. (Default value)
838400
Enable the specific baud rate at 38.4K.
857600
Enable the specific baud rate at 57.6K.
8115200
Enable the specific baud rate at 115.2K.
53
GA-9ILDR Motherboard
CAgent wait time
Timeout w ait for connection
8Option: 1 (Default v alue), 2, 4, 8
CAgent after boot
8Enabled
Enable this option to keep Agent running after OS boot.
8Disabled
Disable this function. (Default v alue)
54
GA-9ILDR Motherboard
Power Management Setup
Phoenix -Aw ard WorkstationBIOS CMOS Setup Utility
Adv anced
Pow er Management Setup
Item Help
ACPI Function
[Enabled]
Soft Off by PWR-BTTN
[Instant-Off]
PME Ev ent Wake Up
[Disabled]
PWRON After PWR-Fail
[Off]
Wakeup On Ring
[Disabled]
Resume By Alarm
[Disabled]
x Date (of Month) Alarm
0
x Time (hh: mm: ss)
0:0:0
POWER ON Function
[Any Key ]
x KB Pow er On Passw ord
Enter
x Hot Key Pow er On
Ctrl + F1
higf: Mov e
Enter: Select +/-/PU/PD: Value
F5: Prev ious Values
F10: Sav e
F7: Optimized Defaults
F8: Q-Flash
Figure 2-4: Pow er Management Setup
55
ESC: Ex it F1: General Help
BIOS Setup
C ACPI Function
8Enabled
Enable ACPI function. (Default Value)
8Disabled
Disable this function.
C Soft-off by PWR-BTTN
8Instant-off
Press pow er button then Pow er off instantly . (Default)
8Delay 4 Sec.
Press pow er button 4 sec to Pow er off. Enter suspend if button is pressed less
than 4 sec.
C Wake Up On Ring
8Disabled
Disable Wake Up On Ring function. (Default v alue)
8Enabled
Enable Wake Up On Ring function.
C PME Event Wake Up
8Enabled
Enable PME Ev ent w ake up function. (Default v alue)
8Disabled
Disable PME ev ent w ake up function.
C Resume by Alarm
You can set "Resume by Alarm" item to enabled and key in Data/time to pow er on sy stem.
8Disabled
Disable this function. (Default)
8Enabled
Enable alarm function to POWER ON sy stem.
If RTC Alarm Lead To Pow er On is Enabled.
Date ( of Month) Alarm :
Ev ery day , 1~31
Time ( hh: mm: ss) Alarm :
(0~23) : (0~59) : (0~59)
56
GA-9ILDR Motherboard
C Power On Function
8Passw ord
Enter from 1 to 5 characters to set the Key board Pow er On Passw ord.
8Hot Key
Press specified Hot Key s (Described in the follow ing category ) to pow er on
sy stem.
8Mouse Mov e
Mov e mouse to pow er sy stem.
8Mouse Click
Mouse double click to pow er sy stem.
8Any Key
Press any key to pow er on sy stem. (Default v alue)
8BUTTON ONLY
Press the pow er button to pow er on sy stem.
8Key board 98
if y our key board has “key board 98” button, y ou can press the key to pow er
on y our sy stem.
4 KB Power ON Password
This entry can be adjust when user select [Password] at Power On Function.
Press [Enter] to set password.
4 Hot Key Power ON
This entry can be adjust when user select [Hot Key] at Power On Function.
The hot keys options are: [Ctrl-F1], [Ctrl-F2], [Ctrl-F3], [Ctrl-F4], [Ctrl-F5], [Ctrl-F6], [Ctrl-F7],
[Ctrl-F8], [Ctrl-F9], [Ctrl-F10], [Ctrl-F11] and [Ctrl-F112].
This Default setting is [Ctrl-F1].
57
BIOS Setup
Security
Phoenix -Aw ard WorkstationBIOS CMOS Setup Utility
Main
Adv anced Boot
Seccurity
PC Health
Clk/Voltage
Set Superv isor Passw ord
Defaults
Ex it
Item Help
Set User Passw ord
Passw ord Check
higf: Mov e
[Setup]
Enter: Select +/-/PU/PD: Value
F5: Prev ious Values
F10: Sav e
F7: Optimized Defaults
ESC: Ex it F1: General Help
F8: Q-Flash
Figure 4: Security
When you select this function, the following message will appear at the center of the screen to assist
you in creating a password.
Type the password, up to eight characters, and press <Enter>. You will be asked to confirm the
entered password. Type the password again and press <Enter>. You may also press <Esc> to abort the
selection and not enter a password.
To disable password, just press <Enter> when you are prompted to enter password. A message
“PASSWORD DISABLED” will appear to confirm the password being disabled. Once the password is
disabled, the system will boot and you can enter Setup freely.
The BIOS Setup program allows you to specify two separate passwords:
SUPERVISOR PASSWORD and a USER PASSWORD. When disabled, anyone may access
all BIOS Setup program function. When enabled, the Supervisor password is required for entering the
BIOS Setup program and having full configuration fields, the User password is required to access only
basic items.
If you select “System” at “Password Check” in Advance BIOS Features Menu, you will be
prompted for the password every time the system is rebooted or any time you try to enter Setup Menu.
If you select “Setup”at “Password Check”in Advance BIOS Features Menu, you will be prompted
only when you try to enter Setup.
C Password Check
Select whether the password is required every time when the system boots or only when user enter
the setup.
58
GA-9ILDR Motherboard
PC Health
Phoenix -Aw ard WorkstationBIOS CMOS Setup Utility
Main
Adv anced Boot
Seccurity
PC Health
Clk/Voltage
Defaults
Ex it
Item Help
4Temperature
4Voltage
4FAN
Halt On
[All, But Key board]
igf: Mov e
Enter: Select +/-/PU/PD: Value
F5: Prev ious Values
F10: Sav e
F7: Optimized Defaults
ESC: Ex it
F1: General Help
F8: Q-Flash
Figure 5: PC Health
C Temperature
8Display the current CPU0/1 temperature, shutdow n temperature, SCSI controller, PCI connector,
SDRAM socket and LAN controller ambient temperature.
C Voltage: CPU 0/1 VCORE/ +12V/ +1.2V/ +1 .5V/ +3.3V/ +5V/ +1.8V/
+2.5V/ +1 .25V / +1.0V/ -1 2V/ STB +3.3V/ 5 VSB/ VBAT
8Detect sy stem's v oltage status automatically .
C FAN (RPM)
8Display the current CPUs and Sy stem 1/2 FAN speed.
59
GA-9ILDR Motherboard
C Halt On
The category determines whether the computer will stop if an error is detected during power up.
8NO Errors
The sy stem boot w ill not stop for any error that may be detected
and y ou w ill be prompted.
8All Errors
Whenev er the BIOS detects a non-fatal error the sy stem w ill be
stopped.
8All, But Key boar
The sy stem boot w ill not stop for a key board error; it w ill stop for
8All, But Diskette
The sy stem boot w ill not stop for a disk error; it w ill stop for all
all other errors. (Default v alue)
other errors.
8All, But Disk/Key
The sy stem boot w ill not stop for a key board or disk error; it w ill
stop for all other errors.
60
BIOS Setup
CLK / Voltage
Phoenix -Aw ard WorkstationBIOS CMOS Setup Utility
Main
Adv anced Boot
Seccurity
PC Health
Auto Detect DIMM/PCI CLK
[Enabled]
Spread Spectrum
[Disabled]
higf: Mov e
Enter: Select +/-/PU/PD: Value
F5: Prev ious Values
Clk/Voltage
Ex it
Item Help
F10: Sav e
F7: Optimized Defaults
Defaults
ESC: Ex it F1: General Help
F8: Q-Flash
Figure 6: Clk/Voltage
C Auto Detect DIMM/PCI Clk
8Enabled
Disable PCI slot clock if no PCI dev ice is plugged into corresponding PCI slot.
(Default v alue)
8Dsiabled
Enable all PCI slot clocks ev en no PCI dev ice is plugged into any PCI slot.
C Spread S pectrum
When the motherboard's clock generator pulses, the ex trem e v alues (spikes) of the pulses
creates EMI (Electromagnetic Interference). The Spead Spectrum function reduces the EMI
generated by m odulating the puls es so that the spikes of the pulses are reduced to flatter
curv es. It does so by v ary ing the frequency so that it doesn't use any particular frequenc y for
more than a moment. This reduces interference problems w ith other electronic s in the area.
8Enabled
Enable specific spread spectrum.
8Dsiabled
Disable this function. (Default v alue)
61
GA-9ILDR Motherboard
Defaults
Phoenix -Aw ard WorkstationBIOS CMOS Setup Utility
Main
Adv anced Boot
Seccurity
PC Health
Clk/Voltage
Load Optimized Defaults
higf: Mov e
Defaults
Ex it
Item Help
Enter: Select +/-/PU/PD: Value
F5: Prev ious Values
F10: Sav e
F7: Optimized Defaults
ESC: Ex it F1: General Help
F8: Q-Flash
Figure 7: Defaults
CLoad Optimized Defaults
When you press <Enter> on this item, you will get a confirmation dialog box with a message
as below:
Load O ptimal Defaults? ( ( Y/ N ) Y
62
BIOS Setup
Exit
Phoenix -Aw ard WorkstationBIOS CMOS Setup Utility
Main
Adv anced Boot
Seccurity
PC Health
Clk/Voltage
Sav e & Ex it Setup
Defaults
Ex it
Item Help
Sav e & Turn Off
Ex it Without Sav ing
higf: Mov e
Enter: Select +/-/PU/PD: Value
F5: Prev ious Values
F10: Sav e
F6: Fail-Safe Defaults
ESC: Ex it F1: General Help
F7: Optimized Defaults
Figure 8: Ex it
CSave & Exit Setup
Type “Y” will quit the Setup Utility and save the user setup value to RTC CMOS.
Type “N” will return to Setup Utility.
CSave & Turn Off
Type “Y” will quit the Setup Utility and save the user setup value to RTC CMOS and turn of power
automatically.
Type “N” will return to Setup Utility.
CExit Without Saving
Type “Y” will abandon all data and quit without saving.
Type “N” will return to Setup Utility.
63
GA-9ILDR Motherboard
Chapter 4 SCSI BIOS and Configuration Utility
Overview
A SCSI BIOS is the bootable ROM code that manages SCSI hardware resources. The LSI
SCSI BIOS integrates with a standard sy stem BIOS to extend the standard disk serv ice
routine that is provided through INT13h. During the boot time initialization, the SCSI BIOS
determines if the system BIOS has already installed other hard disks, such as an IDE drive. If
so, the SCSI BIOS maps any SCSI drives it finds behind the already-installed drive( s).
Otherwise, the SCSI BIOS installsdrives starting with the system boot drive and the system
boots from adrive controlled by the SCSI BIOS.
ENTERING SETUP
Power ON the computer and press Ctrl+C immediately will allow you to enter Setup.
4-1. Main Menu
When invoked, the Configuration Utility (CU) first displays the Main Menu, which contains a
scrolling list of up to 256 LSI Logic PCI to SCSI host adapters and nformation about each of
them. Use the arrow keys to select an adapter. Press Enter to view and modify the properties
of the selected adapter, and to gain access to the attached devices. The CU can only access
adapters with LSI Logic Control enabled. After selecting an adapter and pressing Enter, the
CU scans the adapter’s SCSI bus and then displays the Adapter Properties screen.
The Main Menu contains two selections: Boot Adapter List and Global Properties. The Boot
Adapter List allows selection and order ing of boot adapters. The Global Properties allows
changes to global settings.
64
GA-9ILDR Motherboard
LSI Logic MPT SCSI Setup Utility
<Boot Adapter List>
Version -x.xxx
<Global Properties>
LSI Logic Host Bus Adapters
Adapter
PCI Dev/
Port IRQ
NVM Boot
Bus Func Number
Order
LSI Logic
RAID
Control
Status
<LSI1030
2
28>
9000 10
Yes
0
Enabled
--
<LSI1030
2
29>
9400 11
Yes
1
Enabled
--
Esc=Abort/Exit ArrowKeys=Select Item
+/- = Change [Item]
Home/End=Select Item
Enter=Execute <Item>
F2=Menu
Main Menu Field Description
Field
Adapter
PCI Bus
Dev/Func
Port Number
IRQ
NVM
Boot Order
LSI Logic
Control
Description
Indicates the specific family of LSI Logic Host Adapters.
Indicates the PCI Bus number assigned by the system BIOS to an
adapter. The PCI Bus number can be between 0x00 and 0xFF.
Indicates the PCI Device and PCI Function assigned by the system
BIOS to an adapter. Bits [2:0] of this 8-bit value designate the PCI
Function. Bits [7:3] designate the PCI Device.
Indicates the I/O Port Number that communicates with an adapter.
The system BIOS assigns this number.
Indicates the Interrupt Request Line for the adapter. The system
BIOS assigns this value.
Indicates whether an adapter has nonvolatile memory. The possible
values are es or No.
Indicates the relative boot order of an adapter. The BIOS traverses
up to four adapters in the specified order in search of bootable
media. The possible values are 0, 1, 2, or 3. The Boot Adapter List
Menu modifies this item.
Indicates whether an adapter is eligible for LSI Logic software
control or is reserved for control by non-LSI Logic software.
65
GA-9ILDR Motherboard
4-1-1.
Boot Adapter List
LSI Logic MPT SCSI Setup Utility
Version -x.xxx
Boot Adapter List
Insert = Add an adapter
Adapter
PCI Dev/
Delete = Remove an adapter
Boot
Current
Next
Bus Func Order
Status
Boot
<LSI1030
2
28>
[0]
[On]
[On]
<LSI1030
2
29>
[1]
[On]
[On]
Press Insert to select an adapter from this list:
<LSI1030
<LSI1030
2
28>
2
29>
Esc=Abort/Exit ArrowKeys=Select Item
+/- = Change [Item]
Home/End=Select Item
Enter=Execute <Item>
F2=Menu
Figure 4-1-1: Boot Adapter List
The BootAdapter List Menu specifies the adapter boot order when more than one OS adapter
is present. The CU can designate up to four adapters as bootable. To access the Boot Adapter
Menu, select <Boot Adapter List> on the Main Menu and press enter. The CU then displays
the Boot Adapter List Menu.
To add an adapter to the boot list, press Insert while on the Boot Adapter List. This locates the
cursor on the adapter select list. Use the arrow keys to select an adapter and press Enter to
add it to the end of Boot Adapter List. To remove an adapter from the boot list, select the adapter
and press Delete. Select the adapter and press the “-” key to decrease the adapter¡¦s relative
order in the boot list, or press the “+” key to increase he adapter¡¦s relative order in the boot
list.
66
GA-9ILDR Motherboard
Boot Adpater List Menu Field Description
Field
Adapter
PCI Bus
Description
Indicates the specific family of LSI Logic Host Adapters.
Indicates the PCI Bus number assigned by the system BIOS to an
adapter. The PCI Bus number can be between 0x00 and 0xFF.
Dev/Func
Indicates the PCI Device and PCI Function assigned by the system
BIOS to an adapter. Bits [2:0] of this 8-bit value designate the PCI
Function. Bits [7:3] designate the PCI Device.
Boot Order
Indicates the relative boot order of an adapter. The BIOS traverses
up to four adapters in the specified order in search of bootable
media. The possible values are 0, 1, 2, or 3. The Boot Adapter List
Menu modifies this item.
Current Status Indicates if an adapter in the boot list was enabled during the most
recent boot.The Fusion-MPT SCSI BIOS ignores disabled adapters
and their attacheddevices, but these adapters and devices are
visible to the CU.
Next Boot
Specifies whether to enable an adapter upon the next boot.
67
GA-9ILDR Motherboard
4-1-2.
Global Properities
The Global Properties Menu allows configuration of the Display and Video modes, as well as
a pause if the CU displays an alert message. To access the Global Properties Menu, select
<Global Properties>he Main Menu and press Enter. The system then displays the on Global
Properties Menu.
LSI Logic MPT SCSI Setup Utility
Version -x.xxx
Global Properties
Pause When Boot Alert Displayed
[Yes]
Boot Information Display Mode
[Verbose]
Negotiate with devices
[Supported]
Video Mode
[Color]
Support Interrupt
[Hook interrupt, the Default]
<Restore Defaults>
Figure 4-1-2: Global Properities
68
GA-9ILDR Motherboard
Global Properities Menu Field Description
Field
Pause When Boot Alert
Displayed
Boot Information
Display Mode
Negotiate with Devices
Video Mode
Support Interrupt
<Restore Defaults>
Description
This option specifies whether or not the CU pauses
for user acknowledgement after displaying an alert
message during boot. To continue after displaying a
message, specify ‘No’. To wait for the user to press
any key after displaying a message, specify ‘Yes’.
This option specifies the information display mode of
the BIOS. It controls how much adapter and device
information the system displays during boot. You
can set the Display Mode to either ’Terse’ or ‘Verbose’.
Specify the Terse mode to display the minimum amount
of information. Specify theVerbose mode to display
detailed information.
This option sets the default value for synchronous
and wide negotiations with specified devices.
Options are: All, None, or Supported.
This option specifies the default video mode for the
CU. You can set the Video Mode to either ‘Color’
or ‘Monochrome’. The monochrome
settingenhances readability on a monochrome
monitor.
This option allows the ability to stop the system from
hanging on INT40.
Pressing Enter obtains default settings.
69
GA-9ILDR Motherboard
4-1-3.
Adapter Properties Menu
The Adapter Properties Menu allows you to view and modify adapter settings. It also provides
access to an adapter¡¦s device settings. To access the Adapter Properties Menu, select the
adapter on the Main Menu and press enter. The CU then displays the Adapter Properties
Menu for the selected adapter.
LSI Logic MPT SCSI Setup Utility
Version -x.xxx
Adapter Properties
Adapter
LSI1030
PCI
Dev/
Bus
Func
0
60
<Device Properties>
Host SCSI ID
[ 7]
SCSI Bus Scan Order
[Low to High (0..Max)]
Removable Media Support
[None]
CHS Mapping
[SCSI Plug and Play Mapping]
Spinup Delay (Secs)
[2]
Secondary Cluster Server
[No]
Termination Control
[Auto]
<Restore Defaults>
Esc=Abort/Exit ArrowKeys=Select Item
+/- = Change [Item]
Home/End=Select Item
Enter=Execute <Item>
F2=Menu
Figure 4-1-3: Adapter Properities
70
GA-9ILDR Motherboard
Adapter Properties Menu Field Description
Field
<Device
Properties>
<Mirroring
Properties>
<Synchronize
Mirror>
Host SCSI ID
SCSI Bus Scan
Order
Removable
Media Support
Description
Press Enter to view and modify device properties.
Press Enter to view and modify the mirroring properties. The
CU grays-out this field if the Integrated Mirroring feature is
currently unavailable. This could result from using firmware
that does not support the IM feature or having an
incompatiblefrom using firmware that does not support the
IM feature or having an incompatible setup.
If a mirrored volume currently exists, press enter to Whole
resynchronize the volume. The CU greys-out this field if the
current firmware in use does not support the IM feature or if
the existing mirrored volume does not need
resynchronization.
This field indicates the SCSI identifier of an adapter. LSI
Logic recommends setting this field to the highest priority
SCSI identifier, which is SCSI ID 7.
This field indicates the order in which to scan SCSI
identifiers on an adapter. Changing this item affects drive
letter assignments if more than one device is attached to an
adapter and might create a conflict with an operating system
that automatically assigns drive order.
This field specifies the removable media support option for
an adapter. There are three possible settings: None, Boot
Drive Only, and With Media Installed. ‘None’ indicates there is
no removable media support, whether the drive is selected
as first (BBS), or is the first in the scan order (non-BBS). ‘A
Boot Drive Only’ provides removable media support for a
removable hard drive if it is first in the scan order. ‘With
Media Installed?¦ provides removable media regardless of
the drive ordering.’With Media Installed’ provides removable
media regardless of the drive ordering.
71
GA-9ILDR Motherboard
Adapter Properties Menu Field Description (Cont.)
Field
CHS Mapping
Spinup Delay
Secondary
Cluster Server
Termination
Control
Restore Defaults
Description
This field defines the Cylinder Head Sector (CHS) values
mapping method. CHS Mapping allows two settings: ‘SCSI
Plug and Play Mapping’ (Default value) and ‘Alternate CHS
Mapping’. SCSI Plug and Play Mapping automatically deter
mines the most efficient and compatible mapping. Alternate
CHS Mapping utilizes an alternate method that might be
required if a device is moved betweenadapters from
different vendors.
These options have no effect after the FDISK command
partitions the disk. To change the CHS Mapping on a
partitioned disk, use the FDISK command to delete all
partitions and reboot the system to clear the memory. Be
certain that the correct disk is the target of an FDISK
command.
This field indicates the number of seconds to wait between
spin-ups of devices attached to an adapter. Staggered
spin-ups balance the electrical current load on the system
during boot. The default value is 2 seconds, with choices
between 1 and 10 seconds.
The options for this field are ‘Yes’ or ‘No’ (Default). Setting
this field to Yes indicates that the Fusion-MPT adapter shares
devices with another adapter, and prevents the MPT
SCSI BIOS from issuing SCSI Bus resets. This is a equirement
for the Microsoft Cluster Server.
This field indicates if an adapter has automatic termination
control. The options for this field are ‘Auto’ or ‘Off’. ‘Auto’
indicates that the adapter automatically determines to enable
or disable its termination. ‘Off’ indicates that termination at
the adapter is off and that other devices at the ends of the
SCSI bus must terminate the bus. If Auto is grayed out, it
means that termination is not programmable.
To obtain default settings, press Enter.
72
GA-9ILDR Motherboard
4-2. Exiting the SCSI Setup Utility
Because some changes only take effect after the system reboots, it is important to exit the
configuration utility properly. To exit, press Esc and respond to the verification prompts. Some
changes might be lost if you reboot before properly exiting the Configuration Utilities.
73
GA-9ILDR Motherboard
Revision History
Chapter
5 Technical Reference
Block Diagram
74
Driv er Installation
Revision History
Chapter
5 Driver Installation
A.
Intel Chipset Software Installation Utilities
Insert the driver CD-title that came with your motherboard into your CD-ROM driver, the driver
CD-title will auto start and show a series of Setup Wizard dialog boxes. If not, please double click the
CD-ROM device icon in "My computer", and execute the setup.exe.
Installation Procedures:
1. The CD auto run program starts, Double click on “Intel Chipset Software Installation Utilities” to
start the installation.
2. Then, a series of installation wizards appear. Follow up the wizards to install the drivers.
3.Setup completed, click “Finish” to restart your computer.
Auto Run windows
Setup Wizard
1.Click "Intel Chipset Software
Installation Utility" item.
2.Click "Next".
(2)
(1)
License Aggremment
Readme Information
3.Click "Yes".
4.Click "Next".
(3)
(4)
75
GA-9ILDR Motherboard
Installation Completed
5. Installation completed, Click
"Finish" to restart computer.
(5)
76
Driv er Installation
B.
Broadcom BCM5751 Feature Application Installation
Insert the driver CD-title that came with your motherboard into your CD-ROM driver, the driver
CD-title will auto start and show a series of Setup Wizard dialog boxes. If not, please double click the
CD-ROM device icon in "My computer", and execute the setup.exe.
Installation Procedures:
1. The CD auto run program starts, Double click on “Broadcom BCM5751” to start the installation.
2. Then, a series of installation wizards appear. Follow up the wizards to install the applications.
Auto Run windows
Broadcom BCM5751 Driver
1.Click "Managementr Program” item.
1.Click "Broadcom BCM5751 Driver”
item.
(2)
(1)
Preparing to install
Setup program
4.Click "Next".
(4)
(3)
77
GA-9ILDR Motherboard
License Aggremment
Selecting features
6. Select the desired features
and click “Next”.
5.Click "Yes".
Selecting Features
Control Suite This feature will install Broadcom Advanced Control Suite graphical user interface.
This appliction contains a set of utilities supporting diagnostic, monitoring, and
configuration for Broadcom network adapters.
BASP
This feature will install Broadcom Advanced Server Program. This NDIS
intermediates driver software allow for load balancing and failover, and VLAN
capabilities.
SNMP
This feature will install SNMP sub-agent, allowing he SNMP manager to monitor
the Broadcom Network Adapters. Note that the the Microsoft SNMP Service must
be running for this feature to function properly.
CIM Provider
This feature will install Commond Information Model provider that presents network
adapter information to WMI based management applications.
6. Installation completed, Click
"OK”.
78
Driv er Installation
C.
SCSI Driver Installation
Insert the driver CD-title that came with your motherboard into your CD-ROM driver, the driver
CD-title will auto start and show a series of Setup Wizard dialog boxes. If not, please double click the
CD-ROM device icon in "My computer", and execute the setup.exe.
Installation Procedures:
1. The CD auto run program starts, Double click on “SCSI Driver” to start the installation.
2. Select the specific folder refering to your operating system.
Auto Run windows
Operating System Menu
1. Click "SCSI Driver" item.
(2)
(1)
79
GA-9ILDR Motherboard
D.
DirectX 9.0 Driver Installation
Insert the driver CD-title that came with your motherboard into your CD-ROM driver, the driver
CD-title will auto start and show the installation guide. If not, please double click the CD-ROM device
icon in "My computer", and execute the setup.exe.
Installation Procedures:
1. The CD auto run program starts, Double click on “Directx9.0” to start the installation.
2. Then, a series of installation wizards appear. Follow up the wizards to install the drivers.
3.Setup completed, click “Finish” to restart your computer.
Auto Run windows
License Agreement
2.Select “I accept the
agreement and click "Next".
1.Click "DirectX 9.0 Driver" item
(2)
(1)
Starting Installaiton
Installaiton Wizard completed
4.Click "Finish" to complete
the installation.
3. Click “Next” to start the
installation .
(3)
(4)
80
Driv er Installation
E.
If you don’t find specific drivers
If you don’t find specific drivers that you want to install, please take following steps install desired
derivers.
Installation procedures
Step 1 Insert the driver CD-title that came with your motherboard into your CD-ROM driver.
Step 2 Go to the Desktop of your computer
Step 3 Go to Start --> My Computer
Step 4 Right click “My Computer” and select Properities.
Step 5 Select “Hardware” tab and click on “Device Manager”
Step 6 Double click the hardware device with question mark to install the required drivers.
81
GA-9ILDR Motherboard
82
Appex dix
Revision History
Chapter
6 Appendix
Acronyms
Acronyms
ACPI
APM
AGP
AMR
ACR
BBS
BIOS
CPU
CMOS
CRIMM
CNR
DMA
DMI
DIMM
DRM
DRAM
DDR
ECP
ESCD
ECC
EMC
EPP
ESD
FDD
FSB
HDD
IDE
IRQ
Meaning
Advanced Configuration and Power Interface
Advanced Power Management
Accelerated Graphics Port
Audio Modem Riser
Advanced Communications Riser
BIOS Boot Specification
Basic Input / Output System
Central Processing Unit
Complementary Metal Oxide Semiconductor
Continuity RIMM
Communication and Networking Riser
Direct Memory Access
Desktop Management Interface
Dual Inline Memory Module
Dual Retention Mechanism
Dynamic Random Access Memory
Double Data Rate
Extended Capabilities Port
Extended System Configuration Data
Error Checking and Correcting
Electromagnetic Compatibility
Enhanced Parallel Port
Electrostatic Discharge
Floppy Disk Device
Front Side Bus
Hard Disk Device
Integrated Dual Channel Enhanced
Interrupt Request
83
GA-9ILDR Motherboard
Acronyms
I/O
IOAPIC
ISA
LAN
LBA
LED
MHz
MIDI
MTH
MPT
NIC
OS
OEM
PAC
POST
PCI
RIMM
SCI
SECC
SRAM
SMP
SMI
USB
VID
Meaning
Input / Output
Input Output Advanced Programmable Input Controller
Industry Standard Architecture
Local Area Network
Logical Block Addressing
Light Emitting Diode
Megahertz
Musical Instrument Digital Interface
Memory Translator Hub
Memory Protocol Translator
Network Interface Card
Operating System
Original Equipment Manufacturer
PCI A.G.P. Controller
Power-On Self Test
Peripheral Component Interconnect
Rambus in-line Memory Module
Special Circumstance Instructions
Single Edge Contact Cartridge
Static Random Access Memory
Symmetric Multi-Processing
System Management Interrupt
Universal Serial Bus
Voltage ID
84
Appex dix
&
Technical Support/RMA Sheet
Customer/Country:
Contact Person:
Company:
E-mail Add. :
Model name/Lot Number:
BIOS version:
O.S./A.S.:
Hardware
Configuration
CPU
Memory
Brand
Video Card
Audio Card
HDD
CD-ROM /
DVD-ROM
Modem
Network
AMR / CNR
Keyboard
Mouse
Power supply
Other Device
Mfs.
Phone No.:
PCB revision:
Model name
Size:
Driver/Utility:
Problem Description:
&
85