1
Multipla 9V LCD
User manual
Page 2
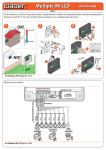
Remove the cover of the battery pocket from its seat, connect the batteries and position them in the pocket,
applying light pressure. Use only new 9 volt alkaline batteries, type IEC 6LR61. Refit the battery cover. The
appliance is able to operate with one battery only, although the life of the battery will be shorter (about 6
months with a daily watering program using four lines);
1
2
3
3d
2d
a
4d
Y
7d
NC
UE
h
24
EQ
FR
h
12
20 30
8h
S
60
UR
T+
AR
ST
L
UA
AN
/M
ST
TE
...HO
10
20
30
15
T
60
5
10
SE
RE
20
30
15
60
5
10
20 30
15
60
9 Vne
li
ca
5
10
20
15
30
60
5
Al
10
20
30
15
60
5
10
5
3d
2d
4d
Y
7d
NC
UE
h
24
EQ
FR
h
12
20
8h
URS
60
HO
ART
ST
+ ...
10
20
30
15
L
UA
AN
/M
ST
TE
T
20
15
30
60
60
5
a
2d
60
30
60
30
60
L
UA
10
20
15
click!
D
IPLA
DC
9V
AN
/M
ST
TE
5
LC
15
LT
MU
7d
Y
ART
ST
NC
UE
EQ
Y
NC
UE
EQ
FR
10
20
15
30
60
5
R
60
5
60
20
60
5
20
30
60
30
60
5
5
20 30
60
5
10
20
5
15
30
60
5
10
20
15
30
10
20
15
10
ET
RES
15
15
10
30
10
15
10
20 30
20
15
+
60
10
60
...H
T
E
ES
AN
/M
ST
TE
20 30
O
...H
L
UA
FR
20 30
OU
T+
AR
ST
5
10
4d
7d
8h
URS
h
24
5
5
4d
h
8h
RS
10
20
15
30
3d
12
5
10
20
15
3d
2d
h
24
h
12
10
SE
RE
30
b
30
60
5
10
5
10
20
a
15
30
60
5
10
b
5
c
For Multipla 9V LCD (p/n): 8060
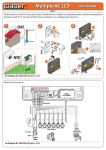
On fitting the batteries, the timer automatically runs a test cycle, closing all the valves, during which each of the
Leds will blink once in turn.
1
3d
2d
4d
CY
7d
h
24
UEN
led-valve 1
...
Closing valve 1...
...
led-valve 2
...
...closing valve 2...
...
led-valve 3
...
...closing valve 3...
...
led-valve 4
...
...closing valve 4...
...
led-valve 5
...
...closing valve 5...
...
led-valve 6
.
...closing valve 6.
EQ
FR
h
12
20
8h
RS
30
60
OU
T+
AR
ST
AL
/M
ST
TE
U
AN
...H
10
20
30
15
T
SE
5
60
10
RE
20
15
30
60
5
10
20
15
30
60
5
10
20
15
30
60
5
10
20
15
30
60
5
10
LA
5
IP
LT
MU
DC
9V
L
CD
For Multipla 9V LCD (p/n): 8060