1
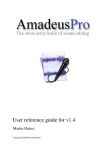
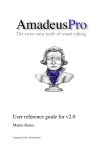
Mental Software 5.1 User manual
User Manual
Mindfield® Mental Software 5.1
Welcome to this user manual
for the Mindfield® Mental Software 5.1
Please read this document very carefully.
Click on a chapter you are interessted in.
If you read this manual for the first time please
read the chapters in their order starting with the first.
Only after you read all,
try by yourself.
file:///C|/Dokumente%20und%20Einstellungen/Jür...20Hübner-Kosney/Desktop/help/help/en/index.htm (1 von 2) [06.02.2007 21:25:17]
Mental Software 5.1 User manual
1. Before you start
2. The configuration dialog
3. The welcome dialog
4. Playing a session
5. Creating a session
6. Insert music
7. The option dialog
8. The audio cd ripper
In case of trouble
Advanced editing functions
MulticolorPro features
Copyright 2003-2007 Mindfield Biosystems Ltd.
All rights reserved.
file:///C|/Dokumente%20und%20Einstellungen/Jür...20Hübner-Kosney/Desktop/help/help/en/index.htm (2 von 2) [06.02.2007 21:25:17]
Before you start
Last chapter
Startpage
Next chapter
Congratulations
you bought a Digital Mentalsystems from Mindfield®
You now have the software from CD-ROM or from our Website.
To install the software please make a double click on the install program which is
found on your CD-ROM in the directory "Mental Software". Choose the subdirectory which
belongs to your specific operation system.
Our install routine will lead you through the installation process.
After a successful finish of the installation you will find an entry in the startmenue from which you
can start the software. You also find a link to deinstall the software.
You get a desktop icon if you choose it during the installation process.
Now you can start the software with a click on the link or the desktop icon. Have fun!
Please continue reading this manual before you do something by yourself.
Last chapter
Startpage
Next chapter
file:///C|/Dokumente%20und%20Einstellungen/Jürgen%2...ey/Desktop/help/help/en/Html/01before_you_start.htm [06.02.2007 21:25:18]
The configuration dialog
Last chapter
Startpage
Next chapter
The configuration dialog:
After the first start of the software you see the configuration dialog:
Here you can see, that a MulticolorPro model has been autodetected.
You will also find the models Basic and ProUSB in the table.
If you own a digital mentalsystem with USB connection you only have to lick on "USB
Mentalsystem conntected".
If you do not see your model in the list an error occured. The driver may not be installed correctly
or the Digital Mentalsystem is not connected. Please read the chapter "In case of trouble".
If you own an older model with printer port connection (parallel port) please click on "Printer
port". The settings of the printer port have to be done later in the option dialog. In normal cases
the standard settings of the printer port which are now already set are correct and you do not
have to do anything in the option dialog later. Of course you need to have installed "DLportIO"
before you start the software.
Last chapter
Startpage
Next chapter
file:///C|/Dokumente%20und%20Einstellungen/Jürgen%2...esktop/help/help/en/Html/02configuration_dialog.htm [06.02.2007 21:25:19]
The welcome dialog
Last chapter
Startpage
Next chapter
The welcome dialog:
You have four options to choose from:
Create new session: Let's you create a new, empty session as you like to do with the
possibility to play the session afterwards
Edit existing session: Opens an existing session (included in delivery or self created) to
edit for and to play.
Play existing session: Opens an existing session to be played without any editing.If you
wanna start as fast as possible use this option to play one of the 20 included
sessions.
Help: Opens the help
file:///C|/Dokumente%20und%20Einstellungen/Jürg.../Desktop/help/help/en/Html/03welcome_dialog.htm (1 von 2) [06.02.2007 21:25:20]
The welcome dialog
Last chapter
Startpage
Next chapter
file:///C|/Dokumente%20und%20Einstellungen/Jürg.../Desktop/help/help/en/Html/03welcome_dialog.htm (2 von 2) [06.02.2007 21:25:20]
Playing a session
Last chapter
Startpage
Next chapter
Playing a session:
We start with the welcome dialog.
Click on "Play existing session".
You see a session overview with all available sessions.
file:///C|/Dokumente%20und%20Einstellungen/Jürg.../Desktop/help/help/en/Html/04play_a_session.htm (1 von 7) [06.02.2007 21:25:21]
Playing a session
We choose "Deep Relaxation in 20min".
file:///C|/Dokumente%20und%20Einstellungen/Jürg.../Desktop/help/help/en/Html/04play_a_session.htm (2 von 7) [06.02.2007 21:25:21]
Playing a session
Click on "Load".
The session will be loaded and you are asked if you would like to insert background music. Use
this function everytime, a session with music is more comfortable as without music.
Click on "Yes".
file:///C|/Dokumente%20und%20Einstellungen/Jürg.../Desktop/help/help/en/Html/04play_a_session.htm (3 von 7) [06.02.2007 21:25:21]
Playing a session
You see an overview with all included music files
(later you can add your own music you have):
Let's choose the file "Regenwald.mp3".
file:///C|/Dokumente%20und%20Einstellungen/Jürg.../Desktop/help/help/en/Html/04play_a_session.htm (4 von 7) [06.02.2007 21:25:21]
Playing a session
With a click on "Open" you will insert the file as background music.
Now you can start the session with a click on "Play".
file:///C|/Dokumente%20und%20Einstellungen/Jürg.../Desktop/help/help/en/Html/04play_a_session.htm (5 von 7) [06.02.2007 21:25:21]
Playing a session
Choose the mode in which the LEDs should flash and the time to start the session:
In the alternating mode the LEDs will flash out of phase. That is developed with the University of
Hamburg (Germany) and will give you best effects.
In the synchron mode the LEDs will flash synchron like all other Mind Machines on the market
will do.
Click now on "Play".
The session is playing.
With the controller you can adjust the volume of tones and music. At the basic model (ProUSB)
also the brightness of the LEDs. The brightness of the MulticolorPro LEDs is controlled at the
file:///C|/Dokumente%20und%20Einstellungen/Jürg.../Desktop/help/help/en/Html/04play_a_session.htm (6 von 7) [06.02.2007 21:25:21]
Playing a session
case.
Now close your eyes (keep them closed during the whole session), sit back and relax!
After the session is finished you have several possibilities:
The options are self explaining.
Last chapter
Startpage
Next chapter
file:///C|/Dokumente%20und%20Einstellungen/Jürg.../Desktop/help/help/en/Html/04play_a_session.htm (7 von 7) [06.02.2007 21:25:21]
Creating a session
Last chapter
Startpage
Next chapter
Creating a session:
We start with the welcome dialog.
Click on "Create new session".
You will see an empty window.
file:///C|/Dokumente%20und%20Einstellungen/Jürg...esktop/help/help/en/Html/05create_a_session.htm (1 von 8) [06.02.2007 21:25:23]
Creating a session
With the left mouse button you can set some points in the white area, like these:
file:///C|/Dokumente%20und%20Einstellungen/Jürg...esktop/help/help/en/Html/05create_a_session.htm (2 von 8) [06.02.2007 21:25:23]
Creating a session
You see a color gradient in the background which will show you the brainwave state you activate
with the choosen frequencies. There we have four colors which differ the four known brainwave
states, Beta, Alpha, Theta and Delta.
To get more informations about a specefic state please click an the Greek letter:
file:///C|/Dokumente%20und%20Einstellungen/Jürg...esktop/help/help/en/Html/05create_a_session.htm (3 von 8) [06.02.2007 21:25:23]
Creating a session
Now we want to adjust the setted points.
To adjust a point click on it:
In the right lower edge of the screen you find the informations about the point you clicked on.
This points is at 4min 11 sec and has the frequency of 6,12 Hz. To get this to another precise
file:///C|/Dokumente%20und%20Einstellungen/Jürg...esktop/help/help/en/Html/05create_a_session.htm (4 von 8) [06.02.2007 21:25:23]
Creating a session
value click on the numbers and overwrite them:
And adjust the time to 4:30
In this way you can adjust all points to get precise sessions.
Now we have to write a description of these session. Click on the button "Description":
file:///C|/Dokumente%20und%20Einstellungen/Jürg...esktop/help/help/en/Html/05create_a_session.htm (5 von 8) [06.02.2007 21:25:23]
Creating a session
The description dialog will open:
Here you can do all inputs to make a session recognizable. If you wish you can protect a session
against later editing by setting them read only.
file:///C|/Dokumente%20und%20Einstellungen/Jürg...esktop/help/help/en/Html/05create_a_session.htm (6 von 8) [06.02.2007 21:25:23]
Creating a session
With a click on "OK" you save your settings.
Now you only have to save the session with a click on "Save".
Afterwards you see your session in the session overview when you click on the button "Session
overview":
file:///C|/Dokumente%20und%20Einstellungen/Jürg...esktop/help/help/en/Html/05create_a_session.htm (7 von 8) [06.02.2007 21:25:23]
Creating a session
Well done! Now you have created your first own session! In the next chapter you learn how to
insert music into a session.
Last chapter
Startpage
Next chapter
file:///C|/Dokumente%20und%20Einstellungen/Jürg...esktop/help/help/en/Html/05create_a_session.htm (8 von 8) [06.02.2007 21:25:23]
Insert music
Last chapter
Startpage
Next chapter
Inser music into a session:
Let's use the testsession from the last chapter:
Click on the button "Music editor":
file:///C|/Dokumente%20und%20Einstellungen/Jürg...ey/Desktop/help/help/en/Html/06insert_music.htm (1 von 8) [06.02.2007 21:25:25]
Insert music
The graph is now grey and you can insert an audiofile with the button "Insert music file" in the
toolbar:
A dialog will appear:
file:///C|/Dokumente%20und%20Einstellungen/Jürg...ey/Desktop/help/help/en/Html/06insert_music.htm (2 von 8) [06.02.2007 21:25:25]
Insert music
Choose a file and click on "Open", you can also prelisten the file:
file:///C|/Dokumente%20und%20Einstellungen/Jürg...ey/Desktop/help/help/en/Html/06insert_music.htm (3 von 8) [06.02.2007 21:25:25]
Insert music
You now have to choose from inserting the music as background music or free positioning:
We choose to insert them as "Background music". Click on "Background music":
file:///C|/Dokumente%20und%20Einstellungen/Jürg...ey/Desktop/help/help/en/Html/06insert_music.htm (4 von 8) [06.02.2007 21:25:25]
Insert music
Now we want to insert a second file as free positioning. Click again on "Insert music file" and
choose another file.
To show you the function free positioning best we use a short mp3 file which is not included in
your software.
file:///C|/Dokumente%20und%20Einstellungen/Jürg...ey/Desktop/help/help/en/Html/06insert_music.htm (5 von 8) [06.02.2007 21:25:25]
Insert music
Now we chose "Free positioning":
You see the music file in a second sound track:
file:///C|/Dokumente%20und%20Einstellungen/Jürg...ey/Desktop/help/help/en/Html/06insert_music.htm (6 von 8) [06.02.2007 21:25:25]
Insert music
With drag and drop you can move the frame of the musicfile to a later start in the session:
file:///C|/Dokumente%20und%20Einstellungen/Jürg...ey/Desktop/help/help/en/Html/06insert_music.htm (7 von 8) [06.02.2007 21:25:25]
Insert music
If you click on the frame you can also change it's lengh and delete it:
With the trash icon you can delete it, with the arrow you can change the lengh. Shorten the
music file to let it end earlier or make it longer to repeat a part of it.
Use this function very ofter to make great sessions with music and speech for best
entertainment and effects.
If you want to cut, edit and record audio files we prefer a free audio editor called "Audacity" It is
available in the internet at http://audacity.sourceforge.net/
If you want to insert your own audio files, you have to copy them first the the subdirectoy
"musics" of your software installation directory. Otherwise you won't be able to open your
files in the insert-music-dialog.
Last chapter
Startpage
Next chapter
file:///C|/Dokumente%20und%20Einstellungen/Jürg...ey/Desktop/help/help/en/Html/06insert_music.htm (8 von 8) [06.02.2007 21:25:25]
The option dialog
Last chapter
Startpage
Next chapter
The option dialog:
You can open the options dialog with a click on "Options"
The option dialog will appear:
file:///C|/Dokumente%20und%20Einstellungen/Jürg...y/Desktop/help/help/en/Html/07option_dialog.htm (1 von 3) [06.02.2007 21:25:25]
The option dialog
With the file card "Language" you can set the programms language.
In the file card "Session" you can set the time for fade it and fade out of the tones, music and
LEDs. Everytime a session starts or ends you have a nice fading process.
file:///C|/Dokumente%20und%20Einstellungen/Jürg...y/Desktop/help/help/en/Html/07option_dialog.htm (2 von 3) [06.02.2007 21:25:25]
The option dialog
The file card "Mentalsystem" shows you all detected Digital Mentalsystems at your PC. You can
test the LEDs if you click on "Test LEDs". The LEDs must flash if you test them. If you are not
flashing there is a problem with the driver or the device is not connected, please read the chapter
"In case of trouble".
If you own an older model you can set the options for the printer port right here. Normally the
standard options 888 are working. If not try the other options.
A click on "Save settings" will remember your settings.
Last chapter
Startpage
Next chapter
file:///C|/Dokumente%20und%20Einstellungen/Jürg...y/Desktop/help/help/en/Html/07option_dialog.htm (3 von 3) [06.02.2007 21:25:25]
The CD ripper
Last chapter
Startpage
Next chapter
The CD ripper:
You can convert normal audio cds to your hard drive with this function to insert the tracks into
your self created sessions.
A dialog can be seen:
file:///C|/Dokumente%20und%20Einstellungen/Jürg...ey/Desktop/help/help/en/Html/08cdripper_eng.htm (1 von 7) [06.02.2007 21:25:27]
The CD ripper
Take care that your audio cds are already in your cd-rom drive before starting the ripper
otherwise they will not be recognized.
After a click on "Next" you see all cd-rom drives. In this example we have three different audio
cds in three cd-rom drives.
file:///C|/Dokumente%20und%20Einstellungen/Jürg...ey/Desktop/help/help/en/Html/08cdripper_eng.htm (2 von 7) [06.02.2007 21:25:27]
The CD ripper
Choose your drive and click on "Next"
Now you see all tracks on this cd:
file:///C|/Dokumente%20und%20Einstellungen/Jürg...ey/Desktop/help/help/en/Html/08cdripper_eng.htm (3 von 7) [06.02.2007 21:25:27]
The CD ripper
Select one or more tracks of your choice. After a click on a track a hint is given:
file:///C|/Dokumente%20und%20Einstellungen/Jürg...ey/Desktop/help/help/en/Html/08cdripper_eng.htm (4 von 7) [06.02.2007 21:25:27]
The CD ripper
Please fill in at least the name of the artist.
After you did this you can go ahead and finish the ripping dialog.
After a click on "Finish" the Ripper starts ripping! :)
file:///C|/Dokumente%20und%20Einstellungen/Jürg...ey/Desktop/help/help/en/Html/08cdripper_eng.htm (5 von 7) [06.02.2007 21:25:27]
The CD ripper
After successful work you get a notice:
From now on you find the ripped tracks when you insert some music into your sessions! Have
fun!
file:///C|/Dokumente%20und%20Einstellungen/Jürg...ey/Desktop/help/help/en/Html/08cdripper_eng.htm (6 von 7) [06.02.2007 21:25:27]
The CD ripper
Last chapter
Startpage
Next chapter
file:///C|/Dokumente%20und%20Einstellungen/Jürg...ey/Desktop/help/help/en/Html/08cdripper_eng.htm (7 von 7) [06.02.2007 21:25:27]
In case of trouble
Startpage
In case of trouble:
In some rare cases our customers had some problems with the Digital Mentalsystems. Here are some
advises:
The most common problem was an incorrect installed driver of the Digital Mentalsystem (Mind
Machines).
If your google is not autodetected correctly at the first start of the software please check the connection
and the driver.
To check the driver installation please do the following:
Click on the "Start" button from Windows. Click on "Preferences" and then on "Control Panel" In the
control panel please click on "System". Then in the file card "Hardware" on "Device Manager"
Their you find your model in the point "Digital Mentalsystem"
file:///C|/Dokumente%20und%20Einstellungen/Jürg...esktop/help/help/en/Html/in_case_of_trouble.htm (1 von 3) [06.02.2007 21:25:28]
In case of trouble
If there is no yellow exclamation mark or a red cross to see, everything works fine! If you see a yellow
exclamation mark please deinstall the driver and reinstall it again. To deinstall it click on the model with
the right mouse button.
file:///C|/Dokumente%20und%20Einstellungen/Jürg...esktop/help/help/en/Html/in_case_of_trouble.htm (2 von 3) [06.02.2007 21:25:28]
In case of trouble
If you see a red cross please active the driver also with a right mouse click.
Startpage
file:///C|/Dokumente%20und%20Einstellungen/Jürg...esktop/help/help/en/Html/in_case_of_trouble.htm (3 von 3) [06.02.2007 21:25:28]
Advanced editing
Startpage
Advanced session editing:
Let us use a random session for demonstration:
You can mark more points at once if you click and pull a frame around several points.
file:///C|/Dokumente%20und%20Einstellungen/Jürg.../Desktop/help/help/en/Html/advanced_editing.htm (1 von 8) [06.02.2007 21:25:30]
Advanced editing
file:///C|/Dokumente%20und%20Einstellungen/Jürg.../Desktop/help/help/en/Html/advanced_editing.htm (2 von 8) [06.02.2007 21:25:30]
Advanced editing
You can move the frame with drag and drop:
file:///C|/Dokumente%20und%20Einstellungen/Jürg.../Desktop/help/help/en/Html/advanced_editing.htm (3 von 8) [06.02.2007 21:25:30]
Advanced editing
With a click on the two red or white dots in the upper right edge of the frame you can clone the
points. They will be copied to the right.
file:///C|/Dokumente%20und%20Einstellungen/Jürg.../Desktop/help/help/en/Html/advanced_editing.htm (4 von 8) [06.02.2007 21:25:30]
Advanced editing
file:///C|/Dokumente%20und%20Einstellungen/Jürg.../Desktop/help/help/en/Html/advanced_editing.htm (5 von 8) [06.02.2007 21:25:30]
Advanced editing
The clone function is very useful if you want to duplicate some difficult session parts which
should repeat in a session.
file:///C|/Dokumente%20und%20Einstellungen/Jürg.../Desktop/help/help/en/Html/advanced_editing.htm (6 von 8) [06.02.2007 21:25:30]
Advanced editing
A click on the trash icon and all marked points are deleted.
file:///C|/Dokumente%20und%20Einstellungen/Jürg.../Desktop/help/help/en/Html/advanced_editing.htm (7 von 8) [06.02.2007 21:25:30]
Advanced editing
You can also delete only one point if you click on it and click on the trash icon.
Now you have learned all editing functions.
Startpage
file:///C|/Dokumente%20und%20Einstellungen/Jürg.../Desktop/help/help/en/Html/advanced_editing.htm (8 von 8) [06.02.2007 21:25:30]
MulticolorPro Features
Startpage
Advanced functions of the MulticolorPro:
Our lates model the MulticolorPro gives you unique new functions!
You can set the colors of the LEDs for every moment of a session! The software
generates smooth color fadings by themself.
If you own a MulticolorPro you can set the color for a single point or for a group of points:
Click on the little color triangle to open the color dialog:
file:///C|/Dokumente%20und%20Einstellungen/Jürge.../help/help/en/Html/multicolorpro_features_en.htm (1 von 5) [06.02.2007 21:25:31]
MulticolorPro Features
With a click on the color you want the LEDs flash up in that color. Please click on "OK".
So we set the color of that point to blue. You can give every point of your session its specific
color:
file:///C|/Dokumente%20und%20Einstellungen/Jürge.../help/help/en/Html/multicolorpro_features_en.htm (2 von 5) [06.02.2007 21:25:31]
MulticolorPro Features
Remember to keep your eyes closed during a session is playing. Also with the color
model. The colors can be seen trough the eyelid.
You can set a color for several points at once. Pull a frame around the points and set the color
with the color triangle:
file:///C|/Dokumente%20und%20Einstellungen/Jürge.../help/help/en/Html/multicolorpro_features_en.htm (3 von 5) [06.02.2007 21:25:31]
MulticolorPro Features
We set the color of all points to red:
file:///C|/Dokumente%20und%20Einstellungen/Jürge.../help/help/en/Html/multicolorpro_features_en.htm (4 von 5) [06.02.2007 21:25:31]
MulticolorPro Features
Have fun with experimentating!
Startpage
file:///C|/Dokumente%20und%20Einstellungen/Jürge.../help/help/en/Html/multicolorpro_features_en.htm (5 von 5) [06.02.2007 21:25:31]