1
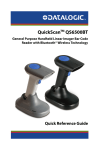
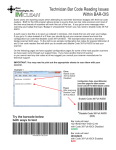
Instructions
QuickScan® QS6500BT Table Mount and
QuickScan® QS6500BT Wall Mount
Preparing to Install the Mount
1. Determine the best location to mount the Base Station. Some considerations are:
• Proximity to the host device. Verify that the Base Station will be mounted within a reasonable distance
of the host, and that cabling can be routed between the devices without kinking, stretching or exposing cabling to tampering or other portential damage.
• Mounting stability. Avoid mounting the unit in such a way as to subject it to excess vibration, bumping, spillage, etc.
• Ensure the Base Station will be mounted in such a way as to allow best radio (BlueTooth) communication between the station and its linked imager. (No adjacent metal objects or thick barriers, provide
reasonable line of sight, install within optimal operating distance, etc.)
2. Use the appropriate template (Table Mount or Wall Mount) from the next page to locate and mark the
position of the screw holes needed for your installation.
3. The methods described below are general guidelines outlining easy ways to install the mounts. The accessories have been designed, however to allow flexibility for numerous configurations you may wish to try.
Installing the Table Mount
Use this set of instructions for horizontal (tabletop surface) installations. Proceed to the next section if installing to a vertical (wall) surface.
1. Screw the mount to the Base Station using two M3 screws. Alternatively, install two M3 machine screws
into the bottom of the Base Station and leave the screw heads protruding by two to three threads. It will be
secured to the mount later, as described in step 4.
2. Secure the mount to the table using two self-tapping M4 or #8 screws.
3. The cable can be optionally routed as shown; up through a hole in the table and out through the underside of the mount.
4. If the mount is not screwed to the
Base Station already, insert the screw
heads (protruding beneath the Base
Station) into wide end of the mount’s
"keyhole" openings. Rotate the Base
Station clockwise to secure it in position. It can be removed by reversing
this process.
Table Mount
5. Carefully pull the cable through to
remove any extra slack.
R44-2820 (Rev. A)
© 2006 - 2007 Datalogic Scanning, Inc
6/07
Installing the Wall Mount
Use this set of instructions to install to a vertical (wall) surface. Use the instructions on the previous page if
installing to a horizontal (tabletop surface).
1. Secure the mount to the wall using two M4 or #8 screws. As shown in the Wall Mount Template, you
can optionally install the screws through the mount’s drilled holes in alternate position #1, or you can
install screws in alternate position #2 which allows notches in the mount to be slid down onto the screw
heads (which for this purpose are left protruding by two to three threads).
2. Secure the Base Station to the mount using two M4 or #8 machine screws.
Wall Mount
Options
NOTE
...or
2
1
...or
1
1
2
2
Openings in the mount are
provided for flexible mounting
options, plus to accommodate
the pads on the underside of
the Base..
R44-2820 (Rev. A)
Table Mount
Alternate hole location #2
51mm centers
Wall Mount
Alternate hole location #1
69mm centers
Mount Templates
© 2006 - 2007 Datalogic Scanning, Inc
6/07