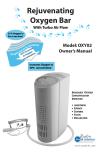
1
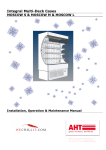
USER'S MANUAL ORIGINAL Cabin et RCV Vera ES SYSTEM K SP. Z O.O. 10 Wrzosowa St. 32-340 Wolbrom woj. małopolskie (Małopolskie Province) www.essystemk.com e-mail [email protected] e-mail [email protected] LEGEND Manual transport. Prior to use, read thisinstruction manual. Transport lugs. Warnings and notes. Adjustable components may be raised at indicated points only. Do not place any items on the covers. Do not lean on. Do not step on. Warning. High voltage. Allowable pressure on the shelf. Washing the device. Defrosting. Information related to device recycling. Storage of explosives such as aerosol cans with flammable propellant in this deviceis prohibited. Warning. This object is heated up to high temperatures. Danger of burns if touched. This device is equipped with rotational elements and sharp edges. Wear protective gloves and disconnect from the mains when carrying on maintenance activities (cleaning). Information related to connection to electrical system Ambient conditions and climatic class, condensation. Information condenser cleaning . relatedto Rating plate 1. General information 1.1. Guarantee 2. Device 2.1. Type of device 2.2. Limitations 2.3. Packaging and transport conditions 2.3.1. Lifting and transport lugs 2.4. Transport damages 3. Placement and sequencing 3.1. Placement the devices in a sequence 3.2. Sequencing the devices 3.3. Assembly 3.3.1. Electrical system 3.3.2. Cooling system 3.3.3. Sanitary system 3.4. Assembly and adjustment of guards and accessories 4. Operation 4.1. Preparatory works for the first start-up 4.2. Start-up activities 4.3. Product display 4.4. Alteration of controller settings (thermostat) 4.5. Carel controller description 4.5.1. Displayed messages 4.5.2. Temperature control 4.6. ELIWELL controller description 4.6.1. Displayed messages 4.6.2. Temperature control 4.7. Automatic defrosting 4.8. Cleaning in the course of operation 4.8.1. Condenser cleaning (related to integrated refrigerating unit) 5. Power failure 6. Troubleshooting 7. Service and parts 7.1. Replacement of lighting items 8. Recycling 9. Declaration of compliance 1. General information Prior to assembly and start-up carefully read this instruction manual. Conditions for proper assembly, adjustment, connection, and start-up including conditions for proper operation are specified in this manual. This manual shall be stored in a safe place and made available to all users. This device shall be installed and operated as per its intended use and the manufacturer's recommendations, including local instructions and regulations. In case of damage to this device or any of its sub-components, or in case of malfunction, first of all, it should be checked whether it is safe for people or property. If necessary, power supply shall be disconnected and the nearest servicing unit (indicated by the manufacturer) shall be contacted immediately. All the users shall be aware of its correct and safe op er ati on 1.1 Guara ntee Each device is warranted against defects in workmanship and materials provided that normal ambient conditions are maintained in the course of operation. Detailed information is included in the guarantee card. Normal ambient conditions shall not following values: relative humidity 60% RH; ambient temperature +25°C; ambient air flow rate < 0.2 m/s. exceed ATTENTION: Accidental or any other acts of windowpane or lighting item breaking shall not be covered by the guarantee. ATTENTION: The guarantee is valid only in the territory of Poland. Operational elements are not covered by the warranty. the 2. Device The refrigerated cabinet RCV Vera is a device manufactured for the display and sale of food articles in the temperature from +1°C to + 10°C. It has a closed cooling system with an evaporator (4) powered by a thermostatic expansion valve. The cabinet is a self-supporting construction placed on a steel frame (9). The internal and external surfaces of the device are made of galvanized, varnished and stainless steel plates. The insulation layer is made of polyurethane foam. External surface of the insulation is made of galvanised steel plate The sides of the device are also made of polyurethane foam and their external surface is made of plate. The device has four rows of display shelves (3), which can be adjusted as to their height. In the lower part of the cabinet there is a condensing unit, placed on a frame. There is also a steering box and a container for water from defrosting or the outflow equipped to the connection to external sewage system. The steel frame is equipped with adjustable feet that enable correct levelling of the cabinet. In the upper part of the cabinet a lighting panel is also placed (2) enabling proper product display. On the client's request, the following can be installed: – fluorescent lamps with a different light colour; – fluorescent lamps under each shelf; – wheels enabling shifting around the device (excluding 2.35 module) The cabinet is equipped with a night roller blind as standard. Description of diagram: 1. Air outlet 2. Lighting panel 3. Display shelf 4. Evaporator 5. Lower operational area 6. Fans 7. Air inlet 8. Condenser 9. Steel frame 10. Adjustable feet Technical parameters: Mod ule sides) Total length (excl. Total length (incl. sides) Height Width Operational area Usable capacity Wei ght Power output of evaporator fans Power output of de-frosting heaters* Rated power of standard lighting Nominal power consumption 1, 09 1, 2 1120 1, 5 1400 2, 0 1875 2,35 7 1050 1200 1480 1955 2320 1935 1935 1935 1935 1935 6 1 1 , 3 3 2 0 3 6 1 2 , 3 8 2 3 3 6 1 2 , 4 7 2 6 3 6 1 3 , 6 4 3 1 4 6 1 4 , 7 6 3 8 6 3x21 3x21 3x21 4x21 6x21 Qua ntity [W] 1 0 1 1 2 1 1 1 2 1x30 1x30 1x36 1x58 2x30 [W] 2180 2180 2650 [mm ] [mm ] [mm ] [mm ] 2 [m ] [dm3 ] [kg] Qua ntity [W] [W] *) electrical defrosting in the option, **) separate supply for drip evaporation, Supply voltage 230 [V] Type of device Temperature class Temperature range *** Max. allowable shelf load Refrigerant [oC] [kg/m2] 50 [Hz] Refrigerated cabinet H 1 +1 ÷ +10 1 5 R404A, (R507) < Noise emitted by the device [dB] 7 60 [%]. ***) for surrounding conditions: temperature +25 [oC], relative humidity 1800/140 0 * 2240 2.1. Type of device The cabinet Vera is a refrigerated cabinet that can be sequenced. The device is equipped with a closed cooling system that consists of: condensation aggregate; evaporator with expansion element (the capillary/valve); electric heater for evaporator de-frosting; fans. 2.2. Limitations This unit is designed for storing and displaying goods as per information included in section 2 of this manual.The use of this unit in non-compliance with its use and user's manual is forbidden. The manufacturer shall not be responsible for adverse events caused by misuse of the unit or non-compliance with warnings included in this manual or failure to comply with given specifications related to its application. Entering the unit or entering its upper part is forbidden. Stepping onto any part of the unit is forbidden. Special care shall be taken when handling glass elements in order to avoid damages to fingers or any other parts of the body. These units are designed for application interiors only. in In case of coolant leakage suspicion, the interior should be aired. Storage of flammable and hazardous materials in this unit. is strictly forbidden. Storage of explosives such as aerosol orflammable propellant cans in this device is prohibited. In case of devices equipped with inner cooling unit, when the non-detachable power lead is damaged it should be replaced at the manufacturer's or at professional workshop or by a qualified person to avoid any hazards. The goods stored in these units may not have temperatures exceeding the unit's operational temperature. 2.3. Packaging conditions and transport Transport of the unit to its final location, as far as possible, is recommended to be carried out using the manufacturer's original package. ATTENTION: Do not pile these units on top of one another Materials used for packagings are subject to recycling. 2.3.1. Lifting and transport lugs Theunit shall be lifted and moved as per the information enclosed with it and basing on the following diagram. 2.4. Transport damages The unit shall be unpacked and checked against damages that might have occurred in the course of transport. In case of such damages, the seller (sales representative, final vendor) or the manufacturer of the unit shall be informed immediately. 3. Placement and sequencing the devices In the course of installation, make sure that the following criteria have been met: – the floor, on which the unit will be placed, shall be horizontal and flat, – the device is not placed in the close vicinity of heat sources, such as: radiators, heaters or reflectorsfocusing the light, – the unit shall not be exposed to direct sunlight . If necessary, blinds/roller blinds in windows shall be applied. – air coming out of air conditioners or ventilation build-up in the compartment is not directed towards the device. Fig. 1 Inappropriate locations of the device : – In case of devices with an in-built cooling unit, remember to provide air to evaporator (it cannot be covered), – keep minimal distances according to the parameters: A+80cm, B=20 cm. Fig. 2 Correct placement of the device In case of sequencing it is recommended to carry out the assembly in stages. It shall be commenced from primary unit (primary unit -the unit that has been placed and levelled in its final location, from which the installation shall be started) to which consecutive modules are sequenced. Primary unit shall be selected individually as per installation potentials. Connection to the system shall be carried out upon prior sequencing of the units. ATTENTION: All sequencing actions may be carried out only by suitably qualified personnel. ATTENTION: The manufacturer shall not be responsible for damages occurring from inappropriate. connection of the unit to the installation. 3.1. Preparatory sequencing. works prior to Refrigerated cabinetsVera canbe sequenced. Placing in a sequence consists in bolting together the devices prior to dismantling the sides and the elements covering the placementpoints, as well as levelling the devices. After bolting the devices into a sequence the device has to be sealed with silicone in the connection points. In order to facilitate sequencing, following steps shall be taken: Adjust all the feet to the same height. Push the units close to the final location. Carry out initial levelling through feet adjustment. Fig. 3 Levelling: a) feet adjustment, b) initial levelling, c) levelling units' with respect to one another. Draw aside the units in order to facilitate installation of connectors. Remove items that cover placement points. Removal of items that cover placement points Prior to sequencing of the units, hanging shelves shall be dismantled (1) and lower operational surface (2) in addition ceiling plates and honeycomb cover shall be dismantled (4) and hanging plates (3). 3.2. Sequencing the devices Upon earlier completion of preparatory works for bolting, the subsequent step that includes sequencing may be commenced. All assembly points (bolts, dowels and tapes) were included to the set. Additionally, silicone/threadlocker shall be applied (not enclosed in the kit). The manufacturer recommends application of neutral silicone SILIRUB 2 or polyurethane thread locker Soudaflex 40FC. All consecutive stages of sequencing are shown below. If available, insert dowels (enclosed in the kit) to suitable locations. If necessary, drill out some holes with borers of the same diameter as the diameter of dowels. Attention: In case of close proximity to glass items, a particular care shall be taken in the course of the dowels placement in marked locations. Apply leak stoppers to joint locations. Apply sealing tape or a layer of silicone to marked locations. The following diagram shows placements of sealing items. Diagram for application of sealing items Above stated diagram shows location for application of sealing items (sealing tape and silicone). Sealing tape shall be applied to side edge of the shell. A manner for silicone application to the element pictured on section „A” for: a) sequencing of devices, b) assembly of the side. Push the devices near to one another and bolt them with suitable assembly bolts. Diagram for placement of assembly bolts and screwing the device into a Some assembly holes (1) that enable sequencing have been located along the device. In case of sequencing upon units' placement next to one another (earlier levelled and placed in final location) these units must be assembled together. For this purpose, some bolts shall be inserted (as shown in figure (2)) in a manner as to fix them to suitable holes in the units and then to screw on nuts including washer to bolts. Consequently, all bolts shall be tightened. Upon bolting the device, excess of silicone shall be removed. Upon sequencing the units, assembly of final modules may be commenced. In case of final modules (not butt modules), sides of the unit must be assembled (if delivered separately). Diagram for side Some assembly holes (1) that enable sequencing and assembly of the device's side have been located along the device. A side has some assembly holes (2) with rivet nuts to which assembly bolts are fixed in order to fasten sides to the unit. A manner for inserting bolts is shown (3) beside. Attention: After the screwing, seal the tubs of the device with silicone. 3.2. Assembly of the installation The device is equipped with an aggregate. In order to ensure the device's correct operation, it is recommended to connect it adhering to the information contained in the further part of this section. In case of devices adapted to bolting into a sequence, the process of joining any installations is recommended to be carried out upon earlier sequencing of the devices. Attention: All installations shall be completed by the manufacturer or qualified personnel. ATTENTION: Assembly of all installationsshall be carried out upon disconnection from power source. 3.2.1. Electrical system Lightning symbol inside a triangle on yellow background, which is located on the body or the cover of electrical system, indicates that 230V powervoltage is led in. Only personnel qualified in the range of installation and repair of electrical systems receives access to the items that are supplied with power voltage. Prior to connecting the device it is necessary to check if the value of power voltage in the grid and the quantity of required overload protection (a fuse) corresponds to properties indicated in the table or in the rating plate that has been placed on the body of the device. The device is adapted for 230 V, 50 Hz alternating power supply through a wire equipped with a plug. ATTENTION: If the device is equipped with power lead with a plug, then it is necessary to insert it only to a plug equipped with protective pin! Electrical socket must be equipped with protective pin (earthing) and secured with suitable 15 [A] time delay cut-out. ATTENTION: No other device may be connected to a single fuse. a single fuse. ATTENTION: The device should not cover supplying socket to which it is connected! NOTE: All other electrical connections must be provided by authorised and qualified personnel and these must be compliant with all general (EU) and local (national) regulations; non-compliance may lead to electrical shock or evenfatal accidents. Fig. 4 Location of electrical box. Electrical diagrams are placed in the electrical box of the device. Connecting electrical system shall be provided as per below stated diagrams DIAGRAM OF CONNECTIONS OF THE ELECTRONIC CONTROLLER AND ELECTRICAL RCV DISTRIBUTION UNIT (1,0/1,2/1,5) 1. CONTROLLER 2. OPERATION SWITCH 3. SWITCH 4. PROBES 5. POWER LEAD 6. ELECTRICAL DISTRIBUTION UNIT 7. SPRING TYPE CONNECTOR 8. CONTACTOR DIAGRAM OF CONNECTIONS OF THE ELECTRICAL CONTROLLER AND ELECTRICAL DISTRIBUTION UNIT RCV 2,0 1. CONTROLLER 2. OPERATION SWITCH 3. SWITCH 4. PROBES 5. POWER LEAD 6. ELECTRICAL DISTRIBUTION UNIT 7. SPRING TYPE CONNECTOR 8. CONTACTOR DIAGRAM OF CONNECTIONS OF THE ELECTRONIC CONTROLLER AND ELECTRICAL DISTRIBUTION UNIT RCV 2,35 1. CONTROLLER 2. OPERATION SWITCH 3. SWITCH 4. PROBES 5. POWER LEAD 6. ELECTRICAL DISTRIBUTION UNIT 7. SPRING TYPE CONNECTOR 8. CONTACTOR Lighting panel and choke panel Diagram of RCV lighting panel (1.0/1.2/1,5/ 0) Diagram of RCV choke panel (1.0/1.2/1,5/2/ 0) Diagram of lighting panel RCV (2.35) Diagram of choke panel RCV (2.35) COOLING SYSTEM INSTALLATION Electrical diagram of energy-saving evaporator fans for RCV 1,0/1,2/1, 5 Electrical diagram of energy-saving evaporator fans for RCV 2,0 Electrical diagram of energy-saving evaporator fans for RCV 2,35 Electrical diagram of evaporation heater Evaporator heater electrical diagram Electrical diagram of aggregate 3.3.2. Cooling system In the device that is to be connected to external cooling unit, systemconduits have already been led to the outside. Cooling unit electrical system has been led to electrical box located in the device (description of the electrical installation of the system is shown in electrical diagrams in item 3.3.1). Attention: In the course of cooling unit soldering special care must be taken. Cover all the elements that may be exposed to high temperatures in the course of soldering. Attention: Prior to tube soldering check if these are free from impurities/filings, which may later disrupt the device's operation. Attention: Soldering tubes to one another in order to stiffen the run of a pipeline is forbidden. In order to stiffen these tubes, a tape or clamping strips shall be applied. Note: Cooling system installation may be provided only by the manufacturer of this device or qualified personnel. Note: Installation led from the device located on the conduit coming from evaporator is equipped with service valve; the second conduit that feeds evaporator is soldered. The device system has been filled in with nitrogen in order to check its leakproofness; the system is over-pressured. During dismantling of the service valve , nitrogen should escape from the system . If that is not the case, the producer should be contacted. The terminal for conduits is illustrated below. Fig. 4. The entry point for the cooling installation is located under the device Fig. 5 End of cooling unit conduits 3.3.3. Sanitary system The device is equipped with condensate drainage system which shall be connected to facility sewage system at the place of installation. Sewage outlet coming from the device is shown below. Fig. 7. Schematic display of the condensate outflow 4. Operation All information and notes related to the first start-up and correct operation of the unit have been specifiedin the content of this section. 4.1. Preparatory works for the first start-up Prior to the first use, internal part including all shelves shall be washed with mild detergent. ATTENTION: Make sure that all applied washingagents are non-toxic and non-caustic! Upon washing completion, carefully dry all surfaces and empty water tank as well. In case of cooling units, approx. 0.25 litre of water shall be poured out to each drain hole in order to fill up drainage air-trap. 4.2. Start-up activities ATTENTION: Before start-up and after transportation positioning of the device in the target place wait 60 minutes. and – Check if power lead is not damaged. – Turn on main switch of electrical system. – Change over all switches, located in control box and in lighting panel into „I”. Cooling unit: refrigerating unit , fans, and anti-reflux heaters shall be started-up. lighting Note: Starting-up anti-reflux heaters may be carried out only in case of huge ambient humidity that manifests in dew occurrence on the components of device. – Wait for 90 minutes or until set-up temperature is obtained. At this moment the unit will be ready to be stocked up (placing the products). 4.3. Product display Be careful in the course of stocking up. Do not throw goods into the unit. Exceeding load limit is forbidden. Maximum load to display area is shown in a table related to technical specifications of the device. Products must be placed at least at 10mm spaces on the display area. Products shall neither protrude from shelf edges nor cover air inlets and outlets. Guidelines related to the height of stock inthe unit (covering air inlets is forbidden). Inappropriate stock replenishment may cause disturbance to air circulation inside the unit. This may subsequently cause disturbances against correct operation of the unit. Additionally, in case of units equipped with cooling unit: Do not cover ventilating holes located on plates that protect the frame. Do not cover ventilating holes on plates that protect unit. cooling NOTE: Cooling unit is not designed for product frosting but for its storing. Products with temperature exceeding set-up temperature should not be placed in this device. For example, if set-up temperature is 23°C, then all stored products should have temperature lower or equal to 23°C. 4.4. Alteration of controller settings (thermostat) The device may be equipped with individual controller (thermostat) that controls operation of the device. It may also beconnected to external controller. In case that the device has been equipped with a controller (thermostat) for controlling the device operation, it is built-in to control box. The controller isfactory set for the optimum temperature within the range of the device operational conditions. However, changing temperatures of operation within the range of operational conditions of the device may be carried out. 4.5. CAREL PJ EASY (PJEZC) controller description Fig. 6 Carel controller Description of Carel PJ EASY [PJEZC] display diode 1 Compressor: this symbol is visible when compressor is operated. It flashes when compressor start is delayed due to protective procedure application. It flashes in the course of a cycle: two flashes – stoppage, when permanent operation mode is active. 2 Fan: this symbol is visible when evaporator fans are active. It flashes when start-up of fans is delayed due to external switch-off or in the course of any other mode. 3 De-frosting: this symbol is visible when de-frosting mode is active. It flashes when start-up of de-frosting is delayed due to external switch-off or in the course of any other mode. 4 AUX: this symbol is visible when additional AUX output is active 5 Timer: this symbol is visible when timer is active or when one of time limits is active. Upon switching on, this symbol appears for a couple of seconds as an information related to timer availability. 6 Alarm: this symbol is visible when alarm is active 7 UP/ON OFF during normal operation of controller: pushing it and holding down for more than 3 sec. will cause a change to the controller operation ON/OFF; when this button and DOWN button are pushed and held down simultaneously for more than 3 sec. it will cause activation or disactivation of continuous operation function. In parameter set-up mode: it enables switching to consecutive parameters. When setting-up parameters: it causes increasing a parameter. 8 9 SET/MUTE During normal operation of controller: it disactivates alarm sound; when it is pushed and held down for more than 1 sec. it shows set-up point; when pushed and held down for more than 3 sec. it will cause entering to parameter set-up menu; when this button and DOWN button are pushed and held down simultaneously at the moment of powering controller, it will cause return to factory settings. In parameter set-up mode: pushing this button causes change when displaying information: parameter name – parameter value; when pushed and held down for more than 3 sec. it will cause recording parameters that have been set up. When setting-up parameters: if pushed and held it causes recording the held parameter has been DOWN/DEFROST During normal operation of down controller: when pushed and down that for more than 3 sec. it will cause activation/disactivation of manual de-frosting mode; when this button and UP button are pushed and held down simultaneously, it will activate or disactivate continuous operation; when it is pushed at the moment of powering up it will cause displaying information related to software version; when this button and SET button are pushed and held down simultaneously at the moment of powering up, it will cause return to factory settings. In parameter set-up mode: it enables switching to previous parameters. When setting-up parameters: it causes decreasing of set-up values. 4.5.1. Displayed messages In case of alarm, controller displays relevant alarm code and current temperature in turns on the screen. If a controller is equipped with sound unit (activated) and additional AUX output, then the sound unit and AUX output will be activated. All alarms are automatically reset (when the reason for alarm disappears), except CHt alarm which is cancelled manually (the controller is disactivated through pushing UP button or through isolation of circuit). Pushing SET button will disactivate sound effect; alarm code and alarm relay will be still activated until the reason for alarm disappears. alarm codes are as follows: FLASHING „E0”: damage to adjustment detector, FLASHING „E1”: damage to evaporator detector or product detector, FLASHING „E2”: damage to detector 3 or condenser, FLASHING „IA”: external alarm, FLASHING „dOr”: open-door alarm, FLASHING „L0”: low-temperature alarm, FLASHING „HI”: high-temperature alarm, FLASHING „EE”: regulator internal error, FLASHING „EF”: operation parameter error, FLASHING „Ed”: frosting complete upon setup time, FLASHING „dF”: defrosting in progress, FLASHING „cht”: contaminated condenser initial alarm, FLASHING „cHt”: contaminated condenser alarm. 4.5.2. Temperature settings control Temperature was previously set up the manufacturer to optimal value on the basis of operational range which is designed for a particular unit. User may alter operational temperatures only within operational temperature range. Temperature ranges are specified in a table in section 2. Procedure for temperature changes may be activated as follows: Pushand hold SET button until temperature value flashes. Pushing UP and DOWN buttons determines limit operational temperature from among available temperature range. To confirm pressSET button.If it is not confirmed within 15 seconds, the setup parameters will return to previously set values. Cooling units: In case of cooling units, automatic defrosting has been programmed. If necessary „manual de-frosting”may be carried out. Procedure for manual de-frosting may be activated as follows: During normal operation, push and hold DOWN/DEFROST button for more than 3 sec. and it will cause activation/disactivation of manual de-frosting mode. 4.6. ELIWELL IDPlus 974 controller description Fig. 7 Eliwell controller Button description Display diode description “UP” button It is used for parameter change and value increase. It activates manual de-frosting mode. Compressor It glows when compressor is on. It flashes when parameters related to delay or protection of compressor are activated. “DOWN” button It is used for parameter change and value decrease. Defrost It glows in the course of automatically activated de-frosting mode. It flashes when de-frosting mode is activated manually. “STAND-BY” (ESC) button Exit Return to previous menu level. Confirmation of parameter value. Activation of stand-by mode (par. H08). Alarm It glows when alarm is active. It flashes when alarm is cancelled. “SET” button Alarm display (when activated) Entering basic menu. Entering programme menu. Fan It glows when fan operates. 4.6.1. Displayed messages In case of alarm, the user is informed through operation of diode or buzz (if applicable). When "SET" button is pushed down (if alarm is activated), the display shows"AL"; when "SET" button is pushed down again, , following messages will be displayed "AH1", "AL1", "EA" or "Opd" meaning appropriately: maximum temperature alarm "AH1" exceeding maximum setup temperature; minimumtemperature alarm "AL1" - exceeding minimum setup temperature; external alarm "EA" – other setup alarms; ! open door alarm "Opd" – exceeding limit of opening door setup time. Additionally, following alarms may be directly displayed : E1 - alarm for damage to chamber temperature detector. E2 - alarm for damage to de-frosting temperature detector. 4.6.2. Temperature settings control Temperature was previously set up by the manufacturer to optimal value on the basis of operational range which is designed for a particular unit. User may alter operational temperatures only within operational temperature range. Temperature ranges are specified in a table in section 2. Procedure for temperature changes may be activated as follows: It is required to push downSET button twice and then through application of UP, DOWN buttons to select a limit temperature value. Confirm this operation by two-time pushing STAND-BY button Cooling units: In case of cooling units, automatic defrosting has been programmed. If necessary „manual de-frosting”may be carried out. Procedure for manual de-frosting may be activated as follows: Press and hold „UP” button for 5 seconds. If temperature in the cooler exceeds setup temperature for de-frosting completion, the display will flash 3 times and de-frosting shall not commence. NOTE: In case of application of a controller that has not been listed above, additional manual will be enclosed by the manufacturer. 4.7. Automatic defrosting In case of units equipped with controller, it controls automatically defrosting operation as well. De-frosting (electric de-frosting) is carried out as per the manufacturer's recommendations (other frequency of defrosting may be set up depending on the needs and operational conditions but only upon agreement with the service). Water from de-frosting flows to drainages located at the bottom of the unit, and then it should be carried away to drainage system. Inthe course of de-frosting, the unit internal temperature raises to above zero; however it does not have any impact onto frosted products. Fogging up of internal surfaces may occur in the course of de-frosting. It is particularly visible on door glass. It is typical effect and it should abate upon de-frosting completion. NOTE: Once a week, total de-frosting should be carried out. NOTE: In the course of de-frosting, it is forbidden to use sharp objects for removal of ice excess. 4.8. Cleaning in the course of operation Each quarter, following cleaning activities shall be carried out: 1. Turn off the unit; 2. Empty the unit; 3. Wait until ambient temperature in the unit is obtained; 4. Remove all remains of stored products; 5. Inspect water drainage and remove all potential contaminations; 6. Wash external surfaces with mild detergent (non-toxic and noncaustic). Then, dry it delicately with dry, soft cloth; 7. Upon washing completion, turn on the unit as per guidelines in item 4.2. 4.8.1 Condenser cleaning (applies to devices with the integrated refrigerating unit) The reason for frequent failures or malfunctions of cooling units may be contamination of condenser in condensing apparatus. Cleanness of condenser is recommended to be checked at least once a month. It is user's obligation. If necessary, condenser's finsshould be dusted andchecked for obstacles blocking air flow. 5. Power failure Upon recovery of power failure or upon turning off and on the unit, it will start operation automatically. Upon recovery of power failure, check if the unit operates normally. If necessary, contact the nearest authorised service. 6. Troubleshooting In case of the unit or its component malfunction, or if it does not operate normally, it should be checked if hazards to people and properties are not generated. If necessary, contact the nearest authorised service. Prior to calling service it is necessary to check: 1. if power is continuously provided; 2. if electrical system, to which the unit has been connected, is not 3. 4. 5. 6. 7. damaged; if the unit is properly adjusted; if condenser is not covered or contaminated; if products are properly arranged along the unit; if air flow in the unit is not disturbed; if de-frosting has not started – inspect controller and thermometer. In case of the units equipped with controllers, in the course of de-frosting temperature indications on controller and thermometer may significantly differ as current temperature shown on the display is „blocked.” When uncertain if the unit is in the course or just upon completion of de-frosting, wait for approx. 1 – 2 hours and check temperature one more time. In case the indications are not altered, it may prove the unit malfunction. In case of lack of reason for malfunction, turn off the unit and call local authorised service. ATTENTION: Insignificant differences of temperature readings may occur at various locations. NOTE: In case of cooling units, it is necessary to check regularly if condenser is clean and if air flow through inlet and outlet holes is not clogged by product remains, used packages and other similar materials. 7. Service and parts The unit technical specification is printed on rating plate. When contacting authorised service it is always necessary to submit the unit type and its serial number located on the rating plate. Operational manual, electrical diagram, and guarantee card are enclosed to each unit. Recommended servicing periods for the unit are enclosed with the guarantee contract. Fig. 8 Rating plate ATTENTION: Only qualified personnel is allowed to carry out services and repairs of mechanical and electrical components. Manufacturer's original parts arerecommended. 7.1. Replacement of lighting items In case of units equipped with fluorescent lamps, the damaged one may be replaced by the user. Follow the guidelines to replace recessed fitting fluorescent lamp: 1. 2. 3. 4. 5. Disconnect the unit for safety reasons; Remove the cover of fluorescent lamp; Remove the lamp from the fitting, turning it around its axis; Insert a new lamp; Through rotation of the lamp around its axis, adjust it as it was settled previously; 6. Turn on the unit. ATTENTION: Fluorescent lamps shall be replaced into those that are compliant with the manufacturer's recommendations. NOTE: In case of equipment, in which fluorescent lamps with double shelter were used, these may be replaced for identical items only. NOTE: In the course of fluorescent lamp replacement, a starting switch (if applicable) shall be exchanged definitely. In case of LED application, replacement shall be ordered to authorised service indicated by the manufacturer 8. Recycling Upon the end of term of use, the unit shall be recycled as per local rules and regulations. Prior to disposal of agents and materials that are harmful to environment and that may be recycled contact professional body for advice. The manufacturer reserves the right to alter the construction of the unit! 9. Declarations compliance of