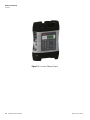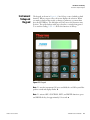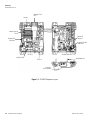
1
TVA2020 Instruction Manual Toxic Vapor Analyzer Part Number 111755-00 29Jul2014 © 2013 Thermo Fisher Scientific Inc. All rights reserved. Specifications, terms and pricing are subject to change. Not all products are available in all countries. Please consult your local sales representative for details. Thermo Fisher Scientific Air Quality Instruments 27 Forge Parkway Franklin, MA 02038 1-508-520-0430 www.thermoscientific.com/aqi WEEE Compliance This product is required to comply with the European Union’s Waste Electrical & Electronic Equipment (WEEE) Directive 2002/96/EC. It is marked with the following symbol: Thermo Fisher Scientific has contracted with one or more recycling/disposal companies in each EU Member State, and this product should be disposed of or recycled through them. Further information on Thermo Fisher Scientific’s compliance with these Directives, the recyclers in your country, and information on Thermo Fisher Scientific products which may assist the detection of substances subject to the RoHS Directive are available at: www.thermoscientific.com/WEEERoHS. Thermo Fisher Scientific WEEE Compliance Thermo Fisher Scientific WEEE Compliance About This Manual This manual provides information about installing, maintaining, and servicing the TVA2020 Toxic Vapor Analyzer (TVA). It also contains important alerts to ensure safe operation and prevent equipment damage. The manual is organized into the following chapters and appendices to provide direct access to specific operation and service information. Thermo Fisher Scientific ● Chapter 1 “Introduction” provides an overview of the product, describes the theory of operations, and product specifications. ● Chapter 2 “Hardware and Startup” describes the setup and different instrument configurations, and provides a quick start procedure. ● Chapter 3 “Display Menus” describes the functions of the instrument keypad, and the enhanced probe display. ● Chapter 4 “Calibration” describes the calibration process and provides procedures for calibrating the instrument. ● Chapter 5 “Preventive Maintenance” provides maintenance procedures to ensure reliable and consistent instrument operation. ● Chapter 6 “Troubleshooting” provides guidelines for diagnosing analyzer problems, isolating faults, and includes recommended actions for restoring proper operation. ● Chapter 7 “Servicing” provides guidelines for diagnosing analyzer problems, isolating faults, and includes recommended actions for restoring proper operation. ● Chapter 8 “Optional Accessories” describes the optional equipment that can be used with this analyzer. ● Appendix A “Warranty” is a copy of the warranty statement. ● Appendix B “Text Data Formats” is a description of the files available for download from the instrument. ● Appendix C “Response Factors” describes response factors for monitoring different compounds and provides a list of the various gases. TVA2020 Instruction Manual i About This Manual Safety Safety Review the following information carefully before using the instrument. This manual provides specific information on how to operate the instrument, however if used in a manner not specified by the manufacturer, the protection provided by the equipment may be impaired. Safety and Equipment Damage Alerts This manual contains important information to alert you to potential safety hazards and risks of equipment damage. Refer to the following types of alerts you may see in this manual. Safety and Equipment Damage Alert Descriptions Alert Description DANGER A hazard is present that will result in death or serious personal injury if the warning is ignored. ▲ WARNING A hazard is present or an unsafe practice can result in serious personal injury if the warning is ignored. ▲ CAUTION The hazard or unsafe practice could result in minor to moderate personal injury if the warning is ignored. ▲ Equipment Damage The hazard or unsafe practice could result in property damage if the warning is ignored. ▲ Safety and Equipment Damage Alerts in this Manual Alert Description WARNING Do not replace battery in an area classified as hazardous due to presence of flammable gases or vapors. ▲ Do not operate battery charger in an area classified as hazardous due to presence of flammable gases or vapors. ▲ Misusing or mishandling the battery packs can lead to fluid leakage, heat generation, fire or an explosion. ▲ Charger and USB connections are not allowed in an area classified as hazardous due to presence of flammable gases or vapors. ▲ To prevent a potential explosion, do not operate the instrument with the PID compartment open or FID detector cap removed. ▲ Power down the instrument before performing any service procedures. ▲ ii TVA2020 Instruction Manual Thermo Fisher Scientific About This Manual Safety and Equipment Damage Alerts Alert Description Never change an electrical component in an area classified as hazardous due to presence of flammable gases or vapors. ▲ Parts replacement and maintenance should not be performed in areas classified as hazardous due to presence of flammable gases or vapors. Use only Thermo Fisher Scientific replacement parts. (Extended Service Plans are available; contact Thermo Fisher Scientific for further information.) ▲ A safe refill operation means there are no hydrogen leaks. Before any valves are opened, use a wrench to firmly tighten connections to the hydrogen supply tanks and the tank fill adapter. If escaping hydrogen is heard during the filling operation, close all valves and correct the leak before proceeding. Leak test with soapy water or equivalent. ▲ Remove the hydrogen tank from the instrument before servicing. ▲ All maintenance procedures must be performed on a clean surface using clean tools. Avoid touching the lamp's window as well as the metalized portion of the cell assembly with your bare fingers. Fingerprints left on these parts may adversely affect the sensors operation. Latex gloves are preferred, but if they are not used, your hands must be clean and free of oils, lotions, etc. It is acceptable to hold the lamp by its glass body or by the edges of the window. ▲ CAUTION If you use multipoint calibration or a gas other than methane or isobutylene and then apply response factors/curves (that have been generated with reference to a single point methane/isobutylene calibration), the resulting measurements will probably be incorrect. ▲ Do not fill hydrogen tank to a pressure greater than 15.2 MPa (2200 psig). ▲ Observe all hydrogen handling procedures listed below. ▲ Do not allow any contact with the igniter coil during cleaning. ▲ Equipment Damage Thermo Fisher Scientific Do not operate the TVA2020 if its case is damaged or otherwise compromised. ▲ TVA2020 Instruction Manual iii About This Manual WEEE Symbol WEEE Symbol The following symbol and description identify the WEEE marking used on the instrument and in the associated documentation. Symbol Description Marking of electrical and electronic equipment which applies to electrical and electronic equipment falling under the Directive 2002/96/EC (WEEE) and the equipment that has been put on the market after 13 August 2005. ▲ Where to Get Help Service is available from exclusive distributors worldwide. Contact one of the phone numbers below for product support and technical information or visit us on the web at www.thermoscientific.com/aqi. 1-866-282-0430 Toll Free 1-508-520-0430 International We continue to support our customers with advanced online resources. Our Air Quality Instruments Online Library allows our customer’s access to product documents and information on a constant basis. Available 24-hours a day and seven-days a week, the online library provides quick access to information regardless of time zone or office hours. To register for an account or log in, please visit www.thermoscientific.com/aqilibrary. iv TVA2020 Instruction Manual Thermo Fisher Scientific Contents Thermo Fisher Scientific Chapter 1 Introduction ........................................................................................................ 1-1 Flame Ionization Detection (FID)....................................................... 1-2 Benefits of Flame Ionization Detection ............................................ 1-3 Photoionization Detection .................................................................. 1-4 Benefits of Photoionization Detection .............................................. 1-5 Dual Detectors .................................................................................... 1-6 Benefits of Dual Detectors ............................................................... 1-7 Concentration Calculation and Calibration......................................... 1-8 Standard Specifications ....................................................................... 1-9 External Influences ............................................................................ 1-11 Product Safety Specifications ............................................................. 1-12 Chapter 2 Hardware and Startup...................................................................................... 2-1 Overview ............................................................................................. 2-1 Instrument Functions .......................................................................... 2-3 Using the Instrument .......................................................................... 2-4 Startup ................................................................................................ 2-4 Instrument Connections ..................................................................... 2-4 Instrument Sidepack Display............................................................... 2-6 Instrument Sidepack Keypad............................................................... 2-7 Control Menu ..................................................................................... 2-9 Quick Start Procedure ....................................................................... 2-10 Chapter 3 Display Menus ................................................................................................... 3-1 Main Menu Structure ......................................................................... 3-1 Run Mode........................................................................................... 3-4 Accessing the Run Menu .................................................................. 3-5 Run: Log None ............................................................................. 3-5 Run: Log Auto .............................................................................. 3-5 Run: Log VOC ............................................................................. 3-6 Run: Log F.E. ............................................................................... 3-8 Setup Menu ........................................................................................ 3-9 Calibration Settings ............................................................................. 3-9 Alarm Levels...................................................................................... 3-10 Accessing the Alarm Menu ............................................................. 3-12 STEL Level Alarm ....................................................................... 3-12 Low Ceiling Alarm ...................................................................... 3-13 High Ceiling Alarm..................................................................... 3-14 Log Methods ..................................................................................... 3-15 TVA2020 Instruction Manual v Contents Accessing the LOG Menu .............................................................. 3-16 Log None .................................................................................... 3-16 Log Auto ..................................................................................... 3-17 Log VOC .................................................................................... 3-18 Log F.E. ...................................................................................... 3-19 Log Custom ................................................................................ 3-21 Passcode Protection ........................................................................... 3-23 New Passcode................................................................................. 3-23 Enable ............................................................................................ 3-23 Disable ........................................................................................... 3-24 Other Settings ................................................................................... 3-24 User Identification Number ........................................................... 3-24 Date ............................................................................................... 3-25 Time of Day................................................................................... 3-26 User Options.................................................................................. 3-27 Key Click .................................................................................... 3-28 Display Delay.............................................................................. 3-28 Information Menu ............................................................................ 3-29 Memory ............................................................................................ 3-30 vi Chapter 4 Calibration .......................................................................................................... 4-1 Calibration Scenarios .......................................................................... 4-1 Scenario 1 ........................................................................................ 4-1 Scenario 2 ........................................................................................ 4-1 Scenario 3 ........................................................................................ 4-2 Calibration Configuration ................................................................... 4-3 Number Span Pt .............................................................................. 4-4 Defining the Span Gas Concentration(s) .......................................... 4-4 Background Correct ......................................................................... 4-6 Defining the Background Correction ............................................ 4-7 RF Calc Mode.................................................................................. 4-8 Cal Accept Mode ............................................................................. 4-8 Cal Save Mode ................................................................................. 4-9 Detector Counts.................................................................................. 4-9 Defining the Response Factor ........................................................... 4-10 Response Factor Multiplier ............................................................ 4-11 Response Curve .............................................................................. 4-11 Zero Reference Point Calibration ................................................... 4-14 Span Reference Point(s) ................................................................. 4-16 Flow Calibration ............................................................................... 4-18 Chapter 5 Preventive Maintenance ................................................................................. 5-1 Safety Precautions ............................................................................... 5-2 Replacement Parts ............................................................................... 5-2 Battery and Battery Charger ................................................................ 5-2 TVA2020 Instruction Manual Thermo Fisher Scientific Contents Battery Warnings and Precautions.................................................... 5-2 Safety Test Criteria........................................................................... 5-4 Hydrogen Gas Tank............................................................................ 5-4 Precautions in Handling and Storage ............................................... 5-5 Fuel Refilling Procedure ................................................................... 5-6 Cleaning an FID Cartridge ................................................................. 5-7 Cleaning the FID Detector Cap .......................................................... 5-9 Cleaning the FID Detector Cavities .................................................. 5-10 Replacing Water Trap Probe Filter and O-Rings............................... 5-11 Replacing the O-Rings ................................................................... 5-12 Cleaning or Replacing a Sintered Metal Filter Cup ........................... 5-13 Replacing the Charcoal Filter ............................................................ 5-14 Thermo Fisher Scientific Chapter 6 Troubleshooting ................................................................................................ 6-1 Troubleshooting Guide ....................................................................... 6-2 Warning Messages ............................................................................... 6-6 Service Locations ................................................................................. 6-7 Chapter 7 Servicing............................................................................................................. 7-1 Replacement Parts List ........................................................................ 7-2 Opening the Instrument ..................................................................... 7-5 Replacing the Battery .......................................................................... 7-6 Hydrogen Gas Tank............................................................................ 7-6 Precautions in Handling and Storage ............................................... 7-7 Fuel Refilling Procedure ................................................................... 7-7 Cleaning the PID Lamp ...................................................................... 7-9 Replacing the FID End Cap .............................................................. 7-14 Flow Tests ......................................................................................... 7-14 Leak Check ....................................................................................... 7-16 Flow Check ....................................................................................... 7-17 Flow Calibration ............................................................................... 7-17 Servicing the Pump ........................................................................... 7-19 Removing the Pump Assembly ....................................................... 7-19 Accessing the Orifice ...................................................................... 7-20 Replacing the Pump ....................................................................... 7-21 Replacing the Pump Valve ............................................................. 7-21 Replacing the Sample Line in Enhanced Probe ................................. 7-23 Replacing Sample Line in Sample Probe ........................................... 7-25 Replacing the Connector Access Door............................................... 7-26 Replacing the Internal Battery Charger Connector Cable .................. 7-27 Replacing the Internal Probe Connector Cable ................................. 7-28 Chapter 8 Optional Accessories....................................................................................... 8-1 Sample Probe Option .......................................................................... 8-1 Enhanced Probe Option...................................................................... 8-2 TVA2020 Instruction Manual vii Contents Enhanced Probe Display .................................................................. 8-3 Enhanced Probe Keys .................................................................... 8-4 The Enhanced Probe and the RUN Mode ....................................... 8-4 Auto Logging with the Enhanced Probe ........................................... 8-5 VOC Logging with the Enhanced Probe .......................................... 8-6 FE Logging with the Enhanced Probe .............................................. 8-7 Route Entry Response Factor ........................................................ 8-7 Navigating the Route File ............................................................. 8-8 Logging Data ................................................................................ 8-8 Repair Menus ................................................................................ 8-9 Additional Component Information .............................................. 8-10 Telescoping Extension Option .......................................................... 8-11 Activated Charcoal Filter Adapter ..................................................... 8-12 Bluetooth Communications .............................................................. 8-13 Bluetooth Commands .................................................................... 8-13 Digital Data Logging (Bluetooth) .................................................. 8-15 GPS .................................................................................................. 8-16 viii Appendix A Warranty............................................................................................................. A-1 Appendix B Text Data Formats ............................................................................................ B-1 Route Database ................................................................................... B-2 Route List ........................................................................................... B-6 Configuration ..................................................................................... B-8 Calibration ........................................................................................ B-11 Factory .............................................................................................. B-13 Calibration History ........................................................................... B-15 Logged Data...................................................................................... B-17 Appendix C Response Factors ............................................................................................. C-1 TVA2020 Instruction Manual Thermo Fisher Scientific Figures Figure 1–1. Typical Flame Ionization Detector ................................................... 1-3 Figure 1–2. Typical Photoionization Detector .................................................... 1-5 Figure 1–3. TVA2020 Dual Detector Configuration ........................................... 1-7 Figure 1–4. Interconnection Control Drawing .................................................. 1-12 Figure 2–1. Instrument Sidepack Display........................................................... 2-2 Figure 2–2. TVA2020 Instrument Connections................................................... 2-5 Figure 2–3. Keypad ............................................................................................. 2-7 Figure 3–1. TVA2020 Menu Structure ................................................................ 3-3 Figure 5–1. Replacing the FID Cartridge ............................................................ 5-7 Figure 5–2. Removing the FID Cartridge ............................................................ 5-8 Figure 5–3. Cleaning the FID Detector Cap ........................................................ 5-9 Figure 5–4. Water Trap Probe Assembly – Filter and O-Ring Replacing ........ 5-11 Figure 5–5. Water Trap Probe Assembly – Filter and O-Ring Replacing ........ 5-12 Figure 5–6. Sintered Metal Filter – Cleaning or Replacing ............................. 5-13 Figure 5–7. Activated Charcoal Filter Adapter ................................................. 5-14 Figure 7–1. TVA2020 Component Layout ........................................................... 7-4 Figure 7–2. Hardware ......................................................................................... 7-5 Figure 7–3. Removing the PID Sensor ................................................................ 7-9 Figure 7–4. Removing the Filter Cap ................................................................ 7-10 Figure 7–5. Removing the Filter Media ............................................................ 7-10 Figure 7–6. Removing the Spacer .................................................................... 7-10 Figure 7–7. Removing the Cell Assembly ......................................................... 7-11 Figure 7–8. Removing the PID Lamp ................................................................ 7-11 Figure 7–9. Cleaning the PID Lamp .................................................................. 7-11 Figure 7–10. Installing the Lamp into the Sensor ............................................ 7-12 Figure 7–11. Pressing Down the PID Lamp ...................................................... 7-12 Figure 7–12. Installing the Cell Assembly ........................................................ 7-12 Figure 7–13. Placing the Spacer ....................................................................... 7-13 Figure 7–14. Placing the Filter Media .............................................................. 7-13 Figure 7–15. Aligning the Cap Key ................................................................... 7-13 Figure 7–16. Sample Flow Troubleshooting Flowchart ................................... 7-15 Figure 7–17. Removing the Pump ..................................................................... 7-19 Figure 7–18. Replacing the Pump ..................................................................... 7-20 Figure 7–19. Exploded View of Pump Head ..................................................... 7-22 Figure 7–20. Replacing Sample Line in Enhanced Probe ................................. 7-24 Thermo Fisher Scientific TVA2020 Instruction Manual ix Figures Figure 7–21. Replacing the Sample Line in Simple Probe ............................... 7-25 Figure 7–22. Replacing the Connector Access Door ........................................ 7-26 Figure 7–23. Replacing the Internal Battery Charger Connector Cable ........... 7-27 Figure 7–24. Replacing the Internal Probe Connector Cable ........................... 7-28 Figure 8–1. Sample Probe Option ....................................................................... 8-1 Figure 8–2. Enhanced Probe Option.................................................................... 8-2 Figure 8–3. Enhanced Probe Option Display ...................................................... 8-3 Figure 8–4. Telescoping Extension Option ....................................................... 8-11 x TVA2020 Instruction Manual Thermo Fisher Scientific Tables Table 1–1. TVA2020 Product Specifications ...................................................... 1-9 Table 1–2. TVA2020 External Influences ......................................................... 1-11 Table 1–3. TVA2020 Product Safety Specifications ........................................ 1-12 Table 2–1. Keys and Functions ........................................................................... 2-8 Table 3–1. Main Menu Selection and Functions ............................................... 3-2 Table 3–2. Alarm Configurations ...................................................................... 3-11 Table 3–3. Available Log Data Types ............................................................... 3-15 Table 4–1. Gas Concentration Units ................................................................... 4-6 Table 4–2. Detector Counts .............................................................................. 4-10 Table 6–1. Troubleshooting ................................................................................ 6-2 Table 6–2. Warning Messages........................................................................... 6-6 Table 7–1. TVA2020 Replacement Parts ............................................................ 7-2 Table 8–1. Enhanced Probe Keys and Functions ................................................ 8-4 Table 8–2. Enhanced Probe Menu ...................................................................... 8-5 Table 8–3. Bluetooth Commands ..................................................................... 8-13 Thermo Fisher Scientific TVA2020 Instruction Manual xi Tables xii TVA2020 Instruction Manual Thermo Fisher Scientific Chapter 1 Introduction The Thermo Scientific™ TVA2020 Toxic Vapor Analyzer, is an advanceddesign, portable, organic/inorganic vapor monitor for the gas survey industry. The analyzer uses either a flame ionization detector (FID), or both an FID and a photoionization detector (PID). For details of the instrument’s theory of operation and product specifications, see the following topics: ● “Flame Ionization Detection (FID)” on page 1-2 ● “Photoionization Detection” on page 1-4 ● “Dual Detectors” on page 1-6 ● “Concentration Calculation and Calibration” on page 1-8 ● “Standard Specifications” on page 1-9 ● “External Influences” on page 1-11 ● “Product Safety Specifications” on page 1-12 Thermo Fisher Scientific is pleased to supply this portable survey instrument. We are committed to the manufacture of instruments exhibiting high standards of quality, performance, and workmanship. Service personnel are available for assistance with any questions or problems that may arise in the use of this instrument. For more information on servicing, see Chapter 7, “Servicing”. Thermo Fisher Scientific TVA2020 Instruction Manual 1-1 Introduction Flame Ionization Detection (FID) Flame Ionization Detection (FID) A Flame Ionization Detector (FID) measures organic compounds by utilizing a flame produced by the combustion of hydrogen and air (see Figure 1–1). When hydrocarbons in the sample are introduced to the detection zone, ions are produced by the following reaction: RH + O RHO+ + e– H2O + CO2 where: R = carbon compound A collector electrode with a polarizing voltage is also located within the detector chamber, and the ions produced by this reaction are attracted to it. As the ions migrate towards the collector, a current is produced which is directly proportional to the concentration of hydrocarbons introduced to the flame. This current is then amplified and sent to a microprocessor. The FID has a wide dynamic range. The effective dynamic range can be further expanded by use of a dilutor kit which reduces very high volatile organic compound (VOC) concentrations to within the dynamic range (or even linear range) of the analyzer. The dilutor kit can also be used to enrich oxygen deficient samples by adding ambient air that is rich in oxygen (20.9% usually). Low oxygen can affect the characteristics of the hydrogen flame, causing readings to be artificially elevated and possibly extinguishing the flame. As a general rule of thumb, greater than 16% oxygen is required to support the flame. If underground gases or samples in gas bags are to be measured by an FID, it is advised that a dilutor be used to combat the problem. 1-2 TVA2020 Instruction Manual Thermo Fisher Scientific Introduction Flame Ionization Detection (FID) EXHAUST METER IGNITION FILAMENT COLLECTOR ELECTRODE JET AIR SAMPLE FUEL (H2) Figure 1–1. Typical Flame Ionization Detector Benefits of Flame Ionization Detection Thermo Fisher Scientific Benefits of Flame Ionization Detection include: ● Wide dynamic and linear range ● High sensitivity to hydrocarbon vapors (including methane) ● Very stable and repeatable response ● Virtually unaffected by ambient levels of CO, CO2, and water vapor TVA2020 Instruction Manual 1-3 Introduction Photoionization Detection Photoionization Detection A Photoionization Detector (PID) consists of an ultraviolet (UV) lamp of a specific energy and an ionization chamber (see Figure 1–2). Compounds passing through the chamber are excited by photons of UV energy and ionized according to the following equation: R + h R+ + e– where: R = most organic/inorganic compounds These ions are attracted to a collecting electrode, producing a current proportional to the concentration of the compound. Whether or not a compound can be detected by a PID depends upon the energy required to remove an electron from the compound (its ionization potential). If the lamp energy is greater than the compound’s ionization potential, the PID will detect it. The lamp in the TVA2020 is 10.6 eV. Because of its smaller dynamic range (0-2000 ppm), the PID is not the detector of choice for measuring high concentrations of vapors. A PID is also more susceptible to interference from water vapor than a FID. However, as a PID does not require hydrogen or oxygen, it is the detector of choice when fuel is limited or unavailable, or when ambient oxygen concentrations are low. The PID is also very sensitive to aromatic and chlorinated compounds, and can even measure some inorganic compounds that the FID does not detect at all (ammonia, carbon disulfide, carbon tetrachloride, chloroform, ethylamine, formaldehyde, and hydrogen sulfide, to name a few). 1-4 TVA2020 Instruction Manual Thermo Fisher Scientific Introduction Photoionization Detection UV SOURCE LAMP IONIZATION CHAMBER WINDOW METER SAMPLE OUT SAMPLE IN COLLECTING ELECTRODE Figure 1–2. Typical Photoionization Detector Benefits of Photoionization Detection Thermo Fisher Scientific Benefits of Photoionization Detection: ● High sensitivity to aromatics, unsaturated hydrocarbons and chlorinated hydrocarbons ● Ability to measure some inorganic gases ● Very simple operation ● No support gases required ● Non-destructive detector allows sample to be recovered TVA2020 Instruction Manual 1-5 Introduction Dual Detectors Dual Detectors The benefits of each individual detector are very clear: both the FID and the PID have their advantages and disadvantages. However, with either detector alone, the number of organic and inorganic vapors that one can detect is limited by the measurement capabilities of that detector. With the TVA2020, users can obtain more complete information about organic and inorganic vapors more quickly and easily than with single detector technology alone. Since both detectors may be displayed and logged simultaneously, the relative response of the two detectors may give some clues about the identity of the compound being measured (see Figure 1–3). For instance, the PID does not respond to methane at all, but the FID responds very well. A high FID reading with virtually no PID response might indicate the presence of methane. Consequently, PIDs respond very well to some inorganic gases that FIDs cannot detect. A high PID reading with no FID reading might suggest the presence of an inorganic compound. With readings from both detectors readily available, the TVA2020 can help a user make decisions about the type of compound present and which detector reading to use. 1-6 TVA2020 Instruction Manual Thermo Fisher Scientific Introduction Dual Detectors PID 00000 PPM FID 00000 PPM % AMPLIFIER METER EXHAUST F LAME ARRESTOR F ID TVA2020 COLLECTOR ELECTRODE PID IGNITION FILAMENT JET LAMP VENT AIR SAMPL E OUT COLLECTOR ELECTRODE AIR SAMPLE IN AIR SAMPLE IN HYDROGEN SUPPLY Figure 1–3. TVA2020 Dual Detector Configuration Benefits of Dual Detectors Thermo Fisher Scientific Benefits of Dual Detectors: ● Cost-effective packaging ● Detector response ratios can help characterize compounds ● Enhanced analytical capability derived from simultaneous detection TVA2020 Instruction Manual 1-7 Introduction Concentration Calculation and Calibration Concentration Calculation and Calibration The concentration calculation is defined as the process that transforms a detector count into a displayed final concentration. The process is as follows: DETECTOR COUNT TRANSLAT ED INTO A STANDARD DET ECT OR CONCENT RAT ION USING A DET ECT OR COUN T VS. DETECTOR CONCENTRATION CALIBRATION CURVE. STANDARD DETECTOR CONCENTRATION IS CORRECTED TO A SPECIFIC GAS USING T HE INSTRUMENT RESPON SE FACTOR. SPECIFIC GAS CONCENT RAT ION IS BACKGROUN D C ORRECTED (IF ENABLED) INSTRUMENT RESPONSE FACTOR AND BACKGROUND CORRECTED C ONCENTRAT ION IS RF CORRECTED USING THE CURRENT ROUTE ENTR Y RF (IF ANY) FINAL CONC ENTR ATION READING 1-8 TVA2020 Instruction Manual Thermo Fisher Scientific Introduction Standard Specifications Standard Specifications Thermo Fisher Scientific Table 1–1 lists the standard specifications for the TVA2020. Table 1–1. TVA2020 Product Specifications Item Description Accuracy PID Instrument—±20 % of reading or ±0.5 ppm, whichever is greater, from 0.5 to 2,000 ppm. Accuracy listed is achieved using isobutylene with a 1-point calibration at 1,000 ppm (including drift) at the temperature and humidity of the calibration. FID Instrument—±10% of reading or ±1.0 ppm, whichever is greater, from 1.0 to 10,000 ppm. Accuracy listed is achieved using methane with a 1-point calibration in the range from 100 to 500 ppm (including drift) at the temperature and humidity of the calibration. ±10% of reading from 3,000 to 30,000 ppm with a 1-point methane calibration at 15,000 ppm. Repeatability PID Instrument—1% at 100 ppm of isobutylene FID Instrument—2% at 500 ppm of methane Dynamic range PID Instrument—0.5 to 2,000 ppm of isobutylene FID Instrument—1.0 to 30,000 ppm of methane Linear range PID Instrument—0.5 to 2,000 ppm of isobutylene FID Instrument—1.0 to 30,000 ppm of methane Minimum detectable level The minimum detectable level is defined as seven times the standard deviation of the peak-to-peak noise. PID Instrument—0.5 ppm of isobutylene FID Instrument—0.5 ppm of methane Response time using close area sampler PID Instrument—Less than 3.5 seconds for 90% of final value, using 500 ppm of isobutylene FID Instrument—Less than 3.5 seconds for 90% of final value, using 10,000 ppm of methane Recovery time using close area sampler PID Instrument—Less than 4.5 seconds to return to 10% of base line from 500 ppm of isobutylene FID Instrument—Less than 4.5 seconds to return to 10% of base line, using 10,000 ppm of methane Response time using charcoal filter adapter PID Instrument—Less than 15 seconds for 90% of final value, using 500 ppm of isobutylene FID Instrument—Less than 15 seconds for 90% of final value from 10,000 ppm of methane Recovery time using charcoal filter adapter PID Instrument—Less than 20 seconds to return to 10% of original value, using 500 ppm of isobutylene FID Instrument—Less than 20 seconds to return to 10% of original value, using 10,000 ppm of methane TVA2020 Instruction Manual 1-9 Introduction Standard Specifications 1-10 TVA2020 Instruction Manual Data storage interval Auto Mode—1 per second to 1 per 999 minutes, user selectable VOC or FE Mode - 2 to 30 seconds, user-selectable Item Description Sample flow rate 1 liter/minute, nominal, at sample probe inlet Battery The battery can be fully charged in less than 10 hours. The battery operating time is 10 hours minimum at 0 °C (32 °F). Use of the backlight on the probe display shortens battery life. The battery is replaceable by accessing the inside of the instrument. WARNING: Do not replace battery in an area classified as hazardous due to presence of flammable gases or vapors. Battery charger The battery charger is a separate unit capable of operating the analyzer while simultaneously charging the internal battery. An adapter cable is provided to charge the battery separate from the analyzer. The charger can charge a fully discharged battery in a maximum of 10 hours. Charging takes 14 hours if performed while the instrument is operating. Charger capable of operation from 90 Vac to 260 Vac, 50/60Hz, with regional plugs. WARNING: Do not operate battery charger in an area classified as hazardous due to presence of flammable gases or vapors. PID lamp life Greater than 2000 hours, with normal cleaning FID life Greater than 5000 hours Audio output level Greater than 90 dB at 3 feet Gas cylinder capacity Pressure—15.3 MPa at 25 °C (2200 psi at 77 °F) maximum Empty—85 cc (5.19in3) Hydrogen supply operating time 10 hours of continuous operation, starting from a cylinder charged up to 15.3 MPa (2200 psi) Instrument Enclosure Description The analyzer enclosure and front panel are made from a chemically resistant thermoplastic material or equivalent. Can be decontaminated (10% chlorine solution) Electrical/communication connections Probe connections are weather-tight. WARNING: Charger and USB connections are not allowed in an area classified as hazardous due to presence of flammable gases or vapors. Mechanical connections A quick connect fitting is used for the sample line connection. Portability A removable shoulder strap is provided with the instrument. Tool kit An accessory tool kit is provided with each instrument. The kit contains special tools for accessing the FID and PID compartments and special flow restrictors for calibrating the pump flow. Approximate mass Analyzer: FID only—9.2 lb Dual—9.4 lb) Probe Assembly: Standard Probe—0.5 lb Enhanced Probe—1.5 lb Thermo Fisher Scientific Introduction External Influences Bluetooth Wireless communications module certified to Bluetooth® ver2.0 Support for SPP (Serial Port Profile) Transmit Class 2 (typical range of 6’) “This device complies with Part 15 of the FCC Rules. Operation is subject to the following two conditions: (1) this device may not cause harmful interference, and (2) this device must accept any interference received above the radiated susceptibility limits, including interference that may cause undesired operation.” This device contains FCC-ID POOWML-C40 GPS External Influences Frequency 1575 MHz Channels up to 12 simultaneously Update rate 1 Hz This product is intended for use in indoor and outdoor environments as a portable instrument carried by a user, as specified in Table 1–2. The same environmental conditions also apply to the sample stream being monitored. Table 1–2. TVA2020 External Influences External Influences Reference Operating Conditions Normal Operating Conditions Operative Limits Transportation and Storage Limits Ambient temperature 23 ± 2 °C -10 to +45 °C -10 and +45 °C -20 to +60 °C -4 and 140 °F Ambient pressure 860 to 1060 mbar 70 to 108 kPa Relative humidity 50% ± 10% FID: 20 to 95% PID: 20 to 70% noncondensing Radiated Susceptibility None 20 to 108 kPa 15 and 95% noncondensing 0 to 100% 3 V/m 80 to 2700 MHz Conducted susceptibility Not applicable, battery operated Conducted emission Not applicable, battery operated Radiated emission See Part 15 FCC/ Bluetooth requirement ESD Sensitivity >6000 Volts Battery charger supply voltage 120 or 230 ±1% Vac 100 to 240 Vac 100 to 240 Vac Not applicable Battery Charger supply frequency 50/60 Hz ±0.5 Hz 50/60 Hz 50/60 Hz Not applicable Thermo Fisher Scientific TVA2020 Instruction Manual 1-11 Introduction Product Safety Specifications Product Safety Specifications Table 1–3 lists the specifications for the TVA2020. Refer to Figure 1–4 for Interconnection Control Drawing. Table 1–3. TVA2020 Product Safety Specifications Testing Laboratory, Types of Protection, and Area Classification Conditions of Classification FM: intrinsically safe for Class I, Division 1, Groups A, B, C, and D Temperature Class T4 Figure 1–4. Interconnection Control Drawing 1-12 TVA2020 Instruction Manual Thermo Fisher Scientific Chapter 2 Hardware and Startup For a description of the instrument functions, instrument connections, and how to start the instrument, see the following topics: Overview ● “Overview” on page 2-1 ● “Instrument Functions” on page 2-3 ● “Using the Instrument” on page 2-4 ● “Instrument Connections” on page 2-4 ● “Instrument Sidepack Display” on page 2-6 ● “Instrument Sidepack Keypad” on page 2-7 ● “Control Menu” on page 2-9 ● “Quick Start Procedure” on page 2-10 The vapor concentration may be read immediately on either of two displays—one mounted directly on the optional enhanced sample probe and the other on the instrument sidepack itself (see Figure 2–1). Vapor concentration can be displayed on both displays in parts per million (ppm) or percent concentration (%). The data displayed may also be collected and saved in analyzer memory and downloaded to a personal computer for analysis. The optional Bluetooth device will continuously output the concentration data for use with a third party hand-held device. Through the sidepack keyboard, choose the mode of operation, select concentration units for the display, set alarm thresholds, select data collection mode, and change setup (configuration) parameters. This unit is shipped with the battery installed. The unit is ready for operation upon completion of setup, calibration, and charging. Thermo Fisher Scientific TVA2020 Instruction Manual 2-1 Hardware and Startup Overview Figure 2–1. Instrument Sidepack Display 2-2 TVA2020 Instruction Manual Thermo Fisher Scientific Hardware and Startup Instrument Functions Instrument Functions This analyzer functions in any of four modes: ● RUN ● SETUP ● INFO ● MEMORY In the RUN mode, the instrument automatically displays its measured values in units of ppm or %. The RUN mode may be operated either as survey only, in which the instrument displays measured values but does not store any data, or survey and log, in which the instrument displays measured values and also stores the information in memory. In SETUP mode, you can enter or select operational parameters, such as calibration values, alarm levels, operator ID, datalogging method and interval, date, and time. This may be performed locally by using the analyzer keypad or remotely by using the USB connection to a personal computer (PC). In INFO mode, you can review operational parameters entered or selected in SETUP mode as well as instrument serial number, Bluetooth friendly name, battery status, GPS coordinates, etc. In MEMORY mode, you can download data stored within the TVA2020 to a PC for analysis and printing, upload route list, calibration, and configuration parameters from a PC to the TVA2020, clear data memory, and update instrument firmware. Each of the four modes is explained in detail later in Chapter 3, “Display Menus”. Thermo Fisher Scientific TVA2020 Instruction Manual 2-3 Hardware and Startup Using the Instrument Using the Instrument While operating this instrument in the field, you normally carry the TVA2020 at your side using the shoulder strap or in a backpack (not supplied). With the pump on, detector(s) on, and the unit warmed up, you monitor the area of concern. As soon as the instrument analyzes a sample, the sidepack displays concentration of the vapor. The display on the optional enhanced probe duplicates the vapor concentration on the sidepack display. Using the enhanced probe, you can toggle the display between detector types by pressing the SELECT button on the probe, configure to log the survey data by pressing the MENU button, and backlight the LCD display by pressing the lamp button. The concentration data is also streamed out from the optional Bluetooth device, if installed and turned on. WARNING Charger and USB connections are not allowed in an area classified as hazardous due to presence of flammable gases or vapors. ▲ WARNING To prevent a potential explosion, do not operate the instrument with the PID compartment open or FID detector cap removed. ▲ Startup To place the TVA2020 in Startup mode, press and hold the ON key for 2 seconds until you hear a beep. The instrument will display a Please Wait message, shortly after, the MAIN MENU screen is displayed. In this screen you may scroll to the various different menu selections. MAIN MENU 1=Run 2=Setup 3=Info 4=Memory Instrument Connections There are four external instrument connections on the TVA2020, as shown in Error! Reference source not found.. The umbilical attached to the probe consists of two connections, an electrical cable with locking connector and a sample line with locking fitting. Two additional connections—battery charger input and USB interface— are located on the bottom of the unit, below the keypad. All mechanical connections are keyed for easy orientation. 2-4 TVA2020 Instruction Manual Thermo Fisher Scientific Hardware and Startup Instrument Connections Carrying Strap Connection Press probe lines into groove to secure after making connections to instrument. Panel Probe Sample Connection FID Cap Probe Electrical Connection Charger Connection Figure 2–2. TVA2020 Instrument Connections WARNING Charger and USB connections are not allowed in an area classified as hazardous due to presence of flammable gases or vapors. ▲ WARNING To prevent a potential explosion, do not operate the instrument with the PID compartment open or FID detector cap removed. ▲ Thermo Fisher Scientific TVA2020 Instruction Manual 2-5 Hardware and Startup Instrument Sidepack Display Instrument Sidepack Display The liquid crystal display (LCD), in the instrument sidepack, has four 16character lines for three types of displays (MENU, ENTRY, and RUN). In menu displays, the whole screen is normally dedicated to the menu. In entry displays, the screen provides prompts and instructions for inputting new data. The normal run display consists of the live measurement data on lines 1 and 2 and menu items on lines 3 and 4. Other display information appears as you page through various menus. ● In Menu Display, the whole screen is normally dedicated to the menu. MAIN MENU 1=Run 2=Setup 3=Info 4=Memory ● In Entry Display, the screen provides prompts and instructions for entering new data. Enter High Ceil: P&F: 005000ppm Up/Dn=Next unit Enter=Accept ● The normal Run Display consists of the live measurement data in Lines 1 and 2 and menu items on lines 3 and 4. PID: 450ppm FID: 500ppm BLD___________________ Press char key Other display information appears as you page through various menus. 2-6 TVA2020 Instruction Manual Thermo Fisher Scientific Hardware and Startup Instrument Sidepack Keypad Instrument Sidepack Keypad The keypad, as shown in Figure 2–3, has 19 keys, some of which are dual function. When you press a key, the screen displays the selection. When you make a selection that creates or changes a parameter, you must then press the ENTER key. The left/right arrow keys move the character entry position. The up/down keys make page selections or switch from ppm or % to another reading. Table 2–1 shows the functions of all keys. Figure 2–3. Keypad Note To turn the instrument ON, press and hold the on ON key until the speaker sounds and display flashes. ▲ Note To activate OFF, CONTROL, EXIT, and ENTER functions, press and HOLD the key for approximately 1/2 second. ▲ Thermo Fisher Scientific TVA2020 Instruction Manual 2-7 Hardware and Startup Instrument Sidepack Keypad Table 2–1. Keys and Functions 2-8 TVA2020 Instruction Manual Key Function ON The ON key enables power from the battery to the instrument. OFF The OFF key disables power from the battery to the instrument. CONTROL The CONTROL key is multi-function and is used to turn the pump, PID, and FID, Bluetooth and GPS on or off, and to ignite the FID. Note: Value displayed is opposite of existing status. If pump displays “OFF”, you would press the 1 key to turn it off. EXIT The EXIT key clears any entry made in error or bypasses information that you do not want to change, and clears error or warning screens. ENTER The ENTER key has three functions: 1. Press ENTER if you have typed one or more characters and wish to keep that information. 2. Press ENTER to respond to a menu question. 3. Press ENTER instead of entering the logging mode from the enhanced probe to initiate logging. Left/Right Arrows The left and right arrow keys move character entry positions. Up/Down Arrows The up and down arrow keys make page selections or scroll through options in SETUP entry screens and info screen. Alphanumeric The alphanumeric keys enable you to type letters or numbers into various menus. If a display asks for a number only, simply press the desired key. Two steps are required to type an alphanumeric character. First, press the key with the desired letter or number. The screen then displays a selection prompt at the bottom in which 1 = first letter, 2 = second letter, 3 = third letter, and 0 = number. Press the appropriate key to execute the selection. Three uses: Select menu options Enter numbers, 0-9, using single keystroke Enter alphanumeric data, A-Z, 0-9, SPACE, using 2 keystrokes per character Thermo Fisher Scientific Hardware and Startup Control Menu Control Menu The Control Menu is used for turning the sampling pump on and off, turning the PID lamp and FID on and off, for initiating gas ignition of FID, and Bluetooth and GPS options. CONTROL MENU 1=Pump on 2=FID on 3=Ignt 4=PID on 5=More The CONTROL MENU screen has five options: 1. Turn Pump ON/OFF 2. Turn FID ON/OFF 3. Ignite FID 4. Turn PID OFF/ON 5. More (Bluetooth and GPS) Selecting Option 1 toggles the pump on or off. Selecting Option 2 toggles the FID on or off. In the RUN mode, when the FID is off, dashes will appear instead of a reading and all FID alarms are overridden. Selecting Option 3 initiates the FID flame ignition sequence, which momentarily turns on the ignite coil and simultaneously reduces the pump flow. Selecting Option 4 toggles the PID on or off. In the RUN mode, when the PID is off, dashes will appear instead of a reading, and all PID alarms are overridden. Selecting Option 5 toggles the next screen, if Bluetooth or GPS are installed. If neither is installed, option 5 does not display. Thermo Fisher Scientific TVA2020 Instruction Manual 2-9 Hardware and Startup Quick Start Procedure CONTROL MENU 1=BT off 2=GPS off 3=More After running the initial startup diagnostic, the Control menu can be accessed at any time. Quick Start Procedure Before starting the unit, perform the following steps: 1. Charge battery. 2. Connect sample probe. 3. Fill/install hydrogen tank (which starts hydrogen flowing). To start the unit, execute the following procedure: 4. Press ON until the speaker sounds and the display flashes (approximately 1 second). 5. Press CONTROL. 6. Press 3 to ignite. 7. Press 2 = Setup. 8. Press 1 = Calibrate. 9. Press 6 = Configure. 10. Press 2 = Span Concentration. 11. Enter Span Concentration for calibration gas being used and press ENTER to accept. 2-10 TVA2020 Instruction Manual Thermo Fisher Scientific Hardware and Startup Quick Start Procedure Note If FID only, enter concentration of methane. If dual, enter concentration of both gases. ▲ 12. Press 1 = Zero. 13. Press 1 = Both. 14. Press ENTER = start. 15. Challenge analyzer with zero gas sample. 16. Wait to stabilize. 17. Press ENTER to accept. 18. Press 2 = Span. 19. (PID 1st) Press 2 = PID. 20. Press ENTER = start. 21. Challenge analyzer with isobutylene span gas and wait for readings to stabilize. 22. Press ENTER to accept. 23. Press 2 = Span. 24. Press 3 = FID. 25. Press ENTER = Start. 26. Challenge analyzer with methane span gas and wait for readings to stabilize. 27. Press ENTER = Accept. Thermo Fisher Scientific TVA2020 Instruction Manual 2-11 Hardware and Startup Quick Start Procedure 28. Press 4 = Response Factor. 29. Confirm that Response Factor says “RF0:DEFAULT” 30. Press EXIT 3 times to main menu. 31. Press 1 = Run. You are now in the survey mode. Note To perform more sophisticated operations, you will need to read the rest of the manual. ▲ To power down this instrument, simply press the OFF key. You must also unscrew the hydrogen tank to avoid depleting the tank supply. 2-12 TVA2020 Instruction Manual Thermo Fisher Scientific Chapter 3 Display Menus This chapter describes the main menu display and menu-driven software. For more detail, see the following topics: Main Menu Structure ● “Main Menu Structure” on page 3-1 ● “Run Mode” on page 3-4 ● “Setup Menu” on page 3-9 ● “Calibration Settings” on page 3-9 ● “Alarm Levels” on page 3-10 ● “Log Methods” on page 3-15 ● “Passcode Protection” on page 3-23 ● “Other Settings” on page 3-24 ● “Information Menu” on page 3-29 ● “Memory” on page 3-30 The display on the TVA2020 analyzer is a menu-driven device. The various menus prompt you to select or enter information. With various key strokes, you can accomplish all necessary setup (configuration) and operational tasks. For more detail, see the following topics: MAIN MENU 1=Run 2=Setup 3=Info 4=Memory Thermo Fisher Scientific TVA2020 Instruction Manual 3-1 Display Menus Main Menu Structure Whenever you turn on the TVA2020, a power-up self test is performed and warning screens are displayed if any errors are found. Please refer to “Warning Messages” on page 6-6. If errors are detected, use the EXIT key to clear error message, then MAIN MENU is displayed. When you press the corresponding number key, as described in Table 3–1, the desired menu and the associated display or menu appear automatically. Table 3–1. Main Menu Selection and Functions Key 3-2 TVA2020 Instruction Manual Function 1 = RUN Use this selection to assign tags to specific surveys and to view/log analysis of organic/inorganic compounds. If the optional Bluetooth module is active, the instrument must be in RUN mode to send commands and capture data. (See “Bluetooth Communications” in the Options section of this manual.) 2 = SETUP This menu contains configuration procedures and menu structure for performing calibrations, entering ID numbers, setting alarm levels, selecting log modes, entering response multipliers and setting time/date. 3 = INFO This is a view-only menu structure that displays various instrument diagnostic information. 4 = MEMORY Use this menu to put instrument into USB memory device mode to download/upload information to/from a personal computer, to perform a remote setup from a personal computer, to clear memory, or to update firmware. Thermo Fisher Scientific Display Menus Main Menu Structure Once you are familiar with the various menus and know where to enter specific information, you may want to use a short cut method of tracking the menu structure. The following figure shows the complete menu structure for the TVA2020 Analyzer. RUN SETUP INFO 1. CALIBRATION 1. ZERO 2. SPAN 3. BACKGROUND 4. RF (response factors) 5. FLOW 1. FLOW 1 2. FLOW 2 3. FLOW 3 4. CALC COEF 6. CONFIGURE 1. NUMBER OF SPAN POINTS 2. SPAN CONCENTRATION ▼(down arrow) 1. BACKGROUND CORRECT 2. RF CALC MODE ▼(down arrow) 1. ACCEPT MODE 2. SAVE MODE 2. ALARM 1. STEL 2. LOW CEILING 3. HIGH CEILING 3. LOG 1. NONE 2. AUTO 3. VOC/FE 4. CUSTOM 4. PASSCODE 1. NEW PASSCODE 2. ENABLE 3. DISABLE 5. OTHER 1. USER ID 2. DATE 3. TIME 4. USER OPTIONS 1. KEY CLICK 2. DISPLAY DELAY MEMORY 1. USB MODE 2. CLEAR LOGGING MEMORY 3. UPDATE FIRMWARE 1. CONNECT USB 2. COPY FILE 3. WAIT REBOOT Figure 3–1. TVA2020 Menu Structure Thermo Fisher Scientific TVA2020 Instruction Manual 3-3 Display Menus Run Mode Run Mode How the instrument functions in the RUN mode is governed by the selection made in the SETUP/Log menu. The LOG menu selects how data is stored in the instrument memory. There are four possible choices in the LOG mode as defined in “Log Methods” on page 3-15. In addition, if the optional Bluetooth module is active, data automatically streams out continuously from the instrument. Data will only stream out of the instrument while in the RUN mode. The data will always stream at in the same format independent of the log configuration. (See “Bluetooth Communications” in the Options section for more information.) The TVA2020 performs accurately only after it has been properly set up (configured). The RUN mode displays (as governed by the LOG Selection) are: FID-NONE FID: 1376ppm Exit=Stop FID-AUTO, VOC, or F.E. FID: 1376ppm Sampling: 3sec Exit=Stop PID/FID-NONE PID: FID: 1042ppm 1376ppm Exit=Stop PID/FID-AUTO, VOC, or F.E. PID: 1042ppm FID: 1376ppm Sampling: 3sec Exit=Stop You should install the hydrogen tank and wait 2-3 minutes before entering the RUN mode. Upon entering the RUN mode, the pump will automatically turn ON and the FID will ignite. Note For best performance, the instrument must be ON and warmed up for approximately 30 minutes with the FID flame ignited throughout the warmup period. If the instrument is PID equipped and the PID is to be used, the lamp must be ON throughout the warmup period. ▲ 3-4 TVA2020 Instruction Manual Thermo Fisher Scientific Display Menus Run Mode Accessing the Run Menu Run: Log None From the MAIN MENU display, press 1=Run. Whenever the TVA2020 is in the RUN mode with Log None as the logging selection, the instrument operates as a survey tool only. The readings on the probe display and instrument display show the live reading for the samples at that time. No logging action is taking place. Any alarms that are set will function normally. FID FID: 24950ppm Exit=Stop Run: Log Auto PID/FID PID: FID: 1.1ppm 2.49% Exit=Stop Whenever the TVA2020 is in the RUN Mode with Log Auto as the logging selection, the instrument operates as an automatic survey tool that logs its readings into memory at an interval selected in the Setup Menu. After the 1=Run key is pressed, the first screen viewed is the one shown: FID FID: 24950ppm ---------------Press char key PID/FID PID: 1.1ppm FID: 2.49% ---------------Press char key The tag information should be typed in before starting. Enter the tag information in the space provided (up to 16 characters).The tag may be left blank if desired. Thermo Fisher Scientific TVA2020 Instruction Manual 3-5 Display Menus Run Mode FID FID: 24950ppm A--------------0=1 1=A 2=B 3=C PID/FID PID: 1.1ppm FID: 2.49% A--------------0=1 1=A 2=B 3=C Once the tag information is entered, press the ENTER key. The screen then changes to the next display. The instrument is now ready to start logging. The screen displays live readings and the tag name. However, no logging takes place until you enter the logging mode from the enhanced probe or press the ENTER key on the instrument. FID FID: 24950ppm BLD01SITE5 Enter=Start log PID/FID PID: 1.1ppm FID: 2.49% BLD01SITE5 Enter=Start log Press ENTER or initiate the logging mode from the enhanced probe to start the automatic logging. The instrument counts down from the time selected in the SETUP/Log menu and stores the reading at the end of the count down. For instance, if 12 seconds was selected as the logging time, the instrument will count down from 12 and display 11,10,9,8,7,6,5,4,3,2,1,STORE. The instrument logs into memory either the highest, average, or last reading during the countdown, as configured in the SETUP/Log menu. FID FID: 24950ppm Sampling: 3sec Exit=Cancel PID/FID PID: 1.1ppm FID: 2.49% Sampling: 3sec Exit=Cancel This action continues until the instrument shuts down due to low battery, or the EXIT key is pressed, or the log memory is full. Run: Log VOC 3-6 TVA2020 Instruction Manual Whenever the TVA2020 is in the RUN mode with Log VOC as the logging selection, the instrument operates as a manual survey tool that logs its readings into memory whenever you initiate logging. When the 1=Run Thermo Fisher Scientific Display Menus Run Mode key is pressed, the first screen viewed is the one shown below. The tag information should be typed. The tag may be left blank if desired. Note Tag information can only be entered using the sidepack keypad. ▲ FID FID: 24950ppm ---------------Press char key PID/FID PID: 1.1ppm FID: 2.49% ---------------Press char key The tag information should be typed in before starting. Enter the tag information in the space provided (up to 10 characters).The tag may be left blank if desired. FID FID: 24950ppm TA-------------0=3 1=G 2=H 3=I PID/FID PID: 1.1ppm FID: 2.49% TA-------------0=3 1=G 2=H 3=I Once the tag information is entered, press the ENTER key. The screen then changes to the next display. The instrument is now ready to start logging. The screen displays live readings and the tag name but no logging takes place until you either enter the logging mode from the enhanced probe or press the ENTER key again on the instrument. FID FID: 24950ppm TAG Enter=Start log Thermo Fisher Scientific PID/FID PID: 1.1ppm FID: 2.49% TAG Enter=Start log TVA2020 Instruction Manual 3-7 Display Menus Run Mode FID FID: 24950ppm SAMPLING: 3 SEC Exit=Cancel PID/FID PID: 1.1ppm FID: 24950ppm SAMPLING: 3 SEC Exit=Cancel Press ENTER or initiate the logging mode from the enhanced probe to start the VOC logging sequence. After the instrument counts down for the time selected in the SETUP/Log menu, the word Save appears. When confirmed, the instrument logs into memory either the highest average or last reading achieved during the countdown sample. After the information is stored into memory, the display returns to live measurements and prompts for a new tag. Each VOC log must be done manually and individually. FID FID: 24950ppm Save above smp1? 1=Yes 2=Again Run: Log F.E. PID/FID PID: 1.1ppm FID: 2.49% Save above smp1? 1=Yes 2=Again The operation of the Log F.E. mode is menu driven from the hand-held probe display and requires the use of the optional TVA2020 Enhanced Probe. Whenever the TVA2020 is in the RUN mode with Log F.E. as the logging selection, the instrument logs its readings based on a preconfigured route file. Use the following procedure for use with Fugitive Emissions monitoring. 1. Create a monitoring route using a Fugitive Emissions personal computer software program as described in Appendix B, “Text Data Formats”. 2. Copy the route file to the TVA2020 by overwriting the ROUTE.TXT file in the instrument flash with the one created. It must be named ROUTE.TXT for the instrument to recognize it. After exiting the USB mode, the instrument reads the properly named files from flash into the processor memory. 3-8 TVA2020 Instruction Manual Thermo Fisher Scientific Display Menus Setup Menu 3. Log readings by following the monitoring route shown on the TVA2020 display. 4. At the end of the monitoring route, copy the logged readings to the personal computer. Setup Menu The Setup Menu (configuration) of the TVA2020 is the most important step in obtaining accurate gas measurements. The Setup Menu contains configuration procedures and menu structure for performing calibrations, entering ID numbers, setting alarm levels, selecting log modes, entering response multipliers and setting time/date. From the MAIN MENU display, press 1=Run. SETUP MENU 1=Calib 2=Alarm 3=Log 4=Passcode 5=Other During instrument setup, you must set parameters as follows: 5. Calibration Settings 6. Alarm Levels 7. Datalogging Setup 8. Passcode 9. Other Calibration Settings The Calibration Menu is used to calibrate the instrument. For more detailed information on calibration, see Chapter 4, “Calibration”. From the MAIN MENU display, press 2-Setup. From the SETUP MENU display, press 1=Calib. Thermo Fisher Scientific TVA2020 Instruction Manual 3-9 Display Menus Alarm Levels CALIB MENU 1=Zero 2=Span 3=Backgnd 4=RF 5=Flow 6=Cfg 1. Zero the instrument 2. Calibrate the reference point(s) using known span gas 3. Take background reading Note For most monitoring, background is set to zero. Use if regulations or permits require/allow background elimination. ▲ 4. Set instrument response factors if necessary 5. Calibrate the flow sensor 6. Configure a. Calibrate the reference point(s) using known span gases. The TVA2020 can be configured for as many as nine different span gas values (2=Span). Alarm Levels The TVA2020 is supplied with three user-configurable alarms — STEL (short term exposure limit), Low Ceiling, and High Ceiling. When any of these alarms is exceeded, an alarm message appears on the sidepack display and probe display and an alarm tone is generated. Press EXIT to acknowledge the alarm message and sounder. Once acknowledged, the display returns to the live measurement with an upper case letter representing the alarm or alarm combination appearing to the right of the display. ALARM LEVELS 1=STEL 2=Low Ceiling 3=High Ceiling 3-10 TVA2020 Instruction Manual Thermo Fisher Scientific Display Menus Alarm Levels The three types of user configurable alarms are: Table 3–2. Alarm Configurations Alarm Type Description STEL: The Short Term Exposure Limit alarm indicates that measurements averaged over a running 15-minute interval have exceeded the set alarm limit. Once this alarm is acknowledged, the letter S appears to the right of the live measurement for the appropriate detector. Low Ceiling: This alarm is a warning that a lowest level threshold has been exceeded. Once acknowledged, the letter L appears to the right of the live measurement for the appropriate detector. High Ceiling: This alarm is a warning that a second, higher level, threshold has been exceeded. Once this alarm is acknowledged, the letter H appears to the right of the live measurement for the appropriate detector. The FID maximum setting is 30000 ppm. The three alarm messages appear on the instrument display as follows: ==== ALARM! ==== STEL alarm level alarm exceeded! Exit=Clr PID: FID: ==== ALARM! ==== Low ceiling alarm exceeded! Exit=Clr PID: FID: ==== ALARM! ==== High ceiling alarm exceeded! Exit=Clr PID: FID: 1039ppm 2180ppm S S Press char key 1039ppm L 2180ppm L Press char key 1039ppm H 2180ppm H Press char key Note To display and change the alarm menus, the instrument must be ON but does not have to be warmed up. ▲ Thermo Fisher Scientific TVA2020 Instruction Manual 3-11 Display Menus Alarm Levels Accessing the Alarm Menu Use the following procedure to access the alarm menu. 1. From the MAIN MENU display, press 2=Setup. 2. From the SETUP MENU display, press 2=Alarm and follow the procedures for the appropriate alarm settings. STEL Level Alarm Use the following procedure to access the STEL level alarm. 1. From the ALARM LEVELS display, press 1=STEL. The previous alarm settings for STEL alarm are displayed. FID FID: 100.0ppm STEL Alarm Enter=New Value PID/FID PID: 100.0ppm FID: 100.0ppm STEL: 1=Both 2=PID 3=FID 2. To change the alarm level to a new value, press ENTER on a single detector instrument or 1, 2, or 3 on a dual detector instrument. FID PID/FID Enter STEL: FID: 100.0ppm Up/Dn=Next Unit Enter=Accept Enter STEL: P&F: 100.0ppm Up/Dn=Next Unit Enter=Accept Use the up and down arrow keys to select ppm or %, and decimal point position, then type the numeric value for the alarm level desired. 3. Press ENTER to store new values into instrument memory. 4. Press EXIT to return to the ALARM LEVELS without making a change. 3-12 TVA2020 Instruction Manual Thermo Fisher Scientific Display Menus Alarm Levels Low Ceiling Alarm Use the following procedure to access the low ceiling alarm. 1. From the ALARM LEVELS display, press 2=Low Ceiling. The previous alarm settings for the Low Ceiling alarm are displayed. FID FID: 100ppm Low Ceiling Alrm Enter=New Value PID/FID PID: 100ppm FID: 100ppm Low Ceil: 1=Both 2=PID 3=FID 2. To change the alarm level to a new value, press ENTER on a single detector instrument or 1, 2, or 3 on a dual detector instrument. FID PID/FID Enter low ceil: FID: 000500ppm Up/Dn=Next Unit Enter=Accept Enter Low ceil: P&F: 000500ppm Up/Dn=Next Unit Enter=Accept Use the up and down arrow keys to select ppm or %, and decimal point position, and then type the numeric value for the alarm level desired. 3. Press ENTER to store the new values into instrument memory. 4. Press EXIT to return to the ALARM LEVELS without making a change. Thermo Fisher Scientific TVA2020 Instruction Manual 3-13 Display Menus Alarm Levels High Ceiling Alarm Use the following procedure to access the high ceiling alarm. 1. From the ALARM LEVELS display, press 3=High Ceiling. The previous alarm settings for the High Ceiling alarm are displayed. FID FID: 250ppm High Ceiling Alm Enter=New Value PID/FID PID: 250ppm FID: 250ppm High Ceil:1=Both 2=PID 3=FID 2. To change the alarm level to a new value, press ENTER on a single detector instrument or 1, 2, or 3 on a dual detector instrument. FID Enter high ceil: FID: 001000ppm Up/Dn=Next Unit Enter=Accept PID/FID Enter high ceil: P&F: 001000ppm Up/Dn=Next Unit Enter=Accept Use the up and down arrow keys to select ppm or %, and decimal point position, and then type the numeric value for the alarm level desired. 3. Press ENTER to store the new values into instrument memory. 4. Press EXIT to return to the ALARM LEVELS display without making a change. Note The high ceiling alarm cannot be set higher then 30,000 ppm or 3%. ▲ 3-14 TVA2020 Instruction Manual Thermo Fisher Scientific Display Menus Log Methods Log Methods Selecting the LOG mode not only identifies the way in which data is stored in instrument memory but also governs the way the RUN mode works. Four possible choices in the LOG mode are available, None, Auto, VOC/FE, and Custom. Table 3–3. Available Log Data Types Thermo Fisher Scientific Option Description 1. None: Selecting None means that no logging action takes place at all. When the instrument is in the RUN mode, you can only display readings. 2. Auto When you select and configure the AUTO method, the RUN mode functions automatically once an action is initiated. You choose an automatic logging rate between 1 second and 999 minutes, type a tag identifier, and start the instrument. You initiate automatic sampling by either pressing the LOG key on the probe or the ENTER key on the instrument. From that point on, the instrument automatically logs the reading of the sample at the end of each countdown and continues to do so until the battery goes low, you press the EXIT key, or the logging memory is full. 3A. VOC The VOC method of sampling is a manual means of triggering a sample/log. Once configured for VOC, the RUN mode prompts you to type a tag identifier. After you enter the tag, the instrument stands ready until you initiate the logging mode with with the enhanced probe or press the ENTER key on the instrument. Once LOG is initiated, the instrument counts down. Samples are taken over that count down and the highest reading achieved, or average (or last) reading is logged in memory and displayed on both displays. The stored values are cleared by pressing either the SELECT key on the enhanced probe or the ENTER key on the instrument. Each VOC log must be done manually and individually. 3B. F.E. The F.E. method of sampling is a manual means of triggering a sample/log using a pre-configured monitor route file which has been downloaded and stored in instrument memory. The F.E. method requires use of the enhanced probe. You choose a sample time of between 2 and 30 seconds and you choose to log either the highest reading or average (or last) reading achieved during the sample time. Once configured for F.E. and the RUN mode entered, the FE probe menu screen guides you through the monitor route, displaying each pre-configured tag identifier in sequential order. A SEARCH function is available at the probe menu to allow you to find tags that are out of order. The probe display prompts you to confirm the tag identifier, after which the instrument stands ready until you either select LOG from the probe or press the ENTER key on the instrument. Once initiated, the instrument begins a count down, sampling over the configured sample time. The reading sampled during the countdown is displayed on both displays and you are given the option to save the reading in memory or to select LOG again. The stored values are cleared by selecting LOG on the probe display or by pressing ENTER on the instrument. Each F.E. log must be done individually and manually. 4. Custom The Custom mode allows the user to configure all the logging parameters. Refer to the Log Custom section for a more complete description. TVA2020 Instruction Manual 3-15 Display Menus Log Methods The RUN mode displays (as governed by the LOG selection) are: FID-NONE FID: 1376ppm PID/FID-NONE PID: FID: Exit=Stop FID-AUTO, VOC, or F.E. FID: 1376ppm Sampling: 3sec Exit=Stop 1042ppm 1376ppm Exit=Stop PID/FID-AUTO, VOC, or F.E. PID: 1042ppm FID: 1376ppm Sampling: 3sec Exit=Stop Note To display and change the log menu, the instrument must be ON but does not have to be warmed up. ▲ Accessing the LOG Menu Use the following procedure to access the log menu. 1. From the MAIN MENU display, press 2=Setup. 2. From the SETUP MENU display, press 3=Log. LOG MODE None 1=None 2=Auto 3=VOC/FE 4=Custm The previous log selection is displayed on the second line. Follow the procedure below to set the log mode. Log None 3-16 TVA2020 Instruction Manual From the LOG MODE menu, press 1=None to display this message briefly. The screen then returns to the SETUP MENU. Thermo Fisher Scientific Display Menus Log Methods None -ACCEPTED- Log Auto Use the following procedure to access the auto log. 1. From the LOG MODE display, press 2=Auto. The previous log selection is displayed on the second line of the screen. Enter log rate: Auto,rate=000sec Up/Dn=Sec<->Min Enter=Accept 2. Use the up and down arrow to select minutes (min) or seconds (sec). Then, type the appropriate time interval desired for the automatic sampling. 3. Press ENTER and, after a brief message of acceptance, the automatic sampling is ready to be used in the Run mode. Note To allow for STEL calculations, the log rate value must be less than 90 seconds. If a log rate greater than 90 seconds is selected, a warning message will appear. Press EXIT to bypass this message and proceed. ▲ In the LOG Auto mode, data is logged in the format described below: Thermo Fisher Scientific ● Every time logging is initiated in the Run mode, a new header is created. ● Data is logged periodically, at the user-entered log rate, in the following format: TVA2020 Instruction Manual 3-17 Display Menus Log Methods ● Log VOC Approximately 9500 data samples may be taken with a single header. Use the following procedure to access the VOC Log. 1. From the LOG MODE display, press 3=VOC/FE. The previous log selection is displayed on the second line of the screen. LOG MODE None 1=VOC 2=FE 2. Press 1=VOC. The previous log selection is displayed on the second line of the screen. Enter sampling: VOC,time=03s,Max Up/Dn=Next type Enter=Accept 3. Press the Up/Dn arrow keys to choose the type of sampling to be used (Max, Avg, Smp). a. Max=the maximum reading obtained during the log interval. b. Avg=the average reading obtained during the log interval. 3-18 TVA2020 Instruction Manual Thermo Fisher Scientific Display Menus Log Methods c. Smp=the last reading obtained during the log interval. 4. Type the appropriate time interval desired for VOC sampling. 5. Press ENTER and, after a brief message of acceptance, the VOC method of logging is now ready to be used in the Run mode. Note The allowable Sample Time range is 2–30 seconds. If a Sample Time of less than 2 seconds or greater than 30 seconds is selected, a warning message will appear and you will be required to re-enter the Sample Time. ▲ In the LOG VOC mode, data is logged in the format described below: Log F.E. ● Every time the user initiates logging, the instrument will countdown by a defined interval and will prompt the user to save the captured value. The user will need to re-initialize the logging sequence, including tag, for successive samples. Data will fall under the same heading. ● Data is logged in the following format whenever you press the LOG button: ● Approximately 4500 data samples may be taken. Use the following procedure to access the F.E. Log. Note The F.E. method requires use of the enhanced probe. ▲ Thermo Fisher Scientific TVA2020 Instruction Manual 3-19 Display Menus Log Methods 1. From the LOG MODE menu, press 3=VOC/F.E. The previous log selection is displayed on the second line of the screen. LOG MODE Auto,rate= 10sec 1=VOC 2=FE Press 2=FE to display this message. Enter sampling: FE,time=00s,Max Up/Dn=Next type Enter=Accept 2. Press the Up/Dn arrow keys to choose the type of sampling to be used (Max, Avg, Smp). a. Max = the maximum reading obtained during the log interval. b. Avg = the average reading obtained during the log interval. c. Smp = the last reading obtained during the log interval. 3. Type the appropriate time interval desired for F.E. sampling. 4. Press Enter, and, after a brief message of acceptance, the F.E. method of logging is now ready to be used in the RUN mode. Note The allowable Sample Time range is 2-30 seconds. If a Sample Time of less than 2 seconds or greater than 30 seconds is selected, a warning message will appear and you will be required to re-enter the Sample Time. ▲ Note If dual option, the user must use the enhanced probe to change detector type. ▲ 3-20 TVA2020 Instruction Manual Thermo Fisher Scientific Display Menus Log Methods ● Log Custom Approximately 2900 data samples may be taken. The TVA2020 has several pre-designed logging methods. However, if you find that you would prefer to log data in a different fashion, you can use Custom logging to create your own log type. The TVA2020 will prompt you through a series of questions which will assist you in setting the various logging options. The end result is a logging method which collects data the way you want it to. The following variable settings can be configured when designing a Custom log method. 1. Log data type This setting allows you to choose the format in which data will be saved. The choices are as follows: a. None. b. Auto – Data stored in a fashion similar to Auto logging (tag, calibration information, Detector Counts, time/date, alarms). c. VOC – Data stored in a fashion similar to VOC logging (Tag, Calibration Information, Detector Counts, time/date, alarms). d. FE – Data stored in a fashion similar to FE logging. 2. Sample time This setting allows you to adjust the sampling interval. 3. Log time units Thermo Fisher Scientific TVA2020 Instruction Manual 3-21 Display Menus Log Methods This setting allows you to choose the units for the sample interval (seconds or minutes). 4. Log sample type This setting allows you to choose the way in which sample readings are collected over the sample rate or interval. The choices are as follows: a. Last sample — the last reading obtained within the sample interval is stored b. Max — the maximum reading obtained within the sample interval is stored c. Avg — the average reading obtained over the sample interval is stored 5. Log unit lock This setting allows you to decide whether to enable auto-ranging or lock the TVA2020 units to either ppm or %. 6. Log auto repeat This setting allows you to determine whether the TVA2020 should automatically cycle through logging events (auto repeat ON) or pause for a user command before logging (auto repeat OFF). 7. Log save accept This setting determines whether the TVA2020 prompts the user before saving a logged reading (Manual) or automatically saves the reading without a user prompt (Auto). 8. Tag active This setting determines whether or not you want to assign tags to logged readings. If you wish to assign tags, choose ON. If you wish to skip tagging, choose OFF. 9. Route active This setting determines whether the logging should follow a pre-loaded route list of tags. If you wish to upload a list of tags to the TVA2020 and follow that list while logging, choose ON. If you do not wish to use routing, choose OFF. 3-22 TVA2020 Instruction Manual Thermo Fisher Scientific Display Menus Passcode Protection Passcode Protection The TVA2020 Setup Menu can be passcode protected. This option allows you to protect the setup parameters from anyone who is not familiar with your 6-digit passcode. If this feature is enabled, you need to enter your passcode each time you choose to display the SETUP menu. 1. From the MAIN MENU display, press 2-Setup. 2. From the SETUP MENU display, press 4=Passcode. 3. Press ENTER to accept passcode. PASSCODE MENU Disabled 1=New Passcode 2=Enabl 3=Disabl New Passcode New Passcode allows you to enter and/or change the 6-digit calibration passcode. You may use any characters from the alphanumeric keypad in your passcode. You must then verify the passcode to make sure you have entered it properly. From the PASSCODE MENU display, press 1=New Passcode. Enter passcode: THER___ 1=S 2=T 3=U Enable Thermo Fisher Scientific 0=7 Enable allows you to activate the passcode protection feature. Once this feature is activated, you must enter your passcode whenever you request access to the SETUP MNEU. Once passcode protection has been enabled and you exit the SETUP MENU, the option can only be disabled by entering the passcode to gain access to the SETUP MENU again. REMEMBER YOUR PASSCODE! TVA2020 Instruction Manual 3-23 Display Menus Other Settings Disable Disable allows you to deactivate the passcode protection feature. Once this feature is deactivated, you have unlimited access to the SETUP MENU without entering a passcode. Note In the event you inadvertently forget your passcode, contact Thermo Fisher Scientific for assistance. ▲ Other Settings Other Settings include: OTHER SETTINGS 1=User ID 2=Date 3=Time 4=User Options ● 1=User Identification Number ● 2=Date ● 3=Time ● 4=User Options Note Time may be set only if the date is within the valid range of 1980 to 2037. ▲ User Identification Number Use the following procedure to set the user identification number. Note To set the User ID number, the instrument must be ON but does not have to be warmed up. ▲ 1. From the MAIN MENU display, press 2=Setup. 2. From the SETUP MENU display, press 5=Other. 3. From the OTHER SETTINGS menu, press 1=User ID. 3-24 TVA2020 Instruction Manual Thermo Fisher Scientific Display Menus Other Settings User ID: USERID Enter=Change 4. From the User ID prompt, press ENTER. 5. Use the keypad to type your user ID. Enter user ID: ---------Press char key 6. Press ENTER to store the user ID into memory. Date Use the following procedure to set the date. Note To set the correct date, the instrument must be ON but does not have to be warmed up. Date entries earlier than Jan. 1, 1980 or later than 2037 are invalid. ▲ 1. From the MAIN menu display, press 2=Setup. 2. From the SETUP menu display, press 5=Other. 3. From the OTHER SETTINGS menu, press 2=Date. Thermo Fisher Scientific TVA2020 Instruction Manual 3-25 Display Menus Other Settings Enter date: --/--/-Enter=Accept 4. The next screen reads the current date. If OK, press EXIT or ENTER to change. EXIT returns to the OTHER SETTINGS menu. ENTER prompts you to type the correct date. Do so by typing month/day/year. Date: 05/10/12 Enter=Change 5. Press ENTER to store the date in memory. The display then returns to OTHER SETTINGS. Time of Day Use the following procedure to set the time of day. Note To set the correct time, the instrument must be ON but does not have to be warmed up. The date must be within the valid range of 1980 to 2037. ▲ 1. From the MAIN MENU display, press 2=Setup. 2. From the SETUP MENU display, press 5=Other. 3. From the OTHER SETTINGS menu, press 3=Time. 3-26 TVA2020 Instruction Manual Thermo Fisher Scientific Display Menus Other Settings Time: 05:26:16 Enter=Change 4. The next screen reads the current time. If it is OK, press EXIT or ENTER to change. EXIT returns to the OTHER SETTINGS Menu, ENTER prompts you to type the correct time. Do so by typing hour/minute/second. Enter time: --:--:-Enter=Accept 5. Then press ENTER to store the time in memory. The display then returns to OTHER SETTINGS. User Options This menu contains user settable options to customize the features described below. 1. From the MAIN MENU display, press 2-Setup. 2. From the SETUP MENU display, press 5=Other. 3. From the OTHER MENU display, press 4=User Options. USER OPTIONS 1=Key Click 2=Display Delay Thermo Fisher Scientific TVA2020 Instruction Manual 3-27 Display Menus Other Settings User Options include: Key Click ● 1=Key Click ● 2=Display Delay If the key click is on, a chirp is heard every time a key is pressed. Note To select key click on/off, the instrument must be ON but does not have to be warmed up. ▲ 1. From the MAIN MENU display, press 2=Setup. 2. From the SETUP MENU display, press 5=Other. 3. From the OTHER SETTINGS menu, press 4=User Options. 4. From the USER OPTIONS menu, press 1=Key Click. Key click: Off 1=On 2=Off 5. From the Key click Menu, press 1=On or 2=Off. The screen displays the previous selection. When a new selection is made, the display returns to USER OPTIONS. Display Delay This function determines the length of time that temporary messages remain on the screen. Note To select the display delay, the instrument must be ON but does not have to be warmed up. ▲ 1. From the MAIN MENU display, press 2=Setup. 2. From the SETUP MENU display, press 5=Other. 3-28 TVA2020 Instruction Manual Thermo Fisher Scientific Display Menus Information Menu 3. From the OTHER SETTINGS menu, press 4=User Options. 4. From the USER OPTIONS menu, press 2=Display Delay. Display delay: Medium 1=Short 2=Medium 3=Long 5. From the Display delay menu, press 1=Short, 2=Medium or 3=Long. The screen displays the previous selection. When a new selection is made, the display returns to USER OPTIONS. Note “Short” is approximately 0.5 sec, “Medium” is approximately 1.5 seconds, and “Long” is approximately 3.5 seconds. ▲ Information Menu The information menu is a view-only list of 14 items/parameters existing in the instrument. No changes may be made in this menu. Enter the INFO Menu from the MAIN menu by pressing 3=Info. Use the up/down keys to page through the list. The parameters/items you may view are: Thermo Fisher Scientific ● Model: TVA2020 ● S/N DDDDDDDDDDDD ● Date ● Time ● Det: PID, FID, or both ● Pump: On or Off and % ● Bat: Battery voltage listed, OK or low ● Memory: how much is free to use ● Ver: Current Software Version No. ● Optional Bluetooth status ● Optional GPS status ● PID zero calibration: Date and time of last calibration ● FID zero calibration: Date and time of last calibration TVA2020 Instruction Manual 3-29 Display Menus Memory ● PID span calibration: Date and time of last calibration ● FID span calibration: Date and time of last calibration Note To view calibration information, you must return to the calibration menu in SETUP. Press EXIT to return to MAIN menu. ▲ Memory This menu allows you to link the TVA2020 to a personal computer (PC) through the USB port to copy files from and into the instrument, clear data memory, and update instrument firmware. Note The Flash memory device is erased prior to the file creation process to ensure sufficient memory exists to create the data files. Do not store any files on the instrument Flash drive as they will be lost. ▲ WARNING Charger and USB connections are not allowed in an area classified as hazardous due to presence of flammable gases or vapors. ▲ To enter the MEMORY menu from the MAIN menu, press 4=MEMORY. The following display will appear: MEMORY 1=USB Mode 2=Clear Log Mem 3=UpdateFirmware Choosing 1 = After choosing 1 the display will show “Creating Files Please wait” as shown below. The file creation can take up to one minute, depending on the size of the log file. Creating Files Please Wait Do not connect the USB cable to the instrument until the instrument displays the screen below. 3-30 TVA2020 Instruction Manual Thermo Fisher Scientific Display Menus Memory USB MODE Exit=Cancel The USB barrier device must be connected in line between the computer and the instrument. Two standard USB cables are provided to make this connection. If the barrier device in not used, the following message will be displayed. === WARNING! === Incorrect USB cable detected Exit=Clr When first connected to a PC the TVA2020 will send the correct driver files to the computer. Administrator privileges may be needed to allow the proper files to be transferred to the PC. Once connection has been established the files listed below will be displayed in a newly opened TVA2020 window. These files can be dragged and dropped into any user folder or directory. If the TVA2020 window does not appear, try disconnecting and reconnecting the USB cable from the PC or open Explorer and look for the TVA2020 device. The Flash files can also be deleted without any adverse affect on the instrument. These files are backed up inside the instrument memory. The instrument keypad is disabled while the instrument is connected to the PC via the USB cable. To resume keypad control, close the TVA2020 dialog window and eject the TVA2020 memory device using the PC controls. The following information can be saved from the TVA2020 to the PC: a. ROUTE.TXT (Route List) b. CONFIG.TXT (TVA2020 Configuration) c. CAL.TXT (TVA2020 Calibration Parameters) d. FACTORY.TXT (TVA2020 Factory Calibration) e. LOG.TXT (Logged Data) f. CAL_HIST.TXT (Calibration History) The following information can be saved from a PC to the TVA2020: Thermo Fisher Scientific TVA2020 Instruction Manual 3-31 Display Menus Memory a. ROUTE.TXT (Route List) b. CONFIG.TXT (TVA2020 Configuration) c. CAL.TXT (TVA2020 Calibration Parameters) d. FACTORY.TXT (TVA2020 Factory Calibration) Note TVA2020 only recognizes the above naming format, otherwise the file will be deleted. ▲ Upon exiting the USB MODE screen, any files that have changed will be loaded into the instrument memory. If the file format is incorrect, the following message will appear. === WARNING! === File read error: check err file! Exit=Clr If you choose Exit to clear, the following displays: Error in files 1=USB mode to fix files 2=Revert to old If you choose to fix the files, re-establish the PC USB connection and open the error file that was created to identify the line(s) of text in error. If you choose to revert to the existing files, your changes will be lost unless they were saved on your PC. The following screen appears: Reverting Please wait Text File Formats Messages to be uploaded and downloaded must be written in straight ASCII text and must contain blank spaces between text, not tabs. For more information, See Appendix B, “Text Data Formats”. 3-32 TVA2020 Instruction Manual Thermo Fisher Scientific Display Menus Memory Choosing 2 = Clear Logging Memory will erase any loaded logged data stored in TVA2020 memory. A warning that “You are about to clear all memory” will appear and must be acknowledged before the TVA2020 will clear its memory. Be absolutely sure that you wish to clear memory before choosing this action. Once memory is cleared, it cannot be retrieved. Choosing 3 = Update Firmware allows the user to update instrument firmware upon new releases. 1. Confirm that the new firmware image is stored locally on your hard drive. 2. Before uploading the new firmware back up all the instrument files as detailed in the USB mode section. These files will remain unchanged in the instrument during the upload but a back up is recommended. 3. Press 3=UpdateFirmware. 4. Press ENTER at the first warning screen. === WARNING! === Press Enter to Start fw update Exit=Cancel 5. Press ENTER at the second warning screen. Please note that pressing ‘Enter’ will delete the current firmware installed in the instrument. === WARNING! === Continuing will Erase the FW Exit=Cancel 6. Follow the steps listed on the display. FW 1. 2. 3. Thermo Fisher Scientific UPDATE STEPS Connect USB Copy File Wait Reboot TVA2020 Instruction Manual 3-33 Display Menus Memory 7. After connecting the USB cable the following window will open. Depending on your computer configuration, you may need to cancel one or two other message windows before this window appears. 8. Drag and Drop or Copy and Paste the new firmware file into this ‘Removable Disk’ window. 3-34 TVA2020 Instruction Manual Thermo Fisher Scientific Display Menus Memory 9. The copying window should appear while the file transfers. 10. After transfer, the ‘Removable Disk’ window will close and the instrument will automatically reboot to the main menu. 11. If the instrument does not reboot to the main menu, perform the following: a. With the USB cable still connected to the computer, disconnect and reconnect at the instrument. This will turn the instrument off. b. Press the power key to turn the instrument on. c. The instrument will display two black lines; however the bootloader is still active. d. Return to step 7 in this section and continue from there. e. If the problem persists after several attempts, contact the Thermo Fisher Scientific Service Department. 12. Confirm that the calibrations (gas and flow) are still valid. If needed, they can be transferred back into the instrument using the Memory/USB Mode functions. Thermo Fisher Scientific TVA2020 Instruction Manual 3-35 Chapter 4 Calibration This chapter describes procedures for performing a calibration on the TVA2020. For details, see the following: Thermo Fisher Scientific ● “Calibration Scenarios” on page 4-1 ● “Calibration Configuration” on page 4-3 ● “Detector Counts” on page 4-9 ● “Defining the Response Factor” on page 4-10 ● “Flow Calibration” on page 4-18 Calibration Scenarios The use of multipoint calibration and multiple response factors/curves with the TVA2020 must be fully understood before employing these features. To help explain these TVA2020 capabilities, three scenarios follow: Scenario 1 To maximize standard accuracy, it is highly recommended that you calibrate with methane for the flame ionization detector and isobutylene for the photoionization detector. Almost all published response factors for FIDs and PIDs are based upon methane and isobutylene, respectively. By employing a multipoint calibration for these compounds, you will improve the accuracy of each detector over the entire dynamic range. Response factors/curves can then be employed for correcting the detector’s response to different compounds. However, once a multipoint calibration has been employed, any response curve must characterize only the relative response at each concentration, excluding curvature of the calibrated compound. Thus, use of both multipoint calibration and response curves at the same time is difficult, and is not recommended. Scenario 2 If, for example, you want to measure several different compounds over wide concentration ranges, it is best to use a single-point calibration and then enter response curves for each specific compound (up to 9 response factors/curves can be entered into the analyzer). TVA2020 Instruction Manual 4-1 Calibration Calibration Scenarios Scenario 3 If, instead, you want to measure in direct readings (response factor = 1) for one specific compound with maximum accuracy over a wide range of concentrations, perform a multipoint calibration with the specific compound. Up to 9 span points (plus zero) can be entered for each detector. The use of a response curve is thus unnecessary as the detector is already reading the direct ppm for that specific compound. CAUTION If you use multipoint calibration or a gas other than methane or isobutylene and then apply response factors/curves (that have been generated with reference to a single point methane/isobutylene calibration), the resulting measurements will probably be incorrect. ▲ To provide the specified accuracy, the instrument must be calibrated at the beginning of each workday. ● From the Main Menu, choose 2 = Setup > 1 = Calib. When you reach the CALIBRATION menu, you will see the following selections: CALIB MENU 1=Zero 2=Span 3=Backgnd 4=RF 5=Flow 6=Cfg The steps involved in calibrating the TVA2020 are as follows: 1. Configure the calibration variables (6=Cfg): ● Number or span points (1-9) ● Span concentration ● Background correction (None, PID, FID, Both) ● Response factor calculation mode (Multiplication factor or Curve) ● Accept mode (Manual or Auto) ● Save mode (Manual or Auto) 2. Zero the instrument using either a zero gas or clean ambient air (1=Zero). 4-2 TVA2020 Instruction Manual Thermo Fisher Scientific Calibration Calibration Configuration 3. Calibrate the reference point(s) using known span gases. The TVA2020 can be configured for as many as nine different span gas values (2=Span). 4. Optional: Set instrument response factors if necessary (4=RF). 5. Optional: Take background reading (3=Backgnd). 6. Optional: Calibrate the flow sensor (5=Flow). Note Prior to performing calibration, the instrument must be on and warmed up for approximately 30 minutes. The pump must be ON, the PID lamp must be ON, and the FID must be ignited throughout the warm-up period. ▲ Calibration Configuration Before you calibrate the TVA2020 for the first time, you may want to customize certain calibration settings. Once you have configured these settings, you don’t need to set them again every time you calibrate unless you want to change one. In order to set your calibration options from the CALIBRATION menu, from the CALIB MENU display, choose menu selection #6 (Cfg). This will produce the following CAL CONFIG MENUs which can be scrolled through by using the Up and Down arrows: CAL CONFIG MENU 1=Number span pt 2=Span concs Up/Dn=More CAL CONFIG MENU 1=Backgnd corrct 2=RF calc mode Up/Dn=More Thermo Fisher Scientific TVA2020 Instruction Manual 4-3 Calibration Calibration Configuration CAL CONFIG MENU 1=Accept Mode 2=Save mode Up/Dn=More Number Span Pt The Number Span Pt screen is used to determine the number of span points that will be used to calibrate your TVA2020. Choosing this selection will produce the following screen: FID FID: 3 Span Gas Points Enter=New Value PID/FID PID: 5 FID: 3 Span Pts: 1=Both 2=PID 3=FID From this screen, you may choose which detector you wish to set the number of span points for. Choosing one of these selections produces the following screens: FID PID/FID (Both option) Number span pts: FID: 3 Number Span Pts: P&F: 5 & 3 Select: 1 to 9 Select: 1 to 9 From these screens, press the number of span points that you wish to use. Both detectors can have up to 9 span points each, and they do not necessarily need to have the same number of span points. When Both option is chosen, a single value will be applied to both PID and FID. Defining the Span Gas Concentration(s) 4-4 TVA2020 Instruction Manual The span gas concentration is the known concentration of the gas standards used to calibrate your TVA2020. Methane in air is the recommended calibration standard for the FID, and Isobutylene in air is the recommended calibration standard for the PID. Other gases may be used if desired. Thermo Fisher Scientific Calibration Calibration Configuration Note If your instrument is equipped with dual detectors, you may choose to calibrate the FID separately or PID/FID together. ▲ Note If your instrument is configured for multiple span points, be sure to set the concentration for ALL span points. ▲ 1. From the CAL CONFIG MENU (Page 1) display, press 2=Span concs. The upper display (or two displays if the unit is a dual detector version) will display the concentration value of your span gas (expressed as ppm or %) as of the last calibration: FID FID: 500ppm Span Gas Concent Enter=New conc PID/FID PID: 100ppm FID: 500ppm Span Conc:1=Both 2=PID 3=FID If the TVA2020 is configured for multiple calibration points, the span gas concentration values for Point #3 will be displayed. The Up and Down arrow keys can be used to scroll through the span gas concentration values for other points: FID FID: 500ppm Span Pt3 (Up/Dn) Enter=New conc PID/FID PID: 100ppm FID: 500ppm Span Pt3 (Up/dn) 1=Both 2Pid 3Fid 2. To change a span gas concentration value, choose the detector(s) of interest if using a dual detector analyzer, or press ENTER if using a single detector analyzer. The following display will appear: Thermo Fisher Scientific TVA2020 Instruction Manual 4-5 Calibration Calibration Configuration FID PID/FID Enter span conc: FID: 500ppm Up/Dn=Next unit Enter=Accept Enter span conc: P&F: 100.0ppm Up/Dn=Next unit Enter=Accept Use the up and down arrow keys to select the measurement units (ppm or %) and the decimal point position. There are 3 selections to choose from: Table 4–1. Gas Concentration Units Range Display Units 3 DD.DD % 2 DDDDDD ppm 1 DDDD.D ppm The range of the instrument is determined by your selection of measurement units and decimal point placement. In the run mode, the instrument will auto range upward only to select the optimum range for displaying measurement information. For example, if you entered a value in Range 1 and the measured value changes to a high value, the instrument will automatically switch to range 2. If it increases further, it will switch to Range 3. After you have selected the measurement units and decimal point placement, use the keypad to enter the concentration value. Press ENTER to accept this value and store it in the TVA’s memory. 3. If your TVA2020 is a dual detector analyzer, you may repeat the procedure for the second detector. If your TVA2020 is configured for more than one span point, you may use the Up/Dn arrow keys to select the next span point and repeat the procedure. 4. When the last gas concentration value has been entered, you can return to the CALIBRATION menu, by pressing the EXIT key. Background Correct 4-6 TVA2020 Instruction Manual This selection allows you to choose whether or not to apply background correction to the detector readings displayed and logged in memory. If you choose to apply background correction, the last background reading stored in memory will be subtracted from the measured reading. This corrected Thermo Fisher Scientific Calibration Calibration Configuration reading will be the value displayed and the value logged. Choosing this selection from the CAL CONFIG MENU produces the following display: FID Backgnd correct: ON 1=ON 2=None PID/FID Backgnd correct: PID 1=Both 2=None 3=PID 4=FID The second line of the display shows what option is currently selected. You can change this option by choosing any one of the menu selections in dual detector instruments. You may choose to apply correction to FID, PID or both detectors. Defining the Background Correction From the CALIB MENU display, press 3=Backgnd. FID FID: 0.0ppm Background conc 1=Update 2=Zero PID/FID PID: 0.0ppm FID: 0.0ppm Background conc 1=Update 2=Zero Press 1=Update to read live values of ambient air. FID PID/FID Please wait... Please wait... Sampling backgnd Enter=Accept Sampling backgnd Enter=Accept FID FID: 0.3ppm Sampling backgnd Enter=Accept PID/FID PID: 0.2ppm FID: 0.3ppm Sampling backgnd Enter=Accept Press ENTER. Thermo Fisher Scientific TVA2020 Instruction Manual 4-7 Calibration Calibration Configuration FID FID: 0.3ppm PID/FID PID: FID: -ACCEPTED- 0.2ppm 0.3ppm -ACCEPTED- Note A default background value of 0 is stored in memory until a background reading is taken. ▲ Note The background correction is reset to zero when the unit is powered up and when the user exits the USB Mode screen. ▲ RF Calc Mode This selection allows you to choose how response factor correction will be applied to the reading. Choosing this selection from the CAL CONFIG MENU produces the following display: RF calc Mode: Factor 1=Factor 2=Curve The second line of the display shows what option is currently selected. If “Factor” is chosen, the TVA2020 will use a single constant response factor which is multiplied by the reading. If “Curve” is chosen, the TVA2020 will use a two constant equation. For more information, refer to the section of the manual on “Response Factors.” Cal Accept Mode 4-8 TVA2020 Instruction Manual This selection allows you to choose whether or not calibrations will be automatically accepted. Choosing this selection from the CAL CONFIG MENU produces the following display: Thermo Fisher Scientific Calibration Detector Counts Cal accept mode: Manual 1=Manual 2=Auto The second line of the display shows what option is currently selected. If “Manual” is chosen, the instrument will display the detector count during calibration and prompt the user to decide when to accept the calibration value. If “Auto” is chosen, the instrument will automatically determine the value to be stored and when to do it. Cal Save Mode This selection allows you to choose whether or not the TVA2020 will automatically save an accepted calibration. Choosing this selection from the CAL CONFIG MENU produces the following display: Cal save mode: Manual 1=Manual 2=Auto The second line of the display shows what option is currently selected. If “Manual” is chosen, after a calibration value has been accepted the instrument will prompt the user to decide whether to save the calibration value or repeat the calibration (1 = Yes or 2 = Again?). If “Auto” is chosen, the instrument will automatically store the accepted calibration value without prompting the user. Detector Counts Detector counts are the raw, unscaled detector output values associated with a gas measurement performed by the FID or the PID. Before a detector reading is displayed or recorded, the detector signal is converted from analog to digital. The result is a raw number, or A/D counts. When a detector is calibrated, the detector counts for the zero gas and each of the span gases are saved in memory. These detector counts are then used as reference points for calculating the concentration values to be displayed or stored. When calibrating the TVA2020 in the “Manual” accept mode, the counts from the last calibration (Zero or Span) are displayed before the calibration process is initiated. Once the calibration process is initiated, the live detector counts are then displayed. You can refer to these counts as an Thermo Fisher Scientific TVA2020 Instruction Manual 4-9 Calibration Defining the Response Factor indication of when the reading has stabilized, or as a means of tracking the repeatability of your calibrations. You can also use these counts as an indication of the success of a calibration. The “zero” counts are the counts expected when a zero gas is applied to the detector. The span counts are the counts expected when a span gas of known concentration is applied to the detector. Finally, the detector sensitivity can be calculated by subtracting the zero counts from the span counts and dividing by the span gas concentration. Use the following general observations as a guideline: Table 4–2. Detector Counts Detector Zero Counts Detector Sensitivity FID <6000 160-260 counts/ppm Methane PID (10.6 eV lamp) 1000-2000 10-35 counts/ppm Isobutylene Example: A TVA2020 FID is calibrated with zero air and a 100 ppm Methane in air span gas. The counts observed for the zero are 2895 and the counts observed for the span are 27395. The span sensitivity is thus 245 counts/ppm [(27395-2750)/100 ppm]. Since both of these values (2895 zero counts and 245 detector sensitivity) are within the acceptable range, the calibration is a good calibration. Examples of a bad calibration include unusually high zero counts, or unusually low detector sensitivity. These problems can often be attributed to poor calibration gases, contaminated sampling accessories, a faulty detector capsule, or failure to follow the proper calibration procedure. For more information, consult the “Troubleshooting” chapter in this manual or contact Thermo Fisher Scientific for assistance. Defining the Response Factor Although the FID and PID are calibrated with span gases of known concentration (usually Methane and Isobutylene, respectively), both detectors respond to many different compounds with differing levels of sensitivity. In order to adjust the analyzer reading from “ppm of Methane” or “ppm of Isobutylene” to ppm of the compound of interest, a correction factor must be applied to the reading. This correction factor is also known as a Response Factor. You can choose from up to nine (9) user-defined response factors, or use the default response factor of 1.00. Each response factor can be assigned a 9-character alphanumeric name. The TVA2020 uses one of two different response factor formats: a Multiplier or a Curve. 4-10 TVA2020 Instruction Manual Thermo Fisher Scientific Calibration Defining the Response Factor Response Factor Multiplier A response factor multiplier is defined as follows: Response Factor = Actual Concentration ----------------------------------------------------------Measured Concentration Example: If 100 ppm of a compound produces an FID response of 50 ppm on an analyzer calibrated with Methane, then the FID response factor would be 2.00 (100/50). When using a response factor multiplier to correct a TVA2020 reading, the analyzer multiplies the reading by the response factor and displays the corrected reading. As in the example give above, if a 50 ppm reading is obtained by the TVA2020, the analyzer would automatically multiply 50 times 2.00 to get the actual concentration of 100 ppm. Response Curve Response factors can change as concentration changes. The response factor for a compound determined at 500 ppm may not be the same as the response factor determined at 10,000 ppm. By using a response curve, you can characterize a compounds response over a broader range of concentrations. If the actual concentration is plotted as Y vs. X (measured concentration), the resulting curve can be represented by the rational equation AX Y = -----------------------------------------BX 1 + -------------------------- 10000ppm When using the RF Calc Mode “curve”, the terms A and B are entered into the TVA2020. A represents the response factor multiplier at very low concentrations and B represents a change to the response for every percent concentration increase. The curve can only be defined by collecting response data at several different concentrations and using a xy math spreadsheet to calculate the “best-fit” polynomial expression. Note Once the response curve has been fit, the calibration gas concentrations and number of span points should not be changed without readjusting the curve fit. ▲ Thermo Fisher Scientific TVA2020 Instruction Manual 4-11 Calibration Defining the Response Factor To define and/or choose a response factor, choose 4=RF from the CALIB MENU. The following display will appear: RF0: Default Up/Dn=Next RF Enter=Accept The top line shows the currently active response factor. If no response factor is applied, the currently active response factor will be the factory DEFAULT (1.00 for FID methane and 1.00 for PID isobutylene). The name and value of the default response factor cannot be changed. You can scroll through the other response factors by using the Up and Down arrow keys. The other response factor names will show as you scroll through them: RF3: PROPANE Up/Dn=Next RF 1=Change Enter=Accept If you would like to activate a different response factor, press ENTER=Accept. The TVA2020 will show an ACCEPTED message. If you would like to modify the response factor name or numbers, press 1=Change: FID RF3: PROPANE FID: 1.50 1=Name 2=Numbers PID/FID RF3: PROPANE PID: 1.50 FID: 1.50 1=Name 2=Numbers If you would like to change the name assigned to the response factor, press 1=Name. If you would like to change the response factor value, press 2=Numbers. If you choose 1=Name, the following display will appear: 4-12 TVA2020 Instruction Manual Thermo Fisher Scientific Calibration Defining the Response Factor Enter name: RF3: Hexa_________ Press char key Use the alphanumeric keypad to enter a compound name for the response factor. Press enter when you are finished. If you choose 2=Numbers, the following display will appear: FID Enter RF3: FID:01.50 Enter=Accept PID/FID Enter RF3: P&F:01.50 Enter=Accept Use the keypad to enter a new response factor and press ENTER to store it in instrument memory. Note The TVA2020 will not accept a response factor of 00.00. ▲ Note If a response curve is used, the TVA2020 will prompt you to enter two numbers. ▲ FID RF3: PROPANE FID: 1.25 1.50 1=Name 2=Numbers PID/FID RF3: PROPANE PID: 1.25 1.50 FID: 1.25 1.50 1=Name 2=Numbers Press 2=Numbers Thermo Fisher Scientific TVA2020 Instruction Manual 4-13 Calibration Defining the Response Factor FID PID/FID Enter RF3 fact1: FID:01.25 Enter RF3 fact1: P&F:01.25 Enter=Accept Enter=Accept Press ENTER. FID Enter RF3 fact2: FID: 1.25 +01.50 Up/Dn=+/Enter=Accept Zero Reference Point Calibration PID/FID Enter RF3 fact2: P&F: 1.25 +01.50 Up/Dn=+/Enter=Accept Use the following procedure to zero the instrument. 1. From the CALIB MENU display, press 1=Zero. Note The following sequence shows the procedure when the TVA2020 is configured with both Cal Accept mode and Cal Save mode = Auto. If either mode is Manual, an extra confirmation is required at the appropriate step. ▲ Note If your instrument is a dual detector type (PID and FID), you can zero the PID and FID separately, both together, or one in zero gas and one in clean ambient air. To do so, follow the same procedure. However, it is suggested that you zero both detectors together. ▲ 4-14 TVA2020 Instruction Manual Thermo Fisher Scientific Calibration Defining the Response Factor If you press 1=Zero, the display will show: FID FID: PID/FID 3500 Zero Calib Value Enter=New Calib PID: 1350 FID: 3500 Zero Cal: 1=Both 2=PID 3=FID 2. To perform the actual ZERO procedure: ● FID-only: Press ENTER ● PID/FID: Press 1, 2, or 3 FID PID/FID Apply zero gas at sample inlet Apply zero gas at sample inlet Enter=Start Enter=Start 3. Apply the zero gas to the probe at ambient pressure (using a clean and labeled gas sampling bag) and then press ENTER. FID FID: PID/FID 3500 Wait for zero... Exit=Cancel PID: 1350 FID: 3500 Wait for zero... Exit=Cancel The instrument analyzes the zero sample. Thermo Fisher Scientific TVA2020 Instruction Manual 4-15 Calibration Defining the Response Factor FID FID: PID/FID 3500 -ACCEPTED- PID: FID: 1350 3500 -ACCEPTED- The ACCEPTED message appears for a short time and is then replaced by the normal CALIBRATION menu. When the ACCEPTED message disappears and the CALIB MENU appears, the ZERO reference value is stored. This value is stored in nonvolatile memory until the next calibration is performed. The date and time of this calibration are stored and can be accessed through the INFO menu. Note For optimum accuracy, re-zero the FID every time the hydrogen supply is turned on. ▲ Span Reference Point(s) To set the span reference point, execute the procedure described below. Note that the procedure is the same as that for setting the zero reference except that a span gas is used instead of a zero gas. The procedure is: 1. From the CALIB MENU display, press 2=Span. Note The following sequence shows the procedure when the TVA2020 is configured with both Cal mode and Cal Save mode = Auto. If either mode is Manual, an extra confirmation is required at the appropriate step. ▲ Note If your instrument is a dual detector type (PID and FID), you can set the span reference for the PID and FID separately, both together, or one in one type of calibration gas and one in another type of gas. To do so, follow the same procedure. ▲ Note The FID and PID span concentrations must be the same for both span reference point selections, otherwise an error screen will be displayed. ▲ Note If multiple span points are used, repeat the following procedure for each and every span point. ▲ 4-16 TVA2020 Instruction Manual Thermo Fisher Scientific Calibration Defining the Response Factor When you press 2=Span, the display will show: FID FID: 44750 Span Pt1 (Up/Dn) Enter=New calib PID/FID PID: 4000 FID: 44750 Span Pt1 (Up/Dn) 1=Both 2Pid 3Fid If more than one reference span gas concentration has been configured, pressing the Up/Dn keys will allow you to scroll through all defined reference gas concentration points. 2. To perform the actual SPAN calibration (for example at 100 ppm isobutylene): ● FID-only: Press ENTER ● PID/FID: Press 1, 2, or 3 FID PID/FID Apply span gas1 100.0ppm Apply span gas1 100.0ppm Enter=Start Enter=Start 3. Apply the appropriate span gas to the probe at ambient pressure (using a clean and labeled gas sampling bag) and then press ENTER. FID FID: 44750 Wait for span... Exit=Cancel PID/FID PID: 4000 FID: 44750 Wait for span... Exit=Cancel The instrument analyzes the span sample. When only one reference span gas concentration is used, the ACCEPTED message appears for a short time and is then replaced by the normal CALIBRATION menu. Thermo Fisher Scientific TVA2020 Instruction Manual 4-17 Calibration Flow Calibration FID FID: 44750 -ACCEPTED- PID/FID PID: FID: 4000 44750 -ACCEPTED- When the ACCEPTED message disappears and the CALIBRATION menu appears, the SPAN reference value is stored. This value is stored in non-volatile memory until the next calibration is performed. The date and time of this calibration are stored and can be accessed through the INFO menu. 4. If more than one reference span gas concentration has been defined, the span calibration display returns. Move to the next concentration point (Up/Dn keys) and repeat steps 2-3 above until each reference gas concentration point has been calibrated. Flow Calibration Use the following procedure to perform a flow calibration. 1. Confirm that the instrument passes the Leak Check on page 7-16 prior to performing this calibration. A new water trap filter and a new or clean sintered metal filter should be installed prior to performing this calibration. 2. From the SETUP MENU, choose 1=Calib > 5=Flow. 3. Establish the 1 ±.01 LPM flow at the probe inlet. a. Typical values are 50-60% power with 28K-30K counts. 4. Press Enter=Accept to save the Flow 1 values. 5. Attach one of the red flow restrictors between the probe inlet and the flow meter. 6. Press “2” for the second flow calibration point. 7. Adjust the pump power with the up and down arrows for a reading of 1 ±.01 LPM at the probe inlet. 4-18 TVA2020 Instruction Manual Thermo Fisher Scientific Calibration Flow Calibration a. Typical values are 65-75% power with 29K-31K counts 8. Press Enter=Accept to save the Flow 2 values. 9. Attach a second red flow restrictor, in line with the first, between the probe inlet and flow meter. 10. Press “3” for the third flow calibration point. 11. Adjust the pump power with the up and down arrows for a reading of 1 ±.01 LPM at the probe inlet. a. Typical values are 85-95% power with 31K-33K counts. 12. Press Enter=Accept to save the Flow 3 values. 13. Press 4= calc coef to calculate the flow calibration values. Note The flow calibration values are stored in a file called FACTORY.TXT. This file can be saved to a computer and reloaded to the instrument if the flow calibration were to become corrupted. See the section on flash file transfers. ▲ Thermo Fisher Scientific TVA2020 Instruction Manual 4-19 Chapter 5 Preventive Maintenance This chapter describes the periodic maintenance procedures that should be performed on the instrument to ensure proper operation. Since usage and environmental conditions vary greatly, the components should be inspected frequently until an appropriate maintenance schedule is determined. Thermo Fisher Scientific suggests that you return the entire instrument to the factory or an authorized service center once a year for cleaning, testing, and calibration. This chapter includes the following maintenance information and replacement procedures: Thermo Fisher Scientific ● “Safety Precautions” on page 5-2 ● “Replacement Parts” on page 5-2 ● “Battery and Battery Charger” on page 5-2 ● “Hydrogen Gas Tank” on page 5-4 ● “Cleaning the PID Lamp” on page 7-9 ● “Cleaning an FID Cartridge” on page 5-7 ● “Cleaning the FID Detector Cap” on page 5-9 ● “Cleaning the FID Detector Cavities” on page 5-10 ● “Replacing Water Trap Probe Filter and O-Rings” on page 5-11 ● “Cleaning or Replacing a Sintered Metal Filter Cup” on page 5-13 ● “Replacing the Charcoal Filter” on page 5-14 TVA2020 Instruction Manual 5-1 Preventive Maintenance Safety Precautions Safety Precautions Read the safety precautions before beginning any procedures in this chapter. WARNING Never change an electrical component in an area classified as hazardous due to presence of flammable gases or vapors. ▲ WARNING Parts replacement and maintenance should not be performed in areas classified as hazardous due to presence of flammable gases or vapors. Use only Thermo Fisher Scientific replacement parts. (Extended Service Plans are available; contact Thermo Authorized Service for further information.) ▲ Replacement Parts Battery and Battery Charger See the “Servicing” chapter for a list of replacement parts. You may charge the battery in or out of the instrument or replace it with a charged battery. For information on replacing the battery, see “Replacing the Battery” on page 7-6. WARNING Do not replace battery in an area classified as hazardous due to presence of flammable gases or vapors. ▲ WARNING Do not operate battery charger in an area classified as hazardous due to presence of flammable gases or vapors. ▲ WARNING Charger and USB connections are not allowed in an area classified as hazardous due to presence of flammable gases or vapors. ▲ Battery Warnings and Precautions Various safety features have been included in the design of the lithium-ion battery packs. However, misusing or mishandling the battery packs can lead to fluid leakage, heat generation, fire or an explosion. WARNING Misusing or mishandling the battery packs can lead to fluid leakage, heat generation, fire or an explosion. ▲ 5-2 TVA2020 Instruction Manual Thermo Fisher Scientific Preventive Maintenance Battery and Battery Charger To prevent these situations from occurring and to ensure safe use of the battery packs, observe the following precautions: ● Do not use or store the battery packs in environments with high temperatures, such as in strong, direct sunlight, in vehicles during hot weather, or directly in front of a heater (80 °C or higher). ● Do not immerse the battery packs in water. Do not allow them to get wet. ● Do not break open or damage the battery packs of the casing of the lithium-ion batteries. Do not pierce the battery packs with a nail or other sharp object. Do not strike it with a hammer or step on it. ● Do not put the battery packs into a microwave oven or pressurized container. ● Do not strike, drop, or throw the battery packs. ● Do not assemble or modify the battery packs or the lithium-ion batteries located inside the battery packs. ● Do not install the battery packs into to the TVA2020 if the battery packs leak electrolyte, change color, change shape, or become deformed in any other way. If leaked electrolyte comes in contact with your eyes, flush your eyes immediately. Wash them thoroughly with clean water and consult physician. If skin or clothing comes in contact with leaked electrolyte, wash the area immediately with clean water. ● Do not charge the TVA2020 unit in an environment below 0 °C or above 40 °C). ● Do not charge the TVA2020 unit near fire or in an extremely hot environment. ● Always properly dispose of the TVA2020 battery packs (recycling is preferable, contact Thermo Fisher Scientific for further information). Do not dispose of the battery packs in fire or heat. Equipment Damage Do not operate the TVA2020 if its case is damaged or otherwise compromised. ▲ The lithium-ion battery, supplied with the unit, lasts for a minimum of ten hours of continuous use at 20 °C. Extreme heat or cold and/or use of the backlight, however, will shorten that time. A battery charger with cable is shipped with the instrument. You do not have to remove the battery for charging. Simply plug the output of the charger into the mating connector marked with the battery symbol in the instrument. The cable and connectors are keyed. Orient the cable so that Thermo Fisher Scientific TVA2020 Instruction Manual 5-3 Preventive Maintenance Hydrogen Gas Tank the flat side is facing up. Then, insert the charger plug into the appropriate wall outlet. The charger has three LEDs. The left most LED indicates power status. When green, the charger is ready to charge a battery. Orange or Red indicates a problem with the charger and should not be used. Once the instrument is connected to the charger the center LED will light. The light will initially turn orange for 5 to 10 seconds while measuring the temperature of the battery. If the battery temperature is within the charging limits then the light will turn green. If the light turns red the battery may be too hot or too cold and will not charge until the proper temperature is reached. If you are sure the temperature is correct then either the battery or charger is defective. After the center LED turns green the charger tests the battery to determine the correct charge state. The right most LED will illuminate as defined below to indicate the charge state. ● Orange – Constant current charge state ● Orange/Green alternating – Constant voltage (90% full charge) ● Steady Green – Fully charged ● Red – Indicates the charger or battery is defective and should not be used. Normal charge time for a fully discharged battery is approximately eight hours, or approximately one hour of charge for every hour of use. The battery can be charged while the instrument is ON and running. It takes approximately 14 hours to fully charge a battery with the instrument running. Do not leave the battery on charge for extended periods (greater than 96 hours). If you wish to remove the battery from the TVA2020 for charging or swapping with a spare battery, turn the instrument off. 5-4 Safety Test Criteria The lithium-ion battery packs are designed to meet all U.S. Department of Transportation (DOT) criteria, per: UN Manual of Tests and Criteria Part III sub-section 38.3, T1, T2, T3, T4, T5, T7. This is currently pending. Hydrogen Gas Tank FID instruments are supplied with an 85cc hydrogen gas tank. This tank, which may be pressurized to 2200 psi maximum at 25×C, will provide ten hours operation when fully charged. The tank has an integrally mounted high pressure gauge that can be easily read when the tank is in or out of the instrument. Install the tank in the instrument by inserting it into the receptacle on the top and tightening (left hand threads, tighten counter- TVA2020 Instruction Manual Thermo Fisher Scientific Preventive Maintenance Hydrogen Gas Tank clockwise) until the rubber tank boot is flush with the instrument sidepack and a slight resistance is felt. Do not overtighten. WARNING A safe refill operation means there are no hydrogen leaks. Before any valves are opened, use a wrench to firmly tighten connections to the hydrogen supply tanks and the tank fill adapter. If escaping hydrogen is heard during the filling operation, close all valves and correct the leak before proceeding. Leak test with soapy water or equivalent. ▲ CAUTION Do not fill hydrogen tank to a pressure greater than 15.2 MPa (2200 psig). ▲ Note Use prepurified ZERO grade hydrogen (certified total hydrocarbons as methane <0.5 ppm recommended). ▲ Note The hydrogen filling assembly contains a flow-limiting safety device. Approximately two minutes are required to fill the tank. ▲ Precautions in Handling and Storage The major hazard associated with the handling of hydrogen is flammability. The following specific rules apply when handling hydrogen: ● Never use cylinders of hydrogen in areas where flames, excessive heat, or sparks may occur. ● Use only explosion-proof equipment and spark-proof tools in areas where hydrogen is handled. ● Ground all equipment and lines used with hydrogen. ● Never use a flame to detect hydrogen leaks — use soapy water. ● Do not store reserve stocks of hydrogen with cylinders containing oxygen or other highly oxidizing or combustible materials. ● Store hydrogen tanks in a well ventilated area. ● Follow all regulatory safety and labeling precautions when shipping hydrogen in the TVA2020. Note A bleeder assembly is provided in the tool kit to allow the hydrogen tank to be emptied for common carrier shipment. To use the bleeder, manually screw the bleeder onto the tank valve and allow the hydrogen to vent. This process will take about two minutes to complete. ▲ Thermo Fisher Scientific TVA2020 Instruction Manual 5-5 Preventive Maintenance Hydrogen Gas Tank CAUTION Observe all hydrogen handling procedures listed below. ▲ Note When transporting the instrument, remove the hydrogen tank and place it in its normal location in the carrying case. ▲ Fuel Refilling Procedure Use the following procedure to refill the hydrogen tank. Note All hydrogen fittings are left hand thread — do not overtighten. ▲ 1. Turn supply tank valve OFF. 2. Attach tank fill adapter to supply tank with valve OFF and with manifold valve on OFF position. 3. Attach TVA2020 hydrogen tank to tank fill adapter. (Note left hand thread — do not overtighten.) 4. Open supply tank valve. Move fill adapter valve to FILL position. 5. Wait for TVA2020 tank to fill. This may take 2 to 3 minutes because of flow restrictors in the tank and fill adapter. 6. Close fill adapter valve. 7. Remove TVA2020 tank. 8. Close supply tank valve. 9. Remove tank fill adapter. Always remove the tank from the instrument before storing in the instrument carrying case. 5-6 TVA2020 Instruction Manual Thermo Fisher Scientific Preventive Maintenance Cleaning an FID Cartridge Cleaning an FID Cartridge Use the following procedure to remove and clean the FID cartridge frequently (Figure 5–1). Replace when needed. 1. Remove the hydrogen tank. Turn the instrument off. 2. Using the special spanner wrench provided with the instrument tool kit, unscrew the black cap holding the FID cartridge in place. Figure 5–1. Replacing the FID Cartridge 3. Screw the special extractor tool provided with the accessory kit into the off-center hole in the cartridge (Figure 5–2). 4. Remove the cartridge by pulling on the extractor. Unscrew the extractor from the cartridge. Clean or replace the cartridge. 5. To insert a new cartridge, reverse the procedure. Thermo Fisher Scientific TVA2020 Instruction Manual 5-7 Preventive Maintenance Cleaning an FID Cartridge Figure 5–2. Removing the FID Cartridge To clean an FID cartridge, you will need a cotton swab and some isopropyl alcohol. Dip the swab into the isopropyl alcohol and insert it into the center of the cartridge. Swab the surface until clean and discard the swab. Take care not to touch the igniter coil, which is located close to the end of the capsule opposite the threaded hole used to remove capsule. Then dry the cartridge in an oven at 45 °C to 55 °C for one hour. When dry, reinsert the cartridge into the instrument, reversing the removal procedure. Do not overtighten cap. CAUTION Do not allow any contact with the igniter coil during cleaning. ▲ 5-8 TVA2020 Instruction Manual Thermo Fisher Scientific Preventive Maintenance Cleaning the FID Detector Cap Cleaning the FID Detector Cap Use the following procedure to clean the FID detector end cap (Figure 5– 3). 1. Remove the hydrogen tank from the top of the instrument and turn off the power. 2. Using the special spanner wrench provided with the tool kit, unscrew and remove the FID detector cap. 3. Clean the cap using the isopropyl alcohol followed with a de-ionized or distilled water rinse. Blow out carefully with compressed dry air. 4. Replace the cap. Figure 5–3. Cleaning the FID Detector Cap Thermo Fisher Scientific TVA2020 Instruction Manual 5-9 Preventive Maintenance Cleaning the FID Detector Cavities Cleaning the FID Detector Cavities Use the following procedure to clean the FID detector cavity. 1. Remove the hydrogen tank from the top of the instrument. Turn the instrument off. 2. Using the special spanner wrench provided with the tool kit, unscrew the cap holding the detector cap. 3. Using the special extractor tool provided with the tool kit, screw the extractor into the cartridge. 4. Remove the cartridge by pulling on the extractor. Unscrew the extractor from the cartridge. 5. Carefully clean the inside of the detector cavity using a cotton swab and isopropyl alcohol. Be sure to clean the high voltage contacts along the side of the cavity. Be especially careful around the detector signal collector probe at the rear of the cavity (and the thermocouple probe in the FID). 6. Dry the inside of the cavity using a low heat gun. 7. Insert the cartridges into their respective cavities by reversing the procedure. Note that the cartridges must be rotated to properly locate the key tabs. 5-10 TVA2020 Instruction Manual Thermo Fisher Scientific Preventive Maintenance Replacing Water Trap Probe Filter and O-Rings Replacing Water Trap Probe Filter and O-Rings Use the following procedure to replace the water trap probe filter (Figure 5–4). 1. Unscrew the bottom housing from the top housing. 2. Remove filter. 3. Place new filter into cavity of top housing. 4. Filter can be inserted in either direction into top housing. 5. Screw bottom housing into top housing. Probe Nut Nozzle Water Trap Nozzle Base O-ring O-ring Figure 5–4. Water Trap Probe Assembly – Filter and O-Ring Replacing Thermo Fisher Scientific TVA2020 Instruction Manual 5-11 Preventive Maintenance Replacing Water Trap Probe Filter and O-Rings Replacing the O-Rings Use the following procedure to replace the o-rings (Figure 5–5). 1. Unscrew the bottom housing from the top housing. 2. Remove filter. 3. Remove o-ring from either top housing groove or bottom housing groove or both as necessary. 4. Place new o-ring in groove of housing. Make sure o-ring is seated properly in groove. 5. Repeat for other housing if necessary. 6. Place filter into top housing. 7. Screw bottom housing into top housing. Nozzle O-ring Water trap O-ring Nozzle Base Figure 5–5. Water Trap Probe Assembly – Filter and O-Ring Replacing 5-12 TVA2020 Instruction Manual Thermo Fisher Scientific Preventive Maintenance Cleaning or Replacing a Sintered Metal Filter Cup Cleaning or Replacing a Sintered Metal Filter Cup The filter cup is located behind the sample line quick connect at the sidepack assembly. To remove, unscrew the quick connect to expose the filter (Figure 5–6). Pull the filter cup from behind the fitting and replace and clean as noted below. You may clean the filter by immersing it in isopropyl alcohol or equivalent solvent and/or swabbing the surface with a Q-tip or cotton swab. After thoroughly cleaning the surface of the filter, place the filter in an oven and dry it at 40 °C to 55 °C for one hour. You can then re-insert the filter into the sampling assembly and screw in the cap. Nut Filter Holder O-ring Spring Filter Cup Sample Inlet O-ring O-ring Figure 5–6. Sintered Metal Filter – Cleaning or Replacing Thermo Fisher Scientific TVA2020 Instruction Manual 5-13 Preventive Maintenance Replacing the Charcoal Filter Replacing the Charcoal Filter Use the following procedure to replace the optional charcoal filter. 1. Remove the sampling assembly from the probe by loosening the probe nut and pulling the sampling assembly free from the probe. 2. Unscrew the cap from the sampling assembly. This will expose the end of the charcoal filter cartridge (Figure 5–7). 3. Tip the cartridge up and empty the charcoal from the cartridge. 4. Clean the inside of the cartridge with a cotton swab dipped in isopropyl alcohol. 5. Dry the cartridge thoroughly. 6. Re-fill the cartridge with new “dust-free” charcoal of the type specified for the filter. 7. Apply PTFE tape to the male threads of the charcoal cartridge and screw on the cap. 8. Re-insert the sampling assembly into the probe and tighten the probe nut. CARTRIDGE FILLED WITH ACT IVATED CH ARCOAL THREAD ED EN D WITH TEFLON TAPE CAP Figure 5–7. Activated Charcoal Filter Adapter 5-14 TVA2020 Instruction Manual Thermo Fisher Scientific Chapter 6 Troubleshooting This chapter provides the following troubleshooting and service support information: Thermo Fisher Scientific ● “Troubleshooting Guide” on page 6-2 ● “Warning Messages” on page 6-6 ● “Service Locations” on page 6-7 TVA2020 Instruction Manual 6-1 Troubleshooting Troubleshooting Guide Troubleshooting Guide Table 6–1 provides general troubleshooting information and indicates the checks that you should perform if you experience an instrument problem. Table 6–1. Troubleshooting Problem Possible Reason Solution/Action Unit will not turn on Battery charge low Charge battery. Bad battery connection Ensure proper battery connection. Bad battery Replace battery. Blown fuse or faulty keypad Call Thermo Fisher Scientific Service Department. Defective pump Call Thermo Fisher Scientific Service Department. Faulty keypad Call Thermo Fisher Scientific Service Department. Clogged sample intake Clean/replace filter cups. Pump won’t turn on Low pump flow Clean/replace sample line. Clean/replace flame arrestor. Service pump. Pump fault Call Thermo Fisher Scientific Service Department. Keypad will not respond Faulty keypad Call Thermo Fisher Scientific Service Department. Probe display blank or probe buttons will not respond Faulty probe/display assembly Replace probe/display assembly. Call Thermo Fisher Scientific Service Department. FID won’t ignite Insufficient sample flow Turn pump on. Clean/replace filter cups. Clean/replace flame arrestor. Service pump. 6-2 TVA2020 Instruction Manual Insufficient hydrogen supply (<500 psi) Check hydrogen gauge on supply tank. Refill tank if necessary. Hydrogen leak Check low pressure hydrogen output gauge. If <8 psi, call Thermo Fisher Scientific Service Department. Thermo Fisher Scientific Troubleshooting Troubleshooting Guide Problem FID noisy Possible Reason Solution/Action Broken ignitor Inspect ignitor coil on FID capsule for breakage. If broken, replace capsule. Dirty ignitor contacts Inspect/clean ignitor contacts (not ignitor coils). Battery charge low Charge battery pack. Water/contamination in the detector chamber Clean/replace FID capsule and flame detector. Erratic pump flow Clean/replace cups. Clean/replace flame arrestor. Service pump. Unable to calibrate FID Bad calibration Ensure proper calibration. FID flame out Ignite FID. Span concentration not properly set Input correct span gas concentration at CAL menu. Cal gases contaminated Use clean cal gases and sampling equipment. Sample line/filter cups contaminated Clean/replace sample line. Clean/replace filter cups. Service pump. Excessive hydrogen consumption (<8 hours of run time for 2200 psi hydrogen) Flameout problems Thermo Fisher Scientific FID capsule contaminated or faulty Clean/replace FID capsule. Contaminated hydrogen tank Replace hydrogen tank. Internal detector fault or contamination Call Thermo Fisher Scientific Service Department. Insufficient hydrogen pressure Refill tank. Leaking hydrogen tank Replace tank. Internal hydrogen leak Call Thermo Fisher Scientific Service Department. Sample hydrogen content too high Use dilutor kit to achieve concentration within the dynamic range. Insufficient oxygen in the sample (<14%) Use dilutor kit to dilute sample with air contaminating sufficient oxygen. TVA2020 Instruction Manual 6-3 Troubleshooting Troubleshooting Guide Problem Possible Reason Solution/Action Use PID for measurements. FID capsule contamination Clean/replace FID capsule. Insufficient sample flow (min 800 ml/min) Clean/replace filter cups. Clean/replace flame arrestor. Service pump. Moisture at FID flame arrestor. Insufficient sample flow (min 800 ml/min) Clean/replace filter cups. NOTE: Normal operation produces some moisture. If performance is affected, attempt these solutions. Clean/replace flame arrestor. Service pump. Insufficient warmup time Allow 15-20 minutes warmup. PID lamp not operating Bad PID lamp Replace PID capsule. PID noisy Bad PID lamp Replace PID capsule. Dirty PID window Clean PID window. Erratic pump flow Clean/replace FID capsule. Clean/replace filter cups. Service pump. Unable to calibrate PID Bad calibration Ensure proper calibration. Pump not on Turn pump on. PID lamp not on Turn PID lamp on. Span concentration not properly set Input correct span gas concentration at CAL menu. Cal gas contaminated Use clean cal gases and sampling equipment. Sample line/filter cups contaminated Clean/replace sample line. Clean/replace filter cups. PID window dirty or capsule contaminated or faulty Clean PID window. Replace PID capsule. Slow response time Internal detector fault or contamination Call Thermo Fisher Scientific Service Department. Insufficient sample flow Clean/replace filter cups. Clean/replace flame arrestor. Clean/replace sample line. 6-4 TVA2020 Instruction Manual Thermo Fisher Scientific Troubleshooting Troubleshooting Guide Problem Possible Reason Solution/Action Service pump. High background readings Sampling non-volatile compounds Call Thermo Fisher Scientific Service Department. High ambient concentration N/A. Zero drift/improper calibration Ensure proper zero/span calibration. Sample line contamination Clean/replace sample line. Clean/replace filter cups. Detector capsule contamination Clean/replace FID capsule. Clean PID window. Replace PID capsule. Thermo Fisher Scientific TVA2020 Instruction Manual 6-5 Troubleshooting Warning Messages Warning Messages 6-6 TVA2020 Instruction Manual The following is a list of error and warning messages for the TVA2020. Table 6–2. Warning Messages Message Description Battery Power is low. This display occurs whenever the battery has reached a low level (approximately 6.5 V). It indicates that approximately 15 minutes of operating time remain. Press EXIT to return to the operating display. The lower right corner of all displays now show ± (blinking). If you continue to operate after the warning is displayed, the unit will eventually shut off automatically. To restart after an auto shut down, you must first recharge or replace the battery. Note that collected data is not lost Logger memory is already full. Log memory is full. You cannot continue to log any entries until you have transferred the log memory to a PC or have cleared log memory. The instrument will, however, continue to operate. FID Flameout! Ignite again. This display appears whenever the FID flame is extinguished. Press EXIT to clear, then CONTROL key and 2 to ignite. This warning is active only in RUN and CALIBRATE modes. In the RUN mode, once the alarm is acknowledged, a flashing F appears on the sidepack display and the probe display flashes. Low Flow detected. This message will follow the FID Flameout message if a low flow condition was measured prior to the flameout. High Concentration detected. This message will follow the FID Flameout message if the instrument sees a spike in the concentration prior to a flameout condition. Log rate too slow for PC STEL calc. This message appears whenever you enter a log rate value greater than 90 seconds. The data sampling rate is too low for valid STEL calculations in the PC. Press EXIT to bypass the warning. Log rate invalid! This message appears whenever you enter a log rate of zero. To correct the problem, enter a log rate other than zero. Entry is invalid! This message appears whenever you enter a value equal to zero (except for alarm levels). To correct the problem, enter numbers other than zero. Bad Calibration parameters! This warning display appears during calibration if the current zero calibration value equals or exceeds the span calibration value. To correct the problem, perform a re-zero, a re-span, or both. Hardware Failure. This message appears as a result of a self-test failure. Return the instrument to the factory for service. Thermo Fisher Scientific Troubleshooting Service Locations Service Locations Message Description FID not operating. Displays when the instrument detects a problem with the FID module. Most common cause is the FID is not plugged into the main board. Measurement range exceeded. This message appears if the PID reading exceeds 2,000 ppm or the FID reading exceeds 30,000 ppm. Service is available from exclusive distributors worldwide. Contact one of the phone numbers below for product support and technical information or visit us on the web at www.thermoscientific.com/aqi. 1-866-282-0430 Toll Free 1-508-520-0430 International Thermo Fisher Scientific TVA2020 Instruction Manual 6-7 Chapter 7 Servicing This chapter includes the following parts information and component replacement procedures. Thermo Fisher Scientific suggests that you return the entire instrument to the factory or an authorized service center once a year for cleaning, testing, and calibration. From time to time, you must remove and renew several components of the TVA2020 analyzer. Some components may be replaced as normal maintenance functions performed by operating personnel. Other components, however, should be replaced only by personnel thoroughly trained and familiar with the analyzer instrument and its applications. This chapter includes the following parts information and component replacement procedures: Thermo Fisher Scientific ● “Replacement Parts List” on page 7-2 ● “Replacing the Battery” on page 7-6 ● “Hydrogen Gas Tank” on page 7-6 ● “Cleaning the PID Lamp” on page 7-9 ● “Replacing the FID End Cap” on page 7-14 ● “Flow Tests” on page 7-14 ● “Leak Check” on page 7-16 ● “Flow Check” on page 7-17 ● “Flow Calibration” on page 7-17 ● “Servicing the Pump” on page 7-19 ● “Replacing the Sample Line in Enhanced Probe” on page 7-23 ● “Replacing Sample Line in Sample Probe” on page 7-25 ● “Replacing the Connector Access Door” on page 7-26 ● “Replacing the Internal Battery Charger Connector Cable” on page 728 ● “Replacing the Internal Probe Connector Cable” on page 7-28 TVA2020 Instruction Manual 7-1 Servicing Replacement Parts List Replacement Parts List 7-2 TVA2020 Instruction Manual Table 7–1 lists the replacement parts for the TVA2020 major subassemblies. Refer to Figure 7–1 to identify the component location. Table 7–1. TVA2020 Replacement Parts Part Number Description 56-011811 Battery Pack 114012-00 Hydrogen Tank CR012WJ Hydrogen Refill Assembly 111256-00 PID Capsule 114971-00 PID Maintenance Kit 111177-00 FID Capsule 111420-00 FID End Cap (FM) 620090 Filter Cups / 5 pk 56-011950 Enhanced Probe (complete assembly) 510033-1 Split Ferrule – Probe (for enhanced probe) CR012EG Probe Buttons (for enhanced probe) CR015AC Water Trap Probe (for enhanced probe) CR012EK Probe Nut (for enhanced probe) 55-011879 Sample Probe (complete assembly) 34-011877-0001 Straight Tip 34-011877-0002 Angled Tip 34-011878 Probe Nut CR015DK Water Trap Filter / pk 10 (both probes) 112387-00 Sample Line Tubing 80” (both probes) 112415-00 Sample Line Fitting (both Probes) CR012YH Sample Inlet Connection B0164KB Sample Side Tubing (12” section of TPFE lined Tygon tubing) 111246-00 Pump Assembly 113305-00 O-Ring Kit 113306-00 Hardware Kit 113413-00 Pump Rebuild Kit 111401-00 Battery Charger 112461-00 Sidepack Display 111409-00 Sidepack Probe Connection Thermo Fisher Scientific Servicing Replacement Parts List Part Number Description 111328-00 Sidepack Charger Connection 34-011690-0060 Rubber Connector Door 34-011690-0030 Internal Frame (goes over battery and H2 cylinder) 111782-00 Strap Rods 112694-00 Tool Kit (parts indicated by an asterisk [*] below) CR012PT Spanner Wrench (*part of tool kit) 112697-00 Capsule Extraction Tool (*part of tool kit) 112696-00 Flow Restrictors (*part of tool kit) CR012TA Hydrogen Bleeder (*part of tool kit) 105639-00 USB Cable 114295-00 USB Barrier Device 112693-00 Charger Cable N0249XS Charger Line Cord (120V) 8926 Charger Line Cord (220V) 107315-00 Charger Line Cord (230V – China) 112451-00 Carrying Case CR012DY Carrying Strap WARNING Power down the instrument before performing any service procedures. ▲ WARNING Parts replacement and maintenance should not be performed in areas classified as hazardous due to presence of flammable gases or vapors. Use only Thermo Fisher Scientific replacement parts. (Extended Service Plans are available; contact Thermo Fisher Scientific Department for further information.) ▲ WARNING Never change an electrical component in an area classified as hazardous due to presence of flammable gases or vapors. ▲ Thermo Fisher Scientific TVA2020 Instruction Manual 7-3 Servicing Replacement Parts List Hydrogen Tank Assy Battery Internal Housing Frame Bluetooth Antenna Sample Inlet Connector Instrument Probe Cable Assy PID Assy Charger Cable Assy Sample Pump Strap Holder (2) FID Assy Connector Housing Cover Figure 7–1. TVA2020 Component Layout 7-4 TVA2020 Instruction Manual Thermo Fisher Scientific Servicing Opening the Instrument 3/4-inch Cap Screw and Washers (3) Insert Sleeve, 2 1/4-inch Cap Screw and Washer Barrel Nut (4) Figure 7–2. Hardware Opening the Instrument Use the following procedure to gain access to the internal components. 1. Stand the instrument on end. While holding the barrel nut loosen the socket head screws. 2. Remove the four 10-24 screws to be reused later. Note that one of the screws is much larger than the other three. 3. Position the instrument resting on its back with the keypad facing up. 4. Grasp the instrument cover near the probe connections and carefully open the cover to the right. Thermo Fisher Scientific TVA2020 Instruction Manual 7-5 Servicing Replacing the Battery Replacing the Battery Use the following procedure to replace the battery. WARNING Do not replace battery in an area classified as hazardous due to presence of flammable gases or vapors. ▲ WARNING Do not operate battery charger in an area classified as hazardous due to presence of flammable gases or vapors. ▲ WARNING Remove the hydrogen tank from the instrument before servicing. ▲ 1. Identify the four self-tapping screws securing the internal frame to the bottom enclosure. 2. Remove the four screws. Save for reuse. 3. Unscrew the two captive screws securing the d-sub connector to the battery. 4. Remove and replace the battery. Reverse the above procedure for reassembly. Hydrogen Gas Tank 7-6 TVA2020 Instruction Manual FID instruments are supplied with an 85 cc hydrogen gas tank. This tank, which may be pressurized to 2200 psi maximum at 25×C, will provide 10 hours operation when fully charged. The tank has an integrally mounted high pressure gauge that can be easily read when the tank is in or out of the instrument. Install the tank in the instrument by inserting it into the receptacle on the top and tightening (left hand threads tighten counterclockwise) until the rubber tank boot is flush with the instrument sidepack and a slight resistance is felt. Do not overtighten. Thermo Fisher Scientific Servicing Hydrogen Gas Tank Precautions in Handling and Storage The major hazard associated with the handling of hydrogen is flammability. The following specific rules apply when handling hydrogen: ● Never use cylinders of hydrogen in areas where flames, excessive heat, or sparks may occur. ● Use only explosion-proof equipment and spark-proof tools in areas where hydrogen is handled. ● Ground all equipment and lines used with hydrogen. ● Never use a flame to detect hydrogen leaks — use soapy water. ● Do not store reserve stocks of hydrogen with cylinders containing oxygen or other highly oxidizing or combustible materials. ● Store hydrogen tanks in a well ventilated area. ● Follow all regulatory safety and labeling precautions when shipping hydrogen in the TVA2020. Note A bleeder assembly is provided in the tool kit to allow the hydrogen tank to be emptied for common carrier shipment. To use the bleeder, manually screw the bleeder onto the tank valve and allow the hydrogen to vent. This process will take about two minutes to complete. ▲ CAUTION Observe all hydrogen handling procedures listed above. ▲ When transporting the instrument, remove the hydrogen tank and place it in its normal location in the carrying case. Fuel Refilling Procedure Use the following procedure to fill the tank. WARNING A safe refill operation means there are no hydrogen leaks. Before any valves are opened, use a wrench to firmly tighten connections to the hydrogen supply tanks and the tank fill adapter. If escaping hydrogen is heard during the filling operation, close all valves and correct the leak before proceeding. Leak test with soapy water or equivalent. ▲ Thermo Fisher Scientific TVA2020 Instruction Manual 7-7 Servicing Hydrogen Gas Tank CAUTION Do not fill hydrogen tank to a pressure greater than 15.2 MPa (2200 psig). ▲ Note Use prepurified ZERO grade hydrogen (certified total hydrocarbons as methane <0.5 ppm recommended). ▲ Note The hydrogen filling assembly contains a flow-limiting safety device. Approximately two minutes are required to fill the tank. ▲ Note All hydrogen fittings are left hand thread — do not overtighten. ▲ 1. Turn supply tank valve OFF. 2. Attach tank fill adapter to supply tank with valve OFF and with manifold valve on OFF position. 3. Attach TVA2020 hydrogen tank to tank fill adapter. (Note left hand thread — do not overtighten.) 4. Open supply tank valve. Move fill adapter valve to FILL position. 5. Wait for TVA2020 tank to fill. This may take 2 to 3 minutes because of flow restrictors in the tank and fill adapter. 6. Close fill adapter valve. 7. Remove TVA2020 tank. 8. Close supply tank valve. 9. Remove tank fill adapter. Always remove the tank from the instrument before storing in the instrument carrying case. 7-8 TVA2020 Instruction Manual Thermo Fisher Scientific Servicing Cleaning the PID Lamp Cleaning the PID Lamp Use the following procedure to remove and clean the PID lamp. Replace when needed. WARNING Power down the instrument before performing any service procedures. ▲ WARNING To prevent a potential explosion, do not operate the instrument with the PID compartment open or FID detector cap removed. ▲ WARNING All maintenance procedures must be performed on a clean surface using clean tools. Avoid touching the lamp's window as well as the metalized portion of the cell assembly with your bare fingers. Fingerprints left on these parts may adversely affect the sensors operation. Latex gloves are preferred, but if they are not used, your hands must be clean and free of oils, lotions, etc. It is acceptable to hold the lamp by its glass body or by the edges of the window. ▲ 1. Turn the instrument OFF and remove the sensor from the instrument (Figure 7–3). Figure 7–3. Removing the PID Sensor 2. Remove the filter cap by applying slight upward pressure with the tip of a screwdriver or X-Acto blade just below the hole in the cap and between the cap and housing; it will pop off (Figure 7–4). Thermo Fisher Scientific TVA2020 Instruction Manual 7-9 Servicing Cleaning the PID Lamp Figure 7–4. Removing the Filter Cap 3. With fine-tipped tweezers, remove both filter media and set aside (Figure 7–5). Figure 7–5. Removing the Filter Media 4. Using the X-Acto blade, remove the spacer and set aside (Figure 7–6). Figure 7–6. Removing the Spacer 5. With fine tipped tweezers, carefully remove the cell assembly by prying under the cell’s edge where connector pins are located (Figure 7–7). 7-10 TVA2020 Instruction Manual Thermo Fisher Scientific Servicing Cleaning the PID Lamp Figure 7–7. Removing the Cell Assembly 6. With fine tipped tweezers, grasp the lamp by placing the tips in the housing notch and gently pull it out. Be careful not to scratch the lamp lens or chip edges (Figure 7–8). Figure 7–8. Removing the PID Lamp 7. Grab the lamp by the cylindrical glass body and clean the window by rubbing it against the polishing pad. Use a circular motion and try to keep the window surface flat relative to the pad. Five seconds of rubbing will be enough in most cases. Another indication of cleaning completeness is that you have used about 1/6-inch of the pads surface during the procedure (Figure 7–9). Figure 7–9. Cleaning the PID Lamp Thermo Fisher Scientific TVA2020 Instruction Manual 7-11 Servicing Cleaning the PID Lamp 8. To reassembly, install the lamp into the sensor, making sure that the lamps metalized pads are aligned with the corresponding excitation springs inside the lamp cavity (Figure 7–10). Figure 7–10. Installing the Lamp into the Sensor 9. With the end of the clean tweezers, or the clean blade of a screwdriver, press down firmly. Be careful not to scratch the surface of the lamp (Figure 7–11). Figure 7–11. Pressing Down the PID Lamp 10. Using fine-tipped tweezers, install the cell assembly. Align the pins with the corresponding sockets on the sensor and push down on the end with the pins. Make sure the cell assembly is flush with the lamp window (Figure 7–12). Figure 7–12. Installing the Cell Assembly 7-12 TVA2020 Instruction Manual Thermo Fisher Scientific Servicing Cleaning the PID Lamp 11. Place the spacer around the cell assembly (Figure 7–13). Figure 7–13. Placing the Spacer 12. Place the filter media over the cell assembly centered on top of the sensor. Make sure the filters are installed in the correct order. Filter media #2 first, then filter media #1 on top, with the shiny side up (Figure 7–14). Figure 7–14. Placing the Filter Media 13. Align the cap key with the notch on the housing. Starting at the side opposite the notch, press down until the filter cap snaps on to the housing. If the cap key is incorrectly aligned, there will be a noticeable bulge on the side of the cap (Figure 7–15). Figure 7–15. Aligning the Cap Key Thermo Fisher Scientific TVA2020 Instruction Manual 7-13 Servicing Replacing the FID End Cap Replacing the FID End Cap The flame arrestor, located in the center of the FID end cap, is a critical safety feature to prevent flame propagation into a potentially hazardous area. It has been precision fit into the end cap and must be replaced as an assembly. 1. Remove the hydrogen tank from the top of the instrument and turn off the power. 2. Using the special spanner wrench provided with the tool kit, unscrew and remove the FID detector cap. 3. Replace the end cap as a full assembly. Flow Tests 7-14 TVA2020 Instruction Manual Most flow problems can be traced to a loose connection or dirty filters. Based on that premise this section is organized from the least to the most invasive repair procedures. Reference the Sample Flow Troubleshooting Flowchart (Figure 7–16) to diagnose flow problems. Start with the Leak Check procedure with the probe connected to the instrument. The leak and flow check procedures can be performed on the sub assemblies to identify the source of the problem. Thermo Fisher Scientific Done Thermo Fisher Scientific Pass Pass Perform Pump Assembly Service Fail Flow Check Pump Assembly Fail Flow Check Instrument Only Fail Flow Check Instrument and Probe Pass Calibrate (After Service) Pass Pass Fail Flow Check Pump Assembly Troubleshoot Sample Inlet Assembly for restriction Troubleshoot Probe for restriction Pass Leak Check Instrument and Probe Fail Troubleshoot Probe for leak Pass Leak Check Instrument Only Sample Flow Troubleshooting Flowchart Fail Troubleshoot Sample Inlet Assembly for leak Pass Leak Check Pump Assembly Fail Leak Check Pump Assembly Perform Pump Assembly Service Servicing Flow Tests Figure 7–16. Sample Flow Troubleshooting Flowchart TVA2020 Instruction Manual 7-15 Servicing Leak Check Leak Check Use the following procedure to verify no leaks. 1. Attach a flow meter capable of reading a least 2 LPM to the probe inlet. 2. From the SETUP MENU, choose 1=Calib > 5=Flow. 3. Press “1” for the first flow calibration point. 4. Adjust the pump power with the up and down arrows for a reading of 1 LPM at the probe inlet. 5. From the CONTROL MENU, press 1=Pump Off’. 6. Record the counts associated with the pump off. 7. From the CONTROL MENU, press 1=Pump On. 8. Plug the inlet of the probe. The counts should drop to within ±200 of the “Pump Off” recorded value. 7-16 TVA2020 Instruction Manual Thermo Fisher Scientific Servicing Flow Check Flow Check Use the following procedure to check flow. 1. Attach a flow meter capable of reading a least 2 LPM to the probe inlet. 2. Place the instrument in the RUN mode. From the MAIN MENU, press 1=Run. Note The dynamic flow control is only active in the Run, Span or Zero modes. ▲ 3. The flow should read between 1.050 LPM and 0.950 LPM. 4. Attach one of the red flow restrictors between the flow meter and the probe inlet. The flow should drop to 0.80 to 0.85 LPM and slowly climb to 1.05 to 0.950 LPM within 1-2 minutes. 5. Attach a second flow restrictor in line with the first between the flow meter and the probe inlet. The flow should drop to 0.80 to 0.85 LPM and slowly climb to 1.05 to 0.950 LPM within 1-2 minutes. Note If the pump has been serviced the actual flows may be different than above. In this case a flow calibration should be performed. ▲ Flow Calibration Use the following procedure to perform a flow calibration. 1. Confirm that the instrument passes the Leak Check on page 7-16 prior to performing this calibration. A new water trap filter and a new or clean sintered metal filter should be installed prior to performing this calibration. 2. From the SETUP MENU, choose 1=Calib > 5=Flow. 3. Establish the 1 ±.01 LPM flow at the probe inlet. a. Typical values are 50-60% power with 28K-30K counts. 4. Press Enter=Accept to save the Flow 1 values. Thermo Fisher Scientific TVA2020 Instruction Manual 7-17 Servicing Flow Calibration 5. Attach one of the red flow restrictors between the probe inlet and the flow meter. 6. Press “2” for the second flow calibration point. 7. Adjust the pump power with the up and down arrows for a reading of 1 ±.01 LPM at the probe inlet. a. Typical values are 65-75% power with 1K-3K higher counts 8. Press Enter=Accept to save the Flow 2 values 9. Attach a second red flow restrictor, in line with the first, between the probe inlet and flow meter. 10. Press “3” for the third flow calibration point. 11. Adjust the pump power with the up and down arrows for a reading of 1 ±.01 LPM at the probe inlet. a. Typical values are 85-95% power with 1K-3K higher counts. 12. Press Enter=Accept to save the Flow 3 values. 13. Press 4= calc coef to calculate the flow calibration values. Note The flow calibration values are stored in a file called FACTORY.TXT. This file can be saved to a computer and reloaded to the instrument if the flow calibration were to become corrupted. See the section on flash file transfers. ▲ 7-18 TVA2020 Instruction Manual Thermo Fisher Scientific Servicing Servicing the Pump Servicing the Pump Removing the Pump Assembly Servicing the pump involves removing the pump assembly, accessing the orifice, and replacing the pump. Use the following procedure to remove the pump assembly. 1. Disconnect the 8 pin connector from the pump board (Figure 7–17). 2. Using the correct wrenches, remove the hex elbow attached to the valve assembly (Figure 7–17). 3. Remove the Tygon tubing from the barb fitting on the sample inlet assembly (Figure 7–17). Tygon Tubing Hex Elbow 8 pin Connector Figure 7–17. Removing the Pump 4. Lift the pump up and out of the instrument. 5. Disconnect the pump motor from the pump board. Thermo Fisher Scientific TVA2020 Instruction Manual 7-19 Servicing Servicing the Pump 6. Gently remove the tubing from the pressure transducer (both ports) (Figure 7–18). 7. Loosen the screw on the backside of the board (Figure 7–18). 8. Grasp the pump housing with one hand and the orifice block with the other. 9. Pull the pump/board assembly away from the orifice block assembly. Pressure Transducer Cross Recess Screws (2) Screw Figure 7–18. Replacing the Pump Accessing the Orifice Use the following procedure to access the orifice. 1. Remove the hex head screw. 2. Pull the orifice block apart. 3. Remove the orifice for cleaning. 7-20 TVA2020 Instruction Manual Thermo Fisher Scientific Servicing Servicing the Pump 4. Apply a very small amount of non-hydrocarbon based grease to the orings to facilitate reassembly. 5. Reinstall the orifice into the L-shaped block first. 6. Reverse the procedure to reassemble the pump assembly. Note Be sure to push the pump firmly into the orifice block while tightening the cross recess screw. If the gap is too large the pump will not fit correctly in the bottom housing recess. ▲ Replacing the Pump Use the following procedure to replace/service the pump. 1. Remove the two cross recess screws holding the board to the pump (Figure 7–18). 2. The pump can be further disassembled to replace the diaphragm and valves. 3. Reverse the above procedures to reassemble the pump assembly. Replacing the Pump Valve Use the following procedure to replace the pump valve. 1. Disconnect the pump from electrical power. Make a sketch of the position of any tubes and fittings for ease of re-assembly later. 2. Remove the five screws (010) with a Phillips head screw driver and remove the headplate (020). Check that all parts are free from dirt and clean as necessary. Do not scratch the parts. 3. Remove the old valveplate (030) from the Compressor housing (040). 4. Repeat steps 2 and 3 for opposite pump head. 5. Place the new valveplate (030) in the contour on the compressor housing (040). Do not use tools! Thermo Fisher Scientific TVA2020 Instruction Manual 7-21 Servicing Servicing the Pump 6. Install headplate (020) on to compressor housing (040) 7. Install the five new screws using a Phillips head screw driver. 8. Repeat steps 5-7 for opposite head. Figure 7–19. Exploded View of Pump Head 7-22 TVA2020 Instruction Manual Thermo Fisher Scientific Servicing Replacing the Sample Line in Enhanced Probe Replacing the Sample Line in Enhanced Probe Use the following procedure to replace the sample line (Figure 7–20). 1. Loosen the probe nut and remove the sampling assembly by pulling it free from the probe assembly. 2. Insert a thin rod through the hole in the side of the probe fitting adapter. You will use this rod to pull the adapter and tubing from the probe assembly. 3. Remove the tubing from the quick-connect fitting by carefully cutting the tubing. 4. At the base of the probe handle, gently push the tubing into the probe. At the same time, use the rod to pull the probe fitting adapter and tubing forward from the probe assembly. When the adapter fitting is fully exposed, cut the tubing from the fitting and pull the remainder of the tubing back through the probe assembly until it is completely out of the probe. 5. Cut a new piece of tubing about three inches longer than the old tubing. 6. Insert new tubing through the bottom protective covering (where you connect to the analyzer), and slowly feed the tubing through toward readout handle. 7. Once the tubing exits the top protective covering, insert the new tubing into the probe handle and carefully push it through to the other end. When the tubing is in position, cut the end square and push it over the barbed adapter fitting. 8. Grasp the tubing below the probe assembly handle and pull it back through the probe assembly until the adapter fitting is properly seated in the probe assembly. 9. Cut the other end of the tubing to the proper length and insert it into the end of the quick-connect fitting. (Allow 5/8-inch of tubing inside the fitting.) Thermo Fisher Scientific TVA2020 Instruction Manual 7-23 Servicing Replacing the Sample Line in Enhanced Probe Figure 7–20. Replacing Sample Line in Enhanced Probe 7-24 TVA2020 Instruction Manual Thermo Fisher Scientific Servicing Replacing Sample Line in Sample Probe Replacing Sample Line in Sample Probe Use the following procedure to replace the sample line in sample probe (Figure 7–21). 1. Remove the three screws holding the two halves together. 2. Separate the halves to access the tubing. 3. Remove the water trap assembly. 4. Carefully cut the tubing lengthwise to free it from the barbs. Do not cut too deeply or the barbs could be damaged. 5. Attach the new tubing and return the water trap to either handle half. Make sure the tubing is routed correctly in the grooves. 6. Reinstall the three screws. Water Trap O-ring O-ring Tube Screws (3) Figure 7–21. Replacing the Sample Line in Simple Probe Thermo Fisher Scientific TVA2020 Instruction Manual 7-25 Servicing Replacing the Connector Access Door Replacing the Connector Access Door Use the following procedure to replace the connector access door (Figure 7–22). 1. Cut off the retaining tail from the door if needed. 2. Tilt the case top half up so that the cut off piece slips into the gap between the board and the case. 3. Take the new door and press the retaining tail into the hole. Use a small blade screwdriver to work the tail into the hole. Figure 7–22. Replacing the Connector Access Door 7-26 TVA2020 Instruction Manual Thermo Fisher Scientific Servicing Replacing the Internal Battery Charger Connector Cable Replacing the Internal Battery Charger Connector Cable Use the following procedure to replace the internal battery charger connector cable (Figure 7–23). 1. Locate the battery charger connection. 2. Disconnect the charger cable from the main power cable. 3. Remove the two screws holding the connector in the housing. 4. Re-use the screws to mount the new connector cable. 5. Reconnect the main power cable to the new charger cable. Battery Charger Connector from Main Power Cable Screws Figure 7–23. Replacing the Internal Battery Charger Connector Cable Thermo Fisher Scientific TVA2020 Instruction Manual 7-27 Servicing Replacing the Internal Probe Connector Cable Replacing the Internal Probe Connector Cable Use the following procedure to replace the internal probe connector cable (Figure 7–24). 1. Locate the probe connector connection. 2. Disconnect the probe cable from the main board. 3. Loosen the cross recess screw holding the connector assembly in the housing. 4. Install the new probe connector cable assembly and secure in the housing. 5. Reconnect the cable to the main board. Screw Connector on Main Board Figure 7–24. Replacing the Internal Probe Connector Cable 7-28 TVA2020 Instruction Manual Thermo Fisher Scientific Chapter 8 Optional Accessories The TVA2020 is available with the following options: ● “Sample Probe Option” on page 8-1 ● “Enhanced Probe Option” on page 8-2 ● “Telescoping Extension Option” on page 8-11 ● “Activated Charcoal Filter Adapter” on page 8-12 ● “Bluetooth Communications” on page 8-13 ● “GPS” on page 8-16 For information on additional accessories, such as calibration kits, enhanced probes, or dilutor kits, please contact Thermo Fisher Scientific. Sample Probe Option The sample probe option is a hand-held device that enables you to take vapor samples at precise locations. It connects to the instrument by means of an umbilical. The umbilical has a quick-disconnect fastener. The probe comes with both a straight tip and a bent tip. The probe ends can be quickly changed depending on user preference. Figure 8–1. Sample Probe Option Thermo Fisher Scientific TVA2020 Instruction Manual 8-1 Optional Accessories Enhanced Probe Option Enhanced Probe Option This probe/display option is used to perform menu-driven operational/datalogging functions from the handheld unit and reduces the need to access the sidepack keypad. There are three buttons on the Enhanced Probe which allow you to interact with the TVA2020: ● MENU – Used to cause the menu to appear on the bottom of the probe display and to step through the available selections ● SELECT – Used to choose the currently highlighted menu selection; e.g., “LOG”. ● Light Bulb Icon – Used to turn the display backlight on and off The probe accepts a single display control message. The message is tested for validity, and if valid, the display is updated. The probe displays the contents of the last valid message received since power on. The display provides two display modes. Both display modes display the current concentration for one detector: 1. Bar graph value > 0: Display bar graph 2. Bar graph value = 0: Displays 6 line x 20 character text PROBE NUT AND SLEEVE CLOSE AREA SAMPLING ASSEMBLY PROBE KEYPAD AND DISPLAY THE CLOSE AREA SAMPLER (*CHARC OAL F ILTER OR WATER TRAP) CAN BE PLACED DIRECTLY INTO THE READOUT UNIT OR EXTENDED BY USING THE OPTIONAL TELESCOPING WAND. *OPT IONAL Figure 8–2. Enhanced Probe Option 8-2 TVA2020 Instruction Manual Thermo Fisher Scientific Optional Accessories Enhanced Probe Option Enhanced Probe Display The enhanced probe also has an LCD screen which displays the basic measurement information. The enhanced probe display is larger (8 line x 20 character display) and is capable of providing several menu-driven functions. These Menu selections allow the user to start a datalogging application, switch detectors, ignite the FID, and perform a background scan. In Fugitive Emissions monitoring applications, the MENU selections also allow the user to step through a tag route, search for a selected tag, start a logging event, log repair data, etc. The display, which may be backlit under low light conditions, is active only in the Run mode. In all other modes, the display is OFF. MEASURED VALU E OVERRANGE INDICATOR DETECTOR BEING DISPLAYED fid pid 8.8.8.8. >> XXX MEASUREMENT U NITS (%, PPM, PPB) SEGMENTED BARGRAPH >>> <MONITOR>< > > ><DISP PID> <<<IGNITE><> <<>CLR MENU>> MENU PROBE MENU DISPLAY BUT TON SELECT MENU SELECTOR BUTT ON BUTTON FOR DISPLAY BACKLIGHTING Figure 8–3. Enhanced Probe Option Display Thermo Fisher Scientific TVA2020 Instruction Manual 8-3 Optional Accessories Enhanced Probe Option Enhanced Probe Keys The enhanced probe has three keys, labeled MENU, SELECT, and a lamp Symbol. MENU and SELECT are multi-functional. Table 8–1. Enhanced Probe Keys and Functions Key The Enhanced Probe and the RUN Mode Function MENU Press and release this key to show the probe display menu or to move to the next menu option. Press and hold this key (approx. 2 seconds) to toggle the info screen on/off. SELECT Press and release this key to select the highlighted menu option. Lamp Symbol Press this key to turn the backlight for the probe on or off. As it draws additional power from the battery and thus shortens instrument run time, use it only during low light conditions. Use the following procedure to use the enhanced probe in Run mode. 1. From the MAIN MENU, choose 1=Run. 2. The enhanced probe display will display the detector reading (FID or PID) at the top and an analog bargraph on the bottom. PID Tag: 0.66 ppm 3. Press the MENU key on the Enhanced probe display to show the Opening menu: 8-4 TVA2020 Instruction Manual Thermo Fisher Scientific Optional Accessories Enhanced Probe Option PID Tag: 0.66 ppm [Enter logging mode] -Ignite -other det -Background -Exit The highlighted menu item is the item surrounded by brackets. Pressing the MENU key will cause the brackets to move from menu item to menu item. When you reach the menu item you wish to choose, press SELECT. The Opening menu items are as follows: Table 8–2. Enhanced Probe Menu Auto Logging with the Enhanced Probe Menu Item Function Enter logging mode Enters FE, VOC, or Auto logging mode, allowing you to enter tags, toggle through route files, log data, etc. If no logging is selected in the SETUP menu, then this selection does not appear. Ignite Ignites FID. Other det Toggles between FID and PID reading. This selection does not appear in single detector models. Background Records a new background reading. Exit Clears the menu and returns to the bar graph display. Use the following procedure to use the enhanced probe in auto logging mode. 1. In the RUN mode, from the Opening menu, press the select key to “Enter logging mode.” 2. Use the sidepack to enter a tag, or simply select “Accept” to enter a blank tag. 3. Choose “Start log sampling” to begin Auto logging. 4. The Enhanced probe will display the countdown and continue to log until EXIT is selected at the probe or the sidepack keypad. Thermo Fisher Scientific TVA2020 Instruction Manual 8-5 Optional Accessories Enhanced Probe Option PID Tag: 0.66 ppm 0.59ppm PID 2.50ppm FID Sampling: 3s [Exit] 5. Once EXIT is selected, you may enter another tag and begin logging again or exit from the RUN mode. VOC Logging with the Enhanced Probe Use the following procedure to use the enhanced probe in VOC logging mode. 1. In the RUN mode, from the Opening menu, press the select key to “Enter logging mode.” 2. Use the sidepack to enter a tag, or simply select “Accept” to enter a blank tag. 3. Choose “Start log sampling” to begin Auto logging. 4. The Enhanced probe will display the count down for the interval selected in the SETUP menu and freeze on the reading to be saved (Maximum, Average, or Last Reading). PID Tag: 0.66 0.59ppm 2.50ppm [Sav] –Again ppm PID FID -Exit 5. You may choose to save the reading (SAV), repeat the reading for the same tag (AGAIN), or return to the previous menu (EXIT). 8-6 TVA2020 Instruction Manual Thermo Fisher Scientific Optional Accessories Enhanced Probe Option 6. Once you have saved a reading, you may enter another tag and begin logging again or exit from the RUN mode. FE Logging with the Enhanced Probe In FE logging, you follow a preconfigured route list consisting of component records for equipment to be monitored. You should first download a route to the TVA2020’s memory before entering the RUN mode. For more information on downloading routes, see the “Memory” section in Chapter 3. In the RUN mode, from the Opening menu, press the select key to “Enter logging mode.” 0.66 PID ppm Tag:0033 Eqp:CMP Size: 0.00 Leak: 600 RF:0.80 0.66ppm LastLog [Start log sampling] -Nx -Pr -List -Exit In addition to the concentration display at the top, the FE mode shows several fields which have been filled in by the downloaded route. The TVA2020 starts at the first record in the route and displays the component tag number (Tag), equipment type (Eqp), equipment size (Size), and leak definition (Leak). If a reading has already been logged into memory for this record, it will also be displayed followed by the words “LastLog.” Route Entry Response Factor A secondary response factor correction is based on the response factor associated with the current route entry. This secondary correction adjusts the concentration reading for different component measurements in the same route. For example, let a route contain two entries, one for propane and one for methane. Assume that propane has only half the detector response of methane. If each route location has a leak of 100 ppm, a single response factor based on methane would produce a concentration reading of 100 ppm for methane, but only 50 ppm for propane. The addition of a secondary response factor allows each entry to be corrected for detector sensitivity. Thus, if the secondary response factor is 1.0 for methane and 2.0 for propane, both route samples will read correctly as 100 ppm. Thermo Fisher Scientific TVA2020 Instruction Manual 8-7 Optional Accessories Enhanced Probe Option Only the linear correction mode is used for the secondary route response correction: Linear: FinalConc = RouteRF x BackConc The secondary RouteRF is downloaded to the instrument as part of each route entry. This factor is applied to both detectors, as it is expected that when operating in this mode, only one detector will be used. Entries inserted by the instrument default to a RouteRF of 1.0. Navigating the Route File Selecting “Nx” from the first logging mode screen will allow you to step to the next record in the route. Selecting “Pr” will allow you to step to the previous record in the route. Selecting “List” will show 10 records per page for faster searching through the route. You can also enter a tag via the keypad and the TVA2020 will automatically skip to that tag if it is contained within the route. If the tag is not contained within the route, a “TAG NOT FOUND” message will appear and you will be given the option to “Insert” that tag into the route or “Exit.” Logging Data Once you have reached the correct tag for the component you wish to monitor, you may select “Start log sampling” to begin recording data. The TVA2020 will display the reading from the selected detector and begin counting down for the time interval selected in the SETUP menu. The countdown is shown on the last line of the display: 0.66 PID ppm Tag:0019 Eqp:PMP Size: 0.75 Leak: 50 RF:1.80 0.66ppm PID Sampling: 24s [Exit] Once the countdown is complete, the TVA2020 display will freeze on the reading to be logged and indicate if it is a leak (i.e., if the reading of the active detector exceeds the indicated leak rate). You will be given several options: 8-8 TVA2020 Instruction Manual Thermo Fisher Scientific Optional Accessories Enhanced Probe Option 0.66 PID ppm Tag:0019 Eqp:PMP Size: 0.75 Leak: 50 RF:1.80 0.66ppm NoLeak -Repair [Sav] –Again -Exit If you choose “Sav”, the TVA2020 will store the reading in memory (replacing any previously logged readings for that Tag) and proceed to the next component record in the route. If you choose “Again,” the TVA1000B will repeat the countdown and obtain a new reading. If you choose “Exit” the TVA2020 will return to the previous screen. Repair Menus If the reading obtained during the logging interval exceeds the leak definition, the TVA2020 will indicate that it is a leak by printing “Leaker!” If you wish, you may record what part of the component is leaking and what action was taken as a first attempt at repair. Choose “Repair” instead of “Sav” and the TVA2020 will proceed to the Repair menus: 0.66 PID ppm Leak Source: N/A Repair Method: N/A [Save & sampl again] -Select leak source -Select repair mthd -Exit The two lines below the reading show the currently selected leak source and repair method. Choosing “Select leak source” will allow you to record what part of the component is leaking by choosing from a list of leak sources (Valve Bonnet, Compressor Seal, Downstream Flange, Valve Packing, Pump Seal, Upstream Flange). Choosing “Select repair method” will allow you to record what method was used for the first attempt at repair (Place Cap, Gun Pack Valve, Place Plug, Repack Valve, Replace Gasket, Replace, Seal Job, Steam Seal, Tighten Bonnet, Tighten Cap, Tighten Flange, Tighten Packing, Tighten Plug, Wash Seal). Choosing “Exit” will return you to the previous display. Thermo Fisher Scientific TVA2020 Instruction Manual 8-9 Optional Accessories Enhanced Probe Option If you choose a leak source and repair menu, be sure to select “Sav” when you return to this menu so the reading and repair information will be saved in memory before proceeding to the next component record. Additional Component Information Displays containing additional information about the component and the TVA2020 status are available from the handheld unit. If you press and hold the MENU key for approximately 2 seconds, the Enhanced display will present an INFO page: 0.66 PID ppm Tag:0020 Area:1515 BEN Subarea:WEST Leak: 10 RF:1.00 14:17:52 [Pg] -Exit The INFO page overwrites the bottom four lines of the record with other fields such as Location (Loc) and Description (the two lines below the location). The Location field contains the Area and the Subarea where the component is located. The Description field displays up to 40 characters of additional information about the component. Selecting “Pg” at the bottom of the display will step you through other INFO pages containing information such as Run ID, Record number, number of points logged, number of leakers found, number of repairs performed, pump status, free memory, etc. Selecting “Exit” will return you back to the normal component record. 8-10 TVA2020 Instruction Manual Thermo Fisher Scientific Optional Accessories Telescoping Extension Option Telescoping Extension Option To use an optional telescoping extension, loosen the probe nut and unplug the sampling assembly. Next, insert the telescoping wand and tighten the probe nut. Then, insert the appropriate sampling assembly into the other end of the extension unit and tighten the retaining nut. PROBE ASSEMBLY PROBE NUT CLOSE AREA SAMPLER FILTER ADAPTER TELESCOPING EXTENSION UNIT Figure 8–4. Telescoping Extension Option Thermo Fisher Scientific TVA2020 Instruction Manual 8-11 Optional Accessories Activated Charcoal Filter Adapter Activated Charcoal Filter Adapter The Activated Charcoal Filter Adapter is an accessory that can be installed or attached to the end of the standard probe or to the end of a telescoping extension. The filter is typically filled with activated charcoal which acts as an adsorbent and effectively filters out organic vapors other than methane or ethane. A screw cap on the probe end may be removed for refilling the filter with activated charcoal or other filtering medium. Applications of the filter include: ● Obtaining a clean air sample for zero baseline check and adjustment. ● Rapid screening of methane and non-methane organic vapors. ● Selective screening for natural gas surveys. The charcoal filter adapter fits directly into the telescoping wand. The life of the filter depends on the time in use, the types of compounds, and concentrations of the compounds being filtered. Under typical industrial air monitoring conditions, the filter will last for many days of continuous sampling. For information on replacing the charcoal filter, see “Replacing the Charcoal Filter” on page 5-14. 8-12 TVA2020 Instruction Manual Thermo Fisher Scientific Optional Accessories Bluetooth Communications Bluetooth Communications An optional Bluetooth module may be installed inside the sidepack to provide a wireless data interface via Bluetooth. Bluetooth is used for Digital Data Logging, to turn the pump on or off, or to reignite the FID. The TVA 2020 will advertise the Bluetooth friendly name TVA2020<last six hex digits of Bluetooth address>. A PC or PDA can then connect to it using a passkey of 0000. Bluetooth Commands After connecting to the Bluetooth module from a computer or PDA, the Serial Port Profile (SPP) is used to issue the following commands according to Table 8–3. Table 8–3. Bluetooth Commands Thermo Fisher Scientific Command Result log start Start Digital Data Logging log stop Stop Digital Data Logging detector pid Log PID data only detector fid Log FID data only detector pid_fid Log PID and FID data ignite Reignite FID pump on Turn pump on pump off Turn pump off screen Enter screen mode. In screen mode the sidepack screen is shown, and is updated when the sidepack screen is changed, or every two seconds. push co (control) push do (down) push en (enter) push ex (exit) push le (left) push ri (right) push up push 1 push 2 push 3 push 4 push 5 push 6 push 7 Send key to sidepack (screen mode only) TVA2020 Instruction Manual 8-13 Optional Accessories Bluetooth Communications Command Result push 8 push 9 quit Exit screen mode Note The commands are case insensitive. ▲ All commands are terminated by <CR> or <CR><LF>. If an invalid command is received by the TVA, it will respond with “bad cmd”. This response is terminated by <CR><LF>. 8-14 TVA2020 Instruction Manual Thermo Fisher Scientific Optional Accessories Bluetooth Communications Digital Data Logging (Bluetooth) If digital data logging is enabled, streaming concentration data is sent out via Bluetooth at the end of each measurement cycle (once per second) when the analyzer is in RUN mode. The digital data format is as follows: Digital data log record: pppppppppp sssssssss ffffffffff sssssssss aaaaaaaaa ooooooooo hhhh rr nn <CR><LF> where: pppppppppp = PID concentration, floating point, right justified, leading spaces, or " “ when PID detector not selected ffffffffff = FID concentration, floating point, right justified, leading spaces, or " “ when FID detector not selected sssssssss = " ", "OK ", "DET_OFF ", "DET_FAIL ", "OVERFLOW ", "UNDERFLOW", "BAD_CALIB", "CAL_SLOPE", "CLAMPED ", "AVG_OVFLW", "HIGH_ALRM", "LOW_ALARM", "STEL_ALRM", "HIGH&STEL", "LOW&STEL ", data status: detector not selected no errors or alarms detector not valid detector failed, not "DET_OFF" A/D overflow, not "DET_FAIL" A/D underflow, not "OVERFLOW" invalid calibration parameters calibration sensitivity out of range an intermediate concentration exceeded 100% during log point averaging, an overflow occured high alarm, no STEL, not "UNDERFLOW" low alarm, no high alarm or STEL, not "UNDERFLOW" STEL alarm, no low or high alarm, not "UNDERFLOW" high alarm and STEL, not "UNDERFLOW" low alarm and STEL, no high alarm, not "UNDERFLOW" Digital data logging is initially disabled and the logging type is set according to what detectors are installed so, e.g., if only an FID is installed the logging type will be set to FID data only logging. Thermo Fisher Scientific TVA2020 Instruction Manual 8-15 Optional Accessories GPS GPS 8-16 TVA2020 Instruction Manual An optional Global Positioning System (GPS) module may be installed inside the sidepack to add location to the logged data. The GPS module is based on the SiRF Star III chipset which provides exceptional sensitivity, even in dense refineries. The module can acquire and track up to 20 satellites simultaneously and provide down to 5 meter resolution. The following data is provided by the GPS module for inclusion with logged data and real-time digital data logging: ● Latitude (Degrees with 5 digits to the right of the decimal) ● Longitude (Degrees with 5 digits to the right of the decimal) ● Altitude (Meters) ● Resolution (Meters) ● Number of Satellites Thermo Fisher Scientific Appendix A Warranty Warranty Seller warrants that the Products will operate or perform substantially in conformance with Seller's published specifications and be free from defects in material and workmanship, when subjected to normal, proper and intended usage by properly trained personnel, for the period of time set forth in the product documentation, published specifications or package inserts. If a period of time is not specified in Seller’s product documentation, published specifications or package inserts, the warranty period shall be one (1) year from the date of shipment to Buyer for equipment and ninety (90) days for all other products (the "Warranty Period"). Seller agrees during the Warranty Period, to repair or replace, at Seller's option, defective Products so as to cause the same to operate in substantial conformance with said published specifications; provided that (a) Buyer shall promptly notify Seller in writing upon the discovery of any defect, which notice shall include the product model and serial number (if applicable) and details of the warranty claim; (b) after Seller’s review, Seller will provide Buyer with service data and/or a Return Material Authorization (“RMA”), which may include biohazard decontamination procedures and other product-specific handling instructions; and (c) then, if applicable, Buyer may return the defective Products to Seller with all costs prepaid by Buyer. Replacement parts may be new or refurbished, at the election of Seller. All replaced parts shall become the property of Seller. Shipment to Buyer of repaired or replacement Products shall be made in accordance with the Delivery provisions of the Seller’s Terms and Conditions of Sale. Consumables, including but not limited to lamps, fuses, batteries, bulbs and other such expendable items, are expressly excluded from the warranty under this warranty. Notwithstanding the foregoing, Products supplied by Seller that are obtained by Seller from an original manufacturer or third party supplier are not warranted by Seller, but Seller agrees to assign to Buyer any warranty rights in such Product that Seller may have from the original manufacturer or third party supplier, to the extent such assignment is allowed by such original manufacturer or third party supplier. In no event shall Seller have any obligation to make repairs, replacements or corrections required, in whole or in part, as the result of (i) normal wear and tear, (ii) accident, disaster or event of force majeure, (iii) misuse, fault or negligence of or by Buyer, (iv) use of the Products in a manner for which Thermo Fisher Scientific TVA2020 Instruction Manual A-1 Warranty Warranty they were not designed, (v) causes external to the Products such as, but not limited to, power failure or electrical power surges, (vi) improper storage and handling of the Products or (vii) use of the Products in combination with equipment or software not supplied by Seller. If Seller determines that Products for which Buyer has requested warranty services are not covered by the warranty hereunder, Buyer shall pay or reimburse Seller for all costs of investigating and responding to such request at Seller's then prevailing time and materials rates. If Seller provides repair services or replacement parts that are not covered by the warranty provided in this warranty, Buyer shall pay Seller therefor at Seller's then prevailing time and materials rates. ANY INSTALLATION, MAINTENANCE, REPAIR, SERVICE, RELOCATION OR ALTERATION TO OR OF, OR OTHER TAMPERING WITH, THE PRODUCTS PERFORMED BY ANY PERSON OR ENTITY OTHER THAN SELLER WITHOUT SELLER'S PRIOR WRITTEN APPROVAL, OR ANY USE OF REPLACEMENT PARTS NOT SUPPLIED BY SELLER, SHALL IMMEDIATELY VOID AND CANCEL ALL WARRANTIES WITH RESPECT TO THE AFFECTED PRODUCTS. THE OBLIGATIONS CREATED BY THIS WARRANTY STATEMENT TO REPAIR OR REPLACE A DEFECTIVE PRODUCT SHALL BE THE SOLE REMEDY OF BUYER IN THE EVENT OF A DEFECTIVE PRODUCT. EXCEPT AS EXPRESSLY PROVIDED IN THIS WARRANTY STATEMENT, SELLER DISCLAIMS ALL OTHER WARRANTIES, WHETHER EXPRESS OR IMPLIED, ORAL OR WRITTEN, WITH RESPECT TO THE PRODUCTS, INCLUDING WITHOUT LIMITATION ALL IMPLIED WARRANTIES OF MERCHANTABILITY OR FITNESS FOR ANY PARTICULAR PURPOSE. SELLER DOES NOT WARRANT THAT THE PRODUCTS ARE ERROR-FREE OR WILL ACCOMPLISH ANY PARTICULAR RESULT. A-2 TVA2020 Instruction Manual Thermo Fisher Scientific Appendix B Text Data Formats The TVA2020 supports a USB memory device mode for communications to a computer. In this mode, the instrument will show up as a USB memory device and the files are directly accessible via this interface. The data shown in the USB memory device mode is formatted as printable, readable ASCII text. All files are read to and written from the root directory of the file system for the memory device. The TVA2020 generates files with both <CR> and <LF> at the end of each line. However, the TVA accepts files with <CR><LF>, just <CR>, or just <LF>. At startup and after memory device mode is exited, an evaluation of all config/cal/factory files is performed and a warning is displayed on the sidepack if any of the files are in error. In addition, for any files with errors, a file is created with the same base name and a .ERR extension with the following format: Error, line xxxx: mmmmmmmmmmmmmmmmmmmmmmmmmmmmmmmmmm where xxx is the line number, and mmmm... is an error description. Thermo Fisher Scientific TVA2020 Instruction Manual B-1 Text Data Formats Route Database Route Database The route database file is stored as ROUTE.TXT with the following format: Format Comments ROUTE DATABASE<CR><LF> Title, not processed VER=xxxxx<CR><LF> xxxxx=ver, right just, lead spaces RUN ID=aaaa<CR><LF> a=0-9, A-Z, a-z <CR><LF> Blank line, not processed ROUTE FIELDS<CR><LF> Section title, not processed ------------<CR><LF> Section title, not processed <route entry field 1> See below <route entry field 2> . . . <route entry field 15> <CR><LF> Blank line, not processed PICKLISTS<CR><LF> Section title, not processed ---------<CR><LF> Section title, not processed <picklist definition 1> See below <picklist definition 2> . . . <picklist definition 6> <picklist definition LeakSource> <picklist definition RepairMethod> <CR><LF> Blank line, not processed DISPLAY<CR><LF> Section title, not processed -------<CR><LF> Section title, not processed <display entry 1> See below <display entry 2> . . . <display entry 6> <CR><LF> Blank line, not processed <route entry header line 1> See below: not processed <route entry header line 2> See below: not processed <route entry 1> See below <route entry 2> <route entry 3> . . . <route entry n> <CR><LF> Blank line, not processed END<CR><LF> Marks end-of-text There may be up to 15 route entry fields. The TAG field MUST be included as the first entry in the database, so the minimum number of route entry fields is one. Each route entry field consists of three columns of data: the data type, field width, and title. B-2 TVA2020 Instruction Manual Thermo Fisher Scientific Text Data Formats Route Database The first column in the route entry field defines the type of data, as follows: S P N T H L D R C String (alphanumeric) Pick List (alphanumeric) Number (numeric) Tag (alphanumeric) Hidden Database Key (alphanumeric) Leak Rate (numeric) Dead Band Rate (numeric) Response Factor (numeric) Comment (alphanumeric) The String, Pick List, and Number field types may have more than one entry in the route fields. All other types may be used only once in the route fields. An optional “X” character may be added after the data type to indicate that that entry field may not be edited, it is only shown on the TAG screen. The second column of the route entry field defines the field width, which is used to define data storage size, display data on the probe, and during file transfers. The sum of all defined fields may not exceed 365 characters. Each field may not be larger than 60 characters, with the exception of the Tag field and Pick lists (16 characters). The third column of the route entry field is the label for the route entry field, which is displayed as the column header in the route database file and on the probes as a field prompt. Each label may be no more than 12 characters. Each route entry field is ended with <CR><LF>. Note that the leak source, repair method, and comment fields are not actually stored as part of the route entry. Instead these items are stored with each logged data point. They are included in this section so the user may define the pick lists and comment field size. The next section of the file defines the PICKLISTS. There may be up to 8 pick lists included in the database definition (this includes the LeakSource and RepairMethod lists), but none are required. Each pick list may have up to 16 items consisting of no more than 16 characters each. The pick list definition consists of multiple lines of data. The first line is the pick list label as follows: LABEL=llllllllllllllll Where llllllllllllllll is the pick list label which is left justified and terminated by <CR><LF> at any time (does not require 16 characters). The label must match the label previously defined in the ROUTE FIELDS section of the file. Each additional line is a pick list entry. The pick list is terminated by Thermo Fisher Scientific TVA2020 Instruction Manual B-3 Text Data Formats Route Database the start of a new pick list label, or by the blank line at the end of the PICKLISTS section. There are two special picklists. These picklists are defined using the labels “LeakSource” and “RepairMethod”. If these picklists are present in the route database file, they are used for the Leak Source and Repair Method fields in the logged data. If they are not included in the file, default pick lists are loaded. Note that the “LeakSource” picklist has a hard-coded size of 3 characters and the “RepairMethod” picklist has a hard-coded size of 5 characters. The first entry in each of these picklists must be something equivalent to “N/A”, as these are the default settings indicating that nothing has been selected from the list. The next section of the file is the DISPLAY section. This section defines what database fields are displayed on the Enhanced probe while monitoring. Since there are only three lines of 20 characters each available on the display during monitoring, the user may select which fields are displayed. The first column of the display field is the label for the route entry field to be displayed. This must match a label previously defined in the ROUTE FIELDS section of the file. The second column is the line number (1-3) to display this field. The third column is the column number (1-20) to start displaying this field. The fourth column is the number of characters to display. If the number of characters to be displayed exceeds the number of characters available on the line, it will be wrapped to the next line. If the number of characters to display is less than the number of characters defined in the ROUTE FIELDS section, the first n characters of the field are displayed. If the number of characters to display is a negative number, then the last n characters of the field are displayed. An error is reported when the file is transferred if any of the display fields overlap. The route header line is composed of route entry field titles (line 1) centered over an underline of dashes (line 2) for each field. The fields are delimited with a single space. Each column is of width defined in the route entry field section. These two lines are ignored when receiving a route database file, so formatting is not critical. The route entry format depends on the data in the Route Fields section. Each field goes from left to right in the order they were defined in that section. Each field is delimited by a single space. Numbers may be either left or right justified. Each database entry is ended with <CR><LF>. Downloaded route entries may be terminated any time after the tag by the <CR><LF>. Before the first entry is accepted, the instrument’s route and log memory is cleared. Partial text entries are processed as ending in trailing spaces. Partial number entries are processed as if complete. The default value for fields not included in the entry are: B-4 TVA2020 Instruction Manual Thermo Fisher Scientific Text Data Formats Route Database Field Type String Number Tag Hidden Leak rate Dead band Response factor Default all spaces all spaces all spaces all spaces 0.00 0.00 1.00 Sample, download, beginning characters only, various lengths: ROUTE DATABASE VER= 1.00 RUN ID=0001 ROUTE FIELDS -----------T 16 Tag H 16 DBID P 16 Plant S 8 Area SX 8 Subarea L 5 Max R 4 RF S 3 EQP P 3 EQPick N 6 Size S 48 Description C 32 Comment PICKLISTS --------LABEL=Plant HOUSTON 1 HOUSTON 2 LEFT OF TRACKS LABEL=EQPick VLV FLG PMP DISPLAY ------Tag 1 1 16 EQP 2 1 3 Size 2 10 6 Max 3 1 5 RF 3 12 4 Tag DBID Plant Description ---------------- ---------------- -----------------1 1000000001 HOUSTON 1 2 1000000002 HOUSTON 1 3 1000000003 HOUSTON 2 4 1000000004 HOUSTON 2 5 1000000005 LEFT OF TRACKS Area Subarea Max RF EQP EQP Size -------- -------- ----- ---- --- --- ------ -------------AREA1 AREA2 AREA3 AREA4 AREA5 SUBAREA1 SUBAREA2 SUBAREA3 SUBAREA4 SUBAREA5 0 0 0 0 0 1.00 1.00 1.00 1.00 1.00 N/A BON CSL DFL PKG 1.00 0.50 1.75 10.00 5.50 DESCRIPTION DESCRIPTION DESCRIPTION DESCRIPTION DESCRIPTION 1 2 3 4 5 END Thermo Fisher Scientific TVA2020 Instruction Manual B-5 Text Data Formats Route List Route List This is a legacy file format for ROUTE.TXT to support older third-party applications. The route list format is as follows: Format Comments ROUTE LIST<CR><LF> Title, not processed VER=xxxxx xxxxx=ver, left just, trail spaces RUN ID=aaaa<CR><LF> a=0-9, A-Z, a-z <CR><LF> Blank line, not processed <route entry header line 1> See below: not processed <route entry header line 2> See below: not processed <route entry header line 3> See below: not processed <route entry 1> See below <route entry 2> <route entry 3> . . . <route entry n> <CR><LF> Blank line, not processed END<CR><LF> Marks end-of-text The route header line is composed of text headers (lines 1 & 2) and an underline of dashes (line 3). The route header is specified below by specification of header text for lines 1 & 2 and starting position, all other characters blank. Line 3 is a dash character '-' for all route entry characters except the delimiter (space instead). Route header: Header Line 1 Start 0 17 26 35 41 46 50 57 LEAK RESP EQP EQUIP<CR><LF> Header Line 2 TAG AREA SUBAREA RATE FACT TYP SIZE DESCRIPTION<CR><LF> The route entry format is: Byte 0 16 17 25 26 34 35 B-6 TVA2020 Instruction Manual Length 16 1 8 1 8 1 5 Item Tag delimiter Area delimiter Subarea delimiter Leak rate Format text space text space text space floating point Thermo Fisher Scientific Text Data Formats Route List 40 41 45 46 49 50 56 57 105 106 1 4 1 3 1 6 1 48 1 1 delimiter Response factor delimiter Equipment type delimiter Equipment size delimiter Description <CR> <LF> space floating point space text space text space text 0DH 0AH Downloaded route entries may be terminated any time after the tag by the <CR><LF>. Before the first entry is accepted, the instrument’s route and log memory is cleared. Partial text entries are processed as ending in trailing spaces. Partial number entries are processed as if complete. The default value for fields not included in the entry are: Field Area Subarea Leak rate Response factor Equipment type Equipment size Description Default all spaces all spaces 0.00 1.00 all spaces all spaces all spaces Sample, download, beginning characters only, various lengths: ROUTE LIST VER=1.00 RUN ID=0486 TAG ---------------0123 0124 0124 0125 AREA -------PLANT 1 PLANT 1 PLANT 1 LEAK RESP EQP EQUIP SUBAREA RATE FACT TYP SIZE DESCRIPTION -------- ----- ---- --- ------ ----------SECTION2 10.3 2.00 VLV 5.125 OUTLET SECTION2 100 1.00 PMP 5.125 SECTION2 100 1.00 END Thermo Fisher Scientific TVA2020 Instruction Manual B-7 Text Data Formats Configuration Configuration The configuration is stored as CONFIG.TXT with the following format (options are separated by a '|'): Format CONFIGURATION<CR><LF> VER=XX.XX<CR><LF> <CR><LF> MODEL=xxxxxxxxxx<CR><LF> SERIAL NUMBER=idididididid<CR><LF> DETECTOR=FID|PID&FID<CR><LF> OPERATOR ID=opopopopop<CR><LF> <CR><LF> LOGGING<CR><LF> -------<CR><LF> LOG MODE=NONE|AUTO|VOC|FE|CUSTOM<CR><LF> LOG STORAGE FORMAT=NONE|AUTO|VOC|FEVOC<CR><LF> LOG SAMPLE TIME=nnn<CR><LF> LOG SAMPLE TIME UNIT=SEC|MIN<CR><LF> LOG DATA STORED=SAMPLE|AVERAGE|MAXIMUM<CR><LF> LOG UNIT LOCK=OFF|PPM|PERCENT<CR><LF> LOG AUTO REPEAT=OFF|ON<CR><LF> LOG SAVE MODE=MANUAL|AUTO<CR><LF> TAG ACTIVE=OFF|ON<CR><LF> ROUTE ACTIVE=OFF|ON<CR><LF> <CR><LF> CALIBRATION<CR><LF> -----------<CR><LF> CAL AUTO ACCEPT=OFF|ON<CR><LF> CAL AUTO SAVE=OFF|ON<CR><LF> CAL UNIT LOCK=OFF|PPM|PERCENT<CR><LF> BACKGROUND CORRECTION (PID)=OFF|ON<CR><LF> BACKGROUND CORRECTION (FID)=OFF|ON<CR><LF> <CR><LF> RESPONSE FACTORS<CR><LF> ----------------<CR><LF> SELECTED=n<CR><LF> MODE=FACTOR|CURVE<CR><LF> RF0 (PID)=DEFAULT 1.00 0.00<CR><LF> RF1 (PID)=nnnnnnnnnn xx.xx +yy.yy<CR><LF> . . . RF9 (PID)=nnnnnnnnnn xx.xx +yy.yy<CR><LF> RF0 (FID)=DEFAULT 1.00 0.00<CR><LF> RF1 (FID)=nnnnnnnnnn xx.xx +yy.yy<CR><LF> . . . RF9 (FID)=nnnnnnnnnn xx.xx +yy.yy<CR><LF> <CR><LF> ALARMS<CR><LF> ------<CR><LF> STEL (PID)=ffffff PPM|% <CR><LF> LOW (PID)=ffffff PPM|% <CR><LF> HIGH (PID)=ffffff PPM|% <CR><LF> B-8 TVA2020 Instruction Manual Thermo Fisher Scientific Text Data Formats Configuration STEL (FID)=ffffff PPM|% <CR><LF> LOW (FID)=ffffff PPM|% <CR><LF> HIGH (FID)=ffffff PPM|% <CR><LF> <CR><LF> USER OPTIONS<CR><LF> ------------<CR><LF> PROBE=ENHANCED<CR><LF> KEY CLICK=OFF|ON<CR><LF> DISPLAY DELAY=SHORT|MEDIUM|LONG<CR><LF> DIGITAL DATA LOGGING=NONE|FID|PID|PID&FID|SELDET<CR><LF> BLUETOOTH POWER=OFF|ON<CR><LF> GPS POWER=OFF|ON<CR><LF> POWER (PID)=OFF|ON<CR><LF> POWER (FID)=OFF|ON<CR><LF> <CR><LF> END<CR><LF> Note Lines containing information on uninstalled detector (PID) are not output. ▲ Note Spaces are allowed in names and other text fields entered by the user. ▲ Note Number fields are right justified, leading spaces. ▲ Note The second detector repeats the RF names. During download the last RF name encountered is used. ▲ Note Log parameters must be correct for the specified log mode. ▲ Sample: CONFIGURATION VER= 1.00 MODEL=TVA2020 SERIAL NUMBER=123456789012 DETECTOR=PID&FID OPERATOR ID=USERID LOGGING ------LOG MODE=NONE LOG STORAGE FORMAT=NONE LOG SAMPLE TIME=0 LOG SAMPLE TIME UNIT=SEC LOG DATA STORED=SAMPLE LOG UNIT LOCK=OFF LOG AUTO REPEAT=OFF LOG SAVE MODE=MANUAL Thermo Fisher Scientific TVA2020 Instruction Manual B-9 Text Data Formats Configuration TAG ACTIVE=OFF ROUTE ACTIVE=OFF CALIBRATION ----------CAL AUTO ACCEPT=OFF CAL AUTO SAVE=OFF CAL UNIT LOCK=OFF BACKGROUND CORRECTION (PID)=ON BACKGROUND CORRECTION (FID)=ON RESPONSE FACTORS ---------------SELECTED=0 MODE=FACTOR RF0 (PID)=DEFAULT RF1 (PID)=---------RF2 (PID)=---------RF3 (PID)=---------RF4 (PID)=---------RF5 (PID)=---------RF6 (PID)=---------RF7 (PID)=---------RF8 (PID)=---------RF9 (PID)=---------RF0 (FID)=DEFAULT RF1 (FID)=---------RF2 (FID)=---------RF3 (FID)=---------RF4 (FID)=---------RF5 (FID)=---------RF6 (FID)=---------RF7 (FID)=---------RF8 (FID)=---------RF9 (FID)=---------ALARMS -----STEL (PID)= LOW (PID)= HIGH (PID)= STEL (FID)= LOW (FID)= HIGH (FID)= 0.00 0.00 0.00 0.00 0.00 0.00 1.00 1.00 1.00 1.00 1.00 1.00 1.00 1.00 1.00 1.00 1.00 1.00 1.00 1.00 1.00 1.00 1.00 1.00 1.00 1.00 0.00 0.00 0.00 0.00 0.00 0.00 0.00 0.00 0.00 0.00 0.00 0.00 0.00 0.00 0.00 0.00 0.00 0.00 0.00 0.00 PPM PPM PPM PPM PPM PPM USER OPTIONS -----------PROBE=ENHANCED KEY CLICK=OFF DISPLAY DELAY=MEDIUM PC LINK TYPE=TEXT-AUTO DIGITAL DATA LOGGING=PID&FID BLUETOOTH POWER=ON GPS POWER=ON POWER (PID)=ON POWER (FID)=ON END B-10 TVA2020 Instruction Manual Thermo Fisher Scientific Text Data Formats Calibration Calibration Successful download of the calibration file resets the background concentration to zero. The calibration is stored as CAL.TXT in the following format: Format CALIBRATION DATA<CR><LF> VER=xx.xx <CR><LF> <CR><LF> <detector calibration> <detector calibration> END<CR><LF> Comments Title, not processed xx.xx=ver, right just, lead spaces Blank line, not processed Blank line, not processed PID if available, see below FID if available, see below Marks end-of-text The detector calibration format is as follows (note: from 1 to 9 span gas points are allowed): ddd CALIBRATION:<CR><LF> <CR><LF> CALIB KNOWN CALIB TYPE CONC DATE/TIME ----- ---------- ------------------ZERO aaaaaa uuu dd mmm yy hh:mm:ss SPAN1 aaaaaa uuu dd mmm yy hh:mm:ss . . . . . . . . . . . . . . . . . . . . . . . . . . . SPANn aaaaaa uuu dd mmm yy hh:mm:ss <CR><LF> <CR><LF> MEASURED<CR><LF> CALIB VALUE<CR><LF> -------------------------<CR><LF> bbbbbbbb COUNTS fffffffff<CR><LF> bbbbbbbb COUNTS fffffffff<CR><LF> . . . . . . . . . . . . . . . bbbbbbbb COUNTS fffffffff<CR><LF> where: ddd = detector type "FID" "PID" aaaaaa = gas concentration, floating point, right justified, leading spaces uuu = concentration units: "PPM", parts-per-million "% ", percent dd = day of calibration, 01-31 mmm = month of calibration, Jan-Dec yy = year of calibration, 00-99 hh = hour of calibration, 00-23 mm = minute of calibration, 00-59 ss = second of calibration, 00-59 bbbbbbbb = detector reading for calibration gas, integer, right justified, leading spaces fffffffff = count status: "OK ", no errors "DET_OFF ", detector reading invalid Thermo Fisher Scientific TVA2020 Instruction Manual B-11 Text Data Formats Calibration "DET_FAIL ", "OVERFLOW ", "UNDERFLOW", "BAD_CALIB", "CAL_SLOPE", "CLAMPED ", "AVG_OVFLW", detector failed, not invalid A/D overflow, not invalid A/D underflow, not invalid or A/D overflow invalid calibration parameters calibration sensitivity out of range an intermediate concentration exceeded 100% during log point averaging, an overflow occured n = span gas number, 2-9 Sample, dual detector: CALIBRATION DATA VER= 1.00 PID CALIBRATION: CALIB KNOWN CALIB MEASURED TYPE CONC DATE/TIME CALIB VALUE ----- ---------- ------------------- ------------------------ZERO 0 PPM 12 DEC 99 20:20:10 0 COUNTS OK SPAN1 10.23 PPM 12 DEC 99 20:20:30 123456 COUNTS OK SPAN2 50.23 PPM 12 DEC 99 20:20:40 1234567 COUNTS OK SPAN3 100.23 PPM 12 DEC 99 20:20:50 12345678 COUNTS OVERFLOW FID CALIBRATION: CALIB KNOWN CALIB MEASURED TYPE CONC DATE/TIME CALIB VALUE ----- ---------- ------------------- ------------------------ZERO 0 PPM 12 DEC 99 20:20:10 0 COUNTS OK SPAN1 10.23 PPM 12 DEC 99 20:20:30 123456 COUNTS DET_FAIL END B-12 TVA2020 Instruction Manual Thermo Fisher Scientific Text Data Formats Factory Factory The factory calibration is stored as FACTORY.TXT with the following format (options are separated by a '|'): Format FACTORY<CR><LF> VER=XX.XX<CR><LF> <CR><LF> <CR><LF> POINT 1 TIME =xxxxxxxx<CR><LF> POINT 1 FLAGS =xxxxxxxx<CR><LF> POINT 1 COUNT =xxxxxxxx<CR><LF> POINT 1 DUTY =xxxxxxxx<CR><LF> <CR><LF> POINT 2 TIME =xxxxxxxx<CR><LF> POINT 2 FLAGS =xxxxxxxx<CR><LF> POINT 2 COUNT =xxxxxxxx<CR><LF> POINT 2 DUTY =xxxxxxxx<CR><LF> <CR><LF> POINT 3 TIME =xxxxxxxx<CR><LF> POINT 3 FLAGS =xxxxxxxx<CR><LF> POINT 3 COUNT =xxxxxxxx<CR><LF> POINT 3 DUTY =xxxxxxxx<CR><LF> <CR><LF> SLOPE =xxxxxxxx<CR><LF> INTERCEPT =xxxxxxxx<CR><LF> SUM OF SQUARES=xxxxxxxx<CR><LF> <CR><LF> <CR><LF> END<CR><LF> Sample: FACTORY VER= 1.00 POINT POINT POINT POINT 1 1 1 1 TIME FLAGS COUNT DUTY =1334746787 =0 =26601 =98 POINT POINT POINT POINT 2 2 2 2 TIME FLAGS COUNT DUTY =1324747069 =0 =28642 =34 POINT POINT POINT POINT 3 3 3 3 TIME FLAGS COUNT DUTY =1334747227 =0 =29690 =180 SLOPE INTERCEPT Thermo Fisher Scientific =36.6918 =23264 TVA2020 Instruction Manual B-13 Text Data Formats Factory SUM OF SQUARES=0.934123 END B-14 TVA2020 Instruction Manual Thermo Fisher Scientific Text Data Formats Calibration History Calibration History The calibration history data is stored as HISTORY.TXT in a read-only format. This file is generated from data stored in MRAM each time the instrument is put into USB transfer mode, thus not allowing a user to change the data in the HISTORY.TXT file. If there are fewer history records than the maximum allowed (240), the empty records are not output. Format CAL HISTORY<CR><LF> VER=xx.xx<CR><LF> <CR><LF> <cal history header line <cal history header line <cal history header line <cal history data record . . . <cal history data record <CR><LF> END<CR><LF> Comments Title, not processed xxxxx=ver, right just, lead spaces 1> 2> 3> 1> See See See See below below below below 240> Blank line, not processed Marks end-of-text Cal history header: CALIB KNOWN CALIB MEASURED<CR><LF> DET TYPE CONC DATE/TIME CALIB VALUE<CR><LF> --- ------ ---------- ------------------- -------------------------<CR><LF> Cal history data record: ddd ttttt aaaaaa uuu dd mmm yy hh:mm:ss bbbbbbbb COUNTS fffffffff<CR><LF> See calibration file description for field details, except for CALIB TYPE which is (note the * indicates that the calibration was loaded from a file instead of being performed on the instrument): tttttt "ZERO " "SPAN1 " "SPAN2 " "SPAN3 " "SPAN4 " "SPAN5 " "SPAN6 " "SPAN7 " "SPAN8 " "SPAN9 " "ZERO* " "SPAN1*" "SPAN2*" "SPAN3*" "SPAN4*" "SPAN5*" "SPAN6*" "SPAN7*" "SPAN8*" "SPAN9*" Thermo Fisher Scientific TVA2020 Instruction Manual B-15 Text Data Formats Calibration History Sample calibration history file: CAL HISTORY VER= 1.00 DET --FID PID FID PID FID FID B-16 TVA2020 Instruction Manual CALIB KNOWN TYPE CONC ------ ---------ZERO 0 PPM ZERO 0 PPM SPAN1 10.23 PPM SPAN1* 10.23 PPM SPAN2 50.23 PPM SPAN3 100.23 PPM CALIB MEASURED DATE/TIME CALIB VALUE ------------------- ------------------------12 DEC 99 20:20:10 450 COUNTS OK 12 DEC 99 20:20:10 400 COUNTS OK 12 DEC 99 20:20:30 123456 COUNTS OK 12 DEC 99 20:20:30 123456 COUNTS DET_FAIL 12 DEC 99 20:20:40 1234567 COUNTS OK 12 DEC 99 20:20:50 12345678 COUNTS OVERFLOW Thermo Fisher Scientific Text Data Formats Logged Data Logged Data The logged data is stored in binary format in MRAM, when the user enters the USB transfer mode the software generates the LOG.TXT file. The logged data is stored as LOG.TXT in the following format: Format LOGGED DATA<CR><LF> VER=xx.xx <logged data record 1> . . . <logged data record n> <CR><LF> END<CR><LF> Comments Title, not processed xxxxx=ver, right just, lead spaces See below Blank line, not processed Marks end-of-text The logged data record is different for each data storage type. A header is printed whenever the data storage type changes, a new auto run starts, or the configuration (excluding background) changes. The data type records are: <auto logging record> <voc logging record> <fe logging record> Auto logged header and data, single detector, GPS off: <CR><LF> AUTO DATA tttttttttttttttt<CR><LF> DATE TIME ddd BACKGROUND ddd CONCENTRATION <CR><LF> --------- -------- -------------------- --------------------<CR><LF> dd mmm yy hh:mm:ss xxxxxx uuu fffffffff xxxxxx uuu fffffffff<CR><LF> Auto logged header and data, dual detector, GPS off: <CR><LF> AUTO DATA DATE --------dd mmm yy tttttttttttttttt<CR><LF> TIME PID BACKGROUND -------- -------------------hh:mm:ss xxxxxx uuu fffffffff PID CONCENTRATION / -------------------- / xxxxxx uuu fffffffff / FID BACKGROUND -------------------xxxxxx uuu fffffffff Thermo Fisher Scientific FID CONCENTRATION <CR><LF> --------------------<CR><LF> xxxxxx uuu fffffffff<CR><LF> TVA2020 Instruction Manual B-17 Text Data Formats Logged Data Auto logged header and data, dual detector and GPS on: <CR><LF> AUTO DATA DATE --------dd mmm yy tttttttttttttttt<CR><LF> TIME PID BACKGROUND -------- -------------------hh:mm:ss xxxxxx uuu fffffffff PID CONCENTRATION / -------------------- / xxxxxx uuu fffffffff / FID BACKGROUND -------------------xxxxxx uuu fffffffff FID CONCENTRATION / -------------------- / xxxxxx uuu fffffffff / GPS DATA <CR><LF> ----------------------------------------<CR><LF> aaaaaaaaa ooooooooo hhhh rr nn<CR><LF> VOC logged header and data, single detector, GPS off: <CR><LF> VOC DATA<CR><LF> DATE TIME --------- -------dd mmm yy hh:mm:ss TAG ---------------tttttttttttttttt ddd BACKGROUND -------------------xxxxxx uuu fffffffff ddd CONCENTRATION <CR><LF> --------------------<CR><LF> xxxxxx uuu fffffffff<CR><LF> VOC logged header and data, dual detector, GPS off: <CR><LF> VOC DATA<CR><LF> DATE TIME --------- -------dd mmm yy hh:mm:ss TAG ---------------tttttttttttttttt PID BACKGROUND -------------------xxxxxx uuu fffffffff FID BACKGROUND -------------------xxxxxx uuu fffffffff PID CONCENTRATION / -------------------- / xxxxxx uuu fffffffff / FID CONCENTRATION <CR><LF> --------------------<CR><LF> xxxxxx uuu fffffffff<CR><LF> VOC logged header and data, dual detector and GPS on: <CR><LF> VOC DATA<CR><LF> DATE TIME --------- -------dd mmm yy hh:mm:ss TAG ---------------tttttttttttttttt PID BACKGROUND -------------------xxxxxx uuu fffffffff FID BACKGROUND -------------------xxxxxx uuu fffffffff PID CONCENTRATION / -------------------- / xxxxxx uuu fffffffff / FID CONCENTRATION / -------------------- / xxxxxx uuu fffffffff / GPS DATA <CR><LF> ------------------------------<CR><LF> aaaaaaaaa ooooooooo hhhh rr nn<CR><LF> B-18 TVA2020 Instruction Manual Thermo Fisher Scientific Text Data Formats Logged Data FE logged header and data, GPS off: <CR><LF> FE DATA DATE --------dd mmm yy TIME -------hh:mm:ss ihihihihihih... thththththth... isisisisisis... tstststststs... iiiiiiiiiiiiiiii tttttttttttttttt DET --ddd BACKGROUND -------------------xxxxxx uuu fffffffff CONCENTRATION -------------------xxxxxx uuu fffffffff LEAK ------lllllll LEAK SOURCE -----LLL REPAIR<CR><LF> METHOD chchch...<CR><LF> ------ cscscs...<CR><LF> RRRRR cccccc...<CR><LF> FE logged header and data with comment, GPS off: <CR><LF> FE DATA DATE --------dd mmm yy TIME -------hh:mm:ss ihihihihihih... thththththth... isisisisisis... tstststststs... iiiiiiiiiiiiiiii tttttttttttttttt LEAK ------lllllll DET --ddd BACKGROUND -------------------xxxxxx uuu fffffffff LEAK SOURCE -----LLL / CONCENTRATION / -------------------- / xxxxxx uuu fffffffff / REPAIR<CR><LF> METHOD chchch...<CR><LF> ------ cscscs...<CR><LF> RRRRR cccccc...<CR><LF> FE logged header and data with GPS data: <CR><LF> FE DATA DATE --------dd mmm yy TIME -------hh:mm:ss ihihihihihih... thththththth... isisisisisis... tstststststs... iiiiiiiiiiiiiiii tttttttttttttttt LEAK ------lllllll DET --ddd BACKGROUND -------------------xxxxxx uuu fffffffff LEAK SOURCE -----LLL REPAIR METHOD -----RRRRR / CONCENTRATION / -------------------- / xxxxxx uuu fffffffff / / chchch.../ cscscs.../ cccccc.../ GPS DATA <CR><LF> ------------------------------<CR><LF> aaaaaaaaa ooooooooo hhhh rr nn<CR><LF> where: dd = day (01-31) mmm = “JAN”, “FEB”, “MAR”, “APR”, “MAY”, “JUN”, “JUL”, “AUG”, “SEP”, “OCT”, “NOV”, “DEC”, month: January February March April May June July August September October November December yy = Year (00-99) Thermo Fisher Scientific TVA2020 Instruction Manual B-19 Text Data Formats Logged Data hh = Hours (0-23) mm = Minutes (0-59) ss = Seconds (0-59) tttttttttttttttt = tag ID left justified space padded. NOTE: The following DBID fields are only displayed if a hidden database ID is defined in the route database. ih... = dbid header (1-16 characters, centered, space padded) is... = dbid separator (1-16 -) iii... = dbid (1-16 characters, user defined in route database) th... = tag header (1-16 characters, centered, space padded) ts... = tag separator (1-16 -) ttt... = tag (1-16 characters, user defined in route database) NOTE: The following comment fields are only displayed if a Comment is defined in the route database file. ch... = comment header (0-16 characters, centered, space padded) cs... = comment separator (0-80 -) ccc... = comment (0-80 characters, user input during log) xxxxxx = concentration, floating point, right justified, leading spaces, or "------" when DET_OFF uuu = concentration unit determined by the current unit_lock at the time of the upload: "PPB" "PPM" "% " fffffffff = "OK ", "DET_OFF ", "DET_FAIL ", "BAD_CALIB", "OVERFLOW ", "UNDERFLOW", "CAL_SLOPE", "CLAMPED ", "AVG_OVFLW", "LOW_FLOW ", "HIGH_ALRM", "LOW_ALARM", "STEL_ALRM", "HIGH&STEL", "LOW&STEL ", data status: no errors or alarms detector not valid detector failed, not "DET_OFF" invalid calibration parameters A/D overflow, not "DET_FAIL" A/D underflow, not "OVERFLOW" calibration sensitivity out of range an intermediate concentration exceeded 100% during log point averaging, an overflow occured low sample flow detected high alarm, no STEL, not "UNDERFLOW" low alarm, no high alarm or STEL, not "UNDERFLOW" STEL alarm, no low or high alarm, not "UNDERFLOW" high alarm and STEL, not "UNDERFLOW" low alarm and STEL, no high alarm, not "UNDERFLOW" ddd = detector: "PID" "FID" lllllll = leak indicator: " OK ", no leak "LEAKER!", leak B-20 TVA2020 Instruction Manual Thermo Fisher Scientific Text Data Formats Logged Data aaaaaaaaa = GPS latitude, -dd.ddddd, floating point, right justified, leading spaces "No Comms "= Module installed, but no communications "No Data "= Module installed, but no data "No Power "= Module installed, but power off "Comm Err "= Module installed, but messages not recognized oooooooooo = GPS longitude, -ddd.ddddd, floating point, right justified, leading spaces " "= Module installed, but no comms or data hhhh = GPS altitude, -999 to 9999 meters, right justified, leading spaces " "= Module installed, but no comms or data rr = GPS Resolution, 5 to 99 meters, right justified, leading spaces " "= Module installed, but no comms or data nn = Number of GPS satellites, 0 to 20, right justified, leading spaces " "= Module installed, but no comms or data Sample, auto and VOC data, low alarm=75ppm, high alarm=100ppm: LOGGED DATA VER=2.00 AUTO DATA DATE --------01 JAN 95 01 JAN 95 01 JAN 95 01 JAN 95 01 JAN 95 01 JAN 95 01 JAN 95 01 JAN 95 01 JAN 95 01 JAN 95 01 JAN 95 01234 TIME -------08:31:20 08:32:20 08:33:20 08:34:20 08:35:20 08:36:20 08:37:20 08:38:20 08:39:20 08:40:20 08:41:20 VOC DATA DATE --------- TIME -------- 01 JAN 95 01 JAN 95 01 JAN 95 08:05:10 08:15:25 08:25:37 PID CONCENTRATION -------------------10.02 PPM OK 35.02 PPM OK 75.02 PPM LOW_ALARM 105 PPM HIGH_ALRM 110 PPM HIGH_ALRM 80.12 PPM LOW_ALARM 60.09 PPM OK 50.04 PPM OK 20.03 PPM OK 15.08 PPM OK 9.28 PPM OK TAG ---------------0500 0501 0502 PID BACKGROUND -------------------0.02 PPM OK 0.02 PPM OK 0.02 PPM OK 0.02 PPM OK 0.02 PPM OK 0.02 PPM OK 0.02 PPM OK 0.03 PPM OK 0.03 PPM OK 0.03 PPM OK 0.03 PPM OK PID CONCENTRATION -------------------10.50 PPM OK 103 PPM HIGH_ALRM 25.67 PPM OK FID CONCENTRATION -------------------12.03 PPM OK 40.23 PPM OK 50.11 PPM OK 80.03 PPM LOW_ALARM 101 PPM HIGH_ALRM 91.23 PPM LOW_ALARM 74.98 PPM OK 62.03 PPM OK 41.23 PPM OK 25.98 PPM OK 17.03 PPM OK PID BACKGROUND -------------------0.03 PPM OK 0.03 PPM OK 0.04 PPM OK FID BACKGROUND --------------0.43 PPM OK 0.43 PPM OK 0.43 PPM OK 0.43 PPM OK 0.43 PPM OK 0.43 PPM OK 0.43 PPM OK 0.39 PPM OK 0.39 PPM OK 0.39 PPM OK 0.39 PPM OK FID CONCENTRATION ------------------5.30 PPM OK 99.30 PPM OK 5.30 PPM OK END Thermo Fisher Scientific TVA2020 Instruction Manual B-21 Text Data Formats Logged Data Sample, FE data: LOGGED DATA VER= 2.00 FE DATA DATE --------19 MAR 03 19 MAR 03 19 MAR 03 19 MAR 03 19 MAR 03 19 MAR 03 TIME -------13:10:35 13:11:02 13:11:14 13:11:35 13:12:20 13:12:38 TAG ---------------1 2 3 3 4 5 LEAK REPAIR DET BACKGROUND CONCENTRATION LEAK SOURCE METHOD COMMENT --- -------------------- -------------------- ------- ------ ------ -------------------------------PID 0.00 PPM OK 0.00 PPM DET_FAIL OK N/A N/A THIS IS MY FIRST COMMENT 1234560 PID 0.00 PPM OK 0.00 PPM DET_FAIL OK N/A N/A PID 0.00 PPM OK 0.00 PPM DET_FAIL OK BON GUNP PID 0.00 PPM OK 0.00 PPM DET_FAIL OK N/A N/A ALL FIXED! PID 0.00 PPM OK 0.00 PPM DET_FAIL OK N/A N/A A PID 0.00 PPM OK 0.00 PPM DET_FAIL OK N/A N/A END B-22 TVA2020 Instruction Manual Thermo Fisher Scientific Appendix C Response Factors Response Factors The TVA2020 is a portable vapor analyzer for gas survey monitoring. Each unit is factory calibrated with Methane (in the case of the FID) and Isobutylene (in the case of the PID). However, both detectors respond to many different compounds with differing levels of sensitivity. In order to adjust the analyzer reading from “ppm of Methane” or “ppm of Isobutylene” to ppm of the compound of interest, a correction factor must be applied to the reading. This correction factor is also known as a “Response Factor”. Response factors can be expressed in several different formats. When you acquire a response factor from any source, it is important that you understand the format in which the response factor is expressed so that it can be applied properly. Following are the two most common response factor formats: 1. Response Factor Multiplier The response factor multiplier is the most commonly used and most widely recognized response factor format. This type of response factor is calculated by dividing the actual concentration of a compound introduced to the analyzer by the detector response. Response Factor Multiplier Actual Concentration Measured Response For example, if 100 ppm of a compound produces a 50 ppm FID reading on an analyzer calibrated with methane, then the FID response factor for that compound would be 2.00 (100 divided by 50). When a using a response factor multiplier to correct a TVA reading, simply multiply the analyzer measured response by the response factor. As in the example given above, if a 50 ppm reading is achieved, multiply 50 times 2.00 to get the actual concentration (100 ppm). Response. Response Factor Mulitplier is what the TVA2020 uses. Thermo Fisher Scientific TVA2020 Instruction Manual C-1 Response Factors Response Factors 2. Relative Response Factor In some cases, a response factor may be expressed as a percent or a ratio of a compound’s response to that of the calibration gas. This type of response factor is calculated by dividing the detector response by the actual concentration of a compound of interest. Relative Response Factor Measured Response Actual Concentration (Multiply by 100 to express as a percent) Note that the relative response is the reciprocal of the response factor multiplier. (i.e. 1/RR = RFM). As in our example above, if 100 ppm of a compound of interest produces a response of 50 ppm, the relative response would be 50 divided by 100 (0.50 or 50 %). When using a relative response factor to correct a TVA2020 reading, simply divide the analyzer measured response by the relative response factor expressed as a decimal. As in the example given above, if a 50 ppm reading is achieved, divide 50 by 0.50 to get the actual concentration (100 ppm). Like any FID or PID, the TVA2020 will respond to many different compounds, producing a survey reading of all detectable compounds present. If a single compound is present, a response factor can be applied to correct for the response of that compound. If a mixture of compounds is present, the TVA2020 will respond to all components of the mixture, and will not differentiate between them. In general, response factors are not available for mixtures of compounds. However, if the composition of the mixture is known, a response factor can be calculated by adding weighted fractions of the response factors of the individual compounds. For instance, if a 75 % Benzene, 25 % Toluene mixture is to be measured, multiply the Benzene response factor by 0.75, the Toluene response factor by 0.25 and add them together to achieve the “weighted” response factor. The data from a survey analysis may be expressed in a number of different forms: 1. Relative to the calibration gas If the compound with which the TVA2020 was calibrated is an acceptable standard, then results may be expressed in terms of that compound. For example, an FID reading of 100 ppm could be C-2 TVA2020 Instruction Manual Thermo Fisher Scientific Response Factors Response Factors expressed as “100 ppm of Methane” if the calibration gas used was Methane. Please note that the TVA2020 detectors can be calibrated with gases other than the factory standards as long as the detector has adequate response to that compound. 2. Response factor corrected If the TVA is used to measure a single known compound, a response factor from this set of response curves can be applied to correct the TVA reading for that compound. For example, if a survey of Acetone vapors yields a PID reading of 100 ppm, the response factor multiplier from the Acetone curve (1.417) could be applied to the reading to obtain the result of 141.7 ppm Acetone. 3. Relative to a standard other than the calibration gas If a regulatory agency requires that data be referenced to a standard other than the calibration gas, the response factor for that standard can be applied to the reading. For example, suppose that a survey of total volatile organics must be measured, but the results must be reported in equivalents of benzene. The FID calibrated with methane can be used and the benzene response factor applied to correct the reading. Thermo Fisher Scientific TVA2020 Instruction Manual C-3 Response Factors Response Factors C-4 TVA2020 Instruction Manual Thermo Fisher Scientific