1
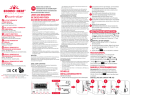
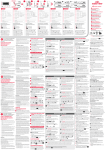
digitally integrated THERMOSTAT & TIMER
Model Nos: 101 and 102
Please note that this accessory is only compatible with Econo-Heat eHeater+
model no. 0607 only. 2 year warranty www.econo-heat.com
Econo-Heat™ Energy Efficient Appliances (Pty) Limited
Address: 7 Mercury Crescent, Wetton, Cape Town, South Africa 7780
Phone: +27 21 762 6500 Fax: +27 21 762 6500
Email: [email protected] Web: www.econo-heat.com
room heater
accessory
SET °C or °F
F1
F2
G
F3
F4
F5
A
B
C
D
E
SET CLOCK
Prior to operating the ECONO-HEAT™
eController, please familiarise yourself with the
following safety instructions:
read and save these
important safety
instructions
• Read all the instructions and only use the eController for its intended
purpose.
• The heater must be switched OFF before plugging or unplugging it from
the wall socket. Do not handle the plug with wet hands.
• Always ensure that the heater is switched OFF before attempting to fit
or remove the eController for programming.
• Do not expose the eController to any liquids.
• Keep batteries out of the reach of children. Batteries pose a choking and
health hazard if swallowed.
• The eController is not intended for use by young children or infirm
persons without supervision. Young children must be supervised to
ensure that they do not play with the eController.
• It is dangerous to alter the specifications or modify eController, only use
the eController as recommended by ECONO-HEAT™.
• If the eController has malfunctioned, or been damaged in any manner,
return the eController to the nearest authorised ECONO-HEAT™ service centre for examination or repair.
• Under no circumstances should the customer attempt to repair
eController.
• The eController should only be repaired by an authorized ECONO-HEAT™ service centre. Failure to do so may render the
warranty void.
Important
The eController must only be connected to an ECONO-HEAT™ wall panel
heater whose voltage and frequency comply with the specifications given on
the eController rating plate. The eController can be used with the following
ECONO-HEAT™ wall panel heater type numbers: EP44-01; EP44-02; EP4403; EP44-04; EP44-06; EP44-07.
TWO YEAR WARRANTY
ECONO-HEAT™ warrants that your eController is free from manufacturing
defects, subject to the following conditions:
• Such warranty shall be to repair or replace the goods in the event of any
manufacturing defect (which shall exclude fair wear and tear) notified
to ECONO-HEAT™ within 2 (two) years of the original purchase (“the
Warranty Period”);
• Any liability on ECONO-HEAT™ hereunder shall be conditional on the
goods having been stored and installed properly (in accordance with
ECONO-HEAT’s installation instructions) and, from the date of delivery: - Having been used and maintained in accordance with ECONO-HEAT’s instructions and/or labelling on the goods;
- No repairs, alterations thereon having been carried out by the Buyer or
any third party.
• The warranty is in substitution for and excludes all expressed or implied
(whether by law or otherwise) conditions, warranties or obligations of any
kind relating to fitness for purpose or quality of workmanship, material or
design, save to the extent that any law prevents such exclusion.
LIMITATION OF LIABILITY
1 Save as expressly provided for in these Conditions of Sale, and save
as may be stipulated to the contrary in the South African Consumer
Protection Act, 2008, ECONO-HEAT™ shall not be liable to the Purchaser
(or their employees, servants or agents, contractors or successor
purchasers) for and direct, indirect, incidental or consequential damages
of any nature howsoever caused (whether based in delict or contract or
otherwise) pursuant to or arising in respect of the installation and/or use
of the goods. This means that if any loss, damage or harm is caused to
anyone due to the use or installation of these goods, you may not hold
ECONO-HEAT™ liable in law.
2 Save as may be stipulated to the contrary in the South African Consumer
Protection Act, 2008, in respect of any liability of the Seller that has been
excluded, the Purchaser hereby indemnifies ECONO-HEAT Energy Efficient Heating Appliances (Pty) Ltd (its
members, employees and agents) against all actions, proceedings and
claims whatsoever brought against it (its members, employees or agents),
by any third party pursuant to, arising in respect of the installation and/
or use and/or supply of the goods. This means that if ECONO-HEAT™
is sued by anyone mentioned in paragraph 1 above arising from the
installation or use of the product that you as the Purchaser will financially
indemnify ECONO-HEAT™ against any losses which ECONO-HEAT™
may suffer, as a result of such law suit.
introduction
Thank you for purchasing the eController for your ECONO-HEAT™ wall panel
heater. As a stand-alone product, the ECONO-HEAT™ wall panel heater has
proven itself worldwide as a remarkably low-cost energy saver heater. Please
note, that even without the eController fitted, the heater still works efficiently
and effectively, creating a warm summer feel inside your home when it’s winter
outside - while using only 400 watts of electricity! However, the heater can
also be used in conjunction with the eController to control hour-by-hour on/off
cycles, room temperatures within your home and much, much more!
ROOM SIZES
QUICK installation STEPS
(see pictorial diagram)
1 Switch the heater OFF before removing or inserting the
cover plate or accessories. Remove the cover plate from
the heater using a screwdriver to leverage the retainer
latch down, while pulling it out.
2 Once the cover plate is removed, the heater will render
itself non-operational. Store the cover plate in a safe
place for safekeeping.
3 Locate and discard the battery pull-tab on the rear side of
the eController. Your eController is now ready to program,
while holding it in hand.
4 Follow the easy START-UP INSTRUCTIONS below. Once
completed, simply slot the eController into your heater –
ready to use.
START-UP INSTRUCTIONS
1 After powering the eController up for the first time the
symbol will flash. Select the temperature unit
(Celcius)
or
(Fahrenheit) with the
and
button.
2 Confirm your selection by pressing the
button.
SetTING THE clock
1 Press and hold the CLOCK
button for one second.
2 The clock symbol will start flashing. Set the clock by
pressing the HOUR
, MIN
and DAY
buttons
respectively.
3 Press the
button to exit.
MODE SELECTION
Push the MODE
button to cycle through the various
modes - Auto Preset , Auto Preset , Auto
(custom
programmable mode), Comfort , Setback , Anti-frost
, Pilot Wire
Due to variable factors, it is impossible to specify what size panel or how
many to install in a room. We do however, recommend the following:
• For regions with normal winters: 1 x 400 Watt or 2 x 260 Watt per
approximately 10-12m² of floor area.
• For regions with very cold winters: 1 x 400 Watt or 2 x 260 Watt per
approximately 8-10m² of floor area.
and
. Press the
activate the Eco mode and again to exit.
button to
MANUAL PROGRAMMING
Please note: While programming, if no button is pressed within 60
seconds, the eController will automatically exit the current setup
mode. Alternatively, press the
button to exit immediately.
THE ORIGINAL LOW COST ENERGY-SAVER HEATER
digitally integrated THERMOSTAT & TIMER
Model Nos: 101 and 102
Please note that this accessory is only compatible with Econo-Heat eHeater+
model no. 0607 only. 2 year warranty www.econo-heat.com
SetTING THE comfort AND
SETBACK TempERATUREs
Please note: The heater should heat your room to a maximum
of 23°C approximately.
1 Press and hold the TEMP
button for one second.
2 The Comfort
Symbol will flash and the comfort
temperature set point is displayed (default 23°C or 74°F).
3 Increase or Decrease the temperature set point (7-30°C,
44-86°F) by pressing the
and
buttons.
4 Confirm by pressing the
button.
5 The Setback Symbol will flash and the Setback
temperature set point is displayed (default 19°C or 66°F)
6 Increase or Decrease the temperature set point (7-30°C,
44-86°F) by pressing the
and
buttons.
7 Confirm by pressing the
button.
8 The display will advance to Comfort
setpoint. Exit with
the
button.
SETTING THE AUTO
MODE
1 Select the
mode with the MODE
button.
2 Use the DAY
button to select the day to program, then
press and hold for 1 second.
3 The first hour of the day will flash. The hour setting can now
be adjusted.
4 Select the mode to be used for that hour of the day.
5 Comfort
- The eController will regulate the room
temperature to the Comfort temperature set point.
6 Setback - The eController will regulate the room
temperature to the Setback temperature set point.
7
Standby – The eController will keep the heater off,
while it stays in standby mode.
8 Select the required mode with the
and
buttons.
9 Move to the next or previous hour with the
and
button.
10When the last hour (24 hour) is programmed and the
button is pressed, it will advance to the 0h. When finished
button or wait for
with the programming, exit with the
the 60 second time-out.
11To program more days select the day with the DAY
button press and hold for 1 second and repeat as above.
REVIEWING your program SETTINGS
While ,
and
mode are selected, press the DAY
button repeatedly to verify the program for each day. The day
of the week will flash indicating the verify program mode. The
eController will automatically exit this mode if the
button is
not pressed for five seconds.
appears. Only use Type CR2032 batteries. Do not mix used
and new batteries or batteries of different brands. Always
replace both batteries simultaneously. Make sure that the
positive (+) and the negative (-) are facing in the correct
directions. Promptly dispose of used batteries in accordance
with local regulations.
FACTORY RESET
Follow these steps to restore the eController to its factory
default settings. Your personal settings will be removed
permanently.
1 Turn the heater OFF and remove the eController.
2 Remove the batteries for 10 seconds or longer.
3 Replace the batteries and the default factory setting will be
restored.
Take care of our environment, do not dispose electrical or electronic appliances via household
waste. Dispose of obsolete or defective electrical appliances via municipal collection points.
Please help to avoid potential environmental and health impacts through improper waste
disposal. Contribute to recycling and other forms of utilization of old electric and electronic
appliances. Your municipality provides with information of collection points for electrical and
electronic waste.
USING THE CHILD LOCK
Press and hold both the
and
buttons for 2 seconds to set the child lock function (all the buttons are
then disabled) the lock symbol will appear on the display.
Repeat the procedure to unlock the child lock function.
REPLACING THE BATTERIES
CAUTION: Batteries may explode if mistreated. Do not
recharge, disassemble or dispose of in fire.
Replace the batteries when the
“empty battery” symbol
MODE DESCRIPTIONS
auto preset 1 This mode offers you a fixed
weekly preset schedule and cannot be changed.
Monday to Friday
Comfort mode is active from 4am - 8am and 4pm - 11pm. The rest of the time the heater will
mode.
remain in standby
0h
4h
8h
16h
23h 0h
WEEKEND: Saturday and Sunday
Comfort mode is active from 6am - 11pm. The rest of the time the heater will remain in standby
mode.
0h
6h
23h 0h
auto preset 2 This mode offers you a fixed
weekly preset schedule and cannot be changed.
EVERYDAY: Monday to Sunday
Comfort mode is active everyday from 4am - 8am and 4pm - 11pm. The rest of the time the
heater will remain in standby
mode.
0h
4h
8h
16h
comfort The room temperature is regulated to
the Comfort temperature setting continuously. This
is used when the room is normally occupied for long
periods of time. Should you wish to change the preset
default temperature of 23°C or 74°F, see the manual programming section of this user manual.
23h 0h
AUTO PX (CUSTOM programable mode)
This is a customisable program mode that allows
you to select and manually program the temperature
for every hour
mode Comfort
, Setback or
of the day, each day of the week.
SETBACK The room temperature is regulated to
the Setback temperature setting continuously. This
mode is used to conserve energy, and is recommended if
the room is unoccupied for more than 2 hours. Typically,
Setback will be used in holiday homes to combat high
humidity and mold. Should you wish to change the preset
default temperature of 19°C or 66°F, see the manual programming section of this user manual.
anti-frost The room temperature is regulated
to a minimum of 7°C or 45°F continuously. This
is used to frost protect the room when it is not being
occupied for 24 hours or longer.
PILOT WIRE Applicable to heater type no. EP44-01
only (mainly found in France). This mode makes
use of an additional wire linked between the heaters and
a programmer that activates the various modes. Modes
, Setback , Anti-Frost
supported are: Comfort
and
. If the heater is not wired with the pilot wire, this mode will revert to Comfort
.
standby The eController is active in standby
mode, however no power is supplied to the heater.
eco (energy saving mode) This easy-1click mode is used to save you even more electricity when
the heater is being used. The heat of the panel
is maintained, however the power supply is switched ON
and OFF intermittently saving further electricity consumption.
A
ECO mode
B
MODE select
Left
C
Set Hour
Up
Set Clock
D
Set Minute
Down
Set Temperature
E
Set Day
Right
Set Manual Program
F
MODE indicator lights
G
LCD display
H
Cover plate
J
eController Integrated Thermostat & Timer Accessory
Mode indicator lights
Please note: The indicator lights will only illuminate
once the eController is plugged into the heater.
F1
Comfort mode is active
F2
Setback mode is active
F3
Anti-frost mode is active
F4
ECO mode is active
F5
The eController is powered by the mains
Please note: When active, the display screen
shows the time of the day.The temperature unit
(Celcius) or
(Fahrenheit) is only shown
on the display screen when setting the Comfort
and Setback temperatures.
When the thermostat switches the heater off
(temporarily), the light of the heater’s on/off
switch will appear ‘off’. Leave the heater on/off
switch in the ‘on’ position during this period.
sleep When the eController is not powered by the mains and running only from battery power it will enter a sleep mode
after 2 minutes when no button is pressed (the display turns off). Press the
button to wake the eController from
the sleep mode.
THE ORIGINAL LOW COST ENERGY-SAVER HEATER