1
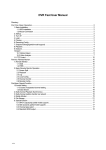
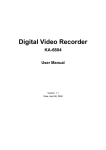
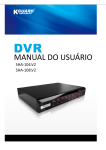
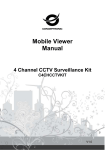
Contents
ENGLISH
Contents
Mobile Device Access.......................................................................................... 4
Android® Phones....................................................................................................................... 4
Blackberry® Phones.................................................................................................................. 6
iPhone® Phones........................................................................................................................ 8
Symbian® Phones.................................................................................................................... 11
Windows® Mobile Phones...................................................................................................... 13
Supported Devices List...................................................................................... 15
HDD Spported List................................................................................................................... 15
USB Device Support List.......................................................................................................... 16
Supported Mobile Phones...................................................................................................... 16
DVR SHA Series Support Manual
2
Mobile Device Access
ENGLISH
Mobile Device Access
The DVR can be remotely viewed and controlled on your mobile phone using the utility software. The utility software is
included on the supplied CD-ROM. However, for the latest software version, it is recommended to download the utility
software from your mobile phone’s download application.
Installation and software interface vary depending on the mobile phone. See succeeding sections for further
instructions.
Android® Phones
Installing the Utility Software
1 Make sure your mobile phone is connected to the Internet (either by mobile data connection or Wi-Fi).
2 Open the Android Market application and search to download Asee.
2a. On the Market search bar, enter “Asee” to search for the application.
2b. Select and download the application.
Select the “ASEE” application.
Click FREE.
Click OK.
The utility software icon is displayed on the application screen.
3 Click the icon to open the utility software.
DVR SHA Series Support Manual
3
Mobile Device Access
ENGLISH
4 Click
to open the Settings page and enter the required settings.
1
No.
Item
Description
1
Address
Enter the IP address assigned to the DVR.
Consult your network administrator or ISP
to obtain this information.
2
Port
Enter the server port number that you
configured in the DVR menu. Refer to your
DVR User Manual for details.
3
Device Name
4
User ID
Enter the user name that you configured
in the DVR menu. Refer to your DVR User
Manual for details.
5
Password
Enter the password that you configured
in the DVR menu. Refer to your DVR User
Manual for details.
2
3
4
5
Enter the desired DVR name.
5 Click Back to view the main screen.
Using the Utility Software
1
2
4
3
No.
1
Item
Display Screen
Icon
-
Description
Displays the channel.
Click the arrow buttons to move the camera direction (for PTZ camera only).
2
PTZ Control
Buttons
Click the icons to adjust the zoom (for PTZ camera only).
Click the icons to adjust the aperture (for PTZ camera only).
Click to adjust the camera focus (for PTZ camera only).
3
Play/Pause Button
Click to play or pause channel viewing.
Full Screen Button
Click to view the channel in full screen.
Capture Button
Click to capture the screen shot. The screen shot is saved in the path sdcard\
MeyePic.
Settings Button
Click to open the Settings page.
Toggle Button
Click to view more channel buttons.
DVR SHA Series Support Manual
4
Mobile Device Access
Item
Icon
Description
3
About Button
Click to view the software information.
4
Channel Buttons
Click a channel button to view on the display screen. More channel buttons are
available by clicking
.
ENGLISH
No.
Blackberry® Phones
Installing the Utility Software
1 Make sure your mobile phone is connected to the Internet (mobile data connection or preferably by Wi-Fi).
2 Open the App World application. 2a. Search for “Asee”.
2b. Select and download the application.
Select the “ASEE” application.
3After installation, click the utility
Click Install.
Login with your BlackBerry ID.
icon to open the application.
4 On the Setting page, enter the necessary settings.
DVR SHA Series Support Manual
5
Mobile Device Access
ENGLISH
1
2
3
No.
Item
1
Title
2
Address
3
Port
4
Channel Total
5
User ID
Enter the user name that you configured in the DVR
menu. Refer to your DVR User Manual for details.
6
Password
Enter the password that you configured in the DVR
menu. Refer to your DVR User Manual for details.
7
Network Type
4
5
6
7
Description
Enter the desired DVR name.
Enter the IP address assigned to the DVR. Consult
your network administrator or ISP to obtain this
information.
Enter the server port number that you configured in
the DVR menu. Refer to your DVR User Manual for
details.
Select the DVR maximum channel capacity.
Select the network to use to connect to the DVR
(WiFi/3G).
5 Click Login to view the main screen.
Using the Utility Software
1
3
2
No.
1
2
Item
Display Screen
Icon
-
Description
Displays the channel.
Play/Pause Button
Click to play or pause channel viewing.
Full Screen Button
Click to view the channel in full screen.
Capture Button
Click to capture the screen shot and then select the storage memory where to
save the image file.
Settings Button
Click to open the Settings page.
About Button
Click to view the software information.
Toggle Button
Click to view other channel buttons or the PTZ control buttons.
Channel Buttons
Click a channel button to view on the display screen. More channel buttons are
available by clicking .
Click the arrow buttons to move the camera direction (for PTZ camera only).
3
PTZ Control
Buttons
Click the icons to adjust the zoom (for PTZ camera only).
Click the icons to adjust the aperture (for PTZ camera only).
Click to adjust the camera focus (for PTZ camera only).
DVR SHA Series Support Manual
6
Mobile Device Access
ENGLISH
iPhone® Phones
Installing the Utility Software
1 Make sure your mobile phone is connected to the Internet (either by mobile data connection or Wi-Fi).
2 Open the App Store application and search to download Asee+.
2a. On the search bar, enter “Asee+” to search for the application.
2b. Select and download the application.
Select the “ASee+” application.
Click FREE.
Click INSTALL.
You may be asked to login with your iTunes account to continue. After download, the utility software icon is
displayed on the application screen.
3 Click the icon to open the utility software.
4 Click
to open the Device Manage page, then click Add.
DVR SHA Series Support Manual
7
Mobile Device Access
ENGLISH
5 Enter the required settings.
1
No.
Item
2
1
Device Name
2
Address
Enter the IP address assigned to the DVR.
Consult your network administrator or ISP
to obtain this information.
3
Port
Enter the server port number that you
configured in the DVR menu. Refer to your
DVR User Manual for details.
4
User ID
Enter the user name that you configured
in the DVR menu. Refer to your DVR User
Manual for details.
5
Password
Enter the password that you configured
in the DVR menu. Refer to your DVR User
Manual for details.
6
Max Channel
Enter the maximum channels that can be
connected to the DVR.
3
4
5
6
Description
Enter the desired DVR name.
5 Click OK. The Device Manage screen appears again. Click the device name to view the main screen.
Using the Utility Software
Viewing Channels
To view channels on your iPhone, you must assign a channel to the window first. To do this perform the following:
1 Click
of the window to assign a channel. The Device List screen appears. Click > to display the channel list.
Click
.
DVR SHA Series Support Manual
8
Click >.
Channel list
Mobile Device Access
ENGLISH
2 Click a channel to assign to the window.
3 Repeat the above procedures to assign other windows.
Switching Screen Modes
By default, the channels are displayed on a 4-window display. To view a channel in full screen, double-tap the window.
Double-tap to
toggle display.
4-Window Display
Full Screen Display
Other Functions
1
2
4
3
No.
Item
Icon
1
Display Screen
2
Channel Buttons
When in full screen mode, click a channel button to view the channel. More
channel buttons are available by clicking
.
Stop Button
Click to stop viewing channels.
Capture Button
Click to capture the screen shot. The screen shot is saved in the photo album.
Settings Button
Click to open the Device Manage screen. To adjust settings, click
Toggle Button
Click to view more channel buttons.
About Button
Click to view the software information.
3
-
Description
Displays the channels.
.
Click the arrow buttons to move the camera direction (for PTZ camera only).
4
PTZ Control
Buttons
Click the icons to adjust the zoom (for PTZ camera only).
Click the icons to adjust the aperture (for PTZ camera only).
Click to adjust the camera focus (for PTZ camera only).
DVR SHA Series Support Manual
9
Mobile Device Access
ENGLISH
Symbian® Phones
Installing the Utility Software
1 Make sure your mobile phone is connected to the Internet (either by mobile data connection or Wi-Fi).
2 Open the Ovi Store application and search to download Asee.
2a. On the search bar, enter “Asee” to search for the application.
2b. Select and download the application.
Select the “ASEE” application.
Click Download.
Download complete.
Note:
Depending on your mobile phone settings, the phone may prompt you to select the type of network connection
before proceeding.
3 Click Launch from the Ovi screen or click the
4 Click
icon from the application menu to open the utility software.
to open the Settings page and enter the required settings.
1
No.
Item
Description
1
IP
Enter the IP address assigned to the DVR.
Consult your network administrator or ISP
to obtain this information.
2
Port
Enter the server port number that you
configured in the DVR menu. Refer to your
DVR User Manual for details.
3
User Name
Enter the user name that you configured
in the DVR menu. Refer to your DVR User
Manual for details.
4
Password
Enter the password that you configured
in the DVR menu. Refer to your DVR User
Manual for details.
5
Alias
2
3
4
5
5 Click Back to view the main screen.
DVR SHA Series Support Manual
10
Enter the desired DVR name.
Mobile Device Access
ENGLISH
Using the Utility Software
1
5
2
4
3
No.
Item
Icon
1
Display Screen
2
Channel Buttons
Click a channel button to view on the display screen. More channel buttons are
available by clicking .
Play/Pause Button
Click to play or pause channel viewing.
Full Screen Button
Click to view the channel in full screen. The screen orientation changes to
landscape mode.
Capture Button
Click to capture the screen shot. The screen shot is saved in the path sdcard\
MeyePic.
Settings Button
Click to open the Settings page.
Exit Button
Click to close the application.
Toggle Button
Click to view more channel buttons.
3
4
-
Description
Displays the channel.
Click to display or hide the PTZ control buttons.
Click the arrow buttons to move the camera direction (for PTZ camera only).
5
PTZ Control
Buttons
Click the icons to adjust the zoom (for PTZ camera only).
Click the icons to adjust the aperture (for PTZ camera only).
Click to adjust the camera focus (for PTZ camera only).
DVR SHA Series Support Manual
11
Mobile Device Access
ENGLISH
Windows® Mobile Phones
Installing the Utility Software
Connect your mobile phone to the computer before proceeding.
1 Insert the CD-ROM to a CD drive. The CD will automatically run and display the KGuard Standalone DVR Solution
screen automatically. Otherwise, double-click Autorun.exe.
2 Click Mobile > 3rd Party > Symbian. Then, copy the *.CAB file from the CD to the internal memory of your mobile
phone or the memory card.
3 After copying the file, disconnect your mobile phone from the computer.
4 On your mobile phone, browse for the utility file and run it for installation. You may be prompted to specify the
installation location.
When installation is complete, the utility software icon is displayed on the application screen.
5 Click the
icon to open the utility software.
6 Enter the required settings.
admin
No.
Item
1
User Name
Enter the user name that you configured
in the DVR menu. Refer to your DVR User
Manual for details.
2
Password
Enter the password that you configured
in the DVR menu. Refer to your DVR User
Manual for details.
3
Server
Enter the IP address assigned to the DVR.
Consult your network administrator or ISP
to obtain this information.
4
Port
Enter the server port number that you
configured in the DVR menu. Refer to your
DVR User Manual for details.
5
Notes
1
2
1 0 . 0 . 1 0 0. 187
3
18004
4
5
Description
Enter a description if necessary.
7 Check Auto Connect to automatically connect to the DVR once the application is opened and select the screen
language.
8 Click OK to confirm the connection information and then click OK again to view the main screen.
DVR SHA Series Support Manual
12
Mobile Device Access
ENGLISH
Using the Utility Software
6
5
4
1
2
No.
1
Item
Display Screen
Icon
-
3
Description
Displays the channel.
Click the arrow buttons to move the camera direction (for PTZ camera only).
2
Click the icons to adjust the zoom (for PTZ camera only).
PTZ Control
Buttons
Click the icons to adjust the camera focus (for PTZ camera only).
Click the icons to adjust the aperture (for PTZ camera only).
Full Screen
Button
Click to view the channel in full screen.
3
Capture Button
Click to capture the screen shot. The screen shot is saved in the path:
Program > Files > Moveeye.
4
Channel
Selection
5
Disconnect
Button
Click to disconnect from the DVR.
6
Settings Button
Click to open the Settings page.
-
Click the box and select the channel to view.
DVR SHA Series Support Manual
13
Supported Devices List
ENGLISH
Supported Devices List
HDD Support List
Below is a list of common HDD models that is supported by the DVR.
Brand
Seagate
Model
Capacity
Pipeline HD
250 GB
320 GB
500 GB
1 TB
Barracuda 7200.12
250 GB
500 GB
1 TB
Barracuda 7200.10
250 GB
320 GB
Barracuda LP
2 TB
SV35.3
250 GB
500 GB
750 GB
1 TB
SV35.4
320 GB
SV35.5
250 GB
500 GB
1 TB
WD-AV
250 GB
320 GB
WD AV-GP
250 GB
320 GB
500 GB
1 TB
1.5 TB
2 TB
WD Caviar Blue
250 GB
320 GB
WD Caviar Green
500 GB
1 TB
WD RE4-GP
2 TB
HDT721032SLA360
320 GB
HDT725032VLA380
320 GB
HDS721010KLA330
1 TB
CinemaSta (HCT721755SLA380)
750 GB
HD502HI
500 GB
HD103SI
1 TB
WD
Hitachi
Samsung
Note:
• The hard disk drive must at least have a minimum capacity of 250 GB.
• The supported list above may have been updated since the time that this documentation has been written.
Check the website (www.kguardsecurity.com) for the latest information.
DVR SHA Series Support Manual
14
Supported Devices List
ENGLISH
USB Device Support List
Below is a list of common USB 2.0 device manufacturers that is supported by the DVR.
Brand
Capacity
Sandisk
4 GB
Kingston
4 GB / 8 GB
Kingston (DT Mini Slim)
4 GB
Transcend
4 GB
Kingmax
2 GB / 8 GB
UNIS
4 GB
Note:
The supported list above may have been updated since the time that this documentation has been written. Check
the website (www.kguardsecurity.com) for the latest information.
Mobile Phones Support List
Below is a list of common mobile phone manufacturers that is supported by the DVR.
Brand \ Operating System
Android
Acer
√
BlackBerry
iPhone
Symbian
Windows
Mobile
√
Asus
√
BenQ
√
BlackBerry
√
Dell
√
Garmin
√
Gigabyte
√
Google
√
√
√
HP
HTC
√
√
√
i-Mate
√
iPhone
Kyocera
√
√
√
Lenovo
√
LG
√
√
Motorola
√
√
Nokia
√
Palm
√
Pantech
√
Samsung
√
Sharp
√
√
√
Siemens
Sony Ericsson
√
√
√
Toshiba
√
Vodafone
√
Note:
• The supported list above may have been updated since the time that this documentation has been written.
Check the website (www.kguardsecurity.com) for the latest information.
• To ensure optimum performance, download and use Asee on Android 1.6 or above.
DVR SHA Series Support Manual
15
Copyright © 2011
All rights reserved
Customer Support
KGUARD INFORMATION CO., LTD.
USA Technical Support Contact
Address: 4F, No.113, Jian 2nd Road,
Jhonghe District, New Taipei City 23585, Taiwan
TEL: +886-2-8228-6080
FAX: +886-2-8221-6857
Email: [email protected]
TEL:1-949-450-0052
Email: [email protected]