1
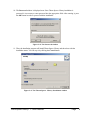
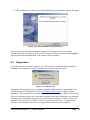
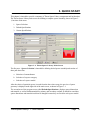
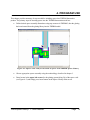
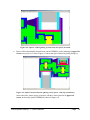
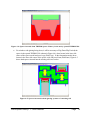
March 2003
User’s Manual
SPACER 1.1
A Windows Based PC Program for Generating Spacer Models for Use
in THERM program (THERM Spacer Library)
Carli, Inc.
Amherst, Massachusetts
SPACER 1.1
A Windows Based PC Program for Generating Spacer
Models for Use in THERM program (THERM Spacer Library)
This Program is the property of Carli, Inc. and should not be used or
duplicated by any other party without the written consent from Carli, Inc.
http://www.fenestration.com/spacer.html
March 21, 2003
© Carli, Inc.
18 Tanglewood Rd.
Amherst, MA 01002
TEL: (413) 256-4647
FAX: (413) 256-4823
web: http://www.fenestration.com
email: [email protected]
Therm Spacer Library 1.1 - User’s Manual
Page
2
TABLE OF CONTENTS
1. INTRODUCTION....................................................................................4
2. INSTALLATION AND REGISTRATION ..............................................5
2.1.Hardware Requirements ...............................................................................................5
2.2. Installation Procedure...................................................................................................5
2.3. Registration................................................................................................................10
3. QUICK START .....................................................................................11
4. PROGRAM USE ..................................................................................13
Therm Spacer Library 1.1 - User’s Manual
Page
3
1. INTRODUCTION
SPACER 1.1 is a Microsoft Windows based computer program for selecting and generating spacer
models for inclusion into the THERM model of a fenestration system. This program is also known as
THERM Spacer Library Program, because it contains library of over 1,000 spacers from all of the
major spacer manufacturers in United States.
The program is designed to enable selection of spacers from the menu of available spacer
manufacturers and to insert selected spacer assembly (i.e., spacer, sealants and desiccant) into
THERM 5 computer program (LBNL 2002). THERM Spacer Library program is user-friendly tool
and requires very short time to learn how to use it. This program is used in conjunction with THERM
program and it can not generate spacers unless the THERM program is already installed.
For information about THERM program and to obtain a free copy, visit
http://www.fenestration.com/therm.html. The site also contains information how to obtain technical
support for THERM, WINDOW and RESFEN programs.
It should be noted that at this time, in version 1.1 of THERM Spacer Library program, data about
primary and secondary sealant and their dimensions can not be changed inside the program because
of the present inability of THERM 5.2 program to accept such data. It is expected that this will be
available in the near future, at which time the update to the SPACER program will be released.
Timely information about this integration will be posted on the web site
(http://www.fenestration.com/spacer.html), and will be sent to the registered users of the program.
The future integration of the THERM Spacer Library Program is planned to include the following
features:
•
Automatic launch of the program from within THERM 5
By clicking on “Draw Spacer” option in “Insert Glazing System” screen, the THERM Spacer
Library program would be launched,
•
Default Size
Upon the selection of the spacer manufacturer and spacer product line, THERM Spacer
Library program would automatically suggest applicable spacers,
•
Automatic dimensions
After the selection of spacer model, THERM Spacer Library will automatically adjust
dimensions of sealants to fit the spacer void, which was already defined in THERM program,
•
Material selection option
Primary and secondary sealants and desiccant material will be available for selection within
THERM Spacer Library program,
•
Automatic position of locator
Locator point will be automatically inserted at the appropriate location, so that spacer
assembly can be imported directly into the spacer void of IGU.
Therm Spacer Library 1.1 - User’s Manual
Page
4
2. INSTALLATION AND REGISTRATION
2.1. Hardware Requirements
First, make sure your computer system meets these specifications:
•
A Pentium class computer with INTEL processor or better.
•
At least 32 MB of random access memory (RAM). For optimal operation, 64 MB or
more of RAM is preferable.
•
Microsoft Windows 98TM, Windows ME TM, Windows NTTM, Windows 2000TM, or
Windows XPTM operating system.
•
Hard disk drive with at least 40 MB of available disk space.
2.2. Installation Procedure
The installation program is provided on a CD and the following are steps for installing the program:
1. Insert the installation CD into the CD-ROM drive on your computer.
2. Start the installation program by double-clicking on the SLSetup.exe. Alternatively, open a
menu by right-clicking on the file SLSetup.exe and selecting Open.
Note: only user with administrator privileges can install Therm Spacer Library on Windows
NT Operating System family (Windows NTTM, Windows 2000TM, or Windows XP TM).
3. A small Installation Wizard window will appear.
Figure 2-1: The Installation Wizard window
4. When the Installation Wizard window has finished, the Therm Spacer Library Welcome
window will appear. Click the Next button to proceed with the installation, or cancel the
installation by clicking on the Cancel button.
Therm Spacer Library 1.1 - User’s Manual
Page
5
Figure 2-2: The Therm Spacer Library Welcome window
5. The Destination Location window is displayed next. The default directory where the
program will be installed is C:\Program Files\LBNL\Spacer Library. If you want to install the
program in another directory, you can use Browse button to specify the location. When you
are satisfied with the Destination Folder, press the Next button to continue with installation.
Figure 2-3: The Destination Location window
Therm Spacer Library 1.1 - User’s Manual
Page
6
6. Next displayed window is Backup Replaced Files window where you have possibility to
choose whether to create copies of all files replaced during the program installation or not. If
you choose to create copies, default destination directory for backup files is C:\Program
Files\LBNL\Spacer Library\BACKUP and there is possibility to change it by clicking on
button Browse.
Figure 2-4: The Backup Replaced Files window
7. The Select Components window is displayed next. There is a possibility to choose which
Therm Spacer Library components you want to install. Required disk space for each
component is also displayed there.
Figure 2-5: The Select Components window
Therm Spacer Library 1.1 - User’s Manual
Page
7
8. When the Select Components window has finished, the Select Program Manager Group
window appears. There you can choose which Program Manager group to add Therm
Spacer Library icons.
Figure 2-6: The Select Program Manager Group window
9. When previous steps are completed, the Start Installation window appears. Any of
previous settings can be changed by clicking the Back button, or accepted by clicking the
Next button.
Figure 2-7: The Start Installation window
Therm Spacer Library 1.1 - User’s Manual
Page
8
10. The Password window is displayed next. Since Therm Spacer Library installation is
protected, it is necessary to enter password into the appropriate field. After entering it, press
the OK button in order to proceed with the installation.
Figure 2-8: The Password window
11. Then, the installation program will install Therm Spacer Library and show bars with the
installation status. You can stop it by clicking the Cancel button.
Figure 2-9: The Therm Spacer Library Installation window
Therm Spacer Library 1.1 - User’s Manual
Page
9
12. When Therm Spacer Library is successfully installed, the final installation window will appear.
Figure 2-10: The Installation Finished window
After the setup program finishes installation, shortcut for Therm Spacer Library.exe will be
automatically put on your desktop. To run the Therm Spacer Library use its icon on the Programs
menu accessed from the Start button, or the shortcut from the desktop.
2.3. Registration
To use this software user MUST register it. The software must be registered within fifteen days of
installation, or the following screen will remind the user that the license has expired.
Figure 2-11: Machine ID
MachineID will correspond to user’s computer system ID, which is obtained automatically by the
SPACER program. This ID should be sent to [email protected] to complete software
registration. The instructions how to unlock this product with full-time license will be sent to the user.
Please note that this license can be used only on machine where above MachineID was generated!
It should also be noted that the program can be moved from one machine to another, but for each
installation, the user will have to contact Carli, Inc. to get the new license key. For multi-license
purchases, each installation will have to be registered and separate license key obtained.
Therm Spacer Library 1.1 - User’s Manual
Page
10
3. QUICK START
This chapter is intended to provide a summary of Therm Spacer Library components and its functions.
The Therm Spacer Library main screen for defining a complete spacer assembly, shown in Figure 31, has three main areas:
1. Spacer Selection
2. Default Specifications
3. Custom Specifications
Figure 3-1: Therm Spacer Library Main Screen
The first area – Spacer Selection is intended for defining desired spacer assembly and consists of
three pull-down lists:
a. Selection of a manufacturer
b. Selection of a spacer category
c. Selection of a spacer model
After the choice of particular spacer is made from the above three steps, the preview of spacer
geometry is displayed at the right side of the main screen, as shown in Figure 3-1.
The second area of the program screen, titled Default Specifications , displays spacer dimensions
and material, as well as default materials for primary and secondary sealants. It should be noted that
spacer dimensions and material could not be changed because they are fixed for each spacer model.
Therm Spacer Library 1.1 - User’s Manual
Page
11
The third area – Custom Specifications contains information about primary and secondary sealant
and their dimensions and this information can be changed as per actual spacer installation in each IGU.
However, at this time, in version 1.0 of THERM Spacer Library program, this data cannot be
changed inside the program because of the lack of proper interface with THERM5 program. To
change sealant dimensions and materials, after the spacer is inserted in THERM5 program, using the
THERM5 tools these parameters can be easily changed. The dimensions and material of the spacer
itself is not allowed to be changed, because that would misrepresent actual spacer configuration.
The lowest section of the main screen contains buttons for manipulating Therm Spacer Library
program and spacer models, as well as for displaying data about program version.
The Insert button is used for inserting chosen spacer in THERM5, while the Close button is used to
exit Therm Spacer Library program.
Finally, the About button opens dialog-box, shown in Figure 3-2, with information about program
version and author. This box also contains information about user, user’s organization, machine ID
and information about trial days that are left before license expire.
Figure 3-2: The About dialog-box
Therm Spacer Library 1.1 - User’s Manual
Page
12
4. PROGRAM USE
This chapter provides summary of steps needed for including spacer into THERM fenestration
product. The primary steps for inserting spacer into the THERM fenestration model are:
•
Define desired spacer assembly dimensions using tape measure in THERM5, after the glazing
has been inserted from the glazing library into the THERM model.
Figure 4-1: Spacer voids ready for insertion of spacer from THERM Spacer Library
•
Choose appropriate spacer assembly using the methodology described in chapter 3.
•
Draw locator in the upper left corner (for the glazing system facing Up) of the spacer void
(see Figure 4-2) and simply press insert button on the Spacer Library main screen.
Therm Spacer Library 1.1 - User’s Manual
Page
13
Figure 4-2: Spacer void in glazing system ready for spacer insertion
•
Spacer will be automatically inserted in the current THERM 5 project attaching its upper left
corner to the project’s Locator. Figure 4-3 shows the spacer inserted in glazing facing Up.
Figure 4-3: Spacer inserted into the glazing cavity spacer void (Up orientation)
At the same time, chosen spacer is inserted, with the Locator placed at its upper left
corner, in the newly opened THERM file, shown in Figure 4-4.
Therm Spacer Library 1.1 - User’s Manual
Page
14
Figure 4-4: Spacer inserted from THERM Spacer Library in the newly opened THERM5 file
•
For windows with glazing facing down, it will be necessary to Flip (Draw/Flip/Vertical) the
spacer in the opened THERM 5 file (shown in Figure 4-4), draw locator in the lower left
corner of the spacer model and press copy (Edit/Copy). In the fenestration model, draw
locator in the lower left corner of the spacer void, and press Paste (Edit/Paste). Figure 4-5
shows both spacers inserted into the meeting rail cross section.
Figure 4-5: Spacers inserted in both glazing systems of a meeting rail
Therm Spacer Library 1.1 - User’s Manual
Page
15
•
Finally, for spacers that have part of glazing cavity space, will need to have this material
changed from the default to the material that has the same conductivity as glazing cavity (See
Figure 4-6).
Figure 4-6: Continuation of the glazing cavity space into the spacer changed from default to
actual glazing cavity effective conductivity, keff
Therm Spacer Library 1.1 - User’s Manual
Page
16