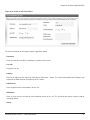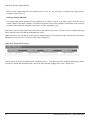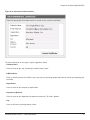
1
EnGarde Secure Linux 3.0 -- Quick Start Guide
EnGarde Secure Linux 3.0 -- Quick Start Guide
Revision History
Revision $Revision: 1.8 $ $Date: 2007/08/07 20:20:17 $ Revised by: rwm
Table of Contents
COPYRIGHT AND PATENT INFORMATION.......................................................................................................................vii
1. Important Information ......................................................................................................................................................1
1.1. Introduction to EnGarde Secure Linux....................................................................................................................1
1.2. Registering Your Product ........................................................................................................................................1
1.3. Default Configuration ..............................................................................................................................................1
1.4. Guardian Digital Master Support Services .............................................................................................................2
1.5. Contacting Guardian Digital ....................................................................................................................................3
2. Installation.........................................................................................................................................................................5
3. The Boot-Up Process .......................................................................................................................................................7
3.1. The Boot Screen.....................................................................................................................................................7
3.2. EnGarde Startup.....................................................................................................................................................7
3.3. The Login Screen ...................................................................................................................................................8
4. Connecting to EnGarde Secure Linux............................................................................................................................9
4.1. Physical Connection ...............................................................................................................................................9
4.1.1. Using a Hub or a Switch..............................................................................................................................9
4.1.2. Using an Ethernet Crossover Cable............................................................................................................9
4.2. Connecting to Guardian Digital WebTool ................................................................................................................9
5. Initial Configuration........................................................................................................................................................11
5.1. Guardian Digital Secure Network Configuration ...................................................................................................11
5.1.1. Activation Code and Password..................................................................................................................11
5.2. Passwords and Access Control ............................................................................................................................11
5.2.1. A Note About Passwords...........................................................................................................................12
5.2.2. Root Password ..........................................................................................................................................12
5.2.3. WebTool Password....................................................................................................................................12
5.2.4. Language ..................................................................................................................................................13
5.2.5. Trusted Host List .......................................................................................................................................13
5.3. Locale and Time Setup .........................................................................................................................................13
5.3.1. NTP Time Servers.....................................................................................................................................13
5.3.2. System Locale...........................................................................................................................................13
5.4. Email, Firewall, and Service Configuration ...........................................................................................................14
5.5. System Summary and Reboot..............................................................................................................................14
6. Guardian Digital WebTool ..............................................................................................................................................15
6.1. Creating Local Users and Groups ........................................................................................................................15
6.1.1. Creating a Group.......................................................................................................................................15
6.1.2. Creating a Local User ...............................................................................................................................16
6.2. Access Control......................................................................................................................................................18
6.3. Service Configuration ...........................................................................................................................................20
6.4. Setting up DNS .....................................................................................................................................................20
6.4.1. Setting up a Forward DNS Zone ...............................................................................................................21
6.4.2. Setting up a Reverse DNS Zone ...............................................................................................................23
6.5. Setting up Remote Access ...................................................................................................................................24
6.5.1. Create a Local User ..................................................................................................................................24
6.5.2. System Access Control .............................................................................................................................24
6.5.3. Guardian Digital Secure User Manager ....................................................................................................24
6.5.4. Logging in With Secure Shell ....................................................................................................................25
6.6. Setting up a Mail Server .......................................................................................................................................29
iii
6.6.1. DNS Setup ................................................................................................................................................29
6.6.2. Create a Mail Domain ...............................................................................................................................30
6.7. Setting up a Web Server.......................................................................................................................................32
6.7.1. DNS Setup ................................................................................................................................................32
6.7.2. Configure a Normal Web Server ...............................................................................................................33
6.7.3. Configure a Secure Web Server ...............................................................................................................34
6.8. Transferring Files with FTP ...................................................................................................................................38
6.9. Using the Guardian Digital Secure Network .........................................................................................................40
6.9.1. GDSN Configuration .................................................................................................................................41
6.9.2. The Update Agent .....................................................................................................................................41
7. Security Enhanced Linux...............................................................................................................................................43
7.1. Disabling SELinux at Boot ....................................................................................................................................43
7.2. Disabling SELinux at Runtime ..............................................................................................................................43
7.3. SELinux User Roles..............................................................................................................................................43
7.3.1. user ...........................................................................................................................................................43
7.3.2. staff ...........................................................................................................................................................43
7.3.3. sysadm......................................................................................................................................................43
7.4. Viewing SELinux Security Types...........................................................................................................................44
7.4.1. id ...............................................................................................................................................................44
7.4.2. ls................................................................................................................................................................44
7.4.3. ps ..............................................................................................................................................................44
7.5. Relabeling the Filesystem.....................................................................................................................................44
8. Summary .........................................................................................................................................................................45
A. Resources.......................................................................................................................................................................47
iv
EnGarde Secure Linux 3.0 -- Quick Start Guide
List of Tables
1-1. Default Configuration Summary ......................................................................................................................................2
1-2. Contacting Guardian Digital ............................................................................................................................................3
6-1. DNS Record Types........................................................................................................................................................21
v
vi
EnGarde Secure Linux 3.0 -- Quick Start Guide
COPYRIGHT AND PATENT INFORMATION
Copyright 2000 - 2007 Guardian Digital, Inc. All rights reserved. This material may be distributed only subject to the
terms and conditions set forth in the Open Publication License, v1.0 or later (the latest version is presently available at
http://www.opencontent.org/openpub/).
Distribution of substantively modified versions of this document is prohibited without the explicit permission of the copyright
holder.
Distribution of the work or derivative of the work in any standard (paper) book form for commercial purposes is prohibited
unless prior permission is obtained from the copyright holder.
Rather then list the names and entities that own the trademarks or insert a trademark symbol with each mention of the
trademarked name, the publisher states that it is using the names for editorial purposes only and to the benefit of the
trademark owner, with no intention of infringing upon that trademark.
Information in this manual is subject to change without notice. Companies, names, and data used in examples herein are
fictitious unless otherwise noted.
Guardian Digital, EnGarde Secure Linux, EnGarde Secure Professional, Linux Lockbox, and Guardian Digital WebTool are
trademarks of Guardian Digital, Inc in the United States and other countries. This product is covered by one or more pending
patent applications.
Microsoft, Internet Explorer, Windows 95, Windows 98, Windows Millennium, Windows NT, and Windows 2000 are either
registered trademarks or trademarks of Microsoft Corporation in the United States and other Countries.
RSA Public Key Cryptosystem and MD5 are registered trademarks of RSA Data Security, Inc.
Tripwire is a trademark of Tripwire Security, Inc. in the United States and/or other countries.
All other trademarks and trade names are the property of their respective owners.
Linux is a registered trademark of Linus Torvalds.
Printed in the United States of America.
Written by Ryan W. Maple with contributions from Nicholas DeClario, Pete O’Hara, Benjamin Thomas, Pax Dickinson, and
Dave Wreski. Edited by Dave Wreski.
Version 3.0.16 (August 2007)
vii
COPYRIGHT AND PATENT INFORMATION
viii
EnGarde Secure Linux 3.0 -- Quick Start Guide
Chapter 1. Important Information
This chapter provides important information regarding EnGarde Secure Linux including how to register your product, details
on the default configuration, and information about Guardian Digital Master Support Services.
1.1. Introduction to EnGarde Secure Linux
Welcome to EnGarde Secure Linux ! EnGarde Secure Linux is a comprehensive solution that provides all the tools necessary to build a complete online presence, including DNS, Web, and e-mail services. EnGarde Secure Linux reduces the
time and resources required to create a secure online presence.
Guardian Digital, the first Open Source security company, engineered EnGarde from the ground-up to be secure. Comprised
of a unique collection of Open Source tools coupled with the security expertise of Guardian Digital, EnGarde Secure Linux
addresses the need for applications where security, reliability, and ease of management are necessary.
This document is intended to guide the reader through basic EnGarde Secure Linux administrative tasks and is not a
comprehensive manual for EnGarde Secure Linux or Guardian Digital WebTool. For detailed information on how to use
EnGarde Secure Linux and Guardian Digital WebTool, please refer to the complete EnGarde Secure Linux Users Guide
which is available from the Guardian Digital Product Manual Library in Appendix A.
http://infocenter.guardiandigital.com/manuals/
By the end of this document the reader will be able to:
•
Connect to their EnGarde Secure Linux machine
•
Take their EnGarde Secure Linux machine through Initial Configuration
•
Manage local users and groups
•
Use the EnGarde Auditing System
•
Remotely log into their EnGarde Secure Linux machine via Secure Shell
•
Set up and manage a local DNS server
•
Set up and manage a local mail server
•
Set up and manage a local web server
•
Keep their EnGarde Secure Linux machine up to date using the Guardian Digital Secure Network.
1.2. Registering Your Product
Activating your copy of EnGarde Secure Linux gives you the ability to join our mailing lists, priority access to the latest
system and security updates, and access to Guardian Digital Master Support. Guardian Digital allows you to activate your
copy of EnGarde Secure Linux from your web browser. Simply connect to:
https://www.guardiandigital.com/register/
Upon registration you will have immediate access to the Guardian Digital Secure Network and to Guardian Digital Master
Support Services.
1
Chapter 1. Important Information
1.3. Default Configuration
EnGarde Secure Linux is designed to be as secure as possible "out of the box." Table 1-1 below provides an overview of
the default configuration.
Table 1-1. Default Configuration Summary
Root Password
lockbox
WebTool Password
lock&%box
IP Address
192.168.10.100
Services
Disabled except for SSH, NTP, and WebTool
The Root password, WebTool password, and Service configuration are changed when you take the machine through Initial
Configuration described in chapter 5. The IP Address may optionally be changed during installation.
1.4. Guardian Digital Master Support Services
Guardian Digital offers a comprehensive menu of technical support services to ensure that we continually surpass the
demands of our customers for every solution we develop. With a qualified support contract, our engineers are at your service
to answer all questions relating to installation, applications, connectivity, comparability, and technical infrastructures. With
simple and flexible support options, Guardian Digital provides all customers with enterprise-grade support at a budgetfriendly price.
Below is an overview of the different Guardian Digital Master Support levels:
•
Tier I - Basic Installation and Configuration Support
Tier I Support is included with all professional versions of EnGarde Secure Linux and corresponding security suites. It is
designed to assist clients with the initial installation and configuration of their EnGarde Secure Linux machine to ensure
it is performing properly. Anything beyond basic installation and configuration would fall into subsequent categories of
support.
•
Tier II - Administration Support
Tier II Support is included with Standard and Enterprise versions of EnGarde Secure Linux and corresponding security
suites. Support inquiries falling into this category would include maintenance issues and/or the desire of the client to alter
the current configuration to allow the EnGarde Secure Linux machine to perform additional tasks not included with the
initial configuration.
•
Tier III - Remote Administration Support
Tier III Support is included with Enterprise versions of EnGarde Secure Linux and corresponding security suites. It
incorporates all services offered in Tier I & II Support and also includes a service allowing Guardian Digital engineers to
access a clients server for diagnostic evaluations only. This Tier of support is ideal for situations where clients are unable
to determine or explain the technical support issues to a support services representative. Once a diagnosis has been
ascertained the representative will provide the client with a detailed description on how the problem can be fixed.
2
EnGarde Secure Linux 3.0 -- Quick Start Guide
Chapter 1. Important Information
•
Tier IV - Managed Services
Tier IV Support is the most comprehensive support option available including all of the services offered in Tier I, II, &
III Support. This level of support is not readily included with any version of EnGarde Secure Linux but can be obtained
through a services contract with Guardian Digital. A managed services, or Tier IV Support contract allows Guardian
Digital to assume all responsibility for the administration and maintenance of a client’s EnGarde Secure Linux machine.
Our expert engineers will provide all services from vulnerability assessment and security monitoring to installing updates
and performing upgrades.
Please contact Guardian Digital Customer Service or your Guardian Digital Authorized Reseller if you are unsure of the
level of support you have or to upgrade your level of support.
1.5. Contacting Guardian Digital
Guardian Digital customer service and technical support representatives and are available between the hours of 9:00AM
and 6:00PM Eastern Time, Monday through Friday.
Table 1-2. Contacting Guardian Digital
Telephone (US Domestic Toll-Free)
(866) GD-LINUX
Telephone
(201) 934-9230
Fax
(201) 934-9231
Customer Service
[email protected]
Sales Inquiries
[email protected]
Technical Support
[email protected]
We love hearing from our customers so feel free to contact us at any time!
EnGarde Secure Linux 3.0 -- Quick Start Guide
3
Chapter 1. Important Information
4
EnGarde Secure Linux 3.0 -- Quick Start Guide
Chapter 2. Installation
This document does not discuss how to install EnGarde Secure Linux. Installation documentation is not available at this
time.
5
Chapter 2. Installation
6
EnGarde Secure Linux 3.0 -- Quick Start Guide
Chapter 3. The Boot-Up Process
This chapter provides a quick overview of the EnGarde Secure Linux boot-up process for users who are not familiar with
Linux. If you have used Linux you can safely skip this chapter.
The startup process of EnGarde Secure Linux is broken down into two phases which are explained below.
3.1. The Boot Screen
Once your system’s BIOS self-tests are complete you are taken to the EnGarde Boot Screen where you will be presented
with a screen similar to the one in Figure 3-1 which asks you to choose which kernel image to load.
Figure 3-1. The Boot Screen
The kernel is the core operating system component of EnGarde Secure Linux responsible for I/O, filesystem access, and
many other things. There are two kernel images available:
•
secure
This is the default kernel image which you will be taken into if you do not explicitly select another image. You should
always boot into this image unless you have an explicit reason to disable the kernel security features present in EnGarde
Secure Linux.
•
standard
This kernel image disables most of the kernel security features present in EnGarde Secure Linux. You should only boot
into this image if you know what you are doing or if you were instructed to by Guardian Digital Master Support.
You do not have to do anything at this screen. Your EnGarde Secure Linux machine will automatically boot into the secure
kernel after five seconds. If you’d like to boot into the standard kernel image, type the word "standard" at the boot: prompt.
3.2. EnGarde Startup
After the Boot Screen has loaded the appropriate kernel image you will see EnGarde Secure Linux begin to boot. You’ll see
several kernel messages scroll by as it loads all of the different kernel subsystems. Once the kernel is fully loaded EnGarde
Secure Linux begins to start all of its subsystems, such as the web server and the mail server, and you’ll see a screen
similar to the one in Figure 3-2.
7
Chapter 3. The Boot-Up Process
Figure 3-2. EnGarde Startup
You’ll see either a green SUCCESSFUL or a red FAILED as EnGarde Secure Linux loads each subsystem.
3.3. The Login Screen
When the system has completely booted you’ll be presented with a login screen similar to the one in Figure 3-3. There is
no need to login here -- you can use Guardian Digital WebTool for all your administration needs!
Figure 3-3. The Login Screen
If you do want to login you may login as the root user using the default root password, or as any local user who is a member
of the admin group.
8
EnGarde Secure Linux 3.0 -- Quick Start Guide
Chapter 4. Connecting to EnGarde Secure Linux
This chapter explains how to connect your EnGarde Secure Linux machine to a network and how to use your web browser
to connect to the Guardian Digital WebTool. The examples below assume that you did not change the default IP address
(192.168.10.100). If you did change this during installation, use the address you changed it to in the examples below.
4.1. Physical Connection
Before you can use EnGarde Secure Linux you must connect it to a network via either a hub/switch or an Ethernet crossover
cable. Before continuing make sure you have either a hub/switch and two Ethernet straight-through patch cables or an
Ethernet crossover cable available.
4.1.1. Using a Hub or a Switch
Connect your EnGarde Secure Linux machine to a port on the hub or switch using a straight-through Ethernet patch cable
then connect your PC to the same hub or switch using a straight-through Ethernet patch cable. Configure your PC to use
an IP address on the same network as your EnGarde Secure Linux machine.
When you’re done you should be able to ping 192.168.10.100 from your PC.
4.1.2. Using an Ethernet Crossover Cable
If you do not have a hub or a switch readily available, or if you want to configure your EnGarde Secure Linux machine before
you put it on your network, you may use an Ethernet crossover cable. Connect one end of the Ethernet crossover cable to
your EnGarde Secure Linux machine and the other end to your PC, then configure your PC to use an IP address on the
same network as your EnGarde Secure Linux machine (ie, 192.168.10.101).
When you’re done you should be able to ping 192.168.10.100 from your PC.
4.2. Connecting to Guardian Digital WebTool
Once you have both your PC and your EnGarde Secure Linux machine connected you may connect to Guardian Digital
WebTool by typing the following URL into your PC’s web browser:
https://192.168.10.100:1023/
Replace 192.168.10.100 with whatever IP address you specified during installation. At the login screen login using the
username admin and the password lock&%box .
You are now ready to proceed with Initial Configuration.
9
Chapter 4. Connecting to EnGarde Secure Linux
10
EnGarde Secure Linux 3.0 -- Quick Start Guide
Chapter 5. Initial Configuration
The goal of this section is to teach the reader how to perform Initial Configuration on their newly installed EnGarde Secure
Linux machine. By the end of this chapter you will have completed Initial Configuration and may begin using EnGarde
Secure Linux.
5.1. Guardian Digital Secure Network Configuration
The Guardian Digital Secure Network is the primary means for obtaining free system and security software updates for
your EnGarde Secure Linux server. If you have an Activation Code (from a previous installation), enter it in the fields below.
If you have not previously received an Activation Code, it’s easy. Simply click on the Create GDSN Account button and fill
out the form. Once you create your GDSN account, the system will automatically confirm you as activated, and you will be
ready to configure your server, and proceed with Initial Configuration.
Figure 5-1. Guardian Digital Network Configuration
5.1.1. Activation Code and Password
If you already have an Activation Code then enter it in this box. Please note that if you are re-installing EnGarde Secure
Linux you need to reset your machine secret.
Enter your Activation Password into the boxes provided.
5.2. Passwords and Access Control
This section allows you to change the system passwords and define what IP addresses or networks may access WebTool
on this machine.
11
Chapter 5. Initial Configuration
Figure 5-2. Passwords and Access Control
5.2.1. A Note About Passwords
In the following sections, and in general, it is very important to choose good passwords. Below are a few guidelines on
developing good passwords:
•
Make sure your password is longer than six characters and contains a mix of letters, numbers, and special characters.
•
Never base your password off a dictionary word.
•
Never write your password down or share your password with anybody. Keep it safe in your head.
•
Never type your password while somebody is watching.
One good password method is to take a word and break it up with letters and numbers. For example, to strengthen the
password lockbox , change the o’s to zero’s and throw in some special characters. One result would be l0ck&%b0x .
For more information on developing good passwords please refer to the following article by Ben Thomas on LinuxSecurity.com:
http://www.linuxsecurity.com/content/view/117260/141/
5.2.2. Root Password
root is the administrator account on EnGarde Secure Linux and is the only system user with full-blown privileges to access
everything and anything. This field allows you to change the password for this account.
Once you have developed a password you need to enter it a second time for verification.
5.2.3. WebTool Password
This field allows you to change the password used for accessing Guardian Digital WebTool. This password should be
different from the root password but just as strong.
12
EnGarde Secure Linux 3.0 -- Quick Start Guide
Chapter 5. Initial Configuration
Once you have developed a password you need to enter it a second time for verification.
5.2.4. Language
This field allows you to select the default language that WebTool will be presented in.
5.2.5. Trusted Host List
This field allows you to define which hosts and/or networks are permitted to access Guardian Digital WebTool on this
machine. You should keep this list as small as possible -- the more people you open up access to, the greater the threat.
You may enter individual IP addresses (ie, 192.168.1.90) or entire networks (ie, 192.168.1.0).
5.3. Locale and Time Setup
This section allows you to define where in the world your machine is and how to keep its system clock accurate.
Figure 5-3. Locale and Time Setup
5.3.1. NTP Time Servers
EnGarde Secure Linux uses the Network Time Protocol (NTP) to synchronize its system clock with "time servers" out on
the Internet, who in turn synchronize their clocks with the world’s most accurate atomic clocks. Enter three time servers in
the boxes provided (if your organization has its own NTP servers) or select three from the drop-down menus.
EnGarde Secure Linux 3.0 -- Quick Start Guide
13
Chapter 5. Initial Configuration
5.3.2. System Locale
Select your system locale from the two drop-down boxes provided. First select your region from the top drop-down (ie, US)
then select your area from the bottom drop down (ie, Eastern).
5.4. Email, Firewall, and Service Configuration
This section allows you define which Internet services will be enabled on this machine. Enable services which you know
you will be using and leave the others disabled -- you can always enable them in the EnGarde Auditing System later on.
Click the checkbox to the left of a service to enable it.
Figure 5-4. Email, Firewall, and Service Configuration
5.5. System Summary and Reboot
Once all of the above is completed you will be brought to a page which summarizes everything you just entered. Review
this information then click the Reboot System button to reboot your machine.
When your machine comes back up it will be fully configured and you may log back on to Guardian Digital WebTool.
14
EnGarde Secure Linux 3.0 -- Quick Start Guide
Chapter 6. Guardian Digital WebTool
The goal of this chapter is to guide the reader through EnGarde Secure Linux configuration tasks using Guardian Digital
WebTool. By the end of this chapter the reader should have enough information to begin using EnGarde Secure Linux in a
production environment.
Guardian Digital WebTool is covered in greater detail in the EnGarde Secure Professional User Manual. The reader is
encouraged to have a copy of that open along side this document as they perform the procedures outlined in this chapter.
Note: If you are using a web browser which implements pop-up blocking (such as Mozilla or Firefox) you may need to add an
exception for the machine that is running WebTool. If you click a button or link and nothing happens make sure you are permitting
pop-ups!
6.1. Creating Local Users and Groups
This section discusses local users and groups on EnGarde Secure Linux. Under normal circumstances each person in your
organization has an account, or a local user, associated with them. Groups are used to group similar users into logical
divisions.
Suppose your organization has 10 employees and 2 divisions (engineering and sales), and there are 7 engineers and 3
salespeople. You could create a group named ’sales’ of which those 3 salespeople are members, and a group named
’engineering’ of which the 7 engineers are members.
Another scenario is that of an ISP. You could have one group per customer of which all those customers accounts are
members.
By the end of this section the reader will have created one group and one local user suitable for uploading files to your
EnGarde Secure Linux server via FTP.
6.1.1. Creating a Group
Log into Guardian Digital WebTool, click the System menu, choose Users and Groups, then select Local Group Listing from
the Modules menu. Click the Create Local Group link and you will be presented with a screen like the one in Figure 6-1.
15
Chapter 6. Guardian Digital WebTool
Figure 6-1. Creating a Group
Fill out the information on this page using the suggestions below:
•
Group Name
Enter the name you’d like for this group. This name cannot contain any whitespace or special characters, besides a dash
(-).
•
Members
This field allows you to put users in this group. You may also add users to groups when creating users so you may leave
this field blank if your users don’t exist yet.
When done click the Create Group button and you’ll be taken back to the group listing where you will see your newly created
group.
6.1.2. Creating a Local User
Log into Guardian Digital WebTool, click the System menu, choose Users and Groups, then select Create Local User from
the Module menu and you’ll be presented with a screen like the one in Figure 6-2.
16
EnGarde Secure Linux 3.0 -- Quick Start Guide
Chapter 6. Guardian Digital WebTool
Figure 6-2. Creating a Local User
Fill out the information on this page using the suggestions below:
•
Username
Enter the username you’d like for this user. This name cannot contain any whitespace or special characters, besides a
dash (-).
•
Name
This is the person’s full name.
•
Password
This is the user’s password. You also have to enter it a second time in the Verify Password field.
•
Shell Access
If this user should be permitted shell-level access to this machine via SSH or the console, choose Yes here. If No is
selected this user will only be allowed to FTP into the machine and retrieve e-mail using POP or IMAP.
•
Type
This field defines the users primary group. If this is an administrative user choose Admin, otherwise choose Users. If
you’d like to add them to another group instead, choose Other and type the name of the group in the space provided.
Note: Your EnGarde Secure Linux system has several users and groups associated with the operating system and occasionally you
will see them listed in Guardian Digital WebTool. As a rule of thumb any user or group with an UID/GID of less then 500 is a system
group. Never delete a system user or group unless you know what you are doing!
EnGarde Secure Linux 3.0 -- Quick Start Guide
17
Chapter 6. Guardian Digital WebTool
When you are finished, click the Create User button and you’ll be taken back to the user listing where you will see your
newly created user.
6.2. Access Control
The Access Control WebTool module gives you fine-grained control over what IP addresses or networks may access specific
services on your machine. For example, if you are running a public FTP server you would want to grant everybody on the
Internet access to that service. If you are running a private FTP server for employee and contractor use only, you may want
to restrict access to it by only permitting specific IP networks access to it.
By the end of this section the reader will be familiar with using the Access Control module.
Log into Guardian Digital WebTool, and click System menu item, then click the Access Control option and you’ll be presented
with a screen like the one in Figure 6-3.
18
EnGarde Secure Linux 3.0 -- Quick Start Guide
Chapter 6. Guardian Digital WebTool
Figure 6-3. System Access Control
In this example the entire Internet may access the Secure IMAP and Secure POP services on this machine, but only
users on the 192.168.1.0 network may access the SSH service and WebTool. This would be a common configuration for
somebody running a mail server with no public shell-level access.
To grant an IP address or network access to a specific service type it into the IP Address box for the appropriate service,
and click the Add button.
EnGarde Secure Linux 3.0 -- Quick Start Guide
19
Chapter 6. Guardian Digital WebTool
To remove an IP address or network’s access to a specific service simply click the address and it will be removed.
The keyword ALL means that access restrictions are disabled and anybody on the Internet may access the service. If the
list is empty, no access to that service will be permitted from anywhere.
6.3. Service Configuration
The Service Configuration module allows you to start and stop your system services, as well as configure which services
should be enabled at startup and shut down or reboot your machine.
By the end of this section the reader will be able to use the Service Configuration module to manage system services.
Log into Guardian Digital WebTool and click the Service menu, then choose Service Configuration and you will see a screen
like the one in Figure 6-4.
Figure 6-4. EAS Service Configuration
The Current State column shows whether or not this service is currently enabled. The Boot State column shows whether
or not this service is configured to start at boot. Click the red or green link to toggle the value between Running or Stopped
for the Current State, or between Enabled or Disabled for the Boot State.
6.4. Setting up DNS
DNS (Domain Name System) is responsible for translating Internet names (such as www.yourdomain.com) into IP ad-
20
EnGarde Secure Linux 3.0 -- Quick Start Guide
Chapter 6. Guardian Digital WebTool
dresses (such as 192.168.1.10). You can think of it like a telephone book for the Internet. Organizations publish DNS
records to tell the rest of the world how to reach them.
The DNS is comprised of zones. A zone is either a domain name or an IP network for which a given server is authoritative.
When you register a domain you define one or more nameservers -- these are the nameservers which are advertised to the
Internet as having authoritative information for the domain.
DNS supports two types of zones: forward, which converts names to addresses, and reverse, which converts addresses to
names.
Another core concept in DNS is a record. There are several different types of records, some of which are summarized in
Table 6-1 below.
Table 6-1. DNS Record Types
A
Address
Publishes names-to-addresses
PTR
PoinT eR
Publishes addresses-to-names
NS
Name Server
Publishes authoritative nameserver
information.
MX
Mail eX changer
Publishes mail server information.
Under normal circumstances you will need to maintain your own DNS server if you are hosting any domains for e-mail or
web. The rest of this section demonstrates creating forward and reverse DNS zones.
By the end of this section the reader will have created one forward and one reverse DNS zone.
6.4.1. Setting up a Forward DNS Zone
Log into Guardian Digital WebTool, click the Services menu, then choose the Domain Name Service link. From the Modules
menu, choose Master Zone Listing, and click the Create Master Zone button. You will then be presented with the screen
shown in Figure 6-5.
EnGarde Secure Linux 3.0 -- Quick Start Guide
21
Chapter 6. Guardian Digital WebTool
Figure 6-5. New Master Zone Options
Fill out the information on this page using the suggestions below:
•
Zone Type
Leave this set to Forward.
•
Domain Name / Network
Enter the name of the domain you want to create the zone for.
•
Master Server
Leave this set to the default value unless you have a reason to change it.
•
Email Address
Enter an administrative e-mail address in this field.
•
Time To Live (TTL)
This is the amount of time results from your server are allowed to be cached by remote servers. Leave this set to the
default unless you have a reason to change it.
•
Allow Queries From...
Leave this set to Anybody .
22
EnGarde Secure Linux 3.0 -- Quick Start Guide
Chapter 6. Guardian Digital WebTool
•
Allow Transfers From...
Leave this set to Nobody unless you intend to set up a slave DNS server, in which case choose Specify and enter the
slave server’s IP address.
When done click the Create Master Zone button. Your zone will be created and you will be taken back to the previous screen
where you will see your new domain in the Forward Zones section. Click the name to edit it.
For more information on adding Address, Name Alias, Name Server, and Mail Server records please refer to the EnGarde
Secure Professional User Manual.
6.4.2. Setting up a Reverse DNS Zone
Setting up a reverse zone is just as easy as setting up a forward zone. Refer to Figure 6-5 and fill out the information on this
page using the suggestions below.
•
Zone Type
Set this to Reverse.
•
Domain Name / Network
Enter the network you want to create the zone for. For example, if your network is 192.168.1.0/24, enter 192.168.1.0.
Under most circumstances the value you enter in this box is the same as your IP network address.
•
Master Server
Leave this set to the default value unless you have a reason to change it.
•
Email Address
Enter an administrative e-mail address in this field.
•
Time To Live (TTL)
This is the amount of time results from your server are allowed to be cached by remote servers. Leave this set to the
default unless you have a reason to change it.
•
Allow Queries From...
Leave this to Anybody .
•
Allow Transfers From...
EnGarde Secure Linux 3.0 -- Quick Start Guide
23
Chapter 6. Guardian Digital WebTool
Leave this set to Nobody unless you intend to set up a slave DNS server, in which case choose Specify and enter the
slave server’s IP address.
When done click the Create Master Zone button. Your zone will be created and you will be taken back to the previous screen
where you will see your new domain in the Reverse Zones section. Click on it to edit it.
For more information on adding Address, Name Alias, Name Server, and Mail Server records please refer to the EnGarde
Secure Professional User Manual.
6.5. Setting up Remote Access
The goal of this section is to guide the reader through how to configure their EnGarde Secure Linux machine for remote
access via Secure Shell (SSH). Most day-to-day system administration tasks may be done via Guardian Digital WebTool
but, every so often, you need to do something from the command-line.
By the end of this section the reader will have:
•
Configured their EnGarde Secure Linux machine to accept incoming SSH connections from their PC.
•
Properly configured the PuTTY SSH client with an SSH key.
•
Successfully logged into their EnGarde Secure Linux machine via SSH.
6.5.1. Create a Local User
Before you can remotely log into your machine you need to create an account to login with. Using the procedure outlined in
the previous section "Creating a Local User," create yourself an account.
6.5.2. System Access Control
Next you must permit access to the SSH service from your IP address or network. Using the procedure outlined in the
previous section "System Access Control," permit access to the SSH service from your IP address or network.
6.5.3. Guardian Digital Secure User Manager
Next you must log into the Guardian Digital Secure User Manager to generate and download an SSH key. For simplicity this
section will not cover uploading an existing SSH key. If you already have an SSH key please refer to the EnGarde Secure
Professional User Manual for assistance.
Begin by logging into the Secure User Manager:
https://192.168.10.100:1022/
Note: Guardian Digital WebTool runs on port 1023 and the Guardian Digital Secure User Manager runs on port 1022. Make sure
you access port 1022 and not port 1023!
24
EnGarde Secure Linux 3.0 -- Quick Start Guide
Chapter 6. Guardian Digital WebTool
Log in using the username and password you created at the beginning of this procedure. Once authenticated go down to
the Generate a New Keypair section and you will see a ssection like Figure 6-6.
Figure 6-6. Generate a New Keypair
Fill out the information on this page using the suggestions below:
•
Filename
The base filename for the key files. If your machine’s hostname is ’snoopy’ you may want to just type that into the box.
This field is provided so you may have more then one key configured.
•
Description
Some comment-like text. Enter something like "My key to access snoopy."
•
Passphrase
The password used to unlock this key, enter something strong. Your passphrase, unlike a password may contain spaces
and other characters. Enter something like "This is my key and there is no other like it!"
After you enter your passphrase you’ll have to enter it a second time for verification.
When you’re all done click the Generate Key button. Your machine will then generate a key and bring up a screen where
you can download it to your PC. Download this file and store it in a safe place.
6.5.4. Logging in With Secure Shell
Before you can SSH into your machine you need to download an SSH client. This section will cover how to use the PuTTY
SSH client for Microsoft Windows, available from the following URL:
EnGarde Secure Linux 3.0 -- Quick Start Guide
25
Chapter 6. Guardian Digital WebTool
http://www.chiark.greenend.org.uk/~sgtatham/putty/download.html
Download the putty.exe and puttygen.exe files from the PuTTY website.
The key you downloaded must now be converted for use with PuTTY . Launch the puttygen.exe file, then click
the Load button and navigate to the private key file you generated and downloaded in the previous section,
Guardian Digital Secure User Manager.
You will be asked for a passphrase to access this key. Enter the passphrase that you used when generating this key. You
should then get a popup window stating the the key was successfully imported. The key has now been converted to a format
that putty can use.Click on OK .
Now it’s time to save the converted key into a key type. Choose SSH-2DSA as the type in the Parameters section and then
click on Save private key in the Actions section. Be sure to choose private key and NOT public key as this key is a private
key. You will be asked to enter a file name to save this converted key in. Enter some ascii string followed by .ppk . For this
example I will use xp-key-converted.ppk . Click on Save. You can now exit the puttygen program. You should now see the
file xp-key-converted.ppk . The key conversion process is now complete.
Now launch putty.exe. When PuTTY first starts up you will be presented with the PuTTY Configuration dialog shown in
Figure 6-7:
26
EnGarde Secure Linux 3.0 -- Quick Start Guide
Chapter 6. Guardian Digital WebTool
Figure 6-7. PuTTY Configuration
Click on Session in the left Category window. Enter the hostname or IP address of your EnGarde Secure Linux machine in
the Host Name (or IP address) box in the right-hand window. Make sure Port is set to 22 and Protocol is set to SSH
Then click on Connection -> SSH -> Auth in the left Category window and you will see a dialog like the one in Figure 6-8.
Click on the Browse... button next to the Private key file for authentication box and locate the private key that you
converted using puttygen.
EnGarde Secure Linux 3.0 -- Quick Start Guide
27
Chapter 6. Guardian Digital WebTool
Figure 6-8. Specifying a Private Key With PuTTY
When you’re all done click the Open button at the bottom of the PuTTY Configuration dialog box. You will be prompted to
accept your machine’s host key (click Ok) then you will be prompted to enter your username and then your key’s passphrase.
If you are successful you’ll be taken to a shell prompt.
Tip: PuTTY allows you to save sessions so you don’t have to enter your machines hostname and key every time you want to connect.
28
EnGarde Secure Linux 3.0 -- Quick Start Guide
Chapter 6. Guardian Digital WebTool
6.6. Setting up a Mail Server
The goal of this section is to teach the reader how to configure a mail server on EnGarde Secure Linux. You should configure
a mail server if you want your machine to be able to send or receive e-mail on the Internet.
By the end of this section the reader will have configured a single mail domain and will be able to send and receive e-mail
through their EnGarde Secure Linux machine with other users and machines on the Internet.
6.6.1. DNS Setup
Begin by creating a new domain using the procedure outlined in the previous section "Setting up a Forward DNS Zone".
Once you have your forward zone created you need to do the following:
1. Create a new Address record for "mail.<yourdomain>", pointing mail.<yourdomain> to the IP address of your EnGarde
Secure Linux machine.
2. Create a new Mail Server record. Enter "mail.<yourdomain>" in the Mail Server field and enter the number 10 in the
Weight field.
For example, if your domain name is engardelinux.org you would enter the following in step 1:
Figure 6-9. Mail Server DNS Address Record
This tells the Internet what IP address the machine mail.engardelinux.org may be found at. Next you need to tell the Internet
that mail.engardelinux.org is a mail server:
EnGarde Secure Linux 3.0 -- Quick Start Guide
29
Chapter 6. Guardian Digital WebTool
Figure 6-10. Mail Server DNS Mail Server Record
DNS on your machine is now properly configured for e-mail.
6.6.2. Create a Mail Domain
Log into Guardian Digital WebTool, click the Services menu, navigate to E-mail Services, and then click the SMTP Server
Management link. Choose Virtual Mail Domains from the Module menu and you’ll see a section like the one in Figure 6-11.
Figure 6-11. Create New Mail Domain
Enter the name of the domain you want receive mail for in the Domain box and optionally enter an e-mail address or a local
username in the Postmaster box, then click the Create New Domain button.
Note: The optional Postmaster account receives all undeliverable mail. You can think of this setting as a "default recipient" -- if
somebody tries to send an email to [email protected] and nosuchuser is not defined as a valid mail recipient, the mail
will go to the Postmaster if one is defined.
30
EnGarde Secure Linux 3.0 -- Quick Start Guide
Chapter 6. Guardian Digital WebTool
You have now successfully created a mail domain and the next step is to add recipients to it. You should see the domain
you just created listed in the Active Virtual Mail Domains section as illustrated in Figure 6-12.
Figure 6-12. Domain Management
Clicking on your new domain will launch a popup shown in Figure 6-13.
Note: If you are using a web browser which implements pop-up blocking (such as Mozilla or Firefox) you may need to add an
exception for the machine that is running WebTool. If you click your mail domain and nothing happens make sure you are permitting
pop-ups!
Figure 6-13. Editing a Mail Domain
The example above has two recipients defined: pete and dave. The Postmaster is ryan.
•
Adding a Recipient
EnGarde Secure Linux 3.0 -- Quick Start Guide
31
Chapter 6. Guardian Digital WebTool
Enter a username in the Address box and enter a recipient address (or local username) in the Recipient box, then click
the Create New Address button.
•
Deleting a Recipient
Click the Delete button next to the recipient you want to delete.
•
Updating a Recipient
Update the Recipient field of the recipient you want to edit then click the Update button next to it.
•
Changing the Postmaster
Change the Recipient of the Postmaster address then click the Update button next to it.
•
Deleting the Mail Domain
Click the Delete this Domain button at the top of the page.
Your mail server is now configured.
6.7. Setting up a Web Server
The goal of this section is to teach the reader how to configure web services on EnGarde Secure Linux. EnGarde Secure Linux supports two types of mail servers: normal and secure. Secure web servers have their content protected with
encryption via SSL (Secure Sockets Layer).
By the end of this section the reader will have properly configured both a normal and a secure web server on their EnGarde
Linux machine and will be in a position where they can begin to upload content via FTP (File Transfer Protocol) or SCP
(Secure Copy Protocol).
6.7.1. DNS Setup
Begin by creating a new domain using the procedure outlined in the previous section, "Setting up a Forward DNS Zone".
Once you have your forward zone created you need to do the following:
1. Create a new Address record for "www.<yourdomain>", pointing www.<yourdomain> to the IP address of your EnGarde
Secure Linux machine.
For example, if your domain name is engardelinux.org you would enter the following:
32
EnGarde Secure Linux 3.0 -- Quick Start Guide
Chapter 6. Guardian Digital WebTool
Figure 6-14. Web Server DNS Address Record
This tells the Internet what IP address the machine www.engardelinux.org may be found at.
6.7.2. Configure a Normal Web Server
Log into Guardian Digital WebTool, click the Services menu, choose the World Wide Web Management link, then choose
the Create New Virtual Host option from the Modules menu and you’ll be presented with a screen like the one in Figure 6-15.
Figure 6-15. Create a Virtual Host
Fill out the information on this page using the suggestions below:
•
Hostname
EnGarde Secure Linux 3.0 -- Quick Start Guide
33
Chapter 6. Guardian Digital WebTool
Enter the name of this website, including the standard "www." prefix.
•
Use SSL
Leave this set to No.
•
Address
Enter the IP address of this website or select one by clicking the ... button. This should correspond to the IP address you
entered in the DNS record at the beginning of this section.
•
Admin Email
Enter an administrative e-mail address for this site.
•
Webmaster
Enter or select a local user who will have read/write access to this site. This should be the primary account used for
managing content.
•
Group
Enter or select a group which will have read/write access to this site. Any user who is a member of this group will have
read/write access to the site.
•
Database Settings (Optional)
This section allows you to optionally create a database for use with this website. If you want to do this select Yes next to
Create Database? and enter a database Username and Password in the boxes provided. The database name will be the
Hostname with the periods changed to underscores, ie www_engardelinux_org.
When done, click the Create New Virtual Host button at the bottom of the screen. Guardian Digital WebTool will set up
your website and you will be returned to the main Webserver Management screen. Click the Restart Apache Web Server
Service button to activate your changes.
After this you are all done! If DNS is properly configured you should be able to access your website and you should receive
a HTTP 403 error page until you upload content.
6.7.3. Configure a Secure Web Server
Log into Guardian Digital WebTool, click the Services menu, choose the World Wide Web Management link, then choose
the Create New Virtual Host option from the Modules menu and you’ll be presented with a screen like the one in Figure 6-16.
34
EnGarde Secure Linux 3.0 -- Quick Start Guide
Chapter 6. Guardian Digital WebTool
Figure 6-16. Create an SSL Virtual Host
Fill out the information on this page using the suggestions below:
•
Hostname
Enter the name of this website, including the standard "www." prefix.
•
Use SSL
Change this to Yes.
•
Address
Enter the IP address of this website or select one by clicking the ... button. This should correspond to the IP address you
entered in the DNS record at the beginning of this section.
•
Admin Email
Enter an administrative e-mail address for this site.
•
Webmaster
Enter or select a local user who will have read/write access to this site. This should be the primary account used for
managing content.
•
Group
EnGarde Secure Linux 3.0 -- Quick Start Guide
35
Chapter 6. Guardian Digital WebTool
Enter or select a group which will have read/write access to this site. Any user who is a member of this group will have
read/write access to the site.
•
Database Settings (Optional)
This section allows you to optionally create a database for use with this website. If you want to do this select Yes next to
Create Database? and enter a database Username and Password in the boxes provided. The database name will be the
Hostname with the periods changed to underscores, ie www_engardelinux_org.
When done, click the Create New Virtual Host button at the bottom of the screen. The website will be configured and you
will be returned to the main Webserver Management screen.
Before you can use this new Secure Virtual Host you need to create an SSL certificate and key. From the main Virtual Host
Management screen you will see a screen like the one in Figure 6-17.
Figure 6-17. Virtual Server Listing
Click the virtual server you just created, which is prefixed by https:// , scroll down to the SSL Certificate Management section,
and click the Create New Certificate button. You will be presented with a popup like the one in Figure 6-18.
36
EnGarde Secure Linux 3.0 -- Quick Start Guide
Chapter 6. Guardian Digital WebTool
Figure 6-18. Generate Certificate and Key
Fill out the information on this page using the suggestions below:
•
Authority Name
Enter the name of your site, including the standard "www." prefix.
•
E-Mail Address
Enter an administrative e-mail address where you may be reached by people who need to contact you regarding your
certificate.
•
Organization
Enter the name of your company or organization.
•
Department (Optional)
Enter the name of your department or corporate subdivision. This field is optional.
•
City
Enter the city where your organization resides.
EnGarde Secure Linux 3.0 -- Quick Start Guide
37
Chapter 6. Guardian Digital WebTool
•
State or Province
Enter the state or province where your organization resides.
•
Country
Enter the two-letter country code where your organization resides.
When done, click the Create Certificate button at the bottom of the screen then navigate back to the main Webserver
Management screen. Click the Restart Apache Web Server Service button to activate your changes.
After this you are all done! If DNS is properly configured you should be able to access your website and you should receive
a HTTP 403 error page until you upload content.
6.8. Transferring Files with FTP
This section provides an introduction to uploading files via FTP (File Transfer Protocol). FTP can be used to transfer files of
any type, but most commonly it’s used to transfer content to your websites. This chapter focuses on this specific use.
By the end of this section the reader will be able to upload files and directories to their website using FTP.
Begin by using the procedure outlined in the previous section "System Access Control" to configure your EnGarde Secure
Linux machine to permit FTP access from your IP address or network.
The next step is to configure the FTP server. Log into Guardian Digital WebTool, click the Services menu, choose the File
Transfer Protocol link, then choose the General Configuration from the Modules menu and you’ll be presented with a screen
like the one in Figure 6-19.
38
EnGarde Secure Linux 3.0 -- Quick Start Guide
Chapter 6. Guardian Digital WebTool
Figure 6-19. FTP Server Configuration
Fill out the information on this page using the suggestions below:
•
Local User Logins
This option defines whether local users may FTP to your machine. If you are using FTP to transfer web content, this
option should be enabled.
•
Local User Chroot
This option defines whether or not local users are chrooted, or restricted to their home directory. If you would like your
users to be able to upload web content this setting should be disabled.
•
Local User Uploads
This option defines whether or not local users may upload files. If this setting is disabled then local users will only be able
to download files.
•
Create Permissions (Local Users)
This option defines whether or not files created by local users will be world readable or only owner readable. If your local
users are uploading web content this should be set to World Readable.
•
Rate Limit (Local Users)
EnGarde Secure Linux 3.0 -- Quick Start Guide
39
Chapter 6. Guardian Digital WebTool
This field allows you to optionally throttle transfer rates for local users. Enter a value in kilobytes per second. Leave this
set to zero to if you do not want to use this feature.
•
Anonymous Logins
This option defines whether anonymous users may FTP to your machine. If you are not running a public FTP servert, this
option should be disabled.
•
Anonymous Uploads
This option defines whether or not anonymous users may upload files. If this setting is disabled then anonymous users
will only be able to download files. This option is ignored if Allow Anonymous Logins is disabled.
•
Anonymous MKDIR
This option defines whether or not anonymous users may create new directories. This option is ignored if Allow Anonymous Logins or Allow Anonymous Uploads are disabled.
•
Create Permissions (Anonymous)
This option defines whether or not files created by anonymous users will be world readable or only owner readable. This
option is ignored if Allow Anonymous Logins or Allow Anonymous Uploads are disabled.
•
Rate Limit (Anonymous Users)
This field allows you to optionally throttle transfer rates for anonymous users. Enter a value in kilobytes per second. Leave
this set to zero to if you do not want to use this feature. This option is ignored if Allow Anonymous Logins is disabled.
•
FTP Banner
This options defines a banner that users will see when they connect to the FTP service on this machine.
•
Interface to Listen On
This option allows you to restrict the FTP service to a specific interface. If your are running EnGarde Secure Linux on a
dual-interface machine and one of them is an "internal" interface, and only internal users should be able to access the
FTP service, select your internal interface here.
When done click the Save Changes button. You should now be able to FTP into your machine as a local user, navigate to
your web sites Document Root (as shown in Figure 6-17), and upload content.
40
EnGarde Secure Linux 3.0 -- Quick Start Guide
Chapter 6. Guardian Digital WebTool
6.9. Using the Guardian Digital Secure Network
The Guardian Digital Secure Network WebTool module allows you to install package updates and additional EnGarde
Secure Linux components. This chapter covers some of the common configuration tasks associated with the GDSN. The
GDSN can be accessed by choosing Guardian Digital Secure Network from the System menu.
By the end of this section the reader will be able to use the Guardian Digital Secure Network.
6.9.1. GDSN Configuration
Access the GDSN General Configuration options by choosing GDSN Configuration from the Module menu. This screen
allows you to enter your Activation Code and your Activation Password. These credentials were provided to you when you
purchased EnGarde Secure Professional or downloaded EnGarde Secure Community. Enter them into the boxes provided.
6.9.2. The Update Agent
The Guardian Digital Secure Network Update Agent is used for keeping your EnGarde Secure Linux machine up-to-date
with the latest security and package updates from Guardian Digital. It is recommended that you run the Update Agent once
a week or whenever you receive an update notification from Guardian Digital.
Begin by logging into Guardian Digital WebTool, choose Guardian Digital Secure Network from the System menu, and
then choose Update Agent from the Module menu. The agent will contact Guardian Digital and download the latest list of
available packages and if there are any updates available you will see a screen like the one in Figure 6-20:
Figure 6-20. GDSN Package List
When you click the Proceed With Upgrade button the Update Agent will download the updates and install them on your
computer.
As the updates install you’ll see a page detailing the process, followed by a popup summarizing the results.
EnGarde Secure Linux 3.0 -- Quick Start Guide
41
Chapter 6. Guardian Digital WebTool
Figure 6-21. GDSN Update Summary
42
EnGarde Secure Linux 3.0 -- Quick Start Guide
Chapter 7. Security Enhanced Linux
This version of EnGarde incorporates Security Enhanced Linux , or SELinux as it is commonly known. SELinux was originally created by the National Security Agency and is a system of Mandatory Access Control, in which every application
running on the system is allowed to perform only the actions required to perform its job, as defined by the system’s security
policy. This effectively restricts the system’s exposure to a security flaw in a running application by denying any action that
would not normally be performed by that application.
This section will discuss the basics of SELinux administration, but is not intended as an in depth discussion of the subsystem.
7.1. Disabling SELinux at Boot
As discussed in Section 3.1, you can start the system using the default Secure option or the Standard option. Entering
standard at the boot prompt will put SELinux into what is known as Permissive mode, where it will still send denial messages
to the system log, but will not actually deny the actions. This is useful for troubleshooting SELinux problems.
7.2. Disabling SELinux at Runtime
The getenforce command will display the current SELinux mode of either Permissive or Enforcing. Use the setenforce
command to change the SELinux mode. Issuing the command setenforce 0 will put your system into Permissive mode,
while issuing the command setenforce 1 will return the system to Enforcing mode.
You must be logged into the sysadm role to change the current SELinux mode, see Section 7.3 for a discussion of SELinux
roles.
7.3. SELinux User Roles
SELinux policy uses roles to determine what users are permitted to interact with the security subsystem.
7.3.1. user
The user role is the default role for normal users. They are not permitted to change their role beyond the default.
7.3.2. staff
The staff role is the default role for administrative user accounts, including the root account. They have no special abilities
beyond the user role, but they can transition into the sysadm role by issuing a newrole command.
Typing the command newrole -r sysadm_r while in the staff role will request your password and then transition you into the
sysadm role.
7.3.3. sysadm
The sysadm role is the equivalent of root in a non-SELinux system. This role is used for all system administration. Being
logged in as the root account is not enough, you must also transition to the sysadm role in order to perform most system
administration tasks.
43
Chapter 7. Security Enhanced Linux
7.4. Viewing SELinux Security Types
Some common commands take an additional -Z option under SELinux that displays security context information.
7.4.1. id
The id command when followed by the -Z flag will display your current SELinux role.
7.4.2. ls
The ls command will display security contexts for the listed files when passed the -Z flag.
7.4.3. ps
The ps command will display security contexts for the listed processes when passed the -Z flag.
7.5. Relabeling the Filesystem
If you experience SELinux related difficulties, a common troubleshooting step is to relabel the filesystem. This rebuilds the
security context of each file on the system, and will clear up SELinux issues caused by incorrect file context labeling.
To relabel, issue a touch /.autorelabel command while logged in as root and the sysadm role, and then reboot the system.
44
EnGarde Secure Linux 3.0 -- Quick Start Guide
Chapter 8. Summary
You now have all the information you should need to begin using EnGarde Secure Linux. Additional information on installation and the rest of Guardian Digital WebTool may be found in the EnGarde Secure Linux Users Guide.
We hope you found this document helpful. If you have any suggestions, corrections, or general comments please send an
e-mail to [email protected] -- we’d love to hear from you!
45
Chapter 8. Summary
46
EnGarde Secure Linux 3.0 -- Quick Start Guide
Appendix A. Resources
This chapter provides links to some online resources where you may obtain further information about Linux, security, and
Guardian Digital products.
•
Guardian Digital Product Manual Library
http://infocenter.guardiandigital.com/documentation/
•
Guardian Digital Online Store
http://store.guardiandigital.com/
•
Guardian Digital Master Support Services
http://www.guardiandigital.com/support/
•
LinuxSecurity.com: The Community’s Center for Linux Security
http://www.linuxsecurity.com/
•
LinuxSecurity.com: Choosing Secure Passwords
http://www.linuxsecurity.com/content/view/117260/141/
47
Appendix A. Resources
48
EnGarde Secure Linux 3.0 -- Quick Start Guide