1
KE2001A
QUICK INSTALL GUIDE
Table of Contents
1
Check for Required Items ............................................................................3
2
Installation Steps ........................................................................................3
2.1
Installation View .................................................................................................. 3
2.2
Connection Chart to Determine Cable Types ............................................................. 3
3
LCD Display .................................................................................................4
4
Ready to Use ...............................................................................................5
4.1
Changing the Setting via Your Phone....................................................................... 5
4.1.1
KE2001A Input Keys.......................................................................................... 5
4.1.2
Network settings............................................................................................... 6
4.1.3
Account settings ............................................................................................... 6
4.1.4
Saving Settings ................................................................................................ 6
4.2
Changing the Settings via Web Browser................................................................... 7
5
Work Normally ............................................................................................7
6
Configuration Parameters............................................................................7
6.1
Network configuration parameters .......................................................................... 7
6.2
VoIP Configuration Parameters ............................................................................... 8
6.3
Advanced Configuration Parameters ...................................................................... 10
7
Other Settings ...........................................................................................10
8
FAQ............................................................................................................11
9
Performance and Features.........................................................................12
9.1
Characteristics ................................................................................................... 12
9.2
Standards and Protocols...................................................................................... 12
9.3
Specification...................................................................................................... 13
9.4
Electronic Characteristics..................................................................................... 13
9.5
Operational Environment..................................................................................... 13
9.6
Recommend Network Condition ............................................................................ 13
1
Check for Required Items
Please check to be sure that you have all of the following components:
• Broad internet access
• One IP phone
2
2.1
• One phone cord
• One handset
• One power adapter
• One Ethernet (RJ45) cable
Installation Steps
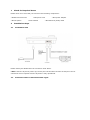
Installation View
Please install your KE2001A as the connection chart above.
! Note: After the IP phone powers up, the PC port has the same function as LAN port. The PC
connection will not operate until the IP phone is fully operational.
2.2
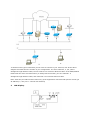
Connection Chart to Determine Cable Types
To determine the type of cable that you will need to connect to your terminal, look at the above
diagram and determine the number of your configuration. The lines marked 2, 4, 5,6,7,8 are
Straight-through Ethernet cable, the line marked 3 is Crossover Ethernet cable. If the ADSL/CABLE
Modem has the auto-reversal function (it usually has the function), the line marked 1 is
Straight-through Ethernet cable, and otherwise it is Crossover Ethernet cable.
Note: when the port LAN connects with line1,2,6,the equipments connected with port PC will not get
IP address(i.e., they can’t
3
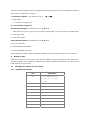
LCD Display
connect with Internet)
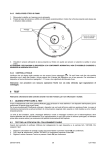
There are 4 status indicators, they are positioned in the upper right corner of the display. In the above
picture they are labeled 1 through 4.
1) Connection Status:
will display one of: !, -> or @
!= login failure
->= in process of Logging In
@ = successfully Logged In
2)Connection Method: will display one of: -, A or S
-: NAT mode not in use. If your service provider supports NAT, you do not need to use NAT mode.
A: using stun mode
S: using static mode
3)PC/LAN Port Status: will display one of: H, F or X
X: No PC connected
H: 10M bandwidth connected
F: 100M bandwidth connected
More detailed information about installation KE2001A Terminal, please refer to the user manual.
4
Ready to Use
When the boot process is complete, some prompt characters will be displayed on LCD. If the first
character displays ‘!’or no display, it means that you didn’t registered successfully. You may need to
make settings on your phone.
4.1
4.1.1
Changing the Setting via Your Phone
KE2001A Input Keys
Key
1
Characters
1
!# $ % ^ & * ( ) _
+|”<>?-=;’/[]
{ } `¥ 1
2
abcABC2
3
defDEF3
4
ghiGHI4
5
jklJKL5
6
mnoMNO6
7
pqrsPQRS7
8
tuvTUV8
9
wxyzWXYZ9
Key
0
*
Characters
.,@0
.:
! NOTE:
1.
Press “ALPHA” key to change input mode between digits and alphanumeric. Default:
alphanumeric
2.
The ‘*’ key can be used to input ’.’
3.
If you need to enter the same character consecutively, press the pound key (#) to confirm the last
entry, and then press the number key again to enter the next character.
For example, if you are entering “Cab”:
•
Press the 2 key 7 times
•
Press the 2 key twice
•
Press the 2 key 3 times
4.1.2
Network settings
First, you should set network type according to your actual network status. DHCP is default status. In
DHCP status, your LAN automatically assigns all the required network parameters to the phone. Press
the SET/OK key,Use “
”key to select Network_Type. Press” SET/OK”, and then use”
” to
select DHCP, Static IP or PPPoE. Press ESC twice, you will see the system activate the settings
automatically.
•
Static IP Settings
If your network is Static IP, then you should set static IP address. Press“ SET/OK” key, use“
”
to select Static IP Settings. Press“SET/OK”, then set IP, gateway and subnet mask. After set
complete,press “ESC” key to save automatically.
•
PPPoE Settings
If your network is PPPoE, you should make PPPoE settings. Press“ SET/OK”key, use “
” to
select PPPoE. Press “SET/OK”key, then enter the PPPoE user name and password. After set
complete,press “ESC” key to save automatically.
Important: If your service provider makes Presetings such as user name, password, IP phone
number, SIP server address, you do not need to do the following operations.
4.1.3
Account settings
Press“SET/OK”key, use“
”key to select Account Settings. In account settings, you should select
Server Register on first, then set server address, user name, phone number, password,
domain .etc.
Please refer to 5.2
4.1.4
Saving Settings
After doing an operation, press the “ESC”key twice and the display should show Activate
Settings…, it will takes several seconds to save these settings.
4.2
Changing the Settings via Web Browser
Press the ESC key on your phone to check IP address.
Open an Internet Explorer browser on a PC that is connected to the same network as the Terminal,
then type the IP address into the address bar and press Enter
USERNAME:user
PASSWORD:voip
Once in the Settings screen, you can verify or enter your network and VoIP related settings, click on
Submit to save any changes.
5
Work Normally
After the phone reboots and properly programmed, the LCD of the phone will display @. In addition,
when the phone is off-hook, you will now hear a dial tone and can make calls.
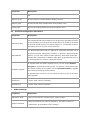
6
6.1
Configuration Parameters
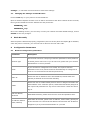
Network configuration parameters
Parameter
Description
The terminal can have 3 ways to get network parameters: DHCP, Static IP
Network Type
or PPPoE, please select one. If you do not know, please ask your network
administrator or service provider.
If your terminal is configured to use DHCP, The required network
DHCP
parameters such as IP, subnet mask will automatically be configured as
soon as it is connected to the LAN and powered up.
Static IP
Select this item to authorize users set IP address, subnet mask and
gateway IP address of the terminal manually.
Select this item to enable PPPoE protocol which is designed for ADSL and
PPPoE
Cable Modem users. With this system, ADSL ISP automatically assigns all
the required IP parameters to any device connected to it when the device
log on.
PPP User Name/
Password
IP Address /Subnet
Mask/ Gateway
With PPPoE selected, please enter the user name and password here.
With Static IP selected, please enter IP address, subnet mask, gateway IP
of the terminal here. Note that this address should match the IP address
assigned to you by network administrator or your ISP.
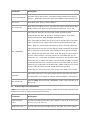
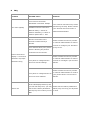
Parameter
First/second DNS IP
NTP Server
NTP Time Zone
Description
This field defines the primary or secondary DNS (Domain Name Server)
address.
With Static IP selected, plese enter DNS IP of the terminal here.
Enter NTP (Time Source) Server address
Enter time zone where you live. The time zone value is according to GMT.
Please confirm your time zone first and then input from +12 to -12
nat traversal: When the IP phone with private IP address need
communicate with other IP phones in a different LAN or on Internet,
please select an item NAT_TRAVERAL Radio Button.
none: Select this item when the sip proxy server and IP phone in the same
LAN, or the SIP server supports the IP phone working behind the LAN.
static: When the system does not support IP phone working behind the
LAN, please select this item to manually type public IP address of the NAT
NAT_TRAVESRAL
device. With this item selected, “NAT External IP” field will be activated.
stun: Select this item with Stun server used according to requirement of
system. STUN presents a working solution for most NATs that are not
symmetric, e.g., most of the household routers have non-symmetric NAT
and in this case, it is OK to use STUN. However, STUN does NOT work with
symmetric NAT and if your routers have built-in symmetric NAT, do not use
STUN. If your configuration is STUN-friendly, please configure your phone
to use it. With this item selected, STUN URL field is activated.
Please ask your service provider if you do not know which one to select.
STUN URL
NAT External IP
6.2
When NAT Traversal is set to Stun, please put the URl of the stun server
into STUN URL, in the format as “domain name/IP address : service port”.
With the static selected in NAT_TRAVERSAL, please type the public IP of
NAT server.
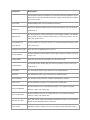
VoIP Configuration Parameters
! Note: Please check with your ISP for the protocol settings. Changing the settings without proper
guidance may result in the the terminal not functioning.
Parameter
Description
Preferred Audio
You can select the type of audio codec: default, G.723_only, G.711u_only,
Codec
G.711a_only or G.729 only
DTMF Relay Type
You can select the type of DTMF relaying: off, 2833, sip_info or inband.
Parameter
Description
These options determine whether user can dial extension telephone. If you
select off, you will can not dial extensions. Please consult with your ISP for
the correct choice.
Select VAD
SIP Server
Enable/disable VAD (Voice Activation Detection)
SIP server address, Please ask your service provider if you do not know
what to fill in.
The local SIP port used by terminal to send register packets. The default
Register Port
port number is 5060 or 5063. Please ask your service provider if you do
not know what to fill in.
Using Outbound
Choose whether to use proxy server.” on” means using this function, while
Proxy Server
“off” means not
Outbound Proxy URL
Enter the URL of Outbound Proxy server
Server Register
Display Name
Domain Name
Choose whether to let the phone send register packet. Usually, you must
choose “on”
Enter the name which will display on you phone’s LCD
It’s the SIP realm. Please ask your service provider if you do not know
what to fill in.
User Name
The user name used to login SIP server for authentication.
Password
The password used to login SIP server for authentication.
Phone Number
The number of this terminal, usually is allocated by system.
Expire Time
Send registration request every expire time. Default:60 s
Using Call Waiting
Use # to Dial Out
Dial Out In X Sec
Timer on/off
Choose whether to use Call Waiting function. “on” means using this
function, while “off” means not
Choose whether to use # as a quick dial key. “on” means using this
function, while “off” means not
Enter the second, after you dialing the destination number, your call will be
dialed out automatically after X seconds.
Whether IP phone display current call duration when getting through a
Parameter
Description
call.
Balance on/off
Choose whether to enable balance display function.
Dialtone Type
Choose the dial tone standard from the dropdown menu.
Ringing Type
Choose the ringing standard from the dropdown menu.
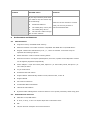
6.3
Advanced Configuration Parameters
Parameter
Description
The Edit Speed Dial section allows you to program the speed dial numbers
Edit Speed Dial
for the M1-M8 keys on the IP phone. Simply enter the number to be dialed
in the field beside the Key you wish to assign it to. (Remember to follow
the Dialing rules set by your service provider)
The Abbreviated Dialing Plan is a table of 10 entries that will allow you to
program frequently dialed phone numbers or “prefixes”. When using this
Edit AbbrDial
feature, you can enter specific number patterns, which when dialed will
actually dial out different or addition digits. Once programmed there are
no special buttons to press to initiate this feature.
To upgrade from the remote upgrade server: You can choose Update
Program to upgrade the function menu, key function, configuration page
Software Upgrade
and kernel program of your phone; choose Update Bootload to upgrade
the booting program for phone starting.
To upgrade from a local PC: You can select the file from your PC and then
click ‘Upgrade’..
7
Handset In
Set the input volume of handset
Handsfree In
Set the input volume of speaker
Other Settings
Parameter
Edit Phone Book
Change Password
Description
Here you can edit the contact’s name, phone number
Enter the password you want it changed to, and then re-enter for
confirmation. Press Submit to save changes
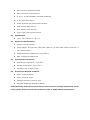
8
FAQ
Problem
Possible Cause
Solution
Your internet connection
bandwidth is less than 30Kbps
Poor Voice Quality
Unstable network connection:
Network delay > 500ms or
network trembling > 100ms or
Your internet connection may not be
performing correctly. Please contact
your Internet Service Provider or
Network administrator.
network packet loss > 10%
Phone’s connection to the
internet is obstructed by a
firewall.
Your network has a proxy server
Please contact the service provider
or network administrator for advice
on how to configure your firewall or
proxy server.
which is blocking the phone’s
connection to the internet.
Phone continues to
Please contact the service provider
display ‘!’ as the first
character of prompt
character string
Your phone is configured with
incorrect account settings.
or network administrator for advice
on how to reconfigure your account
details.
Please contact the service provider
Your phone is configured with an
incorrect server address.
or network administrator to confirm
your phone has the correct server
details.
If the LCD display NO Proxy and
Failure call
you can hear busy tone, you may
Please set the relative parameters
not set the relative parameters
about proxy server by your IP phone
about proxy server when you use
or web.
NAT
T
Problem
Possible Cause
Solution
If you only hear busy tone when
you make a call, the causes may
be as following:
Find the correct reasons or consult
A.
Insufficient balance
with your service provider or
B.
The called party in busy line
network administrator.
C.
The called party off line
D.
The call can’t make through
due to some reasons.
9
9.1
Performance and Features
Characteristics
Program memory—2048 KB Flash memory
Ethernet interface—two RJ45 connector compatible with IEEE 802.3 10/100M Base-T
Keypad—besides the standard keys 0-9,*,#, there are another 12 function keys for
operation and setting of phone
Status indicator—LCD to indicate working status
Hand free function—full duplex speakerphone, dial-tone, speaker and loudspeaker volume
can be digitally adjusted independently
Power adapter— input 100~120V (USA, Japan etc.) or 220~240V (China, Europe etc.) or
100~240V,47-63Hz
Log on Soft-switch
Automatic find Soft-switch
Support DHCP: Automatically obtain local IP, subnet mask, router IP
Support PPPoE
Voice Active Detection
Comfortable Noise Generation
16ms Echo Cancellation
Dynamic Buffer Management—minimize effect to voice quality caused by audio delay jitter
9.2
Standards and Protocols
IEEE 802.3 10/100M Base-T
G.711A, G.711µ, G.723.1 5.3K/6.3 Kbps and G.729 audio codec
SIP
TCP/IP: Internet Transport and Control Protocol
RTP: Real-time Transport Protocol
RTCP: Real-time Control Protocol
G.723.1、G.729 VAD/CNG economical bandwidth
G.165 16ms Echo cancel
DHCP: Dynamic Host Configuration Protocol
DNS: Domain Name Server
NTP: Network Time Protocol
HTTP: Hyper Text Transfer protocol
9.3
Specification
208 × 197 × 68mm (L × W × H)
9.4
Electronic Characteristics
Voltage: 12V DC, 500mA
Power adapter: AC input 100~120V (USA, Japan etc.) or 220~240V (China, Europe etc.) or
100~240V,47-63Hz
Network Interface: IEEE 802.3 10/100 Base-T
EMC: FCC Part15 CLASS B /CE
9.5
Operational Environment
Operational Temperature: -10 to 40° C
Storage Temperature: -40° to 55° C
Humidity: 10% to 90% no dew
9.6
Recommend Network Condition
Delay: Less than 400ms
Jitter: Less than 100ms
Package Loss Rate: Less than 10%
Required Bandwidth: Minimums 30Kbps
Safety Warning: Please do not place this product under fire and high temperature. Avoid
heavy impact, and do not leave the product in rainy or highly humid environments!