1
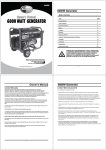
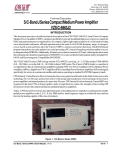
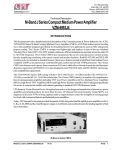
OWNER’S MANUAL Operating and Servicing Instructions CR13000-PAC PORTABLE AIR CONDITIONER with HEAT PUMP Portable Air Conditioner Questions or concerns? For assistance, please call Customer Service ClimateRight® USA 9OVHKZ(]L*VS\TI\Z6/ www.climaterightair.com 7O! IMPORTANT: READ CAREFULLY BEFORE ASSEMBLY AND USE Read and follow all safety rules and instructions before operating this equipment. THIS PRODUCT IS INTENDED FOR HOUSEHOLD USE ONLY. Please keep this manual for future reference. PACKAGE CONTENTS CLIMATERIGHT® CR13000-PAC Portable Air Conditioner with Heat Pump ;OHUR`V\MVYJOVVZPUNH*SPTH[L9PNO[®WYVK\J[;OPZV^ULY»ZTHU\HS^PSSWYV]PKL`V\ with valuable information necessary for the proper care and maintenance of your new product. Please take a few moments to thoroughly read the instructions and familiarize yourself with all the operational aspects of your new ClimateRight® Air Portable Air *VUKP[PVULY^P[O/LH[7\TW Model: CR13000-PAC -VY`V\YV^UYLJVYKZWSLHZLH[[HJOHJVW`VM`V\YZHSLZYLJLPW[[V[OPZTHU\HS(SZV ^YP[L[OLZ[VYLUHTLSVJH[PVUKH[LW\YJOHZLKHUKZLYPHSU\TILYILSV^! (PY0U[HRLHUK6\[SL[*V]LYZ Portable Air Conditioner Unit(1) ,_OH\Z[/VZLZ /VZL(KHW[LYZ >PUKV^2P[(KHW[LY Remote Control (1) ((()H[[LYPLZ Window Kit :SPKPUN7HULSZK\HSOVZLWHULS ZPUNSLOVZLWHULSL_[LUZPVUWHULSZ (PY0U[HRL=LU[MVY:PUNSL/VZL0UZ[HSSH[PVU (Additional Accessory) (1) 6^ULY»Z4HU\HS :[VYL5HTL!FFFFFFFFFFFFFFFFFFFFFFFFFFFFFFFFFFFFFFFFFFFFFFFFFFFF 3VJH[PVU!FFFFFFFFFFFFFFFFFFFFFFFFFFFFFFFFFFFFFFFFFFFFFFFFFFFFFF +H[L7\YJOHZLK!FFFFFFFFFFFFFFFFFFFFFFFFFFFFFFFFFFFFFFFFFFFFFFFFF :LYPHS5\TILYSVJH[LKVUIHJRVM\UP[!FFFFFFFFFFFFFFFFFFFFFFFFFFFFFF SPECIFICATIONS ;OLJVVSPUNJHWHJP[`PZTLHZ\YLKH[HUHTIPLU[[LTWLYH[\YLVM+)->)- 5VPZLSL]LSPZTLHZ\YLKH[HKPZ[HUJLVMM[H^H`MYVT[OLMYVU[VM[OL\UP[^OLU the unit is in cooling mode. 7V^LYJVUZ\TW[PVUPZTLHZ\YLK^OLU[OLMHUY\UZH[[OLOPNOLZ[ZWLLKZL[[PUN IMPORTANT INSTRUCTIONS Before installing and using your portable air conditioner, please read this owner’s manual carefully. Store this manual in a safe place for future reference. ;OLZLZWLJPÄJH[PVUZHYLMVYYLMLYLUJLVUS`-VYHJ[\HSKH[HWSLHZLYLMLY[V[OLYH[PUN label on the back of the unit. 0M[OLLU]PYVUTLU[[LTWLYH[\YLPZOPNOLY[OHU[OLTH_VWLYH[PUN[LTWLYH[\YLVYSV^LY [OHU[OLTPUPT\TVWLYH[PUN[LTWLYH[\YL[OLHPYJVUKP[PVULYTH`UV[^VYRWYVWLYS` 1) Always place the unit on a level surface. Model *97(* 5L]LY\ZLVYZ[VYLNHZVSPULVYV[OLYÅHTTHISL]HWVYVYSPX\PKULHY[OPZ\UP[\USLZZ instructed by this manual. Cooling Capacity );</ Heating Capacity );</ +LO\TPKPÄLY*HWHJP[` W[ZKH` 4HPU[HPUH[SLHZ[PUJOLZJTJSLHYHUJLZWHJLHYV\UK[OPZ\UP[+VUV[ISVJR or cover air inlet or outlet grilles. ;OL\UP[T\Z[ILJVUULJ[LK[VHJVYYLJ[S`NYV\UKLKWV^LYZ\WWS` Power +VUV[Z[HY[VYZ[VW[OL\UP[I`PUZLY[PUNVYW\SSPUNV\[[OLWV^LYWS\N +VUV[\ZLHUHKHW[LYWS\NVYL_[LUZPVUJVYK +VUV[\ZL[OL\UP[PU[OLPTTLKPH[LZ\YYV\UKPUNZVMHIH[OHZOV^LYVYH swimming pool. +VUV[PUZLY[HU`[OPUNPU[V[OLHPYV\[SL[+VUV[VIZ[Y\J[HPYPUSL[VYV\[SL[NYPSSZ Cooling > Heating 1180W Air Flow Volume *-4 Power Source =e/A (47 /LH[PUN*VVSPUN Noise Level K)( Net Weight 88 lbs unless instructed by this manual. +VUV[SL[JOPSKYLUWSH`ULHY[OPZ\UP[ 10) Always inspect the cord for signs of damage before use. If the power cord is KHTHNLKP[T\Z[ILYLWSHJLKI`[OLTHU\MHJ[\YLYVYHX\HSPÄLKZLY]PJL[LJOUPJPHU >OLUJSLHUPUN[OL\UP[HS^H`Z[\YU[OL\UP[VMMHUK\UWS\N[OLWV^LYJVYK Operating Temp >OLU[OL\UP[PZUV[PU\ZLHS^H`ZYLTV]L[OL]LU[PUNRP[MYVT^PUKV^ +V5V[4P_6SK(UK5L^)H[[LYPLZ+V5V[4P_(SRHSPUL:[HUKHYK*HYIVUAPUJ VY9LJOHYNLHISL5PJRLS*HKTP\T)H[[LYPLZ 1 Cooling -- Heating - - Product Dimensions ¹í ¹í¹ Refrigerant 9( 2 LCDI POWER CORD AND PLUG ;OPZHPYJVUKP[PVULYPZLX\PWWLK^P[OHU3*+03LHRHNL*\YYLU[+L[LJ[PVUHUK 0U[LYY\W[PVUWV^LYJVYKHUKWS\NHZYLX\PYLKI`<:5H[PVUHS,SLJ[YPJ*VKL ;OPZJVYKJVUZPZ[ZVMHSLUN[OVMZOPLSKLKÅL_PISLJVYK^P[OUV[LYTPUH[PVUVU[OLSVHK ZPKLHUKH3*+0H[[HJOTLU[WS\NVU[OLSPULZPKL PARTS AND ASSEMBLY EXHAUST HOSES ;OL3*+0WV^LYJVYKHUKWS\N^PSSYLTV]L[OLZ\WWS`ZV\YJL]PHLSLJ[YPJHSKPZJVUULJ[ (circuit trip) if the nominal current leakage between the cord shield and either load JVUK\J[VYL_JLLKZHWYLKL[LYTPULK]HS\L;OLJVYK^PSSYLTHPUKLLULYNPaLK\U[PS [OLKL]PZLOHZILLUTHU\HSS`YLZL[;OPZPZPU[LUKLK[VYLK\JL[OLYPZRVMHÄYLPU[OL WV^LYJVYKVYJVTI\Z[PISLTH[LYPHSZULHYI`;OLJVYKZOPLSKZHYLUV[NYV\UKLKHUK [OL`T\Z[ILJVUZPKLYLKHZOVJROHaHYKZPML_WVZLK;OLJVYKZOPLSKT\Z[UV[IL connected to ground or to any exposed metal. ;OL[LZ[HUKYLZL[I\[[VUZVU[OL3*+07S\NHYL\ZLK[VJOLJRPM[OLWS\NPZ M\UJ[PVUPUNWYVWLYS`;V[LZ[! WINDOW KIT 1. Plug power cord into wall outlet 7YLZZ;,:;)\[[VUJPYJ\P[ZOV\SK[YPWJ\[[PUNWV^LY[V[OLHPYJVUKP[PVULY 7YLZZ9,:,;I\[[VUMVY\ZL 0M[LZ[I\[[VUPZWYLZZLKHUK\UP[JHUZ[PSSIL[\YULKVUJ\YYLU[SLHRHNLOHZILLU KL[LJ[LK+VUV[\ZL[OLHPYJVUKP[PVULYVYH[[LTW[[VYLZL[[OL3*+07S\N*VU[HJ[ ClimateRight® Customer Service for troubleshooting recommendations. ASSEMBLY & INSTALLATION RESET TEST INSTALLATION >OLU[OL\UP[PZVWLYH[PUNHZHUHPYJVUKP[PVULYOLH[LYVYKLO\TPKPÄLY[OL\UP[ KYH^ZPUMYLZOV\[KVVYHPYHUKL_OH\Z[ZOV[HPYPU(*VYKLO\TPKPÄLYTVKLVY JVVSHPYPU/LH[TVKLV\[VM[OLYVVT[VJVTWSL[L[OLHPYL_JOHUNL>OLU[OL \UP[PZVWLYH[PUNPUMHUTVKLUVV\[KVVYHPYL_JOHUNL[HRLZWSHJL;OL^PUKV^RP[ and exhaust hose do not need to be installed when the unit is used as a fan. NOTE: The supplied window kit can be installed in sliding windows and sliding glass doors up to 8 ft. long (approximate length). MOUNTING THE EXHAUST HOSES WARNING: 1. DO NOT press the TEST button while the air conditioner is operating. 2. The TEST and RESET buttons should not be used as “ON” and “OFF” switches. 3. The cord and plug are not intended to offer protection to externally connected loads or supply circuits. 4. The cord and plug are intended for indoor use only. *OVVZLHZ\P[HISLSVJH[PVUULHYHNYV\UKLKLSLJ[YPJHSV\[SL[HUKZ\P[HISL^PUKV^ or door. Remove packaging and locate components. ,_[LUKIV[OLUKZVM[OLL_OH\Z[OVZLZHWWYV_PTH[LS`PUJOLZ :JYL^[OL^PUKV^RP[HKHW[LYVU[VVULLUKVM[OLL_OH\Z[OVZLJSVJR^PZL :JYL^[OLOVZLHKHW[LYVU[V[OLV[OLYLUKVM[OLL_OH\Z[OVZLJSVJR^PZL Repeat on the other exhaust hose. 9LTV]LV\[SL[JV]LYZMYVT[OLIHJRVM[OL\UP[I`ZJYL^PUN[OLT JV\U[LYJSVJR^PZL[OLUSPM[PUN\W 4V\U[[OLL_OH\Z[OVZLZVU[V[OLIHJRVM[OL\UP[I`SVJRPUN[OLOVZLHKHW[LYZ into place. 3 4 WINDOW KIT ASSEMBLY DUAL HOSE WINDOW KIT INSTALLATION ASSEMBLY & INSTALLATION 4XLFNO\DQGHIƂFLHQWO\FRRODODUJHDUHD ;OL]LU[PUNRP[T\Z[ILPUZ[HSSLKPUVYKLYMVY[OL\UP[[V^VYRJVYYLJ[S`PU[OLHPY JVUKP[PVUPUNOLH[PUNVYKLO\TPKPM`PUNTVKL;OL]LU[PUNRP[KVLZUV[ULLK[VIL used while the unit is fanning. PARTS: (;YHJR:JYL^Z )>PUN5\[Z */VZL7HULSZVUL^P[O;^V,_OH\Z[/VZL6WLUPUNZ +:SPKPUN;YHJR7HULS WINDOW KIT ;OL^PUKV^RP[OHZILLUKLZPNULK[VÄ[PU[VTVZ[]LY[PJHSHUKOVYPaVU[HS^PUKV^ VWLUPUNZ;OL^PUKV^RP[JHUHSZVIL\ZLKPUHZSPKPUNKVVY *OVVZLHZ\P[HISLSVJH[PVUULHYHNYV\UKLKLSLJ[YPJHSV\[SL[HUKHZ\P[HISL^PUKV^ or door. Remove packaging. 9LTV]L[OLV\[SL[JV]LYZMYVT[OLIHJRVM[OL\UP[I`ZJYL^PUN[OLT JV\U[LYJSVJR^PZL[OLUSPM[PUN\W 7\SSV\[VULLUKVM[OLL_OH\Z[OVZL[OLUZJYL^VU[OLHKHW[LYJSVJR^PZL Repeat on other exhaust hose. 7\SSV\[[OLVWWVZP[LLUKVM[OLL_OH\Z[OVZL[OLUZJYL^VU[OL^PUKV^RP[ adapter clockwise. Repeat on other exhaust hose. 4V\U[[OLL_OH\Z[OVZLZVU[V[OLIHJRVM[OL\UP[ 6WLU[OL^PUKV^VYKVVYHUKHKQ\Z[[OLSLUN[OVM[OL^PUKV^RP[[VÄ[[OLVWLUPUN 0MULJLZZHY`THYR[OLRP[HUKJ\[KV^UVULLUK[VWYVWLYS`Ä[[OLVWLUPUN ASSEMBLY: ;HRL[OL[YHJRZJYL^ZHUKZJYL^VULPU[VLHJOVM[OLZTHSSOVSLZMV\UKVU[OL hose panels. 5L_[[HRL[OL^PUNU\[ZHUK[PNO[LU[OLTHYV\UKLHJOVM[OL[YHJRZJYL^Z+VUV[ tighten the wing nuts all the way; make sure they are somewhat loose. 5V^WSHJL[OLZSPKPUN[YHJRWHULSV]LY[OL[YHJRZJYL^VUOVZLWHULS 5L_[[HRL[OLV[OLYOVZLWHULSHUKJVUULJ[P[[VOVZLWHULSI`WSHJPUN[OLZSPKPUN track panel over the track screw on hose panel. ;OLOVZLWHULSZZOV\SKUV^ILJVUULJ[LK\ZPUN[OLZSPKPUN[YHJRWHULS ;VJVTWSL[L[OLHZZLTIS`[PNO[LU[OL^PUNU\[ZPUZ[HSSLKLHYSPLY;OLÄUPZOLK window kit should resemble the image seen below. 7. Attached the window kit adapters to the window kit. Close the window or door tightly. Your Portable Air Conditioner is now ready to cool! NOTE: When using the venting system, keep the exhaust hose as short and straight as possible. The exhaust hose can be shortened, but it is not recommended to increase the length of the exhaust hose. Do not use an extension cord with your portable air conditioner. >OLU\ZPUN[VHZSPKPUNKVVYP[PZYLJVTTLUK[VTHRL[OLHPYV\[SL[\W[VHPYPUSL[ 5 6 SINGLE HOSE EXHAUST & WINDOW KIT INSTALLATION CONTROL PANEL, DISPLAY, & OPERATING INSTRUCTIONS Control Panel When you want quick spot cooling, install the CR13000-PAC using the single hose window kit installation. Temp & Timer Selection For Single Hose Installation Fan Speed Button Swing Button Install only the left exhaust hose over the circular air outlet (this outlet will be on the left side of the unit when you are facing the back of the unit). Cover the right circular air intake using the exhaust intake cover. After installing the hose remove the square air intake cover on the back of the unit and install the square air intake vent with removable/washable ÄS[LY Timer Buttons Air Intake Cover Exhaust Hose Installed Temp Select Mode Button Power Button Fan Speed Air Intake Vent* (additional accessory) Multi-Color Display Auto A/C Dehum. Fan Heat For Single Hose Window Kit Installation ;VPUZ[HSS[OL^PUKV^RP[MVSSV^[OLZHTLKPYLJ[PVUZVUWHNLMVYK\HSOVZLPUZ[HSSH[PVU I\[PUZ[LHKVM\ZPUN[OLK\HSOVZL^PUKV^RP[WHULS\ZL[OLZPUNSLOVZLWHULSWPJ[\YLK below. Temp & Timer Indicator Oscillation On / Off Sleep On / Off Single Hose Window Kit Panel Bucket Full 7 Timer On Timer Off Compressor On / Off 8 OPERATING INSTRUCTIONS CONTROL PANEL, DISPLAY, & OPERATING INSTRUCTIONS 1) Power On and Off - Press the POWER button once to manually turn the unit on. Press the POWER button once more to turn the unit off. 56;,!+\YPUNOV[KH`Z[OL\UP[^PSSJVVS[OLYVVTTVZ[LMÄJPLU[S`I`ZL[[PUN[OL[LTperature at the lowest setting and the fan speed on high. Reducing the length of the exhaust duct, insulating the exhaust hose and window kit, and keeping direct sunlight [VHTPUPT\T^PSSHSZVPTWYV]L[OLJVVSPUNLMÄJPLUJ` 2) Mode Selection - Press the MODE Button repeatedly to cycle between the different modes: (\[VTVKL(PY*VUKP[PVULY+LO\TPKPÄLY-HUVUS`HUK/LH[LY NOTE: When the unit is running on cooling mode, the exhaust hoses are required and must be vented outside using the supplied window kit. 3) Fan Speed Control - Press the FAN SPEED Button to cycle through the different fan speeds: High, Medium, and Low;OLMHUZWLLKJHUIL]PZ\HSS`KPZ[PUN\PZOLKI`[OL ZWLLKVM[OLMHUPJVUVU[OLMYVU[WHULS;OLYLPZHUHKKP[PVUHSH\[VZWLLKZL[[PUN[OH[PZ LUHISLKPUVUS`OLH[PUNHUKJVVSPUNTVKLZ;OPZZWLLKPZUL_[ZL[[PUNHM[LYSV^^OLU WYLZZPUN[OLZWLLKJVU[YVSI\[[VU;OLZWLLKZ^PSSJ`JSL[OYV\NOPU[OPZVYKLY!High, Medium, Low, Auto. Each change in speed will be associated with a “beep” sound from the unit. +LO\TPKPÄLY4VKL CONTROL PANEL BUTTONS 4) Temperature - Select the desired temperature by pressing either or key when using [OL\UP[PUJVVSPUNVYOLH[PUNTVKL;OL[LTWLYH[\YLPUKPJH[VYÅHZOLZ[VKPZWSH`[OLKLZPYLK [LTWLYH[\YLZL[[PUN(M[LY[OL[LTWLYH[\YLPZZL[[OL\UP[^PSSKPZWSH`[OPZ[LTWLYH[\YL ZL[[PUN\U[PSP[PZJOHUNLKI`[OL\ZLY;OLT\S[PJVSVYKPZWSH`ZOV^Z[LTWLYH[\YLPU*LSZP\Z VY-HOYLUOLP[7YLZZPUN[OLHUKI\[[VUZZPT\S[HULV\ZS`^PSSJOHUNL[OL[LTWLYH[\YL ZLSLJ[IL[^LLU-HUK* 1) Install the exhaust hoses and window kit properly (see pages ). 7S\N[OL7V^LY*VYKPU[VHULSLJ[YPJHSV\[SL[ ;\YUVU[OL\UP[I`WYLZZPUN[OLPOWER Button on the control panel. 7YLZZ[OLMODE button until the “ ” appears on the control panel display. 56;,!;OL\UP[VWLYH[LZH[SV^MHUZWLLKK\YPUNKLO\TPKPÄLYTVKL;OL\UP[JVVSZ YVVTZSPNO[S`K\YPUN[OLKLO\TPKPÄJH[PVU2LLW[OL^PUKV^ZHUKKVVYZJSVZLK[VHPK the effectiveness of the unit in removing the moisture from the room. 56;,!>OLU[OL\UP[PZY\UUPUNVUKLO\TPKPÄLYTVKL[OLL_OH\Z[OVZLZHYLYLX\PYLK and must be vented outside using the supplied window kit. 56;,!;OL\UP[^PSSUV[WLYMVYTPUKLO\TPKPÄLYTVKL^OLU[OLYVVT[LTWLYH[\YLPZ SV^LY[OHU- Fan Mode 5) Timer;VWYVNYHT[OL[PTLYWYLZZ[OLTIMER ON button until the display shows a ÅHZOPUN¸¹7YLZZ[OLVYI\[[VUZ[VJOHUNL[OLJSVJR[V[OLKLZPYLK[PTLMVY[OL unit to automatically turn on. Press the TIMER OFFI\[[VUHUK[OLKPZWSH`VU[OL\UP[^PSSÅHZO¸ ¹7YLZZ[OLVY I\[[VUZ[VJOHUNL[OLJSVJR[V[OLKLZPYLK[PTLMVY[OL\UP[[VH\[VTH[PJHSS`[\YUVMM;OL TIMER OFFPUKPJH[VY^PSSÅHZOMVYZLJVUKZ[VHJ[P]H[L[OL[PTLZ`V\WYVNYHTTLK NOTE: The timer will also remember your settings when it is set. If you set the timer while in Air Conditioning mode, the timer will automatically turn the unit on and off in air conditioning mode according to the desired programmed times. The timer will also remember the temperature settings, fan speed, and oscillation setting. The timer works ^OLU[OL\UP[PZPU(PY*VUKP[PVULYTVKL/LH[PUNTVKL+LO\TPKPÄLYTVKL-HUTVKLHUK Auto mode OPERATING THE UNIT USING THE CONTROL PANEL (PY*VUKP[PVULY4VKL 0UZ[HSS[OLL_OH\Z[OVZLZHUK^PUKV^RP[WYVWLYS`ZLLWHNLZ 7S\N[OL7V^LY*VYKPU[VHULSLJ[YPJHSV\[SL[ ;\YUVU[OL\UP[I`WYLZZPUN[OL76>,9I\[[VUVU[OLJVU[YVSWHULS 7YLZZ[OL4VKLI\[[VU\U[PS[OL¸ ¹PJVUHWWLHYZVU[OL4\S[PJVSVYKPZWSH` 7YLZZ[OLVYI\[[VUZ\U[PS[OLKLZPYLKYVVT[LTWLYH[\YLHWWLHYZVU[OLJVU[YVSWHULS KPZWSH`;OL[LTWLYH[\YLYHUNLZMYVT--** :LSLJ[[OLKLZPYLKMHUZWLLKI`WYLZZPUN[OLFAN SPEED button. 9 1) Plug the Power Cord into an electrical outlet. ;\YUVU[OL\UP[I`WYLZZPUN[OLPOWER button on the control panel. 7YLZZ[OLMODE button until the “ ” icon appears on the control panel display. :LSLJ[[OLMHUZWLLKI`WYLZZPUN[OLFAN SPEED button. ;VJPYJ\SH[LTVYLHPYWYLZZ[OLSWINGI\[[VUVU[OLYLTV[LJVU[YVS;OLSV\]LYZ will oscillate which moves the louvers up and down to increase air circulation. NOTE: It is not necessary for the exhaust hoses and window kit to be installed to operate the unit in fan mode. Heating Mode 1) Install the exhaust hoses and window kit properly (see pages ). 7S\N[OL7V^LY*VYKPU[VHULSLJ[YPJHSV\[SL[ ;\YUVU[OL\UP[I`WYLZZPUN[OLPOWER button on the control panel. 7YLZZ[OLMODE button until the “ “ icon appears on the control panel display. 7YLZZ[OLVYI\[[VUZ\U[PS[OLKLZPYLKYVVT[LTWLYH[\YLHWWLHYZVU[OL JVU[YVSWHULSKPZWSH`;OL[LTWLYH[\YLYHUNLZMYVT--** :LSLJ[[OLMHUZWLLKI`WYLZZPUN[OLFAN SPEED button. It is recommended to set the fan speed to low. NOTE: When heat mode is selected, the unit will shut down for 3-5 minutes, then start in heating mode. NOTE: When the unit is running on heating mode, the exhaust hoses are required and must be vented outside using the supplied window kit. 10 OPERATING INSTRUCTIONS CONTROL PANEL, DISPLAY, & OPERATING INSTRUCTIONS Auto Mode Emergency Condensate Holding Tank 0UZ[HSS[OLL_OH\Z[OVZLZHUK^PUKV^RP[WYVWLYS`ZLLWHNLZ 7S\N[OL7V^LY*VYKPU[VHULSLJ[YPJHSV\[SL[ ;\YUVU[OL\UP[I`WYLZZPUN[OLPOWER button on the control panel. 7YLZZ[OLMODE button until the “ ” icon appears on the control panel display. Select the fan speed by pressing the FAN SPEED button. NOTE: During AUTO mode, the unit operates in Heating mode when the room [LTWLYH[\YLPZILSV^-+LO\TPKPÄLYmode when the room temperature is between -[V-(UKAir ConditionerTVKL^OLU[OLYVVT[LTWLYH[\YLPZHIV]L- Sleep Mode (This mode can only be selected when using the Remote control ) ;VZL[:SLLWTVKLTHRLZ\YL[OL\UP[PZPU(PY*VUKP[PVULYTVKLVY/LH[PUNTVKL 7YLZZ[OLSLEEP)\[[VUVU[OLYLTV[LJVU[YVS;OL¸ ¹PJVUHWWLHYZVU[OL control panel display. >OLUPUSLEEPTVKL[OLMHU^PSSY\UVUSV^[VRLLWMHUUVPZLH[HTPUPT\T >OLUPU(PY*VUKP[PVULYTVKL[OL[LTWLYH[\YLZL[[PUN^PSSNYHK\HSS`PUJYLHZL[VHIV]L[OLVYPNPUHSZL[[LTWLYH[\YLMVYOV\YZ(M[LYOV\YZ[OL[LTWLYH[\YLZL[[PUN will return to the set temperature. >OLUPU/LH[PUNTVKL[OL[LTWLYH[\YLZL[[PUN^PSSNYHK\HSS`KLJYLHZL[V-ILSV^ [OLVYPNPUHSZL[[LTWLYH[\YLMVYOV\YZ(M[LYOV\YZ[OL[LTWLYH[\YLZL[[PUN^PSS return to the set temperature. >OLUPU+LO\TPKPÄLYTVKL[OL[LTWLYH[\YL^PSSUV[JOHUNL^OLU:SLLWTVKL is selected. >OLU[OLYVVT[LTWLYH[\YLPZSV^HUK[OLPUKVVYO\TPKP[`PZOPNO[OLHPYJVUKP[PVULY TH`UV[ILHISL[VL]HWVYH[LZVTLVM[OLTVPZ[\YLMHZ[LUV\NO>OLU[OPZOHWWLUZ [OL^H[LY^PSSHJJ\T\SH[LPUHULTLYNLUJ`JVUKLUZH[L[HURPUZPKL[OL\UP[6UJL[OL LTLYNLUJ`JVUKLUZH[L[HURPZM\SS[OL\UP[^PSSH\[VTH[PJHSS`ZO\[VMMHUK[OL¸ ¹ ^PSSHWWLHYVU[OLJVU[YVSWHULSKPZWSH`;VLTW[`[OLJVUKLUZH[L[HUR\UZJYL^[OL ZJYL^WS\NH[[OLIV[[VTIHJRVM[OL\UP[@V\^PSSULLKHZTHSSWHUHWWYV_PTH[LS` ¹OPNO[VJH[JO[OL^H[LYJVTPUNV\[VM[OLJVUKLUZH[L[HUR6UJL[OLJVUKLUZH[L [HURPZKYHPULK[OL\UP[^PSSILNPU^VYRPUN^P[OPUHML^TPU\[LZ;OLLTLYNLUJ` JVUKLUZH[L[HUROVSKZHWWYV_PTH[LS`3P[LYZVM^H[LY(UV[OLYVW[PVUPZ[V W\YJOHZLHZTHSSOVZLMYVTHOHYK^HYLZ[VYL[OH[JHUÄ[HYV\UK[OL¹KYHPUWS\N on the back of the unit and drain the unit into a gravity drain or larger pan for continuous drainage. ;VYLZ\TLVWLYH[PVUX\PJRS`LTW[`[OL^H[LYJVU[HPULYHJJVYKPUN[V[OLMVSSV^PUN steps: ;\YU[OL\UP[VMMDo not move the unit when the water container is full. 7SHJL[OLKYHPUWHUHJJLZZVY`\UKLY[OLKYHPUHNLWVY[H[[OLIHJRVM[OL\UP[ 9LTV]L[OLZJYL^WS\NMYVT[OLKYHPUOVSL;OLJVUKLUZH[L^H[LY^PSSKYHPUV\[ H\[VTH[PJHSS`>OLU[OLKYHPUWHUPZM\SSZJYL^[OLZJYL^WS\NIHJRVU[V[OL KYHPUHNLOVSL[VZ[VW[OL^H[LYÅV^,TW[`[OLKYHPUWHU9LWLH[\U[PSHSS[OL^H[LY is emptied. Once the water container has been emptied, screw the plug back onto the drain hole. Do not allow the water to drip continuously into the drain pan, as it might LHZPS`V]LYÅV^ Compressor Indicator ;OL¸¹PJVU^PSSSPNO[\WVU[OLJVU[YVSWHULSKPZWSH`^OLU[OLJVTWYLZZVY[\YUZVU ;OL¸¹PJVU^PSS[\YUVMM^OLU[OLJVTWYLZZVYZO\[ZVMM. Screw Plug 11 Drain Hole 12 OPERATING THE UNIT USING THE REMOTE CONTROL CONTROL PANEL, DISPLAY, & OPERATING INSTRUCTIONS 2) Mode Selection - Press the MODE Button repeatedly to cycle between the KPMMLYLU[TVKLZ!(\[V(PY*VUKP[PVULY+LO\TPKPÄLY-HUVUS`HUK/LH[LYTVKL;OL upper left square on the Remote control dis- play will light up showing which mode is ZLSLJ[LK0U(PY*VUKP[PVULYTVKL[OLKPZWSH`^PSSZOV^¸*663¹PU/LH[PUNTVKL[OL KPZWSH`^PSSZOV^¸/,(;¹PU+LO\TPKPÄLYTVKL[OLKPZWSH`^PSSZOV^¸+9@¹PU-HU TVKL[OLKPZWSH`^PSSZOV^¸-(5¹HUKPU(\[VTVKL[OLKPZWSH`^PSSZOV^¸(<;6¹ LCD Display Mode Button Fan Speed Swing (Louver Oscillation) Power Button Temp Setting Timer On Sleep Button Timer Off Hour Selector Minute Selector 3) Fan Speed - Press the FANZWLLKI\[[VU[VJ`JSL[OYV\NOOPNOTLKP\THUKSV^ MHUZWLLKZ;OLKPZWSH`VU[OLYLTV[LJVU[YVS^PSSZOV^/PNO4LKP\T3V^\UKLY [OL¸:7,,+¹SHILSVU[OLYLTV[LJVU[YVS3*+KPZWSH`;OLYLPZHUHKKP[PVUHSH\[V ZWLLKZL[[PUN[OH[PZLUHISLKPUVUS`OLH[PUNHUKJVVSPUNTVKLZ;OPZZWLLKPZUL_[ setting after low when pressing the FANZWLLKI\[[VUVU[OLYLTV[LJVU[YVS;OL speeds will cycle through in this order: High, Medium, Low, Auto. Each change in ZWLLK^PSSILHZZVJPH[LK^P[OH¸ILLW¹ZV\UKMYVT[OL\UP[;OLYLTV[LJVU[YVS^PSS UV[KPZWSH`¸(<;6¹\UKLY[OLZWLLKSHILS6UJL(\[VMHUZWLLKPZZLSLJ[LK[OL\UP[ will beep and there will not be a fan speed displayed on the remote control. 4) Temperature Setting>OLU[OL\UP[PZPU(PY*VUKP[PVULYVY/LH[PUNTVKL`V\JHU select your desired temperature. Press the or to select your desired temperature ZL[[PUN;OL[LTWLYH[\YLVU[OL3*+KPZWSH`VU[OLYLTV[LJVU[YVS^PSSPUJYLHZLVY decrease accordingly. Pressing the and buttons simultaneously will change the [LTWLYH[\YLZLSLJ[IL[^LLU-HUK* 5) SLEEP MODE:LL¸:3,,746+,¹VUWHNL 6) SWING ;V[\YUVU[OLVZJPSSH[PVUWYLZZ[OLSWING button on the remote control. 6UJL`V\WYLZZ:>05.[OLSV\]LYZVU[OL\UP[^PSSVZJPSSH[L\WHUKKV^U;OLIV[[VT left square of the remote control display will show the “ “ icon when oscillation :>05.PZZLSLJ[LK REMOTE CONTROL OPERATING INSTRUCTIONS 1) Power On and Off 0M[OL\UP[PZHSYLHK`VUWYLZZ[OLPOWER (I/O) button on the YLTV[L^OPSLWVPU[PUN[OLYLTV[LH^H`MYVT[OL\UP[;OPZ^PSS[\YU[OLYLTV[LVU0M [OL\UP[PZVMMUV^WYLZZ[OLPOWER (I/O) button once to manually turn the unit on. Press the Power button once more to turn the unit off. When you press the POWER I\[[VU[OL\WWLYYPNO[ZX\HYLVU[OLYLTV[LJVU[YVS3*++PZWSH`^PSSSPNO[\W>OLUPU (PY*VUKP[PVULY/LH[PUNHUK(\[VTVKL[OLZLSLJ[LK[LTWLYH[\YL^PSSHWWLHYVU[OL YLTV[LJVU[YVSKPZWSH`>OLU[OL\UP[PZPU-HUTVKLHUK+LO\TPKPÄLYTVKL`V\^PSS ZLL[OL¸¹PJVUPUZ[LHKVM[OLZL[[LTWLYH[\YL;OPZZOV^Z[OH[[LTWLYH[\YLZLSLJ[PVUPZUV[H]HPSHISL^OLU[OL\UP[PZPU-HUVY+LO\TPKPÄLYTVKL 13 7) TIMER;VWYVNYHT[OL[PTLYÄYZ[WYLZZ[OLT-ONI\[[VU6UJLT-ON is pressed the auto-on timer will blink in the bottom right rectangle of the remote control display. Press the MIN and HOUR buttons to change the clock to the desired time for the unit [VH\[VTH[PJHSS`[\YUVU;OLTPU\[LZ^PSSPUJYLHZLI`^P[OLHJOWYLZZVM[OLMIN button and the hours will increase by 1 with each press of the HOUR button. Press the T-OFFI\[[VUHUK[OLYLTV[LJVU[YVSKPZWSH`^PSSÅHZO[OLKLZPYLKH\[VVMM[PTLY Press the MIN and HOUR buttons to change the clock to the desired time for the unit [VH\[VTH[PJHSS`[\YUVMM;OL[PTLYPZZL[^OLU[OLH\[VVMM[PTLZ[VWZÅHZOPUNHUK[OL ^VYKZ¸65¹HUK¸6--¹HYLKPZWSH`LKUL_[[V[OL[PTL 8) CLOCK ;VZL[[OLJSVJRVU[OLYLTV[LJVU[YVSOVSKKV^ULP[OLY[OLMIN or HOURI\[[VU\U[PS[OLKPZWSH`LK[PTLÅHZOLZVU[OLYLTV[LJVU[YVSKPZWSH`*OHUNL the minutes by pressing the MIN button and change the hours by pressing the HOUR button. 14 MAINTENANCE 5V[L!4HRLZ\YLWV^LYPZVMMHUK[OLWV^LYJVYKPZUV[WS\NNLKPU[VHULSLJ[YPJHS outlet prior to performing any maintenance on the unit. *SLHUVYYLWSHJLÄS[LY0M[OLHPYÄS[LYPZISVJRLK^P[OHK\Z[[OLHPYÅV^]VS\TLTH` YLK\JL0[PZYLJVTTLUKLK[VJSLHU[OLÄS[LYVUJLL]LY`[^V^LLRZVYHZULLKLK 9LTV]L[OLÄS[LYMYVT[OLÄS[LYJVTWHY[TLU[VU[OLIHJRVM[OL\UP[ >HZO[OLHPYÄS[LYI`PTTLYZPUNP[NLU[S`PU[V^HYT^H[LY^P[OHUL\[YHSKL[LYNLU[ 9PUZL[OLÄS[LYHUKKY`P[[OVYV\NOS`V\[VMZ\USPNO[ :SPKL[OLÄS[LYIHJRPU[V[OLÄS[LYJVTWHY[TLU[HM[LYP[PZ[OVYV\NOS`KYPLK 0M[OLÄS[LYPZ[VYUVY\U\ZHISLVYKLYHUL^ÄS[LYI`JHSSPUN[OLJ\Z[VTLYZLY]PJL number on the warranty page of this manual. Clean the unit housing 1) Keep the unit from being exposed directly to the sun to prevent color fading. *SLHU[OLZ\YMHJL^P[OHKHTWJSV[OHUKKY`P[^P[OHZVM[[V^LS :[VYPUN[OL<UP[MVYHU,_[LUKLK7LYPVKVM;PTLVY;YHUZWVY[PUN[OL\UP[ 1) Empty any excess water by unplugging the water drainage stop in the back of the unit (located at the bottom). <UWS\N[OL\UP[ ;OL\UP[ZOV\SKILZ[VYLKPUHJVVSKY`WSHJL DISCLAIMER ALL INFORMATION AND THE TECHNICAL SPECIFICATIONS PRESENTED IN THIS USER’S MANUAL ARE THE PRESENTATION OF THE MANUFACTURER. CLIMATE RIGHT® HAS NOT CONDUCTED INDEPENDENT TEST TO THE INFORMATION AND THE SPECIFICATIONS PRESENTED HEREWITHIN. WARRANTY One Year Limited Warranty ClimateRight® warrants the accompanying ClimateRight® Air Portable Air Conditioner ^P[O/LH[7\TW[VILMYLLVMKLMLJ[ZPUTH[LYPHSHUK^VYRTHUZOPWMVY[OLHWWSPJH[PVUZ ZWLJPÄLKPUP[ZVWLYH[PVUPUZ[Y\J[PVUMVYHWLYPVKVM65,`LHYMYVT[OLKH[LVM original retail purchase in the United States. 0M[OL\UP[L_OPIP[ZHKLMLJ[PUUVYTHS\ZL*SPTH[L9PNO[®^PSSH[P[ZVW[PVULP[OLYYLWHPY VYYLWSHJLP[MYLLVMJOHYNL^P[OPUHYLHZVUHISL[PTLHM[LY[OL\UP[PZYL[\YULKK\YPUN the warranty period. (ZHJVUKP[PVU[VHU`^HYYHU[`ZLY]PJLVISPNH[PVU[OLJVUZ\TLYT\Z[WYLZLU[[OPZ >HYYHU[`*LY[PÄJH[LHSVUN^P[OHJVW`VM[OLVYPNPUHSW\YJOHZLPU]VPJL THIS WARRANTY DOES NOT COVER: +HTHNLHJJPKLU[HSVYV[OLY^PZL[V[OL\UP[^OPSLPU[OLWVZZLZZPVUVMHJVUZ\TLY not caused by a defect in material or workmanship. +HTHNLJH\ZLKI`JVUZ\TLYTPZ\ZL[HTWLYPUNVYMHPS\YL[VMVSSV^[OLJHYLHUK special handling provisions in the instructions. +HTHNL[V[OLÄUPZOVM[OLJHZLVYV[OLYHWWLHYHUJLWHY[ZJH\ZLKI`^LHY +HTHNLJH\ZLKI`YLWHPYZVYHS[LYH[PVUZVM[OL\UP[I`HU`VULV[OLY[OHU[OVZL authorized by ClimateRight®. -YLPNO[HUK0UZ\YHUJLJVZ[MVY[OL^HYYHU[`ZLY]PJL ALL WARRANTIES, INCLUDING ANY IMPLIED WARRANTY OF MERCHANT ABILITY ARE LIMITED TO ONE YEAR DURATION OF THIS EXPRESS LIMITED WARRANTY. CLIMATERIGHT DISCLAIMS ANY LIABILITY FOR CONSEQUENTIAL OR INCIDENTAL DAMAGES AND IN NO EVENT SHALL CLIMATERIGHT’S® LIABILITY EXCEED THE RETAIL VALUE OF THE UNIT FOR BREACH OF ANY WRITTEN OR IMPLIED WARRANTY WITH RESPECT TO THIS UNIT. ;OPZ^HYYHU[`JV]LYZVUS`UL^WYVK\J[ZW\YJOHZLKMYVTV\YH\[OVYPaLKKLHSLYZVY YL[HPSLYZ0[KVLZUV[JV]LY\ZLKZHS]HNLKVYYLM\YIPZOLKWYVK\J[Z As some states do not allow the limitation or exclusion of incidental or consequential KHTHNLZVYKVUV[HSSV^SPTP[H[PVUVUPTWSPLK^HYYHU[PLZ[OLHIV]LSPTP[H[PVUZHUK L_JS\ZPVUZTH`UV[HWWS`[V`V\;OPZ^HYYHU[`NP]LZ`V\ZWLJPÄJSLNHSYPNO[ZHUK`V\ may also have other rights that vary from state to state. -VY;LJOUPJHS:\WWVY[HUK>HYYHU[`:LY]PJL Please Call: Ph: 800-725-4628 6Y>YP[L;V! 9OVHKZ(]L*VS\TI\Z6/ www.climaterightair.com 15 16