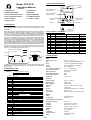
1
7. CALIBRATION
6. INSTALLATION
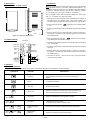
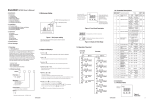
6.1. DIMENSIONS & PANEL CUTOUT
Note: Do not proceed through this section unless their is a genuine need
to re-calibrate the controller. All previous calibration data will be lost. Do
not attempt recalibration unless you have available appropriate calibration
equipment. If calibration data is lost, you will need to return the controller
to your supplier who may apply a charge for re-calibration
.
Prior to calibration ensure that all parameter settings are correct (input
type, °C / °F, resolution, low range, high range).
3.62"
1. Remove sensor input wiring and connect a standard input simulator of
the correct type to the controller input. Verify correct polarity. Set
simulated signal to coincide with low process signal (e.g. zero degrees).
2. Use the Scroll Key until the "
to 8.2.)
" appears on the PV Display. (Refer
3. Use the Up and Down Keys until the SV Display represents the simulated
input.
1.77"
Panel
Panel Cutout
4. Press the Return Key for at least 6 seconds ( maximum 16 seconds ),
then release. This enters the low calibration figure into the controller's
non-volatile memory.
2.55"
Figure 6.1. Mounting Dimensions
6.2. WIRING DIAGRAM
5. Press and release the Scroll Key. "
This indicates the high calibration point.
FDC-8130
_
Control
OUT 1
+
90-264 VAC
Power Input
C
N.O
C
C
N.O
N.C
AC1
AC2
6. Increase the simulated input signal to coincide with high process signal
( e.g. 100 degrees).
Interface
I/O
7. Use the Up and Down Keys until the SV Display represents the simulated
high input.
Alarm2 Com.
8. Press the Return Key for at least 6 seconds ( maximum 16 seconds ),
then release. This enters the high calibration figure into the controller's
non-volatile memory.
Alarm2 N/O
V
_
+
11
12
13
14
15
16
17
18
19
20
+
Control
OUT 2
Tx1
C
Tx2
N.O
_
_
1
2
3
4
5
6
7
8
9
10
+
Alarm1 N/O
Alarm1 Com.
N.O
" appears on the PV Display.
B
B
RTD
A
9. Turn power off the unit, remove all test wiring and replace sensor
wiring (observing polarity).
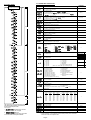
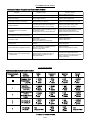
8. OPERATION
8.1. KEYPAD OPERATION
* With power on, it has to wait for 12 seconds to memorize the new values of parameters once it been changed.
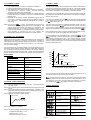
TOUCHKEYS
FUNCTION
AT
Press
for 6 seconds
AT
Press
for 6 seconds
Press
and
and
Press
for 6 seoncds
AT
AT
DESCRIPTION
Scroll Key
Advance the index display to the desired position.
Indexs advanced continuously and cyclically by pressing this
keypad.
Up Key
Increases the parameter
Down Key
Decreases the parameter
Return Key
Resets the controller to its normal status. Also stops auto-tuning,
output percentage monitoring and manual mode operation.
Long Scroll
Allows more parameters to be inspected or changed.
Long Return
1. Executes auto-tuning function
2. Calibrates control when in calibration level
Output Percentage
Monitor
Allows the set point display to indicate the control output value.
Manual Mode
Execution
Allows the controller to enter the manual mode.
Page 2