1
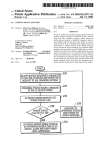
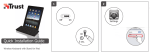
Bluetooth Enabler for Palm V and Vx
blu
e5
sys
tem
s
Contents
Introduction
Box contents ............................................................................................................................................................... 2
Getting Started
Attaching the blue5 .................................................................................................................................................. 3
Using the HotSync Cradle while blue5 is attached ......................................................................... 3
Removing the blue5 ................................................................................................................................................ 4
Installing the blue5 Software ................................................................................................................................ 5
Using blue5
Controlling Bluetooth with Preferences ............................................................................................................ 6
Connecting with other devices ............................................................................................................................. 7
Discovering other devices ........................................................................................................................ 7
Being discovered by other devices ....................................................................................................... 9
Pairing two Palm/blue5 devices ............................................................................................................ 9
Viewing device properties ........................................................................................................................ 9
Removing Bluetooth devices from the list ......................................................................................... 9
Network (Internet) settings ................................................................................................................................ 10
HotSync over Bluetooth (BlueSync™) ............................................................................................................ 11
Bluetooth Profiles ................................................................................................................................................... 12
The blue5 button ................................................................................................................................................... 13
The blue indicator .................................................................................................................................... 13
Menu Items .............................................................................................................................................................. 14
Settings ...................................................................................................................................................................... 14
Troubleshooting and Information
Troubleshooting ...................................................................................................................................................... 15
I still can’t get it to work! ...................................................................................................................................... 15
Warranty and Regulatory Information ............................................................................................................. 16
Copyright and Trademark Notices .................................................................................................................... 16
Technical Information ........................................................................................................................................... 16
Assistance on setting specific Bluetooth devices ........................................................................................ 17
1
Introduction
When you need to share Palm files with another computer, what is required? When
you want to browse the Internet from your Palm using a mobile phone, what do you
do? The answer is usually to connect them together using cables. As more connections become necessary between mobile devices, so too does the number of cables
required to make it all possible.
Next steps
• Attach the blue5
• Install the Software
Bluetooth™ provides a way for devices to communicate without the need for cables
or connectors. Using low power radio waves and a standard vocabulary, any device
with Bluetooth wireless technology is able to make a connection with any other
Bluetooth device to share information and resources.
• Use Palm Preferences
The TDK blue5 is a sleek device that snaps to the back of your Palm V, Vx or IBM
WorkPad C3 and provides a range of Bluetooth capabilities. blue5 uses small
amounts of power from your Palm battery and adds only 26g to the overall weight.
Once the supplied software is loaded into your Palm, you are ready to connect with
an ever-increasing range of smart, wireless devices.
• Reprogram the blue5 button
• Connect with other Bluetooth devices
• Make network settings for Internet access
Box contents
Your blue5 package should contain the following items:
blue5 device
Installation
CD-ROM
blu
e5
sys
tem
s
Also:
Connect/disconnect instructions
Quickstart booklet
2
Getting Started
Attaching the blue5
Note: You must remove any other peripheral devices connected to your Palm
handheld before attaching the blue5.
2 Slide the blue5 onto your Palm until the connector fully mates with the socket
and you sense it clipping into place.
1 With the Palm switched off, line up the black connector on the blue5 with the
socket at the base of your Palm.
blu
e5
sys
tem
s
blu
e5
sys
tem
s
Using the HotSync Cradle while blue5 is attached
You can continue to use your Palm with the HotSync Cradle while the blue5 is
attached. This is because the blue5 replicates the Palm base connector to allow
battery recharging and HotSync operations. Simply place the Palm and blue5 into the
cradle so that the blue5 socket mates with the cradle connector.
Note: Bluetooth communication cannot occur during a HotSync operation. However, if you decide to HotSync using a Bluetooth connection with your computer,
you can disconnect the cradle’s serial port connector so that only battery charging
takes place. Bluetooth operation will then remain undisturbed.
3
Next steps
• Install the Software
• Use Palm Preferences
Removing the blue5
1 With the Palm switched off, gently lift the blue5 away, roughly half a
centimetre, from the back of the Palm.
2 Slide the blue5 towards the base of the Palm until it fully disengages.
4
Installing the blue5 Software
Note: It is not essential for the blue5 to be attached to your Palm while software is
being loaded. However, it is essential that the Palm desktop software is pre-installed
on your PC.
1 Place the Palm, with or without the blue5 attached, into the HotSync cradle as
usual.
2 Insert the blue5 CD-ROM into the CD reader of your PC. The CD should
automatically start and begin its installation procedure (if it does not start
automatically: click the Windows Start menu, click Run then click Browse,
locate the CD-ROM drive and choose the file setup.exe.)
3 Follow the instructions given on screen in order to transfer the required
applications from the CD-ROM, through the PC and into the Palm.
4 Once the application transfer is complete, you can remove your Palm from
the cradle and (if not already done) attach the blue5 device.
Next steps
• Use Palm Preferences
• Connect with other Bluetooth devices
• Make network settings for Internet access
• Reprogram the blue5 button
5
Using blue5
Controlling Bluetooth with Preferences
Once the blue5 software is installed on your Palm, you are ready to begin making
connections to other Bluetooth equipped devices.
On your Palm, the central point for controlling basic Bluetooth operation is within the
Palm Preferences application. During the software installation a new Bluetooth page
was added to Preferences and from this new page, you can:
There are two main stages in getting Bluetooth devices to work together:
• Firstly, one device must discover the other, and
• Begin a search to discover new devices,
• Secondly, the devices then swap security passkeys in order to become paired.
• Set your Palm to be discovered,
Once paired, the two devices can request and supply information or services as
required. For each set of devices, the pairing process need only be carried out once
and from that moment they can call directly to each other as necessary (providing
they are within range, i.e. within ten metres).
• View or delete existing paired devices, and
• Alter various settings.
The discovery and pairing characteristics of your Palm (and blue5) are controlled
from the standard Palm Preferences application.
To display the Bluetooth Preferences page:
1 Tap
The reason for discovery and pairing
2 Tap the
From its initial conception, the Bluetooth standard has been designed with security in
mind. Obviously, when your Palm can theoretically be accessed by any other Bluetooth device, you need to be sure that you are in control of how, and by whom it is
being accessed. For this reason, the process of getting most Bluetooth devices to
work together is divided into two distinct stages - Discovery and Pairing.
to locate the
icon.
icon.
3 If the Bluetooth Devices screen is
not already showing, tap the
in the top right corner and select
Bluetooth from the drop down
list ð
To understand the process, imagine a group of people in a dark room. Person A
wants to find someone to talk to among all the others. So person A calls out if
anyone is there (discover). Person B does not want to be discovered so they don’t
reply (non-discoverable). However, person C does want to be known (discoverable)
and shouts out their name, possibly along with many others. Person A then chooses
person C from a number of responses and asks them directly for more details.
Person C then asks for a secret password (passkey) before the conversation gets
any deeper. Providing the right number or word is given, they form an instant
trusting relationship (pairing) and from that moment on, whenever they need to
share information, they simply call each other by name.
4 Using this screen you can now
control the basic Bluetooth
capabilities of your Palm and
blue5 combination as covered
next.
Next steps
• Connect with other Bluetooth devices
• Make network settings for Internet access
6
Connecting with other devices
The first stage of interaction between Bluetooth devices requires one of them to
search for and discover other such devices. It is generally unimportant which device
does the discovering and which is discovered as once their relationship (pairing) is
confirmed, they can both request or supply resources as necessary. In some cases,
however, devices with limited capability may require special treatment (i.e. wireless
headsets, certain mobile phones, etc.) as they have little or no user interface. Refer
to the user documentation for these devices for further details.
Discovering other devices
Follow this procedure to make your Palm/blue5 perform a search for other Bluetooth devices in the vicinity:
1 Display the Bluetooth page of Preferences.
2 Tap the Add Device button in the
lower right corner. This screen
will be displayed ð
Next steps
• Discovering other devices
ð
3 You are offered two options:
• Require passkey – you
are strongly recommended to keep this
option enabled unless you
are attempting to link with
a device that does not
require or use passkeys.
This will ensure that other
Bluetooth devices that
may be in the vicinity
cannot gain unauthorised
access to your Palm.
• Being discovered by other devices
• Pairing two Palm/blue5 devices
• Removing Bluetooth devices from the list
• Search for – this option
allows you to narrow
down the choices in
situations where many
different Bluetooth
devices are in the vicinity.
7
continued
ð
4 Ensure that the other Bluetooth
device(s) is/are in discoverable
mode (help for specific devices)
and tap the Search button. Your
Palm/blue5 will begin searching
and after a short while will either:
present a list of Found devices, or
indicate that No devices could be
found.
7 Your Palm/blue5 will now
interrogate the selected device
and display a Device Info
screen ð
8 If the device offers more than
one service, tap the required
service to select it and then tap
OK. For more information about
services.
Note: Occasionally, rather than
receiving a device name such as
‘MY PHONE’, you may receive a
string of characters, such as
‘0001EC4ADEA8’. This is the
Bluetooth address for the device
and is sometimes sent at this
stage if the other device didn’t
have time to respond with it’s
user-friendly name. You could
either check that this is the
address of the required device,
or tap Cancel and then Add
Device to start the search again.
9 The two devices are now paired.
The other device will be added
to your Palm’s Bluetooth devices
list with a padlock icon to indicate that it is paired.
5 If the Found devices list contains
more than one Bluetooth device,
tap the required device name to
select it and tap OK. If there is
only one device listed, tap OK
directly.
6 You will be requested to enter a
passkey at this point (unless you deselected the Require passkey option). Tap
the dotted line in the passkey dialog and then enter a passkey, up to sixteen
characters in length, suitable for use with the selected device and tap the OK
button. The other device should respond at this point and request for an
identical passkey to be entered.
Next steps
• Make network settings for Internet access
• HotSync to your PC using Bluetooth
• Reprogram the blue5 button
Note: If you are connecting with a mobile phone or another such numerically-centered device then the passkey must be numeric. For alphanumeric
devices such as computers, the passkey can be of a mixed nature. The
important point is that it is the same on both devices otherwise the link will
be refused.
8
Being discovered by other devices
Pairing two Palm/blue5 devices
Follow this procedure to make your Palm/blue5 discoverable by one or more
Bluetooth devices in the vicinity:
Decide which Palm will discover and which will be discovered. Then:
• Use the Discovering other devices procedure for one, and
1 Display the Bluetooth page of Preferences.
• The Being discovered by other devices procedure for the other.
2 Tap the
button, then tap
Incoming and finally tap
Discoverable mode ð
Viewing device properties
To view the name and Bluetooth address of a discovered device:
A dialog will be displayed with the
option:
Require passkey – You are
strongly recommended to keep
this option enabled unless you
are attempting to link with a
device that does not require or
use passkeys. Tap OK when you
are ready to proceed. Your Palm/
blue5 will now wait for a limited
time in discoverable mode until
contacted by another Bluetooth
device.
1 Display the Bluetooth page of Preferences.
2 Select the appropriate device from the list
3 Tap the
button and then tap Properties.
Removing Bluetooth devices from the list
To delete a Bluetooth device:
1 Display the Bluetooth page of Preferences.
2 Select the appropriate device from the list
3 Tap the
3 Place the other Bluetooth device into Discover mode – (help for specific
devices) Typically its procedure will require you to enter a passkey and once
done, that will induce your Palm to request a matching passkey.
4 When you are requested for a passkey, tap the dotted line in the passkey
dialog and enter a passkey that exactly matches the one entered into the
other device and tap the OK button.
button and then tap Delete.
Next steps
5 The devices should now be paired and added to each other’s device lists.
• Make network settings for Internet access
• HotSync to your PC using Bluetooth
• Reprogram the blue5 button
9
Network (Internet) settings
If you intend to connect to the Internet using your Bluetooth link then you need to
enter some details first. This can be done either before or after you have paired with
an appropriate Bluetooth device. You can get the required information from sources
such as your Internet service provider or company IT department.
In most cases this will be all you need to enter and you can tap the Connect button
to initiate a connection (providing the other Bluetooth device is paired with your
Palm and in the vicinity).
Note: Network settings entered here are not tied to one particular Bluetooth device
and could be used with various devices that support the necessary connection
protocols. For example, a network configuration that you create for use with one
Bluetooth mobile phone can be used with other Bluetooth mobile phones.
To enter network details:
1 Display the Preferences application.
2 Select the Network page (tap the
in the top right corner and
select Network) ð
Other settings
The Details button provides further settings to accommodate a range of network
connections:
3 Tap the
button and then tap
New to create a fresh network
details page.
• Connection type: PPP (default), SLIP, CSLIP. Internet connection protocols –
leave as PPP unless directed to select an alternative.
• Service: - Enter a name to
identify this set of network
details – this can be
anything.
• Idle timeout: Indicates how long to maintain the connection after a network
application closes, which allows you to switch between applications without
dropping the line. The Power Off setting ends the connection whenever your
Palm switches off.
• Username: - Enter the
name by which you are
known on the network.
• Query DNS: Allows you to specify primary and secondary Domain Name
Servers to use rather than accepting ones specified by your ISP.
• IP Address: Allows you to specify a fixed IP Address issued by your ISP rather
than using a dynamically assigned one.
• Password: - If you have been issued with a password for network
access, enter it here.
• Connection: - Select the appropriate Bluetooth profile for your network
connection:
• For an Internet connection via a mobile phone, choose
Bluetooth (Dialup).
• Phone: - Enter the access phone number provided by your Internet
Service Provider.
10
• Script… Allows you to create a login script that will be issued each time you
make the network connection.
HotSync over Bluetooth (BlueSync™)
To BlueSync™ your blue5 to your PC, you need to follow the following setup procedure on your PC and your Palm.
On your PC:
(Using TDK Bluetooth for Windows Connectivity Solutions)
On your Palm:
1 Launch the HotSync application
(tap the
button and locate
HotSync).
Note: If you are using an alternative Bluetooth Windows Connectivity Solution, please refer to its user manual about Pairing devices and enabling
Serial Port Services for third party devices - then go straight to step 3.
2 Ensure the Local option is
selected and then tap the
below the HotSync logo.
1 From the Bluetooth Neighborhood, double click the Search for Devices icon
to discover the PalmV/blue5 device (see Being discovered by other devices).
2 Double click the discovered Palm/blue5 device (this will initiate the Pairing
procedure, if the device is not already paired) and double click the Serial port.
Make a note of the enabled COM Port number (for example COM5).
3 Select the Bluetooth (Serial)
option. Your Palm should now be
ready to perform a BlueSync ™
session – tap the HotSync logo
to commence.
3 Locate the HotSync Manager icon
on the taskbar of your Windows
desktop (usually in the lower right hand corner of the screen).
4 Right-click on the icon and choose Setup.
5 Select Local and change the Serial Port setting to match the Bluetooth
enabled COM Port number
6 Click OK to accept the change.
11
Bluetooth Profiles
One of the key Bluetooth design goals is to offer a direct replacement for cables
between electronic devices. In order to make the transition as easy as possible for
existing devices and software that were never designed to use a wireless radio link
(legacy devices), Bluetooth emulates various types of physical links, such as a serial
cable, etc. These are called Profiles.
When your Palm/blue5 discovers and pairs with another Bluetooth device, you will
be presented with a list of profiles supported by that device. The most likely choices
that will be offered are as follows:
• Serial – One of the most basic yet most used profiles, this mode emulates a
simple RS232 serial cable link between two devices. This profile forms the
basis of several other profiles.
• Dial-Up Network (DUN) – Recreates the conditions under which applications such as web browsers and email packages use a modem link to gain
access to the Internet.
• Fax – Used by a mobile phone or wireless modem device to allow another
Bluetooth device to communicate with a standard fax machine over a telephone link. This is an expansion of the Serial link profile.
The one to choose depends upon the kind of device that you are connecting to and
what you wish to do with it.
12
The blue5 button
The button is the only external control on your blue5, everything else is controlled via
software. What the button does when it is pressed is up to you:
To program the button
1 Display the Preferences application.
2 Select the Buttons page (tap the
in the top right corner and select Buttons).
3 Tap the HotSync… button and then tap the
next to the Modem item.
4 A list of all applications on your Palm will be displayed, select the
one that you want to run whenever the button is pressed (it
is normally set to HotSync).
5 Tap OK and then press the blue5 button to test your
new setting.
The blue indicator
The button also contains a blue indicator that shows the
current Bluetooth status:
blu
e5
blue5 button
and indicator
• Off – No Bluetooth activity
• Rapid flashing – Connecting to other Bluetooth devices or send/receiving data
• One flash every 4 seconds – Bluetooth link is made but currently idle.
13
Menu Items
Settings
The Bluetooth preferences screen offers a limited set of menu items related to the
devices listed. To access the menu:
The blue5 Settings menu offers two options.
To access the settings:
1 Display the Bluetooth page of Preferences.
1 Display the Bluetooth screen
within Preferences.
2 Select the appropriate device from the list
3 Tap the
button to display
ð
2 Tap the
button and tap the
Settings option from the drop
down list.
General
Refresh Name – Initiates an enquiry to
the selected device to check, and update
if necessary, its name.
Use French frequency hopping
This setting is no longer required and
should remain disabled.
Properties – Displays the Bluetooth
name and address of the selected
device. This option also provides a ‘Pair’
button to initiate or renew a pairing with
the selected device.
Powersave (Disable LED)
Enable this option if you wish to minimise the power drain on your Palm
battery. When selected, this option
disables the blue LED indicator.
Delete – Removes the selected devices
from the list.
Settings – Displays the Settings dialog.
Note: When the blue LED indicator is
disabled you will not receive an external
indication that the blue5 is communicating.
About – Displays version information for
the blue5 device and also its fixed
Bluetooth Device Address.
Incoming
Discoverable mode – Sets the blue5
into discoverable mode so that it can be
located by searching Bluetooth devices
in the vicinity.
14
Troubleshooting and Information
Troubleshooting
Warranty
TDK warrants that the blue5 product shall conform to TDK’s published specifications,
which may be subject to change, and remain free from defects in materials and
workmanship under normal, proper and intended use for a period of one (1) year
from date of purchase, provided that proof of purchase be furnished with any
returned equipment.
Pairing problems
The pairing process is a crucial operation. If the devices do not pair then they cannot
share information or resources. Ensure that one device is discoverable and the other
is in discover, or search mode. Check that the passkey is entered identically on both
devices
If, during the warranty period, any component part of the equipment becomes
defective by reason of material or workmanship, and TDK is immediately notified of
such defect, TDK shall at its option supply a replacement part or request return of
equipment, freight prepaid, to its designated facility for repair. In the event that no
fault is found on a product returned for repair, TDK reserves the right to charge the
customer its standard published repair charge.
BlueSync problems
When using HotSync over a Bluetooth connection, the most common cause of
problems lies with the computer’s configuration. Ensure that the HotSync setup has
been adjusted correctly and that the serial port specified in the Local section relates
to that used by the installed Bluetooth adapter.
This warranty shall not apply to any product that has been subject to misuse, bending, twisting, neglect, alteration, improper installation, operation outside of the
parameters of the published specification, use in any non-approved countries or
unauthorised repair performed by anyone other than a TDK designated repair facility.
Any non-warranty repairs or maintenance shall be at TDK’s standard rates in effect at
the time.
I still can’t get it to work!
If, after having tried the aforementioned guidelines you are still experiencing problems please contact your place of purchase or local distributor. Alternatively, for
further guidance and up to date product information try:
This warranty is in lieu of all other warranties, whether expressed, implied, or statutory, including but not limited to, implied warranties or merchantability and fitness for
a particular purpose. In no event shall TDK be liable, whether in contract, in tort, or
on any other basis, for any damage sustained by its customers or any other person
arising from or related to loss of use, failure or interruption in the operation of any
products, or delay in maintenance, or for incidental, consequential, indirect, or
special damages or liabilities, or for loss of revenue, loss of business, or other
financial loss arising out of or in connection with the sale, lease, maintenance, use,
performance, failure, or interruption of these products.
Our website at
www.tdksys.com
or our helpdesk at
[email protected]
15
Regulatory Information
Copyright and Trademark Notices
This product complies with any mandatory product specification in any country
where the product is sold. In addition, the product complies with the following:
The words HotSync, Palm and Palm OS are all registered trademarks of Palm Inc, or
its subsidiaries in one or more countries. Other products and brand names may be
the trademarks or registered trademarks of their respective owners.
European Union (EU) and EFTA
BLUETOOTH is a trademark owned by Bluetooth SIG, Inc, U.S.A. and licensed to TDK
Systems Europe Limited.
This equipment complies with the R&TTE directive
1999/5/EC and the following standards:
ETS 300 328-1 V1.2.2 (2000-07)
ETS 300 826 11/1997
EN 60950:1992 + A1:1993, A2:1993, A3:1995, A4:1997, A11:1997
EU recommendation 1999/519/EC and has been provided with the CE mark
accordingly.
Technical Information
Power consumption - standby:
0.5mA
Power consumption - established connection
with data transfer:
35mA
Bluetooth
Supply voltage:
3.2V - 4.2V
This equipment is qualified according to Bluetooth
specification Ver 1.0B (Specification of the Bluetooth
System, Core Specification Volume 1 and Profiles
Specification Volume 2 V1.0B, December 1st 1999
(Document number 1.C.47/1.0B)+ Critical Errata) and supports DUN and Serial port
profile.
Operating Temperature:
0 - 60oC
Maximum RF output power:
2.5mW (4dBm)
Nominal RF output power:
1mW (0dBm)
Range:
up to 10 metres, free space.
Weight:
26g
Size:
49.3 x 88.4 x 11.8mm (W x L x H)
Special notices for use in France and Italy
France
Dispositif à faible puissance (1 mW), pas de limitation pour son usage à l’intérieur
ou à l’extérieur.
Low power device (1 mW), no limitation for in- or outdoor use.
Compliant with open standard:
Bluetooth 1.0b (Document number 1.C.47/1.0B) + C.e.
Bluetooth power class: 2
Italy
E’ necessaria la concessione ministeriale anche per l’uso. Verificare con i rivenditori la
procedura da seguire.
Licence required for use. Check with your reseller for the procedure you need to
follow.
16
Assistance on setting specific Bluetooth devices
Although limited in its scope, this section aims to provide assistance on configuring
other Bluetooth devices for use with your Palm/blue5. Please refer to our website
(www.tdksys.com) for the latest information.
As a general rule all Bluetooth devices follow the same steps to interoperate. Firstly
you need to ensure the Bluetooth devices are discoverable and secondly, that they
are Paired to establish a permanent relationship. Note, these steps will vary from
device to device so always refer to the equipment User manual for advice.
Please select the required device:
• Ericsson R520m
• Ericsson T39
• Nokia 6210
17
Ericsson R520m
To make the R520m discoverable
Another method for discovering and pairing your Ericsson phone
1 From the standby screen, press < or > to enter the menu.
1 From the standby screen, press < or > to enter the menu.
2 Press 5 to enter the Extras menu.
2 Press 5 to enter the Extras menu.
3 Press 4 to select Bluetooth.
3 Press 4 to select Bluetooth.
4 Press 1 to select Discoverable. The phone will now remain in Bluetooth
discoverable mode for 3 minutes.
4 Press 2 to select Paired Devices.
5 Select Add Device and choose Phone Accepts.
5 Now use the Discovering other devices method on your Palm to locate the
phone.
6 On your Palm/blue5, within the Bluetooth page of Preferences, tap Add
device.
To make the R520m search for other devices
7 Set the Search for option to Phones and tap Search…
1 From the standby screen, press < or > to enter the menu.
8 Select your Ericsson phone from the list of found devices and tap OK.
2 Press 5 to enter the Extras menu.
9 During the connection process you will be asked to type a suitable passkey
on both devices (the number can be up to 16 characters long and must be
typed exactly the same on both devices. Note: for mobile phones, ensure that
the passkey is numerical.
3 Press 4 to select Bluetooth.
4 Press 3 to select Discover. The phone will now perform a search for other
Bluetooth devices in the vicinity. Ensure that your Palm is set to Discoverable
mode.
10 Your devices are now Paired, the next step is to select a Service. On your
Palm/blue5, select either Dial-Up Networking (for Internet connections) or
Serial port (if required for other applications) and tap OK.
5 When devices are located, their names will be displayed. Use the Up or Down
button to highlight the required device name and press Yes.
Your Ericsson phone and Palm/blue5 are now paired with a default service
selected.
6 Next, press Yes to confirm the prompt Add to paired and you will then be
prompted to enter a Passkey.
11 Lastly click Yes from your Ericsson phone to accept the Name Tag.
7 Type a suitable passkey (the number can be up to 16 characters and must be
entered the same on the other device) and press Yes. Following this your
Palm/blue5 should ask for an identical passkey.
Note: If the Discoverable and Discover options in the Bluetooth menu are greyed
out and unselectable, the Bluetooth option may be disabled. Select 4 for Operation
Mode and set the mode to On or Automatic.
8 Enter the same passkey in your Palm and confirm it. The R520m and your
Palm/blue5 should now be paired.
Note: If the Discoverable and Discover options in the Bluetooth menu are greyed
out and unselectable, the Bluetooth option may be disabled. Select 4 for Operation
Mode and set the mode to On or Automatic.
18
Ericsson T39
To make the Ericsson T39 discoverable
Another method for discovering and pairing your Ericsson phone
1 From the standby screen, press < or > to enter the menu.
1 From the standby screen, press < or > to enter the menu.
2 Press 5 to enter the Extras menu.
2 Press 5 to enter the Extras menu.
3 Press 5 to select Bluetooth.
3 Press 5 to select Bluetooth.
4 Press 1 to select Discoverable. The phone will now remain in Bluetooth
discoverable mode for 3 minutes.
4 Press 2 to select Paired Devices.
5 Select Add Device and choose Phone Accepts.
5 Now use the Discovering other devices method on your Palm to locate the
phone.
6 On your Palm/blue5, within the Bluetooth page of Preferences, tap Add
device.
To make the T39 search for other devices
7 Set the Search for option to Phones and tap Search…
1 From the standby screen, press < or > to enter the menu.
8 Select your Ericsson phone from the list of found devices and tap OK.
2 Press 5 to enter the Extras menu.
9 During the connection process you will be asked to type a suitable passkey
on both devices (the number can be up to 16 characters long and must be
typed exactly the same on both devices. Note: for mobile phones, ensure that
the passkey is numerical.
3 Press 5 to select Bluetooth.
4 Press 3 to select Discover. The phone will now perform a search for other
Bluetooth devices in the vicinity. Ensure that your Palm is set to Discoverable
mode.
10 Your devices are now Paired, the next step is to select a Service. On your
Palm/blue5, select either Dial-Up Networking (for Internet connections) or
Serial port (if required for other applications) and tap OK.
5 When devices are located, their names will be displayed. Use the Up or Down
button to highlight the required device name and press Yes.
Your Ericsson phone and Palm/blue5 are now paired with a default service
selected.
6 Next, press Yes to confirm the prompt Add to paired and you will then be
prompted to enter a Passkey.
11 Lastly click Yes from your Ericsson phone to accept the Name Tag.
7 Type a suitable passkey (the number can be up to 16 characters and must be
entered the same on the other device) and press Yes. Following this your
Palm/blue5 should ask for an identical passkey.
Note: If the Discoverable and Discover options in the Bluetooth menu are greyed
out and unselectable, the Bluetooth option may be disabled. Select 4 for Operation
Mode and set the mode to On or Automatic.
8 Enter the same passkey in your Palm and confirm it. The T39 and your Palm/
blue5 should now be paired.
Note: If the Discoverable and Discover options in the Bluetooth menu are greyed
out and unselectable, the Bluetooth option may be disabled. Select 4 for Operation
Mode and set the mode to On or Automatic.
19
Nokia 6210
The Nokia 6210 is permanently discoverable so you merely need to configure the
Palm/blue5 to perform a search.
1 On your Palm/blue 5, within the Bluetooth page of Preferences, tap Add
device.
2 Set the Search for option to Phones and tap Search…
3 Select your Nokia phone from the list of found devices and tap OK.
4 During the connection process you will be asked to type the preset passkey
indicated on a label supplied with the Connectivity Battery. Enter this passkey
when requested by your Palm/blue5.
5 The next step is to select a Service. On your Palm/blue5, select either Dial-Up
Networking (for Internet connections) or Serial port (if required for other
applications) and tap OK.
Your Nokia phone and Palm/blue5 are now Paired and a default service
selected.
You may need to check that your 6210 is upgraded to the latest revision in order to
use Bluetooth. You can do this in two ways:
• Once the Connectivity Battery has been fitted, if there is an icon showing a
dot with waves radiating from it - (((.))) - then the phone has a sufficient
software version.
• From the standby screen (when not in a call), type *#0000# and note the
version number displayed. If it is v05.02 or greater then the phone has a
sufficient software version.
If your phone has an earlier software version, you can get a free upgrade from your
local Nokia dealer.
20