1
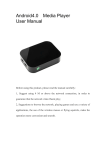
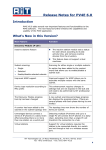
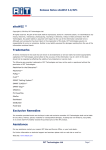
Operation Manual Brought To You By Part of the CTI Group Table of Contents Section Page 1. Product Overview 3 2. Set Up Instructions 7 3. System Navigation 13 4. Play Store Marketplace and Applications 24 5. Settings Explained 42 6. Favorites, File and Web Browser 71 7. Warranty & Support 79 1 by your solution to home connectivity! 2 1. Product Overview CuLink - Front View 3 CuLink - Rear View (Fiber optic audio out) 4 Your unit includes the following components; CuLink Unit with VGA & HDMI ports, 3.5mm earphone jack, S/PDIF fiber optic audio out port, Micro SD port, 2 x USB 2.0 ports, mini USB OTG service port, 3 x Ethernet ports, and built in WiFi and Bluetooth connectivity. A/C power cord External Optical USB mouse (Item 11, below) External VGA cable (Item 12, below) External HDMI cable (Item 13, below) 5 A free BPL Kit is provided as a limited time offer (Items 14-16, below) The CuLink is your solution to home connectivity! Built on a customized open Android 4.2.2 Jellybean ROM platform. The innovative device has the functionality of a tablet along with Gigabit Ethernet data transfer rates and all the extras to make any home or business multi functional and enjoy the flexibility of multimedia on any screen which has a VGA or HDMI port. This complete manual is available on our website. www.vailstream.com.au 6 2. Set Up Instructions In order to experience the full range of applications available you will most likely connect to the internet through one of the units Ethernet ports. Utilizing a shielded Ethernet cable is advised in order to diminish any potential for interfering with radio and television reception. If your CuLink came with a free pair of BPL outlets, utilizing them in conjunction with the CuLink can turn your entire house into a network hub. Smarten up any TV and provide a portable entertainment device with access to innumerable APP's for your Family. The following set up guide provides instructions implementing the BPL devices. If you want to utilize your existing home network connect the CuLink via Ethernet cable and begin with the setup at Step 3. (Refer to Section 2 pg.10) Alternately, if you have a Wi-Fi router you can access the internet through the CuLink's Wi-Fi receiver. (Refer to Section 5 , pg.42) 7 The CuLink has been tested for compatibility with the following Broadband over Power Line Communication devices (BPL’s) which may be used in conjunction with the CuLink; Dlink Netcomm Netgear TP-Link Typical set up shown above utilizing two BPL's and the CuLink. 8 If using VGA for video, the audio out 3.5mm earphone jack or S/PDIF port can be utilized for sound. HDMI transfers sound as well as video and HDMI overrides VGA in source selection. Utilize the additional USB ports to connect a Web Cam, keyboard, or transfer camera and phone data. Safety Precautions This device is for indoor use only. Do not submerge or expose to excessive moisture. Use only as directed. Step By Step Set Up Guide 1. Ensure that your (Broadband over Power Line) BPL adapter is plugged directly to an A/C wall outlet, do not use a power bar. Connect the BPL to your modem via a shielded Ethernet cable. Power your modem through the BPL adapter A/C outlet. 9 2. Plug in your second BPL in the room you want to connect your CuLink in and connect a shielded Ethernet cable between the BPL and one of the the CuLink's three Ethernet Ports. Pair the BPL's as per manufacturer's instructions. 3. If you are not utilizing a BPL system you can connect the Ethernet directly to your home network. Use the power cord to connect the A/C wall outlet to the CuLink. Your CuLink will function with 100-240 Volts A/C at either 50 or 10 60 Hz therefore functioning with most countries electrical supplies. 4. Connect the CuLink to any screen with VGA or HDMI inputs using either of the enclosed video cables, VGA or HDMI. If using VGA for video, the audio out 3.5mm earphone jack or S/PDIF (Sony/Phillips Digital Interface Format) port can be utilized for sound, HDMI overrides VGA in source selection. (Refer to CuLink rear view Section 1 pg.4) 11 5. Connect the included USB mouse to a USB 2.0 port. Vailstream recommends that you utilize a wireless USB mouse/keyboard combo for convenience and to reduce any chance of radio interference. A keyboard will be required to access all of the CuLink's full functionality. Compatible products tested include Logitech, Gigabyte, Microsoft and numerous other devices that will connect through WiFi or Bluetooth. 6. The CuLink will take a couple of minutes to boot up to the home page, use the mouse to left click on the settings icon to get started. 12 3. System Navigation Home Page In order to start enjoying your CuLink you'll need to be familiar with a few basic navigation techniques of the system. Mouse Right mouse button: Back Left mouse button: Select Middle mouse button: Menu Keyboard The CuLink has a built in virtual keyboard but will also will function using a USB wired or wireless keyboard. You can disable the virtual keyboard by left clicking on "Settings" first. 13 Then left click "Language & input" and left click on "Default" (Under Keyboard &Input Methods). Left click on the "OFF" switch to toggle physical keyboard on/off and disable/enable the virtual keyboard. 14 Switching "ON" the physical keyboard will bring up setting options for your selected keyboard. 15 Left clicking on the "Status bar" opens the "Notifications" panel. 16 System Bar Back Home - Return to home page Open App's/pages - Allows you to swipe to close Volume down Volume up Settings 17 Status Bar WiFi Time Ethernet connection Mobile signal strength (Not applicable) Notification Panel Left clicking on the status bar will open the notification panel showing emails received, downloads and progress, etc.. To clear a notification Hold the left mouse button on a notification and slide the mouse to left of the screen. 18 To clear the all notifications Use the left mouse button to click the Clear All Notification Icon located on the top right of the Notification box. To adjust notification sound settings First left click on Settings. Then left click on Sound and left click on Default notification. 19 Select a sound, "Pixie Dust" is the default setting. Or select "None". 20 Connecting to the Internet Now that you are familiar with the Home Page it's time to connect your CuLink to the internet. Still in the "Settings" section, left click on the “More…” at the bottom of the "Wireless & Networks" section. Left click on “Ethernet” and insure there is a check mark in the “Use Ethernet” box. This should bring up a valid “IP Address” below Ethernet Configure. 21 If the "Use Ethernet" box is already ticked and there are Zeros, ie, 0.0.0.0 in the "IP Address", uncheck and recheck the "Use-Ethernet" box and wait a minute till a valid "IP Address" appears. If a valid IP address does not appear you will need to “PAIR” your BPL's following the manufacturer's instructions, usually facilitated by a sequence of 22 reset button pushing, or if you are not utilizing the BPL's check your internet connection. Once your CuLink is connected to the internet the Ethernet connection icon will appear in the status bar. Now you are ready to enjoy your CuLink! Get ready to discover the Google Play Store and the multitude of Applications (App's) available! 23 4. Play Store Marketplace and Applications This is the section that make your CuLink such an exciting device. Left click on the "Applications" icon on the home page. 24 CuLink comes preloaded with a handful of helpful App's. Look for the Play Store icon to shop for more App's, many free App's are also available. 25 Left clicking on "Play Store" opens the following screen. Play Store will prompt you to use an existing or open a new account. 26 Selecting "Existing" will prompt you to enter your GMail address and password. Selecting "New" will prompt you to open a Google account. 27 Enter your first and last name. Choose your user name, (this will be your Google GMail account). Create and confirm your password. 28 Choose a security question. Input your security question answer and enter an alternate recovery email. Agree to Google terms of service etc.. 29 Complete the authentication puzzle. Account details will be saved. The next page will allow you to select a payment method for App and media purchases. You may utilize a credit or debit card, add a PayPal account or redeem a Google Play gift card. You can also skip this section and continue to the Play Store and still have access to a multitude of free App's. 30 You will be prompted to back up your App's and settings etc. allocated with your Google account. Welcome to the Google Play Store! 31 Left click on APPS to access. Left click on the search icon. 32 A virtual keyboard will open on your screen, or you may utilize your physical keyboard if attached. Search and select App's you wish to download. There are numerous free App's and for paid App's you can utilize a Google Play gift card, available at 33 numerous retailers, or alternate options are available such as credit card and PayPal. The following example details the downloading and installation of the Netflix Application. Search for and select Netflix App by left clicking with mouse or select with keyboard arrows and push enter. 34 Left click on "INSTALL". 35 Once you accept the access terms the App will install. 36 Left click on "OPEN". You will be prompted to enter your NETFLIX account details. 37 If you are not yet a NETFLIX account holder open your browser and search for "Netflix" then follow the prompts to start your free month trial. 38 39 Close App’s by left clicking on the “ Open app’s/pages” icon and left clicking and dragging windows up or down till they disappear off the screen. Connecting your phone with the CuLink is as easy as downloading the appropriate App. For example, Apple phones play videos best through the CuLink when utilizing the AirPin (Pro) App. ESSENTIAL APP’s PRE-INSTALLED Camera Email Fire Air Receiver Gmail Google Miracast Receiver Music News & Weather People Play Store (Marketplace) Talk Voice Search 40 RECOMMENDED FREE APP’s Adobe Reader Alarm clock - numerous free choices Australian and world newspapers Calendar - numerous free choices Calculator by Mobi Fast - (Facebook) Games - numerous free choices Google Maps Live wallpaper - numerous free choices News BBC/CNN/Fox/etc. Netflix Office Suite 8 + PDF Converter by Mobi Pandora Internet Radio Skype Slideshow Bob Ten Play - Network Ten Twitter Wikipedia 41 5. Settings Explained The following section details the various settings available on your CuLink. WIRELESS & NETWORKS This is the section where you can activate, set up and configure the CuLink's WiFi and Bluetooth capabilities. The CuLink is able to utilize WiFi to connect to another WiFi service, set up a WiFi hotspot which will allow you to access the internet through other devices, enable Bluetooth connectivity between devices, and enable Bluetooth tethering which allows sharing of the CuLink's internet connection. Enable WiFi to receive WiFi a signal from another device 42 Left click on the WiFi "OFF/ON" switch to turn ON and activate the WiFi receiver. The CuLink will search for available WiFi networks. Left click on the WiFi network you wish to connect to. 43 You will be prompted to enter the password. Activate Bluetooth connectivity To activate the Bluetooth connectivity function of the CuLink left click on the "OFF/ON" switch Available devices and paired devices will be listed. To turn on the Culink Bluetooth visibility, left click on CuLink-Bluetooth and a 2 minute countdown to connect will initiate. 44 Left click on Pair after confirming matching passkeys on both the CuLink and your chosen device. Select the Pair option on your device as well. Newly paired device will now be listed. 45 Activate WiFi hotspot Left click on "More..." then left click on "Tethering & portable hotspot". Left clicking to insert a tick in the Portable Wi-Fi hotspot will enable the hotspot. 46 Left clicking on “Set up Wi-Fi hotspot” will allow you to change the name and password which is a random generated 12 digit alphanumeric code. You must use at least an 8 digit password. Passwords can be alphanumeric and may contain symbols and can be up to 64 characters in length. Utilize the built in virtual keyboard or connect your own. 47 Activate Bluetooth tethering Bluetooth tethering can be enabled from this same menu by left clicking in the Bluetooth tethering box to insert a tick in the box. This will share the CuLink's internet access through paired Bluetooth devices. You can now connect your devices to the CuLink via Bluetooth tethering using your devices settings. 48 Optimizing sound and display settings Your CuLink is able to connect to any screen with VGA or HDMI connections. If you have an older TV you wish to utilize there are adapters available for VGA to RCA or Coaxial. Most screens with multiple inputs will auto select source. Display Left click on Display then left click on Display output mode. 49 Numerous HDMI and VGA screen resolution options will appear including NTSC and PAL formats. Select the optimal screen resolution to match your screens specifications. Changing Wallpaper There are a few ways to change the wallpaper on your screen. You can left click on "Display" as above then left click on "Wallpaper". 50 Select the directory to search for a wallpaper in. 51 Choose from a selection of live or static wallpapers or add your own pictures into UHD Player or download wallpaper App's from the Google Play Store. 52 Left click image to select and then left click "Set wallpaper". 53 You can also change the wallpaper from the home page. Use a physical keyboard and using the left or right arrow keys select any alternate home page icon that is not currently highlighted. (1) Use the mouse and left click menu icon (3 vertical dots). (2) A launcher menu on the right will appear. (3) Use the mouse to left click the "Set the wallpaper". (4) 54 Select wallpaper from the following file locations; Live wallpaper UHD Player Launcher (default wallpaper launcher) TvdLauncher (default wallpaper launcher) 55 Use the mouse to left click the image you wish to set as the wallpaper and then “Set wallpaper” as before. Sound Sound will also auto select based on your connections utilized. To manually select left click Sound then left click Audio output mode. AUDIO_CODEC for 3.5mm earphone jack with VGA. AUDIO_HDMI for HDMI. AUDIO_SPDIF for fiber optic audio out. 56 Storage This section details the used and available internal storage as well as that of the SD Card and any attached devices. 57 Apps This section lists App's under the following headings; Downloaded, On SD Card, Running and All. Left clicking on an App will open its details page. 58 59 Users This section displays and allows you to edit user information. 60 Location access This section allows you to set location access permissions. 61 Security This section contains the security settings. 62 Language & input This is the section to adjust the systems language, keyboard and mouse options. Enabling and disabling the virtual keyboard was discussed previously in Section 3 pg.13. 63 Backup & reset The backup and reset functions allow the user to restore back to factory settings, back up Apps, passwords and settings to Google servers and erase data on the SD card. 64 Accounts The accounts section allows you to add or delete email accounts and synchronize data. Left click on the three dot settings icon on the system bar and a menu will open at the top right corner of your screen. 65 Left clicking on "+ Add account" will open the screen seen below. 66 Date & time Date and time are factory set for Australian Eastern Standard Time at GMT + 10:00 with "Automatic date & time" and "Automatic time zone" selected. To adjust the time zone left click "Settings" then left click "Date & time" and remove tick from "Automatic time zone." 67 Select desired time zone. Then tick the "Automatic time zone" box again and confirm that time and date have adjusted correctly. 68 Accessibility This section details how to select accessibility options for people with hearing and/or vision impairment. Developer options Developer options are for advanced users. Facilities include bug reports, debugging, input, drawing, monitoring and app settings. Developer options can be switched on or off by left clicking on the toggle switch. 69 70 About tablet This section contains the system information in regards to legal licensing, model and firmware and software versions. 6. Favorites, File and Web Browsers The last 3 icons on the home page are; Favorites, File browser and Web browser. 71 Favorites Favorite allows users to bookmark your frequently used App's rather than searching through the Applications section. How to add Apps to Favorites From the home screen, use a mouse to left click the chosen Application. Use the keyboard arrow key to select the App you wish to add to Favorites. Use the mouse and left click menu icon (3 vertical dots). A menu on the bottom will appear. Use the mouse to left click the "Add to favorites app list". 72 File Browser The File Browser allows users to access your files in the CuLink and other external memory devices. User can copy files between the CuLink and external memory devices. How to transfer files between the CuLink and an external memory device From the home screen, use a mouse to left click the "File browser". Locate the file you wish to transfer in one of the folders; Local Memory (CuLink Memory) Sd card (micro SD card) 73 Usb (USB Memory Device) Network Neighborhood NFS Share Left click the mouse to select. Hold down the left mouse button on the file you wish to transfer. 74 A menu on the bottom will appear. Then use the mouse to left click on "Copy". Click the left mouse button on the return icon at the top of the list. Go to the location where you wish to place your file. Hold the left click button on the mouse on the folder you want to save to. 75 A menu on the bottom will appear. Then use the mouse to left click on "Paste". Web Browser Access the World Wide Web using the Web Browser. The Web Browser is a default Android web browser. 76 Tab strip: Back: Shows all the opened tabs. Trace back to the previous web page in the current history. Forward: Trace forward to the previous web page in the current history. Refresh: Reloads the web page. Address bar: Shows the current web address (URL), and used navigates to the different web page. Menu Icon: Shows web browser menu. Web browser menu Left click on the 3 vertical dots on the top right side of the screen to open the browser menu. 77 Refresh: Forward: Reloads the web page. Trace forward to the previous web page in the current history. New tab: Open a new tab. New incognito tab: Open a new tab, with no history stored after closing. Share page: Send URL via Bluetooth, Gmail, or Google. Find on page: Search a word on the web page. Request desktop site: Reload web page that is normally seen using a desktop. Save for offline reading: Save web page in a cache. Page info: Properties of the web pages. Settings: Open web browser setting. 78 7. Warranty & Support Your CuLink by Vailstream is covered by a 1 year manufacturer's warranty. Do not open your unit as there are no customer serviceable parts and your warranty will be voided. Vailstream support staff is available to assist with any problems you could encounter or questions you may have. Call 1-300CuLink (1-300-285-465), email [email protected] or refer to our website www.vailstream.com.au. 79