1
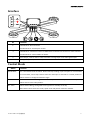
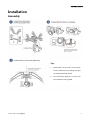
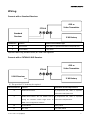
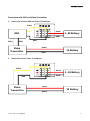
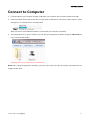
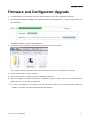
STELLA User Manual V1.0 For: Firmware v1.02, Configuration Software v1.1.0.1 目 录 DISCLAIMER....................................................................................................................................... 1 SAFETY PRECAUTIONS ....................................................................................................................... 1 STELLA Overview ............................................................................................................................... 2 Features..................................................................................................................................... 2 Specifics..................................................................................................................................... 2 Interface .................................................................................................................................... 3 Control Mode ............................................................................................................................ 3 Installation......................................................................................................................................... 4 Assembly ................................................................................................................................... 4 Wiring ........................................................................................................................................ 5 Connect with a Standard Receiver .................................................................................... 5 Connect with a FUTABA S.BUS Receiver ............................................................................ 5 Connect with OSD and Video Transmitter......................................................................... 6 Quick Guide ....................................................................................................................................... 7 Troubleshooting ........................................................................................................................ 7 Connect to Computer........................................................................................................................ 8 Advanced Configuration .................................................................................................................... 9 STELLA Information and Language .................................................................................................. 10 Firmware and Configurator Upgrade .............................................................................................. 11 XAircraft STELLA After-sale Service ................................................................................................. 12 DISCLAIMER 1. Use XAircraft products within the limits permitted by local laws and regulations. XAircraft is not responsible for any illegal activities. 2. Stella is designed as an aeromodelling product. Please strictly follow the aeromodelling guidelines for your area; XAircraft is not responsible for the use and operation of aircraft used for carrying Stella. 3. Model aircraft are not toys! Fly under professional guidance and strictly follow the instruction rules in this document. XAircraft is not responsible for consequences caused by improper installation, incorrect setting or the operation of this product. SAFETY PRECAUTIONS 1. STELLA gimbal is only designed for GoPro Hero 3 and 3+ sports cameras. 2. You must position the GoPro camera onto STELLA before powering-on the aircraft at all times. Powering-on an empty gimbal connected to the aircraft may cause damage. 3. Do not install any third party accessories on the GoPro or gimbal. 4. Ensure you use the original GoPro camera batteries. 5. Do not attempt to adjust or alter the mechanical structure of the gimbal. 6. Please use a separate power source when testing or configuring STELLA, or remove the propellers from the aircraft, or disconnect the motors for your safety. ©2013 XAircraft 版权所有 1 STELLA Overview Features Different versions of firmware may support different functions. The main features are listed below: Two types of installation is supported: Standard (hanging) or upright Control Mode: Speed Mode and Position Mode. 90° Pitch Switch. Built-in GoPro USB connector, transferring the video signal to OSD or video transmitter. Built-in BEC charges the GoPro in the air. Built-in green configuration software. No drivers required. Easily upgrade the firmware and software via PC. Specifics Features Description Camera GoPro Hero3 / GoPro Hero 3+ Wind-resistance <8m/s (17.9mph / 28.8km/h) Max. Remote Control Angle Roll -10°~10° Pitch -110°~20° Attitude Precision 0.08° Environment Temperature Limits -10°C ~ 55°C Remote Controller Standard Receiver with minimum 9 channels or S.BUS Receiver for full function access (Note SBUS and SBUS2 require a transmitter with at least 11 channels for full use of Stella's features whilst flying) Configuration Software Windows System only Electrical Specifications Voltage:DC 10.5V~22.2V (3S – 6S) Power consumption: Max. 10.2W([email protected])when charging the GoPro Normal 3.0W ([email protected]) Weight 120g / 195g (with GoPro onboard) Dimension(Max.) 83.5mm×83.5mm×92.5mm ©2013 XAircraft 版权所有 2 Interface IO P Function S-BUS Receiver: Not connected. Standard Receiver: Camera pitch control S S-BUS Receiver: Camera full control via SBUS when transmitter can access 11 or more channels. Standard Receiver: Control Modes of STELLA V Video Output, used for OSD or video transmitter. The signal pin is the video signal output. B Battery, LIPO(3S~6S, 11.1V~22.2V) Control Mode Mode Speed Mode Function This is the default mode of STELLA. STELLA will keep rotating if you have pitch or roll controlled from transmitter, and it stops rotation when the radio input is returned to a neutral position or STELLA reaches its configured maximum angle. Position Mode STELLA rotates to a certain angle from the radio input. When the input is at a neutral position, STELLA returns to the initial position. 90° Pitch STELLA rotates 90 deg, aiming GoPro to the ground or vertically to the sky. When STELLA works under this mode, speed mode and position mode are disabled. ©2013 XAircraft 版权所有 3 Installation Assembly Tips: 1. Install STELLA at the centre of the copter. Correct placement and settings will give an unobstructed field of view 2. Use stock GoPro batteries to ensure the correct balance of the gimbal. ©2013 XAircraft 版权所有 4 Wiring Connect with a Standard Receiver OSD or Video Transmitter STELLA Standard Receiver STELLA Port 3~6S Battery Function Remote Control Channel Type P Camera Pitch. A dial, slider or separate transmitter's ELEV/THR stick. S Control Mode 3 way switch Important: When using standard receiver, 90° Pitch is not supported. Connect with a FUTABA S.BUS Receiver OSD or Video Transmitter STELLA S.BUS Receiver 3~6S Battery S.BUS ※ The provided "Y" lead may be required. Receiver Channel 8 Function Transmitter Channel Requirements Gimbal Pitch Control A proportional dial, slider or separate transmitters ELEV/THR stick. 9 Gimbal Roll Control. You can disable this by A proportional dial, slider or separate setting the “Remote Control Angle Limit” to transmitters AIL/RUD stick. ZERO in the configuration software. 10 Control Mode 3 way switch 11 90° Pitch 2 or 3 way Switch ©2013 XAircraft 版权所有 5 Connection with OSD and Video Transmitter 1. Connection with an OSD and Video Transmitter Video Power OSD 3~6S Battery GND Video GND Video Transmitter GND Power 3S Battery GND 2. Connection with a Video Transmitter Video Power GND GND Video Transmitter ©2013 XAircraft 版权所有 3~6S Battery Power 3S Battery Power 6 Quick Guide STELLA is currently the simplest brushless gimbal in the world. It is operational after a few short steps listed below. 1. Install the mounting components, GoPro Hero 3/3+ and connect STELLA to your receiver. 2. Configure your radio according to what type of receiver you use (Standard receiver or SBUS receiver). 3. Power on your transmitter, then power on STELLA, and wait for the systems check to finalize. This will take approximately 10 seconds. ※ When powering on STELLA, keep GoPro as stable as possible. During the systems check any vibration or movement to STELLA will cause the systems check to fail. 4. Check your transmitter controls are working correctly. Troubleshooting Symptoms Possible Reasons 10 seconds after powering on There STELLA, camera is still not levelled movement or simply not responding. powering-on STELLA, system check may have or Solutions been some Keep STELLA vibration when powering-on. stationary when has failed. Camera keeps drifting. 1. There may have been some movement when powering-on STELLA. 1. Keep STELLA stationary when powering-on. 2. Adjust 2. The trim setting on your remote controller is too high not correctly stick trim on the controller. or abnormal. Camera is not levelled after System check. 1. STELLA is configured. 2. STELLA is damaged. ©2013 XAircraft 版权所有 1. Reset the initial angle in the configuration software. 2. Contact your dealer. 7 Connect to Computer 1. Connect STELLA to your computer through a USB cable. (The computer will not power up STELLA via USB) 2. Power up STELLA. STELLA will not function correctly when a USB cable is connected. In“My Computer” Stella will appear as an external drive or removable disk. When you see this removable disk, STELLA is connected to your computer successfully. 3. The configuration file is "green" software; you can start the configurator by double clicking the STELLA.exe file in the root of the STELLA disk. Warning: Don’t try to modify any file in STELLA disk. Notice: After tuning the parameters of STELLA, you have to first "eject" the disk, then power cycle STELLA for the changes to take effect. ©2013 XAircraft 版权所有 8 Advanced Configuration 1. Installation Mode a) Mode1: When you pitch 90°, STELLA is looking straight down. b) Mode2: When you pitch 90°, STELLA is looking straight up. With some modifications to the mounting system you can use STELLA on a model plane rather than a multicopter. 2. Initial Angle: This is the initial angle of your GoPro after STELLA is powered up. 3. Default Mode: The default control mode when connection is via a standard receiver. 4. Remote Control Angle Limit: You can tune the angle limits controlled via your transmitter for pitch and roll. 5. Stick Control Gain: This controls the rotation speed of the gimbal. The smaller the gain, the slower speed Stella travels. ©2013 XAircraft 版权所有 9 STELLA Information and Language 1. The Unique ID(UID) is used for firmware upgrades and should not be shared with anyone except for authorized XAircraft staff. 2. Click the “Upgrade” link to update firmware and software quickly from the XAircraft website. Tip: UID can be selected and copied by your mouse. ©2013 XAircraft 版权所有 10 Firmware and Configurator Upgrade 1. Connect STELLA to your computer to get the UID in the ‘About’ tab of your configuration software. 2. Open the STELLA upgrade webpage(http://www.xaircraft.com/stella/upgrade/), paste the UID into the text box and submit: Then download both firmware and software files. 3. Copy both firmware (stella.xfw) and software (Stella.exe) to the root of STELLA: Your computer system may prompt you to confirm you wish to overwrite the STELLA.exe, select YES. 4. Eject the STELLA disk from your computer. 5. Disconnect the power to STELLA to allow the upgrade to take hold. 6. When the upgrade is complete and STELLA is powered up again, a systems check will be performed and STELLA will return to a normal working mode. ※ To check if the upgrade is successful or not, you can connect STELLA to your computer again. When the upgrade is successful, the stella.xfw firmware file will disappear. ©2013 XAircraft 版权所有 11 XAircraft STELLA After-sale Service 1. Warranty Items XAircraft provides a manufacturer's warranty on electronic parts that have failed. It does not include the non-electronic parts like cover, wires and so on, or damage due to accidents or human error. 2. 1) The warranty period is 3 months from the date of purchase. 2) During the warranty period XAircraft will, at their discretion, repair or replace STELLA free of charge. Situations below are NOT INCLUDED in the warranty 1) Users disobey the XAircraft manuals whilst installing or operating XAircraft products. 2) Performance failure caused by wear and tear, misuse, improper operation or chemical reagent. 3) Performance failure caused by intermixing with non XAircraft Parts. 4) Performance failure caused by any modifications. 5) Performance failure on electronic devices due to liquid damage. 6) Performance failure caused by electronic interference. 7) Performance failure on electronic parts caused by using low quality batteries or an unreasonable voltage source. 8) Performance failure caused by incidents or human error such as transportation, collision, improper operation or connection to incorrect voltages. 9) Performance failure caused by forces of nature, including but not limited to fire, earthquake, lightning and so on. 10) Damage or loss during the shipping. Please consult the relevant logistics corporation. 3. Paid-Service. You can select a paid service when performance failure occurs outside of the warranty period (see below). Please contact your distributor for further information. 1) Up to one year after the date of purchase of your XAircraft product, you will only be required to pay for the cost of materials and shipping. 2) After one year from the purchase date of your XAircraft product, you will be required to pay for labor, materials and shipping. 4. Procedure of Service 1) If your XAircraft product has a performance failure within the warranty period, please contact your distributor immediately. You can also email [email protected] for assistance. Please have the following details ready: a) Proof-of-Purchase of your XAircraft product, including date of purchase and where you ordered the item from. b) Product ID(UID), you can find this in the configuration software. c) A detailed description of the problem, including weather conditions, environment, operation and ©2013 XAircraft 版权所有 12 aircraft motion when the failure occurred. d) 2) Your contact information. XAircraft and its global distributors will strictly follow the warranty claim to confirm the scope of services required. 3) Users may still be required to pay for repairs necessary after a damage assessment is completed by XAircraft or its authorized distributors. You will be notified prior to the repair being carried out of any costs involved. 4) XAircraft reserves the right to repair or replace any item purchased from them within the warranty period. This does not extend to items purchased second hand, from non-authorized dealers or third party products. 5. Shipping Fee 1) Users in mainland China have to pay for the return shipping if their XAircraft product has a performance failure during the warranty period. Beyond this warranty period users also have to pay for the cost of return shipping. 2) Users outside of China have to contact their local distributor prior to returning the faulty product to determine shipping costs. ©2013 XAircraft 版权所有 13 [email protected] http://www.xaircraft.com XAircraft has the final power of interpretation on this manual.