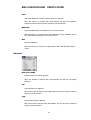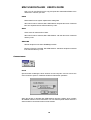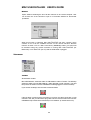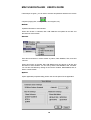
1
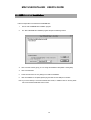
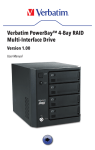
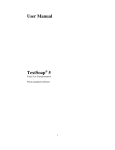
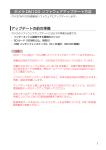
MAC INSTALL STEP
Mac USB DataLink
User’s Guide
INSTALL STEP
Please follow the step:
1. Copy the file into iMac, and unzip it.
2. there will be an installer- DataLink program, execute the
program to
setup the driver
3. there is an S/W application- MacUSB DataLink PPC, execute
the program to run
the file transfer.
MAC USB DATALINK USER’S GUIDE
Table of Contents
INTRODUCTION .............................................................................................2
PACKAGE CHECKLIST .................................................................................3
SYSTEM REQUIREMENTS ………….……………………………………………4
Software requirements ………………………………………………………………………………...4
Hardware requirements………………………………………………………………………………..4
MAC USB DATALINK INSTALLATION........................................................4
INTERFACE OVERVIEW ................................................................................5
APPLICATION MENU .....................................................................................6
File menu .................................................................................................................................................6
New Folder ...........................................................................................................................................6
Open .....................................................................................................................................................6
Move to Trash ......................................................................................................................................7
Get Info.................................................................................................................................................7
Page Setup ............................................................................................................................................8
Print ......................................................................................................................................................9
Make disk .............................................................................................................................................9
Quit.......................................................................................................................................................9
Edit menu ................................................................................................................................................9
Undo .....................................................................................................................................................9
Cut ........................................................................................................................................................9
Copy .....................................................................................................................................................9
Paste ...................................................................................................................................................10
Clear ...................................................................................................................................................10
Select All ............................................................................................................................................10
Connect menu .......................................................................................................................................10
Local...................................................................................................................................................10
Remote................................................................................................................................................11
View menu.............................................................................................................................................11
Toolbox ..............................................................................................................................................11
Refresh................................................................................................................................................12
Sort List ..............................................................................................................................................12
Options ...............................................................................................................................................12
Window menu .......................................................................................................................................13
Cascade......................................................................................................................... ………………..
Title ........................................................................................................................................................
Close...................................................................................................................................................13
Windows list.......................................................................................................................................13
MAC USB DATALINK USER’S GUIDE
Introduction
Mac USB DataLink software will use USB DataLink cable to establish Mac to Mac
connection or Mac to PC connection. This cable allows you to easily connect two
computers via the USB port and instantly transfer files with great speed and ease.
To establish Mac to PC connection the application will require USB DataLink for
Windows installed on PC computer.
Mac USB DataLink software package will include client DataLink application program
(containing USB driver part), a Mac OS Finder-like user interface, which provides a
very easy-to-use environment that makes file transfer as easy as drag-and-drop.
Features
The USB DataLink provides the following features:
•
High-speed data transfer rate up to 5 Mbps
•
Single cable solution for data communication
•
Mac OS 8.6 and higher
•
File manipulation functions including removing, renaming, and getting info for local
and remote files and folders plus creating folders.
•
Easy drag-n-drop file transfer
2
MAC USB DATALINK USER’S GUIDE
Package Checklist
The Mac USB DataLink product package includes the following items:
•
USB DataLink Cable
•
A CD-ROM, including Mac USB DataLink installer and Read me file
•
This User’s Guide
System Requirements
Software requirements
Operating system: Mac OS 8.6 and higher
Hardware requirements
Computer: PowerPC G3, PowerPC G4, or iMac
Free disk space: 2 MB
3
MAC USB DATALINK USER’S GUIDE
Mac USB DataLink Installation
Follow the steps below to install the Mac USB DataLink :
1.
Run the Mac USB DataLink Installation program
2.
The Mac USB DataLink Installation program will open the following window:
3. Click on Install Location popup you can change the installation disk (default - starting disk).
4. Click on Install button.
5.
Follow the instructions on every dialog box to finish the installation.
6.
After the installation is completed, please plug the cable into the USB port on the Mac.
Note: If you want to build up a connection between Mac and PC, to install the driver on the PC, please
refer to PC DataLink USB cable user’s manual.
4
MAC USB DATALINK USER’S GUIDE
Interface Overview
Mac USB DataLink software will have Mac OS Finder-like user interface. User will be
able to open finder window for local volumes and for all available remote volumes. File
manipulation functions will include removing, renaming, and getting info for local and
remote files and folders plus creating folders. The application will provide easy drag-ndrop file transfer abilities. Besides, the application will provide multi selection of files
and folders and sorting functions by Name, Date Modified, Size, and Kind columns.
The following figure shows the outlook of the application software.
5
MAC USB DATALINK USER’S GUIDE
Application menu
File menu
New Folder
Creates new folders for local and remote machine.
For local disk:
When this function is selected, Mac USB DataLink open dialog will contain new
directory name (default name is “New Folder”). You can rename the directory to
the name you want.
For remote disk:
When this function is selected, Mac USB DataLink open dialog will contain new
directory name (default name is “New Folder”). You can rename the directory to
the name you want.
Open
Opens selected folder or file, and application
For files:
When this function is selected, Mac USB DataLink will execute the application
software program and open the documents in Mac recognizable format.
Note: For Mac to PC, Mac USB DataLink can open text files only.
For directories:
When this function is selected, Mac USB DataLink will open the selected directory
in new window. The new window will contain a list of all files and directories from
selected directories.
For application
6
MAC USB DATALINK USER’S GUIDE
When this function is selected, Mac USB DataLink will execute the application
software program.
Move to Trash
Moves selected files or folders to Trash.
When this function is selected, Mac USB DataLink will move all the selected items
(files and folders) to trash.
Get Info
Shows Get Info dialog for selected files or folder.
For local computer:
7
MAC USB DATALINK USER’S GUIDE
For remote computer:
Page Setup
Opens Page Setup dialog of current system printer.
When this function is selected, Mac USB DataLink will open Page Setup dialog for
current system printer. For example:
8
MAC USB DATALINK USER’S GUIDE
Print
Opens the application software of the file with print command.
When this function is selected, Mac USB DataLink will open the application
software for selected file and send command to print selected file.
Make disk
Copies installation files of the application to the chosen volume
When this function is selected, Mac USB DataLink will copy installation files of
Mac USB DataLink application to the chosen volume.
Quit
Quits the application.
When this function is selected, the application of Mac USB DataLink will be
closed.
Edit menu
Undo (Can’t Undo)
Undoes the previous editing operation.
When this function is selected, Mac USB DataLink will undo the last editing
operation.
Cut
Cuts selected text to clipboard.
When this function is selected, Mac USB DataLink will cut the name of selected
directory or file to clipboard.
Copy
Copies selected text to clipboard.
When this function is selected, Mac USB DataLink will copy the name of selected
directory or file to clipboard.
9
MAC USB DATALINK USER’S GUIDE
Note: You can use Drag & Drop to copy and paste the selected files/folders to the
directories or volumes you want.
Paste
Pastes data from the system clipboard into editing field.
When this function is selected, Mac USB DataLink will paste the name of selected
item from clipboard into the selected directory or file.
Clear
Clears name for selected file or folder.
When this function is selected, Mac USB DataLink will clear the name of selected
directory or file.
Select All
Selects all objects in the active DataBridge window.
When this function is selected, Mac USB DataLink will select all objects contained
in the selected directory or file.
Connect menu
Local
Opens window containing the list of volumes on local computer. User can choose one
of the volumes to open it in Finder-like window for file transfer operations.
When this function is selected, Mac USB DataLink will open a dialog, which contains
all available volumes on the local machine. You can select required volume and then a
client window for the selected volume will be created.
10
MAC USB DATALINK USER’S GUIDE
Remote
Opens window containing the list of all the volumes on the remote computer. User
can choose one of the volumes to open it in Finder-like window for file transfer
operations.
When this function is selected, Mac USB DataLink will open a dialog, which
contains a list of all the available volumes on the remote machine. Remote
machine is either a PC or a Mac connected by DataBridge cable. This menu will
be activated when the remote machine is running Mac USB DataLink (for
Macintosh) or PC DataLink (for PC) and the USB cable is plugged.
View menu
Toolbox
Shows/Hides Toolbox.
Mac USB DataLink shows the status of USB DataLink cable in Toolbox. The left lamp
shows the status of local USB DataLink cable (plugged in local machine). The right
lamp shows the status of remote USB DataLink cable (plugged in remote machine).
If you see the red lamps, then the cable connection failed.
If the left lamp is green and the right lamp is red, then the cable connection in local
machine is OK, but you still need to plug cable into the remote machine and run Mac
USB DataLink (if another side is Macintosh) or PC DataLink (if another side is PC).
11
MAC USB DATALINK USER’S GUIDE
If both lamps are green, you can start to execute all operations allowed in the remote
computer (copying files, creating folders, removing files, etc.)
Refresh
Updates information in active window.
When this function is selected, Mac USB DataLink will update all the files and
directories in active window.
Sort List
Sorts files and folders in active window by Name, Date Modified, Size, and Kind
columns.
When this function is selected, Mac USB DataLink will sort the list of all files and
directories in active window. You can sort by Name, Date Modified, Size, and Kind.
You can also sort files list by clicking on the columns of Name, Date Modified, Size, or
Kind in current window.
Options
Opens application properties dialog, where user can set options for the application.
12
MAC USB DATALINK USER’S GUIDE
Properties dialog will include settings for
♦
♦
Communication Settings:
♦
Allow System Suspend
♦
Cable ID
Mac Files and Folders displaying
Show/Hide columns: Data Modified, Kind, and Size
♦
Windows Files and Folders displaying
Show/Hide Attributes: Read Only, Hidden, Archive, and System
Window menu
Close
Closes the active window.
Windows list
All currently opened windows will be listed on the Windows list. User can switch
among windows by ticking a window on the list.
13