1
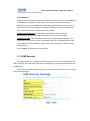
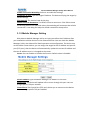
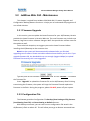
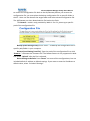
Korenix Mobile Manager Utility User Manual Korenix Mobile Manager Utility User Manual V1.0 Oct. 2015 Korenix Mobile Manager Utility User Manual Copyright Copyright © 2015 all rights reserved. No part of this publication may be reproduced, adapted, stored in a retrieval system, translated into any language, or transmitted in any form or by any means without the written permission of the supplier. About This Manual This user manual is intended to guide professional installer to install the Korenix Mobile Manager Utility (KMM) and how to configure the related setting in Cellular Router/Gateway devices. The software can be downloaded in Korenix web site. You can contact Korenix Sales or Technical Service Window for further need. Sales: [email protected] Technical Service: [email protected] Korenix Mobile Manager Utility User Manual Content Chapter 1 Introduction................................................................................................... 5 1.1 Introduction ............................................................................................... 5 1.2 Major Features ........................................................................................... 5 1.3 Typical System Architecture ....................................................................... 6 1.4 System Request .......................................................................................... 7 Chapter 2 KMM Configuration Guide ............................................................................ 9 2.1 Main Screen ............................................................................................... 9 2.2 Device Monitoring.................................................................................... 10 2.3 Tools ......................................................................................................... 11 2.3.1 File ................................................................................................ 11 2.3.1.1 2.3.1.2 2.3.1.3 Start/Stop..................................................................................... 11 Preference .................................................................................... 11 Export ........................................................................................... 13 2.3.1.4 2.3.2 2.3.2.1 2.3.2.2 2.3.2.3 2.3.3 2.3.4 2.3.4.1 Exit ............................................................................................... 14 Configuration File ......................................................................... 14 Configuration File Backup ............................................................ 14 Configuration File - Restore ......................................................... 15 Configuration File - Save .............................................................. 16 Firmware ...................................................................................... 16 Log ................................................................................................ 17 Log - Show Panel .......................................................................... 17 2.3.4.2 Log – Log Window........................................................................ 17 2.4 Right Click Tool ......................................................................................... 18 2.5 Panel - Cellular/Network .......................................................................... 19 2.5.1 Panel – Cellular............................................................................. 19 2.5.2 Panel - Network............................................................................ 22 Chapter 3 Appendix ..................................................................................................... 25 3.1 JetWave 2310 Cellular Web GUI .............................................................. 25 3.1.1 Basic Settings ............................................................................... 25 3.1.2 SIM Security ................................................................................. 28 3.1.3 Debug Mode ................................................................................ 29 3.1.4 Connection Watchdog.................................................................. 29 3.1.5 Mobile Manager Setting .............................................................. 30 3.2 JetWave Web GUI - Maintenance ............................................................ 31 3.2.1 Firmware Upgrade ....................................................................... 31 3.2.2 Configuration File ......................................................................... 31 Revision History............................................................................................................ 33 Korenix Mobile Manager Utility User Manual Chapter 1 Introduction Korenix Mobile Manager Utility User Manual Chapter 1 Introduction 1.1 Introduction After the mobile devices are applied to the field, the issue of mobile devices’ access is an important topic of administrators. Due to the limited number of public address, most carrier provider may offer you the private IP for the cellular router. The carrier provider may have different IP policy, for example, the IP address may be changed every a period of time, may get the different IP address while you reboot the device…etc. The Korenix Mobile Manager (KMM) is a simple utility to resolve the issue of mobile devices’ inabilities to be accessed from the internet. With a PC and a public IP, the PC can be the Mobile Manager Server. Configuring the Mobile Manager Server’s IP address on your mobile device, then the up-to-date IP address, cellular type, Ethernet port type… network status can be reported to the server. The utility also provides you device management and maintenance features. 1.2 Major Features Easy tool for Korenix Mobile Devices’ management, Quick Start without installing, Device Monitoring: Get live information about the mobile/cellular devices Cellular Type Management: Cellular type, SIM settings, User Info and GPS Position information Cellular Communication Watchdog Enable/Disable and Auto-Reconnect settings Ethernet Port Management: Network Mode, LAN IP settings Device Maintenance: Backup and Restore the configuration file, firmware upgrade, Event Log Window and Panel Export and Save the connected status Low system performance request Korenix Mobile Manager Utility User Manual 1.3 Typical System Architecture After you have run the Mobile Manager Utility, the Computer you run becomes the Mobile Manager Server of your remote cellular devices. You must have a public IP for the Mobile Manager Server first, thus all the remote cellular devices can report the latest IP and information to it. In remote cellular devices, you can find the Mobile Manager Settings page in Web GUI. Before delivering to the customer site, please “Enabled” the feature and type the Server IP Address and specific TCP port of the mobile manager server, press “Apply” and go to “Save” page to save the settings. Between the Mobile Manager Server and Remote Cellular Devices, it is complex and different environment may have different requests. The Public IP and open specific TCP port for your Mobile Manager Server are MUST settings. You can check the public IP address with your carrier provider. Normally, you must pay the cost to keep the permanent public IP. After you have the public IP, you must open the Korenix Mobile Manager Utility User Manual specific public TCP port (or use default port number, 2310) for the mobile manager in the router/gateway of your environment. If you install the Mobile Manager Server behind the complex firewall of your office, you need to setup port forwarding rule, it requests administrator privilege to change the setting in your firewall. Please check with your IT engineer and ask them open the port for your server. 1.4 System Request The Mobile Manager Utility does not request high system resource, the PC performance is not quite critical for this application. However, if you want to monitor many remote cellular devices, good performance computer is better to manager and monitor them. You don’t need to pre-install the software on your Window OS. The application currently supports Window OS. You just need to double click it on your computer, the application can be activated. The user capacity of the application is not limited in current version, the free download version will not charge you cost before end of 2016. We reserve the right to define the user capacity, price and new functionality in the future. Korenix Mobile Manager Utility User Manual Chapter 2 KMM Configuration Guide Korenix Mobile Manager Utility User Manual Chapter 2 KMM Configuration Guide This chapter describes the Korenix Mobile Manager (use KMM to represent Korenix Mobile Manager in following pages) configuration. 2.1Main Screen Double click the KMM Utility to start the application. The figure shows the KMM icon, you can see this after decompress the RAR file. You will be the Main screen and Login screen as below. You must login the application first. The default User Name is “admin”, Password is “admin”. The Main screen includes the Configuration tool on the top, Device list and status update, Cellular/Network configuration panel…etc. features. You can click “Hide Panel” to hide the Cellular/Network panel. Enter “Edit” mode to change configuration…etc. Please read below chapters for detail configuration. Korenix Mobile Manager Utility User Manual 2.2Device Monitoring To monitor the devices’ status with wider screen, you can click “Hide Panel>>”. Then the Main screen only displays the devices list as below. No. is a sequence number. Model Name: The model name of your cellular device. MAC Address: The MAC address of your cellular device. MAC address is a unique address to identify your device in worldwide network. Device Name: The device name of your cellular device. You can change the device name in web GUI. IP Address: The current IP address of your cellular device. The IP address may be changed by your carrier provider, the remote cellular device will report the new IP address to the utility after you correctly setup. This is the main purpose of this utility. Port: The TCP port number of your cellular device. The port number should be the same of the remote cellular device and mobile manager server. Version: The firmware version of your cellular device. Status: The current status of your cellular device. The status includes Connected, Disconnected, Upgrading, Backup/Restoring… information. Last Connected: The last connected time of your cellular device. Note: While you exit the program, the above last updated remote cellular device will be saved in the database automatically. They will be recalled when you open the Korenix Mobile Manager Utility User Manual program next time. 2.3 Tools are some tools on the top of the main screen. Following are the configuration guide of these tools. 2.3.1 File In this function, you can Start or Stop monitoring the KMM monitoring function. You can change the server and account setting in Preference, you can export the device list in Export and Exit the program. 2.3.1.1 Start/Stop The default setting is “Start” while you run the KMM program. The program will poll the information of your remote device and accept the updated status. You can change it to “Stop”, the program will stop to poll the devices’ status and do not update the status here. However, it doesn’t mean that the device will also stop generating packet to Mobile Manager Server. If you want your cellular device stop updating status, you must disable the Mobile Manager Setting in you device as well. 2.3.1.2 Preference The Preference command allows you to change the Server setting and Account settings. Preference - Server Korenix Mobile Manager Utility User Manual Idle Time: The program will wait until the Idle Timeout time is expired while the remote cellular device failures to update its status. The field defines the Idle Timeout time in seconds and the volume here must be above 10 sec. Service Port: This is the specific communication TCP port number between your cellular device and mobile manager server. Polling Period: This is a timer indicates the period the program asks for device’s information actively. Preference - Account This screen allows you to change the user name and password. You need to type old and new password correctly. Please follow the above indication. Korenix Mobile Manager Utility User Manual 2.3.1.3 Export This is the command for you to export the device lists. Choose “Export” in tool bar, you can see the popup screen, select the target folder and type the file name. Click “Export” to export the information or “Cancel” to cancel the command. After exported, you will find the file in the target folder. Below is an example of the file name “KMM Export.csv”. Right Click the “KMM Export.csv” and open it by Microsoft Excel or Word Pad. You will see the remote cellular devices’ information. Note: The “Status” information will not be saved in KMM database, so that you will not see the live status in the export file. If you want to check current status or the change of status, please open the log window and save the log file. You can find more history information. Korenix Mobile Manager Utility User Manual 2.3.1.4 Exit Select “Exit”, you will exit the application immediately without popup warning. The device list will be saved and you can see them when you run the application next time. 2.3.2 Configuration File This is the configuration file command to Backup/Restore the configuration file for your cellular device and you can permanently Save the configuration you modified to the device. 2.3.2.1 Configuration File Backup Select the target folder and give a name of the configuration file. Click Backup to continue. Korenix Mobile Manager Utility User Manual 2.3.2.2 Configuration File - Restore Choose the “Restore”, then you will see the Configuration File Restore popup screen. Click “…” and then select the file you want to restore. Click “Restore” to continue the progress. You can also see the updated status is changed to ”Restoring…” in device list. Note: The Backup and Restore progress here is the same as you operate in local area network. The program provides an option you can operate remotely through cellular network. Korenix Mobile Manager Utility User Manual 2.3.2.3 Configuration File - Save This command helps you to save the configuration you changed to the remote cellular device. This is a MUST step to permanent save the new configuration. 2.3.3 Firmware Select the Upgrade to run the firmware upgrade progress remotely. After selected, you will see the Firmware Upgrade popup screen. Click “…” to select the firmware file. Press “Upgrade” to continue the progress. Note: The Firmware Upgrade progress here is the same as you operate in local area network. The program provides an option you can operate remotely through cellular network. Korenix Mobile Manager Utility User Manual 2.3.4 Log There are two commands, Show Panel and Log Window. 2.3.4.1 Log - Show Panel Show Panel command allows you to show the log information on the lower column of the main window. The red area in below figure is the Log panel after you selected “Show Panel”. 2.3.4.2 Log – Log Window Select the “Log Window”, you will see the popup Log window as below figure. There Korenix Mobile Manager Utility User Manual are three small icons on the top, they are Save, Delete and Close. Save: After click “Save” command, you will see the popup screen for you to browse the target folder. Give the new name for the log file means you can save the log file. Select the old log file name means you will replace the old contents. Below is the figure that you can see the log file in the selected folder. Delete: Delete the log information of the log window. Close: Close the Log Window. 2.4Right Click Tool Select the target and click the Right click of your mouse, you will see below popup screen. Korenix Mobile Manager Utility User Manual There are some convenient quick commands. The progress of the Firmware Upgrade and Configuration File Backup/Restore is the same which described in above chapter 2.3.3 Configuration File and 2.3.4 Firmware. Configuration File - Save: Save the configuration after you changed setting in edit mode to the device. Telnet: You can directly telnet to the selected device. Kick: You can kick the selected device. The status of the device will be changed to “Disconnected”. The entry will be kept, the program will wait next update from the device. While you kick the device and export the device list to a file, you can still see the entry. Delete: You can delete the selected device. The entry will be deleted. While you delete the device and export the device list to a file, you will not see the entry. Reboot Device: You can reboot the selected device. 2.5Panel - Cellular/Network The chapter describes the Cellular/Network configuration panel information. Some of the fields are editable, you must enter the “Edit Mode” if you want to change the settings. 2.5.1 Panel – Cellular Below screen shows the Cellular Status. Some of the fields are editable, you must enter the “Edit Mode” if you want to change the settings. Korenix Mobile Manager Utility User Manual Cellular Status: In here, you can Enable/Disable Cellular interface, see the Provider, Service Type, IMEI, Signal Strength, Connection Status and Cellular IP address. SIM Settings: In here, you can configure SIM Control and SIM card settings. If the cellular supports dual SIM, you can change SIM selection and change SIM 2 settings. Korenix Mobile Manager Utility User Manual Advanced Settings: In here, you can Enable/Disable Cellular Communication Watchdog, configure the watchdog timer parameters. You can also enable Cellular Redundant if you inserted dual SIM cards. GPS Settings: In here, you can Enable/Disable GPS function if you cellular product supports GPS function and see the latest Latitude/Longitude location information. After change the settings in Edit mode, press “Apply” to active the setting. Korenix Mobile Manager Utility User Manual Note: After applied, please select the device and click the “Save” command in Configuration File Toolbar. It means you can permanently save the new configuration. 2.5.2 Panel - Network Below screen shows the Network/LAN Status. Some of the fields are editable, you must enter the “Edit Mode” if you want to change the settings. After enter the Edit mode, you can change the Network Mode and LAN IP Settings, for example the IP Address, Subnet mask, gateway and DNS settings. Korenix Mobile Manager Utility User Manual Note: After applied, please select the device and click the “Save” command in Configuration File Toolbar. It means you can permanently save the new configuration. Korenix Mobile Manager Utility User Manual Chapter 3 Appendix Korenix Mobile Manager Utility User Manual Chapter 3 Appendix In the chapter, we provide some reference information. In chapter 3.1 and 3.2, we copied some related Web GUI configuration settings from our cellular device for your reference. If you already well known of our product, you can ignore this chapter. For the other Web GUI configuration we don’t select, you check the products’ user manual. 3.1 JetWave 2310 Cellular Web GUI This chapter is copied from the JetWave 2310 Cellular Setting Web GUI. You can find the description of the Cellular settings, SIM selection, Connection Watchdog and Mobile Manager Setting. 3.1.1 Basic Settings The system supports Dual SIM socket, you can select SIM 1 or SIM 2 as the startup SIM socket, and configure whether the 2 SIM socket will Redundant with each other or not. For 3G SIM settings, normally, you can connect the 3G Gateway to the ISP cellular network without configuring 3G setting. However, in some countries, before the 3G gateway can access the ISP’s cellular data network, you may need to enter the APN settings, User Name, Password, Authentication type… on the device. You can use this page to configure the parameters. Korenix Mobile Manager Utility User Manual Disable 3G Interface: You can disable the 3G interface manually. SIM Selection: SIM 1 means the SIM socket 1, you can see the ID in the front panel. SIM 2 means the SIM socket 2. Select one of it as the startup SIM socket. SIM 1 is the default settings. Please insert the 3G SIM card to the SIM socket you select. 3G Redundant: While you enable 3G Redundant, please insert the dual SIM cards into the two SIM socket before power on the system. Then the Dual SIM will be Redundant with each other while the primary 3G connection is failed. The selected SIM number will be the primary SIM, the other one is backup SIM. The redundant timer is based on your settings of Reconnection Delay and Retries. 3G Redundant Timer = Reconnection Delay x Reconnection Retries + Reset Module Time For example, while the SIM 1 connection is failure for (30 seconds x 10 times + 30 seconds), the SIM 2 will become primary SIM after 330 seconds. The system may take additional 30 seconds to exchange the SIM from SIM 1 to SIM 2. Note: The 3G Redundant is only available while you insert two SIM cards into the socket. If you only insert one, the 3G Redundant will not work. Note: Please adjust the Reconnection Delay and Retires based on your Korenix Mobile Manager Utility User Manual application, if you requests shorter redundant time, you can modify the delay time or retires times. SIM 1/ SIM 2 Settings: Assign below setting for the specific SIM card. APN: Every ISP has a specific APN (Access Point Name) assigned to its cellular network. The system can read this name from the SIM card. You can also find this setting by contacting your ISP to know this. Once you failed to connect your 3G cellular network, this is the first way you can check. Please check with your ISP to know the APN and correctly input the setting through the page. User Name: The user name for the 3G connection. Normally, this is provided by your ISP. Password: The password for the 3G connection. Normally, this is provided by your ISP. Authentication Type: You can select CHAP or PAP per your ISP request. Normally, this is provided by your ISP. Connect: You can press “Connect” to re-connect the 3G connection of the selected SIM card. This progress may take 30 seconds. You will see below popup screen ask you wait 30 seconds. Reconnection Delay: Reconnection Delay time is the delay time for each 3G Retry. Reconnection Retries: This is the times of Reconnection Retry. While 3G is not connected, the system will retry the connection according to the Reconnection Delay time and Retry times. Note: You should not select the empty SIM and press “Connect” for the empty Korenix Mobile Manager Utility User Manual socket. This is error configuration. Auto IP Report: Most of the ISP assigns the dynamic IP address to the 3G clients and change the IP address every period of time. While you need to remotely control the gateway, you may need additional information generated from the remote 3G client device. The Auto IP Report in JetWave 2310 can meet your need while you need to know the IP address from the product. Enable Auto IP Report: Press Enable Auto IP Report, the system will automatically update the system information to remote server/URL. IP Report to URL: Type the correct URL here for your Gateway report to. You can build your own server, rent URL address from ISP or Google Cloud service also supports this functionality. Please check with your ISP or create through Google cloud. Press “Apply” to activate the new setting. 3.1.2 SIM Security This page allows you to assign the SIM security. If you (or ISP) already apply the PIN number to your SIM card, you need to configure the correct PIN number for your AP/Gateway. After correctly enter the PID number, you can start the 3G connection or change the new PIN settings. Korenix Mobile Manager Utility User Manual 3.1.3 Debug Mode The page allows you to debug 3G connection. This is applied to JetWave 2310/2311-HSPA. Select “Enable Detailed Debug mode” and press “Apply” to activate the debug mode. Press “Save…” while the 3G connection is failure, you can know more about the 3GPP process done while 3G connection Retry. 3.1.4 Connection Watchdog The page allows you to configure the connection watchdog. In some country, the carrier provider may terminate your cellular connection while you don’t transmit data for a period of time. This setting can help you keep the connection always alive. Korenix Mobile Manager Utility User Manual Enable Connection Watchdog: Select it to enable the settings. IP Address to Ping: Type the target IP Address. The device will ping the target by below settings. Ping Interval: The interval time of the ping. Failure Count to Reconnect: The failure count to reconnect. If the failure count of the Ping reaches the specified value, the watchdog will reconnect the cellular connection. It can help you keep the cellular connection always alive. 3.1.5 Mobile Manager Setting With Korenix Mobile Manager Utility can help you collect the IP Address after you installed the cellular devices in the remote field site. You can check the Mobile Manager Utility User Manual for detail operation and configuration. The device acts as the cellular router device, you can assign the target Server IP Address and specific port (TCP port), then the device will automatically update the current IP address and the new IP address once it is changed to the server. Server: You can Enable or Disable the function. Default value is Disabled. Server Address: Type the Mobile Manager’s IP address in this field. Server Port: The device will update info to server through this port. You can assign specific TCP port number. Control Port: The Control Port (TCP port) allows you to connect to the device. You can assign specific TCP port number. Korenix Mobile Manager Utility User Manual 3.2 JetWave Web GUI - Maintenance This chapter is copied from JetWave 2310 Web GUI, Firmware Upgrade and Configuration Backup/Restore functions. It helps you to understand the progresses of our cellular devices. 3.2.1 Firmware Upgrade In this section, you can update the latest firmware for your AP/Gateway. Korenix provides the latest firmware in Korenix Web site. The new firmware may include new features, bug fixes or other software changes. We’ll also provide the release notes for the update as well. From technical viewpoint, we suggest you use the latest firmware before installing the AP/Gateway to the customer site. Note that the system will be automatically rebooted after you finished upgrading new firmware. Please remind the attached users before you do this. If you upgrade firmware 3G, the bandwidth may not enough (suggest 1Mbps) to upload firmware file correctly, this is not suggested. Type the path of the firmware in Select File: field. Or click “Browse…” to browse the firmware file. Press “Upgrade” to upload the firmware file to the AP/Gateway. After finishing transmitting the firmware, the system will copy the firmware file and replace the firmware in the flash. During the progress, please DO NOT power off your system. 3.2.2 Configuration File The Gateway provides Configuration File Backup (Save Setting to File), Restore (Load Setting from File) and Reset Setting to Default features. With Backup command, you can save current configuration file saved in the AP/Gateway’s flash to admin PC. This will allow you to go to Restore command later Korenix Mobile Manager Utility User Manual to restore the configuration file back to the AP/Gateway. Before you restore the configuration file, you must place the backup configuration file to specific folder in the PC. Users can also browse the target folder and select existed configuration file. The AP/Gateway can then download this file back to the flash. This Browse… mode is only provided by Web UI. For CLI, please type specific path of the configuration file. Backup (Save Setting to File): Press “Save…” to backup the configuration file to specific path/folder in your computer. Restore (Load Setting from File): Type the path of the configuration file or click “Browse…” to browse the firmware file. The Browse feature is only supported in Web GUI. Press “Upload” after the file is selected. Reset Settings to Default: Press “Reset” can reset all the configurations, but not included default IP address to default settings. If you want to reset the IP address to default value, select “Include IP Settings”. Korenix Mobile Manager Utility User Manual Revision History Version Description st V1.0 1 released Firmware Version: V1.0 Date Editor Oct. 28, 2015 Orwell Hsieh