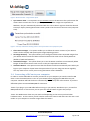
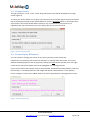
1
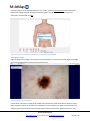
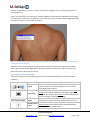
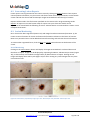
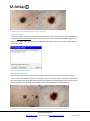
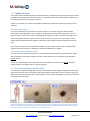
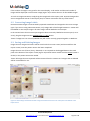
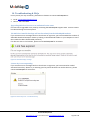
User Manual Version 1.1 © 2013 MoleMap NZ Ltd www.MoleTrac.com ● +64 9 520 8220 ● [email protected] Page 1 of 27 Contents 1 Introduction to MoleTrac ................................................................................................................ 3 2 Installation & Setup......................................................................................................................... 4 3 4 5 2.1 Requirements.......................................................................................................................... 4 2.2 MoleTrac & DLCam Interface Install ....................................................................................... 4 2.3 DLCam Interface Setup ........................................................................................................... 5 2.4 Connecting a DLCam to your computer.................................................................................. 6 Activation & Login ........................................................................................................................... 7 3.1 MoleTrac Activation ................................................................................................................ 7 3.2 Login Requirements ................................................................................................................ 7 3.3 License Details......................................................................................................................... 8 3.4 License Expiry & Renewal ....................................................................................................... 8 Toolbar & Settings........................................................................................................................... 9 4.1 Settings ................................................................................................................................... 9 4.2 New Users ............................................................................................................................. 10 Patient Index ................................................................................................................................. 11 5.1 New Patients ......................................................................................................................... 11 5.2 Find Patient ........................................................................................................................... 12 5.3 Patient Session ...................................................................................................................... 12 5.4 Start/End Sessions ................................................................................................................ 12 6 Details Screen................................................................................................................................ 13 7 Overview Screen ........................................................................................................................... 14 7.1 8 9 10 Mannequin View ................................................................................................................... 14 Lesions Screen ............................................................................................................................... 15 8.1 Lesion Registration & Reporting ........................................................................................... 15 8.2 Generating Lesion Reports.................................................................................................... 18 8.3 Lesion Monitoring ................................................................................................................. 18 Import Screen................................................................................................................................ 20 9.1 Associating Images with Lesions ........................................................................................... 20 9.2 Converting Image Labels ....................................................................................................... 21 9.3 Saving and Deleting Images .................................................................................................. 21 Troubleshooting & FAQs ........................................................................................................... 22 © 2013 MoleMap NZ Ltd www.MoleTrac.com ● +64 9 520 8220 ● [email protected] Page 2 of 27 1 Introduction to MoleTrac MoleTrac by MoleMapMD connects the DermLite DLCam (or any camera of your choice) to an application designed specifically for documenting and monitoring skin lesions. In the first instance, the MoleTrac application transfers images of your patients’ lesions, photographed during the course of a normal skin check consultation, into the computer and immediately displays these on screen. You and your patient are then able to view this in full resolution to determine if any further action is required. The MoleTrac application allows for these lesion images to be “mapped” to the requisite location on a mannequin. You will be able to add clinical notes against each lesion that you are documenting and include history details such as personal or family history of melanoma into the patient file. At follow-up you have the facility to select any lesion that you wish to re-image, photograph it and immediately compare this with the image from the last visit. At any stage you can generate and save a PDF report that will include the clinical and dermoscopic images. This report can then be imported into your electronic health record. MoleTrac, your tool in providing comprehensive documentation of skin lesions. © 2013 MoleMap NZ Ltd www.MoleTrac.com ● +64 9 520 8220 ● [email protected] Page 3 of 27 2 Installation & Setup 2.1 Requirements To install MoleTrac you will require: A Windows operating system: Windows XP, Windows Vista, Windows 7 or Windows 8. The installed size of MoleTrac is approximately 14 MB and the DLCam Interface is an additional 0.5 MB. Images and information added during patient sessions will increase the size of disk space required. Retrieving the Install Package and Activation License Key You can retrieve your free 30 day trial, or purchase a 1 or 4 year MoleTrac license by visiting: www.moletrac.com. MoleTrac has different licensing options depending on your desired lesion capacity and subscription length: 1 Year licenses give you access to add and edit patients and their information for a period of one year from the date of software activation. 4 Year licenses give you the ability to add and edit patients and their information for a period of four years from the date of software activation. The lesion count is the number of lesions that you can image per patient per day. For example, a lesion count of 5 will allow you to image up to 5 lesions per patient in a single day. There is no limit to the number of patients you can image in a day. 2.2 MoleTrac & DLCam Interface Install Performing a MoleTrac Install 1. Double-click on the downloaded MoleTrac.Setup file 2. Follow the Setup Wizard instructions to choose where to install MoleTrac and any shortcuts 3. Click Install to begin the install process. *Note: If you do not own a DLCam, you can exit the Setup Wizard at this stage with no loss of functionality. Performing a DLCam Interface Install The DLCam Interface software is used to connect a DermLite DLCam hardware to a Windows 7 or Windows 8 computer and enables the MoleTrac software to automatically upload images from a connected DermLite DLCam. 1. The DLCam Interface Setup Wizard will be displayed immediately after MoleTrac is installed. *Note: If you do not have .Net V4 installed this will be downloaded from the Internet and may take a few minutes depending on your internet speed 2. Follow the Setup Wizard instructions to choose where to install the program and shortcuts 3. Click Install to begin the install process © 2013 MoleMap NZ Ltd www.MoleTrac.com ● +64 9 520 8220 ● [email protected] Page 4 of 27 4. When installation is complete the Setup Wizard allows you to choose whether you want to launch the DLCam Interface immediately or not. Default settings will launch the program immediately. Un-tick this checkbox if: You do not own a DermLite DLCam *Note: No change in functionality will result from changing default settings if you do not own a DLCam You want to launch the DLCam Interface manually at a later date *Note: If you un-tick this checkbox, you will not be able to import images from a connected DLCam. If, at a later date, you want to connect and use your DLCam to automatically import lesion images in real time, you will need to launch the program from the start menu and perform a setup (section 2.3) before you start taking images. 5. Click Finish to exit the setup and start using MoleTrac. 2.3 DLCam Interface Setup *Note: The DLCam Interface has been tested on WIN7 32 bit and mostly works on 64 bit. The interface may not work on Windows XP and may cause the camera and/or program to freeze. Please contact MoleMapMD for assistance in this instance. 1. Following installation, the DLCam Interface program will automatically launch and run in the background. This will be denoted by a small camera icon which will appear in your system tray (taskbar at the bottom right of your screen). See section 10 – Troubleshooting & FAQs if you cannot locate this icon 2. Right-click on the icon to display the DLCam Interface options menu (Figure 1) and ensure the following items are ticked: Auto Start and Set Image Directory. You are now ready to start using your DermLite DLCam with MoleTrac. Figure 1: DLCam Interface option menu. DLCam Interface Menu Options Image Viewer – This screen enables you to view your DLCam image on your computer screen as soon as it is taken. If you have the default settings enabled (Figure 2) each image will be displayed momentarily on import, in separate window from MoleTrac, for you to check its content and clarity. These settings allow you and/or your patient to see what is being imaged and choose the best possible images for serial monitoring purposes. © 2013 MoleMap NZ Ltd www.MoleTrac.com ● +64 9 520 8220 ● [email protected] Page 5 of 27 Figure 2: DLCam Interface - Image Viewer option. Sync Camera Time – It is important to Sync Camera Time on the DLCam as this synchronises the camera time to match the time on your computer. Thus, when images are imported into MoleTrac, they are automatically associated with the correct lesion. Figure 3 shows the desired Time Sync display showing New Camera Time synced to be the same as Current Time (computer time). Figure 3: Time Sync notification showing camera Time Synced with current (computer) time. Clear Camera Images – This option enables you to delete the entire contents of your DLCam camera card to simplify and speed up the image importing process. Set Image Directory – This option allows you to change the folder where imported images from your DLCam will be saved. The folder selected should be the same as that used by MoleTrac (default C:\MoleTrac\Monitor). Auto Delete Images – This option allows you to set the DLCam Interface to automatically delete images off the DLCam camera card as soon as they are imported into MoleTrac. Auto Start DLCam – This option ensures that the DLCam Interface automatically starts when you login to your computer. Please leave this option ticked if you are using your DLCam regularly. You may want to turn it off if you are using alternative camera hardware. 2.4 Connecting a DLCam to your computer In order to use the USB cable to connect your DLCam to your computer you need to install a USB driver. Press the Power button to turn on your DLCam before plugging the USB cable into your computer. Windows will find the driver automatically, but this may take a few minutes. If you have difficulties please contact MoleMapMD for assistance. *Note: If you plug in your USB cable before turning on your DLCam, Windows may try to install an OMap 3430 driver. In this instance you can press the Cancel button to ignore this prompt. *Note: The Windows XP driver may not work at all depending on the service pack and other hardware issues. In this instance you will need to remove the camera card and insert this into a card reader on your computer to transfer images from the camera. © 2013 MoleMap NZ Ltd www.MoleTrac.com ● +64 9 520 8220 ● [email protected] Page 6 of 27 3 Activation & Login 3.1 MoleTrac Activation 1. Click on the MoleTrac icon on your Desktop or Start Menu to start the application *Note: Until a License Key has been supplied MoleTrac will not unlock for use 2. Paste or type your License Activation Key (see section 2.1) into the License window and click the Activate button to advance to the Login screen (Section 3.2) *Note: A trial licence may only be used if the software has not previously been licenced *Note: If your licence has expired, MoleTrac will open in read-only mode. You may view existing patients, but will be unable to modify their files. 3.2 Login Requirements To access MoleTrac you will require a username and password to enter in the appropriate fields on the Login screen (Figure 4). For first time use, your login credentials are as follows: Username*: admin Password*: admin * First time use only. To change this password and add new users to the program, see section 4.2. Figure 4: Login screen showing the 'Training Mode' option selected. Training Mode If you are new to MoleTrac, click the Training Mode checkbox on the Login screen. This will provide extended tips when you move your cursor over buttons, images and other items in the program. © 2013 MoleMap NZ Ltd www.MoleTrac.com ● +64 9 520 8220 ● [email protected] Page 7 of 27 3.3 License Details The type of license i.e. Trial, 1 Year, 4 Year along with lesion count will be displayed on the Login screen (Figure 4). To access your license details at any other time, open the License window (Figure 5) from the System tab on the Program Settings screen within MoleTrac. Click the Activation button to check how many days remain in the license period (where relevant). You can also enter a new license key to upgrade/renew your subscription prior to the expiry date of your current license. Figure 5: License activation details. 3.4 License Expiry & Renewal You can activate or change your licence at any time by entering a new License Key. If MoleTrac is not licenced, your licence has expired, or is expiring within the month, the License window will be displayed on start-up (Figure 6). Clicking the Close button will take you to the Login screen where your license details will also be highlighted as a warning/reminder. If your current license has expired, access is still permitted, but MoleTrac will be limited to read-only functionality i.e. all saved patient files and images will remain visible however no new patients, lesions, images or notes may be added. Reports can still be generated for existing patients’ lesions. Figure 6: License expiry warning. © 2013 MoleMap NZ Ltd www.MoleTrac.com ● +64 9 520 8220 ● [email protected] Page 8 of 27 4 Toolbar & Settings The buttons are displayed in the top right hand corner of the MoleTrac screen. Button Button Name Button Description Help Displays the help window. Time Sync Settings Lock Computer Displays a window with instructions describing how to synchronise the camera time to match the computer's time. Displays the Program Settings screen. Displays the User Management screen. Locking the computer pops up the Unlock Computer screen and requires the user's account password to be entered to unlock the computer. This does not log the user off or end the session; it simply prevents unauthorised access to your computer. 4.1 Settings You can access the Program Settings screen (Figure 7) by clicking the Settings button (see section 4) on the toolbar. The Program Settings screen allows you to customise some of the settings in MoleTrac. Some of the changes you make will update the program automatically; others may require you to restart the program: Figure 7: Import tab - Program Settings. © 2013 MoleMap NZ Ltd www.MoleTrac.com ● +64 9 520 8220 ● [email protected] Page 9 of 27 System Tab – Set information relating to your license, the screen display and user messages Fix Tab – Set options to help with program stability Lesions Tab – Set where you want PDF reports saved Import Tab – Change interface displays and set where MoleTrac will look for images from an attached DermLite DLCam (or alternative camera hardware) *Note: This should be the same as the directory you set in the DLCam Interface. 4.2 New Users New users can be created from the Settings icon under User Management (Figure 8). Having different users allows MoleTrac to register who mapped a particular patient on a specific date. *Note: The Administrator account cannot be removed, but passwords may be changed. Figure 8: LEFT - Login for changes to users, RIGHT - New user input page. © 2013 MoleMap NZ Ltd www.MoleTrac.com ● +64 9 520 8220 ● [email protected] Page 10 of 27 5 Patient Index Following login, the Patient Index screen will be displayed as shown in Figure 9 (a Test Patient is included in MoleTrac for teaching purposes). The Patient Index is where you can view all registered patients, add new patients or edit current patient information. Figure 9: Patient index screen – Initial start-up. 5.1 New Patients To add patients into the system, enter their name and date of birth (MoleTrac will verify the date in the grey field immediately adjacent). As this information is entered, all similar patients will be listed so you can check to see if the patient already exists in the system. Once you have verified that the patient is new to the system, click the Add button to display the Add New Patient screen (Figure 10). *Note: Patient files cannot be deleted, but information can be edited at a later date. © 2013 MoleMap NZ Ltd www.MoleTrac.com ● +64 9 520 8220 ● [email protected] Page 11 of 27 Figure 10: Add new patient display window. 5.2 Find Patient To find a particular patient in MoleTrac’s Patient Index, type part of the patient’s name (their date of birth) to display a list of matching patients. Alternatively, click the Show All button to display a complete list of all Patient files in MoleTrac. 5.3 Patient Session Select a patient from the list and click the Open button (or double-slick on the selected patient) to start a session for that patient. If you need to modify the patient details, select the patient in the list and click the Edit button. 5.4 Start/End Sessions The session starts when a patient is selected and the Details screen is displayed. The session ends when you click the Close button and choose to Save or Abandon the current patient session. © 2013 MoleMap NZ Ltd www.MoleTrac.com ● +64 9 520 8220 ● [email protected] Page 12 of 27 6 Details Screen The Details screen (Figure 11) is where you can enter further patient details including their skin cancer risk factors. You can also modify patient information by clicking the Edit button. Figure 11: Details screen showing patient information. © 2013 MoleMap NZ Ltd www.MoleTrac.com ● +64 9 520 8220 ● [email protected] Page 13 of 27 7 Overview Screen The Overview screen shows a general view of the locations of a patient's lesions on a mannequin. Moving the cursor over one of the plotted lesions will display the latest images for the lesion (Figure 12). Click on any marked lesion to display the Lesion screen for further lesion information. Figure 12: Overview screen showing lesions per location on a mannequin. Latest images are displayed when the cursor is held over a specific lesion location. 7.1 Mannequin View Image Name Description Add lesion Add a lesion to an area on a specific mannequin view Lesion number Number of lesions captured in a specific mannequin view Green marker Pink marker Lesion locator Selected lesion © 2013 MoleMap NZ Ltd www.MoleTrac.com ● +64 9 520 8220 ● [email protected] Page 14 of 27 8 Lesions Screen The Lesion screen is used to add/’register’ patient lesions or modify information associated with lesions that have already been plotted (including lesions saved in previous sessions). 8.1 Lesion Registration & Reporting Click the Add Lesion button and the Create Lesion screen (Figure 13) will be displayed. Click on one of the mannequin images at the bottom of the screen to select the appropriate orientation. You can then click on an enlarged view (Figure 14) to accurately plot a lesion of interest. Figure 13: Create Lesion screen. Figure 14: Lesion screen enabling accurate placement of the lesion on the mannequin. © 2013 MoleMap NZ Ltd www.MoleTrac.com ● +64 9 520 8220 ● [email protected] Page 15 of 27 If the description of the plotted location is not correct, click the Set Descriptor button which will display the Change Location Description window (Figure 15). When the correct location and description are selected, click OK. Figure 15: Lesion screen enabling description of lesion placement to be changed. Enlarging Images Right-clicking on any image in the Lesions screen will display it in full-screen mode (Figure 16). Rightclick on the image again to return to the previous view. Figure 16: Image in full-screen mode. If more than one lesion is visible on an image it may be hard to recall which lesion requires review when a patient returns for a follow-up consultation. In this instance it is useful to save a body shot image as part of the patient session to help clarify location of the lesion. MoleTrac assists in this © 2013 MoleMap NZ Ltd www.MoleTrac.com ● +64 9 520 8220 ● [email protected] Page 16 of 27 situation by providing a ‘crosshair’ locator which can be dragged onto any enlarged image to aid clarity (Figure 17). *Note: You will need to use alternative camera hardware to the DLCam for taking body shot images. You can import a body shot into MoleTrac in the same way as you would any other image taken with alternative hardware, as described in section 9. Figure 17: Body shot image imported to MoleTrac showing a lesion of interest marked with a crosshair to provide clarity around its location for follow-up. Whenever a new lesion has been created it will be assigned a unique lesion registration number. This unique number will be displayed on the Overview, Lesion and Import screens as well as any generated reports relating to that lesion. Associating Lesions with Images See section 9 for details on importing images from your DermLite DLCam or alternative camera hardware. Button Button Name Import Next Image Add/Change Images Next/Previous Lesion Button Description Transfers you to the Import screen, to enable images to be imported from any camera hardware and to associate them with lesion locations. If multiple images are associated with a lesion, the Next Image button will be displayed in the bottom right hand corner of the image on the Lesions screen indicating more than one image is available for viewing. Transfers to the Import screen to allow images which have already been imported to be associated with the lesions. If multiple lesions are registered on a patient, the Next/Previous lesion buttons will be activated to allow scrolling between patient lesions © 2013 MoleMap NZ Ltd www.MoleTrac.com ● +64 9 520 8220 ● [email protected] Page 17 of 27 8.2 Generating Lesion Reports Lesion reports can be generated on the Lesion screen by clicking the Report button. These reports contain patient information, any skin cancer risk factors taken from the questionnaire on the Details screen and both the clinical and dermoscopic images associated with the lesion(s) of interest. Reports will be saved in the file location specified on the Lesions Tab in Program Settings under Reports. All reports are in PDF format ready for import into your electronic health record. Reports are all named with the following structure: <Patient Name>.<Lesion Number>.<Date>.<Time of Report Generation>. 8.3 Lesion Monitoring Once a lesion has been registered (section 8.1) and images have been associated (section 9.1), the Lesion screen will contain all current and historical information relevant to that lesion of interest. Notes on a particular lesion can be added and stored here along with relevant clinical information. To view another registered lesion, click the Next or Previous Lesion buttons at the bottom of the screen. Serial Monitoring Clicking on the Lesion History button will display all images associated with a selected lesion and their date of import. Images can be displayed by separating the Macro and Microscopic views (Figure 18), or alternatively as thumbnails arranged solely by date and time of import. Clicking on two images will display them side by side (Figure 19) to aid in viewing any small changes that may have occurred over time. Figure 18: Lesion history separated by image type. TOP – Macroscopic view, BOTTOM – Microscopic view © 2013 MoleMap NZ Ltd www.MoleTrac.com ● +64 9 520 8220 ● [email protected] Page 18 of 27 Figure 19: Two images selected for closer comparison viewing. Lesion Excisions If a lesion stored in MoleTrac is excised, this information can also be recorded for file completeness using the Excision / Histology button on the Lesion screen. The Excision Note window (Figure 20) allows for excision notes, e.g. date and subsequent pathology results, to be entered and saved for future reference. Figure 20: Excision Note window. Measuring Lesion Size Click on any image on the Lesion screen to register the start of a lesion measurement. Drag the cursor to cover the desired length and click again to end the measurement. A blue line will indicate the measurement on the image and the length (in millimetres) will be displayed in the top corner of the image (Figure 21). Clicking on the image a third time will delete the measurement. Figure 21: Measurement of lesions showing increased measurement accuracy on the microscopic view. © 2013 MoleMap NZ Ltd www.MoleTrac.com ● +64 9 520 8220 ● [email protected] Page 19 of 27 9 Import Screen The Import screen enables images to be imported from your DermLite DLCam (or alternative camera hardware). Once imported, this screen gives an overview of all the imported images and allows you to associate them with your patient's lesions. *Note: It is necessary for a lesion to be added to MoleTrac (section 8.1) before any images can be assigned. DermLite DLCam Users If you have followed the instructions in section 2.2 and 2.3, and are using your DLCam whilst connected via the USB cable to your computer, images will automatically be imported as soon as they are taken. If the Lesion screen is displayed when images are taken, the imported images will also be associated with the current lesion as they are imported. If you are on the Import screen, images will be imported and will appear in the Import pane ready for manual association (section 9.1). If you choose to have your DLCam disconnected from your computer while you are taking lesion images, follow instructions for ‘Alternative Camera Hardware Users’ below. Alternative Camera Hardware Users If you do not have a DermLite DLCam (or are using a disconnected DLCam) you will need to import lesion images by inserting the camera card into a card reader on your computer and clicking the Import button. *Note: To enable images to be imported from a card reader you must tick the Source checkbox option (found on the Import tab in Program Settings). 9.1 Associating Images with Lesions To associate an imported image with a lesion on the Import screen, drag the image from the Import pane into the Lesion pane to the right of the appropriate lesion location view as shown in Figure 22. Both macro and micro images that are allocated to a lesion will be displayed in the order of time that each image was imported. Figure 22: LEFT IMAGE – Lesion location. The number in bottom left corner indicates the unique lesion number. The red marker indicates associated images may be out of view. RIGHT IMAGES – Images are labelled with the time the image was taken and the type of image i.e. Macroscopic or Microscopic view. © 2013 MoleMap NZ Ltd www.MoleTrac.com ● +64 9 520 8220 ● [email protected] Page 20 of 27 If the number of images is too great for the screen display, a red marker and the total number of images will be displayed on the location image (Figure 22) to advise the user of all available images. To undo an image association, simply drag the image back to the import pane. Imported images that are not assigned will remain in the Import pane, for future association with any other lesions. 9.2 Converting Image Labels DermLite DLCam images are automatically imported to MoleTrac and assigned as the correct image type. If you are not using a DermLite DLCam, only images with a focal length between 0 – 30mm will be labelled as microscopic images. All other images will be labelled as macroscopic. In the unusual event that a microscopic image has been incorrectly labelled as macroscopic (or viceversa), drag the image onto the CONVERT MAC <–> MIC button. *Note: If images are not correctly labelled they will not be correctly grouped together in MoleTrac. 9.3 Saving and Deleting Images Images that are assigned to lesions will be saved under the Lesion screen (and removed from the Import screen) once the patient session has been completed. Images that are out-of-focus, blurry, distorted, or not required can be dragged down to the trash pane at the bottom of the Import screen (Figure 23) and will remain visible until the Delete button is clicked, or the patient session has ended. *Note: All images that are imported will be removed from the camera card. Images that are deleted will be irretrievable for use. Figure 23: Delete Image confirmation window. Image to be deleted is shown in the Trash pane at the bottom of the Import screen. © 2013 MoleMap NZ Ltd www.MoleTrac.com ● +64 9 520 8220 ● [email protected] Page 21 of 27 10 Troubleshooting & FAQs For any issues you may encounter, please do not hesitate to contact MoleMapMD at: Email: [email protected] Phone: +64 9 520 8220 Upgrading MoleTrac licenses to an unlimited lesion count Licenses can be upgraded at any time by contacting the MoleMapMD support team. Licenses cannot be reduced during the license period. The MoleTrac Installer Package will not download from the MoleMapMD website If you receive an error message similar to that shown in Figure 24, you have exceeded the number of allowable download attempts. Please try looking in the Downloads folder on your computer to see if the installer has been downloaded previously. If it does not exist in this location, please contact MoleMapMD for assistance. Figure 24: Download expiry message. License key is not responding If you receive an error message similar to that shown in Figure 25, you have entered an invalid activation license key. Please try re-entering your key and if this does not resolve the error, please contact MoleMapMD for assistance. Figure 25: License key error – invalid license key. © 2013 MoleMap NZ Ltd www.MoleTrac.com ● +64 9 520 8220 ● [email protected] Page 22 of 27 If you receive an error message similar to that shown in Figure 25, you have entered an invalid activation license key. Please try re-entering your key and if this does not resolve the error, please contact MoleMapMD for assistance. Figure 26: License key error – expired (old) version of license key. Trial license key is not accepted If you receive an error message similar to that shown in Figure 27, it means you have previously used a trial license key with your software. MoleTrac is only able to accept one trial license. Please visit www.moletrac.com to purchase a new valid license or contact MoleMapMD for assistance. Figure 27: License key error – free trial has already been used. MoleTrac crashes or fails to open If MoleTrac crashes on start-up you may need to reinstall the application © 2013 MoleMap NZ Ltd www.MoleTrac.com ● +64 9 520 8220 ● [email protected] Page 23 of 27 If MoleTrac crashes on login you may need to try un-ticking the ‘Update DLCam Interface settings’ option in the Import tab in Program Settings. To do this you will need to manually set MoleTrac properties (right-click on MoleTrac icon on your Desktop to display the properties window) by changing the Target folder in to match that shown in Figure 28 Figure 28: MoleTrac properties If MoleTrac crashes when opening a patient file (or when loading an image), there are a number of fix options you can try. Go to the Fix tab of Program Settings (see Figure 29) and try each of the fix options outlined below. Try each option separately and only try them together if the program is still crashing: 1. Firstly, tick the ‘Native Image Handling’ checkbox, 2. Then, try ticking the ‘Disable Subclassing’ checkbox, *Note: The ‘Disable Subclassing’ option will disable the mouse wheel 3. Lastly try ticking the ‘Use Manifest File’ checkbox (ensure options in 1 & 2 are not selected). © 2013 MoleMap NZ Ltd www.MoleTrac.com ● +64 9 520 8220 ● [email protected] Page 24 of 27 *Note: You may need to restart MoleTrac to effect these changes. Figure 29: Fix tab of Program Settings. Using alternative camera hardware with MoleTrac For the best user experience we recommend the DermLite DLCam. Images will instantaneously import and be assigned as a clinical or dermoscopic view when using the DLCam with MoleTrac. However, if you are not using a DermLite DLCam, you can still import your images into MoleTrac. To do so, you will need to remove the camera card and insert this into a card reader on your computer. You will also need to ensure that the Card Reader checkbox is ticked on the Import tab of Program Settings before clicking the Import button on either the Lesion or Import screen. Accessing the DLCam Interface Menu If you can’t see the DLCam Interface icon in your system tray (taskbar at the bottom right of your screen) you will need to click on the up arrow and then click Customize (Figure 30). This will open the Notification Area Icons control panel (Figure 31). Find the DLCam icon in the list provided and set it to Show icon and notifications. Figure 30: System Tray - taskbar at the bottom right of your screen. © 2013 MoleMap NZ Ltd www.MoleTrac.com ● +64 9 520 8220 ● [email protected] Page 25 of 27 Figure 31: Notification Area Icons section of Control Panel. Time Sync fails If you receive an error message similar to that shown in Figure 32, please ensure that your DLCam is turned on before you attempt to sync the time. You may also have to wait a few minutes to the USB driver to load once the DLCam is turned on. If this does not resolve the error, please contact MoleMapMD for assistance. Figure 32: Time sync error message. MoleTrac takes a long time to load If you are finding that MoleTrac is taking a long time to load, it may be due to a large number of imported images that have not been assigned to lesions and still remain in the import pane, for future association with any other lesions. Try decreasing the number of images you have in the Import screen by deleting those that are no longer required. If problems persist, please contact MoleMapMD for assistance. Images are not loading If your DLCam is connected to your computer via the USB cable, but images are not loading automatically once an image is taken, click the Import button to scan for images. If you receive a ‘Card Full’ error on the screen of your DLCam, check that the camera card is fully inserted into the slot. If you are using a card reader and your images are not importing, go to the Import Tab in Program Settings and ensure that the Card Reader checkbox is ticked. If problems persist, please contact MoleMapMD for assistance. © 2013 MoleMap NZ Ltd www.MoleTrac.com ● +64 9 520 8220 ● [email protected] Page 26 of 27 My license has expired, how can I access my patient’s images? If your current license expires all saved patient files and images will remain accessible read-only functionality. When the License window is displayed, click the Close button and enter your login details. MoleTrac will open but patients, lesions or images may not be added or edited until a new license key is entered (see section 3.4). Reports may still be generated for existing patients. Figure 33: License expiration notifications, LEFT IMAGE – on start-up, RIGHT IMAGE– on attempt to add lesions. © 2013 MoleMap NZ Ltd www.MoleTrac.com ● +64 9 520 8220 ● [email protected] Page 27 of 27