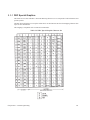
1
MS320 for Windows 2.00.121 MiniSoft, Inc. 1024 First street Snohomish, WA 98290 U.S.A. 1-800-682-0200 360-568-6602 Fax: 360-568-2923 MiniSoft Marketing AG Papiermuhleweg 1 Postfach 107 Ch-6048 Horw Switzerland Phone: +41-41-340 23 20 Fax: +41-41-340 38 66 CompuServe: 100046,450 [email protected] Internet access: [email protected] [email protected] httpL//www.minisoft.com ftp://ftp.minisoft.com Disclaimer The information contained in this document is subject to change without notice. MiniSoft, Inc. makes no warranty of any kind with regard to this material, including, but not limited to, the implied warranties of merchantability and fitness for a particular purpose. MiniSoft, Inc. or its agents shall not be liable for errors contained herein or for incidental or consequential damages in connection with the furnishings, performance, or use of this material. This document contains proprietary information which is protected by copyright. All rights are reserved. No part of this document may be photocopied, reproduced, or translated to another programming language without the prior written consent of MiniSoft, Inc. ©1991 by MiniSoft, Inc. © DCSi All product names and services identified in this document are trademarks or registered trademarks of their respective companies and are used throughout this document in editorial fashion only and are not intended to convey an endorsement or other affiliation with MiniSoft, Inc. License Agreement In return for payment of a onetime fee for this software product, the Customer receives from MiniSoft, Inc. a license to use the product subject to the following terms and conditions: • The product may be used on one computer system at a time: i.e., its use is not limited to a particular machine or user but to one machine at a time. • The software may be copied for archive purposes, program error verification, or to replace defective media. All copies must bear copyright notices contained in the original copy. • The software may not be installed on a network server for access by more than one personal computer without written permission from MiniSoft, Inc. Purchase of this license does not transfer any right, title, or interest in the software product to the Customer except as specifically set forth in the License Agreement, and Customer is on notice that the software product is protected under the copyright laws. 90-Day Limited Warranty MiniSoft, Inc. warrants that this product will execute its programming instructions when properly installed on a properly configured personal computer for which it is intended. MiniSoft, Inc. does not warrant that the operation of the software will be uninterrupted or error free. In the event that this software product fails to execute its programming instructions, Customer’s exclusive remedy shall be to return the product to MiniSoft, Inc. to obtain replacement. Should MiniSoft, Inc. be unable to replace the product within a reasonable amount of time, Customer shall be entitled to a refund of the purchase price upon the return of the product and all copies. MiniSoft, Inc. warrants the medium upon which this product is recorded to be free from defects in materials and workmanship under normal use for a period of 90 days from the date of purchase. During the warranty period MiniSoft, Inc. will replace media which prove to be defective. Customer’s exclusive remedy for any media which proves to be defective shall be to return the media to MiniSoft, Inc. for replacement. ANY IMPLIED WARRANTY OF MERCHANTABILITY OR FITNESS IS LIMITED TO THE 90-DAY DURATION OF THIS WRITTEN WARRANTY. Some states or provinces do not allow limitations on how long an implied warranty lasts, so the above limitation or exclusion may not apply to you. This warranty gives you specific rights, and you may also have other rights which vary from state to state or province to province. LIMITATION OF WARRANTY: MiniSoft, Inc. makes no other warranty expressed or implied with respect to this product. MiniSoft, Inc. specifically disclaims the implied warranty of merchantability and fitness for a particular purpose. EXCLUSIVE REMEDIES: The remedies herein are Customer’s sole and exclusive remedies. In no event shall MiniSoft, Inc. be liable for any direct, indirect, special, incidental, or consequential damages, whether based on contract, tort, or any other legal theory. u TABLE OF CONTENTS CHAPTER 1 INTRODUCTION 1.1 1.1.1 1.1.2 1.1.3 1.2 1.3 1.4 1.4.1 CHAPTER 2 DOCUMENTATION LAYOUT Notation Examples Emulator Commands EMULATOR AND VT320 FUNCTION KEYS APPLICATION WINDOW LINE RECALL AND EDITING Command Line Editing GETTING STARTED 2.1 PACKAGE CONTENTS 2.2 MINIMUM REQUIREMENTS 2.3 REGISTRATION 2.4 INSTALLATION 2.4.1 Creating an Icon 2.5 Emulator Application Window 2.6 CONNECTING 2.6.1 Connections 2.6.2 Session Manager 2.6.2.1 Creating Sessions 2.6.2.2 Copying Sessions 2.6.2.3 Deleting Sessions 2.6.2.4 Switching Sessions 2.6.2.5 Exiting Sessions Remotely 2.6.3 Windows Sockets 2.6.3.1 Windows Sockets Setup 2.6.3.2 Edit Node List Table of Contents 11 12 13 13 13 14 15 16 16 17 18 18 18 18 19 19 20 20 21 23 24 24 25 25 26 27 28 2 2.6.4 Modem (TAPI) 2.6.4.1 Edit Phone List 2.6.5 Poly/LAT-32 2.6.6 Serial 2.6.6.1 Serial Setup 2.7 WINDOW SIZING AND LOCATION 2.7.1 Number of Emulation Lines 2.7.2 Maximize Workspace 2.8 SCREEN SCROLLBACK 2.9 VIDEO ATTRIBUTE TO COLOR MAPPING 2.10 CHARACTER SETS 2.11 PRINTER SUPPORT 2.12 COMPOSE CHARACTERS 2.13 COMMON PROBLEMS 2.14 TECHNICAL SUPPORT CHAPTER 3 DROP DOWN MENUS 3.1 EDIT 3.1.1 Copy 3.1.2 Paste 3.1.3 Send 3.1.4 Select All 3.1.5 Select Screen 3.2 EXECUTE 3.2.1 Abort 3.2.2 Break (short) 3.2.3 Break (long) 3.2.4 Command Line 3.2.5 Clear Communications 3.2.6 DDE Command Builder 3.2.7 Drop DTR 3.2.8 Reset 3.2.9 Send Answerback 3.2.10 WordPerfect 5.x Mode 3.3 FILE 3.3.1 Edit Command File Selection 3.3.2 Run Command File Selection 3.3.3 Capture Text to File 3.3.4 Record Log File Selection 3.3.5 Replay Log File Selection 3.3.6 Receive 3.3.7 Send 3.3.8 Print 3.3.9 Page Setup 3.3.9.1 Page Setup Options 3.3.10 Exit 3.4 HELP 3.4.1 Index 3.4.2 Using Help 3.4.3 About 3.4.3.1 General 3.4.3.2 Version 3.5 SETUP 29 30 31 32 33 34 34 35 35 35 36 36 37 39 40 41 42 42 42 42 42 42 43 43 43 43 43 43 43 43 44 44 44 44 45 46 47 48 49 49 49 50 51 52 53 54 54 54 54 54 55 55 3 3.5.1 Customizable Toolbars 3.5.2 Keyboard Mapper 3.5.3 Mouse Mapper 3.5.4 File Transfer 3.5.5 General 3.5.5.1 DDE 3.5.5.2 Directories 3.5.5.3 Log File Replay 3.5.6 Terminal Setup 3.5.6.1 Display 3.5.6.1.1 Color Setup 3.5.6.2 Keyboard 3.5.6.2.1 Default Enhanced Keyboard Key Assignments 3.5.6.2.2 Default AT Keyboard Key Assignments 3.5.6.3 Terminal Tabs 3.5.6.3.1 Terminal Tab Options 3.6 VIEW 3.6.1 Menu 3.6.2 Status Line 3.6.3 Centered 3.6.4 Framed 3.6.5 Maximize Workspace 3.6.6 Scrollbar 3.6.7 File Transfer Messages 3.6.8 Message History 3.6.9 Toolbars 3.6.9.1 Default Toolbar Descriptions CHAPTER 4 KEYBOARD, MOUSE & TOOLBAR 4.1 KEYBOARD MAPPING 4.1.1 Creating a New Key Map 4.1.2 Defining a Key 4.1.3 Changing a Key Definition 4.1.4 Deleting a Key Definition 4.2 MOUSE MAPPING 4.2.1 Creating a New Mouse Map 4.2.2 Defining a Mouse Button 4.2.3 Changing a Mouse Button Definition 4.2.4 Deleting a Mouse Button Definition 4.3 CUSTOMIZE TOOLBARS 4.3.1 Creating a New Toolbar 4.3.2 Properties Tab 4.3.3 Buttons Tab 4.3.4 Button Editor Tab 4.3.4.1 Defining a Toolbar Button 4.3.4.2 Changing a Toolbar Button Definition 4.3.4.3 Deleting a Toolbar Button Definition 4.3.4.4 Renaming a Toolbar Button Definition Table of Contents 56 56 56 56 56 56 57 58 59 59 61 62 64 66 68 69 71 71 71 71 71 71 71 71 72 72 73 75 76 77 78 81 81 82 83 84 88 88 89 89 89 91 92 94 97 97 97 4 CHAPTER 5 EXTENDED FEATURES 5.1 LOG FILES 5.1.1 Record Log File 5.1.2 Replay Log File 5.1.2.1 Keyboard Instructions 5.1.3 Replay Options 5.1.3.1 Replay Rate 5.1.3.2 Pause on Clear Screen 5.1.3.3 Pause on Every Page 5.1.3.4 Pause on Text 5.1.4 Replay Pauses 5.1.5 Programming Considerations 5.1.5.1 Menu Driven Applications 5.2 ONLINE HELP 5.3 WORDPERFECT MODE 5.3.1 Entering WordPerfect Mode 5.3.2 Terminating WordPerfect Mode 5.3.3 Operation of WordPerfect Mode 5.3.4 WordPerfect Mode - Transmit Codes CHAPTER 6 FILE TRANSFER 6.1 FILE TRANSFER SETUP 6.1.1 Common Setup 6.1.2 Kermit Protocol Setup 6.1.3 XMODEM Protocol Setup 6.1.4 YMODEM Protocol Setup 6.1.5 ZMODEM Protocol Setup 6.1.6 ASCII Protocol Setup 6.1.6.1 Additional Information 6.1.7 Auto Command Mode Setup 6.1.7.1 ASCII Protocol - Additional Information 6.1.7.1.1 Send Command Strings 6.1.7.1.2 Receive Command Strings 6.2 PERFORMING FILE TRANSFERS 6.2.1 File Transfer Directory 6.2.2 Sending Files 6.2.2.1 Kermit Transfers - Additional Information 6.2.2.2 Kermit File Formats 6.2.2.3 ZMODEM Transfers - Additional Information 6.2.3 Receiving Files 6.2.3.1 Kermit Transfers - Additional Information 6.2.3.2 Kermit File Formats 6.2.3.3 ZMODEM Transfers - Additional Information 6.2.4 File Transfers Using the Command Line 6.2.5 Emulator Kermit Commands 6.2.6 Transferring Files Using Kermit 6.2.6.1 Send/Server Mode 6.2.6.2 Send/Non-Server Mode 6.2.6.3 Receive/Server Mode 6.2.6.4 Receive/Non-Server Mode 6.2.6.5 Send File Examples 6.2.6.6 Receive File Examples 6.2.6.7 Aborting Transfers 99 100 100 101 101 101 102 102 102 102 102 102 102 103 103 103 103 103 104 105 106 107 107 109 109 110 111 112 113 114 114 115 115 115 116 118 119 119 119 122 122 122 123 123 123 123 123 124 124 124 125 126 5 CHAPTER 7 COMMAND LANGUAGE 7.1 COMMAND SYNTAX 7.2 COMMAND EXECUTION 7.2.1 Command Line Execution 7.2.1.1 Entering Multiple Commands 7.2.2 Executing from the Host 7.3 COMMAND FILES 7.3.1 Specifying a Command File 7.3.2 Default Command File 7.3.3 Command Line Execution 7.3.4 Executing from the Host 7.3.5 Nested Command Files 7.3.6 Comments 7.4 ABORTING COMMANDS 7.5 EMULATOR COMMAND LIST 7.5.1 Emulator Command Descriptions CHAPTER 8 COMMAND FILE PROGRAMMING 8.1 DOCUMENTING COMMAND FILES 8.2 PASSING PARAMETERS 8.3 SYMBOLS 8.3.1 Symbol Types 8.3.1.1 Permanent Global Symbols 8.3.2 Assigning Symbol Values 8.3.2.1 Implied String Assignments 8.4 LABELS 8.5 EXPRESSION EVALUATION 8.5.1 String to Integer Conversion 8.5.2 String Expressions 8.5.3 Integer Expressions 8.5.4 Expression Substitution 8.6 OPERATORS IN EXPRESSIONS 8.6.1 String Operations 8.6.2 Arithmetic Operations 8.6.3 Logical Operations 8.6.4 String Comparisons 8.6.5 Arithmetic Comparisons 8.6.6 Radix Operators 8.7 SPECIAL CHARACTERS 8.7.1 Input Conversion 8.7.2 Output Conversion 8.8 FOREIGN COMMANDS 8.9 LEXICALS 8.10 DISPLAY LEXICALS 8.11 SYMLEXES 8.11.1 Defining a Symlex 8.12 SYMBOL AND LEXICAL SUBSTITUTION 8.12.1 Automatic Symbol Substitution 8.12.2 Substitution Using Apostrophes 8.12.3 Substitution Using Ampersands 8.12.4 Three Phases of Symbol Substitution 8.12.4.1 Iterative Substitution Using Apostrophes Table of Contents 127 128 128 128 129 129 129 129 130 130 130 130 131 131 132 134 175 176 176 177 177 177 178 178 179 180 180 180 181 181 182 183 183 184 184 185 185 186 186 187 188 189 192 193 193 195 195 195 196 197 198 6 8.12.4.2 Iterative Substitution Using Command Synonyms 8.12.4.3 Iterative Substitution in Expressions 8.12.4.4 Substitution of Undefined Symbols 8.13 ERROR FACILITY 8.13.1 $STATUS Conditional Codes 8.13.2 DOS ERROR LEVEL 8.13.3 Messages CHAPTER 9 VT320 PROGRAMMING 9.1 QUICK REFERENCE TABLES 9.1.1 Character Sets 9.1.2 Transmitted Codes 9.1.3 Received Codes 9.1.3.1 VT320 Control Sequences 9.1.3.2 VT100 Escape Sequences 9.1.3.3 VT52 Escape Sequences 9.1.4 Reports 9.1.4.1 VT320 Reports 9.1.4.2 VT100 Reports 9.2 CHARACTER ENCODING 9.2.1 7-Bit ASCII Codes 9.2.2 8-Bit ASCII Codes 9.2.3 Control Functions 9.2.3.1 Control Sequences 9.2.3.2 Escape Sequences 9.2.3.3 Device Control Strings 9.3 CHARACTER SETS 9.3.1 DEC Multinational 9.3.2 ISO Latin-1 9.3.3 DEC Special Graphics 9.3.4 National Replacement Character 9.3.5 Character Set Selection 9.3.6 Mapping Character Sets 9.4 TRANSMITTED CODES 9.4.1 Main Keypad 9.4.1.1 Standard Keys 9.4.2 Editing Keypad 9.4.3 Auxiliary Keypad 9.4.4 Top Row Function Keys 9.4.5 Control Codes 9.5 RECEIVED CODES 9.5.1 Character Rendition and Attributes 9.5.1.1 Select Graphic Rendition 9.5.1.2 Select Attributes 9.5.2 Compatibility Level 9.5.3 Control Characters 9.5.4 Cursor Positioning 9.5.5 Editing 9.5.6 Erasing 9.5.7 Line Attributes 9.5.8 Printing 9.5.9 Scrolling Region 9.5.10 Select C1 Controls 9.5.10.1 Select 7-bit C1 Transmission (S7C1T) 198 199 199 200 201 203 203 207 208 208 209 211 211 215 217 218 218 221 222 223 224 226 226 226 227 227 228 230 231 232 232 234 236 236 236 236 237 238 239 240 240 240 241 241 244 245 246 246 247 247 247 248 248 7 9.5.10.2 Select 8-bit C1 Transmission (S8C1T) 9.5.11 Tab Stops 9.5.12 Terminal Modes 9.5.12.1 Reset Mode (RM) 9.5.12.2 Set Mode (SM) 9.5.12.3 ANSI/VT52 Mode (DECANM) 9.5.12.4 Auto Repeat Mode (DECARM) 9.5.12.5 Auto Wrap Mode (DECAWM) 9.5.12.6 Backarrow Key Mode (DECBKM) 9.5.12.7 Character Set Mode (DECNRCM) 9.5.12.8 Column Mode (DECCOLM) 9.5.12.9 Cursor Key Mode (DECCKM) 9.5.12.10 Insert/Replace Mode (IRM) 9.5.12.11 Keyboard Action Mode (KAM) 9.5.12.12 Keypad Mode (DECKPAM/DECKPNM) 9.5.12.13 Line Feed/New Line Mode (LNM) 9.5.12.14 Numeric Keypad Mode (DECNKM) 9.5.12.15 Origin Mode (DECOM) 9.5.12.16 Print Extent Mode (DECPEX) 9.5.12.17 Print Form Feed Mode (DECPFF) 9.5.12.18 Screen Mode (DECSCNM) 9.5.12.19 Scrolling Mode (DECSCLM) 9.5.12.20 Select Status Display (DECSASD) 9.5.12.21 Select Status Line Type (DECSSDT) 9.5.12.22 Send/Receive Mode (SRM) 9.5.12.23 Text Cursor Enable Mode (DECTCEM) 9.5.13 Terminal Reset Mode 9.5.13.1 Soft Terminal Reset 9.5.13.2 Hard Terminal Reset 9.5.14 Programming User Defined Keys (UDKs) 9.5.14.1 DECUDK DCS Format 9.5.14.2 Guidelines for Loading Keys 9.5.14.3 Examples for Using DECUDK 9.5.15 DCS Private Control Sequences 9.5.15.1 Example - DCS Private Sequence 9.6 REPORTS 9.6.1 Device Attributes 9.6.1.1 Primary Device Attributes 9.6.1.2 Secondary Device Attributes 9.6.2 Device Status Reports 9.6.2.1 Cursor Position 9.6.2.2 Keyboard Dialect 9.6.2.3 Operating Status 9.6.2.4 Printer Status 9.6.2.5 User-Defined Key (UDK) Status 9.6.3 Terminal State Reports 9.6.3.1 Restore Terminal State 9.6.4 Presentation State Reports 9.6.4.1 Request Presentation State Report 9.6.4.2 Cursor Information 9.6.4.3 Tab Stop Report 9.6.4.4 Restore Presentation State 9.6.5 Mode Settings 9.6.5.1 Request Mode 9.6.5.2 Report Mode Table of Contents 248 248 248 249 249 250 250 251 251 251 251 252 252 252 252 253 253 253 253 254 254 254 254 255 255 256 256 256 256 257 257 258 258 259 259 260 260 260 261 261 261 261 261 262 262 263 263 264 264 264 267 267 267 268 269 8 9.6.5.3 9.6.5.4 9.6.6 9.6.7 9.6.8 Set Mode Reset Mode Save and Restore Cursor State Control Function Settings User-Preferred Supplemental Set 270 270 271 271 272 APPENDIX A CABLING DIAGRAMS 273 APPENDIX B ASCII CONTROL CODE TABLE 275 APPENDIX C ANSI COLOR SUPPORT 277 APPENDIX D DYNAMIC DATA EXCHANGE 281 D.1 D.1.1 D.1.2 D.1.3 D.2 D.2.1 D.3 D.3.1 D.3.2 D.3.3 D.3.4 D.3.5 D.3.6 D.4 D.4.1 D.4.2 D.4.3 D.4.4 D.5 D.5.1 D.6 APPENDIX E USING DDE DDE Concepts Service Names, Topic Names, and Item Names Server Topics SYSTEM TOPIC System Topic Items ECL TOPIC ECL Topic Items Requesting the Value of an ECL Variable Changing the Value of an ECL Variable Creating an Advise Data Link to an ECL Variable Executing ECL Commands or Command Files Settings Topic DDE COMMANDS DDE Server Operation DDE Error Facility Client Messages Server Messages DDE COMMAND BUILDER Copying a DDE Command to the Command Line DDE DEMO SCO ANSI PROGRAMMING E.1 SCO ANSI PROGRAMMING SEQUENCES E.1.1 Character Attributes E.1.2 Character Sets E.1.3 Color Attributes E.1.3.1 ANSI Color Attributes E.1.3.2 SCO Xenix Color Attributes E.1.4 Columns E.1.5 Cursor Positioning E.1.6 Inserting E.1.7 Key Assignments E.1.8 Keyboard Control E.1.9 Report 282 282 283 283 283 284 284 284 285 285 285 286 286 286 286 287 287 288 289 289 290 291 291 291 292 292 292 293 293 294 294 295 295 296 9 GLOSSARY 297 INDEX 299 Table of Contents 10 u CHAPTER 1 INTRODUCTION OVERVIEW The emulator is a high quality, 32-bit, DEC VT320 emulator for IBM and IBM-compatible computer systems running Microsoft Windows NT, Windows 95 and Windows 98. The software duplicates virtually all functions of the DEC VT320, VT220, VT102, VT100, VT52, SCO ANSI and BBS ANSI terminals. In VT102 mode, the emulator performs all functions of a DEC VT102 terminal including scrolling regions, video attributes, double-width characters, local printer support, character insert/delete, and full keyboard emulation. In VT320 mode, the emulator emulates the expanded VT320 keyboard, user-defined function keys, compose key, multinational character sets, and 8-bit control sequences. The emulator offers many extended features, including: o o o o o o o Kermit, ASCII, XMODEM, YMODEM, and ZMODEM file transfer Extensive command (script) language Keyboard mapping, Mouse mapping and Customizable Toolbars Screen scrollback Data logging and replay WordPerfect mode Color support Chapter One - Introduction 11 1.1 DOCUMENTATION LAYOUT The Quick Start Guide is composed of the first four chapters listed below, while the online Reference Manual contains all of the following documentation. Chapter 1 Introduction Documentation overview and general description of the application window. Chapter 2 Getting Started Describes the connection process and standard emulator operating mode. Chapter 3 Drop Down Menus Describes the drop down menus, dialog boxes, and each of the menu options. Chapter 4 Keyboard and Mouse Mappers and Customizable Toolbars Describes the configuration and use of the Keyboard, Mouse and Toolbar features. Chapter 5 Extended Features Describes the emulator features not directly related to terminal emulation. Chapter 6 File Transfer Describes ASCII, Kermit, XMODEM, YMODEM, and ZMODEM file transfers. Chapter 7 Emulation Command Language Describes the use of the Emulation Command Language and each command. Chapter 8 Command File Programming Describes programming features of the Emulation Command Language. Chapter 9 VT320 Programming Describes programming control sequences for the VT320 Terminal. Appendixes Cabling Diagrams ASCII Control Code Table ANSI Color Support Dynamic Data Exchange 12 1.1.1 Notation All emulator documentation uses the following notation: COMMAND /OPTIONS arguments Emulator commands appear in uppercase letters in bold text, and as user input in examples. Additional options are preceded by a forward slash (/) and also appear in uppercase letters. Arguments may or may not follow commands. A descriptive word in lowercase letters represents command arguments. [optional] Options or arguments appearing in square brackets are optional. Menu - Submenu - Tab Drop down menus and the menu fields appear in italics and are separated by hyphens. PC A general descriptor for all types of personal computers. PROMPT> Prompts appear in Courier type and are used in examples to illustrate where certain commands are given, or features used. TOKEN Tokens are either emulator or VT320 functions that can be remapped to different keys. They appear in uppercase, bold letters contained in a box. USER INPUT Input required from the user is shown in uppercase and bold letters. Note: All instructions in this documentation assume that you are using a mouse. If you do not have a mouse, follow the Microsoft Windows instructions for accelerator keys. 1.1.2 Examples Examples are given throughout the manual. They have the following format: Example: CMD> WRITE HOST CMD> represents the command line prompt. The command is shown as user input. 1.1.3 Emulator Commands Throughout the manual, you will see the phrase, “Enter the xxxx command to...”. Emulator commands are entered by pressing CMD (default is Alt C), clicking Execute - Command Line or by clicking the C> button on the CMD Toolbar. The command line CMD> prompt appears on the screen. Enter the command at the command prompt. Many functions that are not assigned to keys are available through emulator commands. Chapter One - Introduction 13 1.2 EMULATOR AND VT320 FUNCTION KEYS The mouse activates most emulator and VT320 functions. These functions are also assigned to keys. PC keys activate emulator functions and send VT320 control sequences to the host. Normally, when describing a function activated by a key, it can be written “Press Alt K to display the KERMIT> prompt.” However, all function key assignments in the emulator can be reassigned by the user. A function other than Kermit may have been assigned to Alt K. This creates a documentation problem. The emulator uses the concept of keys and tokens. Keys are physical PC keys while tokens are mnemonics that represent the emulator or VT320 functions. Token names always appear boxed to distinguish them from other information in the manual. VT320 functions exist on the VT320 keyboard and are emulated by the emulator. PF1 and Setup are examples of VT320 function keys. Emulator functions are unique to the emulator, and do not exist on a DEC VT320. For example, Kermit is an emulator function. When describing the activation of a VT320 or emulator function, the manual refers to the function key by its token name. To locate the physical key assigned to the token, refer to the Default Key Assignments topic in Chapter 3. Example: Press KERMIT to display the KERMIT> prompt. 14 1.3 APPLICATION WINDOW The application window displays many standard Microsoft Windows features such as scrollbars, maximize/minimize buttons, and a Control Menu icon. Figure 1-1 Application Window The Menu Bar lists common Microsoft Windows features and emulator specific features. Chapter 3 (Drop Down Menus) describes the menu bar options. The Status Line displays terminal settings and messages indicating active features such as LOG and PRINT. All host communications scroll through the window as they are received. Chapter One - Introduction 15 1.4 LINE RECALL AND EDITING Input lines can be recalled and edited in the command window. 1.4.1 Command Line Editing Command Line Editing is available on all input to emulator commands. This includes input entered in response to the CMD> prompt or emulator functions activated by function keys. The following keys are available for Command Line Editing: Table 1-1 Command Line Edit Keys Key Function Key Function Up Arrow Recall previous line Del Delete character Down Arrow Recall next line Backspace Delete character left of cursor Left Arrow Move cursor left Ins Toggle Insert/Overstrike mode Right Arrow Move cursor right Ctrl U Delete entire line The number of command lines stored for recall is set to 100 lines. 16 u CHAPTER 2 GETTING STARTED OVERVIEW The emulator is a 32-bit VT320 terminal emulation and communications package designed specifically for personal computers running Microsoft’s Windows NT, Windows 95 and Windows 98. Chapter Two - Getting Started 17 2.1 PACKAGE CONTENTS The emulator package includes: o o o o Getting Started guide Online Reference Manual CD-ROM Registration Card If any of these items are missing, please call DCSi at (303) 447-9251. 2.2 MINIMUM REQUIREMENTS o o o o o o 2.3 486 or Pentium processor Microsoft’s Windows 95, Windows 98, Windows NT 4.0 or Windows NT 3.51 with Service Pack 5 8 MB Memory (Windows 95 only) 16 MB recommended. NT requires 16 MB 15 MB Hard Disk space A Mouse One of the following: a) serial port directly connected to host; b) serial port connected to modem; c) network connection to host REGISTRATION There is a registration number on your program disks. Please record this number for future reference, updates, and technical support. Please take a few moments to fill out your product registration card and send it in. This will ensure that you receive prompt service and update notices. 2.4 INSTALLATION The emulator files are stored in compressed format on the disk(s). The installation procedure decompresses the files and copies them into the correct directory. To install the emulator, you must be running Windows, but close all other programs. 1) Select Start - Run. Select from Browse, or enter A:\SETUP. (Where A is the floppy drive containing the program disk.) 2) Click the OK button. The installation program begins. 3) Answer any questions that appear on the screen. 18 2.4.1 Creating an Icon The Program Group and Icon are automatically created once the installation program is complete. To select a different icon follow the steps listed below. 2.5 1) Click the emulator icon with the right mouse button. 2) Select Properties from the drop down list. 3) From the Properties dialog box, select the Shortcut tab. 4) Click the Change Icon... button. 5) Select a new icon, then click OK. Emulator Application Window The Emulator Application Window displays whenever the emulator is started, unless the emulator is configured to start as an icon. Figure 2-1 Emulator Application Window Chapter Two - Getting Started 19 2.6 CONNECTING There are two ways to connect; through the Connections dialog box or through the Session Manager. 2.6.1 Connections To make connection through the Connections dialog box: 1) Click on Connect - Connect. The Connections dialog box appears. Figure 2-2 Connect 2) Select the tab defining the desired mode of connection to the host. 3) Enter a Node Name, a Phone Number or select a serial port, depending on the tab selected. 4) Click the Setup... button if available. Make any desired parameter changes, then click OK. 5) Click the Connect button. Status messages regarding the progress of the connection appear on the status line. 20 2.6.2 Session Manager The emulator provides a Session Manager which allows you to set the Properties of different sessions for the emulator and set up an automatic connection to the desired host. For example, you can save multiple network sessions that have different connection requirements, and save them with each assigned a unique name. Similarly, you can set up Modem (TAPI) connections as well as Serial port connections. Connecting is simply a matter of selecting a session from the list and then clicking the Start button. Each connection type is assigned an identifying icon so for example, you can easily distinguish between say, a network connection and a modem connection. Click on Connect - Session Manager to display the Session Manager dialog box. Figure 2-3 Session Manager - Create Sessions Create Sessions Displays a list of available sessions for opening, copying, or setting up as specified by the options below All Displays all the sessions. Modem Displays the modem sessions. Network Displays the network sessions. Serial Displays the COM Port sessions. Chapter Two - Getting Started 21 Show Active Sessions Displays the Show Active Sessions dialog box. Start Button Starts a session. Close Button Closes the dialog box. Help Button Displays Help on the Session Manager dialog box. Click on any field to find helpful information. New Button Creates a new session, and launches the Properties page allowing you to select the session and its parameters. Properties... Button Displays the Properties page for the selected session. Copy Button Creates a copy of the selected session, and launches the Properties page to allow you to set its options. Delete Button Deletes the session from the list. Add to Favorites Add the currently selected session to the Windows Favorites Folder. 22 2.6.2.1 Creating Sessions To create a new session: 1) Click on Connect - Session Manager. 2) Click the New button. The Properties dialog box for the new session is displayed. Figure 2-4 Session Manager - Default Properties The following options are available on the Properties page: Session Name The emulator automatically assigns a Session Name to each new or copied session. However, the default name can be changed. Command File A Command File name can be entered which will automatically be executed when the session is launched. Exit on Disconnect Exits the emulator when the session is disconnected. Chapter Two - Getting Started 23 OK Button Saves the Properties page and returns to the Session Manager. New sessions and copied sessions appear in the Create Sessions list. will Cancel Button Cancels any changes made to the Properties page and returns to the Session Manager without creating a new or copied session. 3) Enter a new Session Name if desired. Otherwise a default name, “Session X”, is assigned. 4) Select the type of connection from the available tabs. 5) Adjust property parameters as necessary. For more information, refer to the following sections. 6) Click OK. The new session name displays in the Create Sessions list. 2.6.2.2 Copying Sessions The Copy feature is a quick way to create sessions of a similar type. For example, if connecting to both VMS and UNIX systems, a VMS version and a UNIX version connection can be created. These base versions can then be copied when making multiple sessions for a given type. To copy a session: 1) Click on Connect - Session Manager. 2) Select a session to copy. 3) Click the Copy button. The Properties dialog box for the new session displays. 3) Enter a new Session Name if desired. Otherwise a default name, “Copy X”, is assigned. 4) Select the type of connection from the available tabs. 5) Adjust property parameters as necessary. For more information, refer to the following sections. 6) Click OK. The new Session Name displays in the Create Session list. 2.6.2.3 Deleting Sessions To delete a session: 1) Click on Connect - Session Manager. 2) Select a session to delete. 3) Click the Delete button. 24 2.6.2.4 Switching Sessions To switch between sessions: 1) Click on Connect - Session Manager. 2) Click the Show Active Sessions... button. The Session Manager switches to the Session Manager Active Sessions dialog box. Figure 2-5 Session Manager - Active Sessions 3) Select a session to switch to from the Active Sessions window. 4) Click the Go To button. 2.6.2.5 Exiting Sessions Remotely To exit a session remotely: 1) Click on Connect - Session Manager. 2) Click the Show Active Sessions... button. 3) Select a session to close. 4) Click the End Session button. If the session selected is the current session, a message appears warning the user that they are about to exit the session. Chapter Two - Getting Started 25 2.6.3 Windows Sockets Windows Sockets (WINSOCK) provides connectivity using any of several protocols. WINSOCK is a standard network interface that many network protocol providers have available for their protocol stacks. Normally WINSOCK gives the user access to a TCP/IP stack. Figure 2-6 Connections - Windows Sockets Node Name Enter or select a node name. If a new node name is entered and the connection is successful, the node name will be added to the Node Name list. Port Enter or select the desired port. Edit Node List... Displays the Edit Node List dialog box. Setup... button Displays the Windows Sockets Setup dialog box. 26 2.6.3.1 Windows Sockets Setup From the Windows Sockets tab, click the Setup... button. The Windows Sockets Setup dialog box is displayed. Figure 2-7 Windows Sockets Setup Log Telnet Data Create a special log file that includes Telnet “Interpret as Command” (IAC) negotiations along with the actual data stream. Negotiate Transmit Binary Transmit Binary causes the Telnet protocol to interpret characters not preceded by an IAC character (255 decimal) as 8-bit Binary data. Chapter Two - Getting Started 27 2.6.3.2 Edit Node List From the Windows Sockets tab, click the Edit Node List... button. The Edit Node List dialog box is displayed. Figure 2-8 Edit Node List Node List Displays the list of available nodes. Add Button To add a node to the list, type the node name in the edit box, then click Add. Delete Button To delete a node from the list, click on the node name or type the name in the edit box, then click Delete. Update Button Click on a node name. It will appear in the edit box. Change the node name, then click Update. 28 2.6.4 Modem (TAPI) TAPI is a protocol available in Windows 95 and Windows NT that allows connections to modems defined in the Windows operating system. If the modems were not installed by Windows plug-and-play or manually through the Windows Control Panel, the modem will not be available in TAPI. Figure 2-9 Connections - Modem Phone Number The number to dial. The number can include spaces or dashes for readability. The maximum length is 32 characters. If the phone number is not in the list, but is entered, and a successful connection is made to that location, the new number will be added to the phone number list. Port Device Displays a list of the modem(s) installed in Windows. If the list is blank, a modem must be installed before TAPI can be used. Config... Button Displays the Properties page for the selected port device. Edit Phone List... Button Displays the Edit Phone List dialog box. Hangup Hangs up the modem. Chapter Two - Getting Started 29 2.6.4.1 Edit Phone List The Edit Phone List dialog box displays a list of phone numbers which can be added, deleted or updated. Figure 2-10 Edit Phone List Phone List Displays the list of available phone numbers. Add Button To add a phone number to the list, type the number in the edit box, then click Add. Delete Button To delete a phone number from the list, click on the number or type the number in the edit box, then click Delete. Update Click on a number. It will appear in the Phone List box. Change the number, then click Update. 30 2.6.5 Poly/LAT-32 PolyLAT/32 is a LAT protocol for DEC terminal communications. If polyLAT is installed on your system, this tab displays and DECnet terminal communications can be established. Figure 2-11 Connections - polyLAT/32 Node Name The list of nodes is compiled by and from the network. If the desired Node Name does not appear in the list, contact your network administrator. Chapter Two - Getting Started 31 2.6.6 Serial Serial communications are accomplished by a direct serial connection between the host and the PC. The Serial tab allows connection through the PC’s available serial ports. Figure 2-12 Connections - Serial Nodes Displays a list of the available Serial ports. Setup... button Displays the Serial Setup dialog box. 32 2.6.6.1 Serial Setup The Serial Setup dialog box is used to configure the specified communications port. Figure 2-13 Serial Setup Baud Rate Selects the communications port speed. Parity Selects parity for the data word. Even Even parity. Mark Forces parity bit to one. None No parity bit. Use this setting when operating in a full VT320 8-bit environment. Odd Odd parity. Space Forces parity bit to zero. Recommended for 7-bit environments not requiring odd or even parity. Data Bits Selects 7 or 8 data bits. Seven bits is usually required when Parity is set to anything other than None. Stop Bits Sets the number of stop bits for each data word to 1 or 2. For baud rates above 110 the correct setting is 1. Chapter Two - Getting Started 33 Flow Control Selects the communications flow control protocol. None Disables all receive buffer control. In this mode, characters are lost if the emulator cannot process characters fast enough to prevent the receive buffer from overflowing. The receive buffer size should not be set below 3168 characters if None is selected. RTS/CTS Sets hardware flow control mode. When the buffer is full, the RTS (Request to Send) modem control signal is dropped. When space becomes available in the receive buffer, RTS is enabled. If CTS is disabled, the emulator cannot send characters. Xon/Xoff The flow control method used by all DEC and most other computer systems. Xon/Xoff sends a DC3 (Ctrl S) character to the host when the receive buffer is full. When space becomes available in the receive buffer, a DC1 (Ctrl Q) is sent to the host. Modem Control If enabled, the emulator monitors the modem’s carrier detect signal to determine the modem connect status. Modem Control should be disabled when using a direct connection to the host. Transmit Limited Enabling limited transmit restricts the emulator transmit speed from between 150 and 180 characters per second, regardless of the actual baud rate. This places a nominal interrupt burden on the host computer’s operating system. Limited transmit may be necessary for proper communication with some half-duplex systems. 2.7 WINDOW SIZING AND LOCATION Several options in View control the appearance of the emulation mode presentation. The emulation window can be toggled between framed or unframed and maximize workspace, left justified or centered. The size of the emulation window is determined by the font selected for the presentation window size. The emulator automatically selects a font that utilizes as much of the presentation window as possible while displaying all lines and columns currently configured. Presentation window sizing is accomplished in the typical Windows manner; use mouse button 1 to grab a border and drag it to size the window. However, the emulator will not allow you to resize the emulator smaller than the smallest font. To size the emulator without automatic font selection (so not all columns and rows are visible without scrolling), press mouse button 2 while dragging the borders. 2.7.1 Number of Emulation Lines The number of emulation lines is configured in Setup - Terminal - Display and is continuously variable from 24 to 48. 34 2.7.2 Maximize Workspace Maximize Workspace maximizes the emulation window (working area) by “hiding” the menu bar, message lists, status line and toolbars. Emulator drop down menus are available through the Control Menu by enabling the Menu Bar option. There are three ways to toggle Maximize Workspace mode on and off: o o o Click on the toolbar icon. Click on View - Maximize Workspace. Click on the Control Menu icon located in the upper-left corner of the emulator title bar (or press Alt Spacebar) and select the Maximize Workspace item. Figure 2-14 Control Menu 2.8 SCREEN SCROLLBACK The scrollback display is manipulated through the vertical scrollbar. To move one line, click on the arrows at the ends of the scrollbar. To move a page, click in the gray area near the ends of the scrollbar. If the scrollbar is not displayed, click on either View - Scrollbar or the scrollbar button on the Hold Toolbar. The size of the scrollback memory can be set to a maximum of 10,000 lines. 2.9 VIDEO ATTRIBUTE TO COLOR MAPPING Video attribute color mapping is mapping of colors to normal VT320 monochrome attributes such as bold, reverse video, and underline. Video attribute mapping is configured through the Color Setup tab. For more information, refer to the Color Setup topic in Chapter 3. Chapter Two - Getting Started 35 2.10 CHARACTER SETS The emulator supports the following character sets: o o o o o DEC Multinational (consists of the ASCII and DEC supplemental character sets) DEC Special Graphics ISO Latin-1 National Replacement Character PC If a DEC VT terminal is selected, then on initial load or after a terminal reset, DEC Multinational is mapped as the default terminal character set. The ASCII set is accessed for character codes 0-127. The DEC Supplemental set is accessed for codes 128-255. During a serial connection, the DEC Supplemental set does not display properly unless the emulator is set to 8 Data Bits and No Parity. 2.11 PRINTER SUPPORT All VT100 and VT320 print modes are supported. Table 2-10 Print Modes Print Mode Print Screen Auto Print Function Sends the contents of the screen to the printer. If the screen is set to 132 columns, up to 132 columns can be sent to the printer. Prints every line sent to the screen. Same as Continuous Print mode. Printer Controller Prints received characters without displaying them on the screen. Print Cursor Line Prints the line the cursor is on. Print Extent Prints the contents of the scrolling region. The following print modes can be initiated using a function key, emulator PRINT command, or by a host control sequence. Other print modes can only be selected by using control sequences. Refer to the Printing topic in Chapter 9 of the online Reference Manual for more information. Table 2-11 Print Options Print Mode Print Screen Token PRTSCR Command PRINT SCREEN Auto Print PRTAUTO PRINT ON/OFF Controller Print PRTCTL PRINT/CONTROLLER ON/OFF 36 2.12 COMPOSE CHARACTERS This feature allows you to create characters that do not exist on the standard North American keyboard using compose sequences. There are two types of compose sequences; two-stroke sequences and three-stroke sequences. Since the two-stroke sequences cannot be used on a North American keyboard, the emulator supports only the three-stroke compose sequences. Three-stroke sequences can be performed on all keyboards. First, press COMPOSE (default is Alt F1) then press two standard keys whose characters form a valid sequence. To create a compose character: 1) Locate the character in the Compose table. 2) Press COMPOSE (the Compose indicator displays on the Status Line). 3) Type the two characters from the “3-Stroke Sequence” column (the Compose indicator turns off when the sequence is complete). For example, to create a U with an umlaut (Ü), press COMPOSE , then type U and a double quotation mark. Chapter Two - Getting Started 37 Table 2-12 Compose Sequence Characters Resultant Character ¡ (inverted !) ¢ (cent sign) £ (pound sign) ¥ (yen sign) § (section sign) ¤ (currency sign) © (copyright sign) ª (feminine ordinal) « (angle quotation mark) ° (degree sign) (plus/minus sign) 2 (superscript 2) 3 (superscript 3) µ (micro sign) ¶ (paragraph sign) • (middle dot) 1 (superscript 1) º (masculine ordinal) » (angle quotation mark) 1⁄4 (fraction one-quarter) 1⁄2 (fraction one-half) ¿ (inverted ?) À (A grave) Á (A acute)  (A circumflex) à (A tilde) Ä (A umlaut) Å (A ring) Æ (A E ligature) Ç (C cedilla) È (E grave) É (E acute) Ê (E circumflex) Ë (E umlaut) Ì (I grave) Í (I acute) Î (I circumflex) Ï (I umlaut) Ñ (N tilde) Ò(O grave) 3-Stroke Sequence !! c/ l- or l= y- or y= so or s! or s0 xo or x0 co or c0 a_ << 0^ or (sp)* +2^ 3^ /u p! .^ 1^ o_ >> 14 12 ?? A’ A’ A^ A~ A" or “A A* AE C, E’ E’ E^ E" or “E I‘ I‘ I^ I“ or ”I N~ O’ Resultant Character Ó (O acute) Ô (O circumflex) Õ (O tilde) Ö (O umlaut) Œ (OE ligature) Ù (U grave) Ú (U acute) Û (U circumflex) ÿ(yumlaut) Ü (U umlaut) Ÿ (Y umlaut) ß (German small sharp s) à (a grave) á (a acute) â (a circumflex) ã (a tilde) ä (a umlaut) å (a ring) æ (ae ligature) ç (c cedilla) è (e grave) é (e acute) ê (e circumflex) ë (e umlaut) ì (i grave) í (i acute) î (i circumflex) ï (i umlaut) ñ (n tilde) ò (o grave) ó (o acute) ô (o circumflex) õ (o tilde) ö (o umlaut) œ (oe ligature) ø (o slash) ù (u grave) ú (u acute) û (u circumflex) ü (u umlaut) 3-Stroke Sequence O’ O^ O~ O" or “O OE U’ U’ U^ y" or “y U" or “U Y" or “Y ss a’ a’ a^ a~ a" or “a a* ae c, e’ e’ e^ e" or “e i’ i’ i^ i" or “i n~ o’ o’ o^ o~ o” or “o oe o/ u’ u’ u^ u" or “u 38 2.13 COMMON PROBLEMS Keyboards The backspace key doesn’t appear to work VT terminals have two backspace codes to choose from. To set these codes select the Keyboard tab in Setup - Terminal. Change the backspace setting to the other keycode. Click OK. Terminal Type XXX not defined Winsock Connections to UNIX systems only: Be sure that the terminal type selected in Setup - Terminal is a terminal type recognized by the host. Logoff and logon again. Note that many UNIX systems do not recognize the terminal type VT320, but they do recognize the terminal type VT220. Error message: Error Attempting Connect For Winsock (TCP/IP) connections: Check that the node name is correct and try again. Or, instead of the node name, try the IP address of the host. Certain TCP/IP configuration problems can cause names to fail while allowing IP addresses to work. For polyLAT/32 connections: Be sure that polyLAT/32 is installed. PolyLAT/32 is available from DCSi. Be sure that no other LAT, such as Pathworks LAT, is installed. If so, remove it or it will interfere with polyLAT/32. For TAPI (modem) connections: Check the phone number for accuracy. The phone line might be busy. For Serial connections: No Response The port might be in use by another application. Be sure that no other copy of the emulator is connected to the port. Ensure that no FAX program is connected to the port. Incorrect COM (serial) port selected in the Serial Setup dialog box. Incorrect baud rate selected in the Serial Setup dialog box. Flow control is off on the host system. Press Ctrl Q (Xon) to clear the flow control. More than one serial communications interface is assigned to the same COM port. Look at the jumpers on the serial board to make sure that they are set for a unique COM port. Consult the serial board documentation. Incorrect RS232 cable. Try another cable. Garbage Characters Appear on the Screen Incorrect baud rate selected in the Serial Setup dialog box. Incorrect parity selection when using VT320 mode. VT320 mode interprets all eight bits. If your host system is not properly configured for full 8-bit operation, select Space Parity in the Serial Setup dialog box. Most common combinations are 8 Data Bits/No Parity and 7 Data Bits/Space Parity. Chapter Two - Getting Started 39 Dropping Characters The host doesn’t use Xon/Xoff flow control. Try reducing the baud rate in the Serial Setup dialog box. The PC has a hardware problem. Try running the emulator on another PC. More than one serial communications interface is hardware jumpered to the same COM port. 2.14 TECHNICAL SUPPORT DCSi offers free Technical Support to all registered customers of the emulator. However, many problems can be solved without having to make a phone call. Please consult the following first: o o o Help: click on Help - Index - Troubleshooting. Online Reference Manual Website: http://www.dcsi.com contains a Technical Support section for frequently asked questions. If you are still unable to find a solution to your problem, Technical Support can be reached by: o o o o Phone: 303-447-9251 FAX: 303-447-1406 E-Mail: [email protected] Internet: http:\\www.dcsi.com Whichever option you select, please include (for telephone service, have ready) all of the following information. This will help us serve you quickly and effectively. 1) For telephone service, be at a computer that can duplicate the problem. 2) Have your registration number and the emulator version number ready. These are found on the program disk label. The version number is also located in Help - About. 3) Please have the following information for the support person: o o o o o o The problem (including the exact error messages) and the steps needed to reproduce it Type of host Type of connection to host (i.e., Serial, Network,...) Type of PC, keyboard, monitor and video card (display adapter) Whether the problem occurs on more than one system (if available) Microsoft Windows version You may be requested to send the problem file by mail or courier. The mailing and delivery address is: TECHNICAL SUPPORT DCSi 3775 Iris Ave Ste 1B Boulder CO 80301 USA 40 u CHAPTER 3 DROP DOWN MENUS OVERVIEW The menu bar lists the drop down menus for emulator features and setup. Click on a name and a list of options will drop down. Click on the desired option to display a dialog box or to execute a command or feature. Chapter Three - Drop Down Menus 41 3.1 EDIT The Edit drop down menu lists the Windows Clipboard functions. See the Microsoft Windows documentation for detailed information on the Clipboard application. 3.1.1 Copy Copies selected text to the Clipboard. 3.1.2 Paste Pastes a copy of the current Clipboard contents at the current cursor position. 3.1.3 Send Sends the contents of the Clipboard to the host computer. Carriage returns are sent at the end of each line. 3.1.4 Select All Selects the current screen and all of the scrollback data. 3.1.5 Select Screen Selects all the text on the screen. 42 3.2 EXECUTE The Execute drop down menu lists different emulator commands and features. 3.2.1 Abort Click on Execute - Abort to abort file transfers, emulator commands, and command file execution. 3.2.2 Break (short) Sends a 200 millisecond break to the Serial or Modem communications port. 3.2.3 Break (long) Sends a 3.5 second break to the Serial or Modem communications port. 3.2.4 Command Line Displays the command prompt (CMD>) for execution of emulator commands and command files. 3.2.5 Clear Communications Releases a hold condition and sets flow control on. 3.2.6 DDE Command Builder Displays the DDE Command Builder dialog box. For more detailed information on this dialog box and DDE, refer to Appendix D (Dynamic Data Exchange) in the online Reference Manual. 3.2.7 Drop DTR Drops the Data Terminal Ready (DTR) and Request to Send (RTS) modem control signal. Chapter Three - Drop Down Menus 43 3.2.8 Reset Resets the terminal emulator. The following actions take place during a reset: o o o o o o The default character set is selected. The scrolling region is set to 24 lines. The UDKs are cleared. The screen is erased and the cursor is set to [1,1]. Video attributes are set to normal. All screen characters positions are set to erasable. 3.2.9 Send Answerback Sends the Answerback message to the host. The message is specified in the Terminal Setup dialog box. 3.2.10 WordPerfect 5.x Mode Toggles WordPerfect 5.x mode on or off. A checkmark indicates that WP5 mode is enabled. In WP5 mode, the VAX/VMS WordPerfect version 5.x operates using the PC keystrokes. This features allows the user familiar with PC WordPerfect 5.x keystrokes to operate VAX/VMS WordPerfect 5.x without having to learn the VAX WordPerfect 5.x keystrokes. 3.3 FILE The File drop down menu lists different features requiring filename input. 44 3.3.1 Edit Command File Selection Click on File - Edit Command File to display the Edit Command File Selection dialog box. Figure 3-1 Edit Command File Selection File Name Select or enter the name of the command file to edit. Open button Launches the Notepad editor with the selected file loaded for editing. Chapter Three - Drop Down Menus 45 3.3.2 Run Command File Selection Click on File - Run Command File to display the Run Command File Selection dialog box. Figure 3-2 Run Command File Selection File Name Select or enter the name of the command file to execute. Open button Executes the selected command file. 46 3.3.3 Capture Text to File The Capture Text to File feature records all data sent to the emulator from the host into a file on the PC. The data is first interpreted by the emulator, so it appears in the log file as it appears on the screen. Click on File Capture Text to File to display the Capture Text to File dialog box. Figure 3-3 Capture Text to File File Name Specifies the name of the capture file where the data is recorded. Append Selects append mode. If selected, the data recorded is appended to the end of an existing capture file. Overwrite Protection When enabled, prompts for overwrite confirmation if the specified file already exists. Save button Opens the capture file and begins recording. To stop recording, click on File - Stop Capturing Text to File. Chapter Three - Drop Down Menus 47 3.3.4 Record Log File Selection Click on File - Record Log File to display the Record Log File Selection dialog box. Figure 3-4 Record Log File Selection The Log feature records all data sent to the emulator from the host into a file on the PC. File Name Specifies the name of the log file where the data is recorded. Append If selected, the data recorded is appended to the end of an existing log file. Overwrite Protection When enabled, prompts for overwrite confirmation if the specified file already exists. This also applies when opening a log file from the command line. Save button Opens the log file and enables recording. To stop recording, click on File - Stop Recording Log File. 48 3.3.5 Replay Log File Selection Click on File - Replay Log File to display the Replay Log File Selection dialog box. Figure 3-5 Replay Log File Selection File Name Select or enter the name of the log file to replay. Open button Replays the selected log file. 3.3.6 Receive Click on File - Receive to display the File Receive Selection dialog box. Refer to Chapter 7 (File Transfer) in the online Reference Manual for detailed information on file transfer. 3.3.7 Send Click on File - Send to display the File Send Selection dialog box. Refer to Chapter 7 (File Transfer) in the online Reference Manual for detailed information on file transfer. Chapter Three - Drop Down Menus 49 3.3.8 Print To enter the Print dialog box, click on File - Print. Figure 3-6 Print Note: Changes made to this dialog box are not saved and are valid for the individual print cycle only. Printer Displays the name of the default printer. Click on the down arrow to select another installed printer. Properties button Click on this button to display the properties of the selected printer. Print to File When this box is enabled and OK is clicked, the Print to File Selection dialog box appears. Select or enter the name of the file. The default extension of .PRN is used. Print Range Screen Prints only the text on the screen. Scrollback Prints the text on the screen and in scrollback. Selected Prints only selected text. If no text is selected, this option is disabled. Graphics Prints graphics. (VT340 mode only.) Copies Select the number of copies to print. 50 3.3.9 Page Setup The Page Setup selects various options for the printer. Click on File - Page Setup to display the initial Page Setup dialog box. Figure 3-7 Page Setup Note: Changes made to this dialog box are saved for all subsequent print operations. Paper Select the paper size and source. Orientation Select portrait or landscape printing mode. Margins Select the margins for the top, bottom, left and right sides of the page. Lines Per Page Select the number of lines to print per page. Options... button Displays the Page Setup options dialog box. Chapter Three - Drop Down Menus 51 3.3.9.1 Page Setup Options Click the Options... button in the Page Setup dialog box to display the Page Setup options dialog box. Figure 3-8 Page Setup Options Print Mode Normal Prints the entire contents of the screen. Auto Sends each line of text displayed on the screen to the printer. Options Print to File When this box is enabled and OK is clicked, the Print to File Selection dialog box appears. Select or enter the name of the file. The default extension of .PRN is used. Force Black on White This option forces the printer to reverse the printing from white text on a black background to black text on a white background. Automatic Close on Print Screen If checked, the printer is closed after each print screen. If this option is unchecked, the printer closes after the time specified by Idle Time before Close option. Idle Time Before Close The idle timer monitors the printer activity. When the host sends a message for the emulator to stop printing, the timer takes effect. When the timer expires, the emulator sends the Finalize String, closes the print job and ejects the page. The print job can be closed manually, before time runs out, by clicking the Close Printer button on the Hold Toolbar. If the timer is set to manual, the Close Printer button must be used to close the print job. 52 Print Controller These strings define the character strings that control various printer functions. Most printer control strings have an enable string that selects a printer feature and a disable string that deselects a printer feature. The printer strings can include any ASCII control character. Refer to Appendix B (ASCII Control Code Table) in the online Reference Manual to locate the correct control character mnemonic. Example: <ESC> <^O>(ESC SI) Enables Condensed Print for the IBM ProPrinter. The Esc key is displayed as Ctrl [. Initialization The initialization string can be used to: o o Select a specific printer connected to a printer sharing device. Select a printer feature, such as condensed print, prior to sending the printer data. This string is sent to the printer, at the beginning of printer output, when the print is initiated. Finalize The reset string is sent to the printer at the end of a print operation, and can be used to: o o Deselect a printer attached to a printer sharing device. Reset a printer feature that was enabled by the initialization string. 80 Column This string is sent when the emulator is in 80 column mode. This string is sent when Auto print mode is selected or when the host initiates a printer mode. 132 Column This string is sent when the emulator is in 132 column mode. This string is sent when Auto print mode is selected or when the host initiates a printer mode. Table 3-1 Sample Condensed Print Escape Sequences Printer Epson FX, MX, or LQ HP LaserJet IBM ProPrinter Set String <ESC><^O> <ESC>(s16.66H <ESC><^O> Reset String <^R> <ESC>(s10H <^R> Form Feed on Close If enabled, the printer is sent a form feed after every print screen. Convert LF to CR/LF If enabled, the printer is sent a carriage return in addition to each line feed it receives. 3.3.10 Exit Exits the emulator, closes the application window, and disconnects all sessions. Chapter Three - Drop Down Menus 53 3.4 HELP The Help drop down menu lists the help options. 3.4.1 Index Lists all help topics. Cross-referencing and searching is supported. 3.4.2 Using Help Gives instructions on using Windows Help. See the Microsoft Windows documentation for more information. 3.4.3 About 3.4.3.1 General Displays information such as the version number and release date of the emulator installed on your PC. Figure 3-9 Help About General 54 3.4.3.2 Version The Version tab displays the name, version and path to all the modules used by the emulator. Figure 3-10 Help About Version 3.5 SETUP The Setup menu lists the following categories that customize the emulator to your PC and host computer. There are two Save options available. o o To save your selections immediately, click on Save Now. Save on Exit saves all configuration changes upon exiting the emulator. A checkmark indicates when this option is in effect. Chapter Three - Drop Down Menus 55 3.5.1 Customizable Toolbars The Customizable Toolbars feature is discussed in detail in Chapter 4 (Keyboard, Mouse and Toolbar). 3.5.2 Keyboard Mapper The Keyboard Mapper is discussed in detail in Chapter 4 (Keyboard, Mouse and Toolbar). 3.5.3 Mouse Mapper The Mouse Mapper is discussed in detail in Chapter 4 (Keyboard, Mouse and Toolbar). 3.5.4 File Transfer The File Transfer Setup is discussed in detail in Chapter 6 (File Transfer) of the online Reference Manual. 3.5.5 General The General Settings dialog box contains tabs for DDE, Directories and Log Replay. To display, click on Setup - General. 3.5.5.1 DDE Click on Setup - General and then select the DDE tab to display the DDE dialog box. Figure 3-11 DDE 56 Server Enable Allows the emulator to act as a DDE Server. If disabled, the emulator ignores any attempt by another application to initiate a DDE conversation. This is helpful when running multiple instances, e.g., if a specific instance should be prevented from participating in a DDE conversation. Name The name that the emulator responds to as a DDE server. A client uses this name as the “Service Name” when performing a DDE connect transaction. Append Unique Identifier When enabled, appends a Unique Identifier to the end of the Server Name. This allows the execution of multiple instances of the emulator while still being able to distinguish them as servers. Timeout The amount of time, in seconds, that the emulator waits, after sending a message to the client, to receive an acknowledgment. An error occurs if the acknowledgment is not received within the specified time. 3.5.5.2 Directories Click on Setup - General and then select the Directories tab to display the Directories dialog box. Figure 3-12 Directories Command Files Enter the directory paths containing command files that you wish to read from multiple locations. Separate each path name with a semi-colon. Picture Files (VT340 mode only.) File Transfer Directory Enter the directory path to be used for file transfers. Chapter Three - Drop Down Menus 57 3.5.5.3 Log File Replay Click on Setup - General and then select the Log Replay tab to display the Log Replay dialog box. Figure 3-13 Log Replay Replay Rate Sets the rate of replay for log files. Incremented from slowest to fastest, the rates go from 300, 1100, 2400, 4800, 9600 to the maximum baud rate. Pause On Clear Screen If enabled, causes the log file replay to pause each time the screen is cleared. Every Page If enabled, causes the log file replay to pause when a new page of text is scrolled onto the screen. Text This parameter is used to enter a comparison string. When the string is matched by data in the replay file, a replay pause occurs. The string can be up to 25 characters in length and can include control characters. To disable the comparison string, leave this field blank. 58 3.5.6 Terminal Setup The Terminal Setup dialog box contains tabs for Display, Keyboard and the Terminal type. 3.5.6.1 Display Click on Setup - Terminal, then select the Display tab. The Display setup dialog box appears. Figure 3-14 Display Columns Sets the display width to 80 or 132 columns. This option is typically controlled by the host. Cursor Selects a visible or invisible cursor. Cursor Type Selects a block or underline cursor. Chapter Three - Drop Down Menus 59 Auto Wrap Enables or disables Auto Wrap. Disabled Characters written to the last column of the screen overwrite each other. Enabled Wraps the next received character at the end of a full line to the beginning of the next line. Display lines are 80 or 132 columns, depending on the number of screen columns selected. Smooth Scroll Enables or disables smooth scrolling. Display Lines Selects the number of lines, from 24 through 48, that are displayed on the emulation screen. Jump Scrolling Determines the number of lines scrolled when updating the screen. Increasing the number of lines enables the screen to keep up with the data being received from the host. Scrollback Lines Sets the size of scrollback memory in lines. The maximum value is 10,000 lines. Tabs A small line represents each character of a 132 column line. To add a tab, click on the desired location. An arrow appears for each tab setting. To delete a tab, click on the location again and the arrow disappears. Clear All button Clears all tab settings. Set Every button Sets the tabs to every position indicated by the selected number. 60 3.5.6.1.1 Color Setup Click the Color Setup... button in the Display tab to display the Color Setup dialog box. Figure 3-15 Color Setup Description Foreground and background colors can be selected for video text attributes such as bold, underline and reverse video, and the various combinations of these attributes. To modify colors, select the foreground or background column of the video attribute. Click on the up or down arrow until the number matches the desired color displayed in the Colors palette. When colors are modified, existing text is unaffected. However, any new text or screen erase reflects the new selections. Colors The color palette shows the possible colors for text foreground and background. Attribute Control The following options affect both color and monochrome systems. Use Bold Characters Bolds characters by increasing font width. Show Underline Draws a line under the character. Blink Blinks the character. Factory Colors button Clicking this button forces all color entries to the factory default colors. Chapter Three - Drop Down Menus 61 Saved Colors button At any time, the user can recall the last set of colors saved using the Save Now or Save on Exit options by clicking this button. Working Colors button Reverts to using the colors most recently selected in the dialog box that have not been saved using the Save Now or Save on Exit options. 3.5.6.2 Keyboard Click on Setup - Terminal, then select the Keyboard tab. The Keyboard setup dialog box appears. Figure 3-16 Keyboard Keyboard Type The emulator checks the system for the keyboard installed on the PC and displays a match for use with the emulator. Thus, the name may not reflect the actual keyboard name but is the appropriate configuration. 62 Margin/Warning Bells Margin Bell If checked, the bell sounds when the cursor is eight columns from the end of the current line during keyboard input only. Warning Bell If disabled, the emulator will not generate a bell tone for operating errors and receipt of a Ctrl G character. Key Behavior Backspace Key Delete Sets the Backspace key to generate the delete (7F Hex) code and Shift Backspace to generate the backspace (08 Hex) code. Backspace Sets the Backspace key to generate the backspace code and Shift Backspace to generate the delete code. IBM Keypad (AT Keyboard only) Uses the unshifted IBM keypad keys 2, 4, 6, and 8 (keypad arrow keys) as numeric keypad keys or arrow keys. If the NumLock key is activated, it will override this selection. Numeric The keypad 2, 4, 6, and 8 keys generate the numeric key codes. The Shift 2, 4, 6, and 8 keys generate the arrow key codes. Arrows The keypad 2, 4, 6, and 8 keys generate the arrow key codes. The Shift 2, 4, 6, and 8 keys generate the numeric key codes. Return Key Selects the characters sent to the host when the Return key is pressed. CR Sends a carriage return to the host (normal setting). CR/LF Sends a carriage return and line feed to the host. LF Sends a line feed to the host. Menu Bar Accelerator Key Operation Specifies the operation of the accelerator keys. Off If selected, Alt key combinations will not activate menu bar selections; you must use the mouse. All default emulator key definitions are available when this option is selected. Alt Key Only Pressing and releasing the Alt key moves the cursor up to the menu bar. The arrow keys or the underlined letter can then be used to select the option of interest. Alt Key Plus Letter Key Pressing the Alt key plus the underlined letter of the menu bar option displays the associated drop down menu or dialog box. Also enables Alt Key Only. Chapter Three - Drop Down Menus 63 3.5.6.2.1 Default Enhanced Keyboard Key Assignments When accelerator keys are enabled, some Alt keys are reserved to access the menu bar. To prevent this, the Accelerator Keys must be disabled. Table 3-2 Emulator Functions - Enhanced Emulator Token ABORT BREAK CMD DEBUG DROP_DTR ESC KERMIT LONG BREAK LOG REPLAY Key Alt A Alt B Alt C Alt ‘ Alt D Escape Alt K Alt Shift B Alt L Alt ; 64 Table 3-3 VT320 Functions - Enhanced Chapter Three - Drop Down Menus VT320 Token PF1 PF2 PF3 PF4 KP0 - KP9 KP COMMA KP ENTER KP MINUS KP PERIOD Key Num Lock Keypad Slash Keypad Asterisk Keypad Minus Keypad 0 - 9 Pause Keypad Enter Keypad Plus Keypad Period DO FIND INSERT HERE NEXT SCREEN PREVIOUS SCREEN REMOVE SELECT VT HELP Scroll Lock Insert Home Page Down End Page Up Delete F5 UP ARROW DOWN ARROW LEFT ARROW RIGHT ARROW Up Arrow Down Arrow Left Arrow Right Arrow BACKSPACE COMPOSE DELETE HOLD SCREEN LINE FEED PRTAUTO PRTSCR Shift Backspace Alt ESC Backspace F1 Shift Enter Alt F2 F2 UDK6 - UDK12 UDK13 - UDK20 VTF6 - VTF12 VTF13 -VTF20 F4 F5 Alt F6-Alt F10 Shift F6 - F12 Alt Shift F3 - F10 F6 - F12 Alt F3 - F10 VTF14 VTF15 (Help) VTF16-VTF20 65 3.5.6.2.2 Default AT Keyboard Key Assignments When accelerator keys are enabled, some Alt keys are reserved to access the menu bar. To prevent this, the Accelerator Keys must be disabled. Table 3-4 Emulator Functions - AT Emulator Token ABORT BREAK CMD DEBUG DROP_DTR ESC KERMIT LONG BREAK LOG REPLAY SCRBCK Key Alt A Alt B Alt C Alt F10 Alt D F2 Alt K Alt Shift B Alt L Alt ; Alt S 66 Table 3-5 VT320 Functions - AT Chapter Three - Drop Down Menus VT320 Token PF1 PF2 PF3 PF4 KP0 - KP9 KP COMMA KP ENTER KP MINUS KP PERIOD Key Esc Num Lock Scroll Lock Sys Req Keypad 0 - 9 Keypad Minus Keypad Plus PrtSc Keypad Period DO FIND INSERT HERE NEXT SCREEN PREVIOUS SCREEN REMOVE SELECT VT HELP Alt Scroll Lock Alt Keypad 7 Alt Keypad 8 Alt Keypad 6 Alt Keypad 5 Alt Keypad 9 Alt Keypad 4 Alt Num Lock UP ARROW DOWN ARROW LEFT ARROW RIGHT ARROW Shift Keypad 8 or F5 Shift Keypad 2 or F6 Shift Keypad 4 or F7 Shift Keypad 6 or F8 BACKSPACE COMPOSE DELETE HOLD SCREEN LINE FEED PRTAUTO PRTSCR Shift Del Alt F1 Del F1 Shift Return or F4 Alt F4 F4 UDK6 - UDK10 UDK11 - UDK20 VTF6 - VTF10 VTF11 - VTF20 Alt Shift 6 -0 Alt Shift Q - P Alt 6 - 0 Alt Q - P 67 3.5.6.3 Terminal Tabs Click on Setup - Terminal. Select a Terminal Type, then click on the corresponding Terminal tab. Figure 3-17 Terminal Terminal Type/Terminal ID VT320 Emulates a DEC VT320 terminal. In this mode all 7 and 8-bit control sequences are interpreted and multinational characters are displayed. This mode is recommended for combined VT102/220/320 operation as it offers VT100 compatibility and provides all the VT320 features. VT220 Emulates a DEC VT220 terminal. When VT220 is selected, the terminal identifies itself as a VT220 instead of a VT320. VT102 Emulates the DEC VT102 and identifies itself as a VT102 terminal to the host. All VT102 control sequences are emulated. This mode is recommended for VT100 emulation. VT100 Emulates the VT102 terminal. However, it identifies itself as a VT100 with AVO and a printer. This mode is for use with programs that require the VT100 identification sequence. All VT102 control sequences are emulated in this mode. VT52 Emulates the older DEC VT52 terminal. SCOANSI SCO ANSI is a blend of VT, ANSI color, and extensions limited to hosts running SCO. The emulator interprets the control sequences sent by the host running SCO. BBSANSI Displays the ANSI characters and color sequences which are generally available through bulletin board services. 68 Status Selects Online or Local mode. Online Allows the emulator to communicate with the host system. This is the default setting. Local The emulator does not send data to the host or process data received from the host. Local Echo Sends the data transmitted to the host computer to the PC screen. Enable Local Echo when communicating with half-duplex computer systems. 3.5.6.3.1 Terminal Tab Options Note: All the options below are found on the VT320 tab, but since each Terminal Type is different, these options will vary, depending on the selected terminal. Answerback Auto Answerback Enables or disables (default) the sending of the Answerback Message automatically when a communication connection is established. When using serial communications, Modem Control must be enabled if Auto Answerback is enabled. Conceal Message If selected, the Answerback Message is not displayed on the screen. Instead, “<Concealed>” appears. Once an Answerback Message is concealed, it can only be made visible by entering a new message. Message The Answerback Message is sent on receipt of an ENQ code, clicking Execute - Send Answerback, or entering the SEND ANSWERBACK command. It is generally used as a security measure by host computer systems to identify certain terminals or users. Settings New Line Sends a carriage return and line feed to the host. If a line feed is received from the host, a carriage return is added. Control Sequence Debug This mode is a substitute for VT320 Display Controls mode. When debug mode is enabled, and DEBUG (default is Alt ‘) is pressed, VT320 control sequences display on the bottom line of the screen before they are executed. Pressing any key executes the sequence. Press DEBUG again to allow control sequences to execute without displaying. Host Writable Status Line If enabled, this option allows the host program to write information to the bottom line of the screen. PC Fonts Uses the IBM PC character set which includes line drawing characters. Character Set 8-Bit Int’l Selects the DEC Multinational or the Korean character set. 7-Bit National Selects the 7-bit National Replacement Character Set. Refer to the National Replacement Character topic for more information. Chapter Three - Drop Down Menus 69 Options Character Set Selects DEC Multinational (default) or ISO Latin-1 as the DEC Supplemental character set. Cursor Pad Allows manual control of the codes generated by the VT320 cursor pad. The cursor pad is normally controlled by the host computer. If Normal is selected the code for the arrows printed on the keys is generated. If Application is selected, the emulator generates control sequences used by application programs. Key Codes 7-bit Sends 7-bit control sequences to the host, but still interprets 8-bit control sequences and characters. 8-bit Eight-bit control sequences are transmitted to the host computer by the emulator. VT320 8-bit mode is not a communication setting. It is an operating environment. To select 8-bit communications, configure the emulator to 8 data bits and no parity. Keypad Allows manual control of the codes generated by the keypad. This is normally controlled by the host. If Numeric is selected the numeric values printed on the keys are generated. If Application is selected the emulator generates control sequences used by application programs. User Defined Keys (UDKs) Locks or unlocks the user-defined keys. Lock Locking the keys prevents downloading and protects the current key contents. UDKs can be locked by the host system but can only be unlocked through the setup menu. Unlock When unlocked, the host system can download the function keys with user-defined strings. User Features Locks or unlocks the user preference features. If locked, the emulator ignores control sequences that affect the user preference features. Slow/fast scroll and normal/reverse screen are considered user preference features. 70 3.6 VIEW The View menu options affect the look of the emulation window. 3.6.1 Menu Toggles the display of the menu bar. 3.6.2 Status Line Toggles the display of the status line on the bottom of the emulation window. 3.6.3 Centered If checked, centers the emulation window. Otherwise, the window is left-justified. 3.6.4 Framed If checked, places a frame around the emulation window. Otherwise, the window is unframed. 3.6.5 Maximize Workspace Toggles the Maximize Workspace mode on and off. When the workspace is maximized, the status line, menu bar and toolbars are hidden. A checkmark indicates that this option is in effect. For more information on how the Maximize Workspace feature works, refer to the Maximize Workspace topic in Chapter 2. 3.6.6 Scrollbar Toggles the display of the scrollbar. 3.6.7 File Transfer Messages Toggles the display of the File Transfer Messages window. Chapter Three - Drop Down Menus 71 3.6.8 Message History Toggles the display of the Message History window. 3.6.9 Toolbars The display of the Toolbars is controlled in the Toolbars dialog box. Click on View - Toolbars to select the toolbars to display. Figure 3-18 Toolbars Toolbars This window contains a list of available toolbars. To select or deselect, click on the white box to the left of each name, then click Close. 72 3.6.9.1 Default Toolbar Descriptions The figure below shows the default Toolbar buttons and their functions. Figure 3-19 Toolbars Chapter Three - Drop Down Menus 73 74 u CHAPTER 4 KEYBOARD,MOUSE&TOOLBAR OVERVIEW The operation of the emulator can be customized using the Keyboard and Mouse mappers and the Customize Toolbars feature. Keystrokes and mouse clicks can be assigned to a wide variety of functions through these simple, easy-to-use mappers. Toolbar buttons and toolbars can be created to suit individual preferences. Chapter Four - Keyboard, Mouse and Toolbar 75 4.1 KEYBOARD MAPPING Through the Keyboard Mapping dialog box, the keyboard can be configured to perform many different functions. An individual key can be defined to send a string, a command, execute a command file, access a help file, and more. The emulator provides some default keymaps whose definitions can be edited, but not deleted. To configure the keyboard, click on Setup - Keyboard Mapper. The Keyboard Mapping dialog box appears. Figure 4-1 Keyboard Mapping Current Keymap Displays the name of the current keymap. You can select another keymap from the drop down list if available, or create a New keymap. Mapped Keys Displays a list of mapped keys with their definitions for both the default and current keymaps. Current Key Displays the currently highlighted key and its definition. 76 Enable Default Ket Assignments Disables the default definitions of the keys. Each predefined key definition is then set to UNMAPPED. Show Default Key Assignments Toggles the display of the key definitions in the Mapped Keys window. This option does not disable the definitions which will still display in the Current Key section. 4.1.1 Creating a New Key Map The top of the dialog box contains a section that deals with the keymaps as whole entities. The name of the current keyboard map is listed in the Current Keymap list box. New button When clicked, the New Key Map dialog box appears. Enter a new Key Map name, then click OK. Figure 4-2 New Key Map Rename button When clicked, the New Key Map dialog box appears. Change the Key Map name, then click OK. Delete button Deletes the currently selected Key Map. Chapter Four - Keyboard, Mouse and Toolbar 77 4.1.2 Defining a Key Key definitions are set in the Current Key section. Note that predefined keys displayed on the online keyboards are outlined in green, while user-defined keys are outlined in blue. To define a key to perform a specific function: 1) Using the mouse, click on the desired keys in the order they should be pressed. For example, to map the following keystroke, Alt+Shift+F1, click the Alt key, then the Shift key, followed by the F1 key. The sequence displays in the Current Key - Key field as follows: KEY: A^S^F1 Any combination of Alt, Shift, and Ctrl can be used. Note however, that these keys will always display in the Key field in the order A^,S^, and C^. 2) Select a function for the keystroke from the Set To list. The following Set To options are available: Command Defines a single ECL command to be executed when the key is pressed. Enter a valid command in the Command field. Refer to Chapter 7 (Command Language) in the online Reference Manual for more information. Example: Command: ERASE SCREEN Erases the screen when the key is pressed. Example: Command: DISPLAY “HELLO THERE” Displays HELLO THERE at the current cursor position. Command File Specifies the execution of a command file. Enter the path name of a command file in the CMD File field or click Browse to display the Command File Selection dialog box. Select a command file then click OK. See Chapter 8 (Command File Programming) in the online Reference Manual for more information. 78 DEC Keyboard Perform a DEC keyboard function. Enter a valid name in the DEC Keybrd field or click Browse and select a function from the list. The following options are available: Table 4-1 DEC Keyboard DEC Keyboard Arrow Keys Edit Pad F6 - F20 Keypad Printing User Defined Keys Other Chapter Four - Keyboard, Mouse and Toolbar Name UP ARROW DOWN ARROW LEFT ARROW RIGHT ARROW FIND INSERT HERE NEXT SCREEN PREV SCREEN REMOVE SELECT F6 - F14 F15 F16 F17 - F20 PF1 - PF4 0-9 COMMA MINUS PERIOD ENTER PRINT AUTO PRINT CLOSE PRINT CONTINUOUS PRINT CONTROLLER PRINT SCREEN UDK1 - UDK20 BACKSPACE BREAK BREAK (Long) COMPOSE DELETE DROP_DTR ESCAPE HOLD SCREEN LINE FEED NULL SEND ANSWERBACK Function Up arrow Down arrow Left arrow Right arrow Find Insert here Next screen Previous screen Remove Select F6 - F14 Help Do F17 - F20 PF1 - PF4 Keypad 0 - 9 Keypad comma Keypad minus Keypad period Keypad enter Continuous print mode (auto) Close the printer Continuous print mode Controller print mode Print contents of the screen UDK 1-20 Backspace Send a short break Send a long break Compose Delete Drops DTR for 2 seconds Escape Hold screen Line feed Null Log File 79 Edit/Paste Performs an edit/paste function. Enter a valid name in the Edit/Paste field or click Browse and select from the list. The following functions are available: Table 4-2 Edit/Paste Edit/Paste Copy Paste Send Select All Select Screen Function Copy selected text to Clipboard. Paste information from Clipboard. Send selected text to host. Select the current screen and all the scrollback data. Select all the text on the screen. Emulator Functions Executes a VT key or emulator function. Enter a valid name in the Emul. Func. field or click Browse and select from the list. The following functions are available: Table 4-3 Emulator Functions Name 80/132 Abort CMD Prompt Command Messages DDE Prompt Debug Exit File Messages File Receive File Send Help Kermit Prompt KP Numeric Toggle KP-Set Numeric KP-Set Function Log Record Log Replay Max Workspace Scrollback Switch Session VT Mode WordPerfect 4014 Mode Function Toggles between 80 and 132 column modes. Performs an abort of a file transfer or command execution. Displays the command prompt. Toggles the display of the Command Messages window. Displays the DDE command prompt. Debug on/off. Exits the emulator. Toggles the display of the File Transfer Message window. Opens the File Transfer Receive dialog box. Opens the File Transfer Send dialog box. Opens the help file. Displays the Kermit command prompt. Keypad Numeric toggle. Keypad top numeric mode. Keypad top function mode. Record a log file. Replay a log file. Maximizes the workspace. Enables or disables the display of scrollbars for scrollback. Switches to the next instance of the emulator (if any). Switches to VT terminal mode. Toggles between normal and WordPerfect modes. Switches to Tek 4014 mode (Tektronix only). 80 Help File Launches a help file. Enter the path name of a help file in the Help File field or click Browse to display the Help File Selection dialog box. Select a help file, then click OK. Nothing Ignores any key action (disables the key definition). Nothing can be entered in the Nothing field. String Defines a string to be sent to the host. A simple ASCII string can be entered in the String field. To enter special characters, enclose the ASCII value in angle brackets < >. Refer to the Special Characters topic and Appendix B (ASCII Control Table) in the online Reference Manual for more information. Examples: String: <027>OP or String: <ESC>OP Both examples send the escape sequence Control [ OP (^[OP). String:<<BELL>> Sends <BELL>. Double angle brackets prevent conversion to numeric values. String:<%x44> Converts the string from its Hex value to D. Unmapped The default setting for unmapped keys. Nothing can be entered in the Unmapped field. 3) When you are satisfied with the key combination, click the Add button. The key definition displays in the Mapped Keys list box, and the keystroke combination is highlighted in blue. If at any time while defining a key you wish to make changes, click the Undo button. 4) Save the Key Map by clicking the OK button. 4.1.3 Changing a Key Definition To change the existing configuration for the currently selected keystroke. 1) Select the key definition to change. 2) Set to the desired function. 3) Click the Change button Note: Be sure to click the Add or Change button before selecting another key definition from the keyboard map, otherwise all changes to the current keystroke will be lost. 4.1.4 Deleting a Key Definition To delete a key definition: 1) Select the key definition to delete. 2) Click the Delete button. Note: Predefined (default) keys can be edited and redefined, but can never be deleted. If you delete the user-defined definition, it will revert to the default definition. Chapter Four - Keyboard, Mouse and Toolbar 81 4.2 MOUSE MAPPING Through the Mouse Mapping dialog box, mouse buttons can be configured to perform many functions such as sending a string, a command, a mouse position report, a command file, perform emulator functions, and more. Mouse clicks are only redefined while the mouse cursor is in the emulation window. If the mouse cursor is moved outside of the emulation window, the mouse buttons perform their normal Windows functions. To enter the Mouse Mapping dialog box, click on Setup - Mouse Mapper. Figure 4-3 Mouse Mapping Current Mousemap Displays the name of the current mousemap. You can select another mousemap from the drop down list if available, or create a New mousemap. Mapped Action Displays a list of mapped mouse buttons with their definitions for both the default and current mousemaps. Current Action Displays the currently highlighted mouse button and its definition. 82 Enable Default Button Assignments Disables the default definitions of the mouse buttons. Each predefined mouse button is then set to UNMAPPED. Show Default Button Assignments Toggles the display of the mouse button definitions in the Mapped Action window. This option does not disable the definitions which will still display in the Set To field. 4.2.1 Creating a New Mouse Map The top of the dialog box contains a section that deals with the mouse maps as whole entities. The name of the current mouse map is listed in the Current Keymap list box. New button Creates a new mouse map. When this button is clicked, the Mouse Map Name dialog box appears. Figure 4-4 New Mouse Map Rename button Used to change the current mouse map’s name. When clicked, this button displays the Mouse Map Name dialog box. Change the mouse map’s name, then click OK. Delete button Deletes the currently selected mouse map. Note: The New, Rename, and Delete operations cannot be undone by clicking the Cancel button. Chapter Four - Keyboard, Mouse and Toolbar 83 4.2.2 Defining a Mouse Button Mouse button definitions are set in the Current Action section. Note that predefined mouse buttons displayed on the Mouse Button Layout are outlined in green, while user-defined keys are outlined in blue. To define a mouse button to perform a specific function: 1) Using the mouse, click on the desired mouse button and Alt, Shift, or Control if desired. For example, to map the following mouse button, Alt+Right Button, click the Alt key followed by Right. The sequence displays in the Current Action - Action field as follows: ACTION: A^Right Any combination of Alt, Shift, and Ctrl can be used. Note however, that these keys will always display in the Action: field in the order C^, A^, and S^. Mouse buttons that are shown with a colored border are predefined and display in the Mapped Action window. 2) Select a function for the mouse button from the Set To list. The following Set To options are available: Command Defines a single ECL command to be executed when the mouse button is pressed. Enter a valid command in the Command field. Refer to Chapter 7 (Command Language) in the online Reference Manual for more information. Example: Command: ERASE SCREEN Erases the screen when the mouse button is pressed. Example: Command: SAVE C:\EMULATOR\SETTING3 Saves the current settings to SETTING3.CNF in the \EMULATOR directory. Command File Specifies the execution of a command file. Enter the path name of a command file in the CMD File field or click Browse to display the Command File Selection dialog box. Select a command file then click OK. See Chapter 8 (Command File Programming) in the online Reference Manual for more information. 84 DEC Keyboard Perform a DEC keyboard function. Enter a valid name in the DEC Keybrd field or click Browse and select a function from the list. The following options are available: Table 4-4 DEC Keyboard DEC Keyboard Arrow Keys Edit Pad F6 - F20 Keypad Printing User Defined Keys Other Chapter Four - Keyboard, Mouse and Toolbar Name UP ARROW DOWN ARROW LEFT ARROW RIGHT ARROW FIND INSERT HERE NEXT SCREEN PREV SCREEN REMOVE SELECT F6 - F14 F15 F16 F17 - F20 PF1 - PF4 0-9 COMMA MINUS PERIOD ENTER PRINT AUTO PRINT CLOSE PRINT CONTINUOUS PRINT CONTROLLER PRINT SCREEN UDK1 - UDK20 BACKSPACE BREAK BREAK (Long) COMPOSE DELETE DROP_DTR ESCAPE HOLD SCREEN LINE FEED NULL SEND ANSWERBACK Function Up arrow Down arrow Left arrow Right arrow Find Insert here Next screen Previous screen Remove Select F6 - F14 Help Do F17 - F20 PF1 - PF4 Keypad 0 - 9 Keypad comma Keypad minus Keypad period Keypad enter Continuous print mode (auto) Close the printer Continuous print mode Controller print mode Print contents of the screen UDK 1-20 Backspace Send a short break Send a long break Compose Delete Drops DTR for 2 seconds Escape Hold screen Line feed Null Log File 85 Edit/Paste Performs an edit/paste function. Enter a valid name in the Edit/Paste field or click Browse and select from the list. The following functions are available: Table 4-5 Edit/Paste Edit/Paste Copy Paste Send Select All Select Screen Function Copy selected text to Clipboard. Paste information from Clipboard. Send selected text to host. Select the current screen and all the scrollback data. Select all the text on the screen. Emulator Functions Executes a VT key or emulator function. Enter a valid name in the Emul. Func. field or click Browse and select from the list. The following functions are available: Table 4-6 Emulator Functions Name 80/132 Abort CMD Prompt Command Messages DDE Prompt Debug Exit File Messages File Receive File Send Help Kermit Prompt KP Numeric Toggle KP-Set Numeric KP-Set Function Log Record Log Replay Max Workspace Scrollback Switch Session VT Mode WordPerfect 4014 Mode Function Toggles between 80 and 132 column modes. Performs an abort of a file transfer or command execution. Displays the command prompt. Toggles the display of the Command Messages window. Displays the DDE command prompt. Debug on/off. Exits the emulator. Toggles the display of the File Transfer Message window. Opens the File Transfer Receive dialog box. Opens the File Transfer Send dialog box. Opens the help file. Displays the Kermit command prompt. Keypad Numeric toggle. Keypad top numeric mode. Keypad top function mode. Record a log file. Replay a log file. Maximizes the workspace. Enables or disables the display of scrollbars for scrollback. Switches to the next instance of the emulator (if any). Switches to VT terminal mode. Toggles between normal and WordPerfect modes. Switches to Tek 4014 mode (Tektronix only). 86 Mouse Function Assigns special mouse actions to a mouse button. Enter the name of a mouse function in the Mouse Func. field or click Browse to display the Mouse Functions list. Select a Mouse Function, then click OK. Table 4-7 Mouse Functions Name Function Mark Mark Column Selects text by the pressing and holding of the assigned button. Release the button when finished selecting. Marks blocks of text using column mode. Send Sends the text contained in the selected area. Note: Only one mouse button can be assigned to a particular mouse function. When selecting a mouse function for a button, the emulator resets all other mouse buttons with the same mouse function. Mouse Position Report Sends the following string to the host indicating the mouse position in alpha cursor coordinates. Example: ESC P[row;column] CR The Mouse Pos. field is disabled for this selection. Nothing can be entered. Extended Mouse Report Sends the following string to the host indicating the cursor position, mouse button, and the shift keys: ESC M(A1 A1 A3 B) [row;column] CR Where: A1 is “A” if Alt key is down - blank if not. A1 is “C” if Control key is down - blank if not. A1 is “S” if Shift key is down - blank if not. B is “L(left), M(middle), or R(right) for the button pressed. Example: ESC M(A L)[1;1] CR Results: Keys = A SPACE SPACE Alt key Button = L Left Position = 1;2 Row 1, Column 2 The possible key combinations are: Control, Shift, Shift Control, and Alt. The Ext. Mouse field is disabled for this selection. Nothing can be entered. Nothing Ignores any mouse button action (disables the mouse button definition). Nothing can be entered in the Nothing field. Chapter Four - Keyboard, Mouse and Toolbar 87 String Defines a string to be sent to the host. A simple ASCII string can be entered in the String field. To enter special characters, enclose the ASCII value in angle brackets < >. Refer to the Special Characters topic and Appendix B (ASCII Control Table) in the online Reference Manual for more information. Examples: String: <027>OP or String: <ESC>OP Both examples send the escape sequence Control [ OP (^[OP). String:<<BELL>> Sends <BELL>. Double angle brackets prevent conversion to numeric values. String:<%x44> Converts the string from its Hex value to D. Unmapped The default setting for unmapped mouse buttons. Nothing can be entered in the Unmapped field. 3) When you are satisfied with the mouse button combination, click the Add button. The mouse button action displays in the Mapped Action window, and the mouse button combination is highlighted. If at any time while defining a mouse button you wish to make changes, click the Undo button. 4) Save the Mouse Map by clicking the OK button. 4.2.3 Changing a Mouse Button Definition To change the existing configuration for the currently selected mouse button. 1) Select the mouse button definition to change. 2) Set to the desired function. 3) Click the Change button. Note: Be sure to click the Add or Change button before selecting another mouse button definition from the Mouse Button Layout, otherwise all changes to the current mouse button will be lost. 4.2.4 Deleting a Mouse Button Definition To delete a mouse button definition: 1) Select the mouse button definition to delete. 2) Click the Delete button. Note: Predefined (default) mouse buttons can be edited and redefined, but can never be deleted. If you delete the user-defined definition, it will revert to the default definition. 88 4.3 CUSTOMIZE TOOLBARS To create a toolbar or edit an exi+++++sting toolbar, click on Setup - Customize Toolbars. The Properties tab displays. 4.3.1 Creating a New Toolbar To create a new toolbar, in the Properties tab, click on the New... button. The New Toolbar dialog box displays. Enter a new Toolbar Name and then click OK. 4.3.2 Properties Tab The options selected in the Properties tab determine the way the toolbars display on the screen. You can also create a new toolbar or rename a new toolbar in this tab. Figure 4-5 Properties Toolbars Lists the available toolbars. A checkmark toggles the display of the toolbar on the screen. Note that clicking the X in the upper right corner of the Floating Toolbar will turn the display of the toolbar off. Chapter Four - Keyboard, Mouse and Toolbar 89 Dockable If selected for the toolbar, the toolbar will dock (attach to a permanent location) to the frame where it is placed. If this option is not selected, the toolbar will “float” in any location. Show Tool Tips Displays a brief description of the toolbar button when the mouse cursor is placed over the button and held in place for a moment. Show Button Text Displays the user-specified button text. Note that the button size may automatically adjust to accomodate the text length, regardless of the Bitmap Size selected. New... Displays the New Toolbar dialog box. Enter a unique name for the new toolbar. Delete Deletes the selected toolbar. Default toolbars cannot be deleted. Reset If a change is made to a toolbar, such as changing a button function or adding a button to the toolbar, these changes can be undone by clicking Reset. If the Reset button is disabled, there are no changes to be undone. Toolbar Name Displays the name of the currently selected toolbar. In this field any new toolbar name can be edited. Note that the default toolbar names cannot be edited. Bitmap Size Determines the size of the bitmap displayed on the button. Choose from one of the four predefined sizes. 90 4.3.3 Buttons Tab Create a new toolbar or add buttons to an existing toolbar through the Buttons tab. Select a category, then click on a button to display its description. Drag the desired button to an existing toolbar. To create a new button with a toolbar function, click on the Button Editor tab. Figure 4-6 Buttons Available Categories Displays the buttons based on their designated function. Click on a Category and the corresponding buttons display in the Buttons field. Any new button created with the Button Editor is placed in the User Defined category. Buttons Displays the available buttons for the selected category. When a button is clicked once, its properties display in the Descriptions field. To add a button to a toolbar, click on it once and drag and drop to the desired toolbar. Chapter Four - Keyboard, Mouse and Toolbar 91 Descriptions Displays the properties of the button as specified in the Button Editor tab. Button Name Determines the action performed when the button is clicked. Button Text Identifying text that displays on the button. Help Text A description of the button’s function that displays on the status line when the button is clicked. Tool Tip A brief description of the button’s function that displays when the mouse cursor is held over the button for a moment. 4.3.4 Button Editor Tab Toolbar button definitions are set in the Button Editor tab. Figure 4-7 Button Editor User Defined Buttons Any new button created is placed into the User Defined category. 92 Button Function Specifies the bitmap that appears on the toolbar button. The following options are available. Internal Displays a list of default bitmaps. For a Text Only button, select the Empty bitmap option. File Click on the (ellipse) button to display the Bitmap Selection dialog box. We strongly recommend importing bitmaps at the optimum size, 16 x 15. Bitmaps should be 16 colors or 256 colors. Figure 4-8 Bitmap Selection If you import a larger bitmap at the maximum import size, and then later, specify a smaller size in the Properties tab, specify a smaller Bitmap Size, it will be resized to fit. Chapter Four - Keyboard, Mouse and Toolbar 93 4.3.4.1 Defining a Toolbar Button To define a toolbar button to perform a specific function: 1) Click the New... button. The New Button dialog box appears. Enter a name for the button then click OK. 2) Select a Bitmap. You can select an internal bitmap or import a bitmap from another location. 3) Select from the Category functions. The following options are available: Unmapped The default setting for unmapped toolbar buttons. Nothing can be entered in the Unmapped field. Nothing Ignores any toolbar action (disables the button definition). Nothing can be entered in the Nothing field. String Defines a string to be sent to the host. A simple ASCII string can be entered in the String field. To enter special characters, enclose the ASCII value in angle brackets < >. Refer to the Special Characters topic and Appendix B (ASCII Control Table) in the online Reference Manual for more information. Examples: String: <027>OP or String: <ESC>OP Both examples send the escape sequence Control [ OP (^[OP). String:<<BELL>> Sends <BELL>. Double angle brackets prevent conversion to numeric values. String:<%x44> Converts the string from its Hex value to D. Command Defines a single ECL command to be executed when the toolbar button is pressed. Enter a valid command in the Command field. Refer to Chapter 7 (Command Language) in the online Reference Manual for more information. Example: Command: ERASE SCREEN Erases the screen when the toolbar button is pressed. Example: Command: SAVE C:\EMULATOR\SETTING3 Saves the current settings to SETTING3.CNF in the \EMULATOR directory. Command File Specifies the execution of a command file. Enter the path name of a command file in the CMD File field or click Browse to display the Command File Selection dialog box. Select a command file then click OK. See Chapter 8 (Command File Programming) in the online Reference Manual for more information. 94 DEC Keyboard Perform a DEC keyboard function. Enter a valid name in the DEC Keybrd field or click Browse and select a function from the list. The following options are available: Table 4-8 DEC Keyboard DEC Keyboard Arrow Keys Edit Pad F6 - F20 Keypad Printing User Defined Keys Other Chapter Four - Keyboard, Mouse and Toolbar Name UP ARROW DOWN ARROW LEFT ARROW RIGHT ARROW FIND INSERT HERE NEXT SCREEN PREV SCREEN REMOVE SELECT F6 - F14 F15 F16 F17 - F20 PF1 - PF4 0-9 COMMA MINUS PERIOD ENTER PRINT AUTO PRINT CLOSE PRINT CONTINUOUS PRINT CONTROLLER PRINT SCREEN UDK1 - UDK20 BACKSPACE BREAK BREAK (Long) COMPOSE DELETE DROP_DTR ESCAPE HOLD SCREEN LINE FEED NULL SEND ANSWERBACK Function Up arrow Down arrow Left arrow Right arrow Find Insert here Next screen Previous screen Remove Select F6 - F14 Help Do F17 - F20 PF1 - PF4 Keypad 0 - 9 Keypad comma Keypad minus Keypad period Keypad enter Continuous print mode (auto) Close the printer Continuous print mode Controller print mode Print contents of the screen UDK 1-20 Backspace Send a short break Send a long break Compose Delete Drops DTR for 2 seconds Escape Hold screen Line feed Null Log File 95 Edit/Paste Performs an edit/paste function. Enter a valid name in the Edit/Paste field or click Browse and select from the list. The following functions are available: Table 4-9 Edit/Paste Edit/Paste Function Copy Copy selected text to Clipboard. Paste Paste information from Clipboard. Send Send selected text to host. Select All Select the current screen and all the scrollback data. Select Screen Select all the text on the screen. Emulator Functions Executes a VT key or emulator function. Enter a valid name in the Emul. Func. field or click Browse and select from the list. The following functions are available: Table 4-9 Emulator Functions Name Function 80/132 Toggles between 80 and 132 column modes. Abort Performs an abort of a file transfer or command execution. CMD Prompt Displays the command prompt. Command Messages Toggles the display of the Command Messages window. DDE Prompt Displays the DDE command prompt. Debug Debug on/off. Exit Exits the emulator. File Messages Toggles the display of the File Transfer Message window. File Receive Opens the File Transfer Receive dialog box. File Send Opens the File Transfer Send dialog box. Help Opens the help file. Kermit Prompt Displays the Kermit command prompt. KP Numeric Toggle Keypad Numeric toggle. KP-Set Numeric Keypad top numeric mode. KP-Set Function Keypad top function mode. Log Record Record a log file. Log Replay Replay a log file. Max Workspace Maximizes the workspace. Scrollback Enables or disables the display of scrollbars for scrollback. Switch Session Switches to the next instance of the emulator (if any). VT Mode Switches to VT terminal mode. WordPerfect Toggles between normal and WordPerfect modes. 4014 Mode Switches to Tek 4014 mode (Tektronix only). 96 4) Enter the Button Text. 5) Enter the Help Text. 6) Enter the Tool Tip. The new button will be available in the Buttons tab under the User Defined category and can be added to any toolbar. 4.3.4.2 Changing a Toolbar Button Definition To change the existing configuration for the currently selected toolbar button. 1) Select the button name from the User Defined Buttons list. 2) Edit its Button Function properties. Note: To revert back to the previous definition, click the Reset button. The Reset button is available after editing a button and prior to closing the dialog box. 4.3.4.3 Deleting a Toolbar Button Definition To delete a toolbar button definition: 1) Select the button name from the User Defined Buttons list. 2) Click the Delete button. Note: Predefined (default) mouse buttons cannot be edited, redefined, or deleted. 4.3.4.4 Renaming a Toolbar Button Definition To rename a toolbar button definition: 1) Select the button name from the User Defined Buttons list 2) Click the Rename button. The Rename Button dialog box appears. 3) Enter a new name for the button, then click OK. Note: Predefined (default) mouse buttons cannot be edited, redefined, or deleted. Chapter Four - Keyboard, Mouse and Toolbar 97 98 u CHAPTER 5 EXTENDED FEATURES OVERVIEW The emulator offers the following extended features: Table 5-1 Extended Features Feature Function Log Files Capturing and replay of data sent to the screen in a log file Online Help Comprehensive online Help WordPerfect Mode Emulates keystrokes of the PC version of WordPerfect when running VAX/VMS WP Chapter Five - Extended Features 99 5.1 LOG FILES The Log feature records all data sent to the emulator from the host into a file on the PC. 5.1.1 Record Log File Figure 5-1 Record Log File To record a log file: 1) Click on File - Record Log File. 2) Enter the desired filename. The log file name can include a complete path specification. If an extension is not specified, the emulator assigns .LOG. 3) Enable Append to add new log information to the end of an existing log file. 4) Enable Overwrite Protection to be notified if the file already exists. 5) Click on Save to begin recording. 6) To stop recording, click on File - Stop Recording Log File. 100 5.1.2 Replay Log File Click on File - Replay Log File to display the Replay Log File Selection dialog box. Figure 5-2 Replay Log File Selection This option replays previously recorded log files offline from the host. It can be replayed at different speeds, and programmed to pause during replay. The replay can also be paused at anytime using HOLD . To start the replay operation: 1) Click on File - Replay Log File. 2) Enter the filename. The filename can include a complete DOS path name. 3) Click on OK. Terminate replay by clicking on Cancel. 5.1.2.1 Keyboard Instructions 1) Press REP (default is Alt ;), the following prompt is displayed: Replay File Name: 2) Enter the log file name. The filename can include a complete DOS path specification. 3) To stop Replay, press REP again, or answer Q to the Replay pause prompt. 5.1.3 Replay Options Setup - General - Log Replay includes several options that control the operation of the Replay function. Chapter Five - Extended Features 101 5.1.3.1 Replay Rate Selects one of six rates for replay speed. Beginning with the slowest, the range excompasses: 300 baud, 1100 baud, 2400 baud, 4800 baud, 9600 baud, to the maximum baud rate. 5.1.3.2 Pause on Clear Screen Pauses replay before executing any control sequence that causes an erase of the entire screen. 5.1.3.3 Pause on Every Page Pauses each time a new page of text is scrolled up the display. This option may not work correctly with log files that display text using direct cursor positioning. 5.1.3.4 Pause on Text Pauses when the data in the log file matches the user-defined string. The string can be 25 characters long and include any control character. To disable this option, clear the user-defined string. 5.1.4 Replay Pauses When a replay pause occurs, the following message appears on the screen: Replay Pause (CR = Continue, Q = Quit, P = Print Screen) Press Return to continue, Q to terminate the replay operation, or P to print the screen. 5.1.5 Programming Considerations Some experimentation with the replay programming may be necessary to achieve the desired replay results. The following are guidelines for setting programming options: Select the desired replay rate and use HOLD to stop the replay at the desired places. Selecting the Every Page option in Setup - General - Log Replay causes a replay pause after each page of text. 5.1.5.1 Menu Driven Applications Pauses for menu driven applications require some consideration. The display techniques vary widely between programs. One or more options may be required simultaneously to program the desired pauses. Selecting the Clear Screen option in the Log Replay setup tab works for many menu driven applications by causing an automatic pause before clearing each screen. Many menu programs clear the screen one line at a time. These programs will not pause when the screen is cleared. If the replay doesn’t pause when the screen is cleared, examine the application screens for a string that appears near the bottom of every screen. Enter the string in the Text option in Log Replay dialog box. 102 5.2 ONLINE HELP Help is available on emulator operation and features, drop down menus, key assignments, and commands. o o o o 5.3 Click on Help - Contents to display the online Help. If you are unfamiliar with Windows Help, click on Help - Using Help. Click on About to find the version number and release date of your copy of the emulator. When you are finished with Help, click on File - Exit to exit Help. WORDPERFECT MODE The emulator includes a WordPerfect mode that can be utilized when running VAX/VMS WordPerfect version 5.x. When WP mode is activated, the VAX version of WordPerfect operates using the same keystrokes as the PC version. The emulation is so exact that you can use your PC WordPerfect template when operating with the VAX version. 5.3.1 Entering WordPerfect Mode To enter WordPerfect mode: o o o Click on Execute - WordPerfect 5.X. Type WP5 ON at the CMD> prompt. WordPerfect mode can be invoked from the host computer by sending one of the following commands: CS I 5|WP5 ON ST or ES C [5|WP5 ON ESC\ When WordPerfect mode is on, WP5 appears on the status line. 5.3.2 Terminating WordPerfect Mode To terminate WP mode: o o o Click on Execute - WordPerfect 5.x. Type WP OFF at the CMD> prompt. WP mode can be terminated from the host computer by sending: CS 3;0| I 5.3.3 Operation of WordPerfect Mode To simulate the PC version of WordPerfect, the emulator sends the appropriate VT320 keystrokes to the VAX for each WP key pressed. Since many of the WP assignments overlap normal emulator assignments, several emulator keys do not operate in WP mode. If an emulator key is not assigned to a WP function it will operate normally. Chapter Five - Extended Features 103 5.3.4 WordPerfect Mode - Transmit Codes Table 5-5 WordPerfect Mode Transmit Codes Key (PC) Home, Home, Home, Home, Home, Home, Home, Home, Home, Home, Home, Home, Home, Home, Home, Home, Home, Home, F1 F2 - F8 F9 - F10 F11-F12 Shift F1 - F8 Shift F9 - F10 Ctrl F1 - F8 Ctrl F9 - F10 Alt F1 - F8 Alt F9 - F10 Escape Keypad + Keypad Ctrl Print Screen Home Page Up Page Dn End Delete nsert Ctrl Home Ctrl Page Up Ctrl Page Dn Ctrl End Shift Tab Ctrl Enter Ctrl Hyphen Ctrl Backspace Home, Space Ctrl Ctrl Version 5.0 (VT320) PF4, PF4, Prev Scr Next Scr Home, Home, Home, Home, Home, Home, Home, Home, Home, Home, Home, Home, Home, Home, F7 F8 - F14 F17 - F18 PF3, F9 - PF3, F10 PF1, F7 - PF1, F14 PF1, F17 - PF1, F18 PF2, F7 - PF2, F14 PF2, F17 - PF2, F18 PF3, F7 - PF3, F14 PF3, F17 - PF3, F18 F6 Keypad , Keypad PF1, F13 Find (KP7) Prev (KP9) Next (KP3) Select (KP1) Remove (KP.) Insert Here (KP0) PF2, Find PF2, Prev PF2, Next PF2, Select PF1, Tab PF2, Enter PF2, PF2, Remove PF4, Space PF2, PF2, 104 u CHAPTER 6 FILE TRANSFER OVERVIEW The emulator includes an ASCII file transfer plus four popular protocols for error free file transfer: o o o o Kermit XMODEM YMODEM ZMODEM ASCII transfer moves text files between computer systems using standard file utilities that already exist on the remote computer. ASCII transfers are not guaranteed to be error-free and can only be used for sending and receiving text files that do not contain binary coded information. Error free file transfer protocols insure the correct delivery of binary and ASCII information. One or more of these protocols are usually supported by host systems and bulletin boards. Use of an error-free protocol is recommended over ASCII transfers due to the increased performance and reliability. Chapter Six - File Transfer 105 When transferring files with an error free file transfer protocol, the following scenario typically takes place: 6.1 1) Make the initial connection to, and ready the remote computer for transfer. 2) Tell the remote computer which file to transfer. 3) The file is broken into smaller pieces called packets. The file is sent packet by packet until complete. 4) The receiver inspects the arriving packet; acknowledging if it’s okay, NAKing (rejecting) if it’s damaged. If the packet is accepted, the next one is sent. If the packet is rejected, it is sent again. If the packet is retransmitted and rejected too many times, or if an acknowledgment is not received, the file transfer fails. 5) When the file transfer is complete, the sender tells the receiver that it has reached the “End of File”. 6) Repeat steps 2 - 5 to send more files. When all the files are sent, the two programs disconnect. FILE TRANSFER SETUP The file transfer setup dialog box is divided into two sections, the Protocol Specific section and the Common section. The protocol specific section varies depending on the protocol selected in the protocol list. Protocol Specific Common Figure 6-1 File Transfer Setup 106 6.1.1 Common Setup Overwrite Protection This setting determines what action will be taken if the file being received already exists. The available options are as follows: None The file is overwritten without any notification. Prompt You are prompted to select the action to take. Rename The new file is renamed by appending a number to the name. Cancel The file is not transferred and the file transfer will be terminated. Partial Files A partial (incomplete) file can result when a transfer is aborted due to an error or operator intervention. Selecting Keep will cause the incomplete file to be stored on your disk. Selecting Discard will throw away partial files leaving no trace of the file on your disk. Discard is the recommended setting. Auto Command Mode When Auto Command Mode is enabled, the file transfer program sends the commands stored in Auto Command Mode Setup to the host to automatically startup the host transfer program. Refer to the Auto Command Mode Setup topic for more information. Set Defaults Sets the file transfer defaults for the selected protocol. 6.1.2 Kermit Protocol Setup Figure 6-2 Kermit Protocol Setup Error Checking Selects the error check protocol to be used for file transfer. If the host program does not support the protocol selected, it renegotiates the error checking protocol. CRC is the default. Chapter Six - File Transfer 107 Prefixing Request 8-bit Prefixing Enables the conversion of 8-bit binary information to 7-bit data with a prefix character. Enable this when sending binary information over a communication link that only supports 7-bit data. The default setting is Disabled. Repeated Character Enables the compression of data by using a repeat count when sending the same character multiple times. Default is Enabled. Control Character Prefix Selects the character used for prefixing control characters. Default is #. There is practically never a reason to change this. 8-bit Character Prefix Selects the character used to prefix 8-bit characters (when 8-bit prefixing is enabled). The default is &. There is practically never a reason to change this. Repeat Character Prefix Selects the character used for prefixing repeated characters. The default is ~. There is practically never a reason to change this. Advanced Settings Of the following settings, only Packet Size and Windows are normally changed. End of Line Character The control character that indicates the end of a line (packet). The default is a carriage return. Handshake Character Used for half-duplex systems that require a handshake or turnaround character. The default value is none. Normal values for the handshake character are Xon, Xoff, CR, LF, or Bell. Packet Size Sets the maximum number of characters in a Kermit data packet. The default is 2048 bytes. Sizes over 94 bytes require Long Packet support from the host Kermit program. Larger packet sizes increase the performance of the file transfer. Pad Count The number of pad characters transmitted prior to sending the packet. The default is zero. Pad Character The character used for padding outgoing packets. Normally padding is not required. However, it is used occasionally when working with half-duplex or slow host computer systems. Null is the default character. Pad characters are not sent if the pad count is zero. Maximum Retries The number of times Kermit will attempt a packet retransmission before giving up. Start of Packet The control character indicating the start of a Kermit packet. SOH (Ctrl A) is the default character. Change this field only when the host Kermit program requires a different character. If the character is incorrect, Kermit file transfers will fail. 108 Window Buffer Count The number of sliding windows Kermit attempts to use during file transfer. The default is one. Automatic “End” After Transfer If enabled, the emulator sends an end packet (if required) to the Kermit server when the Done button is clicked. The end packet causes the host Kermit to exit Server Mode. 6.1.3 XMODEM Protocol Setup Figure 6-3 XMODEM Protocol Setup Error Checking The type of error checking to be used. For basic XMODEM, select CRC or Checksum. To send 1 K-byte packets with CRC (only choice available) select CRC/1K. If CRC/1K is not selected, 128 byte packets are used. Select CRC/1K only when transferring to a host XMODEM program that supports 1 K-byte packets. 6.1.4 YMODEM Protocol Setup The YMODEM file transfer protocol has its own tab, but does not offer any protocol-specific options. Chapter Six - File Transfer 109 6.1.5 ZMODEM Protocol Setup Figure 6-4 ZMODEM Protocol Setup Transmit Method The available transmit method is Streaming. Error Checking Select 16-bit CRC or 32-bit CRC (default) error checking. Follow Sender When recieving files, disables common overwrite controls and uses what the sender tells you to use. Automatic Download Start If enabled, the host ZMODEM program can automatically initiate the download of a file (transfer a file to the PC) when the emulator is in emulation mode. This feature is used by most bulletin boards supporting ZMODEM. 110 6.1.6 ASCII Protocol Setup Figure 6-5 ASCII Protocol Setup Send Options Outgoing Character Delay Some systems, especially half-duplex, cannot accept characters at the full baud rate. To bypass this problem, use a Character Delay. Enter 1 to 99 milliseconds of delay for each transmitted character. End of Line Delay Specifies the number of milliseconds to delay after each carriage return. Enter 0 to 999 milliseconds. The default selection depends on the host, but is normally set to zero. Turnaround Character Used to Prevent data overrun without having to specify a character or end of line delay. Waiting for a Turnaround Character insures each line transmitted is received by the host. The normal Turnaround Character is a Line Feed. To disable this option, delete all characters in the field. End of File String The selected End of File String is sent to the host after the end of the data. The purpose of the End of File String is to signal the end of the file causing the host utility program to save the file and exit. The default selection depends on the host. Echo Check The emulator waits for the echo from each character transmitted before sending a new character. Selecting this option slows the transfer down significantly. Use this option only as a last resort. Pad Null Lines If enabled, empty lines of text are padded by inserting a single space before the carriage return. Strip Line Feed Strips all line feeds that follow carriage returns. Enable this option for most systems. Chapter Six - File Transfer 111 Receive Options Host Cancel Character If a file receive is aborted, this character is sent to the host to terminate the transfer. Host Prompt String If this string is detected while receiving a file, the file transfer is ended. This string is used to gracefully end ASCII transfers without putting the host prompt into the file’s data. The default string depends on the host system. Selected Host Selects the correct set of Auto Command Mode commands and Setup options for a host computer system. To install the commands, click on Set Defaults. If your host is not listed, refer to the Auto Command Mode Setup topic for more information. 6.1.6.1 Additional Information When transferring a file between the PC and a host (remote) computer system using ASCII mode, the following scenario usually takes place: 1) A host utility program is started to receive or transmit ASCII data via the terminal port used by the PC. Example: TYPE filename Sends data from a host file to the terminal port. Copy TT: filename Receives data from the terminal port into a file. 2) The PC is instructed to send or receive data. 3) The data is sent or received. This process is automated with the ASCII protocol. Once the ASCII Transfer Setup is configured, only the filenames are required to transfer files. The host commands are issued automatically. There is a great variety of computers that the emulator can connect to, each requiring a different setup. Recommended settings for ASCII file transfer with many host systems are pre-programmed. Select the commands for a pre-programmed host through the Selected Hosts list box, then click the Set Defaults button. If your host system is not included the hosts list, you should be able to program the Auto Cmd Mode Setup for successful operation. Refer to the ASCII Protocol - Additional Information topic for more information. 112 6.1.7 Auto Command Mode Setup Click on Auto CMD Setup... to display the Auto Command Mode Setup dialog box. Figure 6-6 Auto Command Mode Setup The Auto Command Mode Setup dialog is used to configure the commands necessary to support Auto Command Mode for file transfer operations. Using Auto Command Mode, it is possible to eliminate the process of entering commands into the host computer to start the file transfer program. Each protocol has its own Auto Command Mode Setup. Clicking the Set Defaults button installs a set of commonly used commands for each protocol. These can be edited to work for your host system. Send Command Strings The Send command strings are sent when a File Send operation is started. Enter the commands necessary to start the host’s Receive File program, receive a file, and then to exit. Use a single asterisk in place of the filename (the actual filename is substituted for the asterisk when the file transfer is started). When starting Kermit in Server Mode, do not use the asterisk. The Kermit server protocol handles the file names. Receive Command Strings These are the commands sent when a File Receive operation is started. Operates the same as Send Command Strings, except enter the commands necessary to start the host’s Send File program and then send a file. Note: Contact your System Manager or DCSi Technical support if you need help setting up the command strings. Turnaround Character Prevents data overrun and ensures that each line transmitted is received by the host. Waits for a Turnaround Character to be echoed by the host after sending a carriage return. To disable, delete all characters in the field. The normal Turnaround Character is a Line Feed. Command Delay Some operating systems, such as RSX11M, cannot accept file transfer commands as fast as they are sent. A Command Delay (entered in milliseconds) slows the command line send rate, (e.g., 1000 delays for one second after issuing each command). A maximum delay of 9.999 seconds can be entered. Chapter Six - File Transfer 113 6.1.7.1 ASCII Protocol - Additional Information 6.1.7.1.1 Send Command Strings The send file commands are used to start a utility on the host that creates a file and receives data from the terminal port. Some commonly used utilities are Create, Copy, and text editors in Line Insert mode. The following special symbols are used to program the send file command field: Table 6-1 Send File Command Symbols Symbol * # ~ Meaning Substitute the filename and send the data at the end of the line. Substitute the filename. Data is not sent at the end of the line. Send data. The data from the PC file is sent to the host. Normally, * is the only symbol used in programming commands. The # and ~ are available to add flexibility. Note: If the only command in the command line field is ~ (Send/Receive data symbol), data is sent without sending the carriage return. By default, a carriage return is always sent. Example 1: COPY TT: * Sends: Copy TT: filename File data EOF String Example 2: EDIT # INSERT ~ Sends: EDIT filename INSERT File data EOF String Example 3: COPY TT: * PRINT # Sends: COPY TT: filename File data EOF String PRINT filename If a data transmit symbol (∗ or ~) is not encountered while sending the send file commands, the data is sent after the last command. 114 6.1.7.1.2 Receive Command Strings The receive commands are used to start a utility on the host that sends a file to the terminal port. Some commonly used utilities are Copy and Type. The following special symbols are used to program the receive command field: Table 6-2 Receive File Command Symbols Symbol Meaning * Substitute the filename and go into receive mode at the end of the command line. # Substitute the filename. The emulator does not go into receive mode. ~ Receive data. Puts the emulator into receive mode. Normally the * is the only symbol used in programming commands. The # and ~ are available to add flexibility. Note: If the only command in the command line field is ~ (Send/Receive data symbol) data is received without sending the carriage return. Blanking the commands field sends a carriage return. Example: Type * Sends: Type filename 6.2 PERFORMING FILE TRANSFERS The operation of all file transfer dialog boxes is essentially the same. However, there are a few features that are available for only some of the protocols. Where appropriate these differences are pointed out. Note: Throughout this section, when entering host commands is described, it is possible to avoid these steps by using Auto Command Mode. 6.2.1 File Transfer Directory When you display the File Send or Receive Selection dialog boxes, the default file transfer directory is used to display the list of PC files. If the file transfer directory is changed, the new directory is remembered until you exit the emulator. When the emulator is restarted, the file transfer directory is set back to the default. Normally the default file transfer directory is the directory where the emulator was installed. However, the normal default can be overridden by clicking on Setup - General - Directories and entering a File Transfer Directory string. Chapter Six - File Transfer 115 6.2.2 Sending Files To send a file: 1) Start the host file transfer program. Examples: Host Prompt>KERMIT KERMIT>SERVER Starts Kermit in Server mode on a VAX/VMS host. Host Prompt>XMODEM RT TEST.DAT Starts XMODEM and asks to receive the text file TEST.DAT. 2) Click on File - Send to display the File Transfer Send dialog box. Insure that the desired transfer protocol is selected. If using Kermit, select the desired Transfer Options. Figure 6-7 File Transfer Send 116 3) Select the files to send by entering the filename(s) in the File Name field or selecting the files from the Look In window. When entering the File Name, wildcards and path names can be used. If wildcards are used, pressing Enter updates the list to display the selected files. To select multiple files individually, hold down the Ctrl key while clicking file names. To select a range of files, click on the first file, press and hold Ctrl+Shift, click on the last file, then release. Note: If a filename is double-clicked, the file is selected and the transfer begins immediately. 4) If a Host File Name input box exists, you can rename the file as it is transferred by entering a valid host name. If the Host File Name is left blank, the file name on the host computer will be the same as the PC file name. Normally, files are sent to the host’s default directory. However, you may send the file to a directory other than the default directory by editing the Host File Name to include the host’s directory specification after selecting the files to send. If you are using Kermit and wish to enter the host directory, you must have entered the KERMIT command for literal file naming or Kermit will not translate the directory name correctly. Kermit commands vary between hosts. However, here are two examples of setting literal file naming: SET FILE NAMING UNTRANSLATED SET FILE NAMING LITERAL 5) Send the files by clicking the Send button. The Send File Status dialog box displays while the transfer is in progress. Figure 6-8 Send File Status Chapter Six - File Transfer 117 The Send File Status dialog box displays all or some of the following information depending on the protocol selected. o o o o o o o o The From and To filenames. The percentage of data transferred. The estimated time of the transfer and the amount of time remaining in the transfer. The transfer throughput in characters per second. The byte count (in K-bytes) of data transferred. The current packet count and packet size. The number of times a packet has been retransmitted or NAKed. The status of the transfer and error messages. The file transfer can be aborted by clicking on Abort. Additional file transfer information appears in the File Transfer Messages box which pops up automatically during the file transfer. To toggle the display of this box, click on View - File Transfer Messages. in the emulator’s message box. The message box is automatically popped up during file transfers. After the file transfer is complete, click on Close. 6.2.2.1 Kermit Transfers - Additional Information Kermit Options Use Server Mode Host Kermit programs can operate in Server or Non-Server mode. Each mode has its own operating characteristics. By selecting the correct mode, the emulator’s file transfer program can do a better job of transferring files and checking for errors. No EOF If enabled, an EOF (Ctrl Z) will not be appended to each file sent. End button (Server mode only) Clicking End causes an END packet to be sent to the host after the file transfer. The END packet will cause the host Kermit to exit server mode. If Automatic “End” After Transfer is enabled in the Kermit setup, clicking the END button is unnecessary. 118 6.2.2.2 Kermit File Formats The following information is taken from the VAX/VMS Kermit users guide and may not be accurate for your host system. Please check the Kermit User Manual for your host computer system. VAX Kermit supports three types of file formats: text (ASCII), binary and fixed length - 512 byte records. The default format is ASCII. If transferring files that are not text files, you must tell the VAX Kermit program. Specify binary when sending non-ASCII files between systems. Use binary when backing up a PC directory to a VAX directory. Word processor document files also require binary format. Use fixed format when moving VAX executable files between systems or when 512 fixed length files are required. Use the following commands to set the file format when inside VAX Kermit: o o o SET FILE TYPE ASCII SET FILE TYPE BINARY SET FILE TYPE FIXED 6.2.2.3 ZMODEM Transfers - Additional Information ZMODEM receives can be initiated automatically by a host or bulletin board computer system when the emulator is in emulation mode. If the emulator receives a ZMODEM transfer command and the Automatic Download Start option is enabled, the emulator will automatically begin to transfer the files. 6.2.3 Receiving Files To receive a file: 1) Start the host file transfer program. Examples: Host Prompt>KERMIT Kermit-32>SERVER Starts Kermit in Server mode on a VAX/VMS host. Host Prompt>XMODEM ST TEST.DAT Starts XMODEM and starts sending the text file TEST.DAT. Chapter Six - File Transfer 119 2) Click on File - Receive to display the File Transfer Receive dialog box. Make sure that the desired transfer protocol is selected. If are using Kermit, select the proper Use Server Mode option. Figure 6-9 File Receive Selection 3) If the Host File Name input box appears, enter the name of the host file to transfer. If the Host File Name input box is not visible, enter the name for the PC File Name. 4) To select an alternate directory or filename, click the (Browse) ... button. The Open directories dialog box appears. Select a new directory or filename, then click OK. Click on Receive to start the transfer. (If a filename is double-clicked, the file is selected and the transfer begins immediately.) You may rename the file as it is transferred by entering a PC File Name. A PC File Name is not required. If left blank, the file name on the host computer will be the same as the Host File Name. Normally, files are received from the host’s default directory. However, you can receive files from a directory other than the default directory by including a host directory specification in the host file name specification. If you are using Kermit and wish to enter the host directory, you must have entered the host’s Kermit command for literal file naming or Kermit will not translate the directory name correctly. Kermit commands vary between hosts. However, here are two examples of setting literal file naming: SET FILE NAMING UNTRANSLATED SET FILE NAMING LITERAL 120 5) The Receive File Status dialog box displays while the transfer is in progress. Figure 6-10 Receive File Status The status box displays all or some of the following information depending on the protocol selected. o o o o o o o o The From and To filenames. The percentage of data transferred. The estimated time of the transfer and the amount of time remaining in the transfer. The transfer throughput in characters per second. The byte count (in K-bytes) of data transferred. The current packet count and packet size. The number of times a packet has been retransmitted or NAKed. The status of the transfer and error messages.. The file transfer can be aborted by clicking on Abort. Additional file transfer information appears in the File Transfer Messages box which pops up automatically during the file transfer. To toggle the display of this box, click on View - File Transfer Messages. in the emulator’s message box. The message box is automatically popped up during file transfers. After the file transfer is complete, click on Close. Chapter Six - File Transfer 121 6.2.3.1 Kermit Transfers - Additional Information Kermit Options Use Server Mode Host Kermit programs can operate in Server or Non-Server mode. Each of these two modes have their own operating characteristics. By selecting the correct mode, the emulator’s file transfer program can do a better job of transferring files and checking for errors. Add EOF If enabled, a trailing Ctrl Z (EOF) is added to the file sent to the host. End button (Server mode only) Clicking End sends an END packet to the host after the file transfer. The END packet causes the host Kermit to exit server mode. If Automatic “End” After Transfer is selected in the Kermit setup, clicking the End button is unnecessary. 6.2.3.2 Kermit File Formats The following information is taken from the VAX/VMS Kermit users guide and may not be accurate for your host system. Please check the Kermit User Manual for your host computer system. VAX Kermit supports three types of file formats: text (ASCII), binary and fixed length - 512 byte records. The default format is ASCII. If transferring files that are not text files, you must tell the VAX Kermit program. Specify binary when sending non-ASCII files between systems. Use binary when backing up a PC directory to a VAX directory. WordPerfect document files also require binary format. Use fixed format when moving VAX executable files between systems or when 512 fixed length files are required. Use the following commands to set the file format when inside VAX Kermit: o o o SET FILE TYPE ASCII SET FILE TYPE BINARY SET FILE TYPE FIXED 6.2.3.3 ZMODEM Transfers - Additional Information ZMODEM receives can be initiated automatically by a host or bulletin board computer system when the emulator is in emulation mode. If the emulator receives a ZMODEM transfer command and the Automatic Download Start option is enabled, the emulator will automatically begin to transfer the files. 122 6.2.4 File Transfers Using the Command Line There are two commands used for file transfers, FILE and KERMIT. The FILE command can be used to send a file using any protocol whereas the KERMIT command is used only for Kermit transfers. The KERMIT command supports more Kermit features than are available through the FILE command. For more information on these commands, refer to Chapter 7 (Command Language). 6.2.5 Emulator Kermit Commands Kermit commands can be entered from the command prompt or from the Kermit prompt. If a Kermit command is entered from the Kermit prompt, do not precede the command with KERMIT. Examples: CMD>KERMIT GET FILE Performs a Kermit GET from the CMD> prompt. KERMIT>GET FILE Performs a Kermit GET from the KERMIT> prompt. For more information on Kermit commands, refer to Chapter 7 (Command Language). For a list of the commands available on your host Kermit, see your host Kermit manual or help system. 6.2.6 Transferring Files Using Kermit 6.2.6.1 Send/Server Mode 1) Start Kermit on the host computer by entering the host command to execute Kermit. 2) Put Kermit into server mode by typing SERVER. 3) Enter Kermit mode. 4) Use the SEND command to send the desired files to the host. 5) Type END to end server mode when all of the files have been transferred. 6.2.6.2 Send/Non-Server Mode 1) Start Kermit on the host computer by entering the host command to execute Kermit. 2) Type RECEIVE to put the host Kermit into receive mode. 3) Enter Kermit mode. 4) Use the SEND command to send the desired files to the host. 5) Return to host Kermit mode by typing CONNECT. 6) Exit from the host Kermit program. Chapter Six - File Transfer 123 6.2.6.3 Receive/Server Mode 1) Start Kermit on the host computer by entering the host command to execute Kermit. 2) Put Kermit into server mode by typing SERVER. 3) Enter Kermit mode. 4) Use the GET command to retrieve the desired file from the host. 5) Type END when all the files have been transferred. 6.2.6.4 Receive/Non-Server Mode 1) Start Kermit on the host computer by entering the host command to execute Kermit. 2) Type SEND followed by the file specification. 3) Enter Kermit mode. 4) Type RECEIVE to retrieve the files from the host. 5) Exit Kermit mode. 6) Exit from the host Kermit program. 6.2.6.5 Send File Examples Example 1: Host Prompt>KERMIT Kermit-32>SERVER Click the K> button on the CMD Toolbar KERMIT>SEND/END X.DAT [VAXDIR]X.DAT KERMIT>EXIT Sends file X.DAT to the [VAXDIR] directory on the VAX, ends server mode and exits the host VAX Kermit. Example 2: Host Prompt>KERMIT Kermit-32>RECEIVE Click the K> button on the CMD Toolbar KERMIT>SEND \FILES\*.* KERMIT>CONNECT KERMIT>EXIT Sends all the files in the \FILES directory to the host, ends server mode and exits the host Kermit. 124 Example 3: Host Prompt>KERMIT Kermit-32>SERVER Click the C> button on the CMD Toolbar CMD>KERMIT KERMIT>SEND TEST.DAT KERMIT>END KERMIT>EXIT Sends the file TEST.DAT to the host, ends server mode and exits the host Kermit. Example 4: Host Prompt>KERMIT Kermit-32>SERVER Click the C> button on the CMD Toolbar CMD>KERMIT SEND/END ABC.DAT,DEF.DAT KERMIT>EXIT Sends files ABC.DAT and DEF.DAT to the host, ends server mode and exits the host Kermit. Example 5: Host Prompt>KERMIT Kermit-32>SERVER Click the K> button on the CMD Toolbar KERMIT>EXIT Sends all the files in the \FILES directory to the host, ends server mode and exits the host Kermit. 6.2.6.6 Receive File Examples Example 1: Host Prompt>KERMIT Kermit-32>SERVER Click the C> button on the CMD Toolbar CMD>KERMIT KERMIT>GET TEST.DAT KERMIT>END KERMIT>EXIT Receives the file TEST.DAT from the host, ends server mode and exits the host Kermit. Example 2: Host Prompt>KERMIT Kermit-32>SERVER Click the C> button on the CMD Toolbar CMD>KERMIT GET/END ABC.DAT,DEF.DAT KERMIT>EXIT Receives files ABC.DAT and DEF.DAT from the host, ends server mode and exits the host Kermit. Chapter Six - File Transfer 125 Example 3: Host Prompt>KERMIT Kermit-32>SERVER Click the C> button on the CMD Toolbar CMD>KERMIT GET/END *.* KERMIT>EXIT Requests all the files in the host’s default directory, ends server mode and exits the host Kermit. Example 4: Host Prompt>KERMIT Kermit-32>SERVER Click the K> button on the CMD Toolbar KERMIT>GET/END [VAXDIR]X.DAT KERMIT>EXIT Receives file X.DAT from the VAX directory [VAXDIR], ends server mode and exits the host Kermit. Example 5: Host Prompt>KERMIT Kermit-32>RECEIVE Click the K> button on the CMD Toolbar KERMIT>GET TEST.TXT KERMIT>CONNECT KERMIT>EXIT Receives file TEST.TXT from the current host directory and exits the host Kermit. 6.2.6.7 Aborting Transfers Kermit file transfers can be aborted by clicking on the Abort button in the Status box. Aborting a transfer may cause the Kermit server to exit server mode. 126 u CHAPTER 7 COMMAND LANGUAGE OVERVIEW The Emulation Command Language (ECL) is a powerful command/script language that is similar to DCL, Digital’s Command Language for VAX/VMS. The ability to execute emulator commands from command files allows both simple and complex tasks to be automated. Some of the tasks that can be easily automated with command files are: o o o o o Dialing and login File transfer Management of host programs Data logging and analysis Designing a menu driven user interface for host applications Chapter Seven - Command Language 127 7.1 COMMAND SYNTAX Emulator commands appear in uppercase letters (e.g., WRITE HOST). The standard syntax is: COMMAND /OPTION(S) argument(s) Note: Arguments shown in brackets, [ ], are optional. A command may be abbreviated to the minimum number of characters required to make it non-ambiguous. Multiple command arguments are separated by spaces. All options begin with a slash (/). Options may be used anywhere in the command. Examples: SEND /FILTER TEXT SEND TEXT /FILTER Both forms of the send command are valid. If the argument is a string of characters, the options must immediately follow the command. Character string arguments (referred to as strings) must be enclosed in quotation marks. Example: DISPLAY/NOCR “Hello there” This example shows the use of an option with a string argument. The option directly follows the command, and the string (Hello there) is enclosed in quotes. 7.2 COMMAND EXECUTION Emulator commands can be executed from: o o o o The command line prompt A keyboard or mouse definition The host computer A command file (see the Executing Command Files section) 7.2.1 Command Line Execution To execute a command from the command line: 1) Click on Execute - Command Line, the C> button on the CMD Toolbar, or press CMD (default is Alt C). The CMD> prompt displays. 2) Enter the command or command file specification at the command prompt. Example 1: CMD>SET HOST /DISCONNECT Disconnects the currently connected port. 128 7.2.1.1 Entering Multiple Commands A series of commands can be given by entering interactive command mode. In interactive mode, the command prompt reappears after each command is executed. The INTERACTIVE command enters interactive mode. To terminate interactive mode, use the ENDINTERACTIVE command. 7.2.2 Executing from the Host Emulator commands may be executed by the host using a DCS private control sequence. CS 5|Command I Note: StringST CS and ST are 8-bit characters that can only be used I ES [ is the 7-bit equivalent of CS . ES \ is the 7-bit C I C Example: CS 5|SET HOST /DISCONNECTS I T ES [5|SET HOST /DISCONNECTES \ C C on systems that support full 8-bit characters. equivalent of ST . or These commands are used to disconnect the currently connected port.. 7.3 COMMAND FILES Command files are text files that contain emulator commands. Command files are useful for automating tasks such as transferring files, logging on, and defining keyboard configurations. However, command files are not limited to these functions. Chapter 8 (Command File Programming) covers more advanced programming topics. A command file executes each emulator command in sequence. Emulator command files execute from: o o o o o The command line prompt A key definition The host computer The modem dialer A command file 7.3.1 Specifying a Command File Prefixing a filename with an at symbol (@) tells the emulator to expect a command file. If the filename does not include an extension, the emulator automatically appends .ECF to the filename. The default filename extension of .ECF may be overridden by specifying an extension with the command file name. A command file name can also include a path specification. Command files can be executed using a search path. Click on Setup - General - Directories to set the command file default directory (search path). Chapter Seven - Command Language 129 7.3.2 Default Command File A command file can be executed automatically when the emulator loads by entering the name in the Command File field in the Session Manager’s Properties dialog box. Do not enter the @ symbol as part of the name, or an extension - the default .ECF, is assumed. 7.3.3 Command Line Execution A command file can be executed at the CMD> prompt any time you are in the emulator. 1) Click on Execute - Command Line, the C> button on the CMD Toolbar, or press CMD (default is Alt C). The CMD> prompt displays. 2) Type the @ followed by the name of the command file. 3) Press Return or click the checkmark icon. The command file executes. Example: CMD>@LOGIN Executes a command file named LOGIN.ECF. 7.3.4 Executing from the Host An emulator command file can execute from the host computer system through a DCS Private control sequence. CS 5|@command I Note: file specificationST CS I and ST are 8-bit characters. They can only be used on systems that support full 8-bit characters. ESCá[ is the 7-bit equivalent of CSI. ESC \ is the 7-bit equivalent of ST. Example: CS S I5|@MENU T ES [5|@MENUES \ C C or The host uses these commands in programs, script or command files to run MENU.ECF. 7.3.5 Nested Command Files To specify a command file from within a command file, precede the command filename with the @ symbol. After a nested command file is completed, control returns to the next line of the calling command file. 130 7.3.6 Comments Comments are used in command files to document the purpose of the file and each emulator command. Comments are prefixed with the exclamation point (!). Any data to the right of the exclamation point is ignored. Example: ! This command file logs onto a VAX/VMS system and ! changes to the TEST directory. WAIT “Username:” WRITE HOST “USER” WAIT “Password:” WRITE HOST “USER_TEST” WRITE HOST “SET DEF [.TEST]” EXIT ! wait for host prompt ! send username to host ! wait for host prompt ! send password to host ! change to test directory ! exit command file Comments are used to clearly state the purpose of the file and describe each line of the command file. 7.4 ABORTING COMMANDS To abort emulator commands and/or command file execution, click Execute - Abort, or click on the Abort button. Chapter Seven - Command Language 131 7.5 EMULATOR COMMAND LIST Table 7-1 Emulator Command List Command BREAK CAPTURE CLOSE CLS CONTINUE DDE ADVISE DDE CONNECT DDE DISCONNECT DDE DISCONNECTALL DDE EXECUTE DDE POKE DDE REQUEST DDE TOPICS DDE UNADVISE DELAY DELETE SYMBOL DISPLAY DOS DROPDTR EMULATE ENDINTERACTIVE ERASE SCREEN EXIT FILE FLUSH GOSUB GOTO HELP IF INQUIRE INTERACTIVE KERMIT KERMIT BYE KERMIT CONNECT KERMIT DOS KERMIT END KERMIT EXIT KERMIT FINISH KERMIT GET KERMIT HELP Function Send a communications break Captures text to a file. Close a file Clear screen (short form) Resume execution of next command Create Advise Data Link Connect a client and server application Disconnect the specified conversation Disconnect all conversations Send commands to the server to be executed Send a data item value to the server Request the value of a data item from the server Compile a list of active server applications and topics Delete an Advise Data Link Delay specified time Delete symbol(s) Output data (emulator to screen) Execute DOS command Drop Data Terminal Ready (DTR) Enter Emulation mode End interactive command mode Erase the screen Exit to DOS Perform a file transfer Flush receive buffer Execute a subroutine within a command file Go to a command file label Display emulator Help Test condition Prompt for input Enter interactive command mode Enter Kermit mode Logout from the host and exit emulator mode Return to emulation mode Execute DOS command End Kermit Server session Exit to Windows Tell server to exit Receive files from server Display Kermit help 132 Table 7-1 Emulator Command List (cont’d) Command KERMIT LOGOUT KERMIT RECEIVE KERMIT SEND LOG ON ABORT ON DEVICE_ERROR ON DISCONNECT ON error_severity OPEN PRINT EJECT PRINT ON/OFF PRINT SCREEN PRINT SCROLLBACK QUIT READ READ HOST READ SCREEN REPLAY RETURN SCAN SEND SESSION SET ABORT SET CDELAY SET [NO]DDEAUTOINITIALIZE SET [NO]DDEAPPPENDINSTANCE SET DDECLIENTTIMEOUT SET DDEERVERNAME SET DEVICE_ERROR SET DISCONNECT SET EOF SET HOST SET LDELAY SET MESSAGE SET ON SET TERMINAL SET TURNAROUND SET VERIFY SHOW SYMBOL STOP WAIT WIN WP5 ON/OFF WRITE Chapter Seven - Command Language Function Tell server to logout Non-server receive file Send file to server Create a log file of session Set condition for ON ABORT Set condition for ON DEVICE_ERROR Set condition for ON DISCONNECT Set condition for ON error levels Open a file Eject printer page Print on/off Print the text screen Prints text in scrollback memory plus the screen contents Exit emulate mode Read a string from the host or file Read an ASCII record from host into the specified symbol. Read screen text into symbol Replay an emulator Log file Return from a GOSUB command Display the key names Send ASCII text file to host Start a session defined in the Session Manager Set Abort key checking Set delay for sending characters Set DDE auto initialize Set DDE append instance Set timeout value for DDE client commands Set DDE server name Set device error checking Set disconnect checking Set the End of File character Create a connection to a remote node Set delay for sending lines Set message control Set error checking Set terminal characteristics Set a turnaround character Set verify mode Display local and global symbol values Terminate execution of all command files Wait for a host string Launch Windows application Enable/Disable WordPerfect 5.x mode Write a string to the host or file 133 7.5.1 Emulator Command Descriptions BREAK BREAK (no arguments) Sends a 200 millisecond communications break to the communications port. Valid options: /LONG Sends a long (3.5 second) break. CAPTURE CAPTURE filename Records all data sent to the emulator from the host into a file on the PC. The data is first interpreted by the emulator, so it appears in the text file as it appears on the screen. If the file exists and /OVERWRITE or /APPEND is not specified, an error results. The default is /OPEN. The default extension is .TXT. Valid options: /APPEND Open a text file and appends the text to the end of file. If no file exists, one is created. /CLOSE Close the previously opened capture file. The filename is not required. /OPEN Create a text file. /OVERWRITE Open a text file and overwrite any old copies. If no file exists, one is created. /PROMPT Displays the interactive capture text to file prompt. If logging is already enabled, CAPTURE/PROMPT closes the file and disables the cature. If /PROMPT is used, any other option on the command line is ignored. /SCREEN Write the current screen contents to the previously opened text file. This command formats the data with spaces exactly as it appears on the screen. None of the terminal escape sequences used to format the screen are written to the text file. /TEXT Records all incoming data in the same format as the /SCREEN option. Example 1: CAPTURE TEST Creates log file TEST.TXT. If TEST.TXT already exists, an error occurs. 134 Example 2: INQUIRE TIME “ENTER CURRENT DATE AND TIME: ” OPEN/WRITE ERRORS ERRMESS.LOG WRITE ERRORS TIME CLOSE ERRORS CAPTURE/APPEND ERRMESS.LOG WRITE HOST “@BUILD” WAIT “$” CAPTURE/CLOSE ERRMESS.LOG Creates a text file with a date and time stamp which captures error messages generated from running a VMS COM file. Example 3: CAPTURE/CLOSE Closes the text file. Example 4: CAPTURE/OVER TEST Opens TEST.TXT and overwrites any old copies. Example 5: WRITE HOST “MAIL” WRITE HOST “READ” CAPTURE/TEXT MAIL WRITE HOST “EXIT” Captures a host mail message into a MAIL.TXT file. CLOSE CLOSE logical-name[:] Where: logical-name is a DOS file logical assigned by the OPEN command. Closes the logical name previously opened with the OPEN command. If the CLOSE command is not issued, the logical name is closed upon exiting the emulator. Valid options: /ERROR=label Process continues at the label if an error occurs. Example: !Get user input into DATE INQUIRE DATE “Enter current date and time: ” OPEN/WRITE FILE DATA.LOG ! Open PC file DATA.LOG WRITE FILE DATE ! Write DATE into FILE CLOSE FILE ! Close PC file Places a date and time stamp on a log file by opening the PC file DATA.LOG, writing the date, and closing the file. DATA.LOG can be added later to the LOG/APPEND command. Related topics: OPEN Chapter Seven - Command Language 135 CLS CLS (no arguments) Clears the screen. CLS is the short form of the ERASE SCREEN command. Example: WRITE HOST “ls” DELAY 3 INQUIRE FILENAME “Enter name of file to delete: ” WRITE HOST “rm’’FILENAME’” CLS This Unix example lists the contents of a directory, removes the specified file from that directory, and clears the screen. Related topics: ERASE SCREEN CONTINUE CONTINUE (no arguments) Resumes execution on the next line of a command file. Used with the ON command to ignore error conditions. Example: ON ERROR THEN CONTINUE If an error occurs, the command continues at the next line. DDE ADVISE DDE ADVISE variable1 “item name” variable2 Where: Variable1 is the conversation number returned by an earlier DDE CONNECT command. “Item name” is a string expression that tells the server what data item to monitor. Variable2 specifies the variable to receive the new data item value. Variable2 changes whenever the value of the data item in the server application changes. Creates an Advise Data Link between the emulator (the client) and the server application. The value of the emulator variable is updated whenever the specified item’s value in the server application changes. An Advise Data Link can be removed with the DDE UNADVISE command. All Advise Data Links associated with a conversation are removed when the conversation is disconnected. Example: DDE ADVISE ‘CONV’ “COUNT” RESULT Assumes that CONV refers to a conversation with another copy of the emulator as the DDE server using the ECL topic. An Advise Data Link is created so that when the DDE server’s variable COUNT changes, the new value is assigned to the variable RESULT in the DDE client copy of the emulator. Related topics: DDE UNADVISE 136 DDE CONNECT DDE CONNECT “service name” “topic name” variable Where: “Service name” is a string expression that corresponds to a DDE server application name. An empty string (“”) can be used as a wildcard to find all DDE server applications. “Topic name” is a string expression that corresponds to the desired DDE conversation topic. An empty string (“”) can be used as a wildcard to find the DDE conversation topics. Variable specifies the variable to contain the conversation number. Initiates a DDE conversation between the emulator (the client) and a specified application (the server). Both the service and topic names must be supported by the server application. If more than one DDE server application responds to DDE CONNECT, a conversation is initiated only with the first server responding. The resulting conversation number (a number from 1-10) is stored in the specified variable. This number is used to specify this conversation in other DDE client commands. A conversation is specified by a service name and a topic. Use DDE TOPICS command to display a list of available DDE servers and topics. Example: DDE CONNECT “EXCEL” “DATA.XLS” CONV Initiates a conversation with Excel, with a topic of DATA.XLS. Places the resulting conversation number in the variable CONV. Related topics: DDE DISCONNECT DDE DISCONNECT DDE DISCONNECT variable Where: Variable indicates the conversation number of the conversation to disconnect. This should be the same number that was returned from the DDE CONNECT command. Disconnects the specified DDE conversation. Any DDE advise-links associated with the conversation are removed. Example: DDE DISCONNECT ‘CONV’ Terminates the conversation associated with the conversation number CONV. Related topics: DDE DISCONNECTALL DDE DISCONNECTALL DDE DISCONNECTALL Disconnects all DDE conversations initiated by the DDE CONNECT command. Any DDE advise-links associated with the conversations are removed. Related topics: DDE DISCONNECT Chapter Seven - Command Language 137 DDE EXECUTE DDE EXECUTE variable “command string” Where: Variable is the conversation number returned by an earlier DDE CONNECT command. “Command string” contains the command to execute. This command sends the specified command string to the server to be executed. Example: DDE EXECUTE ‘CONV’ “@TEST” Assumes that CONV refers to a conversation with another copy of the emulator as the DDE server using the topic ECL. The command sent to the server runs the command file TEST.ECF. DDE POKE DDE POKE variable “item name” “value” Where: Variable is the conversation number returned by the DDE CONNECT command. “Item name” is a string expression that specifies the data item to change. “Value” is a string expression containing the data to send to the server. Sends “value” to the named item in the server application of the specified conversation. This command sets the server’s item to a specified value. Example: DDE POKE ‘CONV’ “WELCOME” “Hello!” Assumes that CONV refers to a conversation with another copy of the emulator as the DDE server using the ECL topic. The variable WELCOME in the server the emulator is set to a message string “Hello!”. DDE REQUEST DDE REQUEST variable1 “item name” variable2 Where: Variable1 is the conversation number returned by an earlier DDE CONNECT command. “Item name” is a string expression that tells the server what data item is being requested. Variable2 specifies the variable to receive the value of the data item. Requests the value of the item from the server application, and stores the value of that data item into the specified variable. This value returned for the item may be an empty string if the DDE REQUEST command fails. Example: DDE REQUEST ‘CONV’ “WELCOME” RESULT Assumes that CONV refers to a conversation with another copy of the emulator as the DDE server using the ECL topic. The DDE_REQUEST command retrieves the contents of the variable WELCOME from the server and places the value in the emulator‘s variable RESULT. 138 DDE UNADVISE DDE UNADVISE variable “item name” Where: Variable1 is the conversation number returned by an earlier DDE CONNECT command. “Item name” is a string expression that tells the server what Advise Data Link is to be terminated. Removes an existing Advise Data Link for the specified item. Example: DDE UNADVISE ‘CONV’ “COUNT” Assumes that CONV refers to a conversation with another copy of the emulator as the DDE server using the ECL topic, and that an advise-link exists to its variable COUNT. The DDE UNADVISE command removes the Advise-Data Link. Related topics: DDE ADVISE DDE TOPICS DDE TOPICS “service name” “topic name” variable Where: “Service name” is a string expression that corresponds to a DDE server application name. An empty string (“”) can be used as a wildcard to find all DDE server applications. “Topic name” is a string expression that corresponds to the desired DDE conversation topic. An empty string (“”) can be used as a wildcard to find the DDE conversation topics. Variable specifies the variable to receive the server/topic list. Builds a tab-separated list of DDE server application(s) and topic(s) that are currently running. This list only contains the server applications that match the name and name specification parameters. The list is stored into the specified variable as a string, and is empty if a match is not found. Example 1: DDE TOPICS “” “” TLIST Creates a list of all DDE server applications that are currently running and places this list into the variable TLIST. Example 2: DDE TOPICS “” “SYSTEM” TLIST Stores a list of all DDE servers that support the System topic into the variable TLIST. Chapter Seven - Command Language 139 DELAY DELAY [dd:hh:mm:]ss Delays the specified amount of time. All of the fields are optional with the exception of seconds. Maximum value is 99:23:59:59. DELAY is intended for command file use. DELAY does not prevent the emulator from accepting emulator commands sent from the host computer using a DCS private control sequence. Valid options: /NODISPLAY Data received from the host is not displayed on the screen during the delay period. /NOMESSAGE Disables display of the delay message. Example 1: DELAY 5 Delays command file execution for five seconds. Example 2: @LOGIN DELAY/NODISPLAY 5 WRITE HOST “ACCOUNTING” EXIT Automatically logs a user in, prevents all login messages from displaying on the screen and starts an accounting application on the host. Example 3: LOG/OPEN SYSLOG.LOG DELAY/NOMESS 23:59 LOG/CLOSE SYSLOG.LOG Creates the SYSLOG.LOG file on the PC. Captures information for one day and closes the file. DELETE SYMBOL DELETE SYMBOL symbol-name Deletes a symbol name from the local and/or global symbol table. The symbol name is required. Wildcarding is supported. The default is /LOCAL. Valid options: /GLOBAL Deletes the symbol name from the global symbol table. /LOCAL Deletes the symbol name from the local symbol table. 140 Example 1: DELETE SYMBOL *A Deletes all the local symbols that end with “A”. Example 2: DELETE SYMBOL/GLOBAL VARI?? Deletes all the six letter global symbols that start with “VARI”. DISPLAY DISPLAY [[row,column]] [string-expression] Where: string-expression is a quoted string, lexical, symbol, or combination of the above joined by plus signs (+) (i.e., “string” + symbol). Displays single or multiple lines of text to the screen. DISPLAY can process terminal escape sequences, lexicals, and symbols as part of the string expression. The terminal escape sequence is processed by the selected terminal type when displaying the emulation window. An initial cursor position can be optionally specified in brackets [ ] immediately following the DISPLAY command. If specified, the cursor moves to the position indicated before the string displays. Specifying a cursor position of 0 for the row or column positions the cursor at the current row or column position. By default, data is output to the emulation window. Data can be displayed on the status line or to a dialog box by by using the /STATUS and /DIALOG options. DISPLAY will send a carriage return and line feed unless the /NOCR option is used. Note: Using cursor positioning while outputting data to the status line produces unusual results. Valid options: /DIALOG Displays the text defined by the string-expression in a dialog box. /NOCR Do not send a carriage return and line feed. /STATUS Displays the text defined by the string-expression on the Status Line. Example 1: DISPLAY “Hello there” Displays Hello there at the current cursor position. Example 2: DISPLAY [0,40] “Hello there” Displays Hello there at the current row, column 40 on the screen. Example 3: DISPLAY or DISPLAY “” Outputs a carriage return and line feed at the current cursor position. Chapter Seven - Command Language 141 Example 4: DISPLAY /DIALOG “This is a message to the user.” This example would yield the following dialog box. Note: The D$BLOCK lexical is not supported with the /DIALOG option. Example 5: ! ... Additional commands DISPLAY/NOCR “<CSI>0;0|” DISPLAY/NOCR “<CSI>0;2|” ! enable user def. status line ! erase status line ! status line message DISPLAY/NOCR “<CSI>0;3;20| Press ABORT to exit” ! ... Additional commands This example uses DEC terminal escape sequences. Example 6: DISPLAY/STATUS “<ESC>[?3h” + “132 columns” Sets the screen to 132 column mode, and displays “132 columns” on the status line. Related topics: INQUIRE, Special Features DOS DOS [DOS command string] Executes the DOS command string and returns to the emulator. If a DOS command string is unspecified, the DOS shell window appears. Any valid DOS command can be entered in the DOS shell window. To exit from DOS, type EXIT followed by a carriage return. If a DOS command string is specified, the emulator executes the DOS command and holds the DOS screen. Pressing any key returns closes the DOS shell window and returns to emulation mode. When the DOS command is issued by the host computer or from a command file, the emulator automatically returns to emulation mode without waiting for keyboard input. Symbols can be used to assign DOS command strings to a more convenient form. For example, DIR :== “DOS DIR” creates an emulator command that lists DOS directories. 142 Valid options: /NOWAIT When specified interactively, the DOS screen is not held until a key is pressed. The DOS command executes and returns to the emulator without pausing. It has no effect when used in a command file. Example 1: DOS TYPE READ.TXT Executes the DOS command TYPE and displays the file READ.TXT in a DOS window. Example 2: TYPE :== “DOS TYPE” TYPE READ.TXT Creates an ECL command TYPE, then displays the DOS file READ.TXT in a DOS window. Example 3: DOS/NOWAIT DEL TEST.LOG Switches to a DOS window, deletes the TEST.LOG file, and returns to emulation mode. DROPDTR DROPDTR milliseconds Drops the DTR (Data Terminal Ready) and RTS (Request to Send) lines for the number of milliseconds specified. If milliseconds is zero or missing, DTR and RTS will be dropped permanently. EMULATE EMULATE [match-string-expression] Puts the emulator into emulation mode from a command file. If emulation mode has been entered from a command file, pressing EXIT returns to the calling command file rather than to Windows. The EMULATE command can be used with the ON DISCONNECT command to enter emulation mode and return to a command file when the connection is lost or the user logs out. Valid options: /CASE Force case sensitivity for the return string comparison. /CASE is invalid when used without the /RETURN_STRING option. /LABEL=label Resume execution of the command file at the specified label. /LABEL is invalid when used without the /RETURN_STRING option. Chapter Seven - Command Language 143 /RETURN_STRING = [match-string-expression] Allows a command file to enter emulation mode and returns control to the command file when a specific string occurs. This option is an alternate form of [match-string-expression] argument. If both strings are used, the first string following the EMULATE command takes precedence. Allows a command file to enter emulation mode and return control to the command file when a specific string occurs. Execution of the command file resumes at the line immediately following the EMULATE command unless the /LABEL option is used. Example: 50: 100: SET DISCONNECT ON DISCONNECT THEN GOTO 100 EMULATE EXIT/EM !USER LOGGED OUT !CONNECTION LOST DISPLAY “ATTEMPTING TO RECONNECT” @RECONNECT IF $STATUS GOTO 50 DISPLAY “UNABLE TO RECONNECT” EXIT/EM Monitors connect status. If the connection is lost the command file tries to reconnect. END INTERACTIVE ENDINTERACTIVE (no arguments) Terminates interactive mode. This command is not used in command files. Related topics: INTERACTIVE ERASE SCREEN ERASE SCREEN (no arguments) Erases the screen. Example: ERASE SCREEN DISPLAY [10,20] “1. Connect Session 1" DISPLAY [11,20] ”2. Connect Session 2" DISPLAY [13,20] “3. Exit emulator” INQUIRE [14,20] “Enter menu option number: ” ... Erases the screen before displaying a menu and sends the cursor to Row 1, Column 1. Related topics: CLS 144 EXIT EXIT [specific-error] Where: specific-error is an error code, quoted mnemonic identifier, or symbol. (i.e., EXIT $STATUS) Terminates processing of the current command file. EXIT’s behavior differs, depending on the mode of usage (interactive or command file mode). If used in interactive mode without an error parameter, the emulator exits to Windows. If used with a parameter, the message associated with the error parameter displays, and no other action is taken. If used within a command file without a parameter, EXIT passes the error status to the calling routine. If error checking is enabled and an error parameter is provided, EXIT prints the associated error message. EXIT passes the status and severity codes of the error to the symbols $STATUS and $SEVERITY. It also saves the mnemonic for the error in the symbol $STATUSID and the full error message in F$MESSAGE. If the error message has displayed, bit 15 of the $STATUS symbol is set to 1. If EXIT is issued from a command file while in emulate mode, emulate mode is exited and the next command is executed. Valid options: /EM Exit the emulator and return to Windows with the corresponding $STATUS code passed to ERRORLEVEL. An exit to Windows leaves the modem control signals active. Refer to the DOS ERRORLEVEL topic for more information. Example 1: EXIT Exits the emulator and returns to Windows. Example 2: LOG FILELIST DELAY 1:00: 00 LOG/CLOSE EXIT ! Create FILELIST.LOG file ! Delay 1 hour ! Close log file ! Exit to emulation mode Opens FILELIST.LOG, captures host information for 1 hour, closes the log file, and exits. Example 3: @SET HOST /DISCONNECT DELAY/NOMESSAGE 2 EXIT/EM Disconnects from the host, hides all messages and exits the emulator. Related topics: ON, SET ABORT, SET DEVICE_ERROR, SET DISCONNECT, SET ON, Error Facility, SET MESSAGE Chapter Seven - Command Language 145 FILE FILE operation protocol filename Where: Operation is SEND or RECEIVE. Protocol is one of the available protocols: ASCII, KERMIT, XMODEM, YMODEM, or ZMODEM. Filename is the name of the file to transfer. Performs a file transfer using the specified protocol. Valid options: /RENAME Used with RECEIVE to rename incoming files if they would replace an existing file. FLUSH FLUSH (no arguments) Empties the emulator receive buffer to the screen. Used to insure that all data received from the host has been removed from the receive buffer and displayed on the screen. Related topics: WAIT GOSUB GOSUB label_name Transfers execution to a subroutine label located within the command file. Use the RETURN command to exit the subroutine and resume execution in the calling routine. The calling routine continues at the line following the GOSUB command. (Usable in command procedures only.) Related topics: ON, IF, Labels, RETURN GOTO GOTO label-name Transfers program control to the statement following the specified label. (Used in command procedures only.) Related topics: ON, IF, Labels 146 HELP HELP [keyword] Displays useful information about emulator operation, key assignments, features, and commands. Specifying HELP without a keyword displays Help - Index. IF (CONDITIONAL) IF condition THEN statement Tests the value of an expression and executes the statement following the THEN keyword if the test is TRUE. If FALSE, THEN is ignored, and execution continues with the next command line. The expression is true if the result: 1) Has an odd integer value between 2147483647 and -2147483648. 2) Has a character string value that begins with any of the letters Y, y, T, or t. 3) Has an odd numeric string value between “2147483647" and ”-2147483648". The expression is false if the result: 1) Has an even integer value between 2147483647 and -2147483648. 2) Has a character string value that begins with any letter except Y, y, T, t. 3) Has an even numeric string value between “2147483647" and ”-2147483648". Rules: 1) Symbols used in IF condition expressions are automatically substituted. 2) String comparison operators end in the letter S (.EQS., .LES., .GTS., etc.). Integer comparison operators do not end in the letter S (.EQ., .LE., .GT., etc.). 3) String comparisons are case sensitive. Therefore, CASE and case are considered unequal. To inhibit case sensitivity, create the symbol using an implied literal string (:). The string converts to all caps, and can then be compared. (e.g., in the assignment upper := case, the value of upper is converted to CASE.) Example 1: COUNT = 0 LOOP: COUNT = COUNT + 1 ... IF COUNT .LE. 10 THEN GOTO LOOP This routine loops 10 times. Example 2: INQUIRE ANS “Want to continue [Y/N] (D:N)” IF .NOT. ANS THEN EXIT This routine exits unless ANS = Y. Related topics: Symbols, Lexicals, Error Facility Chapter Seven - Command Language 147 INQUIRE INQUIRE[[row,column]] symbol-name [prompt-string] Where: prompt-string is a quoted string, lexical, symbol, or combination of the above joined by plus signs (+) (i.e., prompt-string = “string”+symbol). Outputs a prompt string and waits for input. The input string is stored in the symbol-name specified. By default, the symbol-name is a local symbol. To make the symbol global, use the /GLOBAL qualifier. Like the DISPLAY command, the INQUIRE command can process terminal escape sequences, lexicals, and symbols in the prompt string. An initial cursor position can be specified in brackets [ ] immediately following the command. If specified, the cursor moves to the position indicated before the prompt string displays. Specifying a position of 0 for the row or column positions the cursor at the current row or column on the screen. By default, INQUIRE uses the screen. However, INQUIRE uses the status line when the /STATUS option is used. Note: Using cursor positioning while outputting data to the status line or dialog box can produce unusual results and should be avoided. INQUIRE will not send a carriage return or line feed unless it is placed within the prompt string or the /CR option is used for a single line of text. Valid options: /CASE By default, INQUIRE/KEY is not case sensitive. It does not return the S^ indicator with the key names for alphanumeric keys. Specifying /CASE returns the S^ indicator with uppercase alphanumeric keys. /CASE is only meaningful when used with the /KEY option. /CR Send a carriage return at the end of the prompt string. /DIALOG symbol-name [prompt-string] Prompts the user for input from a dialog box rather than from the text emulation window. The user supplies a symbol name and a prompt string. The dialog box displays the prompt string and an edit field in which the user can type the symbol value. /GLOBAL The symbol name is defined as global. /KEY Reads a single keystroke and returns its ASCII key name. The name returned is the same name displayed when the key is pressed in Scan mode. Key remapping is disabled when /KEY is used. /KEY is useful for obtaining a single PC keystroke, such as an arrow key. /LOCAL The symbol name is defined as local. This is the default INQUIRE condition. 148 /MAX=count Sets the maximum character count for an INQUIRE input line. If the input data exceeds the max count, the extra characters are ignored. The input line is not terminated until a carriage return is entered unless the /TERMINATE option is specified. /NOECHO Input data is not echoed to the screen. /STATUS Send the prompt string to the status line. /TERMINATE Used with the /MAX option to allow an input line to be terminated when the maximum character count is reached. When /TERMINATE is specified, the input line terminates on a carriage return or when the maximum number of characters has been entered. /TERMINATE has no meaning when used without the /MAX option. Example 1: INQUIRE NUMBER “Enter modem phone number to dial: ” WRITE HOST “ATDT’’NUMBER’” WAIT/TIME_OUT=30/ERROR=LATER “CONNECT 2400" @LOGIN EXIT LATER: DISPLAY ”There is no modem connection, try later." EXIT Requests the phone number from the user. The modem is then dialed. If there is a connection, the user is automatically logged in. If the TIME_OUT criteria is met, then an informational message is displayed and the command file is exited. Example 2: TIME_STR="Enter Time:" INQUIRE/GLOBAL [5,0] TIME TIME_STR Positions cursor at the 5th line and current column and displays the prompt “Enter Time:”. The user input string is stored in the global symbol TIME. Example 3: 50: 100: INQUIRE/KEY KEYSTROKE “<CR><LF>Enter Up Arrow Key” IF KEYSTROKE="UP" THEN GOTO 100 GOTO50 DISPLAY “<CR><LF>You just pressed the Up Arrow Key” Prompts the user to press the Up Arrow key. The name of the key pressed is stored in KEYSTROKE. A message is displayed once the correct key is pressed. Otherwise, it loops to the beginning for another key press. Chapter Seven - Command Language 149 Example 4: INQUIRE /DIALOG THEVAR “This is the prompt string” This example would yield the following dialog box. Note: The D$BLOCK lexical is not supported with the /DIALOG option. Example 5: WAIT/TIME_OUT=30 “Username:” WRITE HOST “SMITH” WAIT/TIME_OUT=30 “Password:” INQUIRE/LOCAL/NOECHO PASS “Enter your password: ” WRITE HOST “’’PASS’” PASS = “” EXIT Starts the login process for SMITH, then prompts the user for the password. Stores user entry in PASS and sends it to the host. Exits to emulation mode. By defining PASS as a local symbol, it is removed when the exit occurs. Example 6: INQUIRE/GLOBAL/NOECHO PASSWD “Password: ” Displays the prompt string “Password:” on the screen. The input string is stored in the global symbol PASSWD. The input string is not echoed when it is entered. Example 7: INQUIRE/STATUS TIME “World time: ” Outputs World time: to the status line and stores the input string in the local symbol TIME. Related topics: DISPLAY, Display functions, Lexicals, Symbols INTERACTIVE INTERACTIVE (no arguments) Sets interactive command mode. Interactive mode is used to enter consecutive commands without clicking Execute - Command Line each time. This command has little meaning in command files. To cancel interactive mode, enter the ENDINTERACTIVE command. Related topics: ENDINTERACTIVE 150 KERMIT KERMIT [kermit command string] Enters Kermit mode. If a command string is not specified, the KERMIT> prompt appears. If a string is specified, the emulator enters Kermit mode, issues the command and returns to emulation mode. Example: WRITE HOST “KERMIT” WRITE HOST “SET FILE TYPE BINARY” WRITE HOST “SERVER” KERMIT SEND/END TEST.EXE WRITE HOST WRITE HOST “EXIT” Automatically sets the host Kermit for a binary file transfer, uploads the PC file, TEST.EXE, and exits the host Kermit mode. KERMIT BYE KERMIT BYE (no arguments) Tells the remote server to logout. The emulator terminates the host session and exits. KERMIT CONNECT KERMIT CONNECT (no arguments) Exits from emulator Kermit mode and returns to host Kermit mode. Does not send any commands to the host Kermit. (Equivalent to pressing Kermit while in host Kermit mode.) KERMIT DOS KERMIT DOS [DOS cmd string] Displays an DOS Shell window. If a DOS command string is not specified, an active DOS shell window appears. Any valid DOS command can be entered in the DOS shell window. To return to emulation mode, type EXIT. If a DOS command is specified, an active DOS Shell window displays the result of the command. Click on the X in the upper right corner of the window and select close to return to emulation mode. When a DOS command is issued by the host computer or from a command file, the emulator automatically returns without waiting for keyboard input. Chapter Seven - Command Language 151 KERMIT END KERMIT END (no arguments) Tells the host server to exit and returns to emulation mode. The host returns to the KERMIT> prompt or to the system prompt. The action taken depends on the host Kermit implementation. KERMIT EXIT KERMIT EXIT (no arguments) Exits the emulator. EXIT does not send any command to the host Kermit. KERMIT FINISH KERMIT FINISH (no arguments) Tells the host server to exit. The Emulator remains in Kermit mode. The host returns to the or to the system prompt. The action taken depends on the host Kermit implementation. KERMIT> prompt KERMIT GET KERMIT GET [switches] source file [destination file] Sends a GET command to the server. This causes the server to send the file or files matching the source file specification to the PC. The destination file specification is optional. If supplied, the source file is renamed to the destination filename on the PC. The destination filename can include a path specification. Multiple files can be received with one GET command by separating the filenames with commas or by using wildcards. Valid options: /END Terminates host server mode and returns to emulation mode after successful file transfer. /EOF Stores a DOS EOF (Ctrl Z) as the last character of the files transferred. /LOGOUT Terminates the host session and returns to emulation mode after successful file transfer. Examples: GET *.DAT \DATA\*.* GET *.DAT \DATA\ GET *.DAT \DATA Transfers all .DAT files from the host to the \DATA subdirectory. 152 KERMIT LOGOUT KERMIT LOGOUT (no arguments) Same as the BYE command. KERMIT RECEIVE KERMIT RECEIVE [switches] [d-file] Receives files from a host running Kermit in non-server mode. Before a RECEIVE command can be issued, the SEND command must be given to the host Kermit. Wildcarding is supported. When using wildcards in the host SEND command, do not specify a destination filename. A destination filename is only required if you wish to rename the host file being sent. Valid options: /EOF Store a DOS EOF (Ctrl Z) as the last character of the file. Examples: RECEIVE Transfers all files sent to the default file transfer directory as specified in Setup - General Directories. RECEIVE \DATA\ Transfers all files sent to the PC’s \DATA subdirectory. When using the RECEIVE command, you must include the trailing backslash (\) on the path specification. KERMIT SEND KERMIT SEND [switches] source file [destination file] Sends the source files specified to the host Kermit program. Works with server or non-server Kermit programs. If the host Kermit program is not in server mode, the RECEIVE command must be issued to the host Kermit program before issuing the SEND command. The file sent can be renamed or sent to a particular directory on the host computer by supplying the optional destination field. Wildcarding is supported. If host directory strings are used in destination file specification, the host Kermit program should not translate filenames received from the PC. To disable filename translation, issue the following command to the host Kermit: SET FILE NAMING LITERAL Note: This is the VAX/VMS syntax for the command. Its syntax may vary on other systems or it may not be supported. Chapter Seven - Command Language 153 Valid options: /END Terminates host server mode and returns to emulation mode after successful file transfer. /LOGOUT Terminates the host session and returns to emulation mode after successful file transfer. /NOEOF Do not send an EOF (Ctrl Z) character to the host even if Ctrl Z is in the DOS file. Example: SEND *.DAT [TEST] Transfers all .DAT files to the [TEST] subdirectory on a VMS host. LOG LOG filename Opens an emulator log file. A log file captures all data received from the host. If the file exists and /OVERWRITE or /APPEND is not specified, an error results. The default is /OPEN. The default extension is .LOG. Valid options: /APPEND Open a log file and append the log data to the end of file. If no file exists, one is created. /CLOSE Close the previously opened log file. The filename is not required. /OPEN Create a log file. /OVERWRITE Open a log file and overwrite any old copies. If no file exists, one is created. /PROMPT Displays the interactive log file prompt. If logging is already enabled, LOG/PROMPT closes the log file and disables logging. If /PROMPT is used, any other option on the command line is ignored. Example 1: LOG TEST Creates log file TEST.LOG. If TEST.LOG already exists, an error occurs. 154 Example 2: INQUIRE TIME “ENTER CURRENT DATE AND TIME: ” OPEN/WRITE ERRORS ERRMESS.LOG WRITE ERRORS TIME CLOSE ERRORS LOG/APPEND ERRMESS.LOG WRITE HOST “@BUILD” WAIT “$” LOG/CLOSE ERRMESS.LOG Creates a log file with a date and time stamp which captures error messages generated from running a VMS COM file. Example 3: LOG/CLOSE Closes the log file. Example 4: LOG/OVER TEST Opens TEST.LOG and overwrites any old copies. Example 5: WRITE HOST “MAIL” WRITE HOST “READ” LOG/TEXT MAIL WRITE HOST “EXIT” Captures a host mail message into a MAIL.LOG file. ON ABORT ON ABORT THEN statement Defines the course of action when a command file is aborted. The specified action is taken only if the command processor is enabled for abort error checking. Abort error checking is enabled (SET ABORT) by default. An ON ABORT action remains in effect until one of the following occurs: o o o The command procedure exits, which resets to the ON ABORT condition previously specified. Another ON ABORT command is executed. The procedure executes the SET NOABORT command. The default error condition is ON ABORT THEN STOP. If an ABORT action is specified, it overrides actions specified for previous levels, and sets the default action for any following sublevels to EXIT. The error codes and mnemonic identifier are stored in the global symbols $STATUS, $SEVERITY, and $STATUSID, even if error checking is disabled (SET NOABORT). Related topics: SET ABORT Chapter Seven - Command Language 155 ON DEVICE_ERROR ON DEVICE_ERROR THEN statement Defines the course of action when an error occurs from a peripheral device, such as a printer or a plotter. The action is taken only if device error checking is enabled (SET DEVICE_ERROR). By default, device error checking is disabled (SET NODEVICE_ERROR). An ON DEVICE_ERROR action remains in effect until one of the following occurs: o o o The command procedure exits, which restores the previous ON DEVICE_ERROR condition. Another ON DEVICE_ERROR command is executed. The procedure executes the SET NODEVICE_ERROR command. The default error condition is ON DEVICE_ERROR THEN STOP. If a DEVICE_ERROR action is specified, it overrides the actions specified for previous levels and sets the default action for any following sublevels to EXIT. When errors occur, the error codes and mnemonic identifier are stored in the global symbols $STATUS, $SEVERITY, and $STATUSID, even if error checking is disabled (SET NODEVICE_ERROR). Related topics: SET DEVICE_ERROR ON DISCONNECT ON DISCONNECT THEN statement Defines the course of action when the communications connection is lost. The action is taken when the disconnect occurs. When using an RS232 Serial connection, the Carrier Detect signal is monitored to determine the state of the connection. However, if Modem Control is disabled in the Port Setup dialog box, the state of the connection is not monitored. When running over a network, the state of the network virtual circuit is monitored. The specified action is taken only if disconnect error checking is enabled (SET DISCONNECT). By default, disconnect error checking is disabled (SET NODISCONNECT). An ON DISCONNECT action remains in effect until one of the following occurs: o o o The command procedure exits, which restores the previous ON DISCONNECT condition. Another ON DISCONNECT command is executed. The procedure executes the SET NODISCONNECT command. The default error condition is ON DISCONNECT THEN STOP. If a DISCONNECT action is specified, it overrides actions specified for previous levels, and sets the default action for any following sublevels to EXIT. When errors occur, the error codes and mnemonic identifier are stored in the global symbols $STATUS, $SEVERITY, and $STATUSID, even if error checking is disabled (SET NODISCONNECT). Related topics: SET DISCONNECT 156 ON (ERROR_SEVERITY) ON error_severity THEN statement Defines the course of action taken when an error occurs that is equal to or greater in severity than the specified error. The default error condition is ON ERROR THEN EXIT. This condition tells the command process to CONTINUE when a WARNING error occurs, and execute an EXIT command when an ERROR or SEVERE_ERROR condition occurs. The action is taken only if error checking is enabled (SET ON). Error checking is enabled by default. These keywords are listed in order of severity and summarize how the command controls error handling: WARNING The action is performed if a WARNING, ERROR, or SEVERE_ERROR occurs. ERROR The action is performed if an ERROR, or SEVERE_ERROR occurs. Does not affect the handling of warning errors. SEVERE_ERROR The action is performed if a SEVERE_ERROR occurs. Does not affect the handling of warning and error conditions. An ON command action is executed only once. After the ON command action is taken, the ON action is reset to the default (ON ERROR THEN EXIT). An ON command action can be specified for each active command level. The ON command action applies only within the command procedure in which it is executed. Upon exiting a command procedure, the prior ON error conditions are re-established to their previous settings. The error codes and mnemonic identifier are stored in the global symbols $STATUS, $SEVERITY, and $STATUSID, even if error checking is disabled (SET NOON). Note: If the command file contains a GOTO command to a non-existent label, an EXIT command executes, regardless of the current ON ERROR assignment. Related topics: SET ON OPEN OPEN logical-name[:] file-specification Where: logical-name is the name used by other commands to reference the open file. file-specification is the file to open and can include a full path name if desired. The default file extension is .DAT. Opens a file for read, write, or append operations and assigns a logical name to the file. This command must precede a READ or WRITE command for file access. The file stays open until the CLOSE command is executed or an application exit occurs. If the command file terminates before the opened file is closed, the file remains open. The same file may be referenced by several open statements. However, each open statement must use a different logical name. Note: The logical name HOST does not have to be opened before reading or writing. Chapter Seven - Command Language 157 Valid options: /APPEND Opens an existing file for write, starting at the end of the file. If the file does not exist, it is created. If the /READ option is included with /APPEND, the file must already exist. If the file does not exist, an error occurs. /ERROR=label Continues the process at the label if an error occurs. /READ Opens an existing file for read only and sets the file data pointer to the beginning of the file. This is the default for the OPEN command. /WRITE Creates a new file for write only. If the file already exists, it is overwritten when the first WRITE occurs. If the /READ option is included with /WRITE, an existing file is opened at the beginning of the file. The file must already exist, otherwise an error occurs. If the /APPEND option is used with /WRITE, the /WRITE option is ignored. Example 1: OPEN FILE2 DATA.TXT Assigns DATA.TXT to the logical FILE2, and opens the file named DATA.TXT for reading. An error results if the file does not exist. Example 2: TOP: INQUIRE/STATUS FILE “Enter the data file name:” OPEN/READ/APPEND/ERROR=ERR DATA ‘FILE’ @PROCEDURE CLOSE DATA DISPLAY “’’FILE’ has been updated.” EXIT ERR: DISPLAY “’’FILE’ does not exist” GOTO TOP Checks for the filename entered by the user. If the file exists, PROCEDURE.ECF is run. If the file does not exist, an error message displays and the command file runs again. Example 3: OPEN/WRITE FILE1 C:\EM320\TEST.DAT Assigns TEST.DAT to the logical FILE1, and creates a file named TEST.DAT for writing. Related topics: CLOSE, READ, WRITE 158 PRINT CLOSE PRINT CLOSE (no arguments) Closes the open printer, flushes the page and sends the document to the spooler to be printed. PRINT EJECT PRINT EJECT (no arguments) Ejects a page on the printer. PRINT ON/OFF PRINT on/off Turns auto print mode on or off. In auto print mode, every line sent to the screen is also sent to the printer. Valid options: /CONTROLLER on/off Sets printer controller mode in which data passes directly to the printer without displaying on the screen. Use the /CONTROLLER options to print lines longer than 132 columns to pass control characters. PRINT SCREEN PRINT SCREEN (no arguments) Prints the screen (text screen). PRINT SCROLLBACK PRINT SCROLLBACK Prints the text in scrollback memory plus the current screen. PRINT SELECTED PRINT SELECTED Prints the current selection. Chapter Seven - Command Language 159 QUIT QUIT [specific-error] Where: specific-error is a quoted mnemonic identifier, error code or a symbol (e.g., EXIT $STATUS). Works exactly like EXIT except that it drops the modem control signals. See EXIT for a description. Valid options: /EM Quit the emulator and return to DOS with the corresponding $STATUS code passed to ERRORLEVEL. See the DOS ERRORLEVEL topic for more information. READ READ logical-name[:] symbol-name Where: logical-name is the logical name assigned by an OPEN command or the HOST logical. Reads an ASCII record from the logical into the specified symbol. If the READ command references a DOS file, the file is read a record at a time. After each read, the file data pointer is positioned to the start of the next record. The maximum record size is 255 characters. Records are terminated by carriage returns. READ is not intended for use with binary files. Valid options: /END_OF_FILE=label Control transfers to the label when the end of the file is detected. If /END_OF_FILE is not used, and the EOF character is encountered, the process continues at the /ERROR label specified. If neither option is specified, and the EOF character is encountered, the current ON condition is taken. Valid only with a DOS file logical. /ERROR=label If an error occurs, control is transferred to the label specified. If /ERROR is not used, the current ON condition action is taken. Related topics: OPEN, WAIT, WRITE 160 READ HOST READ HOST Reads an ASCII record from the currently connected host into the specified symbol. Valid options: /ERROR=label If an error occurs, control is transferred to the label specified. If /ERROR is not used, the current ON condition action is taken. /NODISPLAY Does not display data as it is read. Valid only with the HOST logical. /TIME_OUT=[hh:mm:]ss Waits for data until the time specified. Valid only with the HOST logical. A timeout error occurs if no data is received from the host within the specified time. /TIME_OUT and /ERROR can be specified simultaneously to redirect command execution. Related topics: OPEN, WAIT, WRITE READ SCREEN READ SCREEN [row,col] Symbol-name Where: row is the row of the screen to read. col is the solumn of the screen to start reading. If col is not specified, column 1 is used. Reads a specific row of text from the screen into the symbol. Example: READ SCREEN [1,10] TEXT Reads all the text on line 1 of screen, starting at column 10, into the variable text. Chapter Seven - Command Language 161 REPLAY REPLAY filename Replays an emulator log file. The filename can contain a full path specification and has a default extension of .LOG. Refer to the Log File Replay topic for more information. Valid options: /PROMPT Displays the log file prompt. Example: DISPLAY/NOCR “<CSI>0;0|” DISPLAY/NOCR “<CSI>0;3;20|Press Alt A to end demonstration.” COUNT=0 TOP: CLS DISPLAY [5,10] “This demo shows application menus.” REPLAY MENU1.LOG DELAY/NOMESS 10 REPLAY MENU2.LOG DELAY/NOMESS 10 !... additional replay commands COUNT = COUNT + 1 IF COUNT .LT. 10 THEN GOTO TOP DISPLAY/NOCR “<CSI>0;1|” EXIT Runs a repeating demonstration program of application menu log files. The user-defined status line is used for messages. Related topics: LOG 162 RETURN RETURN (no arguments) Used to return from a subroutine called by the GOSUB command. Valid only with the GOSUB command. Related topics: GOSUB SCAN SCAN (no arguments) Enters keyboard scan mode. In scan mode, pressing a key displays its key name. Scan mode is useful for identifying key names. SEND SEND filename Sends an ASCII text file to the host. Flow control to the host is provided through character delay (SET CDELAY), line delay (SET LDELAY) and use of the turnaround character (SET TURNAROUND). Valid options: /ANSWERBACK Send the answerback message specified in the Setup - Terminal dialog box to the host. Since the answerback message can be concealed, store your password in the answerback message when automatically sending it to the host in a command file. Note: SEND/ANSWERBACK cannot be used with any other qualifiers. /EOF Sends an End of File marker at the end of the file. Ctrl Z is the default. The SET EOF command can be used to change the EOF character sent. To send an EOF character without sending data from a file, use SEND/EOF without specifying a filename. /FILTER Removes control characters. Note: Filter will not pass CR, LF, VT, HT, and ESC . Chapter Seven - Command Language 163 /LINEFEED Normally, the emulator does not send line feeds that are immediately preceded by a carriage return. If the /LINEFEED option is specified, all line feeds in the file are sent to the host. /NOMESSAGE Supresses the defaultmessage: “Sending <filename>”. Related topics: SET CDELAY, SET EOF, SET LDELAY, SET TURNAROUND, WRITE. SESSION SESSION NAME Where: Name is the same session name that is defined in the Session Manager. If the session name contains spaces, enclose the name in double quotes (“). Starts an emulator session that is defined in the Session Manager. SET [NO]DDEAUTOINITIALIZE SET [NO]DDEAUTOINITIALIZE (no arguments) Sets the DDE auto initialize feature to on or off. When enabled, the emulator automatically enables itself as a DDE server and broadcasts its name to other Windows applications. SET [NO]DDEAPPENDINSTANCE SET [NO]DDEAPPENDINSTANCE (no arguments) Sets the DDE append instance feature to on or off. When enabled, the emulator appends a unique identifier to the end of the server name. This allows the execution of multiple instances of the emulator while still being able to distinguish them as servers. Example: SET DDESERVERNAME “MS320” SET DDEAPPENDINSTANCE Sets the DDE server name for an instance and each subsequent instance. New instances of the emulator automatically append a unique identifier if the Append Unique Identifier option is checked in the DDE Setup dialog box. SET DDECLIENTTIMEOUT SET DDECLIENTTIMEOUT seconds Sets the timeout value, in seconds, for the DDE client commands. 164 SET DDESERVERNAME SET DDESERVERNAME “Server Name” Sets the name that the emulator responds to as a DDE server. Clients use this string as the “Service Name” when performing a DDE connect transaction. This value is linked to the Server Name option in the DDE Setup dialog box. Example: SET DDESERVERNAME “MS320” Sets the DDE server name to “MS320” When changing the server name, the emulator disconnects the instance with the old server name, and reconnects with the new server name. Note: Any active conversations with the old server name are terminated. SET ABORT SET [NO]ABORT (no arguments) Enables or disables error checking of Execute - Abort during execution of a command procedure. The SET NOABORT command disables abort error checking and resets the ON ABORT error condition to STOP. The error codes and mnemonic identifier are still updated in the global symbols $STATUS, $SEVERITY, and $STATUSID. The SET ABORT and SET NOABORT commands apply to all command procedure levels. SET ABORT is the default. (Usable in command procedures only.) Note: SET NOABORT is not recommended - it can prevent a normal exit from a command procedure. If a command procedure began to loop uncontrollably, it could not be aborted. Example: SET NOABORT LOG SYSMESS DELAY 15:00:00 LOG/CLOSE Logs all data from the host into SYSMESS.LOG on the PC for 15 hours, say 5pm to 8am. If the command file is aborted, the log file remains open. Related topics: ON ABORT Chapter Seven - Command Language 165 SET CHARACTER DELAY SET CDELAY ms Sets a character delay for the SEND and WRITE commands. The emulator delays the specified number of milliseconds after sending each character. Specify a character delay to slow down the data rate to prevent overrunning the host’s terminal buffer. The default value is zero. Maximum value is 255 ms. Related topics: SEND File, SET LDELAY, SET TURNAROUND SET DEVICE_ERROR SET [NO]DEVICE_ERROR (no arguments) Enables or disables device error checking. A device error can occur from a peripheral device connected to the serial or parallel port, such as a printer or a plotter as a result of an emulator command. Device errors not associated with emulator functions are not monitored. This command disables error checking and resets the ON DEVICE_ERROR condition to STOP. The error codes and mnemonic identifier are still updated in the global symbols $STATUS, $SEVERITY, and $STATUSID. The SET DEVICE_ERROR and SET NODEVICE_ERROR commands apply to all command procedure levels. SET NODEVICE_ERROR is the default. (Usable in command procedures only.) SET DISCONNECT SET [NO]DISCONNECT (no arguments) Enables or disables error checking of the communications connection. Disconnect errors can occur when serial or network connections are lost. This command disables error checking and resets the ON DISCONNECT error condition to STOP. The error codes and mnemonic identifier are still updated in the global symbols $STATUS, $SEVERITY, and $STATUSID. The SET DISCONNECT and SET NODISCONNECT commands apply to all command procedure levels. SET NODISCONNECT is the default. (Usable in command procedures only.) Related topics: ON DISCONNECT SET EOF CHARACTER SET EOF value Where: value is the decimal value of the ASCII character. Ctrl Z (26) is the default. Defines the End of File character sent by the /EOF option of the SEND command. Related topics: SEND File, SET CDELAY, SET LDELAY, SET TURNAROUND 166 SET HOST SET HOST [node-name] Connects to a remote node. The SET HOST command must be used with one of the following: Valid options: /DEFAULT_PORT Connects to the default port selected in the Auto Connect Port dialog box. If the port is set to None or if you are already connected to the default port, an error is returned. /DISCONNECT Disconnects from the currently connected port. /LAST_NODE Connects to the last successfully connected port. If a previous connection did not exist, an error is returned. /PROTOCOL= node Connects to the specified protocol. Where: protocol is SERIAL, MODEM, POLYLAT, WINSOCK, etc,... node is the network node name. /PASSWORD=password Used only with the /PORT option, the /PASSWORD option allows the connect password to be specified. Example 1: SET HOST/SERIAL=COM1 Connects to COM1. Example 2: SET HOST/WINSOCK=WILLY Connects to the WINSOCK node WILLY. Example 3: SET HOST/POLYLAT=MARS Connects to the LAT node MARS. SET KEYMAP SET KEYMAP name Where: name is the name of a keymap. Switches the current keymap to the specified keymap. Chapter Seven - Command Language 167 SET LINE DELAY SET LDELAY secs Sets a line delay for the SEND and WRITE commands. Specifies the time for the emulator to wait after sending a line before sending the next line. The default is zero. Maximum value is 255 seconds. If a line delay and turnaround character is specified, the emulator waits until it receives the turnaround character or the delay expires, whichever occurs first. If SET NOTURNAROUND has been specified, the emulator waits the full delay after each line. Related topics: SEND File, SET CDELAY, SET TURNAROUND, WRITE SET MESSAGE SET [NO]MESSAGE [message_type] Where: message_type is Informational, Warning, Error, or Severe_Error. SET MESSAGE and SET NOMESSAGE enable and/or disable the display of messages. The message_type determines the category of message affected. All messages below or equal to the message_type specified are affected. If no message_type options are provided, SET NOMESSAGE affects all messages. Example: SET NOMESSAGE = WARNING Disables informational and warning messages. SET ON SET [NO]ON (no arguments) Enables or disables error checking. SET NOON disables error checking and error message display. However, the error codes and mnemonic identifier in the global symbols $STATUS, $SEVERITY, and $STATUSID are updated. The SET ON and SET NOON commands apply only to the current command level. If SET NOON is used in a command procedure that calls a second procedure, the default (SET ON) is used while executing the second command procedure. (Usable in command procedures only.) Related topics: ON error_severity 168 SET TERMINAL SET TERMINAL characteristic Sets the terminal characteristics. Valid options: /APPLICATION_KEYPAD Specifies that the keypad keys send application control functions. Limited to DEC terminal emulation modes. /DATA_BITS=bits Where: bits is 7 or 8. Sets the number of communication data bits. The default is 8 bits with parity = none. Limited to Serial communications. /DEVICE=terminal Where: terminal is VT320_7, VT320_8, VT220_7, VT220_8, VT100, VT52, SCO-ANSI, or BBS-ANSI. Selects the terminal to emulate. /[NO]ECHO Controls display of input from the keyboard. If ECHO is set, the data transmitted to the host is locally echoed to the screen. If NOECHO is set, the data is not echoed by the emulator. In NOECHO mode the host is expected to echo the data. NOECHO is the default. ECHO should be set on half-duplex systems. /INSERT Sets the line editing mode to insert. Limited to DEC terminal emulation modes. /LIMITED_TRANSMIT Restricts the transmit speed to between 150 and 180 characters per second. Limited transmit may be necessary for some half-duplex systems. Limited to Serial communications. /LINES=rows Where: rows is 24 - 48. Sets the screen height to the desired number of rows. /LOCAL Sets the emulator to local mode. In local mode, all characters entered from the keyboard are sent to the screen display processor. Data is not sent to the host and data received from the host is ignored. /[NO]MODEM_CONTROL Enables/disables carrier detect monitoring. Modem control should be disabled when using a direct connection. Limited to Serial communications. /[NO]NEW_LINE If enabled, generates a line feed whenever a carriage return is entered. /NUMERIC_KEYPAD Specifies that the keypad keys send numeric control functions. Limited to DEC terminal emulation modes. Chapter Seven - Command Language 169 /ONLINE Allows the emulator to communicate with the host. (Disable with the /LOCAL option.) /OVERSTRIKE Sets the line editing mode to overstrike. New characters entered into the line replace the existing characters. /OVERSTRIKE is the system default. Limited to DEC terminal emulation modes. /PARITY=type Where: type is Odd, Even, Space, Mark or None. Sets the communications parity. Parity = none and Data Bits = 8 is the recommended default. Limited to Serial communications. /PORT=com port Where: com port is COM1, COM2, COM3 or COM4. Selects the communications port. Limited to Serial communications. /FLOW_CONTROL=type Where: type is XON, RTS, or None. Selects the communications flow control protocol. Xon/Xoff is the protocol used by DEC and most other host systems. Limited to Serial communications. /SPEED=baud rate Where: baud rate is 75, 110, 300, 600, 1200, 2400, 4800, 9600, 19200, 38400, 57600, or 115200. Selects the communications speed. Limited to Serial communications. /STOP_BITS=num Where: num is 1 or 2. Sets the number of stop bits for each data word. One is the recommended setting. Limited to Serial communications. /UNLIMITED_TRANSMIT Does not limit the character transmit rate. This is the recommended setting. (The transmit rate can be restricted with the /LIMITED_TRANSMIT option.) Limited to Serial communications. /[NO]WARNING_BELL Enables/disables a warning bell for operating errors and receipt of a Ctrl G. /WIDTH=columns Where: columns is 80 or 132. Sets the screen width to 80 or 132 columns. /[NO]WRAP Controls whether the emulator generates a carriage return and line feed at the end of a line. The end of the line is determined by the /WIDTH option. If /NOWRAP is specified, the characters written at the last column position overwrite each other. /WRAP is the default. 170 SET TURNAROUND CHARACTER SET [NO]TURNAROUND value or quoted string Where: value is the decimal value of the ASCII character or a quoted character. Line Feed (10) is the default. Sets the turnaround character for the SEND command. When a turnaround character is specified, the emulator waits for the turnaround character to be received from the host before sending the next line. Turnaround characters perform flow synchronization and help prevent overrunning the host’s terminal input buffer. If a turnaround character is specified, the SEND operation could hang if a turnaround character is not received. Clicking on Execute - Abort terminates the operation. If a SET LDELAY is specified with the turnaround character, it is used as the maximum time the emulator waits before sending the next line. (Affects the SEND and WRITE command only.) Examples: SET TURNAROUND = 10 SET TURNAROUND = “<LF>” Both commands set the turnaround character to a line feed. Related topics: SEND File, SET CDELAY, SET LDELAY SET VERIFY SET [NO]VERIFY (no arguments) When enabled, displays command lines of a command procedure as they are executed. Also, enables the display of error messages regardless of whether error checking is disabled. The default is SET NOVERIFY. SHOW SYMBOL SHOW SYMBOL [symbol-name] Displays the local and global values for the specified symbol. If no symbol name is given, all the symbols from the local and global symbol table are displayed. Wildcarding is supported; an asterisk (*) may be used for variable length substitution and a question mark (?) for single letter substitution. The default is SHOW SYMBOL /LOCAL/GLOBAL. Note: Although SHOW SYMBOL displays local and global symbols of the same name, the local value of a symbol will override the global value when referenced in a command procedure. Symbol values are displayed on the screen regardless of the message location. Chapter Seven - Command Language 171 Valid options: /GLOBAL Displays the value(s) from the global symbol table. /LOCAL Displays the value(s) from the local symbol table. Example 1: SHOW SYMBOL *A Displays all the symbols that end with “A”. Example 2: SHOW SYMBOL/LOCAL VARI?? Displays all the six letter local symbols that start with “VARI”. Related topics: DELETE SYMBOL STOP STOP (no arguments) Terminates the execution of all command files. Related topics: EXIT WAIT WAIT [match-string-expression] Where: match-string-expression is a quoted string, lexical, symbol, or combination of the above joined by plus symbols (+) (i.e., “string” + symbol). Waits for the match string expression to be received from the host. The string must match the host data exactly, but is not case sensitive unless the /CASE option is specified. WAIT is intended for command file use. If the WAIT command is issued from the host, it does not prevent the emulator from accepting additional host commands while it is waiting for the string. Valid options: /CASE Requires the comparison to be case sensitive. /ERROR=label Process continues at the label if an error occurs. /NODISPLAY Inhibits the display of data from the host. /NOMESSAGE Inhibits the display of the WAIT informational message. 172 /NOSTRING_DISPLAY Inhibits the display of the match string. /TIME_OUT=[hh:mm:]ss Sets a maximum time period to wait for the host string match. If the string is not received in the allotted time, the process continues with the next command line. Specifying a /TIME_OUT qualifier without a string flushes data received from the host until no data is received for the time specified. The /TIME_OUT option can be used with the /ERROR option. Related topics: READ, WRITE WIN WIN (Windows command string) Executes the Windows command string in order to launch a Windows application from within the emulator. Example: WIN NOTEPAD Displays the Windows Notepad. Symbols can be used to assign Windows command strings to a more convenient form. Example: NOTEPAD:=="WIN NOTEPAD" NOTEPAD C:\EMULATOR\MODEM.ECF Creates an emulator command, NOTEPAD, that launches the Notepad editor. The editor then displays the MODEM.ECF file. WORDPERFECT MODE WP5 ON/OFF Enables or disables WordPerfect version 5.0 mode. WP OFF also disables WordPerfect 5.0 mode. In WP mode, the emulator’s keyboard assignments are altered to emulate the PC version of WordPerfect. WRITE WRITE logical-name[:] [string-expression] Where: logical-name is a file logical assigned by the OPEN command or the HOST logical. HOST is a special predefined local symbol that points to the selected communications port. string-expression is a quoted string, lexical, symbol, or combination of the above joined by plus signs (+) (i.e., “string” + symbol). Writes the string expression to the logical name, followed by a carriage return. To suppress the carriage return, use the /NOCR option. If information is written to a file, the file pointer is positioned after the data written. Flow control is provided through character delay (SET CDELAY) and line delay (SET LDELAY). Chapter Seven - Command Language 173 Valid options: /ERROR=label Process continues at the label if an error occurs. /KEY_TOKEN= token Where: token is a valid terminal keyboard token. Used with the HOST logical, this option sends token value to the host. /NOCR No carriage return is sent after the string. A carriage return is sent separately. /UPDATE The data previously READ is to be overwritten. Valid only when rewriting the previous record read. The new data string must be the same length as the previous string or an error results. Valid only with a file logical opened with the /READ and /WRITE options. Example 1: WRITE HOST Sends a carriage return to the host. (Also the same as WRITE HOST “”) Example 2: WRITE /KEY_TOKEN=BACKSPACE HOST Sends a backspace to the host. Example 3: WRITE HOST “SET X:==”"ABC""" Sends SET X:=="ABC" to the host. Example 4: P1 = XRAY.DAT WRITE HOST “ TYPE ‘’P1’” Sends TYPE XRAY.DAT to the host. Example 5: READ FILE2 DATA WRITE/UPDATE FILE2 TEXT Reads the first record from the logical name FILE2 into the symbol DATA, then replaces the data just read with the information in symbol TEXT. Both sets of data must be the same length. The DOS file must have been opened using /READ and /WRITE. Related topics: OPEN, READ, SET CDELAY, SET LDELAY, WAIT 174 u CHAPTER 8 COMMANDFILEPROGRAMMING OVERVIEW Command files are DOS text files that contain emulator commands. Command files are useful for automating tasks such as transferring files, logging on, and defining keyboard configurations. However, command files are not limited to the above functions. This chapter is devoted to command language programming while Chapter 7 (Command Language) explains the individual emulator commands. This chapter covers the following advanced programming features: o o o o o o o Symbol assignment and substitution Full range of lexical functions (Locate, Extract, etc.) Logical operations IF processing Special display lexical functions Command file nesting Comprehensive error control Chapter Eight - Command File Programming 175 8.1 DOCUMENTING COMMAND FILES It is a good programming practice to use comments to document command procedures. Comments are prefixed with the exclamation point (!). Any data to the right of the exclamation point is ignored. If a literal exclamation point is needed in a command line, it must appear within a quoted string or it is interpreted as the comment character. In this example, the boldfaced type is used to set off the comments. Example: ! This procedure dials a modem number and transfers a text file to the host. ! Format: SENDTXT input-file [output-file] ! Where: P1 is the filename to send, [P2] is the output filename if different IF P2 .eqs. “” THEN P2 = P1 ! Make sure p2 is defined ON WARNING THEN EXIT ! Set to EXIT if error DIAL VAX ! Dial phone directory entry VAX WRITE HOST “COPY TT: ‘’P2’” ! Set host to receive data to filename p2 WAIT “<CR><NULL> ” ! Wait for prompt ON WARNING THEN GOTO DONE ! Set to close COPY command if error SEND ‘P1’ ! Send the file p1 DONE: SEND EOF ! Close COPY command EXIT 8.2 PASSING PARAMETERS Up to eight parameters can be passed to a command file. Each parameter must be separated by a space. Example: Or, from the host: @filename [p1] [p2] ... [p8] CS 5|@filename [p1 p2 ... p8]S I T Commands in the command file utilize the passed parameters by referring to P1 - P8. The value of a passed parameter is recovered by quoting the parameter with the symbol substitution character ‘ (single quote). The parameter values are automatically converted to uppercase unless they are enclosed in a set of quotes. Example: The file SEND.ECF contains the string: KERMIT SEND ‘P1’,’P2’ Typing this string at the command prompt: CMD>@SEND FILE1.DAT FILE2.DAT Tells the emulator to issue the command: KERMIT SEND FILE1.DAT, FILE2.DAT 176 8.3 SYMBOLS A symbol (also known as variables) is a name to which a character string or integer value is assigned. The symbol name must begin with an alphabetic character, an underscore ( _ ) or a dollar sign ($), but may contain other alphanumeric characters. The maximum symbol name length is 31 characters. Integer values are limited to 16 bits (-32767 to 32767). Strings are a maximum of 255 characters in length and must be quoted (string = “string”) or assigned using the implied string delimiter (string:=expression). Sypmbols can be used for the following purposes: o o o o Synonyms for emulator commands (foreign commands) Variables in expressions or command procedures Arguments to commands Arguments to command procedures 8.3.1 Symbol Types There are two types of symbols: Local and Global. Local symbols are available as long as the current command file is executing. Global symbols are permanently defined until deleted or the emulator exits. The emulator stores symbols in local and global symbol tables. A local symbol table is maintained for each active command level including emulation mode (no command file executing). These tables are deleted as their respective command level is terminated. (Local symbols from all command levels above the current level are available to the current level.) The emulation mode local symbol table is deleted when the emulator is exited. Note: A new command level is created each time a command file is executed without exiting the current command file (nesting command files). Global symbols are accessible by all command levels. The emulator maintains only one global symbol table. Local symbols are assigned using an equal sign (=). Global symbols are assigned with a double equal sign (==). Example: KER = “KERMIT” SS == “SHOW SYMBOL” (local) (global) 8.3.1.1 Permanent Global Symbols Three permanent global symbols, $STATUS, $SEVERITY, and $STATUSID, are reserved. They hold the error code and error mnemonic from the most recently executed command. These symbols are useful when nesting command files. When a command file is complete, control returns to the calling command file. The status of the exiting command file is stored in $STATUS, $SEVERITY and $STATUSID for testing by the calling command file. If no error occurs, a status of SUCCESS (1) returns in the symbols. Chapter Eight - Command File Programming 177 8.3.2 Assigning Symbol Values The assignment statement equates a symbol to an expression: symbol-name =[=] expression An expression can contain an integer value, a symbol name, a quoted string, a lexical function or a combination of these connected with arithmetic operators. See the Section 8.5.3 (Integer Expressions) for more information. Example 1: XX == “This is a string” ! Global String SHOW SYMBOL XX XX == “This is a string” Example 2: SUBSTR = F$EXTRACT(5,2,XX) ! Local String SHOW SYMBOL SUBSTR SUBSTR= “is” Example 3: COUNT == 1 ! Global integer SHOW SYMBOL COUNT COUNT == 1 Hex=0001 Octal = 000001 Example 4: SS == “show symbol” TEXT== “This is a test” SS TEXT ! Global String ! Global String TEXT== “This is a test” 8.3.2.1 Implied String Assignments Use a colon with an equal sign (:= or :==) to specify an implied string assignment. Quotes are not required. Examples: TEXT:= THIS IS A TEST SS:== SHOW SYMBOL (local) (global) Leading and trailing tabs and spaces are stripped from implied strings. All other multiple spaces or tabs are reduced to a single space character. Implied strings are normally converted to all capital letters. Case toggles on and off using a quote sign (“). Example: TEXT:== “This is a ”test SHOW SYMBOL TEXT TEXT== “This is a TEST” Enclosing the entire string in quotation marks prevents uppercase conversion. Example: TEXT:= “This is a test” SHOW SYMBOL TEXT TEXT== “This is a test” 178 Pair consecutive quotes (“”) together to embed a quotation mark (“) within a string expression. Example: TEXT:= “This is a ”"TEST"" line" SHOW SYMBOL TEXT TEXT== “This is a ”TEST" line" Terminate an implied string expression with a carriage return or an exclamation mark (comment character). Example: TEXT:== This is a ! test SHOW SYMBOL TEXT TEXT == “This is a” An exclamation mark can be included within an implied string assignment by quoting the string. Example: TEXT:== “This is a test!” SHOW SYMBOL TEXT TEXT == “This is a test!” 8.4 LABELS Labels are names used to symbolically reference a location within a command file. Example: LOOP: IF COUNT .EQ. 10 THEN GOTO DONE COUNT=COUNT+1 GOTO LOOP DONE: DISPLAY “DONE” Labels are useful for redirecting command file execution (GOTO label). They are also used for marking the beginning of a D$BLOCK text block. A label is always followed by a colon (:). Any printable ASCII character can be used in a label name. Labels have a maximum length of 32 characters, including the colon. Chapter Eight - Command File Programming 179 8.5 EXPRESSION EVALUATION Expressions evaluate to either string or integer values, depending on the type of value used in the expression and the operator used to modify or compare them. Table 8-1 lists the expression evaluation rules. If “any value” is a string value, it is converted to an integer value before the operation is performed (except string compare). Table 8-1 Expression Modes Expression Result Integer value Integer String value String Integer lexical function Integer String lexical function String Integer symbol Integer String symbol String +,-,or NOT any value Integer Any value .AND. any value Integer Any value .OR. any value Integer String + or - string String Any value * or / any value Integer Any value (string compare) any value Integer Any value (arithmetic compare) any value Integer 8.5.1 String to Integer Conversion Strings containing numbers are converted to their integer values. For example, the string “64" is converted to 64. Alphabetical strings are converted to the integer 1 if the string begins with T, t, Y, or y. If the string begins with any other letter, the string is converted to integer 0. 8.5.2 String Expressions A character string expression is an expression that evaluates to a string value. A character string expression can contain character strings, lexical functions that evaluate to strings, and symbols that evaluate to strings. They can also contain groups of strings connected by operators. Whenever values are connected by one or more operators, all values must be string expressions for the result to remain a string expression. Examples: FILENAME= “XRAY.DAT” TEXT = “TIME” + “OUT” COUNT = “TEN” TOTAL = “THE TOTAL IS ” + COUNT A String value unrepresented by an alphabetical character is inserted into a string with a pair of angle brackets. Example: FF = “<12>” !FF = Form Feed 180 8.5.3 Integer Expressions An integer expression is an expression that evaluates to an integer value. An integer expression can contain integers, lexical functions that evaluate to integers, and symbols that evaluate to integers. They can also contain groups of integers or strings connected by arithmetic operators, logical operators, and comparison operators. Integer values must be specified as decimal numbers unless preceded by a Radix operator. Hexadecimal numbers use %X while Octal numbers are specified using %O. Examples: COUNT = 10 HEX = %XC OCTAL = %012 SUM = 1 + 7 + COUNT ! DECIMAL 10 ! HEX C ! OCTAL 12 8.5.4 Expression Substitution This feature is useful for debugging when SET VERIFY is in effect. Early evaluation of an expression can be forced by the use of the apostrophe (‘) substitution operator. The expression being evaluated must be enclosed in parenthesis and be preceded by the apostrophe. Example: IF ‘(a + b) .eq. ‘(c - d) THEN GOTO END The value of a + b and c - d are evaluated and their values are compared to see if they are equal. If equal, the control continues at label END. The apostrophe does not change the final result. Expression substitution is useful when using SET VERIFY to determine the result of an evaluation. Formal evaluation of an expression occurs left to right within the parentheses. An error results if the expression is unbalanced causing an unresolvable evaluation. See also, Section 8.12 (Symbol and Lexical Substitution). Example: SET VERIFY A=5 B = ‘A * 2 C = ‘(A + B) D = ‘((A + B) - C) IF ‘(A + B) .eq. ‘(C + D) THEN ANS = “TRUE” IF ‘((A + B) .eq. (C + D)) THEN ANS = “TRUE” Read from a command file, these expressions would evaluate and display to the screen as: A=5 B=5*2 C = 15 D=0 IF 15 .eq. 15 THEN ANS = “TRUE” IF 1 THEN ANS = “TRUE” Chapter Eight - Command File Programming 181 8.6 OPERATORS IN EXPRESSIONS Operators connect two or more elements within an expression. Some are mathematical symbols like the plus sign (+). Others specify logical and comparison operations and consist of letters enclosed in a set of periods. If more than one operator appears in an expression, the operators are executed in order of precedence. The higher the precedence number, the higher the priority of the operator. Operators of equal value are executed from left to right. Parentheses override the order operators are evaluated. Expressions enclosed in parentheses are evaluated first. Table 8-2 Operator Precedence Operator + Precedence 7 Description Unary + (Positive number) - 7 Unary - (Negative number) ∗ 6 Multiply / 6 Divide + 5 Add two numbers or string concatenation. - 5 Subtract two numbers or string reduction. .eqs. 4 String equal test .nes. 4 String not equal test .ges. 4 String greater or equal test .gts 4 String greater than test .les. 4 String less or equal test .lts. 4 String less than test .eq. 4 Equal to .ne. 4 Not equal to .ge. 4 Greater or equal to .gt. 4 Greater than . le. 4 Less or equal to .lt. 4 Less than .not. 3 Logical Negate (1’s Compliment) .and. 2 Logical AND or. 1 Logical OR 182 8.6.1 String Operations String operators are used to concatenate or reduce strings. The + operator is used for concatenation and the operator is used for reducing a string. A string concatenation (+) adds two strings together to form a longer string. A string reduction (-) subtracts two strings by removing the string following the minus sign from the first string. If the second string occurs more than once in the first string, only the first occurrence of the string is removed. Example 1: A = “MYFILE” + “.DAT” Result: MYFILE.DAT Example 2: B = “FILE NAME FILE.DAT” – “FILE ” Result: NAME FILE.DAT Note: When concatenating or reducing strings, both operands must be strings or result in an integer. 8.6.2 Arithmetic Operations Arithmetic operators are used to perform calculations in integer expressions. The result of an arithmetic operation is an integer. The following operators are valid: Table 8-3 Arithmetic Operators Symbol Operation + Add - Subtract / Divide ∗ Multiply + Unary plus sign - Unary minus sign If string values are used as operands to arithmetic operations, the strings convert to integers first. See Section 8.5.1 (String to Integer Conversion) for more information. In arithmetic operations, all non-decimal values (values specified using radix operators) convert to their decimal equivalent. Examples: A = 5 + 10 / 2 ! 10 B=5*3–4*6/2 ! 3 C = 5 * (6 – 4) – 8 / (2 – 1) ! 2 D = –5 + 4 ! -1 E = 8 + “1" ! 9 F = %X1f + %O17 – %D10 ! 36 Chapter Eight - Command File Programming 183 8.6.3 Logical Operations Logical operators are used to perform logical functions on integers or to create expressions that perform Boolean arithmetic. The result of a logical operation (.NOT., .AND., .OR.) is an integer value. Examples: A = %X15 .OR. %X12 ! Decimal = 23 A = %X15 .AND. %X12 ! Decimal = 16 .NOT. %X15 ! Decimal = -22 Logical operators can be used in a logical sense as well as arithmetic. An integer has a logical value of true (1) if it is odd (low order bit=1). A character string is true if it begins with Y, y, T, or t. An integer has a logical value of false (0) if it is even (low order bit=0). A string value is false if the first character is not a T, t, Y or y. Example: B = %X200 .OR. %X201 This expression performs a logical OR on two values. The resulting symbol is True and has a value of 513 (odd) or 201 Hex. Of the original operands, 200 Hex is False and 201 Hex is True. 8.6.4 String Comparisons String comparison operators are used to compare character strings. String comparison results are based on the binary value of the string characters. See Appendix B for a table of ASCII character values. The result of a string comparison is the integer 0 (False) or 1 (True). The following are the string comparison operators: Table 8-4 String Comparison Operators Operator Definition .EQS. String equal to .GES. String greater than or equal to .GTS. String greater than .LES. String less than or equal to .LTS. String less than .NES. String not equal to The following rules apply to string comparisons: o o o The comparison is on a character by character basis that stops as soon as two characters do not match. In comparisons of different length strings, the shorter string is padded on the right with null (00) characters before the operation is performed. Lowercase letters have a higher numeric value than their corresponding uppercase letters. Operands in string comparisons are assumed to be string expressions. If an integer expression is specified as an operand, it is converted to a string before the comparison. 184 If a character string is not enclosed in quotes, the string is assumed to be a symbol name. Examples: “ABC” .LTS. “abc” “TRUE” .EQS. 1 “ABC” .GTS. “DEF” “CAT” .EQS. “CATS” ! True (1) ! False (0) ! False (0) ! False (0) CANDY :== MARS BAR “MARS BAR” .EQS. CANDY ! True (1) 8.6.5 Arithmetic Comparisons Arithmetic comparison operators compare integer values. The result of an arithmetic comparison is an integer. If the result is true, the expression result is 1. If the result is false, the expression is evaluated to 0. The following is a list of the arithmetic comparison operators: Table 8-5 Arithmetic Comparison Operators Operator .EQ. .GE. .GT. .LE. .LT. .NE. Definition Equal to Greater than or equal to Greater than Less than or equal to Less than Not equal to Operands in arithmetic expressions are assumed to be integer expressions. If a character string is specified as one of the operands, it is converted to an integer before the comparison is performed. If a character string begins with an upper- or lowercase Y or T, it is converted to a 1. If the string begins with any other letter, it is converted to 0. If the string consists of characters that form a valid number, the number is converted to an integer. 8.6.6 Radix Operators There are three special operators recognized for specifying the radix (number system) for integers. Decimal is the default and %D is not required when specifying decimal values. Table 8-6 Radix Operators Operator %D %X %O Meaning Decimal Hex Octal Example %D100 %X64 %O144 Decimal Value 100 100 100 Example: TOTAL = 100 + %X64 + %O144 SHOW SYMBOL TOTAL TOTAL = 300, HEX = 012C, OCTAL = 000454 Chapter Eight - Command File Programming 185 8.7 SPECIAL CHARACTERS 8.7.1 Input Conversion ASCII codes that are unspecified by a printable character can be inserted into strings using their numeric value. To specify an ASCII character by its value, enclose its numeric equivalent inside angle brackets < >. Example: STRING:==“<7>Attention” Inserts a bell into the string by specifying the decimal equivalent for an ASCII bell character. The most commonly used characters can also be specified by a set of mnemonics. Table 8-7 Mnemonic Table Mnemonic NULL SOH STX ETX EOT ENQ ACK BELL BS HT LF VT FF CR SO SI Decimal Value 00 01 02 03 04 05 06 07 08 09 10 11 12 13 14 15 Mnemonic DLE DC1 XON DC2 DC3 XOFF DC4 NAK SYN ETB CAN EM SUB ESC FS Decimal Value 16 17 17 18 19 19 20 21 22 23 24 25 26 27 28 Mnemonic GS RS US SP DEL IND NEL SSA ESA HTS HTJ VTS PLD PLU RI Decimal Value 29 30 31 32 127 132 133 134 135 136 137 138 139 140 141 Mnemonic SS2 SS3 DCS PU1 PU2 STS CCH MW SPA EPA CS ST OSC PM APC Decimal Value 142 143 144 145 146 147 148 149 150 151 155 156 157 158 159 Example: STRING:== “<BELL>Attention” Unrecognized numeric characters and values greater than 255 are ignored. Radix operators are also supported within the angle brackets. 186 Conversion of numeric values enclosed in angle brackets is prevented by using a double set of brackets << >>. Using a double set of angle brackets results in a numeric string enclosed in a set of single brackets < >. Examples: A = “a b c <68>” B = “a b c <%X44>” C = “a b c <<44>>” D = “<%X7e>,<<abc>>,<<256>>” E = “<ESC>[10;20H” ! “a b c D” ! “a b c D” ! “a b c<44>” ! “~,<abc>,<256>” ! 27"[10;20H" 8.7.2 Output Conversion Non-printable characters and characters specified by enclosing their numeric value in angle brackets < >, are displayed in two ways: 1) Their binary value is sent directly to the screen processor. In this case, the character performs its specific function (e.g., <7> rings the bell) or appears as a character if it is printable (e.g., <%x41> is an A). Commands such as DISPLAY and INQUIRE process data in this manner. 2) The non-printable character or character enclosed in angle brackets displays as a mnemonic or numeric value enclosed in brackets. The output from SHOW SYMBOL and SET VERIFY appears this way. Example: TEST="<7>This is a test" SHOW SYMBOL TEST TEST = “<BELL>This is a test” DISPLAY TEST This is a test (also rings the bell) Non-printable ASCII codes are control characters with numeric values below 32 decimal and ASCII codes with values of 127 to 255. The more frequently used control codes are output as mnemonics instead of decimal values. Table 8-8 Mnemonic Table Output Conversion Mnemonic Decimal Value Mnemonic NULL 00 SI 15 BELL 07 ESC 27 LF 10 DCS 144 FF 12 CSI 155 CR 13 ST 156 SO 14 Chapter Eight - Command File Programming Decimal Value 187 8.8 FOREIGN COMMANDS Symbols can be defined to create personalized commands that execute as if they were part of the emulator command language. These assignments are called foreign commands. Example: NUMSTR:== THIS IS A TEST SS :== SHOW SYMBOL SS NUMSTR NUMSTR = “THIS IS A TEST” When the foreign command, SS, is executed from the command line or command file, it is recognized as a foreign command and the symbol value is substituted and executed. The command executed by the command processor is: SHOW SYMBOL NUMSTR Up to eight parameters (P1...P8) can be passed to a foreign command. However, in order to process the parameters, the foreign command must execute a command file. Example: TYPE :== @DOSTYPE Where: The command file DOSTYPE.ECF contains: ! ECL FILE TO TYPE A DOS FILE IF P1 .EQS. “” THEN GOTO ERROR DOS TYPE ‘P1’ EXIT ERROR: DISPLAY “ERROR - NO FILE SPECIFIED” EXIT ! Error if no file ! Type DOS File ! Exit To execute the foreign command to type a DOS file, enter: TYPE README.TXT Foreign commands are useful for creating short synonyms for lengthy emulator commands, creating new emulator functions, or changing an emulator command verb to one you like better. Examples: KS*END:== KERMIT SEND HK:== HELP KEYS LOGS*CREEN:== LOG/SCREEN/OVERWRITE Placing an asterisk within a foreign command symbol defines the minimum number of characters that must be entered before it is recognized by the command processor. For example, LOGSCREEN requires that LOGS be entered. Additional characters entered thereafter must match the corresponding character in the command exactly. 188 8.9 LEXICALS Lexicals are functions that return information about character strings and other items. Lexical functions are not enclosed in quotation marks and often require an argument. Lexicals can be used in expressions in the same manner as character strings, integers, and symbols. F$EXTRACT F$EXTRACT(offset,length,string) Extracts a substring from a string expression. Arguments: Offset An integer value representing a starting position for the extract. Offsets start at 0. The total length of the string, minus one, is the maximum offset value. Length An integer value representing the number of characters to extract from the string. A maximum value of 255 can be used to extract the remaining portion of the string. String The string expression to extract the substring from. Return Value: A character string extracted from the argument string. Example 1: SUBSTR=F$EXTRACT(10,3,"The quick fox jumped.") SHOW SYMBOL SUBSTR SUBSTR="fox" Example 2: LAZY = “The quick fox jumped.” SUBSTR=F$EXTRACT(10,3,LAZY) SHOW SYMBOL SUBSTR SUBSTR="fox" F$GETINFO F$GETINFO(item) Returns information about the item requested. Arguments: Item The name of the Item to return information about. Return Value: An integer or string value. Chapter Eight - Command File Programming 189 Valid Item Names: COLOR_SUPPORT Returns TRUE if color support is enabled and FALSE if it is not. Color support is always FALSE if the PC has a monochrome monitor. (“CONNECT”) Returns TRUE if the emulator is online (connected). If modem control is disabled when communicating over a COM port, connection status is always true. Connection status is FALSE when the emulator is offline (no connection). (“CONNECT_NAME”) Returns the name of the current RS232 or network connection. Example: DIAL 123-4567 IF F$GETINFO(“CONNECT”) THEN GOTO LOGIN ... If the modem is connected, the command file jumps to LOGIN label. F$LENGTH F$LENGTH(string) Returns the total number of character in a string. Arguments: String The string expression. Return Value: An integer value for the length of the string. Example: TEXT:==This is a test LEN=F$LENGTH(TEXT) SHOW SYMBOL LEN LEN = 14 Hex=000E Octal = 000016 F$LOCATE F$LOCATE(substring,string) Searches for a character substring within a string and returns the substring’s offset. If the substring is not found, the function returns the length of the original string. The first character position is offset 0. Arguments: Substring The character string to search for. String The string searched. Return Value: An integer value representing the offset of the substring argument. 190 Example 1: TEXT="This was a test" OFFSET=F$LOCATE(“was”,TEXT) SHOW SYMBOL OFFSET !Locate “was” !Show the offset when found OFFSET = 5 Hex=0005 Octal = 00005 Example 2: TEXT="This is a test" OFFSET=F$LOCATE(“TTTT”,TEXT) SHOW SYMBOL OFFSET !Will not find “TTTT” !Offset=length if not found OFFSET = 14 Hex=000E Octal = 000016 Example 3: ! The following example requests a string and prints: ! “THE” FOUND If “THE” was entered as part of the string. ! “THE” NOT FOUND If “THE” was not found in the input string. INQUIRE DATA “ENTER A TEXT STRING: ” OFFSET=F$LOCATE(“THE”, DATA) IF F$LENGTH(DATA) .EQ. OFFSET THEN GOTO NOT_FOUND DISPLAY “”"THE"" FOUND" EXIT NOT_FOUND: DISPLAY “”"THE"" NOT FOUND" F$MESSAGE F$MESSAGE(status code) Returns the message string associated with the status code. Arguments: Status code An expression that translates to either a status message mnemonic (e.g.,"INVALARG") or a status message number (e.g.,1248). Using $STATUS or $STATUSID as the status code returns the current error/status message. See Table 8-12 (Error Messages and Status Codes). Return Value: The complete message string for the status code. Example: WP XXX ERROR_MSG=F$MESSAGE($STATUS) SHOW SYMBOL ERROR_MSG ERROR_MSG="CMD-W-INVKEYW, Invalid qualifier or keyword - XXX" Chapter Eight - Command File Programming 191 8.10 DISPLAY LEXICALS Display lexicals are special lexical functions used with the DISPLAY and INQUIRE commands. Arguments to display lexicals must be strings or string expressions enclosed in parentheses. The display lexicals currently supported are D$BLOCK and D$BOX. D$BLOCK D$BLOCK (row, column [,label]) Where: label is a symbol or quoted label name. Displays a block of text. The text block is defined between two block markers { and }. If the optional label is not provided, the block of text must follow the DISPLAY command (see Form 1). Command execution continues following the end of block marker. If the optional label is provided, the text block referenced must not lay in the execution path of the command procedure (see Form 2). Note: Block markers must be on a line by themselves. Form 1 DISPLAY D$BLOCK(10,40) { Line one of text. Line two of text. } ... next command ... Form 2 INQUIRE NAME D$BLOCK(10,40,"LABEL1") ... additional commands ... EXIT LABEL1: { Line one of text. } 192 D$BOX Uses line drawing characters to display a box on the screen. Form 1 D$BOX (upper left row, column, lower right row, column) Arguments: The row and column positions for the upper-left and lower-right corners for the box. Form 2 D$BOX (row offset, column offset) Arguments: The row and column offset for the lower-right corner. The offset is specified relative to the current cursor position. The current cursor position is used for the upper-left corner. 8.11 SYMLEXES Symlexes are special symbols that function similar to lexicals. They are especially valuable for defining control sequences that require arguments passed to them at run time. Example: E$CUP == “<ESC>[$1s;$2sH” Defines a Symlex called E$CUP (cursor position control sequence) with 2 string arguments ($1s and $2s) that are passed at run time. DISPLAY E$CUP(1,1) Uses E$CUP to position the cursor to row 1, column 1. 8.11.1 Defining a Symlex Symlexes are defined in the form: A$A... == “A...$1x...$2x...” Where: A is any alphanumeric character. A... is one or more alphanumeric characters. $1 is the first argument. x is s or n. S identifies the argument as string. N identifies the argument as numeric. $2 is the second argument (etc.). Symlex names must have a dollar sign as the second character of the name ($). Any other character can precede or follow the dollar sign. A maximum of eight arguments can be defined in a symlex definition. Each argument must start with a dollar sign and be followed by the argument number and argument type identifier. When string arguments are substituted at run time, the argument value is passed as a string and quoting is not necessary. If a symlex argument is defined as numeric, it is assumed to be an integer value, symbol, lexical, expression, or quoted string. Chapter Eight - Command File Programming 193 If a symlex name is defined that conflicts with a lexical function name, the symlex is ignored. Symlexes can be used wherever symbols or lexicals are accepted. Example 1: E$CUP == “<ESC>[$1n;$2sH” Defines a global symbol, E$CUP, that sets the cursor to $1n row, $2s column (parameter $1n is defined as numeric and $2s is defined as a string). DISPLAY E$CUP(“10",30) Uses the E$CUP symlex to position the cursor to row 10, column 30. Example 2: U$DEFKEY == “<ESC>P1;1|$1s/$2n<ESC>\” Defines a symlex for loading a VT320 UDK (User-Defined Key). Argument $1s is the key identifier and $2n is the key definition string. DISPLAY U$DEFKEY(34,"53484f5720555345520d") Uses the U$DEFKEY symlex to define UDK20 as “SHOW USER<CR>” Example 3: A$BOLD == “<ESC>[1m” A$UND == “<ESC>[4m” A$REV == “<ESC>[7m” A$RST == “<ESC>[m” !Bold Attribute !Underline !Reverse Video !Reset Attributes Defines a set of symlexes for setting VT320 video attributes. DISPLAY A$BOLD + “ BOLD ” + A$RST Displays the word BOLD in bold and then resets the video attributes. Example 4: U$DCSWSL == “<CSI>0;3;0|$1n<ST>” SETUDSL== “DISPLAY U$DCSWSL (”"""USER DEFINED STATUS LINE"""")" Defines global symbol SETUDSL to write a string to the user defined status line using the symlex U$DCSWSL. The symlex uses a DCS Private Control Sequence. (Parameter $1n is defined as numeric). SETUDSL Writes the string USER DEFINED STATUS LINE to the status line using the symbol U$DCSWSL. The four quotation marks are necessary to send a quoted string to the symlex. 194 8.12 SYMBOL AND LEXICAL SUBSTITUTION When processing a command string, the command interpreter performs substitution by replacing the symbol names or lexical functions with their current values. 8.12.1 Automatic Symbol Substitution In certain contexts, the command interpreter assumes that a string of characters is a symbol name or lexical function. In that case, substitution is automatic and substitution operators are not required or recommended. Automatic symbol substitution takes place under the following contexts: o o o o On the right side of an = or == assignment statement (but not an := or :== assignment). At the beginning of a command line when the symbol is not followed by a symbol assignment operator. On arguments for lexical functions. On arguments to certain commands such as DISPLAY or WRITE. Symbols or lexicals in other contexts must be enclosed within a set of substitution operators in order to translate. 8.12.2 Substitution Using Apostrophes The apostrophe is normally used for symbol substitution. The ampersand is reserved as a special substitution character. See Section 8.12.3 (Ampersands). To substitute a symbol or lexical value, enclose the symbol or lexical name within a set of apostrophes (‘symbol_name’). If symbol substitution is desired within a quoted string, two apostrophes must be placed in front of the symbol (i.e., “’’symbol’”) to force substitution. Example 1: COUNT = 0 TOTAL = COUNT + 1 Evaluated as: TOTAL = 0 +1. Symbol substitution automatically occurs to the right of a symbol assignment statement. Example 2: SS := SHOW SYMBOL SS $STATUS Evaluated as: $STATUS = 1 Hex = 0001 Oct = 00001 Symbol substitution occurs automatically on the first word of a command line. SS is defined as a synonym for Show Symbol and is executed as a foreign command. Example 3: TEXT = “This is it.” STR = F$EXTRACT(5,2,TEXT) Evaluated as: STR = F$EXTRACT(5,2,"This is it.") Symbol substitution occurs automatically on any arguments to a lexical function. Chapter Eight - Command File Programming 195 Example 4: TOTAL=1 COUNT=2 IF COUNT .EQ. TOTAL THEN GOTO DONE Evaluated as: IF 1 .EQ. 2 THEN GOTO DONE Symbol substitution in an IF statement. TOTAL and COUNT are both assumed to be symbols. Their values are substituted before evaluating the condition. Example 5: COUNT = 1 PARAM = P’COUNT’ Evaluated as: PARAM = P1 The use of single quotes forces the substitution. Example 6: FILENAME := X.DAT STR = “’’FILENAME’ has been copied.” Evaluated as: STR ="X.DAT has been copied." Symbol substitution is forced by the usage of double, single quotes within the quoted string. 8.12.3 Substitution Using Ampersands In addition to the apostrophe, the command interpreter recognizes a special substitution operator, the ampersand. The difference between the two is the time when symbol substitution occurs. Symbols preceded by the apostrophe are substituted during phase one; the ampersand is done in phase two. For additional information, refer to the Three Phases of Symbol Substitution topic. In many instances, the apostrophe and ampersand operators are equivalent. Example: CMD>HELP ‘TOPIC’ CMD>HELP &TOPIC These two commands evaluate identically. However, the following example shows how the results can vary. Example: CMD>B="XXXXXX" CMD>A="&B" CMD>SHOW SYMBOL A A = “&B” CMD>DISPLAY ‘A’ XXXXXX CMD>B = “YYYYY” CMD>DISPLAY ‘A’ YYYYY In the first part, SHOW SYMBOL A displays &B because the ampersand is not interpreted within a quoted string. However, &B is interpreted when referenced by the DISPLAY ‘A’ command. In the second part, B was redefined and the results changed accordingly. 196 The following restrictions apply to the use of the ampersand: o o o o It cannot be used within a character string to request symbol substitution. It must be preceded by a space or another delimiter. It cannot be used to request substitution inside a quoted string. To request substitution using the ampersand, append the ampersand to the beginning of the symbol name. Do not use a trailing ampersand. Ampersands are most effective when used with the apostrophe to affect the order of substitution. Example: Assume the following symbol definitions: Assume that TEST.ECF contains: This command yields the results: A:=TRY B:=THIS C:=ONE COUNT=1 START:SHOW SYMBOL &P’COUNT’ COUNT=COUNT+1 IF COUNT .GT. 3 THEN EXIT GOTO START CMD>@TEST A B C A = “TRY” B = “THIS” C = “ONE” The command file displays the values of passed parameters P1 - P3 using the SHOW SYMBOL command. During the phase one of command interpretation, COUNT is replaced by its current value (1 - 3). By using the ampersand, P’COUNT’ (P1 - P3) is substituted in the phase two. Therefore, P1 becomes symbol A, P2 becomes symbol B, and P3 becomes symbol C. The final substitution results in the command lines: SHOW SYMBOL A SHOW SYMBOL B SHOW SYMBOL C (value = TRY) (value = THIS) (value = ONE) It is impossible to obtain the above results using the apostrophe substitution character alone. Refer to the following section for more information on the three phases of symbol substitution. 8.12.4 Three Phases of Symbol Substitution The command interpreter performs symbol substitution in three phases: Command Input Scanning In this phase, the interpreter reads the command input and replaces arguments preceded with apostrophes (double apostrophes when strings are enclosed in quotation marks). Symbols preceded by odd groups of apostrophes are translated iteratively. Refer to the Iterative Substitution Using Apostrophes topic for more information. Symbols within quoted strings, preceded with double apostrophes, are not translated iteratively. Command Parsing During this phase, the command interpreter analyzes the command string and determines whether the first value on the command line is a symbol used as a command synonym (foreign command). If so, the interpreter replaces the symbol with its current value. All substitutions requested with ampersands are performed. In phase two, the Interpreter makes only a single pass through the command string. Chapter Eight - Command File Programming 197 Expression Evaluation During this phase, the command interpreter replaces any remaining symbols used in command expressions. For example, expressions used with the IF command. In phase three, the command interpreter makes only a single pass through the command string. 8.12.4.1 Iterative Substitution Using Apostrophes When an apostrophe is used to request symbol substitution, the command interpreter performs iterative, or multiple pass, substitution during the first (input scanning) phase of symbol substitution. Iterative substitution is performed from left to right. However, substitution using apostrophes is not iterative when substituting symbols inside quoted strings. Example: CMD>SYMBOL = “10" CMD>A =”’SYMBOL’" CMD>B = ‘A’ CMD>SHOW SYMBOL B B= 10 Hex= 000A Octal= 000012 After the statement B = ‘A’ the resulting integer value of the symbol is 10. This result is achieved in the following steps: 1) The symbol name A is enclosed in apostrophes, so it is replaced with its current value (‘SYMBOL’). 2) Because the value (‘SYMBOL’) is also enclosed in apostrophes, the command interpreter replaces the value SYMBOL with its current value (10). 3) Since value (10) has no apostrophes, the command input scanning phase (phase one) is complete. No further substitution is required during the command parsing or expression evaluation phases. Therefore, 10 is the final value given to the symbol name B. However, note what happens when you define B as: Example: CMD>B = “’’A’” CMD>SHOW SYMBOL B B ="’SYMBOL’" In this case, B has the value “’SYMBOL’”. The symbol name A is replaced only once, because substitution is not iterative within quoted character strings. 8.12.4.2 Iterative Substitution Using Command Synonyms The command interpreter performs iterative substitution automatically only when an apostrophe is in the command string. In some cases, you may want to nest synonym definitions. Example: CMD>COMMAND = “HELP” CMD>HH = “’COMMAND’” CMD>HH CMD-W-INVALCMD, Unrecognized command - ‘COMMAND’ In this example, when the command synonym HH is processed, the command interpreter performs substitution only once. The resulting string is ‘COMMAND’. The command interpreter issues an error message because it cannot detect a command on the line. 198 The error occurs because, during the first phase of command processing, no substitution is performed (the string HH is not delimited by apostrophes). During the second phase, the string ‘COMMAND’ is substituted for HH because HH is the first value on the command line. No additional substitution is performed. To correctly use the command synonym HH, it must be enclosed in apostrophes, as shown below: CMD>‘HH’ In this context, the HH is evaluated during the first phase of command processing because it is delimited by apostrophes. Since the use of apostrophes forces the substitution to be iterative, the resulting value (‘COMMAND’) is also evaluated and the string HELP is substituted in place of ‘HH’. 8.12.4.3 Iterative Substitution in Expressions When the command interpreter analyzes an expression, any symbols in the expression are replaced only once; iteration is not automatic. However, iterative substitution can be forced by using an apostrophe or an ampersand in the expression. The rules are as follows: o o The command interpreter performs all substitution requested by apostrophes and ampersands before the command string is executed. Commands that automatically perform symbol substitution do so after the command string has been processed by the command interpreter. The following example illustrates iterative substitution in an IF command. Example: IF P’COUNT’ .EQS. “” THEN GOTO DONE When the command interpreter scans the input line, it replaces the symbol name COUNT with its current value. If the current value of COUNT is 1, the expression is evaluated as follows: IF P1 .EQS. “” THEN GOTO DONE Because this string does not have apostrophes, the command interpreter does not perform any additional substitutions. However, when the IF command executes, it automatically evaluates the symbol name P1 and replaces it with its current value. 8.12.4.4 Substitution of Undefined Symbols If a symbol is not defined when it is used in a command string, the command interpreter either issues an error message or replaces the symbol with a null string, depending on the context. The rules are as follows: o o During command input scanning and during command parsing, the command interpreter replaces all undefined symbols that are preceded by apostrophes or ampersands with null strings. During expression evaluation, the command interpreter issues a warning message and does not complete command processing. Chapter Eight - Command File Programming 199 8.13 ERROR FACILITY On completion of a command, a status condition code is saved in the symbol $STATUS to indicate the reason the command terminated. If error handling is enabled, specific error handling actions, based on that reason, are performed. Error handling is enabled by the ON and SET commands. The default conditions are as follows: o o o o o o o o SET ON ON ERROR THEN EXIT SET ABORT ON ABORT THEN STOP SET NODEVICE_ERROR ON DEVICE_ERROR THEN STOP SET NODISCONNECT ON DISCONNECT THEN STOP Note: The default conditions may be modified by a command file. No action takes place if the error handler for the specific error condition is disabled with one of the following: o o o o SET NOON SET NOABORT SET NODEVICE_ERROR SET NODISCONNECT Descriptive error and informational messages issued by the command interpreter break down into four parts: (1) facility (2) l- (3) ident (4) text The beginning of the message, facility, begins with the processor identification letters; EM for the Emulator Processor, CMD for the Command Processor or KER for the Kermit Processor. 200 The l severity level follows: Table 8-9 Error Message Severity Levels Level Definition E ERROR F FATAL I INFO S SUCCESS W WARNING Ident is the mnemonic code identifying the message, followed by the text. For example, specifying an invalid command would display an error message: Example: CMD>DISPLY CMD-W-INVALCMD, Unrecognized command - DISPLY Once the message displays, the most significant bit (bit 15 of $STATUS) is set to 1, indicating that the message has displayed. The error processor uses this to prevent the message from redisplaying if the status code is passed to the EXIT command. Clearing this bit displays the message again upon exit. 8.13.1 $STATUS Conditional Codes Error message values are saved as a 16 bit word in the reserved global symbol $STATUS. The breakdown of $STATUS is as follows: Bits 0-2 Contains the severity level of the message. Bits 3-14 Contains the message ID number. Bit 15 Indicates if the error message has displayed. To correctly identify an error message with bit 15 possibly set, it is necessary to logically AND the $STATUS code with a mask of %X7FFF to ignore bit 15. The low-order three bits of the $STATUS code are also saved in the reserved global symbol $SEVERITY. These bits represent the severity of the condition that caused the command to terminate. The severity error levels are represented by the following numeric values: Table 8-10 $STATUS Error Level Severity Chapter Eight - Command File Programming Level Definition 0 WARNING 1 SUCCESS 2 ERROR 3 INFORMATIONAL 4 FATAL 201 Note: Some severe errors are handled as fatal system errors and cannot be controlled by the user. The SUCCESS and INFORMATIONAL levels are odd numeric values (true), while the remaining error severity levels are even numeric values (false). This makes it easy to test for successful completion of a command using the IF command. If the program completes with a SUCCESS numeric value, $STATUS and $SEVERITY is odd and the IF expression is true. Example 1: IF .NOT. $STATUS THEN GOTO ERROR This IF statement tests the NOT SUCCESS condition of the last executed command. Example 2: IF $STATUS THEN DISPLAY “Operation completed successfully” This IF statement tests for the SUCCESS condition of the last executed command. Example 3: IF ($STATUS .AND. %X7FFF) .EQ. 52 THEN GOTO EXIT_CLEANUP This IF statement tests for a specific error message (an Abort). When the binary status code is stored in $STATUS, the mnemonic value for the error condition is also stored in $STATUSID. The value in $STATUSID can then be tested symbolically for specific errors. Example 1: IF $STATUSID .EQS. “EOF” THEN EXIT Tests for an EOF condition and then exits if found. Example 2: IF $STATUSID .EQS. “SUCCESS” THEN GOTO 100 Transfers control to label 100 if the previous command was successful. 202 8.13.2 DOS ERROR LEVEL To see a listing of the error codes with their DOS ErrorLevel included, execute the following command file: CMD>SET MESSAGE CMD>@ERRMSG SCREEN 8.13.3 Messages STATUS CODES are made up of three important parts: Table 8-11 Status Code Description Title Description Found In L Severity Level $SEVERITY Ident ID Mnemonic $STATUSID Message Error Message (see Note) Note: The message text is not stored in a symbol, however, the message text may be extracted using the F$MESSAGE lexical function: MSG := F$MESSAGE($STATUS) Chapter Eight - Command File Programming 203 Table 8-12 Error Messages and Status Codes L S W W E W W W W S S E E E E E E E E E E F F F E W W S S S S S S E E E W W W W Ident ABORT ABORTED ABSYMD ALREADYCONN AMBIGCMD AMBIGOPT AMBKEYW ARGLENEXC CMDFONLY CONNLOST DDEBADCONN DDEBADDATA DDEBADDISC DDEINVDATAL DDEMAXADVISE DDEMAXCONN DDENOCONN DDENODATA DEFNODECONN DEFNODEUNDEF DISKFULL DIVBYZERO DOSERR EOF EXPOVFL EXPSYN FILECREATE FILEOPEN FILEPTR FILEREAD FILEUPDATE FILEWRITE GRAPHICSNOTLOADED HELPREAD INSFMEM INVALARG INVALBAUD INVALCMD INVALDECTOKSTR Message >ABORT INTERRUPT< Command process aborted Abbreviated symbol definition conflict - rename symbol Already connected to node Ambiguous command Ambiguous option - / Ambiguous qualifier or keyword Argument exceeded maximum length Command or function enabled for command files only Connection lost DDE Bad conversation handle DDE Bad data handle DDE DISCONNECT failed Invalid data link requested Maximum number of advise items reached Maximum number of connections reached DDE CONNECT failed DDE Data not available from server Default (auto-connect) node already connected Default (auto-connect) node is undefined Disk full error Divide by zero error DOS error - unable to execute cmd End of file detected Command line expansion overflow Invalid expression syntax - check operators and operands Error creating PC file Error opening PC file Error setting file pointer in PC file Error reading PC file Error updating PC file Error writing PC file Graphics not loaded Error reading HELP file - data not properly formatted Insufficient DOS memory Invalid argument Invalid Baud Rate for INT 14 Redirection Unrecognized command Invalid DEC TOKEN string 204 Table 8-12 Error Messages and Status Codes (cont’d) L Ident Message W INVALOPT Invalid option - / W INVALTOK Invalid TOKEN code - S INVFSPEC Invalid PC file specification - W INVKEYW Invalid keyword or qualifier - W INVOPER Unrecognized operator in expression - E INVSKEY Invalid Softkey W IVDELTIM Invalid delta time argument - W IVFNAM Invalid LEXICAL or SYMLEX name - S IVSETUP Invalid SETUP file name - W IVSYMLVAR Invalid SYMLEX variable S KHOSTERR Error packet received from HOST S KPROTO Protocol error I KRENAME File exists - could not rename S KRETRY Packet retry count exceeded S KTIMOUT Timed out waiting for packet E LASTNODECONN Last node already connected E LASTNODEUNDEF Last node is undefined E LINELONG Command line exceeds maximum length W LOGFEXIST Log file already exists - use /OVERWRITE or /APPEND option W LOGICDEF Logical name already defined - W LOGINPROG Logging in progress - request ignored W MISKEYW Missing keyword or qualifier W MISOPTPAR Missing option parameter - check options for required arguments S NETABORTED Connection aborted S NETADDNAM Error adding name to network I NETCONNBAPI BAPI node connected I NETCONNCOM COM port connected I NETCONNCTERM CTERM node connected I NETCONNECT Connecting to Network E NETCONNERR Error attempting connection E NETDISCON Session disconnected I NETINVCOM COM port number invalid E NETINVPASS Invalid password I NETINVPORT Port number invalid Chapter Eight - Command File Programming 205 Table 8-12 Error Messages and Status Codes (cont’d) L Ident Message I NETNOCOM COM port not specified E NETNONFS NFS is not installed I NETNOSESS Multi-sessions not enabled I NETNOTCONN Session not connected E NETNOWSK WINSOCK network is not installed W NETONLY Only available on network versions I NETSESSMAX No more sessions available E NETUNKNOWN Requested node is unknown E NETUNREACH Node is currently unreachable E NODENAMEREQD Node name is required for connection E NOLABEL GOTO label not found - W NOMSG Message number not found - %X W NOMSGID Message identifier not found - E NORETURN No RETURN pointer found from prior GOSUB command E NOTCONN Not connected to a port E NOTEXTBLK DISPLAY text block not found W NOTHEN IF or ON statement syntax error - check placement of THEN keyword E PICFILEEXISTS Picture file already exists E PICFILENOCREATE Cannot create picture file E PICFILENOEXIST Picture file does not exist F PROGERR Program check error - contact technical support for assistance S PRTNOTRDY Printer not ready W READTIMOUT Read time out error S SETFOPEN Error opening Setup File - S SETFREAD Error reading Setup File - S SETFVER Setup File Version Error - S SETFWRITE Error writing Setup File - I SYMTRUNC Symbol truncated to - W SYNTAX Command syntax error w UNDEFSYM Undefined symbol - w UNDFILE PC file not open, check logical filename - I UNDLOGIC Undefined logical - W VALOVFL Value overflow W WILDCARD Improper use of wildcards for this command or expression F WINERR WINDOWS error E XFERERROR Unidentified File Transfer Error 206 u CHAPTER 9 VT320 PROGRAMMING OVERVIEW This chapter describes the character encoding concepts for the VT320. It covers control functions (control characters, escape sequences, and device control strings). Control functions are used in a program to specify how the emulator processes, sends and displays characters. Each control function has a unique name and each name has a unique, mnemonic abbreviation. Chapter Nine - VT320 Programming 207 9.1 QUICK REFERENCE TABLES This section contains quick reference tables for each of the main areas of programming information, namely: character sets, transmitted codes, received codes and reports. A separate section for each area contains more detailed information. 9.1.1 Character Sets The Character Sets section starts on page 9-21. Table 9-1 Character Set Quick Reference Designating Character Sets ES Intermediate C Final Intermediate 94 Character Sets 96 Character Sets To Select Use To Select Use G0 ( G1 G1 ) G2 . G2 ∗ G3 / G3 + Final To Select ASCII DEC Supplemental Graphic ISO Latin-1 User-preferred supplemental DEC Special Graphic Use B %5 A < 0 Mapping Character Sets Locking Shifts Function Locking shift 0. Maps G0 into GL Locking shift 1. Maps G1 into GL Locking shift 1, right. Maps G1 into GR ∗ Locking shift 2. Maps G2 into GL ∗ Locking shift 2, right. Maps G2 into GR ∗ Locking shift 3. Maps G3 into GL ∗ Locking shift 3, right. Maps G3 into GR ∗ Code S I S O ES C ES C ES C ES C ES C ~ n } o | ∗ Indicates VT300 mode only Single Shifts 8-Bit Code 7-Bit Code Function SS 2 ES C N Single Shift 2. Maps G2 into GL for the next character. SS 3 ES C O Single Shift 3. Maps G3 into GL for the next character. 208 9.1.2 Transmitted Codes Table 9-2 Transmitted Codes Quick Reference Key Editing Keypad Find Insert Here Remove Select Prev Screen Next Screen Code CS I 1~ CS I 2~ CS I CS I 3~ 4~ CS 5~ I CS 6~ I Cursor Keys Reset Normal CS A I CS B I CS C I CS D I Set Application SS A 3 SS B 3 SS C 3 SS D 3 Auxiliary Keypad 0 1 2 3 4 5 6 7 8 9 , . PF1 PF2 PF3 PF4 Enter Numeric 0 1 2 3 4 5 6 7 8 9 (minus) (comma) (period) SS P 3 SS Q 3 SS R 3 SS S 3 CR or CRLF Application SS p 3 SS q 3 SS r 3 SS s 3 SS t 3 SS u 3 SS v 3 SS w 3 SS x 3 SS y 3 SS m 3 SS l 3 SS n 3 SS P 3 SS Q 3 SS R 3 SS S 3 SS M 3 Chapter Nine - VT320 Programming 209 Table 9-2 Transmitted Codes Quick Reference (cont’d) Key Top Row Function Keys Hold Screen (F1) Print Screen (F2) Set-Up (F3) Data/Talk (F4) Break (F5) F6 F7 F8 F9 F10 F11 F12 F13 F14 Help (F15) Do (F16) F17 F18 F19 F20 Code * * * * * CS I 17 CS I 18 ~ ~ CS 19 ~ I CS 20 ~ I CS 21 ~ I CS 23 ~ I CS 24 ~ I CS 25 ~ I CS 26 ~ I CS 28 ~ I CS 29 ~ I CS 31 ~ I CS 32 ~ I CS 33 ~ I CS 34 ~ I * Indicates that codes are not generated. 210 9.1.3 Received Codes 9.1.3.1 VT320 Control Sequences Table 9-3 VT320 Control Sequences Escape Sequence Set Character Attributes CS Ps;... m I Ps = 0 Ps = 1 Ps = 4 Ps = 5 Ps = 7 Ps = 2 2 Ps = 2 4 Ps = 2 5 Ps = 2 7 CS “ q I CS 0 “ q I CS 1 “ q I CS 2 “ q I Function Character attributes all attributes off bold on underscore on blink on reverse video on normal intensity not underscored not blinking positive image All Non-graphic off All Non-graphic off All Non-erasable on All Non-erasable off Compatibility Level CS 61"p I CS 62"p I CS 62;0"p I CS 62;1"p I CS 62;2"p I CS 63"p I CS 63;0"p I CS 63;1"p I CS 63;2"p I Level 1 (VT100) Level 3 (VT300 8-bit) Level 3 (VT300 8-bit) Level 3 (VT300 7-bit) Level 3 (VT300 8-bit) Level 3 (VT300 8-bit) Level 3 (VT300 8-bit) Level 3 (VT300 7-bit) Level 3 (VT300 8-bit) Cursor Positioning CS Pn A I CS Pn B I CS Pn C I CS Pn D I CS Pl;Pc H I CS Pl;Pc f I CS H I Cursor up Cursor down Cursor right Cursor left Direct cursor addressing Direct cursor addressing Home Chapter Nine - VT320 Programming 211 Table 9-3 VT320 Control Sequences (cont’d) Escape Sequence Cursor Movement (cont’d) Function CS f I IN D ES D C NE L ES E C RI Home Index Index New Line New Line Reverse Index Reverse Index ES C M Editing CS Pn P I CS Pn @ I CS Pn L I CS Pn M I Delete Pn characters Insert Pn characters Insert Pn lines Delete Pn lines Erasing CS Pn X I CS K I CS 0 K I CS 1 K I CS 2 K I CS J I CS 0 J I CS 1 J I CS 2 J I CS ? K I CS ? 0 K I CS ? 1 K I CS ? 2 K I CS ? J I CS ? 0 J I CS ? 1 J I CS ? 2 J I Erase next Pn characters from cursor Cursor to end of line Cursor to end of line Beginning of line to cursor Entire line Cursor to end of screen Cursor to end of screen Beginning screen to cursor Erase entire screen Selective erase from cursor to end of line Selective erase from cursor to end of line Selective erase from beginning of line to cursor Selective erase entire line Selective erase from cursor to end of screen Selective erase from cursor to end of screen Selective erase from top of screen Selective erase entire screen Line Attributes ES #3 C ES #4 C ES #5 C ES #6 C Double height - top half Double height - bottom half Single width - single height Double width - single height 212 Table 9-3 VT320 Control Sequences (cont’d) Escape Sequence Terminal Modes Set Reset CS 2h I CS 4h I CS 12h I CS 20h I CS ?1h I CS 2l I CS 4l I CS 12l I CS 20l I CS ?1l I CS ?2l I Set Reset CS ?3h I CS ?4h I CS ?5h I CS ?6h I CS ?7h I CS ?8h I CS ?18h CS ?18l I I CS ?19h CS ?19l I I CS ?25h CS ?25l I I CS ?42h CS ?42l I I CS ?66h CS ?66l I I CS ?67h CS ?67l I I CS Ps $} I CS ?3l I CS ?4l I CS ?5l I CS ?6l I CS ?7l I CS ?8l I Ps = 0 Ps = 1 CS Ps $~ I Ps = 0 Ps = 1 Ps = 2 ES C = ES C > Function Mode Name Keyboard Action mode Insert/Replace mode Send/Receive mode Line feed/new line Cursor key mode VT52 mode Mode Name Column mode Scrolling mode Screen mode Origin mode Auto Wrap mode Auto repeat Form Feed mode Screen Print mode Text cursor mode Character Set mode Numeric keypad Backarrow key Select status display main display status line Select status line type none indicator host-writable Keypad mode Printing CS i I CS 0i I CS 4i I CS 5i I CS ?1i I CS ?4i I CS ?5i I Chapter Nine - VT320 Programming Print Screen Print Screen Print Controller mode off Print Controller mode on Print Cursor Line Auto Print mode off Auto Print mode on 213 Table 9-3 VT320 Control Sequences (cont’d) Escape Sequence Programmable LEDs CS Ps;Ps q I Ps = 0 Ps = 1 Ps = 2 Ps = 3 Ps = 4 Function Programmable LEDs all LEDs off L1 on L2 on L3 on L4 on Terminal Reset Mode ES c C CS !p I Hard terminal reset Soft terminal reset Scrolling Region CS Pt; Pb r I Define scroll region Select C1 Control Transmission ES space F C ES space G C 7-bit C1 control transmission 8-bit C1 control transmission Tab Stops HT S ES H C CS g I CS 0 g I CS 3 g I Set tab at current column Set tab at current column Clear at current column Clear at current column Clear all tabs User Defined Keys (DECUDK) DC Pc;Pl | ky1/st1;ky2/st2;...kyn/stn ST S DCS Private Sequences CS 0;0| I CS 0;1| I CS 0;2| I CS 0;3;Pc|...String... ST I CS 2;n| I CS 3;n| I CS 4;pl| I CS 5|...Command String... ST I CS 6| I CS 7;pl| I Enable Status Line Disable Status Line Erase Status Line Write Status Line Set/Reset Local Echo Set/Reset WP mode Set Printer Port Do Emulator Command Request Product ID Set number of lines per screen 214 9.1.3.2 VT100 Escape Sequences Table 9-4 VT100 Escape Sequences Escape Sequence Character Attributes ES [ Ps;... m C Ps = 0 Ps = 1 Ps = 4 Ps = 5 Ps = 7 Function Character attributes All attributes off Bold on Underscore on Blink on Reverse video on Character Sets G0 G1 ES ( A ES ) A C C ES ( B ES ) B C C ES ( 0 ES ) 0 C C ES ( 1 ES ) 1 C C ES ( 2 ES ) 2 C C UK set US ASCII set Special Graphics set Alternate ROM Alternate ROM Special Graphics set Cursor Movement ES [ Pn A C ES [ Pn B C ES [ Pn C C ES [ Pn D C ES [ Pl;Pc H C ES [ Pl;Pc f C ES D C ES E C ES M C ES 7 C ES 8 C Cursor up Cursor down Cursor right Cursor left Direct cursor addressing Direct cursor addressing Index New line Reverse index Save cursor - attributes Restore cursor - attributes Erase ES [ K C ES [ 0 K C ES [ 1 K C ES [ 2 K C ES [ J C ES [ 0 J C ES [ 1 J C ES [ 2 J C Cursor to end of line Cursor to end of line Beginning of line to cursor Entire line Cursor to end of screen Cursor to end of screen Beginning screen to cursor Erase entire screen Line Size ES #3 C ES #4 C Double height - top half Double height - bottom half Chapter Nine - VT320 Programming 215 Table 9-4 VT100 Escape Sequences (cont’d) Escape Sequence Function Line Size (cont’d) ES C ES C #5 Single width - single height #6 Double width - single height Modes Set Reset Mode Name ES [20h C ES [?1h C ES [?3h C ES [?4h C ES [?5h C ES [?6h C ES [?7h C ES [?8h C ES [?9h C ES 1 C ES = C ES [20l C ES [?1l C ES [?3l C ES [?4l C ES [?5l C ES [?6l C ES [?7l C ES [?8l C ES [?9l C ES 2 C ES > C Line feed/new line Programmable LEDs ES [ Ps;Ps q C Cursor key mode Column mode Scrolling mode Screen mode Origin mode Wraparound Auto repeat Interlace Graphic process option Keypad mode Programmable LEDs Ps = 0 All LEDs off Ps = 1 L1 on Ps = 2 L2 on Ps = 3 L3 on Ps = 4 L4 on Reset ES c C Reset Scrolling Region ES [ Pt; Pb r C Define scroll region Tab Stops ES H C ES C ES C ES C Set tab at current column [g Clear at current column [0g Clear at current column [3g Clear all tabs 216 9.1.3.3 VT52 Escape Sequences Table 9-5 VT52 Escape Sequences Chapter Nine - VT320 Programming Escape Sequence Function ES C A Cursor up ES C B Cursor down ES C C Cursor right ES C D Cursor left ES C F Enter graphics mode ES C G Exit graphics mode ES C H Cursor to home position ES C I Reverse line feed ES C J Erase to end of screen ES C K Erase to end of line ES C Y Direct cursor address ES C Z Identify ES C = Enter alternate keypad mode ES C > Exit alternate keypad mode ES C < Enter ANSI mode ES C ^ Enter auto print mode ES C _ Exit auto print mode ES C W Enter printer controller mode ES C X Exit printer controller mode ES C ] Print screen ES C V Print cursor line 217 9.1.4 Reports 9.1.4.1 VT320 Reports Table 9-6 VT320 Reports Host Directives* (host to Emulator) Reports (Emulator to host) Function CS c I CS ? I Primary Device Attributes or CS I0 c Psc ; Ps1 ; ...Psn c Psc Operating level 1 level 1 (VT100) 6 level 1 (VT102) 62 level 2 (VT200) 63 level 3 (VT300) Ps1...Psn Extensions 1 132 columns 2 printer port 6 selective erase 7 soft character set 8 user-defined keys 9 NRC set Secondary Device Attributes CS > I c or CS n CS > I 0c CS > I Pp ; Pv ; Po c Pp Identification code 24 VT320 Pv Firmware version Po Hardware options 0 no options Device Status Reports I6 CS Pl I ; Pc R Pl Pc CS ? I 26 n CS ? I Pd 1 CS 5 I CS ? I n 15 n CS I Line number Column number 27 ; Pd n Keyboard dialect North American 0n no malfunction CS 3 I n malfunction CS ? I 13 n no printer CS ? I 10 n printer ready CS ? I 11 n printer not ready Cursor Position Keyboard Dialect Operating Status Printer Status ∗ All host directives are requests, unless otherwise specified. 218 Table 9-6 VT320 Reports (cont’d) Host Directives∗ (host to Emulator) Emulator Reports (Emulator to host) CS ? I CS ? I 25 n 20 n UDKs unlocked Function UDK Status (VT300 mode only) CS ? I 21 n UDKs locked CS I Ps $ u Ps Report requested 0 ignored 1 terminal state report DC S 1 $ s D...D <checksums 1 and 2> ST D...D Report data S S Ps $ p D...D T Ps Data string format 0 error 1 terminal state report D...D Restored data Terminal State Reports (VT300 mode only) DC Restore terminal state CS Presentation State Reports (VT300 mode only) Cursor information report I Ps $ w Ps Report requested 0 error 1 cursor information report 2 tab stop report DC DC 1 $ u D...D ST D...D Data string S DC S S 2 $ u D...D T D...D Tab stops Ps $ t D...D ST Ps Data string format 0 error 1 cursor information report 2 tab stop report D...D Data string Restore presentation state S CS Pa I Pa $p ANSI mode Chapter Nine - VT320 Programming Tab stop report CS Pa I Pa Ps 0 1 2 3 4 ; Ps $ y ANSI mode Mode state unknown state set reset permanently set permanently reset Mode Settings (VT300 mode only) 219 Table 9-6 VT320 Reports (cont’d) Host Directives∗ (host to Emulator) Emulator Reports (Emulator to host) CS ? I CS Pd $ p DEC private mode Pd CS Pa I Pa Function I ? Pd ; Ps $ y Pd DEC private mode Ps Mode state 0 unknown state 1 set 2 reset 3 permanently set 4 permanently reset ; ...Pa h ANSI mode Set mode CS ?Pd I ; ...Pd h DEC private mode Pd CS Pa I Pa ; ...Pa l ANSI mode Reset mode CS I ? Pd ;... Pd l Pd DEC private mode ES C 7 Cursor Settings Save cursor ES C 8 Restore cursor DC $ q D...D ST D...D Intermediate and/or final characters of function. S CS & I u DC S Ps $ r D...D ST Ps Request validity 0 invalid request 1 valid request D...D Intermediate and/or final characters of function. DC S 0 ! u % 5 ST DEC Supplemental Graphic User-preferred Supplemental Set DC S 1 ! u A ST ISO Latin-1 Supplemental (VT300 mode only) Control Function Settings (VT300 mode only) * All host directives are requests, unless otherwise specified. 220 Table 9-7 ANSI Modes Pa 2 3 4 10 12 20 Mode Keyboard action Control representation * Insert/replace Horizontal editing Send/receive Line feed/new line * Control representation is not supported. Table 9-8 DEC Private Modes Pd 1 2 3 4 5 6 7 8 * Mode Cursor keys ANSI Column Scrolling Screen Origin Autowrap Autorepeat Pd 18 19 25 42 66 67 68 Mode Print form feed Printer extent Text cursor enable National Replacement Character set Numeric keypad Backarrow key Keyboard usage * Keyboard usage is not supported and is permanently reset. 9.1.4.2 VT100 Reports Table 9-9 VT100 Reports Host Directives (host to Emulator) ES [ 6 n C ES [ c or ES [ 0 c C C ES Z C Chapter Nine - VT320 Programming Emulator Reports (Emulator to host) ES [ Pl;Pc R C ES [ ?1; Ps c C ES [ ?1; Ps c C Ps Identification Code 0 Base VT100 1 STP 2 AVO 3 AVO and STP 4 GPO 5 GPO and STP 6 GPO and AVO 7 GPO, STP, and AVO Function Cursor Position Status Report Terminal Identification 221 9.2 CHARACTER ENCODING The VT320 uses an 8-bit character encoding scheme and a 7-bit code extension technique that are compatible with ANSI (American National Standards Institute) standards. When operating in VT100 or VT52 mode, you are limited to working in a 7-bit environment. There are three requirements for operating in an 8-bit environment: o o o Communications must be set for 8-bits and no parity. Your program must be 8-bit compatible. The emulator must be in VT320, 7-bit or 8-bit mode. VT320 7-bit mode displays the VT320 8-bit character set while sending 7-bit control sequences to the host. VT320 8-bit mode also displays the 8-bit character set, but sends 8-bit control sequences to the host. Note: VT320 8-bit mode is not a communication setting. It is an operating environment. To select 8-bit communications, configure the emulator to No Parity. 222 9.2.1 7-Bit ASCII Codes The 7 Bit ASCII Code table shows the octal, decimal, and hexadecimal code for each 7-bit ASCII character. Table 9-10 7-Bit ASCII Codes Chapter Nine - VT320 Programming 223 9.2.2 8-Bit ASCII Codes The 8-Bit ASCII Codes table able 9-11 shows the 8-bit code table, which has twice as many code values as the 7-bit code table. All codes on the left half of the 8-bit table (columns 0 through 7) are 7-bit compatible; the 8th bit is not set, and can be ignored or assumed to be 0. You can use these codes in a 7-bit or an 8-bit environment. All codes on the right half of the table (columns 8 through 15) have their 8th bit set. You can only use these codes in an 8-bit environment. The 8-bit code table has two sets of control characters, C0 (control 0) and C1 (control 1). The table also has two sets of graphics characters, GL (graphic left) and GR (graphic right). The basic functions of the C0 and C1 codes are defined by ANSI. The C0 codes are 7-bit compatible. The C1 codes represent 8-bit control characters that perform functions beyond those possible with the C0 codes. You can only use C1 codes in an 8-bit environment. 224 Table 9-11 8-Bit ASCII Codes Chapter Nine - VT320 Programming 225 9.2.3 Control Functions Control functions are a set of instructions used to program the terminal emulator. All control functions can be expressed in single-byte or multi-byte codes. Single-byte codes are the C0 and C1 control characters. You can perform a limited number of functions using C0 characters. A few more functions are available using C1 characters, but they must be used in an 8-bit environment. Multi-byte control codes represent far more functions than single-byte codes, due to the variety of code combinations possible. These codes are called control sequences, escape sequences, and device control strings. 9.2.3.1 Control Sequences A control sequence starts with a CSI (Control Sequence Introducer), followed by one or more ASCII characters. The 8-bit CSI can also be expressed as the 7-bit equivalent ESC [ (for use in a 7-bit environment). Thus, you can express all control sequences as escape sequences where the second character is the [. For example, the following two sequences are equivalent and perform the same function (they change the display from 80 columns to 132 columns). CS ? 3 I ES [ ? C h 3h Since the 8-bit CSI uses one less byte than the 7-bit equivalent, ESC [, you will gain processing speed by using the CSI. However, you can only use a sequence starting with the CSI character in an 8-bit environment. You can express any C1 control character as a two character escape sequence whose second character has a code that is 40 (hexadecimal) less than that of the C1 character. For example, ST is the same as ESC \. 9.2.3.2 Escape Sequences All escape sequences start with the same C0 character, ESC, and are followed by one or more ASCII characters. For example, the following escape sequence causes the current line to have double-width characters: ES C #6 Because escape sequences use only 7-bit characters, you can use them in 7-bit or 8-bit environments. You can make any escape sequence whose second character is in the range of column-4, row-0 through column-5, row-15 (refer to the 7-Bit ASCII Codes topic for more information) one byte shorter by removing the ESC and adding 40 (hexadecimal) to the code of the second character. This generates a C1 control character. 226 9.2.3.3 Device Control Strings A device control string (DCS) is a delimited string of characters used in a data stream as a logical entity for control purposes. It consists of an opening delimiter (a device control string introducer), a command string (data) and a closing delimiter (a string terminator). Device control strings are used to download character sets and to load user-defined keys. Table 9-12 Device Control String Device Control String DC S Data String Terminator UDKs or Character Set S T A device control character (DCS) is an 8-bit control character. It is expressed as ESC P when coding for a 7-bit environment. A string terminator (ST) is also an 8-bit control character. It is expressed as environment. 9.3 ES C \ when coding for a 7-bit CHARACTER SETS Although the C0 and C1 function codes cannot be changed, the GL and GR codes can have different character sets mapped into them. The Mapping Character Sets topic describes the commands for mapping character sets into GL or GR. The emulator supports the following character sets: o o o o o DEC Multinational (consists of ASCII and DEC Supplemental Character sets) ISO Latin-1 DEC Special Graphics National Replacement Character Downloadable Chapter Nine - VT320 Programming 227 9.3.1 DEC Multinational The DEC multinational character set is the default character set. The C0 and GL codes are the ASCII control codes and character set. The C1 and GR codes are the DEC multinational 8-bit control characters and character set. The C1 and GR control codes and characters are not available in VT52 and VT100 modes. Table 9-13 DEC Multinational Character Set 228 Table 9-13 DEC Multinational Character Set (cont’d) Chapter Nine - VT320 Programming 229 9.3.2 ISO Latin-1 The ISO Latin-1 set has 96 graphic characters. The majority of these are identical to the DEC Supplemental Graphic set, but with a few additional symbols and letters. The ISO Latin-1 set can only be used in VT300 mode. Table 9-14 ISO Latin-1 Supplemental Character Set 230 9.3.3 DEC Special Graphics This character set is also called the VT100 Line Drawing character set. It is comprised of ASCII characters and special symbols. The DEC Special Graphics set can replace either the GL or GR characters. Refer to the Mapping Character Sets topic for more information. This mapping is compatible with VT100 and VT300 modes. Table 9-15 DEC Special Graphic Character Set Chapter Nine - VT320 Programming 231 9.3.4 National Replacement Character All National Replacement Character sets are supported. Select the character set with a set mode control sequence. Table 9-16 NRC Control Sequences Sequence Function CS I Set National ? 42h CS ? I 42l Reset National (Set Multinational) NRC sets are available for the following languages. Language NRC Set Language NRC Set United Kingdom United Kingdom Italian Italian Each 7-bit character set contains 94 graphic characters. The twelve NCR sets resemble the ASCII character set. Danish Norwegian/Danish Norwegian Norwegian/Danish However, some ASCII characters are replaced for a particular European language or dialect. The replaced Dutch Dutch Portuguese Portuguese characters are shown in the table below. Finnish Finnish Spanish Spanish Flemish French Swedish Swedish Note: NCR sets are for 7-bit compatibility. Eight-bit Multinational mode is the recommended operating mode. French/Belgium French Swiss (French) Swiss French/Canadian French Canadian Swiss (German) Swiss German German Table 9-17 National Replacement Character Sets Character Set 35 64 91 92 93 94 95 96 123 124 125 126 9.3.5 Character Set Selection To select a character set, it must first be designated as a G0, G1, G2 or G3 logical set, as in the following sequence: ES C <Intermediate> <Final> The intermediate character is selected based on where the set is to be designated (G0, G1, etc.) and whether the set has 94 or 96 characters. 96 character sets cannot be designated as G0. 232 Table 9-18 Character Set Designation - Intermediate To Select Use 94 Character Set G0 G1 G2 G3 ( ) ∗ + The final character is the designator for the character set. Table 9-19 Character Set Designation - Final To Select ASCII (94) DEC Supplemental Graphic (94) ISO Latin-1 Supplemental (96) User-preferred Supplemental (94) DEC Special Graphic (94) National Replacement Character Sets (94) Example: ES C Use B %5 A < 0 +%5 Designates the DEC Supplemental Graphic set as the G3 logical set. Chapter Nine - VT320 Programming 233 9.3.6 Mapping Character Sets Character sets are mapped into use with locking shift and single shift functions. Locking shift functions map a character set into GL or GR where it remains until another locking shift is used. Table 9-20 Mapping Character Sets with Locking Shifts Sequence Function SI Locking shift 0. Maps G0 into GL S O ES C ES C ES C ES C ES C Locking shift 1. Maps G1 into GL ~ Locking shift 1, right. Maps G1 into GR ∗ n Locking shift 2. Maps G2 into GL ∗ } Locking shift 2, right. Maps G2 into GR ∗ o Locking shift 3. Maps G3 into GL ∗ | Locking shift 3, right. Maps G3 into GR ∗ * Indicates VT300 mode only. Single shift functions map the G2 or G3 set into GL for the next character only. After the next character is displayed, the previous character set is restored into GL. Table 9-21 Mapping Character Sets with Single Shifts 8-Bit Character 7-Bit Equivalent Sequence Function SS 2 ES C N Single shift 2. Maps G2 into GL for the next character. SS 3 ES C O Single shift 3. Maps G3 into GL for the next character. 234 Figure 9-1 Locking Commands (VT100) Figure 9-2 Locking and Single Shift Commands Chapter Nine - VT320 Programming 235 9.4 TRANSMITTED CODES This section describes the codes that the emulator sends to a program. Key codes generated in VT52 mode are listed if they differ from those in ANSI compatible mode (VT200 and VT100). 9.4.1 Main Keypad The main keypad consists of standard keys (used to generate letters, numbers, and symbols) and function keys (used to generate special function codes). 9.4.1.1 Standard Keys The standard keys generate only alphanumeric, ASCII characters. There are no DEC Supplemental characters among the standard keys. However, you can create any DEC Multinational graphics character that is not available through a standard key by typing a valid compose sequence. Each character is represented by a unique code that is based on the character’s position in the code table. Refer to the 7-Bit ASCII Codes table for more information. 9.4.2 Editing Keypad The codes in the following table are generated by the VT320 editing keypad and cursor keys. Table 9-22 Codes from Editing Keys Key Find Insert Here Remove Select Prev Screen Next Screen VT320 Mode CS 1 ~ I CS 2 ~ I CS 3 ~ I CS 4 ~ I CS 5 ~ I CS 6 ~ I Table 9-23 Codes from Cursor Control Mode Key Cursor Key Mode Reset Normal Set Application CS A SS A I 3 CS B SS B I 3 CS C SS C I 3 CS D SS D I 3 VT52 Mode Normal and Application ES A C ES B C ES C C ES D C 236 9.4.3 Auxiliary Keypad The characters sent by the auxiliary keypad keys depend upon the settings of two features; the operating mode (ANSI or VT52) and the keypad mode (application or numeric). Table 9-24 Codes from Auxilary Keypad Keys VT320/VT100 ANSI Mode Key Numeric Application 0 SS 3 1 1 SS 3 2 2 SS 3 3 3 SS 3 4 SS 3 5 5 SS 3 6 6 SS 3 7 7 SS 3 8 SS 3 9 SS 3 - (minus) SS 3 , (comma) SS 3 . (period) SS 3 PF1 SS 3 P SS 3 PF2 SS 3 Q SS 3 PF3 SS 3 R SS 3 PF4 SS 3 S SS 3 Enter C SS 3 0 4 8 9 Note: ES C ES C R or CRLF VT52 Mode Numeric Application 0 ES C ?p q 1 ES C ?q r 2 ES C ?r s 3 ES C ?s 4 ES C ?t u 5 ES C ?u v 6 ES C ?v w 7 ES C ?w 8 ES C ?x 9 ES C ?z m - ES C ?m l , ES C ?l n . ES C ?n P ES C P ES C P Q ES C Q ES C Q R ES C R ES C R S ES C S ES C S M C ES C ?M p t x y R or CRLF [ is the 7-bit equivalent for CSI . O is the 7-bit equivalent for SS3 . Chapter Nine - VT320 Programming 237 9.4.4 Top Row Function Keys On the VT320 keyboard there are 20 top row function keys, F1 through F20. The keys F1 - F5, labeled Hold Screen, Print Screen, Set-Up, Data/Talk, and Break, do not send codes. F6 - F20 send the codes defined below. Table 9-25 Codes from Top Row Functions Function Key Hold Screen Generic Name VT320 Mode VT100/VT52 Mode F1 * ∗ Print Screen F2 * ∗ Set-Up F3 ∗ ∗ Data/Talk F4 ∗ ∗ Break F5 F6 F6 F7 F7 F8 F8 F9 F9 F10 F10 CS I CS I ∗ ∗ 17~ ∗ 18~ ∗ ~ ∗ ~ ∗ ~ ∗ ~ ∗ ~ ∗ ~ ∗ ~ ∗ ~ ∗ ~ ∗ ~ ∗ ~ ∗ ~ ∗ 4~ ∗ CS 1 9 I CS 2 0 I CS 2 1 I CS 2 3 I F11 F11 F12 F12 F13 F13 F14 F14 Help (F15) Do (F16) F17 F17 F18 F18 F19 F19 CS 2 4 I CS 2 5 I CS 2 6 I CS 2 8 I CS 2 9 I CS 3 1 I CS 3 2 I CS 3 3 I F20 CS 3 I F20 ∗ Indicates that codes are not generated. 238 9.4.5 Control Codes The keys and key combinations used to send C0 7-bit control character codes are listed below. Table 9-26 7-Bit Control Character Keys Ctrl Character Mnemonic NU L SO H ST X ET X EO T EN Q AC K BE L B S H T L F V T F F C R S O S I DL E DC 1 DC 2 DC 3 DC 4 NA K SY N ET B CA N E M SU B ES C F S G S R S U S DE L Chapter Nine - VT320 Programming Code Key Pressed with Ctrl 0/00 2, space 0/01 A 0/02 B 0/03 C 0/04 D 0/05 E 0/06 F 0/07 G 0/08 H 0/09 I 0/10 J 0/11 K 0/12 L 0/13 M 0/14 N 0/15 O 1/00 P 1/01 Q 1/02 R 1/03 S 1/04 T 1/05 U 1/06 V 1/07 W 1/08 X 1/09 Y 1/10 Z 1/11 3,[ 1/12 4,\ 1/13 5,] 1/14 6,~ 1/15 7,? 7/15 8 239 9.5 RECEIVED CODES This section describes the emulator’s response to codes received from an application or host system. All data received by the emulator consists of single or multiple character codes. These codes include display characters, control characters, control sequences, escape sequences and device control strings. 9.5.1 Character Rendition and Attributes Character Rendition and Attributes are display functions that affect the way a character is displayed, without changing the character (e.g., underline, blinking, bold). 9.5.1.1 Select Graphic Rendition One or more character renditions can be selected at a time. Multiple parameters are executed in sequence and are cumulative. If using more than one character rendition, the parameters must be separated by a delimiter; the semicolon. Example: CS I0 ;4;5m Turns all attributes off then implements a blinking underline. 240 The select character rendition format is: CS I Ps ; Ps ... m Where: Ps is one of the parameters from the following table. Table 9-27 SGR Character Attribute Parameters Parameter Action 0 All attributes off 1 Display bold 4 Display underscored 5 Display blinking 7 Display reverse video 22 Display normal intensity 24 Display not underlined 9.5.1.2 Select Attributes All characters can be set to erasable or non-erasable by using the following format (VT300 mode only). CS I Ps “q Where: Ps is one of the parameters from the following table. Table 9-28 DECSCA Attribute Parameters Parameter Action 0 All attributes off 1 Designate character as not erasable by DECSEL/DECSED 2 Designate character as erasable by DECSEL/DECSED Chapter Nine - VT320 Programming 241 9.5.2 Compatibility Level There are two levels of operation for compatibility with an application; level one (VT100 operation), and level 2 (VT320 operation). Table 9-29 Level 1/Level 2 Compatibility Area Level 1 (VT100 Mode) Level 2 (VT320 Mode) Keyboard Sends ASCII only. UDKs cannot be loaded. Permits full use of the VT320 keyboard. Editing keypad function keys do not operate. 7 or 8 Bits The 8th bit is set to zero. Character Sets Only ASCII and DEC Special graphics character sets are available. C1 Control Characters All transmitted C1 controls are sent as 7-bitescape sequences (S7C1). All VT320 character sets are available. 242 The compatibility level of the emulator can be set with the following sequences: Table 9-30 Compatibility Level Sequences Sequence Action (sets emulator to...) CS I Level 1 compatibility (VT100 mode) 61“p CS 6 I 2“p Level 3 compatibility (VT300/8-bit) CS 6 I 2;0“p Level 3 compatibility (VT300/8-bit) CS 6 I 2;1“p Level 3 compatibility (VT300/7-bit) CS 6 I 2;2“p Level 3 compatibility (VT300/8-bit) CS I 63“p CS 6 I CS I Level 3 compatibility (VT300/8-bit) 63;1“p Level 3 compatibility (VT300/7-bit) CS 6 I Chapter Nine - VT320 Programming Level 3 compatibility (VT300/8-bit) 3;0“p 3;2“p Level 3 compatibility (VT300/8-bit) 243 9.5.3 Control Characters Tables 9-31and 9-32 define the action taken by the emulator when it receives C0 and C1 control characters. The VT320 does not recognize all C0 and C1 characters; those not shown in either table are ignored. Table 9-31 C0 Control Characters C0 Name Action NU Null Ignored when received. EN Q Enquiry Generates answerback message. BE L Bell Generates bell tone. B S Backspace Moves cursor to the left one position. H Horizontal Tabulation Moves cursor to next tab stop. Does not cause auto wrap. L F Line Feed Causes a line feed. V T Vertical Tabulation Processed as LF. F F Form Feed Causes a form feed. C Carriage Return Moves cursor to left margin on current line. Shift Out (Lock Shift G1) Invokes G1 character set into GL. G1 is designated by a select character set (SCS) sequence. SI (LS0) Shift In (Lock Shift G0) Invokes G0 character set into GL. G0 is designated by a select character set (SCS) sequence. DC 1 Device Control 1 Also referred to as Xon. If Xoff support is enabled, DC1 clears DC3 (Xoff); this causes the emulator to continue sending characters. DC 3 Device Control 3 Also referred to as Xoff. If Xoff support is enabled, DC3 causes the emulator to stop sending characters until a DC1 control character is received. CA N Cancel If received during an escape or control sequence, terminates and cancels the sequence. No error character is displayed. If received during a DCS, the DCS is terminated and no error character is displayed. SU B Substitute If received during an escape or control sequence, terminates and cancels the sequence. Also displays a reverse question mark. If received during a DCS, terminates the DCS and displays a reverse question mark. ES C Escape Processed as an escape sequence introducer. Terminates any escape control or DCS in progress. DE L Delete Ignored when received. Cannot be used as a time fill character. L T R S O (LS1) 244 The equivalent 7-bit code extensions for each 8-bit C1 code are shown in the table below. The code extensions require one more byte than the C1 codes. Table 9-32 C1 Control Characters C1 Name IND Index NE L Next Line S Horizontal Tab Set Equivalent 7-Bit Action RI Reverse Index SS 2 Single Shift G2 ES D C ES E C ES H C ES M C ES N C SS 3 Single Shift G3 ES C O DC S Device Control String P I Control Sequence Introducer ES C ES C Temporarily invokes G2 character set into GL for the next character. G2 is designated by an SCS sequence. Temporarily invokes G3 character set into GL for the next character. G3 is designated by an SCS sequence. Processed as opening delimiter of a DCS for device control use. [ Processed as a control sequence introducer. ES C \ Processed as a closing delimiter of a string opened by a DCS. HT CS S T String Terminator Moves cursor down one line in same column. Moves cursor to first position on next line. Sets one horizontal tab stop at column where the cursor is. Moves cursor up one line in same column. 9.5.4 Cursor Positioning The cursor indicates the active screen position where the next character appears. Cursor positioning can be controlled with the following sequences: Table 9-33 Cursor Positioning Name Cursor Up (CUU) Cursor Down (CUD) Cursor Forward (CUF) Cursor Backward (CUB) Cursor Position (CUP) Horizontal & Vertical Position (HVP) Index (IND) Reverse Index (RI) Next Line (NEL) Save Cursor (DECSC) CS Pn A I CS Pn B I CS Pn C I CS Pn D I CS Pl;Pc H I CS Pl;Pc f I ES D C ES M C ES E C ES 7 C Restore Cursor (DECRC) ES C Chapter Nine - VT320 Programming Sequence 8 Action Moves cursor up Pn lines in the same column. Moves cursor down Pn lines in the same column. Moves cursor right Pn columns. Moves cursor left Pn columns. Moves cursor to line Pl, column Pc. Moves cursor to line Pl, column Pc. Moves cursor down one line in the same column. Moves cursor up one line in the same column. Moves cursor to the first position of the next line. The following is saved in terminal memory: – Cursor Position – Graphic Rendition – Character Set Shift State – State of Wrap Flag – State of Origin Mode – State of Selective Erase Restores the states described for DECSC above. 245 9.5.5 Editing Editing sequences are used to insert or delete characters and lines at the cursor position. Table 9-34 Editing Name Sequence Action Insert Line (IL) CS I Pn L Inserts Pn lines at the cursor position. Delete Line (DL) CS I Pn M Deletes Pn lines at the cursor position. Insert Character (ICH) CS I Pn @ Inserts Pn blank characters at the cursor position (VT320 mode only). Delete Character (DCH) CS I Pn P Deletes Pn characters starting at the cursor position. 9.5.6 Erasing The erasing sequences are used to erase characters, lines, etc. from the cursor position. Table 9-35 Erasing Name Sequence Action Erase Character (ECH) CS I Pn X Erase character at the cursor position and the next Pn-1 characters (VT320 mode only). Erase In Line (EL) CS I CS I CS I CS I K 0K 1K 2K Erase from cursor to end of line, inclusive. Same as above. Erase from beginning of line to cursor, inclusive. Erase the entire line. Erase In Display (ED) CS J I CS 0 J I CS 1 J I CS 2 J I Erase from cursor to end of screen, inclusive. Same as above. Erase from beginning of screen to cursor, inclusive. Erase entire display. Selective Erase In Line (DECSEL) CS I CS I CS I CS I Erase all erasable characters from cursor to end of line. Same as above. Erase all characters from beginning of line to cursor, inclusive. Erase all erasable characters on the line. Selective Erase In Display (DECSED) CS ? J I CS ? 0 I CS ? 1 I CS I ?K ?0K ?1K ?2K J J ?2J Erase all erasable characters from cursor to end of screen. Same as above. Erase all erasable characters from beginning of screen to cursor, inclusive. Erase all characters in the display. 246 9.5.7 Line Attributes Line attributes are display features that affect a complete display line. Select line attributes by using the following sequences: Table 9-36 Line Attribute Sequences Sequence Action ES C #3 Double height line, top half ES C #4 Double height line, bottom half ES C #5 Single width line ES C #6 Double width line 9.5.8 Printing All print operations can be selected using control sequences. But, before you select a print operation, you should check the printer status using the Print Status Report. Table 9-37 Printer Operations Operation Sequence Action Auto Print Mode CS I Printer Controller Mode CS ? I CS 5 I Print Cursor Line CS I CS I Print Screen CS i I Turns on Auto Print mode. The printed line ends with CR and the character that moved the cursor off the previous line (LF, FF, or VT). Auto Wrap lines end with a line feed. Turns off Auto Print mode. Turns on Printer Controller mode. The terminal sends received characters to the printer without displaying them on the screen. Turns off Printer Controller mode. Prints the display line containing the cursor. The Print Cursor Line sequence is complete when the line prints. Prints the screen display. The Print Screen sequence is complete when the screen prints. Same as above. ?5i 4i i 4i ?1i CS 0 I i 9.5.9 Scrolling Region This sequence is affected by Origin Mode. Name Sequence Action Set Top & Bottom Margins CS Pt;Pb I Pt is the top margin and Pb is the bottom margin. The scrolling region must be at least two lines and Pb must be larger than Pt. The cursor is placed in the home position. Chapter Nine - VT320 Programming r 247 9.5.10 Select C1 Controls Select C1 Controls can be used to represent C1 control codes in 7-bit or 8-bit form. However, it is recommended that you use DECSCL sequences instead of Select C1 Controls. The advantage is DECSCL performs a soft reset, putting the emulator in a known state, in addition to setting the Terminal mode and the C1 control state. 9.5.10.1 Select 7-bit C1 Transmission (S7C1T) Name Sequence Action S7C1T ES C Converts all C1 codes returned to the host to their equivalent 7-bit code extensions. space F Note: The S7C1T sequence is ignored in VT100 and VT52 modes. 9.5.10.2 Select 8-bit C1 Transmission (S8C1T) Name Sequence Action S8C1T ES C Returns C1 codes to the application without converting them to their 7-bit code extensions. space G 9.5.11 Tab Stops Table 9-38 Tab Stops Name Sequence Action Set Tab ES C Sets a tab stop at the current column. Clear Tab CS g I CS 0 g I CS 3 g I H Clears a tab stop at the current column. Same as above. Clears all tab stops. 9.5.12 Terminal Modes A mode is a terminal operating state; each mode changes the way the emulator works. Each mode has an identifying mnemonic name. You can set or reset modes individually or in strings, using set mode (SM) or reset mode (RM) control sequences. 248 9.5.12.1 Reset Mode (RM) Resets the ANSI and Digital private modes, individually or in strings. Mode Sequence Action ANSI CS Ps I Reset sequence for ANSI modes. DEC Private CS I ;...; Ps l ? ;...; Ps l Reset sequence for DEC private modes. 9.5.12.2 Set Mode (SM) Sets the ANSI and DEC private modes, individually or in strings. Mode Sequence Action ANSI CS I Ps ;...; Ps h Set sequence for ANSI mode. DEC Private CS I ? ;...; Ps h Set sequence for DEC Private mode. Table 9-39 Selectable Modes Summary Name ANSI/VT52 Code DECANM Set Mode N/A Auto Repeat DECARM On Auto Wrap DECAWM On Backarrow Key DECBKM CS I BS CS I CS I Character Set DECNRCM Column DECCOLM Cursor Key DECCKM Insert/Replace IRM Keyboard Action KAM Keypad Line Feed/New Line DECKPAM/ DECKPNM LNM Numeric Keypad DECNKM Chapter Nine - VT320 Programming ?8h ?7h ? 67 h National CS ? 42 h I 132 Column CS ? 3 h I Application CS ? 1 h I Insert CS 4 h I Locked CS 2 h I Application ES = C New Line CS 20 h I Application CS ? 66 h I Reset Mode VT52 CS ? 2 l I Off CS ? 8 l I Off CS ? 7 l I DE L CS ? I 67 l Multinational CS ? 42 l I 80 Column CS ? 3 l I Cursor CS ? 1 l I Replace CS 4 l I Unlocked CS 2 l I Numeric ES > C Line Feed CS 20 l I Numeric CS ? 66 l I 249 Table 9-39 Selectable Modes Summary (cont’d) Name Code Set Mode Reset Mode Origin DECOM Print Extent DECPEX Print Form Feed DECPFF Screen DECSCNM Scrolling DECSCLM Absolute CS ? 6 l I Scroll Rgn CS ? 19 l I Off CS ? 18 l I Normal CS ? 5 l I Jump CS ? 4 l I Select Status Display DECSASD Select Status Line Type DECSSDT Send/Receive SRM Text Cursor Enable DECTCEM Origin CS ? 6 h I Full Screen CS ? 19 h I On CS ? 18 h I Reverse CS ? 5 h I Smooth CS ? 4 h I CS Ps$} I Ps=0 main display Ps=1 status line CS Ps $~ I Ps=0 none Ps=1 indicator Ps=2 host-writable Off CS 12 h I On CS ? 25 h I On CS 12 l I Off CSI ? 25 l 9.5.12.3 ANSI/VT52 Mode (DECANM) In ANSI mode, reset selects VT52 compatibility mode. In VT52 mode, the emulator responds to Digital private sequences like a VT52 terminal. Mode Sequence Action Reset CS I Sets the emulator to VT52 mode. ?2l Note: There is no Set mode for ANSI/VT52 mode. 9.5.12.4 Auto Repeat Mode (DECARM) Specifies whether or not keys automatically repeat their character when held down. Mode Sequence Action Set CS I ?8h Keys autorepeat when pressed for more than 0.5 seconds Reset CS I ?8l Keys do not autorepeat 250 9.5.12.5 Auto Wrap Mode (DECAWM) Selects where received characters appear when the cursor is at the right margin. Mode Sequence Action Set CS I Reset CS ? I Selects auto wrap. Characters received when the cursor is at the right margin appear on the next line at the left margin. Turns off auto wrap. Characters received when the cursor is at the right margin are overwritten. ?7h 7l 9.5.12.6 Backarrow Key Mode (DECBKM) Selects whether the emulator sends a delete or backspace for the backarrow key. Mode Sequence Action Set CS I CS I ? 67 h Move cursor one position to the left (backspace). ? 67 l Delete previous character. Reset 9.5.12.7 Character Set Mode (DECNRCM) Determines whether the emulator uses NRCs or the DEC multinational character set. Mode Set Sequence CS ? 4 2 h I Action Select National mode. Generates 7-bit characters from NRC sets. Reset CS ? I Selects Multinational mode. Generates 8-bit characters from the multinational character set, including 7-bit characters from the ASCII set. 42l 9.5.12.8 Column Mode (DECCOLM) Column mode selects the number of columns per line; 80 or 132. Mode Sequence Action Set CS ? 3 h I CS ? 3 l I Selects 132 columns. Reset Chapter Nine - VT320 Programming Selects 80 columns. 251 9.5.12.9 Cursor Key Mode (DECCKM) Cursor Key mode determines the character sent by the cursor keys. Mode Sequence Action Set CS I ?1h Causes the cursor keys to send application control functions. Reset CS I ?1l Causes the cursor keys to send ANSI cursor control sequences. 9.5.12.10 Insert/Replace Mode (IRM) Insert/Replace mode determines how the emulator adds characters to the screen. Mode Sequence Action Set CS I 4h Selects Insert mode. New characters move old characters to the right. Reset CS I 4l Selects Replace mode. New characters replace old characters at the cursor position. The old character is erased. 9.5.12.11 Keyboard Action Mode (KAM) Keyboard Action mode lets your program lock and unlock the keyboard. When the keyboard is locked it cannot send codes to the program. Mode Sequence Action Set CS 2 I Locks the keyboard. Reset CS I h 2l Unlock the keyboard, unless it is locked by DC3. 9.5.12.12 Keypad Mode (DECKPAM/DECKPNM) The auxiliary keypad generates either numeric characters or control functions. Mode Sequence Action Application (DECKPAM) ES C = Selects Application keypad mode. Keypad keys send application control functions. Numeric (DECKPNM) ES C > Selects Numeric keypad mode. Keypad keys send numeric, comma, period, and minus sign codes. PF1 - PF4 send control functions. 252 9.5.12.13 Line Feed/New Line Mode (LNM) Line Feed/New Line mode selects the control character(s) sent to the application by the Return and Enter keys. Mode Sequence Action Set CS I 20h Causes a received LF, FF, or VT code to move the cursor to the first column of the next line. Return sends CR and LF. Reset CS I 20l Causes a received LF, FF, or VT code to move the cursor to the next line in the current column. Return sends CR only. 9.5.12.14 Numeric Keypad Mode (DECNKM) Numeric Keypad mode selects whether the emulator sends numeric characters or application sequences for the numeric keypad. Mode Sequence Action Set CS ? 66 h I CS ? 66 l I Numeric keypad sends numeric characters. Reset Numeric keypad sends application sequences. 9.5.12.15 Origin Mode (DECOM) Origin mode allows cursor addressing relative to a user-defined origin. Mode Sequence Action Set CS I Reset CS 2 I Selects home position as the top margin of the user-defined scrolling region. The cursor cannot move out of the scrolling region. All cursor positioning is relative to the top of the scrolling region. Causes a received LF, FF, or VT code to move the cursor to the next line in the current column. Return sends CR only. ?6h 0l 9.5.12.16 Print Extent Mode (DECPEX) Print Extent mode selects the full screen or the scrolling region for a print screen operation. Mode Sequence Action Set CS ? 1 9 h I CS ? 1 9 l I Selects full screen for a print screen operation. Reset Chapter Nine - VT320 Programming Selects the scrolling region for a print screen operation. 253 9.5.12.17 Print Form Feed Mode (DECPFF) This mode determines whether the emulator sends a print termination character after a screen print. The form feed character (FF) serves as the print termination character. Mode Sequence Action Set CS I ?18h Reset CS I ?18l Selects FF as the print termination character. The emulator sends this character to the printer after each print screen operation. Selects no termination character. The emulator does not send a F to the printer after each print screen operation. F 9.5.12.18 Screen Mode (DECSCNM) Screen mode selects a normal or reverse video display on the screen. Mode Set Sequence CS ? 5 h I Action Select reverse video. Reset CS I Select normal screen. ?5l 9.5.12.19 Scrolling Mode (DECSCLM) There are two methods of scrolling; jump and smooth scroll. Mode Set Sequence CS ? 4 h I Action Select smooth scroll. Reset CS I Select jump scroll. ?4l 9.5.12.20 Select Status Display (DECSASD) Selects whether the emulator sends data to the main display (first 24 lines) or the status line (25th line). Available in VT300 mode only. CS Ps I $} Ps Display option 0 data is sent to the main display only 1 data is sent to the status line only 254 9.5.12.21 Select Status Line Type (DECSSDT) Enables the host to select the type of status line. CS I Ps $ ~ Ps 0 1 2 Status line selection no status line indicator host-writable Note: If the status line is changed from indicator to host-writable, the new status line is empty. When the host-writable status line is selected, most control functions affecting the main display affect the status line. The following table lists the exceptions. Table 9-40 Control Function Effects on the Status Line Function Effect ANSI mode Ignored if received in the status line. C1 transmissions Affects main display and status line. Cursor position controls Affects only the column parameters. Hard terminal reset Erases and exits status line. Insert/replace mode Affects main display and status line. Screen alignment test No effect. Screen mode Affects main display and status line. Scrolling mode Affects main display and status line. Select character set The same character set is used in both the main display and status line. Set conformance test Exits status line. Soft terminal reset Exits status line. Tab stops Affects main display and status line. Text cursor enable mode The cursor can be individually enabled in the main display or status line. 9.5.12.22 Send/Receive Mode (SRM) Send/Receive mode turns local echo on or off. Mode Sequence Action Set CS I 12h Reset CS I 12l Disables local echo. When the emulator sends characters to the host, the host must echo characters back to the emulator. Enables local echo. When the emulator sends characters, the characters are automatically sent to the screen. Chapter Nine - VT320 Programming 255 9.5.12.23 Text Cursor Enable Mode (DECTCEM) Text Cursor Enable mode determines if the text cursor is visible. Mode Sequence Action Set CS I ?25h Makes the cursor visible. Reset CS I ?25l Make the cursor invisible. 9.5.13 Terminal Reset Mode There are two terminal reset control sequences: a soft terminal reset, and a hard terminal reset. 9.5.13.1 Soft Terminal Reset The DECSTR sequence sets the terminal to the states listed below. The DECSTR sequence is as follows: CS ! I p Table 9-41 Soft Terminal Reset States Sequence Text Cursor Insert/Replace Origin Mode Auto Wrap Keyboard Action Keypad Mode Cursor Key Mode Top Margin Bottom Margin Character Sets Cursor Position SGR Write State Origin Mode National/Multinational Video Character Attributes Selective Erase Attributes State On Replace Absolute Off Unlocked Numeric Normal 1 24 VT320 defaults Home Normal Normal (reset) Multinational Normal Normal (erasable) 9.5.13.2 Hard Terminal Reset A hard terminal reset is implemented by clicking Execute - Reset. 256 9.5.14 Programming User Defined Keys (UDKs) When the terminal is in VT300 mode, you can download key sequences into the programmable function keys using DECUDK device control strings. To access the keys programmed value, press Shift and the function key. The emulator has 512 bytes available for 20 programmable function keys. (The VT320 only has 256 bytes available for 15 function keys). Space is supplied on a first come-first serve basis. After the 512 bytes are used, you must clear space to redefine keys. There are three ways to clear space: 1) Redefine a key (or keys) using a DECUDK. 2) Clear a key (or keys) using a DECUDK. 3) Clear the definition by clicking Execute - Reset. 9.5.14.1 DECUDK DCS Format The Device Control String (DCS) format for downloading UDKs is as follows: DC S DC S Pc Pc;Pl | Ky1/st1;ky2/st2;...kyn/stn ST The Device Control String introducer, DCS is an 8-bit character. ESC P is the 7-bit coding equivalent. The Pc (clear parameter) determines which keys are cleared, and when. A value of 0 (or no value) clears all keys, and 1 clears each key to be reloaded just before reloading it. Pl The Pl (lock parameter) determines whether the key definitions are locked or not after you load them. A value of 0 (no value) locks the keys (non-define). A value of 1 does not lock them (define). | This is the final character. It designates the control string as a DECUDK. Kyn/stn This is the key definition string. Each string consists of a key selector number (Kyn) and a string parameter (stn) separated by a slash. The Kyn specifies the key to be redefined and the stn is the encoded contents of the string. The stn consists of hex pairs. ST The string terminator is an 8-bit control character that is expressed as ESC \ for 7-bit coding. The following is a list of definable keys and their identifying values: Token Value Token Value Token Value UDK1 UDK2 UDK3 UDK4 UDK5 UDK6 UDK7 12 13 14 15 16 17 18 UDK11 UDK12 UDK13 UDK14 UDK8 UDK9 UDK10 23 24 25 26 19 20 21 UDK15 UDK16 UDK17 UDK18 UDK19 UDK20 28 29 31 32 33 34 The tokens UDK1 - UDK5 are not assigned in the default keyboard configuration. They must be assigned with the Keyboard Mapping feature. Chapter Nine - VT320 Programming 257 9.5.14.2 Guidelines for Loading Keys o o o o o o Use the UDK clear parameter to reclaim key definition space. Generally, you should not leave keys unlocked. The host must keep track of the available space for definitions. If you redefine a key, the old sequence is lost. The emulator uses a special lock for the programmable keys. The lock can be turned on with a DECUDK, but can only be unlocked by the UDK unlock parameter. The lock acts globally over all programmable keys. All key definitions are stored in volatile RAM. If there is a power loss, the key definitions are lost. An invalid DCS in a key definition causes an aborted load. An aborted load locks the keys, saves the successfully loaded keys, and sends the rest of the DECUDK sequence to the screen. 9.5.14.3 Examples for Using DECUDK Example 1: DC S 0;1| ST Clears all of the UDKs. Example 2: DC S 1;0| ST Locks the UDKs. Example 3: DC S 1;1|34/5052494E54 ST Clears and leaves UDK20 unlocked. Then, defines UDK20 as “PRINT”. P R I N T Note: = = = = = 50 hex 52 hex 49 hex 4E hex 54 hex DC is also represented by the 7-bit equivalent of ES S C ST is also represented by the 7-bit equivalent of ES \ C P. . 258 9.5.15 DCS Private Control Sequences DCS private sequences are control sequences supported only by a DCSi emulator. They are not available on VT320 terminals. Table 9-42 DCS Private Control Sequences Name Sequence Action Enable User Status Line CS 0;0| I Disable User Status Line CS 0;1| I Erase Status Line CS 0;2| I CS 0;3;Pc| I Enables the emulator status line for the host. When the emulator receives the enable command, it displays the previous user-defined status line. If the status line was not previously downloaded, it is cleared. Disables the display of the user-defined status line and redisplays the emulator status line. The contents of the downloaded status line are not destroyed. It may be redisplayed by sending an enable sequence. Erases the status line and clears the down-loaded data. Write Status Line Set/Reset Local Echo WordPerfect Mode Printer Port Control Note: ...string... ST CS 2;n| I CS 3;n| I CS 4;pl| I Execute Emulator Command CS 5| I Request Product Identification CS 6| I Set Lines Per Screen CS I ...command string...ST 7;pl| Writes the characters between the vertical bar and the string terminator to the status line starting at column Pc. Enables local echo if n=1. Disables local echo if n=0. Enables WordPerfect mode if n=1, disables if n=0. Controls the assignment of the printer port. Where pl is: 0=none, 1=LPT1, 2=LPT2, 3=LPT3, 4=COM1, 5=COM2, 6=COM3 Sends the command string to the emulator for execution. The command string can contain any valid emulator command or reference a command file. If this sequence is sent to a DCSi emulator, the emulator returns an identification report to the host in the format: ES n xxxx C Where: n is a single ASCII digit indicating the number of characters to follow (n not included). xxxx is the product identification string Where: pl is the number of lines per screen. CS (Hex 9B) is the C1 Control Sequence Introducer. The 7-bit equivalent of CS I I ST (Hex 9C) is the C1 String Terminator. The 7-bit equivalent of ST is ES \. C is ESC [. 9.5.15.1 Example - DCS Private Sequence CS I 7m CSI 0;3;1|User Defined Status Line ST Writes “User Defined Status Line” in reverse video. The status line must have been previously enabled. CS 6| I Sent by the host to the emulator, generates the following identification report: Chapter Nine - VT320 Programming 259 ES C 9.6 5 ETERM32 REPORTS Reports are sent by the emulator in response to requests from the host computer. These new reports provide device attributes, operating status and terminal state and mode information to the host. The host uses the reports to match the computing environment and emulator. 9.6.1 Device Attributes Device attributes are used to give the host information regarding the emulator. 9.6.1.1 Primary Device Attributes Primary device attributes include the service class code and basic attributes. The response of the emulator to this request depends on the type of terminal selected for emulation in Setup - Terminal. Table 9-43 Primary Device Attribtes Exchange Sequence Host to Emulator CS I Emulator to Host CS ? I c or Psc 1 6 62 63 Ps1 1 2 6 7 8 9 CS 0 I c Psc ; Ps1 ; ... Psn c Service class code based on operating level level 1 (VT100) level 1 (VT102) level 2 (VT200) level 3 (VT300) Basic attributes supported by the emulator 132 columns printer port selective erase soft character set user-defined keys national replacement character sets 260 9.6.1.2 Secondary Device Attributes The secondary device attributes include identification code, firmware version and hardware options. Table 9-44 Secondary Device Attributes Exchange Host to Emulator Emulator to Host Sequence CS > c or CS > 0 c I I CS > Pp ; Pv ; Po c I Pp Emulator identification code 24 VT320 Pv Firmware version level of the emulator Po Hardware options 0 there are no options for the VT320 9.6.2 Device Status Reports The emulator uses device status reports to give the host information on cursor position, keyboard dialect, operating status, printer status and user-defined keys. 9.6.2.1 Cursor Position Exchange Sequence Function Host to Emulator CS 6 n I CS Pl ; I Host requests cursor position Emulator to Host Pc R The emulator specifies Pl (line) and Pc (column) as current cursor position 9.6.2.2 Keyboard Dialect Exchange Sequence Function Host to Emulator CS Host requests keyboard Emulator to Host CS I ? 26 n I ? 27 ; Pd n Pd Keyboard dialect 1 North American Keyboard dialect (Pd) is reported 9.6.2.3 Operating Status Exchange Sequence Function Host to Emulator CS 5 n I CS 0 n I CS 3 n I Host requests the emulator’s operating status Emulator to Host Chapter Nine - VT320 Programming or The emulator indicates there is no malfunction The emulator indicates there is a malfunction 261 9.6.2.4 Printer Status Exchange Sequence Function Host to Emulator CS ? I Host requests current printer status Emulator to Host CS ? 13 n I CS ? 10 n I CS ? 11 n I 15 n No printer Printer ready Printer not ready 9.6.2.5 User-Defined Key (UDK) Status This control function is only valid in VT300 mode. Exchange Sequence Function Host to Emulator CS ? I Host requests if UDKs are locked or unlocked Emulator to Host CS ? 20 n I CS ? 21 n I 25 n UDKs are unlocked UDKs are locked 262 9.6.3 Terminal State Reports Terminal state reports include the current setting for all of the emulator’s features except user-defined keys. The host can use the report information to save the current state. The host can then temporarily change the operating state and, later, restore the emulator to the saved state. This control function is valid only in VT300 mode. Table 9-45 Terminal State Report Exchange Sequence Host to Emulator CS Ps I Emulator to Host DC $u Ps 0 1 S Report requested ignored, no report sent terminal state report requested 1 $ s D1...Dnn <checksum1><checksum2> ST D1...Dnn Data string indicating the status of emulator functions. There are nn bytes in the string. D1...Dnn are each in the range of column 4 rows 0 to 15 in the code table. Bit 6 of each Dn byte is always on; bit 7 is always off. <checksum1> 2-byte checksum of all data (D1...Dnn) in the report. Checksum is equal to the <checksum2> 2’s complement of the sum of all data elements in the report (D1+D2+...Dn). Note: Software should not expect the format of the terminal state report to be the same for all VT300 terminals. 9.6.3.1 Restore Terminal State This sequence is sent from the host to restore the emulator to the previous state specified in the terminal state report. Table 9-46 Restore Terminal State Restore Sequence Host to Emulator DC S Ps $ p D...D ST Ps 0 1 D...D Indicates whether or not the host succeeds in restoring the terminal state. Must be 1 for a successful restore. error, restore ignored restore to previous terminal state based on terminal state report Data string containing the restored information. This string is identical to the data string used by the terminal state report. Note: If an invalid value is received, no changes are made. Chapter Nine - VT320 Programming 263 9.6.4 Presentation State Reports There are two presentation reports: cursor information and tab stop. The host can use the report information to save the current state. The host can then temporarily change the presentation state and, later, restore the emulator to the saved state. This control function is only valid in VT300 mode. 9.6.4.1 Request Presentation State Report Table 9-47 Request Presentation State Report Request Sequence Host to Emulator CS I Ps $ w Ps Indicates which report is requested 0 error, request ignored 1 cursor information report 2 tab stop report 9.6.4.2 Cursor Information The cursor information report gives the status of the cursor position, including visual attributes and character protection attributes. Table 9-48 Cursor Information Report Report Sequence Emulator to Host DC S 1 $ u D...D ST D...D Data string of cursor information in the following format: Pr; Pc; Pp; Srend; Satt; Sflag; Pgl; Pgr; Scss; Sdesig The individual parameters that make up the data string are described in the following table. 264 Table 9-49 Cursor Information Report Data String Parameter Description Pr Row number of the cursor position Pc Column number of the cursor position Pp Current page number - always 1 for VT320 Srend One or more characters indicating visual attributes currently in use for writing. The character converts to an 8-bit binary number. The attributes can then be found in the following list. The list is ordered from most significant bit (8) to least significant bit (1). Bit Attribute 8 7 6 Always 1 (on) Extension indicator 0 1 4 Reverse video 0 1 off on 3 Blinking 0 1 off on 2 Underline 0 1 off on 1 Bold 0 1 off on 5 Satt Bit Value Always 0 (off) no more attribute data another character of visual attribute data follows this one Always 0 (off) One or more characters indicating selective erase attributes currently set for writing. The character converts to an 8-bit binary number. The attributes can be found in the following list. Bit Attribute Bit Value 8 Always 0 (off) 7 Always 1 (on) 6 Extension indicator 0 1 no more protection data another character of selective erase data follows this one 5 0 - Reserved for future use 4 0 - Reserved for future use 3 0 - Reserved for future use 2 1 0 - Reserved for future use Selective erase Chapter Nine - VT320 Programming 0 1 off on 265 Table 9-49 Cursor Information Report Data String (cont’d) Parameter Sflag Pgl Pgr Scss Sdesig Description Character(s) indicating flags binary number. Bit Attribute 8 7 6 Extension indicator and modes the terminal must save. The character converts to an 8-bit Bit Value Always 0 (off) Always 1 (on) 0 no more flag data 1 another character of flag data follows this one 5 0 Reserved for future use 4 Autowrap 0 autowrap not pending 1 autowrap pending 3 Single shift 3 setting 0 single shift 3 is off 1 G3 is mapped into GL for the next typed character only 2 Single shift 2 setting 0 single shift 2 is off 1 G2 is mapped into GL for the next typed character only 1 Origin Mode 0 origin mode reset 1 origin mode set Indicates the number of the logical character set (G0 through G3) mapped into GL. 0 G0 is in GL 1 G1 is in GL 2 G2 is in GL 3 G3 is in GL Indicates the number of the logical character set (G0 through G3) mapped into GR. 0 G0 is in GR 1 G1 is in GR 2 G2 is in GR 3 G3 is in GR Indicates the size of the character sets in G0 - G3. The character converts to an 8-bit binary number. Bit Attribute Bit Value 8 Always 0 (off) 7 Always 1 (on) 6 Extension indicator 0 no more size data 1 another character of character size data follows this one 5 0 Reserved for future use 4 G3 set size 0 94 characters 1 96 characters 3 G2 set size 0 94 characters 1 96 characters 2 G1 set size 0 94 characters 1 96 characters 1 G0 set size 0 94 characters 1 96 characters String of intermediate and final characters indicating the character sets designated as G0 through G3. These final characters are the same as those used in select character set sequences. 266 9.6.4.3 Tab Stop Report If the presentation state report requests information on the tab stops, the emulator returns the following: Table 9-50 Tab Stop Report Report Sequence Emulator to Host DC S 2 $ u D...D ST D...D Data string indicating the column number location of each tab stop. Column numbers are separated by slashes (/). 9.6.4.4 Restore Presentation State The restore presentation state report restores the emulator to a previous saved state based on one of the presentation state reports: cursor information or tab stop. The information from only one report at a time can be restored. This sequence is only valid in VT300 mode. Table 9-51 Restore Presentation State Restore Host to Emulator Note: Sequence Ps $ t D...D ST Ps Indicates the format of the data string, D...D, which corresponds to one of the presentation state report formats 0 error, restore ignored 1 cursor information report format 2 tab stop report format D...D Data string containing the restored information. This string is identical to the one used in the report. DC S If there is an invalid value in the restore sequence, the rest of the sequence will be ignored. This may leave the emulator in a partially restored state. 9.6.5 Mode Settings The host can request current settings of any ANSI or DEC private modes. The emulator returns a report indicating which modes are set and reset. The host uses the report information to save the current mode settings. The host then temporarily changes the modes and, later, restores the emulator to the saved modes with the set and reset mode sequences. This control function is only valid in VT300 mode. Chapter Nine - VT320 Programming 267 9.6.5.1 Request Mode The host sends the following sequence to find out if a particular mode is set or reset. There is a different sequence for ANSI and DEC private modes. Table 9-52 Request ANSI Mode Request Sequence Host to Emulator CS I Pa $ p Pa Indicates the ANSI mode on which the host is requesting information. The ANSI modes (Pa) are listed in the following table. Table 9-53 ANSI Modes Pa Mode 2 3 4 10 12 20 Keyboard action Control representation * Insert/replace Horizontal editing Send/receive Line feed/new line * Control representation is not supported. Note: Control representation and horizontal editing are permanently reset. Table 9-54 Request DEC Private Mode Request Host to Emulator Sequence CS ? Pd $ p I Pd Indicates the DEC private mode on which the host is requesting information 268 The DEC private modes (Pd) are listed in the following table. Table 9-55 DEC Private Modes Pd Mode 1 2 3 4 5 6 7 8 18 19 25 42 66 67 68 Cursor keys ANSI Column Scrolling Screen Origin Autowrap Autorepeat Print form feed Printer extent Text cursor enable NRC set Numeric keypad Backarrow key Keyboard usage * 9.6.5.2 Report Mode The ANSI mode and DEC private mode reports are given in the following table. The emulator can report on only one mode at a time. Table 9-56 ANSI Mode and DEC Private Mode Report Report Emulator to Host (ANSI mode) Emulator to Host (DEC private mode) Chapter Nine - VT320 Programming Sequence CS Pa ; Ps $ y I Pa Indicates reported ANSI mode (see Table 9-53) Ps Indicates mode setting 0 mode not recognized 1 set 2 reset 3 permanently set 4 permanently reset CS ? Pd ; Ps $ y I Pd Indicates reported DEC private mode (see Table 9-55) Ps Indicates mode setting 0 mode not recognized 1 set 2 reset 3 permanently set 4 permanently reset 269 9.6.5.3 Set Mode There is a separate set sequence for the ANSI modes and DEC private modes. Some of these may be affected by soft or hard terminal resets. Table 9-57 ANSI and DEC Private Mode Set Sequence Set Mode Sequence Host to Emulator CS Pa I (ANSI form) Host to Emulator (DEC private form) ; ... ; Pa h Pa CS ? I Indicates the ANSI mode to set. See Table 9-53 for the list of ANSI modes. More than one value can be used in the sequence. Pd ; ... ; Pd h Pd Indicates the DEC private mode to set. See Table 9-55 for the list of DEC private modes. More than one Pd value can be used in the sequence. 9.6.5.4 Reset Mode There is a separate reset sequence for the ANSI modes and DEC private modes. Some of these may be affected by soft or hard terminal resets. Table 9-58 ANSI and DEC Private Mode Reset Sequence Reset Mode Sequence Host to Emulator CS (ANSI form) Host to Emulator (DEC private form) I Pa Pa CS I ; ... ; Pa l Indicates the ANSI mode to reset. See Table 9-53 (ANSI Modes). More than one value can be used in the sequence. ? Pd ; ... ; Pd l Pd Indicates the DEC private mode to reset. See Table 9-55 (DEC Private Modes). More than one Pd value can be used in the sequence. 270 9.6.6 Save and Restore Cursor State The save cursor sequence stores many of the emulator’s selections and settings. The host can then temporarily change the settings. The restore cursor sequence restores the emulator to the saved settings. Table 9-59 Saving and Restoring the Cursor State Name Sequence Function Save cursor ES C 7 Saves the following: - Cursor position - Character attributes set by select graphic rendition sequence - Character set (G0, G1, G2, G3) currently in GL or GR - Wrap flag (autowrap or no autowrap) - State of origin mode - Selective erase attribute - Any single shift 2 or single shift 3 functions sent Restore cursor ES C 8 Restores the emulator to the saved state. If nothing was saved with the save cursor sequence, the following occurs: - Moves cursor to home position (upper left of screen) - Resets origin mode - Turns all character attributes off - Maps ASCII set into GL, and DEC Supplemental Graphic set into GR Note: The emulator maintains a separate save cursor buffer for the main display and the status line. A separate operating state for the main display and the status line can be saved. 9.6.7 Control Function Settings The host can request the current selection or setting of the following control functions: active status display, conformance level, status line type, top and bottom margins and graphic rendition. The emulator returns a report with the requested information. The host can use the report information to save the current setting. The host can then temporarily change the control function settings and later, restore the emulator to the saved settings. This control function is only valid in VT300 mode. Note: The control function request can only ask about one function at a time. Chapter Nine - VT320 Programming 271 Table 9-60 Control Functions Setting Report Exchange Host to Emulator Emulator to Host Sequence DC $ q D...D S S T D...D Indicates the control function in question. Consists of the intermediate and/or final characters of the control function requested. $} active status display “q character attribute ”p conformance level $~ status line type r top and bottom margins m graphic rendition DC Ps $ r D...D S S T Ps Indicates if a request from the host is valid 0 invalid 1 valid D...D Indicates the current setting of the control function requested. Consists of all control function characters except the CSI or ESC[ introducer characters. 9.6.8 User-Preferred Supplemental Set The host can request the current user-preferred supplemental character set. This control function is only valid in VT300 mode. Table 9-61 User-Preferred Supplemental Character Set Exchange Sequence Function Host to Emulator CS & I Requests current user-preferred supplemental set Emulator to Host DC 0 ! u % 5 ST DEC Supplemental Graphic set DC 1 ! u A ST ISO Latin-1 Supplemental set S S u 272 u APPENDIX A CABLING DIAGRAMS Modem Cable Transmit Data Receive Data Request to Send Clear to Send Data Set Ready Signal Ground Carrier Detect Data Terminal Ready Null Modem Cable PC Host Computer PC Host Computer 2 3 4 5 6 7 8 20 2 3 4 5 6 7 8 20 2 3 4 5 6 7 8 20 2 3 4 5 6 7 8 20 Figure A-1 Modem Cable The modem cable is used when connecting the PC to a Modem. The null modem cable is used when connecting the PC directly to a serial computer port. Appendix A - Cabling Diagrams 273 The null modem configuration shown is a full null modem configuration. The emulator only requires pins 2, 3 and 7 for direct connection. 9 Pin 25 Pin 1 2 3 4 5 6 7 8 9 8 3 2 20 7 6 4 5 22 Carrier Detect Receive Data Transmit Data Data Terminal Ready Ground Data Set Ready Request to Send Clear to Send Ring Indicator Figure A-2 Pin Adapter Cable 274 u APPENDIX B ASCII CONTROL CODE TABLE OVERVIEW The ASCII Control Code Table can be used during Keyboard, Mouse and Toolbar mapping. Appendix B - ASCII Control Code Table 275 ASCII Character NUL Hex Code 00 Decimal Code 0 Keystroke Ctrl @ SOH 01 1 Ctrl A STX 02 2 Ctrl B ETX 03 3 Ctrl C EOT 04 4 Ctrl D ENQ 05 5 Ctrl E ACK 06 6 Ctrl F BEL 07 7 Ctrl G BS 08 8 Ctrl H HT 09 9 Ctrl I LF 0A 10 Ctrl J VT 0B 11 Ctrl K FF 0C 12 Ctrl L CR 0D 13 Ctrl M SO 0E 14 Ctrl N SI 0F 15 Ctrl O DLE 10 16 Ctrl P DC1 11 17 Ctrl Q DC2 12 18 Ctrl R DC3 13 19 Ctrl S DC4 14 20 Ctrl T NAK 15 21 Ctrl U SYN 16 22 Ctrl V ETB 17 23 Ctrl W CAN 18 24 Ctrl X EM 19 25 Ctrl Y SUB 1A 26 Ctrl Z ESC 1B 27 Ctrl [ FS 1C 28 Ctrl \ GS 1D 29 Ctrl ] RS 1E 30 Ctrl ^ US 1F 31 Ctrl _ 276 u APPENDIX C ANSI COLOR SUPPORT OVERVIEW ANSI color support allows the character, character cell, and screen background colors to be selected directly by sending control sequences from the host. ANSI colors are selected through extensions to the VT320 Set Character Attribute control sequence. The following table describes the control sequences supported. Appendix C - ANSI Color Support 277 Table C-1 Character and ANSI Color Attributes Escape Sequence Function Set Character Attributes and ANSI Colors CS Ps;Ps;...m I Character attributes Ps = 0 Resets all colors and video attributes to defaults Ps = 1 Bold on. If the text color has been changed using an ANSI color control sequence, bold will be the intensified text color. Otherwise, bolded text will display as configured in the Setup - Terminal - Display - Color Setup.... Underscore on. Always uses the colors selected in the Setup - Terminal Display - Color Setup.... Ps = 4 Ps = 5 Blink on Ps = 7 Ps = 22 Reverse video on. Always uses the colors selected in the Setup - Terminal - Display - Color Setup.... Bold off, normal intensity Ps = 24 Underscore off Ps = 25 Blink off Ps = 27 Reverse video off, positive image Character Colors (low intensity unless bolded) Ps = 30 Black Ps = 31 Red Ps = 32 Green Ps = 33 Yellow (displays as brown unless bolded) Ps = 34 Blue Ps = 35 Magenta Ps = 36 Cyan Ps = 37 White Ps = 39 White 278 Table C-1 Character and ANSI Color Attributes (cont’d) Escape Sequence Function Set Character Attributes and ANSI Colors CS Ps;Ps;...m I Character Cell Color (always low intensity colors) Ps = 40 Sets the cell color to the current background color Ps = 41 Red Ps = 42 Green Ps = 43 Yellow (displays as brown) Ps = 44 Blue Ps = 45 Magenta Ps = 46 Cyan Ps = 47 White Ps = 49 Sets the cell color to the current background color < index Specifies the character color index = index Specifies the character cell color index > index Specifies the screen background index Direct Index Control Using a Prefix ANSI Color Indexes 0 = black 1 = red 2 = green 3 = yellow 4 = blue 5 = magenta 6 = cyan 7 = white The following examples use the emulator command DISPLAY to locally test the character attributes and colors. Example 1: CMD>DISPLAY"CSI1;35mBOLD magenta charactersCSI 0m" or CMD>DISPLAY"CSI1;mBOLD magenta charactersCSI0m" Displays the character string in bold magenta characters at the current cursor position. Example 2: CMD>DISPLAY"CSI5;7mReverse blink charactersCSI25m" Displays the character string using the blink attribute, 5, and the reverse video attribute, 7. After the characters display, the blink is turned off, 25. Subsequent characters display in reverse video. Example 3: CMD>DISPLAY"CSI1;33;43mYellow chars/brown cell CSI0m" Displays the character string using the bold attribute and character color 33 to give yellow characters. The character cell color, 43, shows as brown directly around each character. Appendix C - ANSI Color Support 279 280 u APPENDIX D DYNAMIC DATA EXCHANGE OVERVIEW Dynamic Data Exchange (DDE) is a method of exchanging information between two independent Windows applications. These applications carry on a “conversation” by posting messages to each other. The application that initiated the “conversation” is the “client”, and the responding program is the “server”. The emulator can be used as a client, a server, or both. When used as the client, the emulator provides a complete set of DDE commands for interacting with any DDE server. In addition, as a server, the emulator supports symbol linking and remote command execution. All DDE commands are part of the Emulator Command Language (ECL). These commands can be run from a script file, the command line, or the DDE Command Builder dialog box. Several Windows applications currently support DDE. Consult your program’s documentation for more information. Appendix D - Dynamic Data Exchange 281 D.1 USING DDE Data exchanges that do not require ongoing interaction from the operator can be fully automated with DDE. The emulator establishes a link to another application for the sole purpose of exchanging data — after which the emulator and the other application can exchange data without operator involvement. DDE can be used in commands for the following purposes: o o o o Start another application. Send data to another application. Get data from another application. Carry out commands in another application. You can also implement a broad range of local and host application features including: o o o Establishing a link to real-time host data, then transferring the information locally to your PC immediately upon change. Performing data queries between applications, such as a spreadsheet querying the host for current numbers from its database. Creating a compound document, i.e., a Word file with a graphics chart produced by a graphics program, in which the information for the graphics program comes directly from the host. Using DDE, the chart will be updated upon change of the host data, without changing the rest of the document. When exiting a copy of the emulator any associated links and any client or server DDE conversations are closed. D.1.1 DDE Concepts DDE utilizes some unique terminology which is important to understand before using DDE. Client vs. Server The client initiates a conversation with a server, or sends commands to the server to execute. Both the client and the server can terminate the conversation. Conversations and Transactions When two applications exchange DDE messages, they are engaged in a conversation. The messages that are passed back and forth are transactions. The emulator can be engaged in several conversations at the same time, acting as the client in some and as the server in others. These conversations can be between the same application, or different applications. In addition, these conversations may be with other instances of the emulator. DDE transactions can be one-time data transfers, continuous “links” in which applications send updates to each other as data changes, or commands that are executed by the receiving program. Not all DDE servers allow execution of commands. Consult your DDE program’s documentation. 282 D.1.2 Service Names, Topic Names, and Item Names Before initiating a conversation, both applications must agree upon the service, topic, and item names. The DDE syntax of the client application determines how the emulator server recognizes these names. Service Name Each DDE conversation is identified by the service name (formerly known as application name) and topic; the client and server agree upon this before the conversation is initiated. The default can be overridden using either the Server Name option (in the DDE dialog box) or the command SET DDESERVERNAME. This can be used when multiple copies of the emulator are running simultaneously, and client applications need to distinguish between them in order to talk to the window running on the desired host with the appropriate settings. Topic Name The DDE topic is the way data is classified so that multiple data items can be exchanged during a conversation. The topic is typically a filename for those applications operating on file-based documents. Other applications use an application-specific name. Topic and data items are used when a client application begins a DDE conversation with the emulator as the DDE server. Supported topcs include “System”, “ECL”, and “Settings”. Item Name All requests must reference an item name which matches a client request to the proper server response. The data item values can be passed from the server to the client and vice versa. D.1.3 Server Topics DDE clients can address the emulator as a server during a conversation. Topics and data items are used when a client application starts a DDE conversation with the emulator; the way these are compiled into actual DDE commands is determined by the DDE syntax of the client’s application. The emulator supports the following topics: D.2 System Provides information to the client about what topics, items, and data formats the server supports. In addition, the System topic can be used to retrieve the server’s current status. ECL Allows the client to retrieve data from variables within the emulator and execute ECL commands. Settings Provides information about the current settings of the emulator. SYSTEM TOPIC Permits a DDE client to ask a server, such as the emulator, which topic names, item names, and data formats it supports. It also provides general information about the application’s DDE support and accesses the emulator‘s DDE server status. System topic items are accessed with DDE data requests. Each request returns a specific type data. To find out which servers are present and the kinds of information they can provide, a client can request a conversation on the System topic with the service name set to NULL (“”). Appendix D - Dynamic Data Exchange 283 D.2.1 System Topic Items Contained within the System topic are pre-defined items that provide specific information. The emulator supports the following system topic items: SysItems Returns a tab-separated list of items supported under the System topic by this server (SysItems, Topics, Format, Status and StatusNum). Topics Returns a tab-separated list of topics supported by the emulator DDE server. The topics currently supported are: System, ECL, and Settings. Format Returns a tab-separated list of clipboard formats supported by the emulator DDE server. Currently, the only format supported is “TEXT”. Status Returns a status string that describes the status of the prior DDE server operation. The string’s format is as follows: “Status n : status description” Where: N is a numeric status code. A DDE client can use data requests (or establish a permanent link) to monitor the Status item, and receive continuous reports of the server’s status. A second conversation can be maintained by the client for this purpose. This information is essential for a client application that runs complex ECL scripts using the DDE execute message (see Executing ECL Commands). D.3 ECL TOPIC The ECL (Emulator Command Language) topic allows access to EM320’s command language when the emulator is acting as a DDE server. This allows development of sophisticated systems of execution control and dynamic data exchange between other applications and the emulator (and hence host computers and networks). D.3.1 ECL Topic Items The Emulator Command Language (ECL) allows the use of symbols (also known as variables) to hold data values. All command language symbols (variables) are valid ECL topic data items. The following sections discuss the various actions that can be performed using the ECL topic from a client application. These include: o o o o Requesting the value of an ECL variable - Global symbols only Changing the value of an ECL variable Creating an Advise Data Link to an ECL variable Executing ECL commands or command file 284 D.3.2 Requesting the Value of an ECL Variable DDE request messages can be issued from a client application to obtain the value of any emulator command language variable. Even though the item requested may be a numeric symbol, all data items sent to the client are in text format. The client application must convert this text value to numeric if necessary. The following example connects to another instance of the emulator and requests the value of the variable COUNT. Example: DDE CONNECT “MS320” “ECL” CONVS = DDE REQUEST ‘CONV’ “COUNT” RESULT DDE DISCONNECT ‘CONV’ The value of COUNT in the server instance of emulator is placed in the variable RESULT. Note: This example assumes that the global variable COUNT exists in the server instance of the emulator. If the global symbol is not found or not initialized, the value returned from the DDE REQUEST will be zero. D.3.3 Changing the Value of an ECL Variable DDE poke messages can be issued from a client application to change the value of any emulator variable. All data items sent to the emulator must be in text format. For numeric variables, the value is translated by the emulator automatically. The following example connects to another instance of the emulator and sets the value of the variable COUNT. Example: DDE CONNECT “MS320” “ECL” CONV DDE POKE ‘CONV’ “COUNT” “200" DDE DISCONNECT ‘CONV’ The value of COUNT in the server instance of the emulator would be set to 200. Note: If the global variable COUNT does not already exist in the server instance of the emulator, it is created and assigned the passed value. D.3.4 Creating an Advise Data Link to an ECL Variable DDE advise messages can be issued from a client application to create and Advise Data Link to an ECL variable. Whenever the value of the ECL variable changes, the client application is automatically notified and the new value is sent. As with the DDE request messages, all data items sent to the client are in text format. Example: You can update the value of a variable that changes frequently because of the host connection, into your Excel spreadsheet. Create an Advise Data Link from Excel to the emulator symbol. Enter the following DDE link into the desired cell of the spreadsheet : =MS320|ECL!HOSTDATA This command uses the service name “MS320”, the topic “ECL”, and links the spreadsheet cell to an ECL variable called HOSTDATA. Whenever the value of HOSTDATA changes, Excel is automatically updated with the new value. Appendix D - Dynamic Data Exchange 285 D.3.5 Executing ECL Commands or Command Files The DDE execute message allows the client to send commands to the emulator server for execution. The following examples illustrate the execute process. Example 1: “CLS” “STR1 := Dialing...” Example 2: “@LOGIN” Execute the command file LOGIN.ECF. D.3.6 Settings Topic The Settings topic provides query access to a limited number of settings within the emulator. Valid data item names in this topic include the emulator command language SET parameters. Requesting the value of a Settings parameter returns a text string containing the current value of that setting. The Settings topic supports DDE REQUEST only (DDE ADVISE or DDE POKE are not supported). The data items currently supported include: o o o SERVERNAME TERMINAL /WIDTH TERMINAL /LINES Example: DDE CONNECT “MS320" ”SETTINGS" CONV DDE REQUEST ‘CONV’ “TERMINAL /LINES” RESULT DDE DISCONNECT CONV The variable RESULT would contain the current number of display lines for the server instance of the emulator. D.4 DDE COMMANDS DDE commands appear in uppercase letters (e.g., DDE CONNECT). The standard syntax is: DDE CONNECT “service name” “topic name” variable Refer to Chapter 7 (command Language) for more information. Note: When entering DDE commands from the DDE> prompt, do not preceed the command with DDE. D.4.1 DDE Server Operation The emulator can also be used as a server that allows command execution, data retrieval, and data updates. ECL commands used to change server operations can be entered at the emulator command line prompt or set in the DDE Setup dialog box. Refer to Chapter 7 (Command Language) for the SET DDE... commands. 286 D.4.2 DDE Error Facility Whenever a DDE command is completed, the emulator sets a status condition code in the symbol $STATUS to indicate the reason the command terminated. The following status codes are specific to DDE. Table D-1 DDE Error Messages and Status Codes L Indent Message E DDEBADCONN DDE Bad conversation handle E DDEBADDATA DDE Bad data handle E DDEBADDISC DDE DISCONNECT failed E DDEINVDATAL Invalid data link requested E DDEMAXADVISE Maximum number of advise items reached E DDEMAXCONN Maximum number of connections reached E DDENOCONN DDE CONNECT failed E DDENODATA DDE Data not available from server In addition to setting the status code, special DDE messages are displayed just before the $STATUS codes on the command line. These messages often provide more information than the $STATUS code messages. D.4.3 Client Messages Client messages are all prefixed with “DDE [Client]:”, followed by the message. The messages that can appear when using the DDE client commands are as follows: Conversation already exists. The conversation handle passes to the DDE CONNECT command is currently active. Either disconnect the conversation variable or supply a new conversation variable name. Data not available from server. The data requested by the client is not available on the server. The variable name may be misspelled or the symbol on the server may be local instead of global. Disconnected DDE connection. The DDE DISCONNECT or DDE DISCONNECTALL command removed the conversation(s). Error creating DDE data handle. A severe internal error message. Could be caused by low memory conditions. Error creating DDE string handle. A severe internal error message which could be caused by low memory conditions. Error disconnecting from server! An internal error indicating that DDE DISCONNECT or DDE DISCONNECTALL failed. Invalid conversation number. The conversation number no longer exists. This usually occurs because a DDE CONNECT was not previously complete, or the conversation has terminated already. Appendix D - Dynamic Data Exchange 287 Invalid data link requested. The DDE ADVISE command failed because the item could not be found. No such data link exists. The DDE UNADVISE command failed because there was not an active Advise Data Link for this item. Ok establishing DDE connection. The DDE CONNECT command succeeded. This message is informational only. The server forced a disconnect. The server sent a DDE terminate message during a conversation. The conversation number associated with this connection is no longer valid. Unsuccessful connection. The DDE CONNECT command failed. The service name or topic name may be incorrect. D.4.4 Server Messages Server messages are all prefixed with “DDE [Server]:”, followed by the message. The messages that can appear when the emulator is a server are as follows: Advised client of change. The value of an ECL symbol that has an Advise Data Link has changed, and the client was notified. This message is informational only. Could not create data handle. A severe internal error message. This may be a result of low memory. The client has disconnected. The client application sent a disconnect message to the server and therefore terminated the conversation. This message is informational only. DDE connection confirmed. When a client application sends a connect message and the server responds that the connection can be made, the client sends this additional message to confirm the conversation This message is informational only. Requested data sent to client. The client application sent a DDE request message to the server. The message was processed and the value of the item was sent to the client. This message is informational only. Received POKE data from client. The client application sent a DDE poke message to change the value of an ECL variable. The message was processed and the item was updated with the new value. This message is informational only. For more information about the emulator error handling, refer to the Error Facility topic in Chapter 8. 288 D.5 DDE COMMAND BUILDER Click on Execute - DDE Command Builder. The DDE Command Builder makes it easier to perform DDE commands because you don’t need to learn the format of each command. In addition, each field in the Command Builder contains a list of previously entered DDE parameters. Currently, this list holds up to 10 parameters. Figure D-1 DDE Command Builder The DDE Command Builder is used in the following way: 1) To select the desired DDE command, click on the appropriate button under the Client Commands heading. Notice that as different DDE commands are selected, some of the Parameters may become enabled or disabled. This indicates the required parameters for the selected command. 2) Once the desired DDE commands are selected, enter or select the data for the Parameters 3) When all parameters are entered, click the Execute button. The emulator creates the DDE command string, copies the string to the command line, then executes the command string. The results display above the command line just as if the commands were entered on the command line. D.5.1 Copying a DDE Command to the Command Line To edit the DDE command string before executing, click on the Copy button. The emulator creates the DDE command string with the entered parameters, then copies the string to the DDE command line. You can then edit the string by positioning the typing cursor in the string. When you have finished editing the string, click OK to execute the command or Cancel to cancel the command. The Cancel button also closes the dialog box. Appendix D - Dynamic Data Exchange 289 D.6 DDE DEMO The DDE demo demonstrates some of the Dynamic Data Exchange (DDE) capabilities of the emulator. Look at the commands in the command (.ECF) file for examples of how to write your own DDE scripts. To run the 30 second DDE Demo: 1) Start the emulator, if not already running. 2) Run the Command File DDEDEMO.ECF using the File - Run Command File dialog box. The DDE demo displays a screen that indicates the current time and US population. This information is provided by the DDE server. 290 u APPENDIX E SCO ANSI PROGRAMMING E.1 SCO ANSI PROGRAMMING SEQUENCES E.1.1 Character Attributes Table E-1 Character Attributes Sequence Function CS I 0m Reset attributes CS I 1m Bold on CS I 4m Underline on CS I 5m Blink on CS I 7m Reverse video on CS I = Pn E Set or clear the blink bit ( Pn = 0 or 1). Same as CSI 5 m * CS I = Cn F Set normal foreground color to Cn * CS I = Cn G Set normal background color to Cn * CS I = Cn H Set reverse foreground color to Cn - Ignored * CS I = Cn I Set reverse background color to Cn - Ignored * * Specific to SCO 2.3 and above (Non-ANSI) Appendix E - SCO ANSI Programming 291 E.1.2 Character Sets Table E-2 Character Sets Sequence Function CS I 10 m CS I 11 m CS I 12 m CS I Pn g Select primary font. Causes 8-bit PC character set to be used as the font. PC characters in the control character range are not displayed. Select first alternate font. Same as above except all characters other than the Escape character are displayed. Select second alternate font. Displays PC character set in the 80h and above range to be displayed as the lower character set. Display the character from cell Pn. E.1.3 Color Attributes E.1.3.1 ANSI Color Attributes Table E-3 ANSI ISO Color Sequences Sequence Function CS I 3 Pc m Set foreground color from ISO color table CS I 4 Pc m Set background color from ISO color table CS I 8m Set blank - invisible characters Table E-4 ANSI ISO Color Table Pc Color 0 Black 1 Red 2 Green 3 Yellow 4 Blue 5 Magenta 6 Cyan 292 E.1.3.2 SCO Xenix Color Attributes Table E-5 SCO Xenix Color Sequences Sequence Function CS I Set foreground (Pf) and background colors (Pb) 2 ; Pf ; Pb m Table E-6 SCO Xenix Color Cn Color Cn Color 0 Black 8 Dark Grey 1 Blue 9 Light Blue 2 Green 10 Light Green 3 Cyan 11 Light Cyan 4 Red 12 Light Red 5 Magenta 13 Light Magenta 6 Brown 14 Yellow E.1.4 Columns Table E-7 Columns Appendix E - SCO ANSI Programming Sequence Function CS I Set 80 columns ?3l 293 E.1.5 Cursor Positioning Table E-8 Cursor Positioning Sequence Function CS I Pn Z Move cursor backwards Pn stops CS I Pn S Scroll up Pn lines CS I Pn T Scroll down Pn lines CS I P1; P2 H Direct cursor position CS I P1; P2 f Same as above CS I Pn A Move cursor up Pn lines CS I Pn B Move cursor down Pn lines CS I Pn C Move cursor right Pn columns CS I Pn D Move cursor left Pn columns CS I Pn ‘ Position cursor to column Pn CS I Pn a Move cursor Pn positions to the right relative. Does not wrap. CS I Pn d Move cursor to row Pn CS I Pn e Move cursor down Pn rows CS I Pn F Move cursor to beginning of line Pn lines up CS I Pn E Move cursor to beginning of line Pn lines down E.1.6 Inserting Table E-9 Inserting Sequence Function CS I Erase display Pn J Pn = 0 From cursor to end of display Pn = 1 From cursor to beginning of display Pn = 2 CS I Pn K Entire display Erase in line Pn = 0 From cursor to end of line Pn = 1 From beginning of line to cursor Pn = 2 CS I Pn X Entire line Erase Pn number of characters 294 E.1.7 Key Assignments SCO ANSI uses function keys F1-F12, Ctrl F1-F12, Shift F1-F12, and Ctrl-Shift F1-F12. Although the emulator has tokens for these keys, they are not currently available through the Keyboard Mapper. Table E-10 Key Assignments Key Code F1 -F12 ESC [ M...ESC [ V+ Shift F1-F12 ESC [ Y...ESC [ Z ESC [a...ESC [ j Ctrl F1-F12 ESC [ k...ESC [ v Ctrl-Shift F1-F12 ESC [ w...ESC [ z ESC [ @...ESC [ } Up Arrow ESC [ A Dn Arrow ESC [ B Right Arrow ESC [ C Left Arrow ESC [ D Keypad 0-9 0...9 (NUMLCK in numeric mode) Home ESC [ H PgUp ESC [ I End ESC [ F PgDn ESC [ G Ins ESC [ L Del 0x7F Shift Tab ESC [ Z Ctrl Enter 0x81 Ctrl Home 0x82 Ctrl PgUp 0x83 Ctrl BS 0x84 Ctrl End 0x85 Ctrl PgDn 0x86 Ctrl KP - 0x87 Ctrl KP + 0x88 Ctrl Left Arrow 0x89 Ctrl Right Arrow 0x8a E.1.8 Keyboard Control Table E-11 Keyboard Control Appendix E - SCO ANSI Programming Sequence Function CS I 2h Lock keyboard CS I 2l Unlock keyboard 295 E.1.9 Report Table E-12 Report Sequence Function CS I Send screen to host with a line feed after each line. 2i 296 u GLOSSARY ACK A Kermit file transfer term meaning acknowledged. An ACK is sent by Kermit when it successfully receives file information. Address The coded representation of a specific point on the display screen. Alphanumeric Letters of the alphabet, numerals, and other symbols. ANSI American National Standards Institution. ASCII Code American Standard Code for Information Interchange. Standard code consists of 7-bit coded characters (8 bits including parity check). Used for information interchange between systems. Asynchronous A communications mode that uses variable time intervals between characters in a message. Baud A unit of data communication rate. Used to signify the speed of transmitted data. One bit of data per second equals one baud. Byte A sequence of eight adjacent bits operated upon as a unit. Cursor A bar of light that indicates where the next character will appear on the screen. Default The standard setting used if insufficient or optional parameters are not supplied. Default Directory This is the current DOS directory. It is the directory used for file operations if no other directory path is specified. Dialog Box A rectangular box that either requests or provides information. Many dialog boxes present options to choose among before an option is carried out. Some present warnings or explain why a command can’t be completed. Echo A character sent by the computer to the terminal to indicate that the computer has received and processed the data sent to it. Full-Duplex A data link which is capable of carrying data in both directions simultaneously. Binary A method of representing numbers in base two. Glossary 297 Half-Duplex A data link which is capable of carrying data in only one direction at a time. Hardcopy A permanent copy of the displayed data. K Byte (KB) Kilobyte. A kilobyte equals 1024 bytes of information. Kermit A public file transfer protocol, developed by Columbia University. Local Echo Online response of a character within the terminal that is indicated on the display. Local Echo is required in lieu of computer response echo. Mode The operating state of the terminal. Modem A contraction of the words modulator - demodulator. It modulates and demodulates signals transmitted and received over a communications media. Used at the computer and terminal end of a connecting telephone line. NAK A Kermit file transfer term meaning not acknowledged. A NAK is sent by Kermit when file information is not received successfully, and must be transmitted again. Online Operation The operation by which data is transferred between terminal and computer, and vice versa. Parity Bit The eighth-bit in a byte that is used for error detection. A parity bit is added to the end of a byte so that the total number of 1’s is either always even (even parity) or odd (odd parity). Port The portion of the computer that is used for transmission or reception of data. Protocol A set of rules governing orderly communications between several devices. Remote Host The terminal or mainframe the emulator is talking to. Remote Server A remote host in server mode. Root Directory This is the directory that the PC starts in immediately after booting. Server Mode A state of readiness for unlimited file transfer. Without Server mode, only one file transaction can take place. Server mode must be exited when file transfer is completed. Strapable Options Standard options that involve a simple wired plug that can be easily changed. XMODEM Communications protocol that allows for file transfer. This is a public domain protocol that was written by Ward Christensen. Packet A Kermit file transfer term defined as a piece of file or document. Kermit will take a file and break it into groups of information. When all of the groups have been received, the file will be complete. 298 u INDEX ! A $SEVERITY 177 $STATUS 177, 201 $STATUSID 177 132 Column mode 251 132 Column Mode 53 7-Bit ASCII codes 223 C0 codes 224 control sequence introducer (ESC) 226 environment 222 select C1 transmission 248 8-Bit ASCII codes 224 C1 codes 224 control sequence introducer (CSI) 226 environment 222 select C1 transmission 248 80 Column Mode 53 Index Abort 43 command files 131 emulator commands 131 in command files 155 Kermit file transfer 126 set in command files 165 Accelerator Keys 63 ANSI/VT52 Mode 250 Answerback 69 send 44 Application Window 15 ASCII File Transfer setup 111 ASCII File Transfer Setup additional information 112 echo check 111 end of file string 111 end of line delay 111 host cancel character 112 host prompt string 112 outgoing character delay 111 pad null lines 111 299 receive file 115 send file 114 strip line feed 111 turnaround character 111 AT Keyboard 66 Attributes 240 Auto Command Mode Setup 113 Auto Print Mode 52 Auto Wrap 60, 251 Auxiliary Keypad 237 B Backspace/Delete 63 Baud Rate 33 BBS ANSI Mode 68 Bells (see keyboard setup) 63 Binary File Transfer 119, 122 Break long 43 short 43 BREAK Command 134 BYE Command 151 C C0 Control Characters 224 C1 Control Characters 224 Capture Text to File 47 append 47 filename 47 overwrite protection 47 save (capture) 47 Centered Window 71 Character Attributes 240 8-bit ASCII codes 224 select 241 Character Encoding 222 7-bit ASCII codes 223 control functions 226 Character Rendition 240 select 240 Index Character Sets 36, 70, 227 7-bit national 69 8-bit international 69 DEC multinational 36 DEC special graphics 36 default 228 ISO latin 36 mapping, locking shifts 234 mapping, single shifts 234 mode 251 national character set 69 national replacement 36, 232 PC 36, 69 quick reference 208 selection 232 supplemental set report 272 Characters compose sequence 37 special 186 Clear Communications 43 CLOSE Command 135 CLS Command 136 CMD Prompt 43 Color Palette 61 Color Selection 61 Color Setup 35, 61 attribute control 61 color palette 61 factory colors 61 saved colors 62 selecting colors 61 working colors 62 Columns 59 Command File edit 45 execution from menu bar 46 Command Files aborting 131 commenting 131 default 130 documenting 176 executing at CMD prompt 130 executing from host 130 execution of, 129 nested 130 nesting 177 300 parameter passing 176 status symbols 177 Command Line CMD prompt 13, 43 editing and recall 16 Communications problems 39 Compose Characters 37 Connect Modem (TAPI) 29 node name 26 polyLAT/32 31 serial 32 Windows Sockets 27 WINSOCK setup 27 CONNECT Command 151 Connecting to Host problems 39 CONTINUE Command 136 Control Codes 239 Control Function Reports 271 Control Functions 226 control sequences 226 device control string 227 escape sequences 226 Control Menu Icon maximize workspace 35 Control Sequence Debug 69 Control Sequence Introducer 226 Controller print mode 53 Copy 42 Cursor 59 type 59 Cursor Key Mode 252 Cursor Position Sequence 245 Cursor State Reports 271 D Data Bits 33 DCS Private Control Sequence 259 DCS Private Sequence 260 DDE 281 client 282 Index client messages 287 conversations 282 ECL topic 284 error facility 287 item name 283 server 282 server messages 288 server name 283 topic name 283 transactions 282 DDE ADVISE 136 DDE Command Builder 289 DDE DISCONNECT 137 DDE DISCONNECTALL 137 DDE EXECUTE 138 DDE POKE 138 DDE REQUEST 138 DDE Setup 56 append unique identifier 57 server enable 57 server name 57 timeout 57 DDE TOPICS 139 DDE UNADVISE 139 DEC Emulation 68 DEC Multinational Character Set 228 DEC Special Graphics 231 DELAY Command 140 DELETE SYMBOL Command 140 Device Attributes 260 primary 260 secondary 261 Device Control String with user defined keys 257 Device Control Strings 227 device control character 227 string terminator 227 Device Status Reports 261 cursor position 261 keyboard dialect 261 operating status 261 printer status 262 UDK status 262 Directories Setup command files 57 file transfer directory 57 301 picture files 57 DISPLAY Command 141 Display Control Mode 69 Display Lexicals 192 Display Lines 60 Display Setup 59 auto wrap 60 color (see color setup) 61 color setup 35 columns 59 cursor 59 cursor type 59 display lines 34, 60 jump scrolling 60 scrollback lines 60 smooth scroll 60 tab settings 60 Documentation layout 12 notation 13 DOS Command 142, 151 Drop Down Menus 41 edit 42 execute 43 file 44 help 54 setup 55 view 71 Drop DTR 43 DROPDTR Command 143 Dynamic Data Exchange (see DDE) 56, 281 E Edit Command File 45 filename 45 open 45 Edit Menu 42 copy 42 paste 42 select all 42 select screen 42 send 42 Edit Node List 28 Index Edit Phone List 29 - 30 Editing Keypad 236 Editing Sequence 246 EMULATE Command 143 Emulation Lines (see Display setup) 34 Emulator Commands aborting 131 at CMD prompt 128 descriptions 134, 140 - 148, 150, 154 - 158, 160, 162 163, 166, 169 - 170, 172 - 174 executing from host 129 execution 128 foreign commands 188 list of, 132 notation 13 syntax 128 Emulator Functions vs. VT320 functions 14 Emulator Tokens 64 END Command 152 END INTERACTIVE Command 144 Enhanced Keyboard 64 EOF Kermit file transfer 152 set character 166 ERASE SCREEN Command 144 Erasing 246 Error Facility 200 DOS ERRORLEVEL 201 Error Messages 203 Errors see Problems 39 Examples notation 13 Execute Menu 43 abort 43 break, long 43 break, short 43 clear communications 43 command line 43 DDE command builder 43 drop DTR 43 reset 44 send answerback 44 WordPerfect 5.x mode 44 302 EXIT Command 145, 152 Exit Emulator 53 Expression Evaluation 180 integer 181 string 180 string to integer 180 substitution 181 Function Keys top row codes 238 G General Settings 56 DDE (see DDE setup) 56 directories (see directories setup) 57 log file replay (see log file replay setup) 58 GET Command 152 GOSUB Command 146 GOTO Command 146 F File capture 47 replay 49 File Menu 44 capture text to file 47 edit command file 45 exit 53 page setup 51 print 50 receive 49 record log file 48 replay log file 49 run command file 46 send 49 File Transfer 105 ASCII 105 auto command mode setup 113 binary 119, 122 Kermit 105 receive 49 send 49 XMODEM 105 YMODEM 105 ZMODEM 105 File Transfer Messages 71 File Transfer Setup 56 FINISH Command 152 Flow Control 34 RTS/CTS 34 Xon/Xoff 34 FLUSH Command 146 Foreign Commands in command files 188 Framed Window 71 Index H Hangup Modem 29 Hardware Requirements 18 Help 54, 103 about EM320 103 HELP Command 147 Help Menu 54 about 54 index 54 using help 54 Host Writable Status Line 69 I IBM Keypad 63 IF Command 147 INQUIRE Command 148 Insert/Replace Mode 252 Installation 18 creating an icon 19 registration number 18 INTERACTIVE Command 150 International Character Sets character set mode 69 International Setup character set mode 69 ISO Latin-1 Character Set 230 303 AT 66 Enhanced 64 Keycodes 70 Keypad 252 application mode 70 IBM 63 numeric mode 63 Keys vs. tokens 14 J Jump Scrolling 60 K Kermit 126 KERMIT Command 123 Kermit File Transfer 105, 108 command 123 - 124 commands 123, 153 file formats 119, 122 get file 125 send 117 send file 124 setup 107 Kermit File Transfer 108 Kermit File Transfer Setup packet 108 pad 108 Key Codes 7-bit 70 8-bit 70 Key Mapping 76 changing a key definition 81 configuring 78 creating a new keymap 77 defining key 78 deleting a key definition 81 Keyboard type 62 Keyboard Action Mode 252 Keyboard Mapping 56 Keyboard Setup 62 accelerator keys 63 backspace key 63 IBM keypad 63 key behavior 63 margin bell 63 return key 63 type 62 warning bell 63 Keyboards 62 Index L Labels 179 Lexical Substitution 195 phases of, 197 using ampersands 196 using apostrophes 195 automatic 195 iterative in expressions 199 iterative using apostrophes 198 iterative using command synonyms 198 undefined symbols 199 Lexicals 189 D$BLOCK 192 D$BOX 193 display 192 F$EXTRACT 189 F$GETINFO 189 F$LENGTH 190 F$LOCATE 190 F$MESSAGE 191 Line Attribute Sequence 247 Line Editing command line 16 keys for, 16 Line Feed/New Line Mode 253 Local Echo 69 Local Mode 69 LOG Command 134, 154 Log File 100 append to existing 48 record 48, 100 replay 101 replay options 101 replay pauses 102 304 replay programming 102 replay rate 102 replay setup 58 Log File Replay Setup 58 clear screen 58 every page 58 replay rate 58 text 58 Log Telnet Mode 27 LOGOUT Command 153 M Maximize Workspace 35, 71 Menu Bar 71 Menu Bar Accelerator Keys 63 Menus notation 13 Message History 72 Modem cable diagrams 274 connect status 34 control 34 Modem (TAPI) edit phone list 29 - 30 hangup 29 phone number 29 port 29 Modem (TAPI) Setup 29 Mouse Mapping 56, 82 changing a mouse button definition 88, 97 configuring 84, 94 creating a new mouse map 83, 89 defining a mouse button 84 deleting a mouse button definition 88, 97 N National Character Set 69 Negotiate Transmit Binary 27 Normal Print Mode 52 Index O ON Command ABORT 155 DEVICE_ERROR 156 DISCONNECT 156 error_severity 157 Online Help 103 see Help 54 Online Mode 69 OPEN Command 157 Operators 182 arithmetic 183 arithmetic comparisons 185 logical 184 precedence 182 radix 185 string 183 string comparisons 184 Origin Mode 253 Overwrite Protection capture text to file 47 log file 48 P Package Contents 18 Page Setup 51 lines per page 51 margins 51 options (see page setup options) 51 - 52 orientation 51 paper 51 Page Setup Options 52 132 column 53 80 coloumn 53 automatic close on print screen 52 finalize 53 force black on white 52 idle time before close 52 initialize 53 print controller 53 print mode 52 305 print to file 52 Parity 33 Paste 42 PC Fonts 69 Permanent Symbols 177 Phone List 29 - 30 polyLAT/32 Setup 31 node name 31 Presentation State Reports 264 cursor information 264 restore state 267 tab stops 267 Print 50 auto 36 controller mode 36 copies 50 device 50 extent mode 36 graphics 50 print to file 50 properties 50 range 50 screen 36, 50 scrollback 50 selected text 50 PRINT Command EJECT 159 ON/OFF 159 SCREEN 159 Printer support 36 Printing screen 50 Printing Sequence 247 Private Control Sequences DCS 259 Problems 39 dropping characters 40 garbage characters 39 Q QUIT Command 160 Index R READ Command 160 Receive Codes 240 character set selection 232 compatibility level 241 control characters 244 cursor position 245 editing 246 erasing 246 line attributes 247 printing 247 quick reference, VT100 215 quick reference, VT320 211 quick reference, VT52 217 select C1 controls 248 tab stops 248 terminal modes 248 terminal reset 256 user defined keys 257 VT320 control sequences 212 RECEIVE Command 153 Record Log File 48 append 48 filename 48 overwrite protection 48 save (record) 48 Registration Card 18 Registration Number 18, 40 Rendition 240 Replay (see also Log File Replay) 101 REPLAY Command 162 Replay Log File 49 filename 49 open 49 Reports quick reference 218 scrolling region 247 Reset Mode 249 Reset Terminal 44 RETURN Command 163 Return Key 63 RTS/CTS 34 306 RTS/CTS Protocol 34 Run Command File filename 46 open 46 run 46 S SCAN Command 163 SCO ANSI Mode 68 SCO ANSI Programming Sequences 291 ANSI color attributes 292 character attributes 291 character sets 292 color attributes 292 columns 293 cursor positioning 294 inserting 294 key assignments 295 keyboard control 295 report 296 SCO Xenix color attributes 293 Screen Mode 254 Screen Scrollback 35 Scrollback 35 Scrollback Lines 60 Scrollbar 71 Scrolling mode 254 Select All 42 Select Screen 42 Send 42 SEND Command 163 Send File Commands symbols 114 Send/Receive Mode 255 Serial Setup 32 - 33 baud rate 33 data bits 33 flow control 34 limited transmit 34 modem control 34 node name 32 parity 33 setup 33 Index stop bits 33 SET Command ABORT 165 CHARACTER DELAY 166 DEVICE_ERROR 166 DISCONNECT 166 EOF CHARACTER 166 HOST 167 LINE DELAY 168 MESSAGE 168 ON 168 TERMINAL 169 TURNAROUND character 171 VERIFY 171 SET DDEAPPENDINSTANCE 164 SET DDEAUTOINITIALIZE 164 SET DDECLIENTTIMEOUT 164 Set Mode 249 Settings File save 55 Setup Menu 55 file transfer setup 56 general 56 - 57 keyboard mapper 56 mouse mapper 56 terminal 68 SHOW Command SYMBOL 171 Smooth Scroll 60 Special Characters 186 output conversion 187 Status Symbols $STATUS, $STATUSID, $SEVERITY 177 Stop Bits 33 STOP Command 172 Strings syntax 186 Supplemental Character Set Report 272 Symbols 177 substitution using apostrophes 195 assigning values 178 examples 178 purpose of, 177 substitution 195 substitution using ampersands 196 substitution, phases of, 197 307 types 177 Symlex 193 definition 193 examples 194 T Tab Settings 60 clear all button 60 set every button 60 Tab Stops 248 TAPI 29 Technical Support 40 Terminal Modes 248 ANSI/VT52 250 auto repeat 250 auto wrap 251 backarrow key 251 BBS ANSI 68 character set 251 column 251 cursor key 252 insert/replace 252 keyboard action 252 keypad 252 line feed/new line 253 numeric keypad 253 origin 253 print extent 253 print form feed 254 reset 249 SCO ANSI 68 screen 254 scrolling 254 select status display 254 send/receive 255 set 249 status line type 255 terminal reset 256 text cursor enable 256 VT100 68 VT102 68 VT220 68 VT320 68 VT52 68 Index Terminal Modes Reports 267 reset 270 set 270 Terminal Reset 44, 256 hard 256 soft 256 Terminal Setup 68 answerback 69 answerback message 69 auto answerback 69 character sets 69 - 70 color setup (see color setup) 61 conceal message 69 control sequence debug 69 cursor pad 70 DEC keypad 70 display (see display setup) 59 host variable status line 69 key codes 70 keyboard (see keyboard setup) 62 local echo 69 new line 69 options 69 PC fonts 69 status 69 type 68 user defined keys 70 user features 70 Terminal State Reports 263 restore state 263 Text copy 42 paste 42 select all 42 select screen 42 send 42 Text Cursor Enable Mode 256 Tokens default key assingments 64 emulator functions 64 notation 13 vs. keys 14 vt tokens 64 Toolbars 72 Transmit Limited 34 Transmitted Key Codes 236 308 auxiliary keypad 237 control codes 239 editing keypad 236 quick reference 209 standard keys 236 top row function keys 238 U User Defined Keys 257 clear space for, 257 examples 258 format 257 loading keys 258 lock/unlock 70 User Features 70 V Video Attributes 61 View Menu 71 centered window 71 file transfer messages 71 framed window 71 maximize workspace 71 menu bar 71 message history 72 scrollbar 35, 60, 71 status line 71 toolbars 72 window size and location 34 VT Tokens 64 VT100 Escape Sequences quick reference 215 VT100 Line Drawing Character Set 231 VT100 Mode 68 compatibility 241 VT100 Reports quick reference 221 VT102 Mode 68 VT220 Mode 68 VT320 Control Sequences 214 quick reference 211 - 214 Index VT320 Functions vs. emulator functions 14 VT320 Mode 68 VT320 Reports 260 control function settings 271 cursor settings 271 device attributes 260 device status 261 modes 267 presentation state 264 quick reference 218 supplemental character set 272 terminal state 263 VT52 Escape Sequences quick reference 217 VT52 Mode 68 W WAIT Command 172 Warning Bell 63 Window size and location 34 Windows Sockets (see WINSOCK) 27 WINSOCK (see Windows Sockets) 27 WINSOCK Setup edit node list 28 log telnet data 27 negotiate transmit binary 27 WordPerfect 5.x Mode 44 WordPerfect Mode 103 entering 103 operation of, 103 terminating 103 transmit codes 104 WP (WordPerfect) Command 173 WRITE Command 173 X 309 XMODEM File Transfer 105 setup 109 XModem File Transfer 113 Xon/Xoff 34 Y YMODEM File Transfer 105 setup 109 Z ZMODEM File Transfer 105 automatic download start 110 setup 110 Index 310