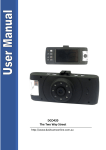
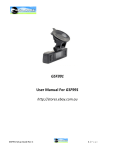
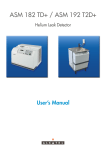
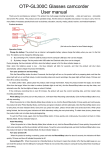
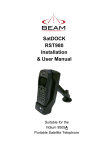
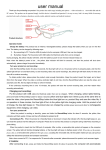
1
GSFF50 http://stores.ebay.com.au/Goshockfree Thanks for purchasing this product. Please read the instructions carefully before using this product. • FCC Compliance Statement: This device complies with Part 15 of the FCC Rules. Operation is subjected to the following two conditions: (1) this device may not cause harmful interference, and (2) this device must accept any interference received, including interference that may cause undesired operation. This equipment has been tested and found to comply with limits for a Class B digital device, pursuant to Part 15 of the FCC rules. These limits are designed to provide reasonable protection against harmful interference in residential installations. This equipment generates, uses, and can radiate radio frequency energy, and if not installed and used in accordance with the instructions, may cause harmful interference to radio communications. However, there is no guarantee that interference will not occur in a particular installation. If this equipment does cause interference to radio or television equipment reception, which can be determined by turning the equipment off and on, the user is encouraged to try to correct the interference by one or more of the following measures: - Reorient or relocate the receiving antenna. - Move the equipment away from the receiver. - Plug the equipment into an outlet on a circuit different from that to which the receiver is connected. - Consult the dealer or an experienced radio/television technician for additional suggestions. You are cautioned that any change or modifications to the equipment not expressly approved by the party responsible for compliance could void your authority to operate such equipment. The symbol of the crossed out wheeled bin indicates this product should not be placed in municipal waste. Instead, you need to dispose of the waste equipment by handing it over to a designated collection point for the recycling of waste electrical and electronic equipment. Caution 1. Do not drop, puncture or disassemble the device; otherwise the warranty will be voided. 2. Avoid all contact with water, and dry hands before using. 3. Use the device with care. Avoid pressing hard on the device body. 4. Use only the accessories supplied by the manufacturer. 5. Keep the device out of the reach of children. 6. For your own safety, don’t operate the device while driving. 7. Do not block your drivers view when mounting this device on the windscreen, we (the seller) do not take responsibility of improperly positioned units. 8. Please follow the instructions in this manual and use only the supplied accessories to avoid unpredicted damages to the device. Failure to follow the instructions will invalidate the warranty and may also endanger personnel safety, for which the seller assumes no responsibility. If your cigarette lighter draws power while the car is off, please disconnect this device to avoid draining the car battery. This device will turn off if the max/min temp is reached. Page 1 Product Description This DVR (Digital Video Recorder) is a dual-channel simultaneous video recording product dedicated for the evolving need of recording devices for automobiles. It features superior compact digital audio/video recording and high quality photo taking capability, high speed USB2.0 interface, and parallel battery charging and filming operation. Features Dual channel simultaneous recording and displaying on screen GPS route tracking G-Senor IR LED’s for Night Footage absent light HDMI Output 2.7” HD display without distortion, Front lens can have180°rotation H.264 image compression technique 30fps Recording Plug-‘n-Play HD PC CAMERA Cyclic recording mode Motion detection Automatic recording when the vehicle starts, charging while recording. 3 minute LCD shut off (Australian road compliance necessity) Specifications Image sensor 3.0MP CMOS WXGA HD Video resolution 480P/720P/720P_H Simplified Chinese/ Traditional Chinese/ English/ Russian/ Japanese/ Korean/ Italian/ Spanish/ French/ Portuguese/ German 2.7" 16:9 TFT display Support up to 32GB Micro SD card 2m-limitless JPEG Built-in microphone USB2.0 3.7V/ 600mAh 0-65 degrees L116×W45×H27mm 125g USB cable, car charger, bracket, manual, HDMI cable, GPS module, CD Language Display Memory Focus Picture MIC USB Battery Temperature Size Weight Accessories GPS Module Included Accesories USB Cable Charger Window Mount HDMI cable AV cable CD software Yes Technical Specifications: 1 2 3 4 5 6 7 8 9 10 11 12 13 14 15 16 17 18 19 20 21 Charging Indicator MIC light Mode Menu OK/Rec Front Lens On/Off/SOS Down Up Display LENS Aperture Bracket Slot Reset HDMI Slot GPS module GPS slot USB Slot TF/SD card slot Mic LED light Back Lens Button Functions POWER/SOS Turn on/ turn off/ SOS emergency MENU Opens the device menu MODE Switch between the camera modes available OK Start/Pause/Confirm DOWN Down /Zoom out UP Up/ Zoom In Installation & Operation: Mount the device preferably behind the rear view mirror or anywhere which does not restrict the driver’s vision of the road. When the adapter is plugged into the car’s charger, the device will start to work automatically when the car starts and will switch off when the car is turned off. Plug the external GPS module into the device if GPS tracking is required. Battery: The device includes an in built a 600mAh lithium battery. It will take about 90minutes to charge it completely in off state. The battery can be charged when DVR is in operation. The working current is about 380mA for normal and 580mA for night vision operation. On/Off 1. Press the POWER button for 3 seconds to turn on/off DVR. Date/Time Setup: Press the “MENU” button to enter setup mode, press the “MENU” button to bring up the second setup menu. Pick “Date/Time” option, “Down”, “UP” buttons to adjust the right date and time. Press “OK” button to confirm and activate the settings. Video Recording Mode: If you require GPS tracking to be recorded please plug the external GPS unit into the device before recording. The GPS satellite will go green once ready 1. 1. Video is the default mode when powered up, the “●” icon on the left upper corner will appear. 2. Press “REC” button to pause/resume the recording operation 3. Press the POWER button to switch the camera displayed. Press “MODE” button once switches to photo taking mode. The upper left corner of the display will show icon. There are three resolutions 1.3M, 3M, and 5M, for choice. Photo mode works only with the wide angle camera. Playback Mode Within Device: 1. Press “MODE” 3 times from video recording mode to enter the playback mode to check the video images taken. 2. Pressing “MODE” will stop the playback. 3. Press “MENU” for delete option can delete the selected file. Menu and Mode Menu Video resolution Picture resolution Time set Recording/ photograph mode White balance G-sensor GPS Key sound Time watermark Audio LED light Auto turn off language Light frequency Screen protect Format Default setting Software version Dual lens:720P/400P single lens:1080I/720P/480P 5M/3M/1.3M OFF//2min/5min/10min Dual lens/ left lens/ right lens Auto/ sunlight/ Fluorescent / Cloudy / Tungsten High/ medium/ low/ OFF ON/OFF ON/OFF ON/OFF ON/OFF Day/ night OFF/2min/5min/ 10min Simplified Chinese/ Traditional Chinese/ English/ Russian/ Japanese/ Korean/ Italian/ Spanish/ French/ Portuguese/ German 50Hz/60Hz OFF/1min/2min/3min OK/Cancel OK/Cancel Playback on PC A CD has been included in the packaging containing the required software to play the video files concurrently with GPS information. Please install this software first before proceeding. Once installed please enter the program by running Once installed the player should load and will look like the image below. Open the folder containing the videos you wish to play back, drag the video into the player. You will now be able to view your video with speed and location information. To view the map please click the google maps icon selected in red.