1
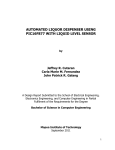
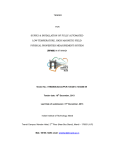
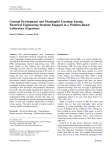
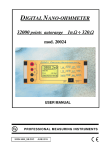
ECKELS ENGINEERING CryoComp 5.0 for Windows User Manual CRYOCOMP 5.0 FOR WINDOWS User Manual Eckels Engineering, Inc. 3322 Ebenezer Chase Drive Florence, SC 29501 Phone 843.661.2829 Fax 843.661.2829 Table of Contents CHAPTER 1 Running CryoComp 5.0 for Windows ......................................... 1 Launching the Material Properties Editor ................... 18 Getting Started....................... 18 Selecting a material...............1 Reviewing Material Properties.................................. 19 Defining the Characteristic Data.................................................2 Editing Material Properties ......................................................... 20 Working with Temperatures ................. 2 Defining a Temperature Range ............ 2 Defining a Temperature Array ............. 3 Residual Resistance Ratio and Magnetic Field...................................................... 4 Design Sample Dimensions.................. 4 Creating a User Defined Material .......20 Copying an Existing CryoComp Material...............................................20 Editing the Property Data....................20 Editing the Temperature Sample Data 21 Adding Temperature Samples .............21 Removing Temperature Samples.........22 Calculating the Table of Properties ....................................5 Reviewing the Properties Table............ 5 Features of the Material Properties Table..................................................... 6 Printing the Material Properties Table.. 6 Material Design Calculations ................................8 Reviewing the Design Results .............. 8 Features of the Design Results Text Area ...................................................... 9 Printing the Design Results .................. 9 CHAPTER 2 Saving Your Data ......................... 10 Saving the Data......................10 Save Format Options...........12 Saving to Microsoft Excel .................. 12 Saving to Comma Separated Values... 13 Saving to Formatted Text ................... 15 CHAPTER 3 Using the Material Properties Editor ............................................ 18 Deleting User Defined Materials .................................... 23 Saving Updates to the User Defined Materials Set ......... 23 CHAPTER 4 Technical Support ........................ 24 Technical Support Contact Information .............................. 24 C R Y O C O M P 5 . 0 F O R 1 Chapter W I N D O W S Running CryoComp 5.0 for Windows With CryoComp up and running, you can now start calculating a material’s thermal properties. T o begin calculating the thermal properties of a material, you must first select the material you wish to work with. CryoComp provides over 60 materials, grouped by material type to help you find a material quickly. CryoComp even allows you to create your own material, or edit one of the existing materials to tailor it to your own specifications. See chapter 5 for more information on creating and editing materials in CryoComp. Selecting a material To select a material: • Select the Materials tab. • Select the material type, by which your desired material selection is categorized, using the drop down box labeled Material Type. • Select the desired material, using the drop down box labeled Material. • Review the material comments for information regarding unique characteristics of the material as well as cautions in usage of the chosen material. 1 Defining the Characteristic Data Now you can begin to specify the characteristic environmental data to which your selected material is to be subjected. This is done in the following steps. • Select the Characteristics Data tab. Note The values entered on the Characteristics Data tab are automatically validated and are subject to the ranges and floating point precision labeled for each component. Values entered out of these ranges will be automatically rounded or adjusted to the nearest allowable value. If no range is specified, no validation is performed, beyond those necessary to complete the calculation. Working with Temperatures CryoComp allows you to specify the temperature value(s), in degrees Kelvin, which will be used in the thermal properties calculations for your material. These temperature values may be entered as an increasing range or as a specified selection of values in a temperature array. It is important to note that whenever a value is applied to the temperature array, the values present in the temperature range portion of the tab will be ignored in subsequent calculations (until the array is cleared). Defining a Temperature Range The temperature range to be used in the thermal property calculations is defined as an initial temperature and a final temperature, with an option to select a step value which will determine the intermediate temperature points to be calculated in the range. These values will be used in the calculation of the table of properties as well as the design calculations. To enter a temperature range: • Enter the initial temperature in the Initial value field. • Enter the final temperature in the Final value field. If you desire to reference only a single temperature, this step and the following step may be skipped. 2 • Enter a temperature Step value by which the calculations may be performed, incrementing in equivalent steps from the initial temperature to the final temperature. If only the initial and final temperature values are to be used, this step may be skipped. Note The temperature range may consist of a single value if desired (identical Initial and Final temperature values), however the design calculation cannot be performed on a single value range. Defining a Temperature Array To define your own set of temperature points, use the Temperature Array component of the tab. These values will be used in the calculation of the table of thermal properties. The design calculations will be performed using the minimum and maximum values in your temperature set as the temperature range of the calculations. The temperature set may consist of a single value if desired, however the design calculation cannot be performed on a single value range. To define your own temperature set: • Enter a desired temperature value in the Array Element value field. • Click/press Add to Array to save that point. • Continue entering temperature points until your temperature set is complete. The temperature points defined in your array will represent the values to be used in the calculation of the material’s thermal properties. These values will remain active until the array is cleared. To clear the temperature array: • Click/press Clear Array to clear all defined temperature points. Note When a temperature array is defined, the temperature range component will remain deactivated until the temperature array is cleared. 3 Residual Resistance Ratio and Magnetic Field If the RRR and Tesla area is accessible, your selected material allows for a range of values for these parameters. If the RRR is not available and is set to zero, a physically implausible but not impossible condition, then data is not available for the material. To adjust the Residual Resistance Ratio and/or Magnetic Field values given: • Enter a desired Residual Resistance Ratio value in the RRR value field. • Enter a desired Magnetic Field value in the Tesla value field. Design Sample Dimensions To perform a design calculation, you must enter a material length in meters and a cross-section in meters squared. The values represent the dimensions of your given material sample, by which the design data will be calculated. To enter these values, use the following steps. • Enter a desired length value (meters) in the length value field. • Enter a desired cross-section value (meters squared) in the cross-section value field. 4 Calculating the Table of Properties The component values provided, temperature range or array with RRR and magnetic field, are sufficient to perform the computation of the properties table. To calculate the table of thermal properties: • Click/press Compute Properties. To review the table of properties: • Click on the Properties Table tab. Reviewing the Properties Table The data table presented represents the calculation of your material’s properties for the given characteristic component values provided. In general, the properties value accuracy's are suitable for engineering calculations. It is well known that processing variations can influence the thermal properties of many materials, making it necessary to test materials to be used in critical applications. If a particularly wide property variation exists in the literature, a local notation is placed in the preview notes of the material selected. RRR is the residual resistance ratio defined as the ratio of resistance at the ice point, 273 °K, to the 4.2 °K value. Density is given as a constant value, room temperature, since for CryoComp purposes the property uncertainty exceeds the density temperature variation. Temperature is required to be entered and evaluated as increasing values. This means for the relative properties, enthalpy, delH, elongation, delL, and the thermal conductivity integral, I(KdT), the lower or lowest value of temperature entered is the reference value. This is readily apparent in the presented table. Specific heat is a temperature specific property as is thermal conductivity, diffusivity and resistivity. 5 Features of the Material Properties Table The data grid presenting the table of properties provides handy functionality for reviewing your material property calculations. One feature is the sort by column feature which allows you to select a column by clicking on the column heading (label at top of column). This feature provides for the numerical sorting of the entire data set by the values of the chosen column. Continued clicking on the same column heading alternates the ordering, descending/ascending values, but the reference temperature does not change. A given example of this feature would be: • You have calculated thermal properties data for differing materials, and you would like to analyze their characteristics, comparing them at like temperature points. Simply click the temperature column heading and the data set will be sorted by temperature to allow for easily recognized changes between materials as the temperature points ascend or descend. Clicking the first column of row numbers restores the original ordering of the data set. Another handy feature of the data grid allows you to select individual cells and/or rows of the table by highlighting table cells using the mouse or using the Windows control keys. This allows you to use the standard Microsoft shortcut keys to select and copy data from the data grid, then copy directly to an external application such as Microsoft Excel, Word, etc. Note The material properties table is a cumulative data set. For each calculation performed, at the given individual temperature points, the table of data values grows. It may be necessary to search for your data by scrolling through the data set. Most recent calculations are present at the bottom end of the data table. To discard the data from the table, when appropriate: • Click/press the Clear Grid button. The clearing of the data grid removes this data from memory and cannot be reversed. Printing the Material Properties Table To print the material properties table, CryoComp 5.0 for Windows provides the 6 standard printing options available to most Microsoft Windows applications. The following options are found in the File menu: • Page Setup - provided for page layout configuration. • Print Preview - visual preview of the document to be printed. • Print - prints the CryoComp data. Note The print functionality prints both the Design Results and the Material Properties Table. If only one set of data is desired, and both are populated, it will be necessary to use the clear functionality of the data set which you do not wish to print. 7 Material Design Calculations The component values provided, including temperature range or array with RRR and magnetic field, also including the material dimensions length and cross-section, are sufficient to perform the design calculation for your material sample. To perform a design calculation: • Click/press Compute Design. To review the design results: • Click on the Design Results tab. Reviewing the Design Results The design results presented represents the calculation of your material’s thermal design properties for the given temperature range and characteristic component values provided, as well as the given dimensions of your material sample. The design computation begins by giving the reference data and temperature specific properties. The second part represents cooldown or warm up of the dimensioned sample, enthalpy change to cooldown or warm up, change in the thermal conductivity integral, and length change of the sample. Listed for metals are the values of I²t for the sample rising in temperature between the two given temperature values by electrical current flow, i.e. Ohmic heating. If the I²t value given is divided by the square of the current flow in amps, the result is rise time in seconds. If a time interval is known and the I²t value is divided by time in seconds, the square root of that result is the current which will raise the sample to the given temperature in the requested time. The third part displays relevant properties for the dimensioned sample under a natural temperature gradient, i.e., adiabatic sample except for the ends which have a heat source and sink respectively. Heat leak is self explanatory. Cooldown enthalpy and contraction are the changes in sample enthalpy and length required to establish the natural temperature gradient. 8 Features of the Design Results Text Area As with the material properties data table, the text area of the design output allows you to select text using the mouse or using the Windows control keys. This allows you to use the standard Microsoft control keys to select and copy data from the text area, then copy directly to an external application such as Microsoft Excel, Word, etc. Note The design results text area is a cumulative data set. For each design calculation performed, for the selected material(s), the set of data in the text area grows. It may be necessary to search for your data by scrolling through the text area. Most recent design calculations are presented at the top of the text pane. To discard the data from the text area, when appropriate: • Click/press the Clear Results Area button. The clearing of the design results area removes this data from memory and cannot be reversed. Printing the Design Results To print the design results, CryoComp 5.0 for Windows provides the standard printing options available to most Microsoft Windows applications. The following options are found in the File menu: • Page Setup - provided for page layout configuration. • Print Preview - visual preview of the document to be printed. • Print - prints the CryoComp data. Note The print functionality prints both the Design Results and the Material Properties Table. If only one set of data is desired, and both are populated, it will be necessary to use the clear functionality of the data set which you do not wish to print. 9 2 Chapter Saving Your Data CryoComp 5.0 for Windows allows you to save your data using convenient file formats which can be imported into many software packages. C ryoComp 5.0 for Windows provides three file formats for saving your calculated material properties and design data. These three formats have been selected in an effort to provide near ubiquitous access to the data through most any data analysis software package. The provided formats are Microsoft’s Excel Workbook, Comma Separated Values, and Formatted Text which replicates the output files provided by previous versions of CryoComp for DOS. Functionality new to CryoComp 5.0 for Windows allows the software to interoperate with Microsoft Excel 2007 and its new Workbook format “.xlsx”. Note The program automatically detects whether Microsoft Excel is installed on your PC. If Excel is not present, the Excel format save functionality cannot be performed, and the option is grayed out. Saving the Data To save the design results and/or table of properties: • Click on the file menu, selecting File. • Then selecting Save. A new menu will appear asking you to select from saving the data to file for your later use (Save Data) or to save the data to a Microsoft Excel workbook to be viewed immediately (Save Data and Launch in Excel). 10 To save the data for later use, follow these steps: • Click on the Save Data menu item. • Using the standard Microsoft Windows save dialog, select a file name to associate the saved data. • Select a file format which best represents the type of application by which you wish to manipulate the output data. • Click Save on the save dialog to proceed with the save processing. • Click Cancel if you wish to skip the save process. To save the data for immediate viewing of the output data in a Microsoft Excel workbook, follow these steps. • Click on the Save Data and Launch in Excel menu item. • Using the standard Microsoft Windows save dialog, select a file name to associate the saved data. • Click Save on the save dialog to proceed with the save processing. • Click Cancel if you wish to skip the save process. With this save option, once the save processing is completed, the workbook containing the program output will be automatically launched in Excel. Note If you choose to Cancel the save processing, your data will still be available for viewing and saving until the program exits or you clear the data from the individual output tabs. 11 Save Format Options CryoComp provides for saving of program output to Microsoft’s Excel format, Comma Separated Values (CSV), and to a text format which replicates the formatting used by the original CryoComp software for DOS. Saving to Microsoft Excel CryoComp 5.0 for Windows provides for saving of the calculated data to Excel through the available Excel DLL on your PC. Microsoft Excel must be installed on your PC for this option to work. When saving to Excel, CryoComp provides a workbook with two sheets, one representing your calculated material properties and the other representing your design calculations. Examples of these sheets are shown as follows. In the following example of the calculated material properties sheet, you can see the columns of data are clearly labeled indicating their names and units. Figure 1: Example Calculated Material Properties Output in Excel 12 In the following example of the calculated design data sheet, you can see the columns and cells of data are clearly labeled indicating their names and units. Figure 2: Example Calculated Design Data Output in Excel Saving to Comma Separated Values The Comma Separated Values format is a popular generic format which can be imported into many numerical analysis and database software packages. When saving to the CSV format, CryoComp divides the file into two sections, one representing your design calculations and the other representing your calculated material properties. The formatting of the CSV data is defined below. The formatting of the Design Data section of a CSV file is defined in the following table. Entry Field Units 1 Material Name 2 Density 3 Residual Resistivity Ratio (RRR) Kg/m ³ 13 Entry Field Units 4 Magnetic Field Tesla 5 Lower bound temperature °K 6 Upper bound temperature °K 7 Specific Heat at lower temperature J/kg-K 8 Specific Heat at upper temperature J/kg-K 9 Thermal conductivity at lower temperature W/m-K 10 Thermal conductivity at upper temperature W/m-K 11 Thermal diffusivity at lower temperature m²/s 12 Thermal diffusivity at upper temperature m²/s 13 Electrical resistivity at lower temperature nohm-m 14 Electrical resistivity at upper temperature nohm-m 15 Thermal expansivity at lower temperature %/Kelvin 16 Thermal expansivity at upper temperature %/Kelvin 17 Integral Cp*dT J/kg 18 Integral Conductivity*dT W/m 19 Length change % 20 Length of material sample m 21 I²t Amp² seconds 22 Cross-section of material sample m² 23 Heat leak Watts 24 Resistance Ohms 14 Entry Field Units 25 Cool down enthalpy Joules 26 Thermal contraction m Table 1: CSV Format Design Data Fields The formatting of the calculated Material Properties Data section of a CSV file is defined in the following table. Entry Field Units 1 Material Name 2 Residual Resistivity Ratio (RRR) 3 Magnetic Field Tesla 4 Density Kg/m ³ 5 Temperature °K 6 Specific Heat J/kg-K 7 delH J/kg 8 Thermal diffusivity m²/s 9 Conductivity W/m-K 10 I(KdT) W/m 11 delL % 12 Resistivity nohm-m Table 2: CSV Format Material Properties Data Fields Saving to Formatted Text The Formatted Text format is another popular generic format which can be imported 15 into many numerical analysis and database software packages. The data file formatting used replicates the output of the original CryoComp for DOS. When saving to Formatted Text using the CryoComp for DOS format, CryoComp divides the file into two sections, one representing your design calculations and the other representing your calculated material properties. Examples of these sheets are shown as follows. In the following example of the calculated design data, you can see the columns and rows of data are clearly labeled indicating their names and units. Figure 3: Example Calculated Design Data Output in Formatted Text (CryoComp for DOS format) In the following example of the calculated material properties data, you can see the columns of data are clearly labeled indicating their names and units. 16 Figure 4: Example Calculated Material Properties Output in Formatted Text (CryoComp for DOS format) 17 3 Chapter Using the Material Properties Editor CryoComp 5.0 for Windows allows you to create and edit your own materials. T he Material Properties Editor provided with CryoComp allows you to review and edit the properties of the materials provided with CryoComp 5.0 for Windows, as well as create your own materials. Launching the Material Properties Editor To launch the Material Properties Editor: • Click on the file menu, selecting File. • Then selecting Material Properties. The Material Properties Editor window will be visible. Please review the introduction screen for the conditions and limitations of the usage of this software. If you do not agree to the terms of these conditions, or need further clarification, please contact the distributor for more information. Getting Started To begin reviewing and editing of the material properties, you must first select a material. To select a material: • Select the Materials tab. • Select the material type, by which your desired material selection is categorized, using the drop down box labeled Material Type. 18 • Select the desired material, using the drop down box labeled Material. • Review the material comments for information regarding unique characteristics of the material as well as cautions in usage of the chosen material. Note Attempting to select a material for review/editing when edits to a previously selected material have not yet been saved will result in a confirmation prompt prior to permanent data loss. Reviewing Material Properties Now you can begin to specify the material properties data to which your selected material is referenced in calculations. This is done in the following steps. • Select the Material Properties tab. Note The values entered on this tab are not validated. Great thought and care must be taken to ensure accuracy of the data; this step is left to you the user. The Material Properties tab presents the material characteristic data, with the temperature sample points which have been recorded for the chosen material. The comments provided indicate any unique characteristics or cautions to be associated with the material. The usefulness of CryoComp originates in its four material properties, thermal conductivity, specific heat, thermal contraction, and resistivity, which are uniquely related to temperature. The materials supplied with CryoComp are treated as Read-Only, preventing any data entry attempts in the material properties tab. 19 Editing Material Properties All new materials or any material categorized as User Defined are editable. To edit a material please review the following sections. Creating a User Defined Material To create a user defined material, the user may use the following steps. • Click on the file menu, selecting File. • Then selecting New. At this point the Material Properties tab will be presented as an empty material to be completed by you the user. Copying an Existing CryoComp Material To create a user defined material by copying an existing CryoComp material, the user may use the following steps. • Select a material as described in the sections above. • Click on the file menu, selecting Edit, and then selecting Copy Material Data. • Click on the file menu, selecting Edit, and then selecting Paste As New Material. At this point the Material Properties tab will be presented as an editable material already populated with the original material’s property data. Editing the Property Data To edit any of the material properties of the set (Material Name, Metallic, Density, RRR, Tesla, Material Comments), you may press the tab key until you’ve reached the desired field on the form, or mouse click directly to the data field, and edit the material property. Again, you the user are required to validate the provided data’s accuracy. 20 Note To register an edit made to a data field, you must press the tab key to move to the next field on the form, or click out of the field, to trigger the update action. Note The Material Name is a key value in the program, so it must be unique to the instance of the data. This will be validated on save. Editing the Temperature Sample Data To edit the temperature steps in the temperature sample data, you may directly access each given data cell, editing as needed. The temperature step data is presented in 5 column increments. To step through the available columns of data: • Click or press Previous 5 Steps or Next 5 Steps. Note Temperature Sample Data can be entered in any order and for any temperature range. An important requirement but not a particularly restrictive one is that the property data must be monotonically increasing with temperature. The interpolation routines used to find properties between data points in the table can be driven into inaccurate ranges, so the full data field should be checked using CryoComp before accepting the property set. Adding Temperature Samples To add temperature steps to the sample set, you may increment the temperature step counter labeled Temperature Steps. Each increment or greater typed value increase will result in the addition of temperature step columns to the data set. These columns will be initialized with a temperature value incrementing from the temperature value in the last column of the set. These values may be directly edited to represent the 21 temperature values for you additions to the data set. Again, you the user are required to validate the provided data’s accuracy. Removing Temperature Samples To remove column(s) of data from the temperature sample data set, you may decrease the temperature step counter labeled Temperature Steps. Each decrement or lesser typed value decrease will result in the deletion of temperature step columns from the upper end (highest temperature(s)) of the data set. An example of using this feature: • If you choose to remove 2 columns from the data set using the above steps, and your upper most samples are say 290° K and 300° K, these columns of sample data will be removed from the data set. To remove individual columns of data from the data set, you may clear the temperature value (leaving the given temperature field blank) from the column to be deleted, then press the tab key or click out of the cell to trigger the column delete action. The above methods for removing temperature sample column(s) are followed up with a confirmation prompt, after which point the data is lost. Note The only recourse to recovering data lost when removing temperature sample data is to exit the material edit mode without saving the material. This can be done by exiting the Material Properties Editor, or by selecting a new material for review and declining to save the material currently being edited. Note When editing temperature values associated with the data columns it may be necessary to reorder (sort) the data set, for instance a column added to the end of the data set, having its temperature updated to one logically located in the middle of the set, will need to be placed at its appropriate index to prevent confusion. This reordering of the data columns is performed whenever you step through the columns using the Previous 5 Steps or Next 5 Steps buttons. Otherwise the set is reordered prior to saving of the material property data. 22 Deleting User Defined Materials To delete a material categorized as User Defined, use the following steps. • Select a material as described in the sections above. • Click on the file menu, selecting Edit, and then selecting Delete Material. The above material deletion action is followed by a confirmation prompt, after which point the data is permanently lost. Saving Updates to the User Defined Materials Set To save creation of new materials and edits to the User Defined material set, use the following steps. • Click on the file menu selecting File. • Click on the Save menu item. The User Defined material data is now saved for immediate use throughout the CryoComp software. Note An attempt to overwrite an existing material will result in a confirmation prompt prior to permanent data loss. Note Attempting to exit the Material Properties Editor when material edits have not been saved will result in a confirmation prompt prior to permanent data loss. 23 4 Chapter Technical Support If you have trouble with CryoComp 5.0 for Windows, Technical Support can help. I f you are having a problem using CryoComp 5.0 for Windows, we want to help. General performance issues can be attributed to processor speed, available memory, and the number of concurrent running tasks which are competing with CryoComp for PC resources. Because of the computationally intensive nature of CryoComp, large data sets can take a while to create. This time could be lessened by freeing up your PC’s resources by running fewer or no other programs when using CryoComp 5.0 for Windows. Technical Support Contact Information Technical support for CryoComp 5.0 for Windows is provided by Phil Eckels of Eckels Engineering, Inc. Email: [email protected] Phone: 843-661-2829 Fax: 843-661-2829 Mailing Address: Eckels Engineering, Inc. 3322 Ebenezer Chase Drive Florence, SC 29501-8006 USA 24 25