1
356
©
3HUVRQDO5HVSRQVH6\VWHP
Windows 3.1/95 or a later version
User’s Manual
Varitronix Limited, Hong Kong
PRS-v2-Ed1-page
1
Technical Support Contact
Varitronix Limited
22 Chun Cheong Street
Tseung Kwan O Industrial Estate
Tseung Kwan O, Hong Kong
Tel: (852) 2197-6000
Fax: (852) 2343-9555
Trade Mark
Personal Response System and 356 are common law
trademark of Varitronix Limited. It is based on the Freeforming One-way Network (patent pending).
Copyright
This document and the associated software are the
property of Varitronix Limited. They are loaned to the
user under the terms of the Limited Use License
Agreement. Unauthorized copying of this document, the
software, or any associated materials is contrary to the
property rights of Varitronix Limited, and is a violation of
state and federal law.
We hereby acknowledge other product names mentioned
in this manual which may be trademarks or registered
trademarks of their respective companies.
First Edition
©
Copyright 1997, 1998
Varitronix Limited
PRS-v2-Ed1-page
2
Activate your classroom with 356!
I . What is 356?
4
II. How does 356 work?
4
III. The special features of 356?
5
IV. Parts list
V. Warranty
VI. Getting started with the Standard Package
A) What you need to have
B) What you need to do the first time
C) 356 Hardware
1) Transmitter
2) Receiver
D) 356 Software
1) Minimum PC configuration required
2) Installation on Windows 3.1/95
3) Changing the Transmitter’s ID number
4) Grading or marking the answers
VII. 356 operation - a quick tour
6
6
6
6
7
8
8
8
9
9
9
9
10
10
VIII. 356 operation - a flow chart
13
IX. 356 operation - a detailed guide
16
A) Starting
B) A question and answer session
C) Options other than the default ones
X. Using Names instead of Numbers for IDs
XI. Class seating chart
XII. Retrieving data files
XIII. Application Notes
A) Active learning in the classroom
B) The choices for Sender-IDs in the Transmitters
C) Campus-wide usage
D) Non-academic applications of 356
16
17
19
22
24
29
31
31
32
32
32
XIV. Appendix
A) PRS Transmitter User’s Guide
33
33
B) PRS Receiver User’s Guide
34
C) PRS ID Changer User’s Guide
D) Mark Program User’s Guide
35
36
PRS-v2-Ed1-page
3
I. What is 356?
356 is for you if you teach and want
• your students to pay attention to what you say in class;
• 100% participation in question-and-answer sessions;
• immediate feedback and reinforcement;
• automatic attendance check;
• automatic recording of student answers;
• a lesson be reasonably understood before going to the next one;
• test or quiz results promptly with automatic grading;
• shy and disadvantaged students be proactive;
• students’ opinions and preferences instantly;
• Continuous monitoring of students’ progresses, both individually and as a group.
In short, 356 is a tool for active learning in the classroom.
356 is also for you if you
• conduct a training session and want immediate feedback and reinforcement;
• convene a meeting to elect officers and want the results immediately;
• demonstrate a new product and want an on-the-spot measure of its impact;
• score a contest using the audience and want the results instantly.
In short, 356 is a tool for electioneering or voting with immediate results, and for
instant polling or surveying of opinions or preferences.
356 stands for Personal Response System. It literally means privately responding
or selecting. It is based on a free-forming one-way network of wireless
communication (patent pending). It is low cost, easy to use, portable, and a flexible
network.
II. How does 356 work?
In a nutshell, each member of the audience responds privately to a question or
prompt, all responses are collected, and the summary displayed for all to see.
Since nearly all questions can be cast in a multiple-choice format, the audience
answer by pressing down on a numeric key on their pocket-size wireless Transmitter
(T). The signals sent are intercepted by a portable Receiver (R) which in turn is
connected to a central Display (D) via an electronic circuit or a PC. Every time a
signal from a T is received, one of the boxes shown on D changes color. Since each
T is encoded with a sender (student) ID number, which is tagged onto the signal
sent, the flashing box on D shows the ID of the corresponding sender. The answer
itself is not displayed. At the end of the question period, a statistical summary of the
answers is shown on D as a histogram.
There are two modes of operation for 356 with which the operator (instructor) can
select prior to the start of each session.
PRS-v2-Ed1-page
4
•
•
In the Anonymous mode, only the statistical results are filed and no record
is kept on the individual response.
In the Known mode, each response (including the associated sender ID)
is recorded on a data file in the sequence received. The cycle is repeated
for each question until the end of the session, at which time an end-of-file
is marked on the data file. The entire file is written on line onto the PC
hard disk. [Note: If a special LED Display Panel is used instead of a online PC, the data file, which is recorded on a memory unit, can later be
transferred off line to a PC.]
III. The special features of 356
•
•
•
•
•
•
•
•
•
•
It is affordable - the cost per user is no more than that of a typical paperback
textbook.
It can be installed and readied for use in minutes.
It is easy to use - the operator and senders can gain familiarity with its
operations in minutes.
It is portable - the wireless transmitters and receiver are pocket-sized and, in an
educational institution, students can be equipped with their own ID-coded
transmitter to use in any classroom.
It is scalable - adding new senders is easy and economical; the network can
start with a small number of units and expand to cover the entire student
population on campus by simply adding the corresponding numbers of
transmitters and receivers.
It is a learning tool - its simplicity makes it applicable to all levels of education
from the primary to the tertiary.
It has security - the ID in the transmitter can be changed only with the use of an
ID changing adapter.
It has two modes of operation - the Known mode in which all ID-tagged
responses are recorded and the Anonymous mode in which these are not.
It has two modes of display - the full-screen mode shows the largest image of the
indicator boxes of signals received and for the histogram of the results, while the
half-screen mode leaves the other half of the screen for displaying the question
or instruction for responses.
It is a teaching tool - it has provisions for creating a class seating chart on line, it
facilitates the administration of quizzes, tests and polling, and permits the
attachment of a confidence level (high, medium, and low) to the answer sent by
the transmitters.
Extensive classroom testing and the use of well established IR technology have led
to this simple functional system that is robust and sufficiently low cost to make it
affordable for all students to have their personal transmitter to use in any classroom
on campus. In sum, 356 could become a universal learning tool in the classroom.
PRS-v2-Ed1-page
5
IV. Parts list
A Standard Package comes with the following items:
• 50 Transmitters;
•
2 Receivers;
•
2 connecting cables;
•
1 9-V transformer;
•
1 ID Changer (for the Transmitters);
•
3 software programs: PRS, MARK and IDChg
•
1 User’s Manual.
Please note that each Transmitter requires two (2) alkaline-type 1.5-V AAA batteries
for power which the user must supply.
Multiple packages, special configurations or specific combinations can be ordered
for campus-wide application. A rule of thumb is 2 Receivers per 50 Transmitters.
A School Package comes with 50 Transmitters and an integral Receiver-LED
Display Panel with Memory (LED Panel for short). No PC is required to operate the
LED Panel. An output port is provided so that the data stored in the LED Panel
memory unit can be off loaded anytime after the end of each session. to a PC or PC
Notebook.
V. Warranty
The manufacturer’s warranty is limited to the repair or replacement at its option of
any 356 product due to any defect in design, material and workmanship which
arises within a period of one year from the date of delivery of such product. This
warranty is subject to:
• the product not being used for any purpose other than the normal purpose for its
applications; and
• the observance by the user of all operating instructions and recommendations
issued by the manufacturer in relation thereto.
VI. Getting started with the Standard Package
A) What you need to have
•
•
a PC or PC Notebook, with a minimum configuration of i486 chip and 8M RAM,
which operates on Windows 3.1/95 (or a later version), and
a projector or a TV monitor that can project your PC monitor screen for the entire
audience to see.
PRS-v2-Ed1-page
6
B) What you need to do the first time
Instructions to the Operator (Instructor):
• Follow the instruction of the User’s Guide to mount and connect the Receivers.
The use of 1 Receiver per 25 Transmitters is recommended. Make sure the small
glass window of each Receiver is visible to the audience.
• Supply power to the Receiver nearest the PC using the 9-V transformer
provided.
• Connect the data output port of the nearest Receiver to the RS232C port of your
PC using the signal cable provided.
Note: Four (4) Receivers will provide adequate coverage even for the largest
lecture hall; if more than 4 Receivers are used, additional 9-V power
source(s) will be required.
Skip the next paragraph if you plan to operate 356 entirely in the Anonymous mode.
Each Transmitter has been pre-loaded with an ID number (ID) at the factory. Before
you hand out the Transmitters to the senders (students), you might want to change
the factory set IDs to the student ID numbers. The ID can be any number from 0 to
999,999,999. Instructions for changing IDs can be found in the 356 ID-Changer
User’s Guide in the Appendix.
Instructions to the senders (students):
• When answering, make sure to aim the narrow end of your Transmitter at a
Receiver.
• Watch the boxes on the display screen. Your ID will appear on one of these
boxes and that box should change color for about 10 seconds when the signal
you sent is received. This is a confirmation that the signal has been received and
registered.
• The display screen also shows a box that indicates “live” the number of senders
(students) that already have answered.
• The Operator (Instructor) will tell you ahead of time
1) whether you can answer only once to a question or you can change your
answer as many times as you wish within the time period allocated. In the
latter case,
there is a built-in delay before the next answer can be sent out; and
only the last answer sent and received will be recorded.
2) if a confidence level (CL) is required for your answer; press on
‘H’ and then the ‘Numeral’ for certainty or high CL,
‘L’ and then the ‘Numeral’ for uncertain or low CL, or
just the ‘Numeral’ for intelligent guessing or medium CL.
PRS-v2-Ed1-page
7
C) 356 Hardware
1) Transmitter
The Transmitter consists of a specially designed IR circuit and powered by two 1.5V batteries (alkaline-type AAA). When the power button is pressed on, the LED is
lighted and the unit is ready for sending signal. A signal is sent when any one of the
ten ‘numeric keys’ is pressed momentarily. This signal corresponds to the numeral
pressed and is tagged with an ID. In order to prevent traffic jam at the Receiver, the
pushbuttons are deactivated for a brief duration following each send action.
A “Confidence Level” can be attached to the answer by first pressing ‘H’, ‘L’, or
nothing before pressing the ‘Numeric’ key. ‘H’ means “High (certainty)” and the LED
is “steady red”. ‘L’ means “Low (uncertain)” and the LED is “steady yellow”. The
default of not pressing means “Medium (intelligent guessing)” and the LED remains
in “steady green”. The confidence level will revert to the default value of “Medium”
after 15 seconds or after each power off/on sequence.
A continuously flashing or blinking of the LED indicates that the unit is
malfunctioning. Try switching off the power and re-start the unit.
The batteries are expected to last at least a semester under normal usage. They will
need replacement if the LED light is deemed or if it does not light up when the power
switch is clicked on.
A 356 Transmitter User’s Guide is appended to the end of this manual.
2) Receiver
The Receiver is an IR detector powered by a 9-V AC-to-DC converter. The red LED
lamp should flash 3 times and be lit when the power is applied. This indicates that
the unit is ready to receive signals. A signal cable is included for the connection
between the RS-232C port of your PC and a Receiver. The signals are received
sequentially, digitized, and passed on to the PC for analysis and recording.
If more than one Receiver is required for coverage, connect the signal output jack of
the second unit to the signal input jack of the first unit and so on. No additional
power source is required if a 9-V transformer is used and the total number of units in
series is four or less.
A 356 Receiver User’s Guide is appended to the end of this manual.
Warning: The IR detector may be damaged by exposure to intense light. Do
not direct any part of the projector light cone on the Receiver.
PRS-v2-Ed1-page
8
D) 356 Software
1) The minimum PC configuration required
The package consists of three programs: PRS, IDChg and Mark. The PC running
the PRS program will need a minimum configuration of i486 chip, 8M RAM, and
Windows 3.1/95 (or later a version).
2) Installation on Windows 3.1/95
(The same procedures apply to installing the IDChg and Mark program).
All programs, libraries and data files are contained in the diskettes. These are
installed with the default path C:\PRS and 3 megabytes of free disk space are
required on your C Drive. No libraries will be installed on your Windows System
Directory in order to avoid the mixing of different library versions.
a) On Windows 95
◊
◊
◊
◊
Turn on the computer and start Windows.
Insert PRS diskette marked “Disk 1” into you diskette drive.
From the Windows Program Manager, click ‘Start’ and select ‘Run’
Type ‘A:\Setup’ (or ‘B:\Setup’ if the floppy disk is in the B Drive) and click
‘OK’.
b) On Windows 3.1
◊
◊
◊
◊
Start Windows
Insert PRS diskette marked “Disk 1” into you diskette drive.
From the Windows Program Manager menu bar, select ‘File’ and choose
‘Run’.
Type ‘A:\Setup’ (or ‘B:\Setup’ if the floppy disk is in the B Drive) and click
‘OK’.
c) Installation
◊
◊
◊
◊
On the welcome screen, close all other applications and click ‘OK’.
Click ‘Install’ to start copying files. The default path is C:\PRS.
After all files have been copied, click ‘OK’ to complete this step.
A PRS folder is created at the completion of the installation.
3) Changing the Transmitter’s ID number
Instructions on the use of the ID-Changer unit and the IDChg software program can
be found in User’s Guide appended to the end of this manual.
PRS-v2-Ed1-page
9
4) Grading or marking the answers
The answers of each PRS session are recorded event-be-event on a data file stored
in the folder C:\PRS\Session. These answers can be graded using the Mark
software program. Detailed instruction can be found in the User’s Guide in
appendix.
VII. 356 Operation - a quick tour
The Default Settings - the Easiest to Use
A) Click on the ‘New Session’ button just below the top pull-down menu bar.
1) A prompt appears which suggests a default filename of “MMddhhmm.csv” for
storing your file at the conclusion of the current session (MM for the month, dd
the day, hh the hour, and mm the minute; .csv means a comma-separatedvalues text file). Click on ‘OK’ unless you want to enter another filename.
2) Inside the “session”, there are the following “question options”:
a) the question number “Qx” which can be changed by clicking on ‘+/- Question’;
b) the time allotted to answer the question “mmss”, with “mm” designating
minutes and “ss” seconds, which can be changed by clicking on ‘+/- Time’;.
[You may want to give sufficient time for the Students to discuss with peers
before answering.]
c) the display screen can be shrunk in half to free the lower half for displaying a
question by first clicking on ‘Screen’ first, next on ‘Half Screen’, and then on
either ‘Black’ to overlay a overhead transparency or ‘Text’ to type in the
question;
d) setting the number of times a Student is permitted to answer a question by
clicking on ’Chances’ and select the desired number (Note that only the last
entry received is recorded);
e) setting the number of choices in the multiple-choice question by clicking on
‘Choices’ and select the desired number; and
f) select whether to show the histogram of answers automatically or by menu
control by clicking on ‘Graph’
3) Click on ‘Start’ to begin receiving the answers to the question.
a) Instruct the Students to commence pressing the key(s) on their Transmitter to
answer, and to watch for the appearance of their ID in one of the display
boxes for confirmation that their answer has been received.
b) Click on ‘Pause’ to stop the clock and on ‘Resume’ to continue.
c) Click on ‘Stop’ to terminate the question period.
d) The number of Students whose answer has been registered is shown on the
right most box on top.
e) The ‘+/- Time’ is functional during the question period.
PRS-v2-Ed1-page 10
4) The answering period concludes when the “clock” runs to zero or the ‘Stop’
button was hit. A summary of answers is displayed immediately as a histogram.
Click on ‘Close’ to go on to the next question.
B) To end the session, click on ‘End Session’ and the event-by-event records of
your session (including the IDs) are stored on your hard disk as a commaseparated-values text file (.csv).
C) To quit, click on ‘File’ and then on ‘Exit’.
IV)
Other
Settings
Other
Settings
A) Click on ‘File’ and then on
1) ‘Open Name File’ - to load a look-up table for replacing the numbers with names
for all IDs on the “display boxes”.
2) ‘Open Class File’ - to retrieve a previously created “Class Seating Chart” (a .csv
type) for use in the current session.
3) ‘No Class File’ - for not using a “Class Seating Chart”.
4) ‘Open Session File’ - to retrieve the histograms of a previous session for use in
the current session.
5) ‘Create Class - Sequential’ - to create a “Class Seating Chart” by asking the
Students to register in a sequence controlled by the Instructor.
a) Drag the ‘horizontal slider’ on the “dialogue box” to the desired “number of
columns (seats per row)” and the ‘vertical slider’ to the “number of rows”
and click on ‘next’.
b) A “Class Seating Chart” appears with the “seat” labeled by “rrcc” where
“rr” refers to the “row number” and “cc” to the “column number”.
c) Make sure that you know the one-to-one correspondence between the
“virtual” and “physical” seat.
d) Starting with “seat = 101 (row 1 - column 01)”, ask the student seating
there to register by pressing any single ‘numeric key’. The “cursor” then
moves to the adjacent “seat = 102” and the student there can be asked to
register and so on and so forth; any empty seat will be skipped after 3 s.
e) Click on ‘end’ and then enter the filename to save the “Class Seating
Chart“ for the next session.
5) ‘Create Class - Random’ - to create a “Class Seating Chart” by asking the
Students to register on a first-come-first-served basis. First follow steps 4-a) to c)
above and then the steps below.
a) Ask each Student to transmit their “seat number” one digit at a time within
10 seconds. A ‘ticker-tape’ display above the top menu bar acknowledges
the reception of each digit by showing the Student ID and the number
string that has been received up to that moment. If their corresponding
PRS-v2-Ed1-page 11
seat on the display box does not show their ID as acknowledgement, wait
10 seconds and re-transmit the whole “seat number”.
b) Terminate the registration process by clicking on ‘end’ and then enter the
filename for the “Class Seating Chart “.
6) ‘COM’ - for designating which communication port, ‘COM1’ or ‘COM2’, to connect
the Receiver(s).
7) ‘About’ - for important reminders,
8) ‘Exit’ - to quit PRS.
B) Click on ‘Audience’ to select the option of:
a) ‘Known’ in which all recorded answers will be tagged with the Student IDs (for
answers which will be marked or graded later) or
b) ‘Anonymous’ in which there will be no ID tag on the recorded answers (for
polling or surveying).
C) Click on ’Chances’ to select the limit on the number of times that a Student is
permitted to answer a question (Note that only the last entry is recorded).
D) Click on ‘Screen’ to select either ‘Full Screen’ which gives the largest display
area or ‘Half Screen’ which frees the lower half for displaying a question with:
a) ‘Black’ giving a dark background to overlay, for example, an overhead
viewgraph, or
b) ‘Text’ for typing in a question or, by double clicking on the white area, for
loading or saving a text file
E) Click on ’Boxes’ to select the number of display boxes to show the IDs of the
most recent responses received.
F) Click on ‘Choices’ to select the number of choices in the current question.
G) Click on ‘Graph’ to select whether to show the histogram of answers
automatically or via menu control.
PRS-v2-Ed1-page 12
IX. 356 Operation – a flow chart
Run
PRS
Accept default
filename or enter
your own
Click
+/- Question
1
3
Yes
Click
New Session
Default
Settings?
Set question
number Qx
2
No
Click
Chance
Set number of
tries allowed
Click
Screen
Set display
screen size
Click
Choices
Set number of
choices for the
answer
Click
Graph
Set when the
histogram is
shown
5
Click
+/- Time
Instruct students
to respond
Set question
answer time
Click
Pause/Resume
Click
Start
Click
Stop
Time=0
4
PRS-v2-Ed1-page 13
4
Automatic
display of
Histogram?
No
Next
Question
Click
End Session
Yes
Click
Close
3
Another
Session?
1
Yes
No
Click
File then Exit
PRS-v2-Ed1-page 14
5
Load look-up
table from folder
C:\PRS\Name
Yes
Change ID
from Numbers
to Names?
Click
Open Name File
From now on all ID
Numbers become Names
No
Seating
Chart?
2
No
Yes
Class File
already exists?
Click
Open Class File
Load pre-existing
file from
C:\PRS\Class
Yes
Set matrix size for
seating chart
No
Create chart
seat-by-seat in
sequence?
Yes
Click
Create Class Sequential
No
2
Enter Class
filename
Ask the student on
Row#1- Col#1 to
transmit a Numeral,
then the adjacent
student to do the same
and so on.
Set matrix size for
seating chart
Create chart
from any seat?
Yes
Click
Create Class Random
Ask students to
transmit their seat
number one digit at a
time within 10 sec.
Enter Class
filename
No
5
PRS-v2-Ed1-page 15
IX. 356 Operation - a detailed guide
The folder C:\PRS should contain several file folders for data input and output. The
names of these folders are shown below..
A) Starting
Run the PRS program and the “Main Display” appears on the PC screen as shown
below.
The colored “boxes” serve the important function of confirming that the signal sent
by a member of the audience is received and registered. That is, upon the reception
and registry of the first signal, the top left most “box” will change color and show the
PRS-v2-Ed1-page 16
ID number of the corresponding Sender. The second signal registered will change
the color of the “box” immediately on the right and so forth.
All “session options” are controlled by clicking on one of the buttons on the “top pulldown menu bar”. The default “options” are set to allow you to start using PRS for
questions and answers (Q&A) immediately. The “session control keys” are the
“highlighted boxes” immediately below the “top pull-down menu bar”.
B) A question and answer session
To start a Q&A session using the default “options”, click on “New Session” and a
“dialogue box” appears as shown below. A comma-separated-values text file is
opened on the C Drive with a default filename of “C:\PRS\Session\MMddhhmm.csv”,
where MM stands for the month, dd the day, hh the hour and mm the minutes; as
shown in the illustration below.
1) Click on ‘OK’ unless you want to enter a different filename. Different “session
control keys” will be highlighted as shown below.
2) The beginning question number is “Q1”. Click on ‘+/- Question” to change the
number. (Note that a default value of 5 has been set for the number of selections
in the multiple-choice question. Click on ‘Choice’ on the top menu bar to change
this number.)
PRS-v2-Ed1-page 17
3) The time allotted to answer the question is shown in the box immediately on the
right as “mmss” with “mm“ for minutes and “ss” for seconds. Click on ‘+/- Time’ to
change the allotment in increment of 30 seconds.
a) You may want to allot sufficient time for the Students to discuss with peers
before answering.
b) If you want a “Confidence Level” to be tagged to their answers, ask the
Students to press on their Transmitter ‘H’ followed by the ‘Numeral’ for
“very confident (certain)”, ‘L’ plus the ’Numeral’ for “not confident (pure
guessing)”, and just the ‘Numeral’ for “moderately confident (intelligent
guessing)”.
4) Click on ‘Start’ to begin receiving answers to the question. Students can
commence pressing the key(s) on their Transmitter to answer.
a) Click on ‘Pause’ to stop the clock and on ‘Resume’ to continue.
b) Click on ‘Stop’ to terminate the question period before the clock time
reaches zero.
c) The number of Students whose answer has been registered is shown on
the right most box on top.
d) The illustration below shows a total of 11 signals were received from 5
Students: 3 from “ID = 000000005 and 2 each from the remaining 4. Note
that i) the color of the box is associated with the last digit of the ID, and ii)
only the last signal received from each Student is registered.
5) The answering period concludes when the “ clock” reads zero, and a summary of
answers is displayed immediately as a histogram as illustrated below.
PRS-v2-Ed1-page 18
a) Of the 5 students, 2 answered “1”, 2 answered “2”, and 1 answered “4”.
b) Since the Students were asked to attach a “confidence level (CL)” to their
answer, the CL results are reflected by the colors of the bars. There were two
“CL = Hi (Red)” for answer “1”, one each of “CL = Lo (Yellow)” and “CL = Med
(Green)” for answer “2”, and one “CL = Med (Green)” for answer “4”. [If no
“confidence level” was required, all bars would be green.]
c) Click on ‘Close’ to go on to the next question.
7) To end the session, click on ‘End Session’ and the event-by-event records of the
session, including the IDs, will be stored automatically on your hard disk as a
comma-separated-values text file (.csv).
8) If you do not want to start another “session”, quit by clicking on ‘File’ and then on
‘Exit’.
C) Options other than the default ones
1) A common option would be “polling” or “opinion sampling” in which no ID
information will be recorded. In this case, one simply click on ‘Audience’ and
then on ‘Anonymous’. Follow all the steps in B) above. The IDs will still be shown
on the “display boxes” for acknowledging the receptions of signals. But the
output file will have no ID information.
PRS-v2-Ed1-page 19
2) For pedagogical reasons, there might a need to allow the Students to answer
only once or a few times. This limit can be imposed by clicking on ’Chances’ and
select the limit. [Note that, for each Student, only the last answer to the question
received is recorded.]
3) It is convenient to have 2 screens or white areas for projecting information - one
for the PRS main display and the other for showing the question to be answered
for all to see. If only one screen or projection area is available, click on ‘Screen’
and select ‘Half Screen’ which frees the lower half for displaying a question.
There are two options under ‘Half Screen’.
a) ‘Black’ giving a dark background to overlay, for example, an overhead
viewgraph.
b) ‘Text’ for typing in a question directly on the white area. The typed question
can be saved by double clicking on the white area and then click ‘Save File’
on the “dialogue box”.
PRS-v2-Ed1-page 20
PRS-v2-Ed1-page 21
If you have a question that is pre-loaded as a text file stored in the folder
C:\PRS\Question, you could click ‘Open File’ on the “dialogue box” and
select that question (econ.txt in the example below).
4) An alternative to using the ‘Half Screen’ option is by adjusting the Windows
frame on the PC monitor screen such that the lower half is available for showing
a question from the file in Notepad, WordPad or MS Word program.
5) Sometimes showing more “display boxes” could be helpful. Click on ’Boxes’ to
select the number desired. [Also see below on “Using Names instead of
Numbers for IDs” and “Class Seating Chart”]
6) For each question asked, the number of available choices for the Students to
answer must equal or be larger than the actual number of multiple choices in the
question. Click on Choices and the appropriate number to satisfy the
requirement.
7) Click on ‘Graph’ to select whether to show the histogram of answers
automatically or by menu control. In the latter mode, viewing the histogram of the
PRS-v2-Ed1-page 22
just concluded Q&A exercise requires two steps: clicking ‘- Question’ and then
‘Graph’.
X. Using Names instead of Numbers for IDs
The option of using Names instead of Numbers for IDs has been provided. To do
this, create a look-up table for names versus numbers. An example to follow is the
file C:\PRS\Name\namsam.csv. You should of course have your own file. Click on
‘File’, then on ‘Open Name File’ and load the look up file. From this action onward,
the “display boxes” will show names throughout the session.
PRS-v2-Ed1-page 23
XI. Class seating chart
A Class Seating Chart is referred to as “Class File” for short. Its creation can be
made ahead of time or on-line at the beginning of a class. Click on ‘File’ and then on
‘Open Class File’ if there is already a pre-existing class file to load.
PRS-v2-Ed1-page 24
A) Off-line creation - In the applications where the Students are assigned seats, a
class seating chart can be created ahead of time. In this case, it may be simpler
to use “Transmitter Number” for “Student ID Number”. Several examples are
included in the folder C:\PRS\Class.
1) One Transmitter per seat - In “the dialogue box” shown above, the file
“CLA50.csv” has been highlighted for selection. The first few lines of the data
inside it are shown below. The 1st and 2nd line is the “number of rows” and
“number of seats per row”, respectively. Beginning from the 3rd line, the 1st entry
is the “Seat Number”, 2nd is “Transmitter Number”, and last is a descriptor for the
number of seats per Transmitter (A=1, A/B=2). Note that in this case the “display
boxes” will show the “Seat Number” as illustrated below. The corresponding
“Transmitter Number” can be revealed by ‘double clicking’ on the box.
PRS-v2-Ed1-page 25
2) One Transmitter per two seats - One advantage of attaching the Transmitters
to seats is that two adjacent students can share the unit if we limit the multiple
choices in a question to no more than 5. This option is activated automatically
if in the “Class File” the descriptors for the number of seats per Transmitter
have both A and B. An example of a file that would activate this mode is
C:\PRS\Class\CLA50AB. Its contents are shown below as well as the main
display that would ensue after the file is loaded. The student with descriptor A
would uses the key set 1 to 5 while the one with descriptor B uses 6 to 0. In
the latter case “6” means 1, “7” means 2….”0” means 5.
B) On-line sequentially - If the students have their own Transmitters, a seating chart
can be created after the Students have settled on their seats. One at a time and
in sequence, the Students can register by transmitting any single “Numeral”.
PRS-v2-Ed1-page 26
Start by clicking on ‘File’ and then on ‘Create Class - Sequential’. A “dialogue
box” appears with sliders for adjusting the “virtual seat matrix” for your class.
Make sure that this overlays the physical seat matrix.
PRS-v2-Ed1-page 27
The process starts with the cursor set at seat number 101 (1st row-1st column) on
the main display. This serves to prompt the occupant there to register by
pressing on any “Numeral” within 3 s. The cursor then moves to seat 102 for the
occupant there to register within 3 s and so on and so forth. An empty seat or
inattentive occupant will be by-passed after 3 s. Seat-by-seat movement of the
cursor cycles through repeatedly until the ‘End’ button in the “dialogue box” is
hit. Clicking on the 4-way arrows will move the cursor from one seat to another.
The snapshot above shows the situation when the first 5 Students have
registered. Immediately below the “Seat Number” is the “Student ID Number”.
Note that a separate acknowledgement of the signal received can be found on
the “ticker-tape” on top of the top menu bar. Click on ‘End’ on the “dialogue
box” to end the registration process. Another “dialogue box” appears for you to
save the seating chart as a “Class File” for future sessions.
C) On-line randomly - This option allows the Students to register immediately when
seated without having to wait for the others to arrive. But the Student will have to
transmit their seat number one digit at a time within 10 seconds. The procedures
are analogous to the sequential method just described above. A ‘ticker-tape’
display above the top menu bar will acknowledge the reception of each digit by
showing the Student ID and the string of numbers that has been received up till
that instant. Start by clicking on ‘File’ and then on ‘Create Class - Random’.
Select the appropriate “virtual seat matrix” for your class. Make sure that this
overlays the physical seat matrix. The snapshot below shows the situation when
5 students have registered and the “ticker tape” still showing the
acknowledgements. The Student “Names” appeared instead of “ID Numbers”
because a “Name File” has been loaded previously.
PRS-v2-Ed1-page 28
XII. Retrieving data files
The results of each PRS session are stored as a “Session File” in a commaseparated-value text file (.csv) inside the folder C:\PRS\Session. This file can be
read with Notepad and any spreadsheet software. The contents of a session file
named “0824165.csv” are shown below as read with Notepad and Microsoft Excel
97.
PRS-v2-Ed1-page 29
There are two main parts in the file. The first part is the event-by-event records of
the answers received for all the questions asked in the session. The second part is
the corresponding statistical summaries. Line-by-line descriptions are given below.
Line 1 - The date and time the file was created.
Line 2 - The headings of the respective columns.
Line 3 to 12 - The record of the 10 events corresponding to 2 questions each
answered by 5 students; for each event,
Column 1 - Question number.
Column 2 - Elapsed time when the last answer attempt was received.
Column 3 - Number of answer attempts.
Column 4 - Label on the “display boxes” (blank since no “Class File” was
used).
Column 5 - ID number of the Transmitter.
Column 6 - Code for one or two users per Transmitter (one user for this
example).
Column 7 - Answer recorded.
Column 8 - Confidence level attached to the answer.
Line 13 - The headings of the respective columns.
Line 14 to 23 - The statistical summaries of the answer choices per question for the
2 questions each with 4 multiple choices.
Column 1 - Question number.
Column 2 - Choice of answer
Column 3 - Number of students selected this choice regardless of the
confidence level (CL).
Column 4 - Number of students selected this choice with a low CL.
Column 5 - Number of students selected this choice with a medium CL.
Column 6 - Number of students selected this choice with a high CL.
Column 7 to 10 - Entries in Column 4 to 6 in percent.
A session file taken under exactly the same conditions as the example above except
that the ‘Audience’ was set for ‘Anonymous’ (poll mode) is shown below. ID
information is clearly absent. Only the statistical summaries are recorded.
PRS-v2-Ed1-page 30
XIII. Application notes
A. Active learning in the classroom
356 is a tool for effecting electronically immediate feedback and reinforcement (IFR)
for active learning by all students in the classroom. Surveys of student users
indicate that a majority of them consider the following features as valuable:
• answering in private;
• discussion with peers before answering; and
• knowing how their peers responded.
The faculty users consider the following as very useful:
• immediate assessment of students comprehension;
• automatic attendance check;
• automatic recording of students answers; and
• a polling option for surveying views and opinions.
In a comprehensive article published in the American Journal of Physics [Vol.66
(1998) pp.64-74], Richard R. Hake showed unequivocally that the use of Interactive
Engagement (IE) strategies in the classroom can increase mechanics-course
effectiveness well beyond that obtained with Traditional (T) methods. The study was
based on a survey of pre/post test data of about 6000 students in high schools,
colleges, and universities using the Halloun-Hastenes Mechanics Diagnostic test
(MD) or Force Concept Inventory (FCI). Defining the average normalized gain <g>
as the ratio of the actual average gain (<post%>-<pre%>) to the maximum possible
average gain (100-<pre%>), Hake found <g>T-ave = 0.23 + 0.04 and <g>IE-ave = 0.48
+ 0.14. The effectiveness of IE approaches over those of T is more than a factor of
2 according to this measure!
The IE methods are those designed at least in part to promote conceptual
understanding through interactive engagement of students to heads-on (always)
and hands-on (usually) activities which yield immediate feedback through discussion
with peers and/or instructors. For the practitioners of Traditional lecture method, the
approach of immediate feedback and reinforcement (IFR) using electronic devices
is, perhaps, the easiest IE approach to adopt. The PRS is, perhaps, the easiest,
lowest cost, and most flexible of the electronic tools for conducting the IFR
approach in the classroom.
Recent literatures on the use of the EFR approach include:
• Robert J. Dufresne, William J. Gerace, William J. Leonard, Jose P. Mestre and
Laura Wenk, “Classtalk: A Classroom Communication System for Active
Learning“ in Journal of Computing in Higher Education, 7, 3-47, (1996). (or see
http://www-perg.phast.umass.edu/UMPERG/papers/CT_Paper/CT_Paper.html).
• Eric Mazur, “PEER INSTRUCTION - A Users Manual”, 1997 (Prentice Hall). (or
see http://galileo.harvard.edu/galileo/lgm/pi/details.html).
The ‘Known’ or “class” mode of operation in which a record is kept on the answer of
every student to every question permits a continuous monitoring of the progress
made by each and every student in class. Some faculty have used these records as
a part of the course grade. Some even assigned relative scores to an answer; for
PRS-v2-Ed1-page 31
example, 5/2/0 for Correct/Wrong/No-Submission. On the other hand, other faculty
prefer the use of informal assessments via the ‘Anonymous’ or “poll’ mode in which
no individualized records are kept.
B. The choices for Sender-IDs in the Transmitters
Note first that the Sender-ID must be a numeral between 0 and 999999999.
In applications where only the ‘Anonymous’ mode is used exclusively, it may be
convenient to change the Sender-IDs to a number sequence starting from 1.
In applications where the Senders (students) are assigned a permanent seat in a
classroom throughout the day, it may be convenient to use the seat numbers as the
Sender-IDs.
For applications where the Senders (students) bring their own Transmitter to use in
many different classrooms or lecture halls, the Sender-IDs naturally would be either
the student ID numbers, or social security numbers or other similar individualized
set of numbers. The choice will depend on what numbers the institution uses for
record keeping.
C. Campus-wide usage
With individualized, pocket-size, wireless Transmitters, a portable Receiver and a
Windows-based simple-to-use software, it is practical and convenient for a) the
students to bring their own Transmitter to class and b) for the instructors to effect
active learning for all in any classroom or lecture hall on campus.
The entire student body could be equipped with their own Transmitter all at the
same time or gradually by starting from one Standard Package and acquiring
additional ones as the needs demand or resources permit. There is also an optional
PRS Barcode Reader that could be ordered to facilitate the entering of the Student
IDs into the Transmitters.
D. Non-academic applications of 356
There are many other applications of 356. The following are a few examples.
• Training classes in language and other technical skills - use 356 to ensure that a
lesson is understood before proceeding to the next one and for monitoring the
learning progress of trainees.
• In a convention or meeting to elect officers or vote on resolution - use 356 to
record votes and tabulating the results immediately.
• In marketing - use 356 to obtain on-the-spot reactions of your audience to your
product demonstration.
• In a contest to be judged by the audience - use 356 to facilitate the scoring by
the audience and to tabulate the results immediately.
PRS-v2-Ed1-page 32
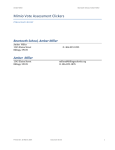
PRS Transmitter User’s Guide
Specification:
Size:
Weight:
Power:
Signal:
Effective Distance:
107mm x 56mm x 25mm
Approx. 50g (without battery)
Two AAA (1.5V) Alkaline
Batteries
Infrared
Not less than 30 meters
Operation:
Press power key to ON.
Locate the Receiver and point the Transmitter towards it.
Make your decision, press the corresponding NUMERIC key, and the LED will be
flashing.
Power will shut OFF when the unit is not use for 15 minutes.
Confidence level (CL):
A confidence level will attached to your answer if you first press H, L, or nothing before
pressing the NUMERIC key.
“H” means High, “L” means Low, and the default of no pre-pressing means Medium.
The confidence level will revert to the default value of Medium after 15 seconds or on
each power off/on sequence.
Signal directio
LED indicator
Green: Medium CL
Red: High CL
Yellow: Low CL
Flashing: Transmission in progress
LED indicator
* Replace batteries when the
LED becomes dim.
Answer selection keys
1
4
7
H
2
5
8
0
3
6
9
L
I
Confidence level
selection
ON/OFF Key
PRS-v2-Ed1-page 33
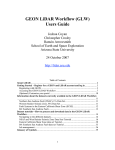
PRS Receiver User’s Guide
Specification:
Dimension:
Weight:
Power:
Receiving half angle:
Approx. 122mm x 60mm x 43mm
Approx. 130 grams
9VDC (via signal cable)
Approx. 45 degrees
Mounting:
~
~
The use of 1 receiver for every 25 transmitters is suggested.
If two receivers are used, mount them on the corners in front of the classroom, and make sure the
sensitive part (glass) of each unit faces the diagonal corner.
Hardware connection:
Detector
OUT
PC
RS232
COM port
IN
OUT
IN
. . . To a maximum of 4 Receivers
in a chain
AC/DC
Adapter
Cable configuration:
Stereo Plug
{
Outer: GND
Middle: Signal
Outer: GND
Middle: Signal
Inner: +9V
Inner: +9V
}
Stereo Plug
Stereo Jack
DB9 Female
DC Jack
Outer: GND
DB9 Female
Pin 2: Signal
Pin 5: GND
Middle: Signal
Stereo Jack
Inner: +9V
Inner: +9V
DC Jack
Outer: GND
PRS-v2-Ed1-page 34
PRS ID Changer User’s Guide
Specification:
Dimension:
Power:
Weight:
Hardware requirement:
90mm x 50mm x 32mm
9V DC
Approx 70 grams
∗ IBM PC compatible
∗ 80386 system or above
∗ Win 3.1, Win95 or above
∗ 1 free COM port
∗ 10Mb Harddisk space
Hardware Connection:
AC/DC
Adapter
PC
RS232
COM port
DC
PC
TX
1
4
7
H
2
5
8
0
3
6
9
L
I
Customizing ID:
The PRS ID-Changer unit enables the user to customize a 9-digit ID number into the transmitter. The
procedure is as follow:
1. Start the PRS IDChg Software.
2. Connect the transmitter to be programmed to the ID-Changer.
3. Click on the button “Customize ID”.
4. Following the prompt, key in the ID number and press ENTER.
5. Simultaneously press on the keys “H” and “L” on the transmitter to write the ID number into the
transmitter.
Verifying ID:
To verity the ID number stored in the transmitter:
1. Start the PRS IDChg Software
2. Connect the transmitter to the ID-Changer.
3. Click on the button “Read ID”.
4. Simultaneously press the keys “H” and “L” on the transmitter.
5. The ID will be read from the transmitter and be displayed on the screen.
PRS-v2-Ed1-page 35
Mark Program User’s Guide
The Mark program marks or grades the answers contained in a “session file” if there
is a corresponding “answer file” available. Details on the “session file” can be found
in Section X on PRS operation - a detailed guide. An example of “answer file” is
shown
below.
This
was
opened
via
Notepad
by
clicking
on
C:\PRS\Answer\Sample.csv. The 1st entry is the question number and the 2nd is the
corresponding answer
Load the PRS Mark program into same file folder where your PRS program resides.
Run the Mark program and the main display will appear as illustrated above.
PRS-v2-Ed1-page 36
1) The weighting factors are shown on the top pull down menu bar. The defaults
settings are “+1” for “Correct” and “0” for “Wrong”. Click on the appropriate
buttons to change to the desired weightings.
2) Click on ‘Load Session’ to get the desired session file which normally resides in
the folder C:\PRS\Session. Below is an example in which the session consisted
of 2 questions each with 4 choices and answered by 5 students.
3) Click on ‘Load Answer’ to get the pre-existing file that contains the correct
answers for the set of questions.
4) Click on ‘Calculate Mark’ and the session score of each student is shown on the
column labeled Mark. The statistical summaries are also computed and shown.
Note that in the example below, the weightings are Correct =+5 and Wrong =+2
with zero for not participating.
5) Click on ‘Save Mark’ to save the results.
6) Click on ‘Exit’ to quit.
PRS-v2-Ed1-page 37