1
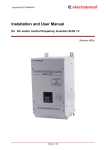
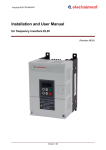
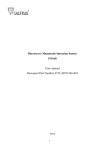
Copyright ELECTROINVENT
DRIVE REMOTE CONTROL PANEL
Type “DRCP”
User Manual
March - 2015
Drive Remote Control Panel_User_manual-Rev.00(Electroinvent).docx
Copyright ELECTROINVENT
Contents
1
2
3
4
5
6
Safety information ................................................................................................ 3
1.1 Warnings for danger and attention ............................................................... 3
1.2 Warranty ....................................................................................................... 4
Introduction ........................................................................................................... 5
Connecting the Control Panel ............................................................................. 6
Allocation of Control Panel display areas ......................................................... 9
4.1 The 'Drive Status' area ................................................................................. 9
4.2 The 'Menu Identification' area ...................................................................... 9
4.3 The 'Parameter Identification' area ............................................................ 10
4.4 The 'Parameter Presently Set Value' area ................................................. 10
4.5 The 'Parameter Edit Value' area ................................................................ 10
Control Panel Keypad ........................................................................................ 11
5.1 Run and Stop buttons ................................................................................ 11
5.2 Up and Down buttons ................................................................................. 11
5.2.1
Browsing Up/Down through the Drive Configuration Menus ...... 11
5.2.2
Increasing ([^]) or Decreasing ([v]) a Configuration Parameter
value when in 'Parameter Edit' state. ......................................... 12
5.3 DATA / ENTER button ............................................................................... 13
5.3.1
Entering the present “Configuration Menu” ................................ 13
5.3.2
Entering the 'Parameter Edit' state for the Configuration
Parameter ................................................................................... 13
5.3.3
Accepting (confirming) the new value for the Parameter ........... 14
5.4 ESC button ................................................................................................. 15
Control Panel Operation States ........................................................................ 16
6.1 The "CONNECTING" State ........................................................................ 16
6.2 The "MAIN" State ....................................................................................... 17
6.3 The "BROWSE MENUS" State .................................................................. 17
6.4 The "BROWSE PARAMETERS" State ...................................................... 17
6.5 The "EDIT PARAMETER" State ................................................................ 18
6.6 The "SPECIAL TASKS" State .................................................................... 18
6.6.1
"Set Password" ........................................................................... 18
6.6.2
"Set Function" ............................................................................. 19
6.6.3
"Faults Log" ................................................................................. 20
6.6.4
"Product Info" .............................................................................. 21
6.6.5
"Hidden Param" .......................................................................... 21
6.6.6
"Save Config" .............................................................................. 22
6.6.7
"Send Config".............................................................................. 22
Drive Remote Control Panel_User_manual-Rev.00(Electroinvent).docx
2/22
Copyright ELECTROINVENT
1 Safety information
The present manual contains important instructions for safety operation, start running
into exploitation and operation with complete units type “DRCP”.
This manual has to be kept together or near the equipment any time!
Used symbols and warning signs:
DANGER
DANGER means risky situation which, if it is not avoided, can lead to death or to
serious injury.
ATTENTION
ATTENTION refers to cases, which are not connected with human injury. Not
conforming to this warning sign can bring to material damages.
1.1 Warnings for danger and attention
DANGER
Read and understand the manual and this installation guide before installing or operating
the DRCP. Installation, exploitation and maintenance of the unit must be performed only
by qualified personnel.
DANGER
Regional standards for installation must be observed.
DANGER
DO NOT connect the “DRCP” unit to the drive, if for some reason the cover of the drive
system is removed.
DANGER
DO NOT open the cover of the “DRCP” units.
DANGER
If some information is not clear, please, contact with the service center of your distributor!
Drive Remote Control Panel_User_manual-Rev.00(Electroinvent).docx
3/22
Copyright ELECTROINVENT
ATTENTION
Warranty void!
The unit must not be damaged, as well as it is forbidden to make holes on it. Any transport
damage has to be established and reported to supplier before unit installation.
1.2 Warranty
The data and installation instructions, given in this guide, are revised regularly and all
corrections are included in next issues. In case of avoiding the installation instructions,
the warranty claims will not be accepted. We cannot bear any responsibility also in
cases of incidents and material damages, due to improper use, as well as from actions
of not authorized persons with resulting from these consequences.
Drive Remote Control Panel_User_manual-Rev.00(Electroinvent).docx
4/22
Copyright ELECTROINVENT
2 Introduction
Drive Remote Control Panel (DRCP) device is intended for monitoring and adjustment of different type drive
systems. It implements user friendly plug & play design for quick connection and service activities.
DRCP is a compact pocket size and lightweight device, which eliminates the need for a PC or laptop. You
can easily connect with the drive to adjust and monitor different parameters or maintain the drive system.
This device is with class of protection degree IP20.
Drive Remote Control Panel_User_manual-Rev.00(Electroinvent).docx
5/22
Copyright ELECTROINVENT
3 Connecting the Control Panel
Connection of the Control Panel (The Panel) to the Drive Unit (The Drive) can be done either before or
after applying power to the latter.
The 9-pin D-sub connector on the Panel is connected to the RJ45 connector of the Drive via provided
serial communication cable. Please, see the Fig. 3.1, below.
Fig. 3.1. Connecting the Control Panel to a Drive Unit (in the picture above is shown example of
connection with SPCS 4-400)
When the cable is plugged at both ends and the Drive is powered, the Panel commences auto-tuning
procedure to detect the Node Id and the communication parameters set in the Drive. In the common case
when the Node Id is set to 1, auto-tuning lasts a couple of seconds.
For bigger Node Id values it may take longer - approximately 4.5 seconds per node. For instance, if
the Drive Node Id has been set to 10 the tuning would take about 45 seconds to complete. During this
procedure the Panel displays the tried connection parameters.
Example:
When tuning is completed and connection with the Drive is established, the Panel displays the Drive
status.
Drive Remote Control Panel_User_manual-Rev.00(Electroinvent).docx
6/22
Copyright ELECTROINVENT
The base version of Control Panel uses RS232 communication (MODBUS RTU). There is a possibility
for optional RS485 communication. For choosing RS232 or RS485 communication must be used the 4position DIP switch next to the communication port of the panel.
On the base model of the Control Panel the DIP switch is properly factory set to RS232 and there is
no need to change the positions of the DIP switch. Please, see Fig. 3.2.
DIP Switch
Fig. 3.2. Positions of the DIP switch
The positions of the DIP switch must be as shown in the table below.
Table 3.1 Positions of the DIP switch
DIP Switch key number
RS232
RS485
1
On (Down position)
Off (Up position)
2
On (Down position)
Off (Up position)
3
Off (Up position)
On (Down position)
4
Off (Up position)
On (Down position)
ATTENTION
In the base model of the Control Panel is applicable only RS232 combination of the DIP
switch.
Drive Remote Control Panel_User_manual-Rev.00(Electroinvent).docx
7/22
Copyright ELECTROINVENT
The label with serial number of the “Drive Remote Control Panel” is on the back of the device – see
Fig. 3.3.
Fig. 3.3. Label with serial number
The dimensions of DRCP device are shown on Fig. 3.4.
Fig. 3.4. Dimensions of DRCP device.
Drive Remote Control Panel_User_manual-Rev.00(Electroinvent).docx
8/22
Copyright ELECTROINVENT
4 Allocation of Control Panel display areas
The Panel Display is 2 x 16 (2 lines x 16 characters). Display space allocation is described below.
Note: display area allocation scheme depicted here concerns the most common Control Panel tasks browsing through menus and parameters and modifying parameter values. Other Panel tasks might
use parts of the display area differently. Display areas allocation for these special cases is described
separately. Only the 'Drive Status' area assignment is completely invariable regardless of present
Panel task, so the Drive Status information is always present on the Panel display.
4.1
The 'Drive Status' area
Drive Unit status is shown in the upper left corner of the Panel Display.
Status inscription stays there all the time after Panel<->Drive communication is established.
Normally drive resides in one of the two stable states: Rdy (ready, not operating) or Run (operating).
Other normal states are transient: Ini (Initializing), CLd (Capacitors Loading), Exc (Excitation), Dex
(Deexcitation) etc.
Most transient states are quite short-lived and are not monitored.
If some of the Drive fault-protections are active, the Drive goes to Fault state.
In that case the Status area displays the active fault inscription: OSF (over-voltage), USF (undervoltage), SC (short circuit), OC (over-current) etc.
Fault inscriptions are shown blinking, so they are distinctly noticeable.
Examples:
(USF blinking)
4.2
The 'Menu Identification' area
Drive configuration parameters are grouped in Configuration Menus.
Menus are denoted by single lower-case Latin letters.
The Menu-Letter uniquely identifies every Drive Configuration Menu. So, the Menu-Letter is also a
Menu Identifier.
Additionally, menus are depicted by Menu Names such as "General Setup", "Current Limit",
"Communication" etc.
When browsing through the configuration menus, the Menu Identifier followed by the Menu Name
nd
occupy the entire 2 (lower) display line.
Example:
Drive Remote Control Panel_User_manual-Rev.00(Electroinvent).docx
9/22
Copyright ELECTROINVENT
4.3
The 'Parameter Identification' area
Parameters within a menu are denoted by an index (parameter number).
A Menu-Letter/Parameter-Index pair such as "a1" or "e11" uniquely identifies every Drive configuration
parameter.
So the Menu-Letter/Parameter-Index pair is also a Parameter Identifier.
Additionally, parameters are depicted by parameter names like "Mains Vtg V", "fInvert.kHz", "Node ID"
etc.
When browsing through the parameters within any configuration menu, the Parameter Identifier
nd
followed by the Parameter Name occupy the entire 2 (lower) display line.
Example:
4.4
The 'Parameter Presently Set Value' area
While browsing through the parameters within any configuration menu, you can look over parameter
values that are currently set in the Drive configuration.
Currently set parameter values are displayed to the right of the Drive Status area (refer to section 4.1).
So, as described in section 4.3, during parameter browsing you observe the Parameter-Identifier +
Parameter-Name on the bottom display line and you monitor the present Parameter Value on the top
display line, above the Parameter name.
Example:
4.5
The 'Parameter Edit Value' area
When 'Edit Parameter' mode is entered, the actual (presently set) parameter value is still shown in its
area as described in section 4.4.
But the Parameter Name area (refer to section 4.3) is replaced by a Parameter Edit Value area.
On entering the 'Edit Parameter' mode, the 'Present Parameter Value' and 'Parameter Edit Value' are
identical. Then, while modifying the 'Parameter Edit Value' you can still observe the presently set
parameter value above it.
The parameters in menu d0 are password protected. You can only browse through the parameters but
you cannot edit them. To enter a password, please refer to section 5.6.
Example:
Drive Remote Control Panel_User_manual-Rev.00(Electroinvent).docx
10/22
Copyright ELECTROINVENT
5 Control Panel Keypad
5.1
Run and Stop buttons
The Run and Stop button pair provides for Drive Unit Start/Stop command independently of the Panel
Operation State (Panel Operation State definition is provided in section 6).
Starting/Stopping the Drive from the Control Panel is possible only if Drive I/O is appropriately
configured.
Drive Configuration setup is Drive Unit specific and goes beyond the scope of this Manual.
Please, refer to the Configuration manual of the particular Drive Unit for details.
The functions of the other four Keypad buttons are dependent on Panel Operation State.
So, just basic outline of the buttons usage is provided here.
More details will be given in further sections in relation with the specific Panel tasks.
5.2
Up and Down buttons
The [^](UP) and [v](DOWN) pair of buttons generally perform two different tasks, depending on the
Panel Operation State:
5.2.1
Browsing Up/Down through the Drive Configuration Menus
Example:
Drive Remote Control Panel_User_manual-Rev.00(Electroinvent).docx
11/22
Copyright ELECTROINVENT
...or Browsing Up/Down through the Parameters within certain Configuration Menu
Example:
5.2.2
Increasing ([^]) or Decreasing ([v]) a Configuration Parameter value when in
'Parameter Edit' state.
Example:
Drive Remote Control Panel_User_manual-Rev.00(Electroinvent).docx
12/22
Copyright ELECTROINVENT
The parameters in menu d0 are password protected. You can only browse through the parameters but
you cannot edit them. To enter a password, please refer to 6.6.
Brief pressing of [^](UP) or [v](DOWN) key increases/decreases the edited value by a 1.
This way of modification could take a lot of time and effort in case of big difference between the presently
set and the desired value. The process goes much faster if the [^](UP) or [v](DOWN) key is pressed and
held for as long as needed. While the key is being held, the edited value starts slowly increasing (or
decreasing) at small steps(ones), then the rate of change accelerates as the step becomes 10, further it
keeps on accelerating as the step grows to 100, then 1000. Releasing the held button returns the
modification step to the smallest value of 1, so if the edited parameter has gone beyond the desired value
while the [^](UP) or [v](DOWN) key has been held, you just release the button for an instant, then trim the
value using a smaller increment.
5.3
DATA / ENTER button
The [DATA/ENTER] button is used for:
5.3.1
Entering the present “Configuration Menu”
Entering the present Configuration Menu, shown in the 'Menu Identification' area (refer to section 4.2)
Thus the Panel Operation State moves one level down (refer to section 6 for Panel Operation States
description).
Example:
5.3.2
Entering the 'Parameter Edit' state for the Configuration Parameter
Entering the 'Parameter Edit' state for the Configuration Parameter, shown in the 'Parameter
Identification' area (refer to section 4.3)
Thus the Panel Operation State moves one level down (refer to section 6 for Control Panel Operation
States description).
The parameters in menu d0 are password protected. You can only browse through the parameters but
you cannot edit them. To enter a password, please refer to 6.6.
Example:
Drive Remote Control Panel_User_manual-Rev.00(Electroinvent).docx
13/22
Copyright ELECTROINVENT
5.3.3
Accepting (confirming) the new value for the Parameter
Accepting (confirming) the new value for the Parameter when in 'Parameter Edit' Operation State
In this case the Parameter value from the 'Parameter Edit Value' area (refer to section 4.5) becomes
the new actual Parameter value and appears in the 'Parameter Presently Set Value' area (refer to section
4.4).
The parameters in menu d0 are password protected. You can only browse through the parameters but
you cannot edit them. To enter a password, please refer to 6.6.
Example:
In this example the second [DATA/ENTER] pressing confirms parameter modification.
The modified parameter value (230) from the Edit area appears in the "Presently Set Value" area.
Drive Remote Control Panel_User_manual-Rev.00(Electroinvent).docx
14/22
Copyright ELECTROINVENT
5.4
ESC button
The [ESC] button is used for moving (returning) to the upper level of the Panel Operation State (refer
to section 6 for Control Panel Operation States description).
The parameters in menu d0 are password protected. You can only browse through the parameters but
you cannot edit them. To enter a password, please refer to 6.6.
Example:
Any modifications done in 'Parameter Edit' state are canceled by pressing the [ESC].
Drive Remote Control Panel_User_manual-Rev.00(Electroinvent).docx
15/22
Copyright ELECTROINVENT
6 Control Panel Operation States
The set of Control Panel tasks that can be accomplished at any given moment is determined by the
Panel Operation state.
The functions of the Panel Keypad buttons and the information shown on the LCD display are also
determined by the Panel Operation state.
Control Panel Operation States are outlined in the diagram below.
Keypad actions and transitions between Operation States are also depicted there.
Power-Up or
Cable Connection
CONNECTING
MAIN
+
SPECIAL TASKS
BROWSE MENUS
Set Password
Set Function
BROWSE
PARAMETERS
Faults Log
Product Info
EDIT PARAMETER
Hidden Param
Save Config
SET PARAMETER
VALUE
6.1
Send Config
The "CONNECTING" State
This is the first state after Panel and Drive Unit are interconnected through the communication cable
as depicted in section 3.
While trying to establish communication with the Drive Unit, the Panel cannot implement any other
task.
Drive Remote Control Panel_User_manual-Rev.00(Electroinvent).docx
16/22
Copyright ELECTROINVENT
6.2
The "MAIN" State
After communication with the Drive is established, the Panel enters MAIN state.
Only Drive Status is displayed in this state (refer to section 4.1).
From "MAIN" state the panel can go either to "BROWSE MENUS" or to "SPECIAL TASKS" state.
- to enter "BROWSE MENUS" state, press any of the [^](UP), [v](DOWN) or [Data/Enter] keys
- to enter "SPECIAL TASKS" state, press and hold [ESC] key, then without releasing it, press
[Data/Enter] key
6.3
The "BROWSE MENUS" State
In "BROWSE MENUS" state the lower line of the LCD display shows the Menu-letter and Menu-name
(refer to section 4.2, The 'Menu Identification' area).
You can exit the "BROWSE MENUS" state and return to the "MAIN" State by pressing [ESC].
Or you can scroll through the menus of the Drive Unit configuration by pressing [^](UP) or [v](DOWN).
When the needed menu appears, you can go inside it to look at its parameters by pressing
[Data/Enter] which brings you to the "BROWSE PARAMETERS" state.
6.4
The "BROWSE PARAMETERS" State
In "BROWSE PARAMETERS" state the lower line of the LCD display shows the Parameter identifier
and Parameter name - refer to section 4.3, The 'Parameter Identification' area.
Besides, the upper line of the LCD display exhibits the configured value of the shown parameter - refer
to section 4.4, The 'Parameter Presently Set Value' area.
You can exit the "BROWSE PARAMETERS" state and return to the "BROWSE MENUS" state by
pressing [ESC].
Or you can scroll through the parameters of the selected menu by pressing [^] (UP) or [v] (DOWN).
When the needed parameter appears, you can press [Data/Enter] to go to "EDIT PARAMETER" state
if you need to change the configured parameter value.
NOTE 1. Modification of some configuration parameters could be restricted to qualified personnel
only, so it might be password protected. If the password needed for the parameter access level has
not been provided in advance, going to "EDIT PARAMETER" by pressing [Data/Enter] will not be
possible.
NOTE 2. Browsing the parameters of Menu b (the Display menu) represents a particular case.
When Menu b is entered, scrolling up or down the parameters by the [^](UP) or [v](DOWN) keys,
selects internal drive variables for continuous monitoring. As an example, three different values of
Menu b parameters shown below enable continuous monitoring of
- the DC-link voltage in [V]
(b0 selected)
- the drive unit phase current in [A] (b1 selected)
- the drive unit output frequency in [Hz] (b3 selected)
Drive Remote Control Panel_User_manual-Rev.00(Electroinvent).docx
17/22
Copyright ELECTROINVENT
Generally, correspondence between the Menu b parameter values and the monitored variables is
Drive Unit dependent, but the selections in this example are common and valid for all Drive Unit types.
6.5
The "EDIT PARAMETER" State
In "EDIT PARAMETER" state the lower line of the LCD display contains the Parameter Identifier and
the Parameter Edit Area - refer to section 4.3, The 'Parameter Identification' area and section 4.5, The
'Parameter Edit Value' area.
Besides, the upper line of the LCD display still exhibits the configured value of the shown parameter refer to 2.4, The 'Parameter Presently Set Value' area.
You can increase or decrease the configured parameter value using [^](UP) or [v](DOWN) keys.
The value in the Parameter Edit Area changes respectively, but the configured value, displayed on the
upper line stays unaltered until you press [Data/Enter]. Pressing [Data/Enter] confirms the modified value
and it appears in the upper line as a new Presently Set Value.
While any parameter value modification is not confirmed through [Data/Enter], you can cancel it by
pressing the [ESC] key which brings you back to "BROWSE PARAMETERS" state.
Pressing [Data/Enter] also returns the Panel to "BROWSE PARAMETERS" state but with parameter
modification accepted.
Please, see also section 5.2.2 for additional details and tips concerning usage of [^] and [v] keys for
parameter value editing.
6.6
The "SPECIAL TASKS" State
As described in 6.2, the "SPECIAL TASKS" state is entered from "MAIN" state by pressing first
[ESC], then [Data/Enter] keys and holding them pressed together for an instant.
From the "SPECIAL TASKS" state you have a choice of various tasks related to Drive Unit
monitoring/control.
Browsing through the available tasks is done by pressing [^](UP) or [v](DOWN): task names appear in
the lower LCD display line.
To start the needed task, you press [Data/Enter]. To exit "SPECIAL TASKS" state and go back to
"MAIN" state, you press [ESC].
6.6.1
"Set Password"
As described in the note 1 in section 6.4, providing a password may be needed in order to obtain
permission to modify some parameters that require higher access level. Restricting access to some
parameters and granting modification permissions only to skilled personnel protects the drive unit from
unreasonable configuration changes that may affect its correct operation.
There are 3 access levels used by the Drive Unit configuration management system.
Correspondingly, there are 3 passwords defined, one for each access level.
Passwords are given to the drive operating personnel according to its qualification and job
characteristics.
When "Set Password" task is entered, the 'Password: ' inscription appears on the lower LCD line,
followed by the Password Entering Area containing the initial Password value (0):
Drive Remote Control Panel_User_manual-Rev.00(Electroinvent).docx
18/22
Copyright ELECTROINVENT
Using the [^] (UP) and [v] (DOWN) keys you modify this value to set the correct password and then
press [Data/Enter] to confirm it. If the provided value is correct, the Panel exits the "Set Password" task
as well as the "SPECIAL TASKS" State and goes to "BROWSE MENUS" state from where you can
navigate to the needed Menu and modify the needed Parameter using the acquired modification rights.
In case that the provided number (password) does not match any of the three access level passwords,
the value in the Password Entering Area is reset to zero, and a "Pls, Retry!" message starts flashing on
the upper display line:
Then you can retry entering the correct password or press [ESC] to exit the "Set Password" task and
return to "SPECIAL TASKS" state.
NOTES:
1) When you commence the "Set Password" task end press [Data/Enter], the result of this
operation overwrites any previous Access Level state. For instance, if you have been granted the
highest Access Level(3) by entering the corresponding password and then you repeat the "Set
Password" task and enter the password corresponding to a lower Access Level(1), then you lose the
Access Level 3 permissions and acquire Access Level 1 ones. If you have acquired some (any)
Access Level rights and then repeat the "Set Password" task and enter an invalid password, you lose
your access permissions.
2) Any Access Level permissions are automatically cancelled if no keypad activity has been
observed for sufficiently long period of time. 5 minutes is adopted as duration of this "keypad idle"
interval.
6.6.2
"Set Function"
Various Digital Input Functions can be assigned to the Drive Unit multi-functional digital inputs.
Reviewing the functions goes beyond the scope of this manual as they are Drive Unit specific.
The essential principle is that a Digital Input Function which is not assigned to any physical input(on
the Drive Unit Terminal Board) may be provided via the serial communication port through the
ConfigMaster PC-software tool or via the Drive Remote Control Panel, which is the object of the manual.
This is done through the "Set Function" task.
When you enter the "Set Function" task, the following items appear on the Panel display:
- the Function Name is displayed starting at the left end of the lower Display line
- the 'State = ' inscription is displayed to the right of the Drive Status Area on the upper Display line
- the present Function State(0 or 1) is displayed immediately after the 'State = ' inscription on the
upper Display line
- the action that can be taken in relation with the displayed function(SET or CLR) is shown at the
right end of the lower Display line
The example below shows the "Emergency Stop" function, which is available on most Drive Unit
systems.
(SET blinking)
Drive Remote Control Panel_User_manual-Rev.00(Electroinvent).docx
19/22
Copyright ELECTROINVENT
The present function state is '0'(inactive), so the available action to take is "activation" (SET) as shown
in the right end of the lower Display line. The "action to take" hint appears blinking.
The available function action (SET in this case) can be applied by pressing [Data/Enter].
Thus the "Emergency Stop" virtual input is activated and the Drive Unit goes from 'ready'(Rdy) to
'disabled'(Off) state
The changed Display appearance after "Emergency Stop" activation (by pressing [Data/Enter]) is
shown below:
(CLR blinking)
As seen, the new function state is '1'(active), so the available action to take is "de-activation"(CLR).
Now a new [Data/Enter] pressing would perform the 'CLR' action - "Emergency Stop" input is de-activated,
the Drive Unit returns to 'ready'(Rdy) state and the Display restores its initial appearance.
To exit "Set Function" task and return to "SPECIAL TASKS" state, press [ESC].
6.6.3
"Faults Log"
"Fault Log" task provides for inspection of Fault Activations logged in the Drive Unit memory.
When the "Fault Log" task is entered, the "Fault #1" inscription appears on the lower Display line,
followed by the name of the 1-st (newest) fault logged.
Pressing [^] (UP) or [v] (DOWN) allows browsing through all logged faults.
'Output Phase Disconnection' is the 1-st logged Fault.
'Over-Voltage' is the 2-nd logged Fault.
In the above example the first display appears when "Fault Log" task is entered (by pressing
[DATA/ENTER]).
Then, pressing [^] (UP) exhibits the 2-nd logged fault. Next [^] (UP) pressing produces no result as
there are not more faults logged. Pressing [v] (DOWN restores the Fault #1 display.
If no faults have been logged in the Drive Unit faults history, the following display appears on entering
the "Fault Log" task:
To exit "Fault Log" task and return to "SPECIAL TASKS" state at any moment, press [ESC].
Drive Remote Control Panel_User_manual-Rev.00(Electroinvent).docx
20/22
Copyright ELECTROINVENT
6.6.4
"Product Info"
The "Product Info" task provides information about both the Drive Unit and the Control Panel.
There are three screens within this task, that can be browsed using the [^] (UP) and [v] (DOWN) keys.
The upper Display line of any screen contains the Drive Unit identification - "SPCS4-400" in the
example below.
The lower lines on the 1-st and 2-nd screens show the hardware and software identifiers of the Drive
Unit.
The lower line on the 3-rd screen shows the Control Panel software revision.
To exit "Product Info" task and return to "SPECIAL TASKS" state at any moment, press [ESC].
6.6.5
"Hidden Param"
"Hidden Parameters" are a special set of Drive Unit configuration entries which are not part of the
usual Menu/Parameter layout.
Typically, factory settings of the hidden parameters don't need further modification, so these
parameters are kept aside and they are also protected by a highest access level password.
There is no Menu Letter, corresponding to the Hidden Parameters menu as there is for any explicit
parameters menu, so the identifier for any hidden parameter contains the "#"-character instead of menu
letter. In all other respects Hidden Parameters are like the ordinary parameters, they can be freely
observed and they can be changed provided that the needed access level has been granted to the
operator.
Please, refer to 4.3 and 4.4 section for details about parameter name/value presentation on the Panel
Display.
The example below shows the "Vtg.Gain" hidden parameter used for scaling of the DC-link voltage
feedback channel:
Using the [^](UP), [v](DOWN and [DATA/ENTER] keys you can browse through the hidden
parameters, modify them and store the modified values in the way described for ordinary parameters in
6.4 and 6.5 section.
However, doing modifications is not recommended unless they have been suggested by the Drive Unit
manufacturer.
To exit "Hidden Param" task and return to "SPECIAL TASKS" state at any moment, press [ESC].
Drive Remote Control Panel_User_manual-Rev.00(Electroinvent).docx
21/22
Copyright ELECTROINVENT
6.6.6
"Save Config"
When "Save Config" task is started, the Control Panel downloads the entire configuration from the
Drive Unit and stores it in the non-volatile memory.
Then the Panel returns to the MAIN operation state.
6.6.7
"Send Config"
When "Send Config" task is started, the Control Panel uploads the stored configuration to the Drive
Unit, and then the Panel returns to the MAIN operation state.
ATTENTION
The stored configuration keeps information about the type of the Drive Unit from which
it's been obtained. Before sending the stored configuration the Panel checks if this type is
the same as the type of the presently connected Drive Unit. If the types do not match, the
following message is displayed for a while:
Then the Panel returns to the MAIN operation state.
Contacts
Tel.:
+(359 2) 862 14 06; 868 70 65
43 „Cherni Vrah” blvd.
Fax:
+(359 2) 962 52 63
1407 Sofia, PO Box 74
E-Mail:
[email protected]
Bulgaria
Web site:
http://www.electroinvent.com/
Drive Remote Control Panel_User_manual-Rev.00(Electroinvent).docx
22/22