1
EZ LADDER Configurations
for PLC on a Chip &
PLC on a Chip Module
Divelbiss Corporation
9778 Mt. Gilead Rd.
Fredericktown, Ohio 43019
© Divelbiss Corporation.
2004-2005
PLC ON A CHIP EZ LADDER CONFIGURATOON
2005001 REV 3
1-800-245-2327
http://www.divelbiss.com
http://www.plconachip.com
CHAPTER 1
GETTING STARTED
PLC on a Chip EZ LADDER Configuration
1-1
Divelbiss Corporation
Title
PLC on a Chip EZ LADDER Configuration
Revision
Document ID
3
2005001.3
Author
Page Number
Page 1 - 2
DER
Table of Contents
SECTION 1 - Getting Started
Table of Contents
Revision History
Definitions
About this Document
1
1
1
1
-
2
3
4
5
SECTION 2 - Supported Functions
Supported EZ Ladder Functions
2-2
SECTION 3 - Target Settings
Configuring PLC on a Chip Target Settings
Detailed Description of Target Settings
3-2
3-4
Divelbiss Corporation 9778 Mt. Gilead Rd. Fredericktown, Ohio 43019 1-800-245-2327 www.plconachip.com
Title
PLC on a Chip EZ LADDER Configuration
Revision
Document ID
3
2005001.3
Author
Page Number
Page 1 - 3
DER
Revision History
Revision
Release Date
Description of Changes
Rev.
Rev.
Rev.
Rev.
3/17/2005
8/5/2005
3/21/2006
Initial Release of Document.
Updates of Supported Functions & Scan Time
Added information for PWM functionality.
Updated functions list & added details for new features.
0
1
2
3
Divelbiss Corporation 9778 Mt. Gilead Rd. Fredericktown, Ohio 43019 1-800-245-2327 www.plconachip.com
Title
PLC on a Chip EZ LADDER Configuration
Revision
Document ID
3
2005001.3
Author
Page Number
Page 1 - 4
DER
Definitions
HDIO
Modbus
Divelbiss high density input output bus
Communication Bus developed by Modicon
Divelbiss Corporation 9778 Mt. Gilead Rd. Fredericktown, Ohio 43019 1-800-245-2327 www.plconachip.com
Title
PLC on a Chip EZ LADDER Configuration
Revision
Document ID
3
2005001.3
Author
Page Number
Page 1 - 5
DER
About this Document
The following information in this document is to aid in the implementation and development of products using
Divelbiss EZ LADDER (based on PLC on a Chip). This document includes the information required to “configure
targets” in EZ LADDER for the PLC on a Chip and PLC on a Chip Modules only. This document does not support configuring EZ LADDER with any other products. When configuring PLC on a Chip Modules, use the model
number of the PLC on a Chip that is installed on the module.
In this document, the following conventions are used to distinguish elements of text:
BOLD
Denotes labeling, commands, and literal portions of
syntax that must appear exactly as shown.
italic
Used for variables and placeholders that represent the type of text
to be entered by the user.
SMALL CAPS
Used to show key sequences or actual buttons, such as
the OK button.
OK,
where the user clicks
In addition, the following symbols appear periodically appear in the left margin to call the readers attention to
specific details in the text:
Warns the reader of a potential danger or hazard that is associated
with certain actions.
Appears when the text contains a tip that is especially helpful.
Indicates that the text contains information to which the reader
should pay particularly close attention.
Divelbiss Corporation 9778 Mt. Gilead Rd. Fredericktown, Ohio 43019 1-800-245-2327 www.plconachip.com
CHAPTER 2
SUPPORTED FUNCTIONS
PLC on a Chip EZ LADDER Configuration
2-1
Divelbiss Corporation
Title
PLC on a Chip EZ LADDER Configuration
Revision
Document ID
3
2005001.3
Author
Page Number
Page 2 - 2
DER
Supported EZ LADDER Functions
PLC on a Chip is programmed using the Divelbiss EZ LADDER ladder diagram development platform. Below is
the list of features provided in EZ LADDER that are available to use with any PLC on a Chip model. Refer to
the EZ LADDER User’s manual for detail on each function.
ABS
ADD
AND
AVG
BOOLEAN
CMP
CNTRTMR
DIRECT COIL
DIRECT CONTACT
DIV
DOWN COUNTER (CTD)
DRUM_SEQ
EEPROM_READ
EEPROM_WRITE
EQUAL TO (=)
FALLING EDGE DETECTOR (F_TRIG)
GC_SSI
GETDATE
GETTIME
GREATER THAN (>)
GREATER THAN OR EQUAL TO (>=)
HIGH_SPD_TMR
HYSTER
INTEGER
INVERTED COIL
INVERTED CONTACT
JUMP
KEYPAD
LABEL
LATCH
LCD_CLEAR
LCD_PRINT
LESS THAN (<)
LESS THAN OR EQUAL TO (<=)
LIMIT
MAVG
MAX
MIN
MOD
MULT
MUX
NOT
NOT EQUAL TO (<>)
OFF DELAY TIMER (TOF)
ON DELAY TIMER (TON)
OR
PID
PULSE TIMER (TP)
PWM
PWM_FREQ
REAL
RISING EDGE DETECTOR (R_TRIG)
ROL
ROR
RS
SEL
SERIAL_PRINT
SETDATE
SETTIME
SHL
SHR
SR
SUB
TIMER
UNLATCH
UP COUNTER (CTU)
UP / DOWN COUNTER (CTUD)
XOR
Modbus, PWM Outputs, LCD Display, Keypad and Serial Print is supported only on the 256K Memory PLC on a
Chip Models.
Divelbiss Corporation 9778 Mt. Gilead Rd. Fredericktown, Ohio 43019 1-800-245-2327 www.plconachip.com
CHAPTER 3
TARGET SETTINGS
PLC on a Chip EZ LADDER Configuration
3-1
Divelbiss Corporation
Title
PLC on a Chip EZ LADDER Configuration
Revision
Document ID
3
2005001.3
Author
Page Number
Page 3 - 2
DER
Configuring PLC on a Chip Target Settings
Before EZ LADDER can function with a PLC on a Chip target, the target must be selected and options installed.
Refer to the EZ LADDER Manual for details on EZ LADDER Menus and features.
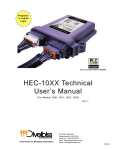
In EZ LADDER, select PROJECT....SETTINGS. This will open the Project Settings Window. Select “PLC on a
Chip” for the target. Figure 2.1 show the Project Settings Window.
Figure 3.1
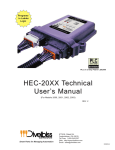
Once the “PLC on a Chip” target is selected, it must be configured with options that will be used in the ladder
diagram program and hardware. Click the PROPERTIES button, which is only available when “PLC on a Chip” is
selected as the target. A drop down dialog box will open with models of PLC on a Chip to select from. Select
the model that will be used. For PLC on a Chip Modules, choose the model of the chip used on the module.
Devices may be added to the selected target by clicking the ADD button. This opens another dialog box with
supported features such as on-board I/O, HDIO Bus, Real Time Clock and others. Select the option(s) that will
be used and click OK until the project settings boxes are all closed. These options are now added to the project
settings for use in the ladder diagram program. You must save the project to save these settings. Figure 2.2
shows the Target Properties.
Note: When most of these options are added, variable names are automatically assigned. They may be renamed if desired. Only options available for the selected target are listed.
Divelbiss Corporation 9778 Mt. Gilead Rd. Fredericktown, Ohio 43019 1-800-245-2327 www.plconachip.com
Title
PLC on a Chip EZ LADDER Configuration
Author
DER
Revision
Document ID
3
2005001.3
Page Number
Page 3 - 3
Figure 3.2
Divelbiss Corporation 9778 Mt. Gilead Rd. Fredericktown, Ohio 43019 1-800-245-2327 www.plconachip.com
Title
PLC on a Chip EZ LADDER Configuration
Revision
Document ID
3
2005001.3
Author
Page Number
Page 3 - 4
DER
Detailed Description of Target Settings
The following I/O and options are available for configuration on PLC on a Chip (model dependent).
On-Board Digital Inputs
GPI0-GPI33
GPIx is a digital input I/O address representing inputs shown in the PLC on a Chip pinout. Each digital input that will be used in the ladder diagram programming must be
added to the target configuration. To use in EZ LADDER, just insert contact and select
the digital input point from the available list.
On-Board Digital Outputs
GPO0-GPO32 GPOx is a digital output I/O address representing outputs shown in the PLC on a Chip
pin-out. Each digital output that will be used in the ladder diagram programming must be
added to the target configuration. To use in EZ LADDER, just insert coil and select the
digital output point from the available list.
HDIO Bus I/O
DI0.0-DI7.15
DIx.y is a digital input I/O address representing the inputs when using the HDIO Bus
option
DO0.0-DO7.15 DOx.y is a digital output I/O address representing the output when using the HDIO Bus
option
To use in EZ LADDER, just insert contact or coil. Name the contact or coil and click
to create a new variable. Type in the address of the I/O point in the Var I/O Number
field.
OK
NOTE: When using the HDIO Bus, some on-board digital inputs and outputs are not available as they are used
in the HDIO Bus option. Refer to the PLC on a Chip Pin assignments for details on which I/O points
are used to control the HDIO Bus.
On-Board Analog Inputs
AN0-AN7
ANx is a analog input I/O address representing the analog inputs. Variables are
automatically declared when this option is activated. To use in EZ LADDER, just insert
the variable and select the analog input channel from the available list.
Real Time Clock
This option installs the EZ LADDER real time clock features for use with the real time clock hardware.
Divelbiss Corporation 9778 Mt. Gilead Rd. Fredericktown, Ohio 43019 1-800-245-2327 www.plconachip.com
Title
PLC on a Chip EZ LADDER Configuration
Author
Revision
Document ID
3
2005001.3
Page Number
Page 3 - 5
DER
Scan Time
The Scan Time for the PLC on a Chip is based on 100 microsecond resolution. The HIGH_SPD_TMR
function uses this time base.
PWM Outputs (Pulse Width Modulation)
PLC on a Chip 256K Models include 8 hardware pulse width modulation channels (PWM). These
channels must be installed before they can controlled in the EZ LADDER diagram.
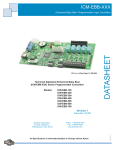
To install PWM Outputs in the target configuration:
1. Use the menu, select PROJECT....SETTINGS. The ProjectSettingsForm dialog will open. Select
the target.
2. Click the PROPERTIES button.
3. Click the ADD button.
4. From the provided ADD dialog Devices list, select the PWM (Pulse Width Modulation).
See Figure 3.3.
Figure 3.3
Divelbiss Corporation 9778 Mt. Gilead Rd. Fredericktown, Ohio 43019 1-800-245-2327 www.plconachip.com
Title
PLC on a Chip EZ LADDER Configuration
Revision
Document ID
3
2005001.3
Author
Page Number
Page 3 - 6
DER
5. Click OK to install the PWM device and return to the target’s properties dialog.
6. Click on PWM and a Properties button will appear on the right side of the target properties dialog.
7. Click the PROPERTIES button. The PWM Properties dialog will open. This dialog is used to add,
remove and configure the PWM channels on the target. See Figure 3.4.
Figure 3.4
8. Click the ADD button. The ADD PWM dialog will open. Select the channels you wish to install (use).
9. Enter the desired frequency for Clock A and Clock B (if installed). The PLC on a Chip has 8
available PWM Channels. These 8 channels are either controlled with Clock A or Clock B. This
allows two different PWM frequencies. The Minimum and Maximum frequencies are displayed in the
PWM Properties dialog. The frequency for Clock A and Clock B must be in this range. The ACTUAL
FREQUENCY is what will be seen on the actual PWM hardware output channels (as close as
possible to the desired frequency; this is due to limitations of the hardware). See Figure 3.5.
10. Click OK to close the PWM Properties and save the changes.
11. Click OK to close the Target Properties and save the changes.
12. Click OK to close the ProjectSettingsForm dialog and save the changes.
The PWM channels are now ready for use using the PWM and PWM_FREQ functions. Refer to EZ
LADDER Manual for details on using and configuring these functions.
Divelbiss Corporation 9778 Mt. Gilead Rd. Fredericktown, Ohio 43019 1-800-245-2327 www.plconachip.com
Title
PLC on a Chip EZ LADDER Configuration
Author
Revision
Document ID
3
2005001.3
Page Number
Page 3 - 7
DER
Figure 3.5
LCD Functionality
The LCD Display feature provides that ability to add an LCD display and print to it from the ladder diagram. The
LCD Display functionality must be ‘installed’ on the target before it may be used. For information on connections
and compatability of the display, please refer to the PLC on a Chip Circuit Design Guildelines document.
To install the LCD display in the target configuration:
1.
2.
3.
4.
5.
6.
7.
Use the menu, select PROJECT....SETTINGS. The ProjectSettingsForm dialog will open. Select the target.
Click the PROPERTIES button.
Click the ADD button.
From the provided ADD dialog Devices list, select the LCD. See Figure 3.6.
Click OK to install the LCD Display and return to the target’s properties dialog.
Click on LCD and a Properties button will appear on the right side of the target properties dialog.
Click the PROPERTIES button. The LCD Properties dialog will open. This dialog is used to configure
the LCD display on the target. See Figure 3.7.
Divelbiss Corporation 9778 Mt. Gilead Rd. Fredericktown, Ohio 43019 1-800-245-2327 www.plconachip.com
Title
Revision
Document ID
3
2005001.3
PLC on a Chip EZ LADDER Configuration
Author
Page Number
Page 3 - 8
DER
Figure 3.6
8. Select the LCD PORT to use from the available ports. You may use any of the listed ports provided it is not
being used by another feature..
9. Select the Controller. Currently the HD44780 is the only supported controller.
10. Enter the number of ROWS on the display (1-4).
11. Enter the number of COLUMNS on the display (8-40).
12. Click OK to close the LCD Properties and save the changes.
13. Click OK to close the Target Settings Properties and save the changes.
14. Click OK to close the ProjectSettingsForm dialog and save the changes.
The LCD display is now ready for use once the display is physically connected. Refer to Section 10 - EZ LADDER Functions for using the LCD_PRINT & LCD_CLEAR functions.
Divelbiss Corporation 9778 Mt. Gilead Rd. Fredericktown, Ohio 43019 1-800-245-2327 www.plconachip.com
Title
Revision
Document ID
3
2005001.3
PLC on a Chip EZ LADDER Configuration
Author
Page Number
Page 3 - 9
DER
Figure 3.7
Keypad Functionality
The Keypad feature provides that ability to add a 4x5 keypad matrix and monitor it from the ladder diagram.
The Keypad functionality must be ‘installed’ on the target before it may be used. For information on connections
and compatability of the keypad, please refer to the PLC on a Chip Circuit Design Guildelines document.
To install the Keypad in the target configuration:
1.
2.
3.
4.
5.
6.
7.
Use the menu, select PROJECT....SETTINGS. The ProjectSettingsForm dialog will open. Select the target.
Click the PROPERTIES button.
Click the ADD button.
From the provided ADD dialog Devices list, select the Keypad. See Figure 3.8.
Click OK to install the Keyapd and return to the target’s properties dialog.
Click on Keypad and a Properties button will appear on the right side of the target properties dialog.
Click the PROPERTIES button. The Keypad Properties dialog will open. This dialog is used to configure
the Keyapd on the target. See Figure 3.9.
8. Select the KEYPAD PORT to use from the available ports. You may use any of the listed ports provided it is
not being used by another feature..
9. Click OK to close the Keypad Properties and save the changes.
10. Click OK to close the Target Settings Properties and save the changes.
11. Click OK to close the ProjectSettingsForm dialog and save the changes.
The Keypad is now ready for use once the keypad is physically connected. Refer to Section 10 - EZ LADDER
Functions for using the KEYPAD function. The Keypad is read using the Keypad function but individual keys
may be read as a discreet digital input.
Divelbiss Corporation 9778 Mt. Gilead Rd. Fredericktown, Ohio 43019 1-800-245-2327 www.plconachip.com
Title
PLC on a Chip EZ LADDER Configuration
Author
DER
Revision
Document ID
3
2005001.3
Page Number
Page 3 - 10
Figure 3.8
Figure 3.9
Divelbiss Corporation 9778 Mt. Gilead Rd. Fredericktown, Ohio 43019 1-800-245-2327 www.plconachip.com
Title
PLC on a Chip EZ LADDER Configuration
Revision
Document ID
3
2005001.3
Author
Page Number
Page 3 - 11
DER
Serial Print Functionality
The Serial Print feature provides that ability to serially print using the multi-pupose port on the target. The Serial
Print functionality must be ‘installed’ on the target before it may be used.
To install Serial Print in the target configuration for PLC on a Chip:
1.
2.
3.
4.
Use the menu, select PROJECT....SETTINGS. The ProjectSettingsForm dialog will open. Select the target.
Click the PROPERTIES button.
Click the ADD button.
From the provided ADD dialog Devices list, select the Serial Print. See Figure 3.10.
Figure 3.10
5. Click OK to install the Serial Print and return to the target’s properties dialog.
6. Click on Serial Print and a Properties button will appear on the right side of the target properties dialog.
7. Click the PROPERTIES button. The Serial Properties dialog will open. This dialog is used to configure
the Serial Port on the target. See Figure 3.11.
Divelbiss Corporation 9778 Mt. Gilead Rd. Fredericktown, Ohio 43019 1-800-245-2327 www.plconachip.com
Title
Revision
Document ID
3
2005001.3
PLC on a Chip EZ LADDER Configuration
Author
Page Number
Page 3 - 12
DER
Figure 3.11
8. Select the COM 1 to use from the available using the drop-down menu. Note COM 1 is the only port support
for PLC on a Chip Targets at this time.
9. Select the Baud Rate. Supports 9600 to 115.2K baud.
10. Select 8 for Data Bits. PLC on a Chip Targets currently only support 8 bit data.
11. Select 1 Stop Bit. PLC on a Chip Targets currently only support 1 stop bit.
12. Select None for Parity. PLC on a Chip Targets currently only support None for parity.
13. Check the Flow Control Box if you require flow control.
14. Set the Buffer Size. It defaults to 100 bytes.
15. Click OK to close the Serial Properties and save the changes.
16. Click OK to close the Target Settings Properties and save the changes.
17. Click OK to close the ProjectSettingsForm dialog and save the changes.
The Serial Print is now ready for use. Refer to Section 10 - EZ LADDER Functions for printing serially using the
SERIAL_PRINT Function.
Divelbiss Corporation 9778 Mt. Gilead Rd. Fredericktown, Ohio 43019 1-800-245-2327 www.plconachip.com
Title
PLC on a Chip EZ LADDER Configuration
Revision
Document ID
3
2005001.3
Author
Page Number
Page 3 - 13
DER
Important Product Notice
Use of products supplied herewith by Divelbiss Corporation ("Divelbiss") is strictly subject to the following
conditions.
Divelbiss reserves the right to make corrections, modifications, enhancements, discontinuation, and other
changes without further notice to any products supplied herewith to improve reliability, function or design.
Divelbiss assumes no responsibility or liability for the use of any of these products, conveys no license or
title under any patent, copyright, mask work right, or other Divelbiss intellectual property right relating to
any combination, machine, or process in which Divelbiss products are used. Divelbiss makes no representations or warranties that these products are free from patent, copyright, or mask work right infringement, unless otherwise specified.
Divelbiss assumes no liability for applications assistance or customer product design. Customers are
responsible for their products and applications using Divelbiss components. To minimize the risks associated with customer products and applications, customers should provide adequate design and operating safeguards.
Divelbiss products are not designed, intended, or authorized for use as components in systems intended
for surgical implant into the body, or other applications intended to support or sustain life, related to the
operation of nuclear facilities, in environments otherwise intended to be fault-tolerant or for any other
application in which the failure of the Divelbiss product could create a situation where personal injury or
death may occur. Should a customer purchase or use Divelbiss products for any such unintended or unauthorized application, such customer shall indemnify and hold Divelbiss and its officers, employees, subsidiaries, affiliates, and distributors harmless against all claims, costs, damages, and expenses, and reasonable attorney fees arising out of, directly or indirectly, any claim of personal injury or death associated
with such unintended or unauthorized use, even if such claim alleges that Divelbiss was negligent regarding the design or manufacture of the part.
Device parameters which may be provided in Divelbiss datasheets and/or specifications can and do vary
in different applications and actual performance may vary over time. All operating parameters must be
validated for each customer application by customer's technical experts. Customers should obtain the latest relevant information before placing orders and should verify that such information is current and complete.
DIVELBISS MAKES NO WARRANTY, REPRESENTATION OR GUARANTEE REGARDING THE SUITABILITY OF THE PRODUCTS SOLD HEREWITH FOR ANY PARTICULAR PURPOSE, NOR DOES
DIVELBISS ASSUME ANY LIABILITY ARISING OUT OF THE APPLICATION OR USE OF ANY PRODUCT OR CIRCUIT, AND SPECIFICALLY DISCLAIMS ANY AND ALL LIABILITY, INCLUDING WITHOUT
LIMITATION LOSS OF PROFITS, LOSS OF BUSINESS OR GOODWILL, LOSS OF DATA OR USE OF
DATA, INTERRUPTION OF BUSINESS, AND FOR ANY INDIRECT, SPECIAL, CONSEQUENTIAL OR
INCIDENTAL DAMAGES OF ANY KIND, HOWEVER CAUSED, WHETHER ANY SUCH CLAIM SOUNDS
IN CONTRACT, TORT, STRICT LIABILITY OR OTHER LEGAL OR EQUITABLE THEORY, EVEN IF
DIVELBISS HAS BEEN ADVISED OF THE POSSIBILITY OF SUCH LOSS. THE DIVELBISS PRODUCT
SOLD HEREWITH IS SUPPLIED "AS IS." CUSTOMER IS RESPONSIBLE TO INSURE THAT THE
DIVELBISS PRODUCT SOLD HEREWITH IS IMPLEMENTED PROPERLY IN AN APPROPRIATE
APPLICATION.
Any use or configuration of the PLC ON A CHIP Kernel software is strictly subject to the terms of the
Divelbiss EZ LADDER OEM Software License Agreement (a copy of which may be obtained upon request
from Divelbiss), and may be undertaken only in connection with designated products.
PLC ON A CHIP Kernel software may not be amended, modified, decompiled, reverse engineered,
copied, or installed on a network, nor may any rights therein be sublicensed, conveyed or purportedly conveyed without the express, written consent of Divelbiss.
Divelbiss Corporation 9778 Mt. Gilead Rd. Fredericktown, Ohio 43019 1-800-245-2327 www.plconachip.com