1
AUTO EXPORT™
This page intentionally left blank.
Auto ExportTM Installation and Operation Manual Version 1.01
Published by:
Electro Industries/GaugeTech
1800 Shames Drive
Westbury, NY 11590
All rights reserved. No part of this publication may be reproduced or transmitted in
any form or by any means, electronic or mechanical, including photocopying, recording, or information storage or retrieval systems or any future forms of duplication, for
any purpose other than the purchaser's use, without the expressed written permission
of Electro Industries/GaugeTech.
© 2012 Electro Industries/GaugeTech
Nexus® and Shark® are registered trademarks of Electro Industries/GaugeTech. The
distinctive shapes, styles and overall appearances of the Nexus® 1500 meter and all
Shark® meters are trademarks of Electro Industries/GaugeTech. Auto ExportTM is a
trademark of Electro Industries/GaugeTech.
Microsoft®, Excel®, and Windows® are either registered trademarks or trademarks
of Microsoft Corporation in the United States and/or other countries.
Software version 2.0.48
Electro Industries/GaugeTech
Electro Industries/GaugeTech
The Leader In Power Monitoring and Smart Grid Solutions
The Leader In Power Monitoring and Smart Grid Solutions
Doc#
E134747
i
This page intentionally left blank.
Electro Industries/GaugeTech
Electro Industries/GaugeTech
The Leader In Power Monitoring and Smart Grid Solutions
The Leader In Power Monitoring and Smart Grid Solutions
Doc#
E134747
ii
Customer Service and Support
Customer support is available 9:00 am to 4:30 pm, Eastern Standard Time, Monday
through Friday. Please have the serial number and a detailed problem description
available. When returning any merchandise to EIG, a return materials authorization
number is required. For customer or technical assistance, phone 516-334-0870 or fax
516-338-4741.
Product Warranty
Electro Industries/GaugeTech warrants all products to be free from defects in material
and workmanship for a period of four years from the date of shipment. During the
warranty period, we will, at our option, either repair or replace any product that
proves to be defective.
To exercise this warranty, fax or call our customer-support department. You will
receive prompt assistance and return instructions.
This warranty does not apply to defects resulting from unauthorized modification or
misuse.
THIS WARRANTY IS IN LIEU OF ALL OTHER WARRANTIES, EXPRESSED
OR IMPLIED, INCLUDING ANY IMPLIED WARRANTY OF MERCHANTABILITY OR FITNESS FOR A PARTICULAR PURPOSE. ELECTRO INDUSTRIES/
GAUGETECH SHALL NOT BE LIABLE FOR ANY INDIRECT, SPECIAL OR
CONSEQUENTIAL DAMAGES ARISING FROM ANY AUTHORIZED OR
UNAUTHORIZED USE OF ANY ELECTRO INDUSTRIES/GAUGETECH
PRODUCT. LIABILITY SHALL BE LIMITED TO THE ORIGINAL COST OF
THE PRODUCT SOLD.
Disclaimer
The information presented in this publication has been carefully checked for
reliability; however, no responsibility is assumed for inaccuracies. The information
contained in this document is subject to change without notice.
Electro Industries/GaugeTech
Electro Industries/GaugeTech
The Leader In Power Monitoring and Smart Grid Solutions
The Leader In Power Monitoring and Smart Grid Solutions
Doc#
E134747
iii
This page intentionally left blank.
Electro Industries/GaugeTech
Electro Industries/GaugeTech
The Leader In Power Monitoring and Smart Grid Solutions
The Leader In Power Monitoring and Smart Grid Solutions
Doc#
E134747
iv
Table of Contents
Table of Contents
Customer Service and Support
iii
Product Warranty
iii
Disclaimer
iii
1: Overview
1-1
2: Installation
2-1
2.1: Installing the Application
2-1
2.2: Uninstalling the Application
2-5
3: Using the Auto ExportTM Application
3-1
3.1: Opening the Application
3-1
3.2: Using the Application
3-1
3.2.1: Creating a Device/Template
3-2
3.2.2: Modifying or Deleting a Device or Template
3-12
3.2.3: Exporting and Importing Templates
3-13
3.3: Output File Structure
3-15
A: Troubleshooting
A-1
A.1: Manually Uninstalling Windows®-based Service
A-1
Electro Industries/GaugeTech
Electro Industries/GaugeTech
The Leader In Power Monitoring and Smart Grid Solutions
The Leader In Power Monitoring and Smart Grid Solutions
Doc#
E134747
TOC - 1
Table of Contents
This page intentionally left blank.
Electro Industries/GaugeTech
Electro Industries/GaugeTech
The Leader In Power Monitoring and Smart Grid Solutions
The Leader In Power Monitoring and Smart Grid Solutions
Doc#
E134747
TOC - 2
1: Overview
1: Overview
The Auto ExportTM application is a Windows®-based Service that lets you export
retrieved EIG meters’ log data from Communicator EXT 3.0 software directly to a
Microsoft® Excel® spreadsheet or a Comma Separated Values (.csv) file. Additionally,
you can set up the application to automatically email the exported files to any
addresses you choose.
NOTE: A Windows®-based Service is a program that is under the control of Windows®' Service Control Manager. A Windows®-based Service program launches and
runs in the background as long as the Windows® operating system is running.
After you install the Auto ExportTM application, you can program it to automatically
take historical log database files and export them into a customized Excel® spreadsheet or .csv file, at whatever frequency you specify (e.g., daily). You also have the
option of performing a Manual export.
• The Auto ExportTM application can be used along with EIG’s Script & Scheduler. You
can set up Script & Scheduler to perform log retrieval on a regular interval, then set
up the Automatic mode of the Auto ExportTM application to convert the retrieved
logs into the Excel® file. See Chapter 15 of the Communicator EXT User Manual for
instructions on using Script & Scheduler.
• A separate Excel® file is created for each month for which data exists in the log
database. Each Excel® file contains a sheet for each day in the month as well as a
sheet for the month as a whole. When you are running the Automatic mode of the
Auto ExportTM application, the retrieved logs are checked at the intervals you
specify, and any new data is written to the Excel® file.
• This software can automatically email monthly usage spreadsheets to users. This
feature is very useful for sending data to load planners and estimators.
When you set up the Template for your Excel® file, you specify the values (data
points) you want to bring in from the retrieved logs. You can also specify totalizing
fields (sum, average, etc) and calculated fields.
Electro Industries/GaugeTech
Electro Industries/GaugeTech
The Leader In Power Monitoring and Smart Grid Solutions
The Leader In Power Monitoring and Smart Grid Solutions
Doc#
E134747
1-1
1: Overview
IMPORTANT! You must specify the data points you want to see on your spreadsheet
both in the Auto ExportTM application and in your meter. See the Communicator EXT
User Manual for instructions on programming data points through Communicator EXT.
The next chapter contains instructions for installing the Auto ExportTM application.
Electro Industries/GaugeTech
Electro Industries/GaugeTech
The Leader In Power Monitoring and Smart Grid Solutions
The Leader In Power Monitoring and Smart Grid Solutions
Doc#
E134747
1-2
2: Installation
2: Installation
2.1: Installing the Application
IMPORTANT! If you previously installed an earlier version of the Auto ExportTM
application, you must uninstall the previous version before installing this version. If
you do not do that, the new installation will fail. Write down the previous version’s
meter settings as the current version of the application is not backward compatible,
i.e., the previous version’s settings are not preserved. See Section 2.2 for uninstall
instructions.
1. To access the folder, insert the Product CD into your PC and choose Open folder to
view Files Using Windows® Explorer or open the CD through My Computer.
2.You will see a folder labeled Content. Double-click the file to open it. See the sample
screen shown below.
Electro Industries/GaugeTech
Electro Industries/GaugeTech
The Leader In Power Monitoring and Smart Grid Solutions
The Leader In Power Monitoring and Smart Grid Solutions
Doc#
E134747
2-1
2: Installation
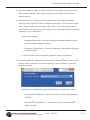
3. Double-click the AutomaticExcelExport folder to open it. You will see the screen
shown below.
You will find the files you need in the Other Programs and Setup Files folders. You
can also run the Setup Windows® installer if necessary.
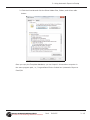
4. The setup file for the Auto ExportTM application is located on the Installation CD, in
the Content/AutomaticExcelExport folder (see the previous section).
5. Double-click the setup Application file (not the Setup Windows® installer) - see the
screen capture below.
Double-click this icon
Electro Industries/GaugeTech
Electro Industries/GaugeTech
The Leader In Power Monitoring and Smart Grid Solutions
The Leader In Power Monitoring and Smart Grid Solutions
Doc#
E134747
2-2
2: Installation
6. You will see the screen shown below.
7. Click Next. You will see the screen shown below.
Electro Industries/GaugeTech
Electro Industries/GaugeTech
The Leader In Power Monitoring and Smart Grid Solutions
The Leader In Power Monitoring and Smart Grid Solutions
Doc#
E134747
2-3
2: Installation
8. Click Next. You will see the screen shown below.
9. Once the application is installed, you will see the screen shown below.
10. The installation is now complete. Click Close and restart your PC.
Electro Industries/GaugeTech
Electro Industries/GaugeTech
The Leader In Power Monitoring and Smart Grid Solutions
The Leader In Power Monitoring and Smart Grid Solutions
Doc#
E134747
2-4
2: Installation
NOTE: The installation program size is 110 MB. It contains the following components
to insure correct performance of the Auto ExportTM application: Microsoft®.NET
Framework® 1.1, Internet Explorer 6.0, Microsoft® MDAC 2.6, and Windows®
Installer.
2.2: Uninstalling the Application
Follow this procedure in the event that you need to uninstall the Auto ExportTM
application, e.g., if you are going to be installing a newer version of the program.
1. Click Start>Control Panel>Programs>Uninstall a program. You will see a list of the
programs on your computer.
2. Double-click the Auto ExportTM application. You will see the message shown below.
3. Click Yes and follow the prompts to uninstall the program.
Electro Industries/GaugeTech
Electro Industries/GaugeTech
The Leader In Power Monitoring and Smart Grid Solutions
The Leader In Power Monitoring and Smart Grid Solutions
Doc#
E134747
2-5
2: Installation
This page intentionally left blank.
Electro Industries/GaugeTech
Electro Industries/GaugeTech
The Leader In Power Monitoring and Smart Grid Solutions
The Leader In Power Monitoring and Smart Grid Solutions
Doc#
E134747
2-6
3: Using Automatic Export to Excel®
3: Using the Auto ExportTM Application
3.1: Opening the Application
You access the Auto ExportTM application from the Window®’s Start menu. If you are
using Windows® XP Operating system (OS), the path is:
Start>Programs>Electro Industries>Automatic Export to Excel
If you are using Windows® 7 OS, the path is:
Start>All Programs>Electro Industries>Automatic Export to Excel
3.2: Using the Application
When the Auto ExportTM application opens, you see the Main Screen, shown below.
This screen allows you to:
• Create, modify, or delete an export configuration Devices and Templates
• Perform a Manual export to an Excel® file or a .csv file
Electro Industries/GaugeTech
Electro Industries/GaugeTech
The Leader In Power Monitoring and Smart Grid Solutions
The Leader In Power Monitoring and Smart Grid Solutions
Doc#
E134747
3-1
3: Using Automatic Export to Excel®
• Set up Automatic export mode
• Access this User Manual online (Click the Help button.)
• Change Connection Settings
3.2.1: Creating a Device/Template
You need to set up both at least one device and at least one Template for the
device(s). The device is the meter you are downloading files from, and the template
lets you specify the input and output directories and the output configuration settings
for your data file (data points, calculations, totalizing, and header data).
1. Select the Device Type that you want to configure from the pull-down menu. The
available types are Nexus® 1200 (Nexus® 1250/60/70/52/62/72 meters),
Nexus® 1500, or Shark® 200 meters. Any available Templates and devices for that
Device Type will be shown in the Available Templates and Available Devices fields in
the screen.
2. To create a device, click the Create New Device button. You will see the screen
shown below.
Electro Industries/GaugeTech
Electro Industries/GaugeTech
The Leader In Power Monitoring and Smart Grid Solutions
The Leader In Power Monitoring and Smart Grid Solutions
Doc#
E134747
3-2
3: Using Automatic Export to Excel®
3. Device Type is the same as your selection on the Main screen. Enter the following
information:
•
Device Name - this must be the same as the Device Name programmed for this
meter.
•
Input Path - this is the location of the historical log database files. Click the
Browse button to locate the files on your PC.
• Output Path - this is the location for the exported files. Click the Browse button
to choose a location.
•
Device Serial - you can enter the meter’s serial number here. Any entry is
included in the export file’s header.
•
Company Name - you can enter your company’s name here. Any entry is
included in the export file’s header.
•
Device Location - you can enter the meter’s location here. Any entry is included
in the export file’s header.
4. Click Save to save this device (click Exit to close the screen without saving the
device).
IMPORTANT NOTE REGARDING NEXUS® 1500 Meter:
The Nexus® 1500 meter has eight historical logs and you must set up a separate
Device ID for each of the historical logs you want to export from the meter. The Input
Path for the device should point to the Interval log in the Retrieved logs database.
For Windows® Vista/2008/7 OS, the path is:
C:\Users\Public\Documents\Electro Industries\Communicator_Ext\Retrieved
Logs\{Nexus 1500 Meter Designation_Serial Number}\logs\INTERVAL_{n}
Example for the Nexus® 1500 meter’s Log 4:
C:\Users\Public\Documents\Electro Industries\Communicator_Ext\Retrieved
Logs\Nexus_1500_0000000028203621\logs\INTERVAL_4
For Windows® XP OS, the path is:
C:\Documents and Settings\All Users\Documents\Electro Industries\
Communicator_Ext\Retrieved Logs\{Nexus 1500 Meter Designation_Serial Number}\logs\INTERVAL_{n}
Electro Industries/GaugeTech
Electro Industries/GaugeTech
The Leader In Power Monitoring and Smart Grid Solutions
The Leader In Power Monitoring and Smart Grid Solutions
Doc#
E134747
3-3
3: Using Automatic Export to Excel®
Example for the Nexus® 1500 meter’s Log 4:
C:\Documents and Settings\All Users\Documents\Electro Industries\
Communicator_Ext\Retrieved Logs\ Nexus_1500_0000000028203621\
logs\INTERVAL_4
5. To create a Template, click the Create New Template button. You will see the screen
shown below.
6. Device Type is the same as your selection on the Main screen. Enter the following
information:
•
Template Name - enter a name for the Template here.
• Active Checkbox - this setting is for the Automatic export mode. Click this box to
activate the Template (process it when the Automatic export process runs). If
you don’t want this Template to be processed when Automatic export runs, leave
the checkbox empty.
Electro Industries/GaugeTech
Electro Industries/GaugeTech
The Leader In Power Monitoring and Smart Grid Solutions
The Leader In Power Monitoring and Smart Grid Solutions
Doc#
E134747
3-4
3: Using Automatic Export to Excel®
•
Logs to Export checkboxes - click the checkbox to select the log(s) you will
export using this template. You can select Log 1, Log 2, and/or Log 3 (one or
more logs).
NOTE: For the Nexus® 1500 meter, select Log 1 ONLY.
•
Export Formats checkboxes - click the XLS checkbox to export the log as an
Excel® file; click the CSV checkbox to export the log as a .csv file. You can select
either or both formats.
•
Email Configuration button - when you are using Automatic export mode, you
can set up the email feature to automatically send the exported file(s) to the
email address(es) you specify. Click the button to configure the email settings.
You will see the screen shown below.
a. Enter the following settings:
• SMTP Server - enter the IP address of the SMTP Server or the Hostname.
• Destination emails - enter the email address(es) you want to send the
file(s) to. Separate emails with a semicolon (;).
• Sender Email - enter the sender’s email address.
b. Click OK to save your settings; click Exit to close the screen without saving
settings.
•
Variables to Export - this setting lets you specify the variables to be included in
the export file. You have the following options for variables:
Electro Industries/GaugeTech
Electro Industries/GaugeTech
The Leader In Power Monitoring and Smart Grid Solutions
The Leader In Power Monitoring and Smart Grid Solutions
Doc#
E134747
3-5
3: Using Automatic Export to Excel®
• Select Variables to Include - click this button to select the log variables
you want in the export file. You will see the screen shown below.
a. Enter the following settings:
• Group - select the first grouping of measured variables, e.g., Accumulators. Depending on your selection, the contents of the subgroup,
subgroup 2, and measured variables list change.
• Subgroup - select the second grouping of measured variables, e.g.,
Energy. Depending on your selection, the contents of the subgroup 2,
and measured variables list change.
• Subgroup 2 - select the third grouping of measured variables, e.g.,
Scaled Primary. Depending on your selection, the contents of the
measured variables list changes.
• Measured Variables list - select a measured variable and click Add to
move it to the Selected Items list. To remove a measured variable
from the Selected Items list, select it and click Remove. It is moved
back to the measured variables list.
Electro Industries/GaugeTech
Electro Industries/GaugeTech
The Leader In Power Monitoring and Smart Grid Solutions
The Leader In Power Monitoring and Smart Grid Solutions
Doc#
E134747
3-6
3: Using Automatic Export to Excel®
To change the position of a measured variable in the export file, click
on the variable and click the Up or Down button. The Up button
moves the measured variable one column to the left in the Excel®
file, and the Down button moves it one column to the right.
b. Click OK to save your settings; click Exit to close the screen without
saving settings.
• Custom Variables - click this button to configure up to 16 variables using
arithmetic expressions. These variables can then be included in the Template. You will see the screen shown below.
a. Enter the following settings:
• Select a custom variable - select from Custom Variables #1 - #16.
• Group - select the first grouping of measured variables, e.g., Accumulators. Depending on your selection, the contents of the subgroup,
subgroup 2, and measured variables list change.
Electro Industries/GaugeTech
Electro Industries/GaugeTech
The Leader In Power Monitoring and Smart Grid Solutions
The Leader In Power Monitoring and Smart Grid Solutions
Doc#
E134747
3-7
3: Using Automatic Export to Excel®
• Subgroup - select the second grouping of measured variables, e.g.,
Energy. Depending on your selection, the contents of the subgroup 2,
and measured variables list change.
• Subgroup 2 - select the third grouping of measured variables, e.g.,
Scaled Primary. Depending on your selection, the contents of the
measured variables list changes.
• Variables list - select a measured variable and click the Add button
under this field to copy it to the Expression box at the bottom of the
screen.
b. Select the operator to include - select an arithmetic operation, e.g., *
(multiply), and click the Add button under this field to copy the operation to the Expression field.
c. Include a numeric constant - if you want, enter a numeric constant in
this field and click the Add button under the field to add the constant
to the Expression field.
d. Click the Validate Expression button under the Expression field to
make sure your expression is mathematically correct.
e.Click Save to save your custom variable; click Exit to close the screen
without saving.
IMPORTANT! In order to export the custom variable, you must
select it from the Variables to Include window - see the instructions
on pages 3-6 - 3-7.
Electro Industries/GaugeTech
Electro Industries/GaugeTech
The Leader In Power Monitoring and Smart Grid Solutions
The Leader In Power Monitoring and Smart Grid Solutions
Doc#
E134747
3-8
3: Using Automatic Export to Excel®
• Group Variables - click this button to choose group variables to be
included in the Template. You will see the screen shown below.
This screen allows you to choose totalizing options for your Excel® file.
These variables operate upon an entire data set (column), for a given
date. They are placed after the last date record in the set.
a. Select a group variable, e.g., Average, from the Selectable Items list
and click the Add button to move it to the Selected Items list. To
remove a group variable from the Selected Items list, select it and
click Remove. It is moved back to the Selectable items list.
b. Click OK to save the selected group variables. They will now be
included in the export file. Click Exit to close the screen without saving any added group variables.
•
Devices to Export - this setting lets you specify one or more devices for log
downloads for this Template. Select the device and click Add to add it to the
Selected Devices list. To remove a device from the Selected Devices list, click on
it and click Remove.
NOTE: You can assign a device to more than one Template.
7. Click Save to save this Template (click Exit to close the screen without saving the
Template). You will be on the Main screen again.
Electro Industries/GaugeTech
Electro Industries/GaugeTech
The Leader In Power Monitoring and Smart Grid Solutions
The Leader In Power Monitoring and Smart Grid Solutions
Doc#
E134747
3-9
3: Using Automatic Export to Excel®
8. To perform a Manual export, click the Export Now button in the middle of the Main
screen. You will see a Confirmation window - click OK and you will see the screen
shown below.
NOTE: If you are running the Auto ExportTM application in Automatic mode, a
message window opens, telling you that the Auto ExportTM Windows®-based Service
was stopped.
Click the OK button to continue. Automatic mode must be selected again after the
Manual export - it will not restart automatically.
9. Make the following settings:
•
Select the input database - click the Browse button to select the log file (.db)
you want to export.
•
Time Range Selection Options - use these settings to specify a date and time
range for the export process. All of the Template’s log file variables that fall
within this time range are exported.
Electro Industries/GaugeTech
Electro Industries/GaugeTech
The Leader In Power Monitoring and Smart Grid Solutions
The Leader In Power Monitoring and Smart Grid Solutions
Doc#
E134747
3 - 10
3: Using Automatic Export to Excel®
10. Click Export Now to begin the export process. You will see a progress bar while
data is being exported. (Click Exit to close the screen without performing a
Manual export.)
11. Automatic Export - use this part of the Main screen to configure automatic
exporting of the log files. All active Templates (see page 3-4) for all Device Types
will be exported during an Automatic export. Also, if you have configured the
email feature, the exported files will be sent to the email addresses you specified
(see page 3-5 for instructions).
a.Make these settings:
• Enable/Disable button - click the checkbox to enable Automatic export;
leave the button empty to disable it.
• Frequency of Data Export - select the frequency using the Hours/Minutes
pull-down fields.
b. Click the Save button to save the Automatic export configuration.
12. Connection Settings - Depending on the version of Windows® OS you are running,
you may need to change the Connection settings. Click this button to open the
screen shown below.
a.Select one of the Data Providers for DB files from the pull-down menu:
• Microsoft®.Jet.OLEDB.4.0 - select this if you are using Microsoft® Office
2003 OS.
• Microsoft®.ACE.OLEDB.12.0 - select this if you are using Microsoft®
Office 2007 OS.
Electro Industries/GaugeTech
Electro Industries/GaugeTech
The Leader In Power Monitoring and Smart Grid Solutions
The Leader In Power Monitoring and Smart Grid Solutions
Doc#
E134747
3 - 11
3: Using Automatic Export to Excel®
• Microsoft®.ACE.OLEDB.14.0 - select this if you are using Microsoft®
Office 2010 OS.
b. Click the OK button to save the selection. Click Exit to close the screen
without saving your selection.
13. Click the X in the right corner of the Main screen to close the application.
3.2.2: Modifying or Deleting a Device or Template
You can modify or delete a previously saved device or Template.
1. From the Main screen, select the Device or Template in the Available Templates/
Available Devices fields. See the screen shown below.
•
Click the Modify button to open the Template or Device screen. Follow the
instructions in Section 3.2.1 to make any changes to the Template or Device.
Electro Industries/GaugeTech
Electro Industries/GaugeTech
The Leader In Power Monitoring and Smart Grid Solutions
The Leader In Power Monitoring and Smart Grid Solutions
Doc#
E134747
3 - 12
3: Using Automatic Export to Excel®
• Click the Delete button to delete a saved Template or Device. You will see a
Confirmation window - click OK to delete (click Cancel to not delete).
NOTE: Before you are able to delete a device, it must be removed from any
Templates that use it. Use the Modify Selected Template button and remove the
meter from the Selectable Devices field (see page 3-9 for instructions).
3.2.3: Exporting and Importing Templates
You can export a Template to another PC, or import a Template from another PC. You
do this by copying the Templates database which contains all of the Template files on
the host PC (the PC where the Template database files are stored).
The Templates are saved in the Data directory on the host PC. The location of this
directory depends on your PC’s OS.
• For Windows® XP OS - C:\Documents and Settings\All Users\Application Data\Electro Industries\Automatic Export to Excel\DB\Templates.mdb
• For Windows® Vista and Windows® 7 OS - C:\ProgramData\Electro Industries\Automatic Export to Excel\DB\Templates.mdb
NOTE: In Windows® 7 OS, the ProgramData file may be hidden. If you do not see
the file, follow these steps to make it visible:
Electro Industries/GaugeTech
Electro Industries/GaugeTech
The Leader In Power Monitoring and Smart Grid Solutions
The Leader In Power Monitoring and Smart Grid Solutions
Doc#
E134747
3 - 13
3: Using Automatic Export to Excel®
1. From the C drive, click Organize>Folder and Search Options.
Electro Industries/GaugeTech
Electro Industries/GaugeTech
The Leader In Power Monitoring and Smart Grid Solutions
The Leader In Power Monitoring and Smart Grid Solutions
Doc#
E134747
3 - 14
3: Using Automatic Export to Excel®
2. Click the View tab and click the Show hidden files, folders, and drives radio
button.
Once you copy the Templates database, you can import it into another computer in
the same program path, i.e., ProgramData>Electro Industries>\Automatic Export to
Excel\DB.
Electro Industries/GaugeTech
Electro Industries/GaugeTech
The Leader In Power Monitoring and Smart Grid Solutions
The Leader In Power Monitoring and Smart Grid Solutions
Doc#
E134747
3 - 15
3: Using Automatic Export to Excel®
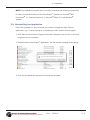
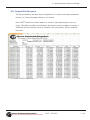
3.3: Output File Structure
The file generated by the Auto ExportTM application is in either an Excel® spreadsheet
format or a Comma Separated Values (.csv) format.
Each Excel® output file contains data for a month or less (depending on your settings). This data is divided into worksheets which each contain the data for one day. A
worksheet for the complete month is included in the last position. See the example
file below.
Electro Industries/GaugeTech
Electro Industries/GaugeTech
The Leader In Power Monitoring and Smart Grid Solutions
The Leader In Power Monitoring and Smart Grid Solutions
Doc#
E134747
3 - 16
3: Using Automatic Export to Excel®
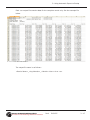
Each .csv output file contains data for the complete month only. See the example file
below.
The output file name is as follows:
<Device Name>_<Log Number>_<Month><Year>.xls or .csv.
Electro Industries/GaugeTech
Electro Industries/GaugeTech
The Leader In Power Monitoring and Smart Grid Solutions
The Leader In Power Monitoring and Smart Grid Solutions
Doc#
E134747
3 - 17
3: Using Automatic Export to Excel®
This page intentionally left blank.
Electro Industries/GaugeTech
Electro Industries/GaugeTech
The Leader In Power Monitoring and Smart Grid Solutions
The Leader In Power Monitoring and Smart Grid Solutions
Doc#
E134747
3 - 18
A: Troubleshooting
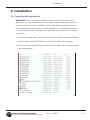
A: Troubleshooting
A.1: Manually Uninstalling the Windows®-Based Service
In the event that the Windows®-based Service (used for the Automatic export process) is modified in the PC where the Auto ExportTM application is installed and the
service can’t be uninstalled or the service is “orphaned,” perform the following procedure to manually uninstall the service:
1. Run command prompt (cmd.exe) from the Windows® Start menu (run it as administrator if the Windows® version is Vista or 7).
2. Type the following command: “sc delete EIG – Automatic Export to Excel”.
This will uninstall the Windows®-based Service in the PC. After that you can run the
Auto ExportTM installer program to perform a new installation of the exporter software
(see Chapter 2 for instructions).
Electro Industries/GaugeTech
Electro Industries/GaugeTech
The Leader In Power Monitoring and Smart Grid Solutions
The Leader In Power Monitoring and Smart Grid Solutions
Doc#
E134747
A-1
A: Troubleshooting
This page intentionally left blank.
Electro Industries/GaugeTech
Electro Industries/GaugeTech
The Leader In Power Monitoring and Smart Grid Solutions
The Leader In Power Monitoring and Smart Grid Solutions
Doc#
E134747
A-2