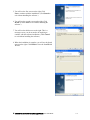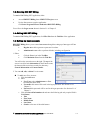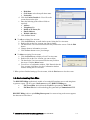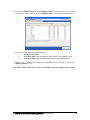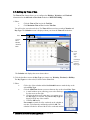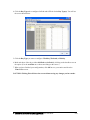
1
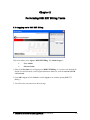
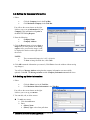
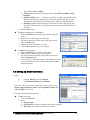
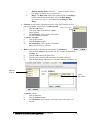
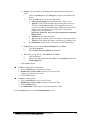
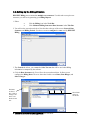
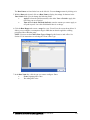
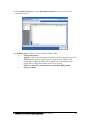
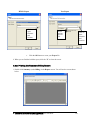
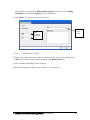
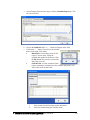
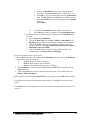
HMI EXT BILLING
USER MANUAL
May 15, 2008
Doc #E134724 V.1.02
e
Electro Industries/GaugeTech
1800 Shames Drive
Westbury, New York 11590
Tel: 516-334-0870
Fax: 516-338-4741
[email protected]
www.electroind.com
“The Leader in Web Accessed Power Monitoring and Control”
E Electro Industries/GaugeTech
Doc # E134724
HMI EXT Billing User Manual
Version 1.02
Published by:
Electro Industries/GaugeTech
1800 Shames Drive
Westbury, NY 11590
All rights reserved. No part of this
publication may be reproduced or
transmitted in any form or by any means,
electronic or mechanical, including
photocopying, recording, or information
storage or retrieval systems or any future
forms of duplication, for any purpose
other than the purchaser’s use, without
the expressed written permission of
Electro Industries/GaugeTech.
© 2008
Electro Industries/GaugeTech
Printed in the United States of America.
E Electro Industries/GaugeTech
Doc # E134724
i
Customer Service and Support
Customer support is available 9:00 am to 4:30 pm, Eastern Standard Time, Monday through
Friday. Please have the model, serial number and a detailed problem description available. If the
problem concerns a particular reading, please have all meter readings available. When returning
any merchandise to EIG, a return materials authorization number is required. For customer
or technical assistance, phone 516-334-0870 or fax 516-338-4741.
Limited Warranty
Electro Industries/GaugeTech warrants that (a) the Software will perform substantially in
accordance with the accompanying written materials for a period of ninety (90) days from the
date of receipt and (b) any Electro Industries/GaugeTech hardware accompanying the Software
will be free from defects in materials and workmanship under normal use and service for a period
of 4 years from the date of shipment. During the warranty period, we will, at our option, either
repair or replace any product that proves to be defective. To exercise this warranty, fax or call our
customer-support department at the number above.
Customer Remedies
Electro Industries/GaugeTech and its suppliers’ entire liability and your exclusive remedy shall
be, at Electro Industries’ option, either (a) return of the price paid, or (b) repair or replacement of
the Software or hardware that does not meet this Limited Warranty and which is returned to
Electro Industries with a copy of your receipt. This Limited Warranty is void if failure of the
Software or hardware has resulted from accident, abuse, or misapplication. Any replacement of
Software or hardware will be warranted for the remainder of the original warranty period or thirty
(30) days, whichever is longer.
No Other Warranties
TO THE MAXIMUM EXTENT PERMITTED BY APPLICABLE LAW, ELECTRO
INDUSTRIES/GAUGETECH AND ITS SUPPLIERS DISCLAIM ALL OTHER
WARRANTIES, EITHER EXPRESS OR IMPLIED, INCLUDING, BUT NOT LIMITED
TO IMPLIED WARRANTIES OF MERCHANTABILITY AND FITNESS FOR A
PARTICULAR PURPOSE, WITH REGARD TO THE SOFTWARE, THE
ACCOMPANYING WRITTEN MATERIALS, AND ANY ACCOMPANYING
HARDWARE. THIS LIMITED WARRANTY GIVES YOU SPECIFIC LEGAL RIGHTS.
YOU MAY HAVE OTHERS WHICH VARY FROM STATE/JURISDICTION TO
STATE/JURISDICTION.
No Liability for Consequential Damages
TO THE MAXIMUM EXTENT PERMITTED BY APPLICABLE LAW, IN NO EVENT
SHALL ELECTRO INDUSTRIES/GAUGETECH OR ITS SUPPLIERS BE LIABLE FOR
ANY DAMAGES WHATSOEVER (INCLUDING WITHOUT LIMITATION, SPECAIL,
INCIDENTIAL, CONSEQUENTIAL, OR INDIRECT DAMAGES FOR PERSONAL
INJURY, LOSS OF BUSINESS PROFITS, BUSINESS INTERRUPTION, LOSS OF
BUSINESS INFORMATION, OR ANY OTHER PECUNIARY LOSS) ARISING OUT OF
THE USE OR INABILITY TO USE THIS PRODUCT, EVEN IF ELECTRO
INDUSTRIES/GAUGE TECH HAS BEEN ADVISED OF THE POSSIBILITY OF SUCH
DAMAGES. IN ANY CASE, ELECTRO INDUSTRIES/GAUGETECH AND ITS
SUPPLIERS’ ENTIRE LIABILITY UNDER ANY PROVISION OF THIS AGREEMENT
SHALL BE LIMITED TO THE AMOUNT ACTUALLY PAID BY YOU FOR THE
SOFTWARE AND/OR ELECTRO INDUSTRIES HARDWARE. BECAUSE SOME
STATES/JURISDICTIONS DO NOT ALLOW THE EXCLUSION OR LIMITATION OF
E Electro Industries/GaugeTech
Doc # E134724
ii
LIABILITY FOR CONSEQUENTIAL OR INCIDENTAL DAMAGES, THE ABOVE
LIMITATION MAY NOT APPLY TO YOU.
Disclaimer
The information presented in this publication has been carefully checked for reliability; however,
no responsibility is assumed for inaccuracies. The information contained in this document is
subject to change without notice.
E Electro Industries/GaugeTech
Doc # E134724
iii
About Electro Industries/GaugeTech
Founded in 1973 by engineer and inventor Dr. Samuel Kagan, Electro Industries/GaugeTech
changed the face of power monitoring forever with its first breakthrough innovation: an
affordable, easy-to-use AC power meter.
Thirty years later, Electro Industries/GaugeTech, the leader in Web-Accessed Power Monitoring,
continues to revolutionize the industry with the highest quality, cutting edge power monitoring
and control technology on the market today. An ISO 9001:2000 certified company, EIG sets the
industry standard for web-accessed power monitoring, advanced power quality, revenue metering,
artificial intelligence reporting, industrial sub-metering and substation data acquisition and
control. EIG’s products can be found on site at virtually all of today’s leading manufacturers,
industrial giants and utilities.
In fact, EIG products are used globally and EIG is accepted as the world leader in power
monitoring and metering technology. With direct offices in the United States, Turkey, Brazil,
Mexico, Guatemala, Croatia and the Philippines, EIG support is available in most regions around
the world. Our worldwide support, advanced technology and quality manufacturing standards
make EIG the superior choice when dependable, reliable service is paramount.
Document Revision History:
HMI EXT Billing User Manual V.1.01
E Electro Industries/GaugeTech
3/14/2007
Doc # E134724
First version
iv
Table of Contents
Warranty
About Electro Industries/Gauge Tech
ii
iv
Chapter 1: Getting Started with HMI EXT Billing
1.1: Overview
1.2: Installing HMI EXT Billing Software
1.3: Running HMI EXT Billing
1.4: Exiting HMI EXT Billing
1.5: Setting up User Accounts
1.6: Understanding Data Files
1-1
1-1
1-3
1-3
1-3
1-4
Chapter 2: Performing HMI EXT Billing Tasks
2.1: Logging on to HMI EXT Billing
2.2: Using the HMI EXT Billing Main Screen
2.3: Setting Up Company Information
2.4: Setting Up Meter Information
2.5: Setting Up Client Information
2.6: Setting Up the Billing Structure
2.7: Setting Up Time of Use
2-1
2-2
2-3
2-3
2-4
2-7
2-10
Chapter 3: Printing HMI EXT Billing Reports
3.1: Overview
3.2: Using the Options Screen
3.3: Printing the Billing Reports
3.3.1: Printing the Detailed Billing Report
3.3.2: Printing the Summary Billing Report
3.3.3: Printing the Data Report
3-1
3-1
3-2
3-2
3-6
3-8
E Electro Industries/GaugeTech
Doc # E134724
v
E Electro Industries/GaugeTech
Doc # E134724
vi
Chapter 1
Getting Started with HMI EXT Billing
1.1: Overview
HMI EXT Billing allows you to print Billing Reports for multiple meters, using Billing data
from the HMI EXT application. You can also print Data Reports for the meters, using the
meter’s log files, generated by the Communicator EXT application. See the HMI EXT User
Manual and the Communicator EXT 3.0 User’s Manual for additional information on those
applications.
The HMI EXT Billing application allows you to:
•
Set up user access to the application
•
Set up your Company data, to be printed on the Billing reports
•
Set up Client data, including locations and meters
•
Set up Billing Rate structures
•
Set up Time of Use data
•
Print Billing Reports
•
Print Data Reports.
1.2: Installing HMI EXT Billing Software
1. Insert the HMI EXT Billing CD into your PC’s CD drive.
2. Open the software Setup file by double-clicking on
hmiextbilling.exe. You will see the first screen on the right.
3. Click the Next button to use the InstallShield Wizard to
install HMI EXT Billing. (Click Cancel to exit without
installing the software.)
4. You will see the second screen on the right. This is a message
screen: you do not need to do anything to continue with the
software installation. (Click Cancel to exit without installing
the software.)
E Electro Industries/GaugeTech
Doc # E134724
1-1
5. You will see the first screen on the right. Click
Next to continue with the installation. (Click Cancel to
exit without installing the software.)
6. You will see the second screen on the right. Click
Install. (Click Cancel to exit without installing the
software.)
7. You will see the third screen on the right. This is a
message screen: you do not need to do anything to
continue with the software installation. (Click Cancel
to exit without installing the software.)
8. When the installation is complete, you will see the fourth
screen on the right. Click Finish to close the InstallShield
Wizard.
E Electro Industries/GaugeTech
Doc # E134724
1-2
1.3: Running HMI EXT Billing
To run the HMI Billing EXT application, either:
•
Access HMI EXT Billing from a HMI EXT Project screen.
•
Use the Start menu to open the application:
Click Start>Programs>Electro Industries>HMI EXT>Billing.
You will see the Logon screen shown in Section 2.1 of Chapter 2.
1.4: Exiting HMI EXT Billing
To exit the HMI Billing EXT application, click File>Exit from the Title Bar of the application.
1.5: Setting Up User Accounts
HMI EXT Billing allows you to control user access through the setting up of two types of User
Accounts:
•
Regular user: able to generate reports and view data.
•
Administrative user: able to perform all tasks, including configuration.
1. Either:
•
•
Click the Users icon in the Tool Bar.
Click Maintain>Users from the Title Bar.
You will see the screen shown on the right. The top of the
screen is used for basic information for the User Account;
the bottom of the screen has two tabs for data entry:
General Information and Contact Details.
2. You can add, edit, or delete User Accounts:
To add a new User Account:
a. Click the Add button.
b. Enter:
• User Type: select Administrator or User
from the pull-down menu.
• Username: this name will be used in the logon procedure. See Section 2.1 of
Chapter 2.
• Password: this password will be used in the logon procedure. See Section 2.1 of
Chapter 2.
c. Click the General Information tab and enter the following (the only required field is
Civil Status):
• Title
• First Name
• Middle Name
• Last Name
• Gender: select one of the radio buttons.
E Electro Industries/GaugeTech
Doc # E134724
1-3
• Birth Date
• Civil Status: select from pull-down menu.
• Nationality
d. Click the Contact Details tab. You will see the
screen shown on the right.
e. Enter the following (none of these fields are
required):
• Address
• Tel(ephone) No.
• Mobile (Cell Phone) No.
• Email (Address)
• Website (Address)
f. Click the Save button.
To edit an existing User Account:
a. Click the Find button. A small window opens, listing the User Accounts.
b. Double-click on the User Account you want to change.
c. The data for the User Account now fills the entry fields on the screen. Click the Edit
button.
d. Change whatever information you want.
e. Click the Save button to save your changes.
To delete an existing User Account:
a. Click the Find button to display a list of User Accounts.
b. Double-click on the User Account you want to delete.
c. The data for the User Account now fills the entry fields on
the screen. Click the Delete button.
d. You will see a Confirmation window. Click Yes to delete the
User Account; click No to close the Confirmation window
without deleting the User Account.
3. When you have finished setting up User Accounts, click the Exit button to close the screen.
1.6: Understanding Data Files
The HMI EXT Billing application is capable of accessing different data sources and using them
to generate reports. The two types of data sources used by HMI EXT Billing are:
•
EIG Trend Data: derived from the Trend files generated by HMI EXT.
•
EIG Data File: derived from the Log files generated by Communicator EXT.
HMI EXT Billing is able to print Billing/Data reports for a meter as long as the meter supports
the data sources listed above.
E Electro Industries/GaugeTech
Doc # E134724
1-4
Chapter 2
Performing HMI EXT Billing Tasks
2.1: Logging on to HMI EXT Billing
This screen allows you to logon to HMI EXT Billing. The default Logon is:
•
•
User: Admin
Password: adm
1. If this is the first time you are logging on to HMI EXT Billing, or if you have not changed the
default User and Password, use this logon information. Otherwise, enter the current User ID
and Password.
2. Click OK to log on. (Click Cancel to exit the Logon screen without opening HMI EXT
Billing.)
3. You will see the screen shown on the next page.
E Electro Industries/GaugeTech
Doc # E134724
2-1
2.2: Using the HMI EXT Billing Main Screen
The HMI EXT Billing main screen opens once you log on to the application.
Menu Bar
Tool Bar
Main
Screen
Status Bar
Showing
User
Account
Information
Use this screen to perform all of the HMI EXT Billing tasks. You can access these tasks in
two ways:
•
Menu Bar: click an item in the Menu Bar - File, Maintain, and Tools, to open
menus containing the HMI Billing tasks and related features.
•
Tool Bar: click an icon in the Tool Bar - Meter, Client, Billing, Reports, Time of
Use, Options, Users, and Company, to access the HMI Billing tasks.
See the following sections for instructions on performing HMI EXT Billing tasks. For
instructions on setting up user accounts, see Chapter 1; for instructions on printing the HMI
EXT Billing Reports, see Chapter 3.
E Electro Industries/GaugeTech
Doc # E134724
2-2
2.3: Setting Up Company Information
1. Either:
•
•
Click the Company icon in the Tool Bar.
Click Maintain>Company in the Title Bar.
You will see the screen shown on the right.
It allows you to set up information for your
Company. This information will print on
the HMI EXT Billing Reports.
2. Enter the following:
•
Company Name
•
Company Address
3. Click the Browse button to locate a logo or
image that you want printed on the Billing
reports. Once you select the image, it will
be displayed in the box on the right side of
the screen.
NOTES:
•
•
The recommended image size is 105 x 94 pixels.
To clear an image from the box, click Clear.
4. Click OK to save the information you entered. (Click Exit to close the window without saving
any changes.)
You will see a Message window stating that the company information was successfully
updated. Click OK. The Message window and the Company Information screen both close.
2.4: Setting up Meter Information
1. Either
•
•
Click the Meter icon in the Tool Bar.
Click Maintain>Meter Information in the Title Bar.
You will see the screen shown on the right.
It allows you to set up your meters.
2. You can add, edit, or delete meters:
To add a new meter:
a. Click the Add button.
b. Enter:
• (Meter) Name
• (Meter) Type: select from pull-down
E Electro Industries/GaugeTech
Doc # E134724
2-3
menu. Either Nexus or Shark.
(Data) Source: select from pull-down menu. Either EIG Trend Data or EIG
Data File.
• (Data) Location: click “…” to Browse for the file’s location. For the EIG Trend
Data, the Location entry should point to the folder with the HST files. For the
EIG Data File, the Location entry should point to the folder with the DB file.
• FileName: click the pull-down menu to select the file name. This field is used
with EIG Trend Data, only. The pull-down menu will list all of the HST files in
the folder.
c. Click the Save button.
•
To edit an existing meter’s information:
a. Click the Find button. A small window opens, listing the
meters.
b. Double-click on the meter you want to edit.
c. The meter’s data now fills the entry fields on the screen.
Click the Edit button.
d. Change whatever information you want.
e. Click the Save button to save your changes.
To delete an existing meter:
a. Click the Find button to display a list of meters.
b. Double-click on the meter you want to delete.
c. The meter’s data now fills the entry fields on the screen.
Click the Delete button.
d. You will see a Confirmation window. Click Yes to delete the
meter; click No to close the Confirmation window without
deleting the meter.
2.5: Setting Up Client Information
1. Either
•
•
Click the Client icon in the Tool Bar.
Click Maintain>Client in the Title Bar.
You will see the screen shown on the right. It allows you to set up
clients, assign Locations to meters, and assign Rate Charges and
other charges for the client..
2. You can perform the following tasks:
To add a new client:
a. Click the Add button.
b. Enter:
• (Client) Name
• (Client) Ref #: a reference number for this client, optional.
• Rate Type: select from pull-down menu. Either:
E Electro Industries/GaugeTech
Doc # E134724
2-4
i.
ii.
Defined and Rate Name: click the “…” button to display a list of
Rate Names. Select the one you want to use.
Range: The Rate Name field will be replaced with a View Ranges
button. Click this button to display a list of the Rate Ranges.
See Section 2.6, steps 6-7, for instructions on setting the Rate
Range.
•
Location: use this field to add locations for the client. Each location can have
one or more meters assigned to it. To add a location:
Enter Location Here
i.
Click the Add button.
ii.
Click in the entry field and enter a name
for the location.
iii.
A Confirmation window opens. Click Yes to
save the location you entered.
To remove a location:
i.
Click on the location.
ii.
Click the Remove button.
iii.
A Confirmation window opens. Click Yes to
remove the location you selected.
•
Meter: use this field to enter meters for locations. To add meters:
i.
Click on the Location in the Location list. The Location is displayed in
the Meter box.
ii.
Click the Add button in the Meter Box.
iii.
Select the meter from the pull-down menu, by double-clicking it.
iv.
Click the Save button. The meter you selected is added to the Meter’s list.
Highlight
Location
Click to
Select Meter
To remove a meter:
i.
Click on the meter.
ii.
Click the Remove button.
iii.
A Confirmation window opens. Click Yes to remove the meter you
selected.
E Electro Industries/GaugeTech
Doc # E134724
2-5
•
Charges: use this feature to add charges other than normal rate charges for a
client.
i.
Click on the Charges tab. The Charges box opens in the middle of the
screen.
ii.
Click the Add button. You are now able to enter:
• (Charge) Description: this will appear on the Client’s report.
• Apply To: Click in this field and select from the pull-down menu.
You can select Period (the charge will be applied once to a pay
period, for example, a one-month range); or Day (the charge will be
applied once a day during the pay period, that is, Charge times
number of days in pay period).
NOTE: See Section 2.6, steps 10-11 for instructions on setting the
Billing Period.
• Amount: the amount of the charge.
• Qty: the number of client meters, if the charge is assessed per meter.
• Total: this field displays the client’s total charges per billing period.
iii.
A Confirmation window opens. Click Yes to save the charges entries.
•
Contact: allows you to enter contact information for the Client.
i.
Click the Contact tab.
ii.
Enter Contact Person, Telephone #, and Fax #.
•
Tax: allows you to specify a Tax Status for the Client.
i.
Click the Tax tab.
ii.
Select either Tax and enter the Tax Code; or Tax Exempt and enter the
Tax Exempt Code.
c. Click the Save button.
To edit an existing client’s information:
a. Click the Find button to open a list of Clients.
b. Double-click a Client’s name in the list to select the Client.
c. Change any information you want.
d. Click the Save button.
To delete an existing client:
a. Click the Find button to open a list of Clients.
b. Double-click a Client’s name in the list to select the Client.
c. Click the Delete button.
d. A Confirmation window opens. Click Yes to delete the Client.
3. Click the Exit button to close the Client Information screen.
E Electro Industries/GaugeTech
Doc # E134724
2-6
2.6: Setting Up the Billing Structure
HMI EXT Billing can accommodate multiple rate structures. Use this task to set up the rate
structures you will use in generating your Billing Reports.
1. Either:
•
•
Click the Billing icon in the Tools Bar.
Click Maintain>Billing Structure>Rate Structure in the Title Bar.
2. You will see the screen shown below. Note the tabs at the top of the screen: General, Rate
Structure, and Billing Periods. Use these screens to configure the rates used by HMI EXT
Billing.
3. The General tab allows you to enter the Sales Tax rate that will be used when Billing
information is computed by the software.
4. Click the Rate Structures tab. You will see the screen shown below. It allows you to
configure the Billing Rates. There are three tabs for this screen: Rates, Rate Ranges, and
Other Charges.
The Rates
are listed
here. Click to
change a rate
name or set
details for the
rate.
E Electro Industries/GaugeTech
These fields
can be set
for the rate.
Doc # E134724
2-7
The Rate Names are listed in the box on the left side. You can change a name by clicking on it.
5. With the Rates tab selected, click on a Rate Name to display the settings for that rate in the
Rate Labels fields. You can change the following fields:
•
Apply To: from the pull-down menu, select either Year or Period to apply this
rate to the year or to a period.
•
Time of Use Labels: Off-Peak/On-Peak: enter the amount you want to apply to
off-peak/on-peak. Leave this field blank if there is no charge.
6. Click the Rate Ranges tab to enter a range for a rate. You will see the screen shown below. It
allows you to configure a consumption range in kWh that can then be applied to a billing
period that falls within that range.
NOTE: You must set the Client’s Rate Type to Range for this feature to take effect. See
Section 2.5 for instructions on selecting the Client’s Rate Type.
7. In the Rate Name box, click the rate you want to configure. Enter:
•
From: beginning kWh value.
•
To: ending kWh value.
E Electro Industries/GaugeTech
Doc # E134724
2-8
8. Click the Other Charges tab to enter miscellaneous charges for a rate. You will see the
screen shown below.
9. In the Rate Name box, click the rate you want to configure. Enter:
•
(Charge) Description
•
Apply To: Click in this field and select from the pull-down menu. You can select
Period (the charge will be applied once to a pay period, for example, a onemonth range); or Day (the charge will be applied once a day during the pay
period, that is, Charge times number of days in pay period).
NOTE: See steps 10-11 for instructions on setting the Billing Period.
•
(Charge) Amount
E Electro Industries/GaugeTech
Doc # E134724
2-9
10. To set up the Billing Periods, click the Billing Periods tab at the top of the screen. You will
see the screen shown below. It shows the Billing Periods, with their date and time range.
11. Click in one of the following fields to change it:
•
(Billing Period) Label
•
From Date/Time: enter the beginning date and time for the Billing Period.
•
From Date/Time: enter the ending date and time for the Billing Period.
12. When you have finished your configurations, click OK to save your changes and close the
Billing Structure screen.
CAUTION! Clicking Exit will close the screen without saving any changes you have made.
E Electro Industries/GaugeTech
Doc # E134724
2-10
2.7: Setting Up Time of Use
The Time of Use feature allows you to configure the Holidays, Weekdays, and Weekend
information for the Off Peak and On Peak schedules of HMI EXT Billing.
1. Either:
•
•
Click the Time of Use icon in the Tool Bar.
Click Maintain>Time of Use from the Title Bar.
You will see the screen shown below. The Time of Use screen has two tabs: Calendar and
Day Type. The Calendar screen is displayed when you select the Time of Use function.
Tabs
Click to
Move
Months
Ahead or
Back
Click
to set
Day
Type
Click days
to set as
selected
Day Type
The Calendar tab displays the screen shown above.
2. Click the checkbox next to the Day Type you want to set: Weekday, Weekend, or Holiday.
The Day Types are color-coded, as shown in the Color field.
3. Either:
•
•
Click a day of the calendar and the Set Schedule button to mark the day as the
selected Day Type.
Click the Multi Date button to set more than one day as the selected Day Type.
a. A small window opens, allowing you to select the day(s).
See the screen on the right.
b. Click the checkbox next to the day(s) you want to set as
the Day Type you selected. The year and Day Type are
displayed at the top of the window.
c. Click the OK button.
For example, to mark all of the weekends on the calendar at
one time, select Saturday and Sunday and click OK. The
calendar will then be shown with all of the weekends marked.
E Electro Industries/GaugeTech
Doc # E134724
2-11
4. Click the Day Type tab to configure On-Peak and Off-Peak for the Day Type(s). You will see
the screen shown below.
5. Click the Day Type you want to configure: Weekday, Weekend, or Holiday.
6. Mark each hour of the day as either Off-Peak or On-Peak by clicking on the checkbox next to
the option. (Use the scroll bar to see hours not fitting on the screen.)
7. When you have finished your configurations, click OK to save your entries and close the
Time of Use screen.
CAUTION! Clicking Exit will close the screen without saving any changes you have made.
E Electro Industries/GaugeTech
Doc # E134724
2-12
Chapter 3
Printing HMI EXT Billing Reports
3.1: Overview
HMI EXT Billing allows you to print Billing and from the HMI EXT application’s Billing
database. Follow the procedures in this chapter to print Billing Reports using the HMI EXT
Billing software.
3.2: Using the Options Screen
The Options screen allows you to set up information for
your Billing Reports.
1. Either:
•
Click the Options icon from the Tool Bar.
•
Click Tools>Options from the Title Bar.
You will see the screen shown on the right.
2. You can do the following:
•
Show Company Logo (set up in the
Company Information screen), Monthly
Consumption Chart (12 months of
consumption presented in a bar graph),
and/or Meter Information (previous
reading, present reading, and total kWh
consumption per meter) in the Billing
Reports: click the checkbox next to each
option you want.
•
Enter notes to be printed on the Billing Reports in the Report Notes entry box.
3. Click the OK button to save your changes and close the Options screen.
CAUTION! Clicking Exit will close the screen without saving any changes you have made.
E Electro Industries/GaugeTech
Doc # E134724
3-1
3.3: Printing the Billing Reports
1. Click the Reports icon in the Tool Bar. You will see the screen shown
on the right. From this screen you can select:
•
Detailed Billing Report
•
Summary Billing Report
•
Detailed Data Report
See the following sections for instructions on printing these reports.
2. Click the Exit button to close this screen.
3.3.1: Printing the Detailed Billing Report
1. Double-click Detailed (under Billing) in the Reports screen. (See above) You will see the
screen shown below.
2. Click Options to select Client and date range for the report. You will see the window shown
on the next page.
E Electro Industries/GaugeTech
Doc # E134724
3-2
Click to
select
Period.
Click to
select
Client.
3. Click “…” to display a list of Clients.
4. Double-click on the Client whose report you want to print. The Client’s name displays in the
Client field, and their locations and meters display in the Billing Details box.
5. Either:
•
•
Select Billing Period from the pull-down menu. These are the periods that were
created using the Rate Structure feature. See Section 2.6 of Chapter 2 for
instructions.
Click the Custom tab to enter a different Billing period for
this report. The screen now displays the Custom tab,
shown on the right.
The Custom option allows you to specify a starting and
ending date and time for this Billing report.
6. Click the OK button to print the report.
7. A message screen opens, displaying processing messages. Click OK to
close the message screen.
E Electro Industries/GaugeTech
Doc # E134724
3-3
8. Your Billing Report is displayed on the screen.
Click
to print
report
Click to
export
report
•
•
Use the scroll bars to view the entire page.
Use the Back and Forward buttons to scroll through the report pages.
From this screen you may:
•
Print the report: click the Print button.
•
Export the report to another format: click the
Export Report button. You will see the window
shown on the right.
a. Select the Export Format you want to use,
from the pull-down menu.
b. Once you select a format, entry fields will
be displayed next to Export Options. See
the sample screens on the next page.
E Electro Industries/GaugeTech
Doc # E134724
3-4
RTF (Rich Text Format) Export
Click to
enter
filename
and
location.
HTML Export
PDF (Portable Document Format) Export
Click to
select
version,
image
quality,
and fonts
to embed
in the file
Microsoft Excel Worksheet (XML)
Select options for the HTML file.
E Electro Industries/GaugeTech
Click to
enter
filename
and
location.
Select options for the Excel file.
Doc # E134724
3-5
HTML Export
Text Export
Click to
enter
filename
and
location.
Select
options
for text
file.
Click to
enter
filename
and
location.
c. Click the OK button to create your Export file.
9. When you are finished with the report, click the “X” to close the screen.
3.3.2: Printing the Summary Billing Report
1. Double-click Summary (under Billing) in the Reports screen. You will see the screen shown
below.
E Electro Industries/GaugeTech
Doc # E134724
3-6
The procedure for generating the Billing Summary Report is the same as for the Billing
Detail Report, except that the Options screen is a bit different.
2. Click Options. You will see the screen shown below.
Click to
select
Client.
Enter
beginning
and ending
year.
3. Click “…” to display a list of Clients.
4. Double-click on the Client whose report you want to print. The Client’s name displays in the
Client field, and their locations and meters display in the Billing Details box.
5. Enter a beginning and ending year for the report.
Continue following the procedure given in Section 3.3.1, from steps 6 - 9.
E Electro Industries/GaugeTech
Doc # E134724
3-7
3.3.3: Printing the Data Report
1. Double-click Detailed under Data Report in the Reports screen. You will see the screen
shown below.
The procedure for generating the Data Report is the same as for the Billing Reports, except
that the Options screen is a bit different.
2. Click Options. You will see the screen shown below.
The Options screen for the Data Report has two tabs:
•
Filter and Generate: this tab is processed in exactly the same way as the Billing
Detail Report. Follow the procedure in Section 3.3.1, steps 3-5.
•
Customize Report: this tab allows you to select the Data Points (meter readings
and other logged values) you want to display on your Data Report.
E Electro Industries/GaugeTech
Doc # E134724
3-8
a. After selecting client and time range, click the Customize Report tab. This
tab is shown below.
b. Click in the DataPoint field. A “…” button will appear in the field.
c. Click on the “…” button. You will see the window
shown on the right. Click either:
•
Data Points: to select data points for the
report. A screen opens, listing the
available data points for the meters. Click
the OK button after you have selected the
data point you want.
•
Custom Point: to create customized data
points, consisting of calculations of the available data points. You
will see the screen shown below.
i.
ii.
Enter a name for this formula (custom data point).
Enter the formula using the Variables chart:
E Electro Industries/GaugeTech
Doc # E134724
3-9
a. Click in the DataPoint field to assign a data point to the
Var(iable). The Line and Point fields are filled in for you.
b. Click OK to copy the selected data point into the DataPoint
field. The Line, Point, and Value fields are filled in for you.
c. Write the formula for the custom data point in the Formula
entry box.
For example:
iii.
Click the Test Formula button to validate your formula.
iv.
Click OK after you have completed your Custom Data Point.
d. The data point you selected or created is displayed in the DataPoint field.
You can:
a. Enter a Label for the DataPoint
b. Click in the Date/Time field to Show or Hide the timestamp for the
DataPoint on your report (select the option from the pull-down menu..
c. Click in the Value field to select it from the pull-down menu. The
available values are: Ave(rage), Beg(inning), End(ing), Max(imum),
Min(imum), Sum, and Sum(I).
d. Click in the Scale field to select it from the pull-down menu. The
available scales are: W(atts), K(ilo), and M(ega).
3. If you want to print a chart in your report:
a. In the Chart entry box (at the bottom of the Data Report screen), click in the DataPoint
field of the Chart you want to use.
•
Chart 1: Real-time Trend for Demand
•
Chart 2: Peak value per day for Demand
•
Chart 3: Accumulated /interval per day for Energy
b. The data point you selected, along with the Line and Point fields are displayed in the
Chart entry box.
c. Click in the Scale field to select it from the pull-down menu. The available scales are:
W(atts), K(ilo), and M(ega).
4. When you have finished selecting Data Points for your report, click the OK button to print it.
5. A message screen opens, displaying processing messages. Click OK to close the message
screen.
5. Your Data Report will be displayed on the screen. Follow the instructions from Section 3.3.1,
steps 8-9.
E Electro Industries/GaugeTech
Doc # E134724
3-10