1
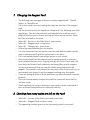
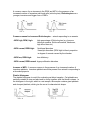
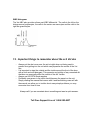
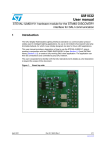
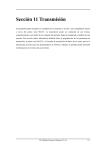
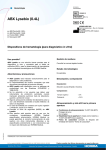
Fast Facts for Operating the scil Vet abc 1. Startup of the Vet abc - Reach around the back of the unit and turn on the Vet abc - Vet abc will go through a 3 minute warmup and a 2 minute startup cycle automatically - Once the startup is completed the unit will provide a printout saying startup has passed. You should not run samples unless the startup cycle has passed 2. Daily Quality Control - Handling and Operation Materials required: One 2.5-mL vial of Minotrol, Blood Control. QC Target Values for the appropriate LOT # Dust Free Gauze Blood Control Card Caution The Blood Controls; - Must be stored in a refrigerator between 2 and 8 degrees Celsius. - Can never be frozen at anytime. - Cannot be left out for more than 10 minutes at room temperature. - Cannot be held in a hand while waiting for control results, may get too warm. - Do not use a Blood Rocker. - Only remove the control that you are going to use from the refrigerator. - Do not store controls in the refrigerator door Blood Control Preparation** Read entire Quality Control Procedure in Fast Facts. Remove ONE Blood Control Vial from the refrigerator. Invert the vial back and forth slowly, paying attention to the concentration of cells at the bottom of the vial. There should not be a concentration of cells at the bottom of the vial when the vial is properly mixed. The bottom of the vial should be almost transparent when in the inverted position. DO NOT SHAKE Once the control is properly mixed, roll the blood control vial in your hands until the vial is almost at room temperature. A good way to check the temperature is to press the vial to your cheek. The Blue and Green controls mix fairly easily while the Red control contains more cells and requires a longer inversion period. When running multiple Blood Controls, always invert the vial 10 times before each sample. Do not continue to roll the vial in your hands. TIPS If a control has been left out of the refrigerator too long the HGB value will be either too high or too low and usually accompanied by the exclamation flag ! If a control is dropped it may damage the cells and cause SCH, MIC flags as well as the $ Flag If dried flakes of blood have fallen inside the vial due to flaking around the rim and cap there is a chance that the * flag or the $ flag may appear beside the WBC or RBC measure value and could possibly create a low value due to a blockage. PLT counts are affected as well. Minotrol is stable until the printed expiration date if unopened. Once the control is opened it is good for 16 days in a refrigerator stored between 2 and 8 deg C as long as proper handling procedures have been followed. Blood Control Operation - One the control Vial is prepared, Insert the Blood control smart card into the smart card reader - Press #2 for Veterinarian, Blood Control will appear on the screen - Press Enter to confirm the Blood Control card - Press ID and enter any number/name - When the needle comes down, remove the cap from Blood Control Vial - Put vial under needle, once the needle touches the bottom of the vial bring the needle up 2mm from the bottom of the vial - Tap Sample bar with your hand to aspirate. - Put the Vial in the foam holder and clean under the cap and around the edges of the vial before putting the cap back on the vial. - Return Blood Control vial to the fridge. 3. Running a sample - Insert the proper species card – push in card until you hear a click Select # 2 - Veterinarians in the Main Menu and press enter The species of the card will appear on the screen, press enter to confirm Behind # 2 - Veterinarians the right species should appear on the display Press ID and enter a patient number, then press enter to confirm Unit will go through a one-minute mini calibration before the needle drops down Always make sure you invert your blood sample eight to ten times to ensure proper mixing before running the sample Insert the needle into the K2 EDTA blood sample Press the sample bar behind to aspirate the sample and then wait 90 seconds for your results Results will appear on the display and then printed Press escape to get back to the main menu to run your next sample 4. Shutdown at end of day - Press ESC until you return to the Main Menu - Reach around the back of the Vet abc and turn the machine OFF. - Do not use the Stand By Button! 5. Reprinting your results - Select # 5 - Setup on the Main Menu – press enter Select # 1 – Results – press enter Select # 1 - Reprint results – press enter The last results will be reprinted 6. Concentrated Cleaning - weekly Select # 4 - Service on the Main Menu - press enter Select # 4 - Concentrated cleaning - press enter Follow the steps on the display You need to take a 10 ml syringe and combine 3ml of Javex bleach and 3 ml of distilled water - Open the front door and syringe 3 ml of the mixture into each of the two chambers you see (start with the right one facing the analyzer), these two chambers are covered and have a one inch oval opening at the top. - The cleaning process will take eight minutes! You can walk away until it is finished - Extremely important this is done weekly or you run the risk of Voiding the one year Warranty - 7. Changing the Reagent Pack - The following two messages indicate an empty reagent pack: ‘Minidil empty’ or ‘Minidil Error’ - Lift up the metal cover and unplug the plug from the top of the reagent pack - Lift the old pack out by the handle and dispose of it by following your local regulations. Take out the new pack and take the four small round red plugs off the four ports. One on the top and three on the bottom. Mark the Date of install on the pack. - Select # 4 - Service on the Main Menu - press enter - Select # 3 - Reagent pack - press enter - Select # 1 - Change pack - press enter - Follow the steps appearing on the display - It is very important that you push in hard the new pack to make sure the pack is seated properly and has connection to the ports - If it is not seated properly you will get errors in your results - One way to check that the reagent pack is seated properly is once you have installed the pack and it is going through the Prime Cycle, open the front door and check if both chambers are being filled up with reagent, and most importantly that you see the needle being cleaned by the reagent. The needle is only cleaned at one point of the Prime cycle so you must watch very closely to see the reagent washing over the needle - If you are seeing all three of these processes you know the pack is seated properly - Once you have properly changed the pack the meter will reset itself to 164 new cycles - Check regularly the cycles remaining in your pack to order a new pack in time and avoid being without a functional machine 8. Checking how many cycles are left on the Pack - Select # 4 – Service of the Main menu and press enter - Select # 3 - Reagent Pack and press enter - The appearing number gives you the remaining cycles in your pack - If you don’t go through steps described in “7. Changing the Reagent Pack” you will not reset the meter and get a false count! 9. ‘Burping’ the Reagent Pack - If you notice that the reagent pack is becoming distended and bulging then it is important to ‘burp’ the pack so that it will not eventually unseat the reagent pack - To do this, unplug the top of the pack and take a pen and press down on the little white flap where the plug was previously - Push on the side of the pack with your hand to force out the air once the valve is opened - You almost have to do this once a day once the pack is getting to the end of its life cycle. 10. Flags and Limits * - following either WBC, RBC HCT or PLT -- system analyzed the sample 3 times but all 3 counts differed and were outside the system’s precision limits (see below). Result should be verified by repeating the sample. $ - between the test result and the units -- 3 counts were made and 2 were within the system’s precision limits (see below). The result can be accepted. ! - next to the HGB result -- the difference between HGB blank done for this analysis and the HGB blank done for the previous analysis was outside the system’s precision limits. Instrument provides a result based on the previous HGB blank. Result can be accepted. If flag persists for more than 3 consecutive times, see section 9.2.3.3 in the scil Vet abc manual to run checkup procedure. H / L – behind result: Result is higher / lower than the reference value. ---D or < printed instead of a result -- linearity range for that parameter has been exceeded (see below). Repeat using a 1:2 dilution with saline solution. Multiply your results by 3. MIC following PLT Flags -- microcytes present in the platelet measurement zone. Verify result with manual count. SCH following PLT Flags -- schistocytes or platelet aggregates present in the platelet measuring zone. Review slide before reporting results. SCL following PLT Flags -- small particles in the 2 - 3 fl zone. Reanalyze sample. If flag persists, perform an automatic cleaning cycle and repeat again. If flag still persists, perform manual platelet count. AG1 and AG2 – Flags for big Leucocytes aggregates (> 1,5 % / 2,5 % of total Leucocytes). Mix sample properly and repeat measurement. Linearity limits: PARAMETER DIL WBC Limit [10³/µl] DIL RBC Limit [106/µl] DIL HGB Limit [g/dl] DIL HCT Limit [%] DIL PLT Limit [10³/µl] 11. DOG CAT HORSE RAT MOUSE RABBIT CATTLE MONKEY PIG SHEEP HUMAN 80 80 80 80 80 80 80 80 80 80 80 10 12 12 20 20 12 20 12 12 20 7.5 25 25 25 25 25 25 25 25 25 25 25 70 70 70 70 70 70 70 70 70 70 70 900 900 900 900 2200 1400 1400 1400 1400 1400 900 Interpretation of the Printout The histogram is a graphic representation of cell size versus cell number. The Vet ABC provides histograms for WBCs, RBCs and platelets. The cell size is on the Xaxis and the cell number is on the Y-axis. RDW: variation in RBC cell size expressed as the red blood cell distribution width MCV: average RBC cell size expressed as the mean corpuscular volume (MCV). MPV: average platelet cell size expressed as the mean platelet volume (MPV). A sharp, narrow curve informs the doctor that the cells are all about the same size. A broad curve informs the doctor that there are abnormally large or small cells present. A common reason for an increase in the RDW and MCV is the presence of an increased number of immature red blood cells (reticulocytes). Reticulocytes are a younger, immature and bigger form of RBCs. Common reason for increased Reticulocytes: - animal responding to an anemia. - MCV high, RDW, high: high percentage of Reticulocytes (e.g. Immune hemolytic anemia, Sickle cell anemia, Newborns, high blood loss etc.) - MCV normal, RDW high: Nutritional disorders Hemolytic disorders (RDW high id direct proportion to degree of anemia caused by the disorder - MCV low, RDW high: Iron deficiency - MCV normal, RDW normal: hypo proliferative disorders Increase of MPV: A common reason is the presence of an increased number of immature platelets. Immature platelets would be present if an animal is responding to a thrombocytopenia. Platelet Histogram: The platelet histogram is useful for evaluating cat blood samples. Cat platelets are naturally variable in size and also tend to clump together after the blood is drawn. In the histogram to the right, which is a cat sample, the sample contains giant platelets and clumped platelets, which give the curve its characteristic shape. WBC Histogram: The Vet ABC also provides a three part WBC differential. The cells to the left on the histogram are lymphocytes, the cells in the center are monocytes and the cells to the right are granulocytes. 12. Important things to remember about the scil Vet abc - - - Always put the dust cover over the unit at night when not being used to prevent dust getting into the unit which can jeopardize the results of the Vet abc It is important to wipe the outside and the inside around the front of the door with a cloth and mild detergent. This prevents any buildup of any unwanted dirt that also can eventually affect the results of the scil Vet abc Always use K2 EDTA blood samples Preferably one person in the clinic should become the expert on the unit. Simply reading the manual that comes with it and familiarizing ones self with the manual can allow you to trouble shoot many simple problems you may encounter from time to time Always call if you are uncertain about something and want a quick answer: Toll Free Support Line at 1-866-382-6937 Calibration ** Before Calibration is performed perform a blockage removal and run a “Startup” by pressing the start up button. Materials required: 1. Blood Control card 2. One vial of Minocal calibration solution. Follow Blood Control Handling Instructions. 3. The reference sheet that comes with your calibrator. You will need the reference ranges (ABX Micros 45, disregard the variances listed), lot number and expiry date from this sheet. Disregard the instructions that come with the calibrator. 4. Pen and paper to write down sample values in chart form. (WBC/RBC/HGB/HCT/PLT) *Note - Calibration may be performed with or without a Calibration SmartCard. -Calibration can NOT be preformed in SI units Procedure: 1. Insert the BLOOD CONTROL SmartCard. From the MAIN MENU, move the cursor to 2) VETERINARY and press ENTER. The display should read TYPE: BLOOD CONTROL. Press ENTER again to verify the card type. 2. From the MAIN MENU, press 3) CALIBRATION and press ENTER. 3. From the CALIBRATION menu, move the cursor to 1) AUTOCALIBRATION and press ENTER. The instrument will then move through a series of entries that require input from the operator. 4. The first entry asks that the operator be identified by displaying the SELECT OP menu. If desired, the initials of all potential operators may be entered into the computer in advance (see User’s Manual). If operators have not been identified, however, the menu lists generic OP_1, OP_2, etc. Select one by moving the cursor to that position and press ENTER. 5. The instrument will then look for a Calibration SmartCard and display an error message (ERROR: NO or BAD SMART CARD) when no card is found. Press ESC to exit this function. 6a. The next entry asks for the lot number of the calibrator solution. At the CHANGE LOT #? prompt, compare the lot number currently in memory to the lot number of the solution to be used. If the lot number is the same, press ESC to indicate that the lot is not to be changed. If the number is different, however, press ENTER. 6b. At the LOT # prompt, type in the new lot number. Numbers are entered using the keypad; letters are entered using the UP and DOWN arrow keys followed by ENTER to advance to the next letter. When the entry is complete, press ENTER again. 7a. The next entry asks for the expiration date of the calibration solution and shows the expiration date of the solution currently in memory. If the date is the same, press ESC. If the date is to be changed, press ENTER. 7b. At the EXP DATE prompt, type in the date using the displayed format then press ENTER. Make sure you use the decimal point to separate day, month and year. 8. The next entry asks for the target values for each parameter, following the same format as above (displaying the currently stored values, asking if change is required, and allowing new values to be entered if needed). Complete the target value entries for each parameter. You will find these values on the reference sheet included with your calibrator. The values that you use are ABX Micros 45. Ignore the variances provided. The number of samples to be run is the next entry, six is recommended. At the CHANGE # SAMPLE? prompt, press ESC to maintain the stored sample number or press ENTER to enter a new value 9. At the RUN CAL? prompt, press enter and the machine will begin a “prime” cycle. Once the cycle is complete the screen will read “Start Calibration #1/6, Press Start to Aspirate” and the sample probe will not come down. This is a “Blank” cycle to create a reference point without a blood sample. No sample is to be aspirated at this point. Once the “Blank” cycle is complete the screen will read “Start Calibration #1/6, Press Start to Aspirate” again and the sample probe will come down. You are now ready to calibrate your machine. 10. Mix the Minocal solution by gentle inversion about 10 times before each of the six samples that are aspirated during the calibration. Open the vial and place the sample probe into the solution, then press the sampling bar. The sample probe aspirates the solution and moves into the instrument. Do not hold the calibrator vial in your hand after aspirating a sample or the vial may get too warm. 11. Have a pen and paper ready to write down your 5 values for each of the six calibration samples that are aspirated. (WBC/ RBC/ HGB/ HCT/ PLT). Keeping track of each run will enable you to decide which, if any, sample results should be discarded throughout the process. See last page for example. 12. Once the Sample has been analyzed the values will show up on the screen. Once you have written the values down Press Enter. The machine will then ask you if you want to discard the sample run by pressing ESC or validate the sample run by pressing ENTER. If you validate the sample run then the machine will display “Start Calibration #2/6, Press Start to aspirate”. If you decide to discard the run by pressing ESC the machine will revert back to “Start Calibration #1/6, Press Start to aspirate”. You can discard as many runs as you think are necessary. The measured values will probably not be exactly the target values indicated on the Minocal Sheet, they will be higher or lower, after the calibration is completed the machines coefficients will be adjusted. The values measured, whether higher or lower, should still be close** to each other throughout the six sample runs. Guidelines **The maximum variation between 6 runs WBC = 0.5 RBC = 0.2 HGB = 0.5 PLT = 35 TARGET Sample 1/6 Sample 2/6 Sample 3/6 Sample 4/6 Sample 5/6 Sample 6/6 Status 10.2 WBC 10.7 10.4 10.8 10.9 10.5 10.5 OK 4.49 RBC 4.78 4.65 4.59 4.68 4.66 4.69 OK 13.5 HGB 13.8 13.6 13.8 13.9 13.8 13.9 OK 38.2 HCT 41.3 40.2 39.7 40.4 40.2 40.4 OK 245 PLT 257 248 249 265 274 253 OK 13. The display then asks for the remainder of the runs. As before, mix the solution by gentle inversion, then aspirate the sample. Evaluate the results of each run against the target values and accept or discard the run as needed. When the pre-programmed numbers of runs is entered, the instrument calculates the statistical values and indicates if calibration passed or failed. If all criteria are met, OK is printed under each parameter, and the display reads CALIBRATION ENDED WITH NEW COEFF. Press any key to return to the main menu. If any of the parameters failed, the word FAILED is printed under that parameter. Note that if any of the parameters fail, none of the new calibration coefficients are entered. The instrument reverts to the previously stored factors and returns to the calibration menu. The operator should then attempt to calibrate the instrument second time. If the calibration fails again, consult Technical Services for troubleshooting options. Examples Of Calibration Calibration Passed Calibration Failed TARGET Sample 1/6 Sample 2/6 Sample 3/6 Sample 4/6 Sample 5/6 Sample 6/6 Status 10.2 WBC 10.7 10.4 11.3 10.9 10.5 10.5 FAIL 4.49 RBC 4.78 4.65 4.59 4.68 4.66 4.69 OK 13.5 HGB 13.8 13.6 13.1 13.9 13.8 13.9 FAIL 38.2 HCT 41.3 40.2 39.7 40.4 40.2 40.4 OK 245 PLT 257 248 249 265 274 253 OK Calibration Passed w/ rejected run – Press ESC to Discard, Enter To Valid TARGET Sample 1/6 Sample 2/6 Sample 3/6 Sample 3/6 Sample 4/6 Sample 5/6 Sample 6/6 Status 10.2 WBC 10.7 10.4 11.3 10.8 10.9 10.5 10.5 OK 4.49 RBC 4.78 4.65 4.59 4.59 4.68 4.66 4.69 OK 13.5 HGB 13.8 13.6 13.1 13.8 13.9 13.8 13.9 OK 38.2 HCT 41.3 40.2 39.7 39.7 40.4 40.2 40.4 OK 245 PLT 257 248 249 249 265 274 253 OK