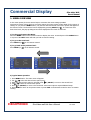
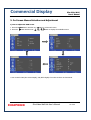
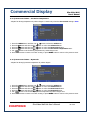
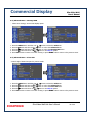
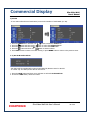
1
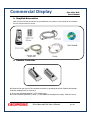
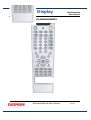
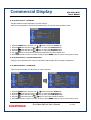
Commercial Display
Slim Video Wall
User’s Manual
Slim Video
Wall
User’s Manual
The information given in this document is carefully checked and believed to be reliable. However, MAKERS takes no
response for any failure or product damage caused by the application of this information.
All manual are subject to change without notification.
Slim Video Wall Unit User’s Manual
1 of 44
Commercial Display
Slim Video Wall
User’s Manual
WARNING
Before operating the set, please read this manual carefully.
WARNING :
To reduce the risk of electric shock does not remove cover (or back). No user serviceable parts
inside . Refer servicing to qualified service personnel. To prevent fire or shock hazard, do not expose
the rear of the set to rain or moisture. Do not rub or strike the Active Matrix LCD with anything hard as
this may scratch, mark, or damage the Active Matrix LCD permanently.
CAUTION:
Unauthorized tampering with the inside of the TV invalidates the warranty.
The manufacturer shall not warrant for any damage caused by improper maintenance and/or repair
work by third parties.
Important safeguards for you and your new product:
Your product has been manufactured and tested with your safety in mind. However, improper use
can result in potential electrical shock or fire hazards. To avoid defeating the safeguards that have
been built into your new product, please read and observe the following safety points when installing
and using your new product and save them for future reference.
1. Read Instructions
2. Follow Instructions
All operating and use instructions should be followed.
3. Retain Instructions
The safety and operating instructions should be retained for future reference.
4. Heed Warnings
All warnings on the product and in the operating instructions should be adhered to.
5. Cleaning
Disconnect the unit from the electricity supply before cleaning. Do not use abrasive cleaners. Use a
damp cloth for cleaning.
Slim Video Wall Unit User’s Manual
2 of 44
Commercial Display
WARNING
Slim Video Wall
User’s Manual
(cont)
6. Water and Moisture
Do not use this apparatus near water.
7. Transporting Product
A product and cart combination should be moved with care. Quick stops, excessive force and uneven
surfaces may cause the product and cart combination to overturn.
8. Attachments
Do not use attachments not recommended by DIGIMORE. as they may cause hazards.
9. Ventilation
Do not block any of the ventilation openings.
Install in accordance with the manufacturer’s instructions.
10. Power Sources
This product should be operated only from the type of power source indicated on the marking label.
If you are not sure of the type of power supply to your home, consult your supplying dealer.
11. Power Lead Polarization
This product is equipped with a three-wire grounding-type cord. This is a safety feature. Do not
defeat the safety purpose of the grounding-type cord.
12. Power Cord Protection
Power-supply cords should be routed so that they are not likely to be walked on or pinched by
s i tems placed upon or against them, paying particular attention to cords at plugs, convenience
receptac les and the point where they exit from the product.
13. Outdoor Antenna Grounding
If an outside antenna or cable system is connected to the product, be sure the antenna or cable
system is grounded so as to provide some protection against voltage surges and built-up static
charges. A “face plate” also needs to be installed with an isolating capacitor to prevent any
damage from static.
14. Lightning
For added protection for this product during a lightning storm, or when it is left unattended and
unused for long periods of time, unplug it from the wall outlet and disconnect the antenna or cable
system. This will prevent possible damage to the product due to lightning and power-line surges.
15. Power Lines
An outside antenna system should not be located in the vicinity of overhead power lines or other
electric light or power circuits, or where it can fall into such power lines or circuits. When installing
an outside antenna system, extreme care should be taken to avoid contact with such power lines or
circuits, as contact with them might be fatal.
16. Earthing the product
This product must be earthed properly to comply with the safety regulations in the country of use.
If you are unsure of these regulations, please consult a qualified electrician.
Slim Video Wall Unit User’s Manual
3 of 44
Commercial Display
WARNING
Slim Video Wall
User’s Manual
(cont)
17. Servicing
Do not attempt to service this product yourself as opening or removing covers may expose you to
dangerous voltages or other hazards. Refer all servicing to qualified service personnel. If the Set
does not operate properly, switch it off and call your dealer.
18. Damage Requiring Service
Isolate this product from the mains supply and refer servicing to qualified service personnel under t
he following conditions:
a. If the power-supply cord or plug is damaged.
b. If the glass front has been damaged.
c. If there is ingress of water between the glass and the LCD screen.
d. If the product does not operate normally by following the operating instructions. Adjust only those
controls that are covered by the operating instructions as an improper adjustment of other controls
may result in damage and will often require extensive work by a qualified technician to restore the
product to its normal operation.
e. If the product has been dropped or the cabinet has been damaged.
f. If the product exhibits a distinct change in performance.
19. Safety Check
Upon completion of any service or repairs to this product, ask the service technician to perform
safety checks to determine that the product is in proper operating condition and the front seal is
intact.
20. Mounting
The product should be mounted on a wall only as recommended in the instructions.
21. Power
This set operates on an AC supply; the voltage is as indicated on the label on the Manual. This appliance
must be earthed at all times through the chassis as well as through the power lead.
22. Location
Do not install on an unstable location with support area smaller than the DID SET.
Please secure enough space for safety use.
WARNING
(cont)
Slim Video Wall Unit User’s Manual
4 of 44
Commercial Display
Slim Video Wall
User’s Manual
Contents
z SUPPLIED ACCESSORIES ....................................................................................... 8
z REMOTE CONTROL KEY ARRANGEMENTS......................................................... 9
z
z
z
FRONT PANEL LED OPERATIONS................................................................ 10
FRONT PANEL KEY DESCRIPTIONS ............................................................. 10
IR-REMOTE CONTROLLER DESCRIPTIONS .................................................... 11
z CONNECTION DETAILS ......................................................................................... 12
z INTERFACE DESCRIPTION................................................................................... 12
1. MENU OVERVIEW..................................................................................................... 13
1) TO SHOW AND REMOVE THE MENU:................................................................. 13
2) TO GO TO THE NEXT LEVEL: ........................................................................... 13
3) TO GO BACK TO THE PREVIOUS LEVEL:.............................................................. 13
4) TYPICAL MENU OPERATION .......................................................................... 13
2. BASIC OPERATION .................................................................................................. 14
1) TURNING ON THE MONITOR.......................................................................... 14
2) ON SCREEN MENUS LANGUAGE SELECTION ...................................................... 14
3. ON SCREEN MENUS SELECTION AND ADJUSTMENT ..................................... 15
1) HOW TO ADJUST THE OSD SCREEN ................................................................. 15
4. SELECT VIDEO INPUT ............................................................................................. 16
1) HOW TO SELECT VIDEO SOURCE BY OSD (NET : NEPTUNE OPTION) ..................... 16
5. PICTURE MENU OPTIONS...................................................................................... 17
1) PICTURE MODE .......................................................................................... 17
2) USER CONTROL .......................................................................................... 17
3) COLOR TEMPERATURE CONTROL .................................................................... 18
4) ASPECT RATIO ........................................................................................... 18
5) VIDEO WALL ............................................................................................. 19
6) PC MENU ................................................................................................. 21
6. SETUP MENU OPTIONS........................................................................................... 22
1) RESET ...................................................................................................... 22
2) TIME SETTINGS .......................................................................................... 22
3) LANGUAGE ................................................................................................ 24
Slim Video Wall Unit User’s Manual
5 of 44
Commercial Display
Slim Video Wall
User’s Manual
4) OSD TONE CONTROL .................................................................................. 25
5) SCREEN SAVER........................................................................................... 25
6) ADVANCED MENU ....................................................................................... 26
6-1) DIMMING .............................................................................................. 26
6-1-1) DIMMING MENU – AUTO DIMMING (LIGHT AMBIENT SENSOR OPTION ONLY)... 26
6-1-2) DIM LEVEL ......................................................................................... 27
6-1-3) DIMMING MENU – MAX DIM AMBIENT (LIGHT AMBIENT SENSOR OPTION ONLY)
.................................................................................................................. 27
6-1-4) DIMMING MENU – MIN DIM AMBIENT (LIGHT AMBIENT SENSOR OPTION ONLY)
.................................................................................................................. 28
6-1-5) DIMMING MENU – AMBIENT (LIGHT AMBIENT SENSOR OPTION ONLY) ........... 28
6-2) ADVANCED MENU – HEAT CONTROL ............................................................ 29
6-2-1) HEAT CONTROL MENU – FAN CONTROL .................................................... 29
6-2-2) HEAT CONTROL MENU – FAN ACTIVE TEMPERATURE.................................... 30
6-2-3) HEAT CONTROL MENU – HYSTERESIS ....................................................... 30
6-2-4) HEAT CONTROL – SHUTDOWN ................................................................ 31
6-2-5) HEAT CONTROL – CURRENT TEMPERATURE ................................................ 31
6-3) ADVANCED MENU – X768 MODE................................................................ 31
6-4) ADVANCED MENU – MESSAGE OSD ............................................................ 32
6-5) ADVANCED MENU – PIVOT OSD................................................................. 32
6-6) ADVANCED MENU – AUTO SOURCE CHANGE .................................................. 33
6-7) ADVANCED MENU – INFORMATION ............................................................. 33
7) SETID ..................................................................................................... 34
7-1) SETID & ACTIVE SET ID ......................................................................... 34
7. PIP (PICTURE IN PICTURE).................................................................................. 35
1) PIP ON/OFF ........................................................................................... 35
2) INPUT SOURCE........................................................................................... 35
3) SIZE ........................................................................................................ 36
4) POSION .................................................................................................... 36
5) PIP SWAP ................................................................................................ 37
6) SOUND SELECT........................................................................................... 37
8. SERIAL CONTROL PROTOCOL .............................................................................. 38
1) SERIAL SETUP............................................................................................ 38
1-1) SERIAL CABLE FOR PC TO MONITOR............................................................ 38
2) PROTOCOLS............................................................................................... 38
2-1) VIRTUAL REMOTE CONTROL....................................................................... 38
2-2) SETTING PARAMETERS TO MONITOR............................................................ 39
2-3)READ PARAMETERS FROM MONITOR ............................................................ 39
3) CONTROL COMMAND PACKET ........................................................................ 40
3-1)VIRTUAL RCU (REMOTE CONTROL UNIT) : EMULATES THE INFRA RED REMOTE
Slim Video Wall Unit User’s Manual
6 of 44
Commercial Display
Slim Video Wall
User’s Manual
CONTROL ...................................................................................................... 40
3-2) SYSTEM PARAMETER DIRECT SETTINGS/READ PACKET ................................... 41
4) CONTROL EXAMPLES AT MASTER PC ............................................................... 44
4-1)SET INPUT SOURCE TO RGB INPUT ............................................................. 44
4-2)READ POWER STATE ................................................................................. 44
Slim Video Wall Unit User’s Manual
7 of 44
Commercial Display
Slim Video Wall
User’s Manual
z Supplied Accessories
Make sure the following accessories are provided with your product. These should all be included in
the box with the main LCD screen.
z Remote Controller
► Remove the rear cover of the remote controller by pressing the arrow Symbol downwards
and then pulling firmly to remove it.
► Insert two supplied batteries (1.5V of AAA type).
► Ensure that the polarities (+ and -) of the batteries are aligned correctly. Close the cover.
Slim Video Wall Unit User’s Manual
8 of 44
Commercial Display
Slim Video Wall
User's Manual
• REMOTE CONTROL KEY ARRANGEMENTS
Slim Video Wall Unit User’s Manual
9 of 44
Commercial Display
Slim Video Wall
User’s Manual
z Front panel LED Operations
Status
Power Off
Normal
Not Connected (No signal)
DPMS
Color
Red
Green
Green
Red
Operation
On
On
Blinking
Blinking
z Front Panel Key Descriptions
Key Name
Operation
Power Key
► Power On/Off.
Menu Key
►
►
►
►
Activates main OSD menu.
Navigates higher menu in main OSD menu.
Stops auto frequency searching.
Exits OSD menu.
Select Key
►
►
►
►
Activates OSD menu of input source selecting.
Changes input source by selecting.
Executes functions (by OSD help commands) in main OSD menu.
Activates Child menu.
Up Key
► Navigates input source.
► Executes function (by OSD help commands) in main OSD menu.
► Navigates previous menu in main OSD menu.
Down Key
► Navigates input source.
► Executes function (by OSD help commands) in main OSD menu.
► Navigates next menu in main OSD menu.
Left Key
► Decreases sound volume of speaker/headphone.
► Executes function (by OSD help commands) in main OSD menu.
► Decreases values of user menu in main OSD menu.
Right Key
► Increases sound volume of speaker/headphone.
► Executes function by OSD help commands in main OSD menu.
► Increases values of user menu in main OSD menu.
Slim Video Wall Unit User’s Manual
10 of 44
Commercial Display
Slim Video Wall
User’s Manual
z IR-Remote controller Descriptions
Key Name
Description
Power
Menu
Up
Down
Right
Left
Enter
EXIT
Info
► Power On/Off
► Same as “Menu key” on keypad.
► Same as “Up key” on keypad
► Same as “Down key” on keypad
► Same as “Right key” on keypad
► Same as “Left key” on keypad
► Same as “Select key” on keypad
► Exit OSD menu
► Displays input source information
► Set minimum sleep timer value more than current sleep timer
value when sleep timer OSD activated
► If sleet timer is maximum value, disables sleep timer
► Toggles sound status of speaker/headphone in mute.
► Activates OSD of source change.
► Deactivates OSD of source change.
► Activates OSD of picture standard mode.
► Deactivates OSD of picture standard mode.
► Activates OSD of sound standard.
► Deactivates OSD of sound standard.
► Activates OSD of aspect ratio control.
► Deactivates OSD of aspect ratio control.
► Toggles picture status between motion and still image.
► N/A
► Activates OSD of MTS sound format.
► Deactivates OSD of MTS sound format.
► Toggles PIP status
► Change PIP input sources when PIP is on
► Change PIP image size when PIP is on
► Change PIP position when PIP image size is not double screen.
► Swap main input source and PIP input source
► Select main/PIP sound source when PIP is on
► Selects input source of PC.
► N/A
► Enter digit value to Active SET ID
► Set Active SET ID
Sleep
Mute
Source
PSM(Picture Standard Mode)
SSM(Sound Standard Mode)
ARC
STILL
PRE_CH
Dual I-II / MTS
PIP
PIP Input
PIP Size
PIP Position
SWAP
S. Select
PC
TV
0~9
BLUE
RED
► Delete Active SET ID
Slim Video Wall Unit User’s Manual
11 of 44
Commercial Display
Slim Video Wall
User’s Manual
z Connection Details
z Interface Description
Interface
In
Connection
RS-232 In
• Facility to control the screen via RS232 protocol
DVI-D In
• High Definition Multimedia Input
HDMI-In
• High Definition Multimedia Input
PC(RGB)-In
• PC Screen Input
Component-In
• Y, Pb, Pr Video Input
CVBS-In
• CVBS Input
S-Video-In
• Y, C Input
RS-232 Out
DVI-Out
Out
Connection
Description
•
•
•
•
Facility to control the screen via RS232 protocol
IR Bypass Out (#9 Pin)
High Definition Multimedia Out
Current source display Out
PC(RGB)-Out
• PC Screen Out
Component-Out
• Y, Pb, Pr Video Out
CVBS-Out
• CVBS Out
S-Video-Out
• Y, C Out
Slim Video Wall Unit User’s Manual
12 of 44
Commercial Display
Slim Video Wall
User’s Manual
1. MENU OVERVIEW
In this menu system, there are several ways to customize the menu settings provided.
Most menus consist of three levels to set up the options, but some require greater depth for the variety of
settings. If you press the MENU button, only the first and second level of the menu system will appear on
the monitor screen. The third level can be displayed by pressing SELECT (or ). If a menu has more
than three levels, the pop-up dialogue box will be displayed as the fourth or fifth level.
1) To show and remove the Menu:
Press the MENU button on the Remote Control to display the menu. A second press of the MENU button
or a press of the EXIT button will take you back to monitor viewing.
2) To go to the next level:
Press SELECT (or ) on the Remote Control.
3) To go back to the previous level:
Press MENU (or
) on the Remote Control.
4) Typical Menu Operation
1. Press MENU button: The main menu will appear.
2. Use
to select the desired menu option (icon).
or (SELECT) to move to the second level.
3. While the desired menu option is selected, press
4. Use
to select the second menu option.
5. Press
or (SELECT) to move to the third level: Some menu options require additional steps.
6. Press MENU to return to the previous menu or press EXIT on the Remote Control to return to monitor
viewing.
Slim Video Wall Unit User’s Manual
13 of 44
Commercial Display
Slim Video Wall
User’s Manual
2. BASIC OPERATION
1) Turning On the Monitor
1. First, connect power cord correctly. At this moment, the monitor switches to standby or power on
mode. In standby mode, in order to turn monitor on, press the POWER button on the remote control.
2. Select the viewing source by using SOURCE button on the remote control.
2) On Screen Menus Language Selection
- The menus can be shown on the screen in the selected language. First select your language.
1. Press the MENU button and then use
button to select the SETUP icon.
button to select Menu Language menu.
2. Press the
button and then use
3. Press the
button and then use
button to select your desired language:
From this point on, the on-screen menus will be shown in the selected language.
4. Press EXIT button to return to monitor viewing or press MENU button to return to the previous menu.
Slim Video Wall Unit User’s Manual
14 of 44
Commercial Display
Slim Video Wall
User’s Manual
3. On Screen Menus Selection and Adjustment
1) How to adjust the OSD screen
1. Press the MENU button and then
2. Press the
button and then use
button to select each menu.
button to display the available menus.
• Your monitor's OSD (On Screen Display) may differ slightly from what is shown in this manual.
Slim Video Wall Unit User’s Manual
15 of 44
Commercial Display
Slim Video Wall
User’s Manual
4. SELECT VIDEO INPUT
1) How to Select Video Source by OSD (NET : Neptune option)
1. Press the SOURCE button and then
button to select each video source.
/ SELECT button to go to desired video source
2. Press the
Slim Video Wall Unit User’s Manual
16 of 44
Commercial Display
Slim Video Wall
User’s Manual
5. PICTURE MENU OPTIONS
1) Picture Mode
- Select the picture appearance to suit your preference and viewing situations.
1. Press the MENU button and then
button to select the PICTURE icon.
button and then use
button to select the desired picture option;
2. Press the
User, Dynamic, Standard, Movie, Mild.
3. Press EXIT button to return to monitor viewing or press MENU button to return to the previous menu.
2) User Control
- Adjust the picture appearance to suit your preference and viewing situations.
1. Press the MENU button and then
button to select the PICTURE icon.
button and then use
button to select the desired picture option;
2. Press the
Contrast, Brightness, Color, Sharpness (All Sources),
Phase(Component), Tint(Video).
3. Press
button and then use
button to make appropriate adjustments.
4. Press EXIT button to return to monitor viewing or press MENU button to return to the previous menu.
Slim Video Wall Unit User’s Manual
17 of 44
Commercial Display
Slim Video Wall
User’s Manual
3) Color Temperature Control
- Choose one of five automatic color adjustments. Set to warm to enhance hotter colors such as red, or
set to cool to see less intense colors with more blue.
1. Press the MENU button and then use
button to select the PICTURE icon.
2. Press the
button and then use
button to select Color Temperature menu.
button to select desired option:
3. Press the
button and then use
Cool2, Cool1, Normal, Warm1, Warm2.
4. Press EXIT button to return to monitor viewing or press MENU button to return to the previous menu.
4) Aspect Ratio
- Selects the screen format.
1. Press the MENU button and then use
button to select the PICTURE icon.
2. Press the
button and then use
button to select Aspect Ratio menu.
button to select desired option:
3. Press the
button and then use
For Video Input - 16:9, Panorama, Zoom1, Zoom2, 4:3, 14:9.
For PC Input - 16:9, 4:3, 1:1.
For DVI, Component Input – Real Resolution, 16:9, Panorama, Zoom1, Zoom2, 4:3, 14:9.
4. Press EXIT button to return to monitor viewing or press MENU button to return to the previous menu.
Slim Video Wall Unit User’s Manual
18 of 44
Commercial Display
Slim Video Wall
User’s Manual
5) Video Wall
- For quick reset of all the Video menu options to their original factory preset values.
Press the MENU button and then use
button to select the PICTURE icon.
button and then use
button to select Video Wall menu.
Press the
button to make appropriate adjustments.
Press
Press EXIT button to return to monitor viewing or press MENU button to return to the previous menu.
z
Video Wall Layout Settings
X Axis
MaxX = 3
1.
2.
3.
4.
Y Axis
MaxY = 3
SetX=1
SetY=1
SetX=2
SetY=1
SetX=3
SetY=1
SetX=1
SetY=2
SetX=2
SetY=2
SetX=3
SetY=2
SetX=1
SetY=3
SetX=2
SetY=3
SetX=3
SetY=3
X Max : Maximum number of column tiles to divide video image.
Y Max : Maximum number of row tiles to divide video image.
Set X : Coordinate of video image’s column position.
Set Y : Coordinate of video image’s row position.
Slim Video Wall Unit User’s Manual
19 of 44
Commercial Display
z
Slim Video Wall
User’s Manual
Setting the Bezel Corrections for Natural Tiled Image
Panel Y
Panel X
Bezel X
Bezel Y
Bezel Correction
for Natural Video Wall Settings
X Gap (‰) = 1000 x Bezel X / Panel X
Y Gap (‰) = 1000 x Bezel Y / Panel Y
X Gap : Proportional Value of Vertical Bezel to Panel size by Per-mil unit.
Y Gap : Proportional Value of Horizontal Bezel to Panel size by Per-mil unit.
Slim Video Wall Unit User’s Manual
20 of 44
Commercial Display
Slim Video Wall
User’s Manual
6) PC Menu
1.
2.
3.
4.
Press the MENU button and then use
button to select the PICTURE icon.
Press the
button and then use
button to select PC Menu.
button and then use
button to make appropriate adjustments.
Press
Press EXIT button to return to monitor viewing or press MENU button to return to the previous menu.
Slim Video Wall Unit User’s Manual
21 of 44
Commercial Display
Slim Video Wall
User’s Manual
6. SETUP MENU OPTIONS
1) Reset
Resets user setting values as default
1. Press the MENU button and then use
button to select the SETUP icon.
2. Press the button and then use
button to select the Reset menu.
3. Press the
or SELECT button and then monitor’s user settings are reset as default.
2) Time Settings
Enable the user to set up the clock information.
Slim Video Wall Unit User’s Manual
22 of 44
Commercial Display
Slim Video Wall
User’s Manual
2-1) Clock
If current time setting is wrong, reset the clock manually.
1.
2.
3.
4.
5.
6.
Press
Press
Press
Press
Use
Press
the MENU button and then use
the
button and then use
the
button and then use
the
button and then use
button to adjust clock.
EXIT button to return to monitor
button to select the SETUP icon.
button to select Time.
button to select Clock.
button to select the Hour, Minute.
viewing or press MENU button to return to the previous menu.
2-2) On Timer
Timer function operates only if current time has been set.
1.
2.
3.
4.
5.
6.
Press
Press
Press
Press
Use
Press
the MENU button and then use
button to select the SETUP icon.
the
button and then use
button to select Time.
the
button and then use
button to select On Timer.
button to select the Hour, Minute, Activation.
the
button and then use
button to adjust on time schedule and activation.
EXIT button to return to monitor viewing or press MENU button to return to the previous menu.
Slim Video Wall Unit User’s Manual
23 of 44
Commercial Display
Slim Video Wall
User’s Manual
2-3) Off Timer
Timer function operates only if current time has been set.
1.
2.
3.
4.
5.
6.
Press
Press
Press
Press
Use
Press
the MENU button and then use
button to select the SETUP icon.
button to select Time.
the
button and then use
button to select Off Timer.
the
button and then use
the
button and then use
button to select the Hour, Minute, Activation.
button to adjust off time schedule and activation.
EXIT button to return to monitor viewing or press MENU button to return to the previous menu.
3) Language
- Select a language for the menus to appear in.
1. Press the MENU button and then use
button to select the SETUP icon.
button to select the Menu Language menu.
2. Press the button and then use
3. Press the button and then use
button to select the desired option:
English, Spanish, Portuguese, German, French, Italiano.
4. Press EXIT button to return to monitor viewing or press MENU button to return to the previous menu.
Slim Video Wall Unit User’s Manual
24 of 44
Commercial Display
Slim Video Wall
User’s Manual
4) OSD Tone Control
- Disable blending OSD background with video image.
1.
2.
3.
4.
Press
Press
Press
Press
the MENU button and then use
button to select the SETUP icon.
the button and then use
button to select the OSD Tone menu.
button to select the desired option: Off, On.
the button and then use
EXIT button to return to monitor viewing or press MENU button to return to the previous menu.
5) Screen Saver
- Enables screen saver functions to avoid panel burning.
1.
2.
3.
4.
5.
Press
Press
Press
Press
Press
the MENU button and then use
button to select the SETUP icon.
button to select the Screen Saver Menu.
the button and then use
button to select the desired functions.
the button and then use
the
button and then use
button to set Screen Saver options.
EXIT button to return to monitor viewing or press MENU button to return to the previous menu.
Slim Video Wall Unit User’s Manual
25 of 44
Commercial Display
Slim Video Wall
User’s Manual
6) Advanced Menu
6-1) Dimming
- Automatic dimming controls by light sensor in Dimming menu.
1.
2.
3.
4.
5.
Press
Press
Press
Press
Press
the MENU button and then use
button to select the SETUP icon.
the button and then use
button to select the Advanced Menu.
the button and then use
button to select the Dimming Menu.
the
button and then use
button to set Dimming options.
EXIT button to return to monitor viewing or press MENU button to return to the previous menu.
6-1-1) Dimming Menu – Auto Dimming (Light Ambient Sensor Option only)
- Enable/disables auto dimming control by light ambient sensor
1.
2.
3.
4.
5.
6.
Press
Press
Press
Press
Press
Press
the MENU button and then use
button to select the SETUP icon.
button to select the Advanced Menu.
the button and then use
the button and then use
button to select the Dimming Menu.
the button and then use
button to select the Auto Dimming functions.
the
button and then use
button to set Auto Dimming options.
EXIT button to return to monitor viewing or press MENU button to return to the previous menu.
Slim Video Wall Unit User’s Manual
26 of 44
Commercial Display
Slim Video Wall
User’s Manual
6-1-2) Dim Level
- Controls Inverter dimming level (0V – 3.3V)
1.
2.
3.
4.
5.
6.
Press
Press
Press
Press
Press
Press
the MENU button and then use
button to select the SETUP icon.
the button and then use
button to select the Advanced Menu.
the button and then use
button to select the Dimming Menu.
button to select the Dim Level functions.
the button and then use
button to set Dim Level functions.
the
button and then use
EXIT button to return to monitor viewing or press MENU button to return to the previous menu.
6-1-3) Dimming Menu – MAX Dim Ambient (Light Ambient Sensor Option only)
- Adjusts detected light ambient to set the maximum dimming
1.
2.
3.
4.
5.
6.
Press
Press
Press
Press
Use
Press
the MENU button and then use
button to select the SETUP icon.
button to select the Advanced Menu.
the button and then use
button to select the Dimming Menu.
the button and then use
the button and then use
button to select the MAX Dim Ambient functions.
button to set detected light ambient value by LUX unit.
EXIT button to return to monitor viewing or press MENU button to return to the previous menu.
Slim Video Wall Unit User’s Manual
27 of 44
Commercial Display
Slim Video Wall
User’s Manual
6-1-4) Dimming Menu – MIN Dim Ambient (Light Ambient Sensor Option only)
- Adjusts detected light ambient to set the minimum dimming
1.
2.
3.
4.
5.
6.
Press
Press
Press
Press
Use
Press
the MENU button and then use
button to select the SETUP icon.
button to select the Advanced Menu.
the button and then use
the button and then use
button to select the Dimming Menu.
button to select the MIN Dim Ambient functions.
the button and then use
button to set detected light ambient value by LUX unit.
EXIT button to return to monitor viewing or press MENU button to return to the previous menu.
6-1-5) Dimming Menu – Ambient (Light Ambient Sensor Option only)
- Displays current detected light ambient level by LUX unit.
Slim Video Wall Unit User’s Manual
28 of 44
Commercial Display
Slim Video Wall
User’s Manual
6-2) Advanced Menu – Heat Control
- Automatic Fan controls by internal/external temperature sensor in Dimming menu.
1.
2.
3.
4.
5.
Press
Press
Press
Press
Press
the MENU button and then use
button to select the SETUP icon.
button to select the Advanced Menu.
the button and then use
the button and then use
button to select the Heat Control Menu.
the
button and then use
button to set Heat Control options.
EXIT button to return to monitor viewing or press MENU button to return to the previous menu.
6-2-1) Heat Control Menu – Fan Control
- Controls fan driving option by temperature sensor / force on / force off
1.
2.
3.
4.
5.
6.
Press
Press
Press
Press
Press
Press
the MENU button and then use
button to select the SETUP icon.
the button and then use
button to select the Advanced Menu.
the button and then use
button to select the Heat Control Menu.
the button and then use
button to select the Fan Control functions.
button to set Off, On, Auto options.
the
button and then use
EXIT button to return to monitor viewing or press MENU button to return to the previous menu.
Slim Video Wall Unit User’s Manual
29 of 44
Commercial Display
Slim Video Wall
User’s Manual
6-2-2) Heat Control Menu – Fan Active Temperature
- Adjusts fan driving temperature by Celsius degree. It works only when the Fan Control setting is Auto.
1.
2.
3.
4.
5.
6.
Press
Press
Press
Press
Use
Press
the MENU button and then use
button to select the SETUP icon.
button to select the Advanced Menu.
the button and then use
the button and then use
button to select the Heat Control Menu.
button to select the Fan Active Temperature Menu.
the button and then use
button to set fan driving temperature by Celsius degree unit.
EXIT button to return to monitor viewing or press MENU button to return to the previous menu.
6-2-3) Heat Control Menu – Hysteresis
- Adjusts fan driving hysteresis temperature by Celsius degree.
1.
2.
3.
4.
5.
6.
Press
Press
Press
Press
Use
Press
the MENU button and then use
button to select the SETUP icon.
the button and then use
button to select the Advanced Menu.
the button and then use
button to select the Heat Control Menu.
the button and then use
button to select the Hysteresis Menu.
button to set fan driving hysteresis temperature by Celsius degree unit.
EXIT button to return to monitor viewing or press MENU button to return to the previous menu.
Slim Video Wall Unit User’s Manual
30 of 44
Commercial Display
Slim Video Wall
User’s Manual
6-2-4) Heat Control – Shutdown
- Adjusts shutdown mode temperature by Celsius degree.
When current temperature reaches the shutdown temp, the monitor enters shutdown mode.
1.
2.
3.
4.
5.
6.
Press
Press
Press
Press
Use
Press
the MENU button and then use
button to select the SETUP icon.
button to select the Advanced Menu.
the button and then use
button to select the shutdown Menu.
the button and then use
the button and then use
button to select the shutdown Menu.
button to set fan driving hysteresis temperature by Celsius degree unit.
EXIT button to return to monitor viewing or press MENU button to return to the previous menu.
6-2-5) Heat Control – Current temperature
- Displays current detected main sensor’s temperature and auxiliary sensor’s (option) temperature
6-3) Advanced Menu – X768 Mode
- When PC input resolution is x768 series, fix output resolution. .
1.
2.
3.
4.
5.
Press
Press
Press
Press
Press
the MENU button and then use
button to select the SETUP icon.
the button and then use
button to select the Advanced Menu.
the button and then use
button to select the X768 Mode Menu.
the
button and then use
button to set output resolution options.
EXIT button to return to monitor viewing or press MENU button to return to the previous menu.
Slim Video Wall Unit User’s Manual
31 of 44
Commercial Display
Slim Video Wall
User’s Manual
6-4) Advanced Menu – Message OSD
- When source change, source OSD display option.
1.
2.
3.
4.
5.
Press
Press
Press
Press
Press
the MENU button and then use
button to select the SETUP icon.
the button and then use
button to select the Advanced Menu.
the button and then use
button to select the Message OSD Menu.
button to set Off, On options.
the
button and then use
EXIT button to return to monitor viewing or press MENU button to return to the previous menu.
6-5) Advanced Menu – Pivot OSD
- Control angle of OSD when panel is portrait mode.
1.
2.
3.
4.
5.
Press
Press
Press
Press
Press
the MENU button and then use
button to select the SETUP icon.
the button and then use
button to select the Advanced Menu.
button to select the Pivot OSD Menu.
the button and then use
button to set Off, On options.
the
button and then use
EXIT button to return to monitor viewing or press MENU button to return to the previous menu.
Slim Video Wall Unit User’s Manual
32 of 44
Commercial Display
Slim Video Wall
User’s Manual
6-6) Advanced Menu – Auto Source Change
- When present mode is no signal(not connect cable), auto detect other source and display.
1.
2.
3.
4.
5.
Press
Press
Press
Press
Press
the MENU button and then use
button to select the SETUP icon.
the button and then use
button to select the Advanced Menu.
button to select the Auto Source Change Menu.
the button and then use
the
button and then use
button to set Off, On options.
EXIT button to return to monitor viewing or press MENU button to return to the previous menu.
6-7) Advanced Menu – Information
- Show present F/W information
1.
2.
3.
4.
5.
Press
Press
Press
Press
Press
the MENU button and then use
button to select the SETUP icon.
the button and then use
button to select the Advanced Menu.
the button and then use
button to select the Information Menu.
the
button and then check information.
EXIT button to return to monitor viewing or press MENU button to return to the previous menu.
Slim Video Wall Unit User’s Manual
33 of 44
Commercial Display
Slim Video Wall
User’s Manual
7) Set ID
- If use video wall and control each Board, must set ID numbers of each Board (01~99).
1.
2.
3.
4.
5.
Press
Press
Press
Press
Press
the MENU button and then use
button to select the SETUP icon.
the button and then use
button to select the Advanced Menu.
button to select the SetID Menu.
the button and then use
button to SetID numbers.
the
button and then use
EXIT button to return to monitor viewing or press MENU button to return to the previous menu.
7-1) Set ID & Active SET ID
- Set Active SET ID number Before Control each Board by Remote control or RS-232
- If control only 15th Board, Active SET ID must set 15.
1. Press the BLUE button and then use 0~9 button to select the Active SET ID.
2. If Press the RED button, delete ID number.
Slim Video Wall Unit User’s Manual
34 of 44
Commercial Display
Slim Video Wall
User’s Manual
7. PIP (Picture In Picture)
- Watch two programs or source at the same time. And set up PIP size and position.
- This function does not support at Video wall mode.
1) PIP ON/OFF
1. Press the MENU button and then
button to select the PIP icon.
button and then use
button to select the desired PIP option; On, Off
2. Press the
3. Press EXIT button to return to monitor viewing or press MENU button to return to the previous menu.
2) Input Source
1.
2.
3.
4.
Press
Press
Press
Press
button to select the PIP icon.
the MENU button and then use
the button and then use
button to select the Input Source Menu.
the button and then use
button to select the desired Input Source option.
EXIT button to return to monitor viewing or press MENU button to return to the previous menu.
Slim Video Wall Unit User’s Manual
35 of 44
Commercial Display
Slim Video Wall
User’s Manual
3) Size
1.
2.
3.
4.
Press
Press
Press
Press
button to select the PIP icon.
the MENU button and then use
the button and then use
button to select the Size Menu.
button to select the desired Size option.
the button and then use
EXIT button to return to monitor viewing or press MENU button to return to the previous menu.
4) Position
1.
2.
3.
4.
Press
Press
Press
Press
the MENU button and then use
button to select the PIP icon.
button to select the Position Menu.
the button and then use
button to select the desired Position option.
the button and then use
EXIT button to return to monitor viewing or press MENU button to return to the previous menu.
Slim Video Wall Unit User’s Manual
36 of 44
Commercial Display
Slim Video Wall
User’s Manual
5) PIP Swap
- Using Swap option, you can exchange two programs or source at the same time.
1.
2.
3.
4.
Press
Press
Press
Press
button to select the PIP icon.
the MENU button and then use
the button and then use
button to select the pip Swap Menu.
the button to select the PIP Swap option.
EXIT button to return to monitor viewing or press MENU button to return to the previous menu.
6) Sound Select
- Using Sound Swap option, you can exchange the sound of two programs or source at the same
time.
1.
2.
3.
4.
Press
Press
Press
Press
the MENU button and then use
button to select the PIP icon.
the button and then use
button to select the Sound Swap Menu.
button to select the desired Sound Swap option.
the button and then use
EXIT button to return to monitor viewing or press MENU button to return to the previous menu.
Slim Video Wall Unit User’s Manual
37 of 44
Commercial Display
Slim Video Wall
User’s Manual
8. SERIAL CONTROL PROTOCOL
1) Serial Setup
Item
Settings
Baud rate
Data Bit
Stop Bit
Parity Bit
19200bps
8bit
1bit
None
Stream Control
None
1-1) Serial Cable for PC to Monitor
CONNCTOR1
2
3
5
CONNCTOR2
3
2
5
FUNCTION
RX
TX
TX
RX
SIGNAL GROUND
CONNECTOR1
CONNECTOR2
2) Protocols
2-1) Virtual Remote Control
PC
CMD
0xF4
0x88
Packet (4Bytes)
ID(0~0xFE)
0xFD
Key Code.
Command Format
0xFX : F = Command Start Sending , X = No of Byte to Send
Current Example (0xF4) : Start Sending 4 Bytes of Packet Data
Slim Video Wall Unit User’s Manual
38 of 44
Commercial Display
Slim Video Wall
User’s Manual
2-2) Setting Parameters to Monitor
CMD
0xF5
PC
0x88
Packet (5Bytes)
ID(0~0xFE)
FE
PARM.
VALUE
Command Format
0xFX : F = Command Send Start , X = No of Byte to Send
Current Example (0xF5) : Start Send 5 Byte of Packet Data
Data setting only (Not adjust function for speed)
CMD
0xF5
PC
0x88
Packet (5Bytes)
ID(0~0xFE)
FC
PARM.
VALUE
Command Format
0xFX : F = Command Send Start , X = No of Byte to Send
Current Example (0xF5) : Start Send 5 Byte of Packet Data
2-3)Read Parameters from Monitor
PC
Lavinia
(Response)
CMD
0xF4
Packet(4Bytes)
0x89
ID(0~0xFE)
0xFE
PARM
CMD Packet(1Byte)
0xF1
VALUE
Command Format
0xFX : F = Command Start Sending , X = No of Byte to Send
Example
0xF4 : Start Sending 4 Bytes of Packet Data
0xF1 : Start Sending 1 Byte of Packet Data
Slim Video Wall Unit User’s Manual
39 of 44
Commercial Display
Slim Video Wall
User’s Manual
3) Control Command Packet
3-1)Virtual RCU (Remote Control Unit) : Emulates the Infra Red Remote Control
CMD
Data1
Data2
Data3
Data4
Description
Command
Target
ID
CMD
Key Code
KEY_INPUT
0x13
KEY_PR+
0x47
KEY_PR-
0x4B
KEY_VOLUP
0x53
KEY_VOLDN
0x57
KEY_MUTE
0x03
KEY_SNDSTD
0x4A
KEY_PICSTD
0x07
KEY_MENU
0x43
KEY_STATUS
0x06
(2)
0x08
KEY_PIPPOS
0x48
KEY_PIPON
0xF4
(Start
Sending)
0x88
0xXX
(0x00~0
xFE)
0xFD
(RCU)
KEY_STILL
0x0A
KEY_PICSIZE
0x4D
KEY_EXIT
0x50
KEY_PC
0x58
KEY_DVI
KEY_AV1
KEY_AV2
KEY_AV4
KEY_COMP1
KEY_0(1)
0x1E
KEY_1(1)
0x1D
KEY_2(1)
0x1C
KEY_3(1)
0x46
(1)
0x15
KEY_5(1)
0x14
KEY_6(1)
0x45
(1)
KEY_7
0x00
KEY_8(1)
0x1F
KEY_4
KEY_9
(1)
0x1B
KEY_ENTER
0x04
KEY_SLEEP
0x0B
Slim Video Wall Unit User’s Manual
40 of 44
Commercial Display
Slim Video Wall
User’s Manual
3-2) System Parameter Direct Settings/Read Packet
CMD
Command
0xF5
(Start Set)
0xF4
(Start Get)
Data1
Target
0x88(Set)
0x89(Get
)
Data2
ID
Data
3
CMD
0xXX
(0x00~0xFE
)
0xFE
/0xFC
Set /Get
Param.
Data4
Param
Data5
Value
Range
Description
Min
Ma x
0x00
LANGUAGE
0
5
0x01
CURRENTSOURCE(1)
0
10
0x02
PC_PICTUREMODE
0
4
0x03
COLORTEMP
0
5
0x04
CONTRAST
0
100
0x05
BRIGHTNESS
0
100
0x06
COLOR
0
100
0x07
SHARPNESS
0
100
0x08
RF_PICTUREMODE
0
4
0x09
Reserved
-
-
0x0A
RF_CONTRAST
0
100
0x0B
RF_BRIGHTNESS
0
100
0x0C
RF_COLOR
0
100
0x0D
NTSC_TINT
0
100
0x0E
RF_SHARPNESS
0
100
0x0F
SCALEMODE
0
-
0x10
USERRED
0
100
USERGREEN
0
100
USERBLUE
0
100
PIPEN
0
1
0x11
0x12
0x13
0x14
0x00~0
xF F
(By MinMax)
Not Send
in Get
Mode
PIPSOURCE
0
11
0x15
PIPSIZE
0
2
0x16
PIPLOCATE
0
3
0x17
MUTE
0
1
0x18
SOUNDSTD
0
4
0x19
AUTOVOLUME
0
1
0x1A
SOUNDSRC
0
1
0x1B
VOLUME
0
100
0x1C
HPVOLUME
0
100
0x1D
BALANCE
0
100
0x1E
EQ100HZ
0
20
0x1F
EQ300HZ
0
20
0x20
EQ1KHZ
0
20
0x21
EQ3KHZ
0
20
0x22
EQ10KHZ
0
20
0x23
ONHOUR
0
23
0x24
ONMINUTE
0
59
Slim Video Wall Unit User’s Manual
41 of 44
Commercial Display
Slim Video Wall
User’s Manual
0x25
ONTIMEONOFF
0
1
0x26
0x27
ONTIMEVOL
0
100
OFFHOUR
0
23
0x28
OFFMINUTE
0
59
0x29
OFFTIMEONOFF
0
1
0x2A
SETID
0
254
0x2B
HALFTONE
0
1
0x2C
BLUESCREEN
0
1
0x2D
PIXELSHIFT_EN
0
1
0x2E
WIPER_EN
0
1
0x30
BGGRAY
0
7
0x32
CURHOUR
0
23
0x33
CURMINUTE
0
59
0x34
GPIO
0
0xF0
0x35
KEYLOCK
0
1
0x36
REMOTELOCK
0
1
0x37
ILLUMINANCE(7)(8)
-
-
0x38
MAX_ILLUMINANCE(2)
0
200
0x39
MIN_ILLUMINANCE(3)
0
200
0x3A
AUTO_DIM
0
1
0x3B
DIM_LEVEL(4)
0
100
0x3C
CURTEMP_MAIN(5)(8)
-
-
0x3D
CURTEMP_AUX(5)(8)
-
-
0x3E
TEMP_THRESHOLD(5)
60
200
0x3F
TEMP_HYSTERESIS(6)
2
20
0x40
FAN_CONTROL
0
2
0x41
FAN_ACTIVE
0
1
0x42
SETX
0
4
0x43
SETY
0
4
0x44
SETXMAX
1
5
0x45
SETYMAX
1
5
0x46
(9)
SETXGAP
0
200
0x47
SETYGAP(9)
0
200
0x48
TEMP_SHUTDOWN(5)
60
200
0x49
Factory Video RGain
0
255
0x4a
Factory Video GGain
0
255
0x4b
Factory Video BGain
0
255
0x4c
Factory Video ROffset
0
255
0x4d
Factory Video GOffset
0
255
0x4e
Factory Video BOffset
0
255
0x4f
Factory Comp. RGain
0
255
0x50
Factory Comp. GGain
0
255
0x51
Factory Comp. BGain
0
255
0x52
Factory Comp. ROffset
0
255
Slim Video Wall Unit User’s Manual
42 of 44
Commercial Display
Slim Video Wall
User’s Manual
0x53
Factory Comp. GOffset
0
255
0x54
Factory Comp. BOffset
0
255
0x55
Factory PC RGain
0
255
0x56
Factory PC GGain
0
255
0x57
Factory PC BGain
0
255
0x58
Factory PC ROffset
0
255
0x59
Factory PC GOffset
0
255
255
0x5a
Factory PC BOffset
0
0x5b
Factory DVI RGain
0
255
0x5c
Factory DVI GGain
0
255
0x5d
Factory DVI BGain
0
255
0x5e
Factory DVI ROffset
0
255
0x5f
Factory DVI GOffset
0
255
0x60
Factory DVI BOffset
0
255
0x61
Autoadjust execute
1
0x62
Blankscreen
ILLUMINANCE_x10
Rd only
0
1
0
-
0x64
0x65
Status
H Frequency
0
1
0
-
0x66
V Frequency
0
-
0xFD
Monitor Refresh
1
1
0xFE
POWER
0
1
0x63
Power(31), DPMS_EN(2f) are discarded.
Notice
(1) CURSOURCE Setting Value
AV1:1, AV2:2, SVIDEO:4, COMP1:7, HDIM:11, DVI12, DSUB:10, MMP:15
(2) MAX_ILLUMINANCE Settings
Setting Value = Ambient Level (by LUX) / 100
Ex) Desired Ambient is 10000 Lux, Setting is 100 (= 10000 / 100)
(3) MIN_ILLUMINACE Settings
Setting Value = Ambient Level (by LUX) / 10
Ex) Desired Ambient is 200 Lux, Setting is 20 (= 200 / 10)
(4) DIM_LEVEL Settings
Dimming is controlled by Brightness Settings. Not working even set.
(5) TEMPERATURE Settings
Setting Value = Desired temperture(by Celsius) x 2 + 60
Ex) Desired temperature is 60℃, Setting is 180 (= 60 x 2 + 60)
(6) TEMP_HYSTERESIS Settings
Setting Value = Desired Hysteresis(by Celsius) x 2
Ex) Desired Hysteresis is 2℃, Setting is 4 (= 2 x 2)
(7) ILLUMINACE
Current lux/10. If Cur_lux>2550 then Value=255
(8) Read only Command
Active
Gap
(9) Gap Settings
Setting Value =(int) (1000 * Gap / Active)
Slim Video Wall Unit User’s Manual
43 of 44
Commercial Display
Slim Video Wall
User’s Manual
4) Control Examples at Master PC
4-1)Set Input Source to RGB Input
CMD
0xF5
Start
0x88
Target
0
ID
Packet (5Bytes)
0xFE
0x01
Set Param CMD CURRENT SOURCE
10
RGB(=10)
4-2)Read Power State
CMD
PC
Lavinia
(Response)
0xF4
Start
Packet (4Bytes)
0x89
Target
0
ID
0xFE
Set Param CMD
CMD
0xF1
Start Send
Slim Video Wall Unit User’s Manual
0xFE
POWER STS
Packet (1Byte)
1(on) or 0(0ff)
Value
44 of 44