1
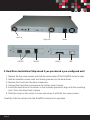
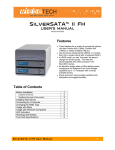
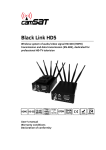
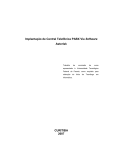
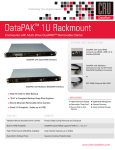
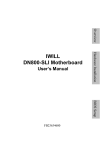
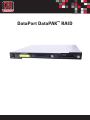
DataPort DataPAK™ RAID
DataPAK - Manual
The 1U Rack mount enclosure with DualPAK removable dual drive carriers is ideal for
disk-to-disk backup where users can “pull” a backup snap shot at anytime. Rugged Sheet
Metal Design and Shock-mounted DualPAK multi-disk removable drive carriers for drive
protection during operation, removal, transporting and storage. Available in RAID (eSATA,
USB 2.0, FireWire 800/400) or Multilane Point-to-Point SAS/SATA JBOD.
Features
• Quadruple connectivity! DataPAK is compatible with four different interfaces:
eSATA, FireWire 800, FireWire 400 and USB.
• Sturdy steel case provides excellent heat dissipation and rugged durability.
• No RAID Initialization. DataPAK’s RAID setup is instantaneous, where some
RAID controllers can take up to 24 hours to set up a RAID 5.
• DataPAK is capable of RAIDs 0, 1, 3, 5 and 10. It is also capable of setting up
hot spares.
• Auto-switching PSU. The 220W power supply automatically switches between
115V and 220V, depending on what is needed.
Page 2
Table of Contents
Table of Contents
Pre-Installation Steps.. ............................................................................................ 4
Hard Drive Installation...............................................................................................5
Understanding Your RAID...........................................................................................6
RAID Configuration .......... .........................................................................................7
LCD Menu ............................................ .....................................................................10
Usage with Mac and Windows Operating Systems..................................................18
FAQs ..........................................................................................................................20
Technical Specifications ........................................................................................... 23
Warranty....................................................................................................................24
© 2010 CRU Acquisitions Group, LLC. ALL RIGHTS RESERVED
No part of this manual may be used or reproduced in any form or by any means, without
prior written permission of CRU Acquisitions Group, LLC.
This manual contains confidential and proprietary information of CRU Acquisition Group,
LLC which is protected by copyright, trade secret, trademark and other intellectual
property rights.
Page 3
DataPAK - Manual
Pre-Installation Steps
1.1 Package Contents
Check the accessories with your DataPAK. Please contact CRU-DataPort if any parts are
missing or damaged. The box should contain the following items:
(1) (1) (1) (6) (3) (4) (8) 1.8M external power cord
FireWire 800 to 800 Cable
Carrier accessories bag
Phillips screws (black, for enclosure)
DataPAK keys
Phillips screws (for DataPAK Carrier)
Shoulder screws with grommets
1.2 Identifying Parts
Take a moment to familiarize yourself with the parts of your DataPAK. This will help you
to better understand the remaining instructions.
Power Switch
Page 4
Left Fan
FW 800
Power
Right Fan
FW 400
eSATA
USB
2. Hard Drive Installation (Skip ahead if you purchased a pre-configured unit.)
1. Remove the four cover screws and slide the carrier cover off the DataPAK carrier to open.
2. Add the shoulder screws with anti-shock grommets to the hard drives.
3. Remove the foam from the drive connectors.
4. Connect the hard drives and secure via bottom mount screws.
5. Install the hard drive in the carrier so the shoulder grommets align with the mounting
slots. Press the drive firmly in place.
6. Slide the cover on the carrier to close and secure it with the four cover screws.
Carefully slide the carriers into the DataPAK enclosure for operation.
Page 5
DataPAK - Manual
3. Understanding RAID
3.1 Consider your RAID type (Skip ahead if you purchased a pre-configured unit.)
A RAID (Redundant Array of Independent Disks) is an array of multiple hard drives that are
combined in a way that provides faster performance and/or data safety. Your DataPAK
unit is capable of creating and managing several different varieties of RAID. You may
choose your preferred RAID level based on factors such as disk capacity, desired data
safety, and desired performance.
3.1.1 Summary of RAID Levels
The DataPAK RAID supports RAID levels 0, 1, 3, 5 and 10. The RAID 10 is the most commonly used application for the DataPAK RAID. In RAID 10 the DataPAKs are mirrored,
allowing a DataPAK to be removed while allowing the data to be accessible.
RAID Features and Performance
RAID
Level
Description
Min.
Drives
Max.
Drives
Data Reliability
Data Transfer Rate
0
Also known as striping. Data distributed across
multiple drives in the array. There is no data
protection.
1
4
No data Protection
Very high
1
Also known as mirroring. All data replicated
on separated disks. RAID 1 is almost always
2 disks.
This is a high availability solution, but due
to the 100% duplication, it is also a costly
solution.
2
2
Very Reliable;
Higher than
RAID 3, 5
Reads are higher
than a single disk;
Writes are similar
to a single disk
3
Also known as Bit-Interleaved Parity. Data and
parity information is subdivided and distributed
across all disks. Parity must be equal to the
smallest disk capacity in the array. Parity
information is normally stored on a dedicated
parity disk.
3
4
Lower than
RAID 1, 10;
Higher than a
single drive
Reads are similar
to RAID 0; Writes
are slower than a
single disk
5
Also known as Block-Interleaved Distributed
Parity. Data and parity information is subdivided
and distributed across all disks. Can withstand
the failure of one drive, and 75% of drive
capacity is usable.
3
4
Lower than
RAID 1, 10;
Higher than a
single drive
Reads are similar
to RAID 0; Writes
are slower than a
single disk
10
Also known Block-Interleaved Parity. Data and
parity information is subdivided and distributed
across all disk. Parity must be the equal to
the smallest disk capacity in the array. Parity
information normally stored on a dedicated
parity disk.
4
4
Very Reliable;
Higher than
RAID 3, 5
Transfer rates are
more like RAID 1
than RAID 0
Page 6
3.1.2 Hot Spares (Host Standby)
RAIDs 3 and 5 are two RAIDs available with DataPAK that will support hot spares. Hot
spares are drives connected as part of your RAID that are switched into operation with a
drive in the RAID fails. In other words, if you setup “3+ Host Standby” with your RAID 3
or 5, then the DataPAK will immediately rebuild the RAID in the event that a drive fails.
After the RAID has rebuilt the DataPAK will need to be powered down and the failed drive
should be replaced preferably with the same model of drive.
4. RAID Configuration (Skip ahead if you purchased a pre-configured unit.)
To set up your RAID you’ll need to use Configurator 3.0. If you have not already installed
Configurator 3.0 then follow the steps below. If it is installed on your computer then skip
below to section 4.1.2.
4.1 Configurator 3.0
4.1.1 Installing Configurator
Configurator 3.0 can be found on our webpage (http://www.cru-dataport.com/software/
configurator.php)
• To install from the web, go to the webpage and select the Configurator that’s compatible with your Mac or Windows Operating System.
Page 7
DataPAK - Manual
4.1.1.1 Windows Installation
If you’ve chosen the Windows version of Configurator 3.0, a Setup Wizard will appear
on your screen. Click “Next”. After you click “Next” it will take you to a licensed
agreement for installing this software. Read over the agreement and select “I accept
the agreement”, then click “Next”. The Setup Wizard will automatically create folders
for Configurator. If you would like to install it in a different folder on your system that’s
acceptable, just click “Browse” and select a new location. Once you’ve decided on where
to store the software click “Next”. Shortcuts will automatically be installed in the Start
Menu under a subfolder called CRU-DataPort. Again, if you’d like to install this in a
different area select “Browse” and choose a different location. After you’ve decided on
where to store the program’s shortcuts click “Next”. Then you can opt to have a desktop
icon installed. Make your selection and click “Next”. After that the wizard will prompt
you to install the software and will give a brief recap of the different selections you
have made. Click “Install” and let the wizard complete your installation. Finally, you can
choose to launch the Configurator now. Click “Finish” and open up Configurator 3.0.
4.1.1.2 Mac Installation
If you’ve chosen the version of Configurator 3.0, a License Agreement will appear on your
screen. You can select “Agree” and run Configurator straight from the source, or you can
select “Save” and save the software to your Mac. CRU-DataPort recommends saving it to
your Mac as well as placing an icon on your desktop for future use.
4.1.2 RAID Setup - Using Configurator 3.0
Open Configurator 3.0. A reminder will appear
telling you to disconnect all other USB and
FireWire devices. Be sure to do that and then
select “Continue”. If configuring a RAID you’ll need
to have your drives loaded inside of the unit. When
Configurator 3.0 appears you can power on your
DataPAK.
Page 8
4.1.2.1 Details Tab
The three tabs that appear house different information and
changeable settings. The Details tab reports basic information
of the unit and is useful if you have a technical support issue.
You can easily see the name of the product, as well as firmware
version. The Chip ID is a changeable setting, but we recommend
not changing that unless prompted by CRU-DataPort. Grayed out
areas, like “Device Type”, are features that are not supported by
this particular chipset and they can be ignored.
4.1.2.2 Options Tab
There is only one selectable feature under the “Options” tab.
Data read from or written to a drive is stored in the drives cache
memory. This cache is normally flushed on a regular basis but
disabling it will stop that action.
4.1.2.3 RAID Tab
The RAID tab will be where you set up your RAID. First you need
to startup the DataPAK without any drives inside and the Configurator closed. After approximately 15 seconds you can open
up Configurator. Still without drives in the enclosure select the
bubble next to your desired RAID type. Look over the different
features that are selectable in your RAID type and be sure that
they are checked if you want them. Finally, be sure to select the
proper number of disks. If there is a grayed area when you are
trying to make your selection that means that the grayed feature is
not compatible with the RAID type you’ve selected.
Page 9
DataPAK - Manual
NOTE: Windows XP can not recognize volumes larger than 2.2TB. If you are running
Windows XP and are using drives larger than 500GB you’ll need to deselect the “Enable
Large Disks” feature. If you are using Vista then be sure to initialize your volume as a
GUID Partition Table (GPT) before formatting the volume.
After you’ve made all of your choices select “Apply Settings”. You will see a progress bar
like the one above. When it says “Device Reinitializing” you can turn to the LCD display
and the DataPAK will prompt you “Re-init”. Press the left button to reinitialize your
DataPAK. You can now insert you drives in a timely manner. After the drives power up it
will also verify the RAID set you selected and the number of disks. Again, press the left
button to verify the RAID set and disk number. The DataPAK will then reset the drives and
advance to the Active Menu. You can now close Configurator 2.0.
NOTE: Future reboots will prompt you to “Re-init” the RAID. If you are just rebooting
your DataPAK then let it complete the start up cycle and go to the “Active Menu” before
you touch anything. If you Are wanting to change your RAID type then let it complete the
start up cycle and repeat 3.4.6. Data will be lost if you “Re-init” the RAID.
5. LCD Menu
The DataPAK LCD Menu is your source for gathering data, changing RAID types and assessing potential errors. This section will help you understand the LCD interface and help
navigate the menu.
Page 10
5.1 Menu Tree
Page 11
DataPAK - Manual
5.2 Navigating the LCD Menu
5.2.1 Active Menu
The Active Menu is the DataPAK starting point. If the Active Menu is not displaying then
either you are in an erroneous state, setting up a RAID or checking enclosure/drive status.
A healthy RAID set will display the Active Menu screen.
5.2.2 RAID Mode
To view the RAID mode press the “Menu” (left) button below the Active Menu once. The
next screen you will see is the RAID Mode screen. From this screen press the “Go” (right)
button below the LCD and that will display the current RAID type and how many disks are
in that RAID. Pressing the “Quit” (left) button will take you back to the Active Menu.
5.2.3 Error Statistics
This section of the Menu will give you Persistent and Recoverable Error Statistics of each
drive in your DataPAK. To get there from the Active Menu press “Menu” (left) twice. Then
press the “Go” (right) button to go to persistent errors. If you want to view the number of
persistent errors on your hard drives press “Go” (right). If you want to view the number of
recoverable errors on your hard drives press “Next” (left). In either case it will take you
through a port by port view of errors, where Port:0 is the first bay/drive, and Port:1 is the
second bay/drive etc. To go back to the Active Menu press “Next” (left) until “Quit” (left)
appears and then press “Quit” (left).
5.2.4 SMART Status
SMART (S.M.A.R.T.), or Self-Monitoring, Analysis, and Reporting Technology, is a monitoring system for hard drives to detect and report various types of information. Some of
those include spin-up time, temperature and hours powered on. Another SMART attribute
is the ability to inform a user if the hard drive has SMART Status, or the ability to detect
and report drive information. This section of the Menu simply informs you if the drive has
SMART Status. To view the SMART Status portion of the Menu press the “Menu” (left)
button three times, then press “Go” (right).
Page 12
This will take you through a port by port look at the hard drives’ SMART Status, where
Port0 is the first bay/drive, and Port1 is the second bay/drive etc. To go back to the Active
menu press “Next” (left) until “Quit” (left) appears and then press “Quit” (left).
5.2.5 Enclosure Status
Fan Speed and Enclosure Temperature (C°) can be found in this portion of the Menu. From
the Active Menu press “Menu” (left) four times, then press “Go” (right). Your first screen
will show the fan’s RPM (Revolutions Per Minute), and the second screen will give the
Enclosure Temperature in Celsius degrees. Simply press “Next” (left) to view the temperature and “Quit” (left) to go back to the Active Menu.
5.2.6 Disk Temperature
Hard drive temperature (C°) can be found in thise section of the menu. To view this press
“Menu” (left) five times, then press “Go” (right). This will take you through a disk by disk
look at the hard drives’ temperature, where Disk 0 is the first bay/drive, and Port 1 is the
second bay/drive etc. To go back to the Active menu press “Next” (left) until “Quit” (left)
appears and then press “Quit” (left).
5.2.7 User Requests
The last section of the menu requests the fan speed. The fan speed is updated every few
minutes, using this feature the fan speed was be requested and updated instantly. To
view this press “Menu” (left) six times, then press “Go” (right). This will take you to the
request fan speed function. Press “Go” (right) to request the fan speed or “Quit” (left) to
return to the active menu.
5.3 Error States
5.3.1 Halted: Bad Disk Count
Halted: Bad Disk Count is an error most likely caused by bad sectors on a hard drive that
has been inserted in the DataPAK. It can also be caused by a hard drive that is not getting
enough power to spin up. This can either be caused by a faulty drive or a bad connection.
Page 13
In any case, contact CRU-DataPort Technical Support to help you troubleshoot this error.
5.3.2 Halted: RAID Invalid/Degraded
This error occurs when the RAID has encountered a problem, most likely caused by bad
sectors or a dead drive. This error will prompt a visual confirmation on the LCD and a
steady System access LED to the right of the LCD. There are different steps to follow
depending on what RAID type the drives are configured in.
5.3.2.1 RAID Invalid: Spanning
There is no data protection in Spanning, you will have to build a new RAID. Remove the
DualPAK and replace the failed drive, preferably with the same model of drive. Open
Configurator to set up a new RAID. (see section 4.1.2)
5.3.2.2 RAID Invalid: RAID 0
There is no data protection in Spanning, you will have to build a new RAID. Remove the
DualPAK and replace the failed drive, preferably with the same model of drive. Open
Configurator to set up a new RAID. (see section 4.1.2)
5.3.2.3 Degraded: RAID 1
The loss of a drive in a RAID 1 will result in a degraded RAID state. The LCD display will
show a “Degraded” state and the RAID LED (yellow) will flash. The RAID can be rebuilt
by powering down the DataPAK and replacing the failed drive, preferably with the same
model of drive. After the new drive is installed power up the DataPAK and wait for
DataPAK to initialize. When the DataPAK has initialized the LCD display will prompt you
to “Add new disk.” Select “yes” (left) and it will being to rebuild the RAID. There will be a
timer in the bottom right corner of the LCD that will give an approximate time to completion. After the rebuild is finished the DataPAK will need to be rebooted. A rebuild with
500GB drives will take approximately 1.5 hours.
NOTE: A degraded RAID 1 will stay mounted and can continue to transfer data. However, CRU-DataPort recommends disconnecting the unit during a rebuild if at all possible.
Page 14
DataPAK - Manual
5.3.2.4 Degraded: RAID 3
The loss of a drive in a RAID 3 without Hot Spare will result in a degraded RAID state.
The LCD display will show a “Degraded” state and the RAID LED (yellow) will flash. The
RAID can be rebuilt by powering down the DataPAK and replacing the failed drive, preferably with the same model of drive. After the new drive is installed power up the DataPAK
and wait for DataPAK to initialize. When the DataPAK has initialized the LCD display will
prompt you to “Add new disk.” Select “yes” (left) and it will being to rebuild the RAID.
There will be a timer in the bottom right corner of the LCD that will give an approximate
time to completion. After the rebuild is finished the DataPAK will need to be rebooted. A
rebuild with 500GB drives will take approximately 1.5 hours.
Select “Yes” (left) and it will begin the rebuild of the RAID. There will be a timer in the bottom
right corner of the LCD that will give an approximate time to completion. After the rebuild is
finished the DataPAK will need to be rebooted. A rebuild with 250GB drives will take approximately 75 minutes.
The loss of two drives will result in a RAID failure. New drives will need to be inserted, preferably the same model of the drives that are getting replaced. Open Configurator 3.0 to set up a
new RAID. (see section 4.1.2)
NOTE: A degraded RAID 3 will stay mounted and can continue to transfer data. However, CRU-DataPort recommends disconnecting the unit during a rebuild if at all possible.
5.3.2.4.1 RAID 3 with Hot Spare
If the RAID 3 is “3 + Hot Standby” then no manual rebuild is necessary. The hot spare will
automatically be added to the RAID. At the end of the rebuild power down the DataPAK and
replace the failed drive. After the new drive is installed power up the DataPAK and wait for it
to initialize. When the DataPAK has initialized the LCD display will prompt you to “Add new
disk.” Select “yes” (left) and that disk will be the new hot spare drive for the RAID.
Page 15
5.3.2.5 Degraded: RAID 5
The loss of a drive in a RAID 5 without Hot Spare will result in a degraded RAID state. The LCD
display will show a “Degraded” state and the RAID LED (yellow) will flash. The RAID can be
rebuilt by replacing the failed drive, preferably with the same model of drive. After the new
drive is installed power up the DataPAK and wait for DataPAK to initialize. When the DataPAK
has initialized the LCD display will prompt you to “Add new disk.” Select “yes” (left) and it will
being to rebuild the RAID. There will be a timer in the bottom right corner of the LCD that will
give an approximate time to completion. After the rebuild is finished the DataPAK will need to
be rebooted. A rebuild with 500GB drives will take approximately 3 hours.
The loss of two drives will result in a RAID failure. New drives will need to be inserted, preferably the same model of the drives that are getting replaced. Open Configurator 3.0 to set up a
new RAID. (see section 4.1.2)
NOTE: A degraded RAID 5 will stay mounted and can continue to transfer data. However, CRU-DataPort recommends disconnecting the unit during a rebuild if at all possible.
5.3.2.5.1 RAID 5 with Hot Spare
If the RAID 5 is “5 + Hot Standby” then no manual rebuild is necessary. The hot spare will
automatically be added to the RAID. At the end of the rebuild power down the DataPAK
and replace the failed drive. After the new drive is installed power up the DataPAK and
wait for it to initialize. When the DataPAK has initialized the LCD display will prompt you
to “Add new disk.” Select “yes” (left) and that disk will be the new hot spare drive for the
RAID.
Page 16
DataPAK - Manual
5.3.2.6 Degraded: RAID 10
The loss of a drive in a RAID 1 will result in a degraded RAID state. The LCD display will
show a “Degraded” state and the RAID LED (yellow) will flash. The RAID can be rebuilt
by powering down the DataPAK and replacing the failed drive, preferably with the same
model of drive. After the new drive is installed power up the DataPAK and wait for
DataPAK to initialize. When the DataPAK has initialized the LCD display will prompt you
to “Add new disk.” Select “yes” (left) and it will being to rebuild the RAID. There will be a
timer in the bottom right corner of the LCD that will give an approximate time to completion. After the rebuild is finished the DataPAK will need to be rebooted. A rebuild with
500GB drives will take approximately 1.5 hours.
NOTE: A degraded RAID 10 will stay mounted and can continue to transfer data. However, CRU-DataPort recommends disconnecting the unit during a rebuild if at all possible.
The loss of two drives will result in a RAID failure. New drives will need to be inserted,
preferably the same model of the drives that are getting replaced. Open Configurator 3.0
to set up a new RAID. (see section 4.1.2)
Page 17
6. Usage with Mac and Windows Operating Systems
6.1 Usage with Macintosh Computers
6.1.1 Compatibility
The DataPAK is compatible with Mac OS X. No drivers are needed.
6.1.2 Using Volumes
When you connect the unit to the Mac for the first time and turn on the power, you’ll
probably see a message saying that the disk is unreadable. This is because you must
format the volume before using it. The easiest way to do this is to use Mac OS X’s Disk
Utility. If you plan to use the unit on both Macs and PCs, select “MS DOS File System” as
the format type. If you only plan to use the unit on Macs, then select “Mac OS Extended”.
After the volume is formatted, an icon representing the drive volume will appear (“mount”)
on the desktop. You can now use the volume just like an internal hard drive.
Eject the volume before powering down the unit by dragging the volume’s
icon to the trash bin, or by selecting the volume then pressing Command-E.
Shutting down the unit without first ejecting the volume can result in data
loss.
6.2 Usage with Windows Computers
6.2.1 Compatibility
The DataPAK is compatible with Windows XP (2.2TB limit) and Vista. No drivers are
needed.
6.2.2 Using Volumes
Before you can use your DataPAK, you must first format the drives into a volume. Use Disk
Management, which you can find by right-clicking on My Computer then selecting Manage. Select NTFS for the format type.
Page 18
DataPAK - Manual
If you wish to format FAT-32 for cross-platform compatibility, you will need to use a thirdparty utility to do so. Windows XP will not create FAT-32 volumes larger than 32GB.
After the volume is formatted, an icon representing the drive volume will appear in My
Computer. You can now use the volume just like an internal hard drive.
If the DataPAK is connected to your computer via FireWire or USB, always eject the device
by clicking the taskbar “eject” icon before turning off power or unplugging the data cable.
Failing to do so could result in data corruption on the drive. When connecting via eSATA,
you will not be able to eject in this way. However, it is possible to disable the device using Device Manager. Whether or not you choose to disable the device in this way, always
make sure the drives are not being accessed before shutting off the DataPAK to avoid data
loss.
Page 19
7. Frequently Asked Questions (FAQ)
Q. My DataPAK Enclosure is making a loud beeping noise but the drives all there. Why is
it making the beeping noise and how can I stop it?
A. The DataPAK Enclosure has an audible fan alarm to warn of fan failures. This alarm
indicates the failure of the right enclosure fan. Contact CRU Tech Support for a replacement fan and instructions on how to disable the fan.
Q. My DataPAK Enclosure is making a loud constant noise. Why is it making that noise
and how can I stop it?
A. The DataPAK Enclosure has an audible RAID failure alarm to warn of drive failures.
This alarm indicates the RAID is operating in a degraded state. The DataPAK carrier with
the bad drive should be removed and the drive should be replaced. Use the display to
determine the failed drive.
Q: I’ve attached my DataPAK and can see the volume, but it shows up twice. Which one is
the real volume?
A: If you are seeing your DataPAK volume mounted twice, chances are the unit is connected to the computer using both the eSATA and FireWire connections. When this is the case,
the OS may attempt to mount the DataPAK twice resulting in two volumes appearing.
Simply turn off the DataPAK and unplug one of the connections to resolve the problem.
Q: Why won’t the computer let me eject or unmount my drive?
A: There may be a software application running in the background with an active link to
the drive. Sometimes, you may see a message such as “The disk is in use and could not be
ejected. Try quitting applications and try again.”
It could be a background application like Sherlock or the Finder. This is not a defect or issue caused by the CRU-DataPort device. Try invoking the Force Quit feature in OS X to see
what software may be running. For Windows XP, the equivalent command is CTRL-SHIFTESC.
Page 20
DataPAK - Manual
CRU DataPort PDR610-IR
Quick Start Guide
Drives connected to the computer via eSATA cannot be ejected in Windows the way
FireWire drives can. However, freeware utilities are available on the internet that provide
a similar function.
Q: What is an acceptable temperature for my hard drives and DataPAK?
A: You hard drives can run between 30-40° Celsius without any risk of overheating. The
DataPAK should trigger the fans to operate when the enclosure reaches 36° Celsius, so
ideal temperatures should also range from 30-40° Celsius.Q: Why does my eSATA device
appear as a Parallel SCSI device in System Profiler?
A: The “Serial ATA” tab in System Profile shows devices attached to the internal SATA
bus, but not always devices attached to an eSATA host card. Sometimes these devices
will appear under the heading “Parallel SCSI” instead. This is entirely normal and does not
indicate a problem with the device or its drivers.
Q: What is the difference between recoverable and persistent errors?
A: Recoverable Errors (aka Transient Error or Disk Error) represent minute errors that the
RAID system encounters during data transfers. These errors are common for RAID setups
and are not necessarily indicative of a drive failure. It is normal for any given disk in a
RAID array to occasionally encounter and report these errors, but a string of these errors
may indicate the upcoming failure of that particular disk.
Persistent Errors (aka Hard Error or Disk Failure) represent the major errors that can affect
a drive and cause it to be removed from the RAID array. This can be caused by electrical
removal (e.g. drive is physically disconnected from the controller, drive suffers electrical
failure, drive loses power, etc.) or by a failure to respond (e.g. the given disk no longer
responds to commands given by the controller). In either case, the result is a degraded
RAID set and a failed disk.
Page 21
Q: What should I do on a reboot when the DataPAK prompts me to “Re-init” the
RAID?
A: If you bought an DataPAK without drives and you want a RAID 5 with 4 disks (default RAID type) then simply insert your drives and select the “Re-init” (left) button on
the front display. DataPAK will verify the RAID 5 with 4 disks and you can select the
“-Init” (left) button on the front display to set up that RAID.
If you desire a different RAID type or disk number refer to section “4.1.2.3 RAID Tab”
in the User Manual for further instructions.
If you are simply rebooting the unit and want to return to the “Active Menu” then
let the DataPAK complete the start up cycle and it will arrive at the “Active Menu”
momentarily. Do not press any buttons on the front display.
Page 22
8. Technical Specifications
Product name/code
DataPort DataPAK
Raid Levels Supported
RAID 0, 1, 3, 5 and 10
Host Interfaces
2 - 1394b (FireWire 800): up to 800Mbs
1 - 1394a (FireWire 400): up to 400Mbs
1 - USB 2.0: up to 480Mbs
1 - SATA 3.0GHz (up to 300MB/sec)
Bridge Type: UF936QSE
Data Interface Speeds
SATA 1.5GHz (up to 150MB/sec)
Drive Types Supported
3.5” SATA hard drives (1.5G or 3.0G compatible)
Hot-Swappable Trays
Yes
Software
Configurator 2.0
System Detection
Hard Disk failure sensors, Cooling fan failure sensor, RAID failure detection
SMART status detection of hard drives
Controller Display
LCD screen with yellow backlight/control panel
Operating System
Requirements
Windows XP (2.2TB limit) and Vista
Mac OS X
Linux distributions that support FireWire
Operating Temperature
50 – 85° Fahrenheit (10 – 30° Celsius)
Operating Humidity
5% to 95%, noncondensing
Power Switch:
2 position: On / Off
Power Supply
220W Auto-ranging PSU
Cooling Fan
Dual 40mm Fans
Safety Certification
CE/FCC
External Material
Steel
Shipping Weights
21lbs sans drives, 26lbs with drives
Enclosure Dimensions
43.69mm (H) x 427.38mm (W) x 450mm (D)
Carrier Dimensions
33.78mm (H) x 138.23mm (W) x 358.80 (D)
Warranty
1-year limited warranty. See warranty statement for details and limitations.
CRU-DataPort offers phone support (800-260-9800) or email support available
at [email protected].
Page 23
DataPAK - Manual
Limited Product Warranty
CRU-DataPort (CRU) warrants the DataPAK to be free of significant defects in material and
workmanship for a period of one year from the original date of purchase. CRU’s warranty
is nontransferable and is limited to the original purchaser.
Limitation of Liability
The warranties set forth in this agreement replace all other warranties. CRU expressly
disclaims all other warranties, including but not limited to, the implied warranties of merchantability and fitness for a particular purpose and non-infringement of third-party rights
with respect to the documentation and hardware. No CRU dealer, agent or employee is
authorized to make any modification, extension, or addition to this warranty. In no event
will CRU or its suppliers be liable for any costs of procurement of substitute products
or services, lost profits, loss of information or data, computer malfunction, or any other
special, indirect, consequential, or incidental damages arising in any way out of the sale
of, use of, or inability to use any CRU product or service, even if CRU has been advised of
the possibility of such damages. In no case shall CRU’s liability exceed the actual money
paid for the products at issue. CRU reserves the right to make modifications and additions
to this product without notice or taking on additional liability.
FCC Certification
This device has been tested and found to comply with the limits for a Class B digital
device, pursuant to Part 15 of the FCC rules.
Operation is subject to the following two conditions:
1. This device may not cause harmful interference, and
2. This device must accept any interference received; including interference that
may cause undesired operation.
IT Power Systems
This enclosure is intended for use on a TN power system. This enclosure was evaluated for use on an IT power system in accordance with Norway National Differences to
IEC60950-1.
A5-001-0007 Rev 1.0
Page 24