1
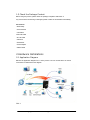
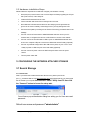
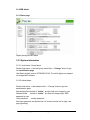
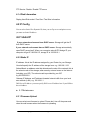
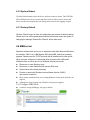
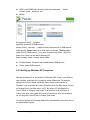
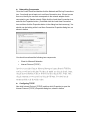
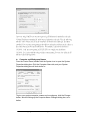
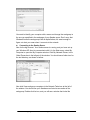
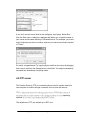
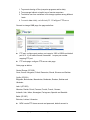
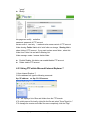
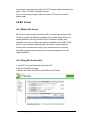
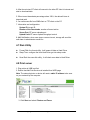
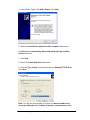
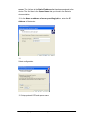
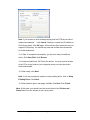
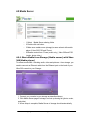
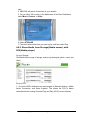
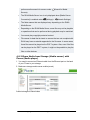
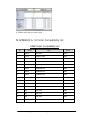
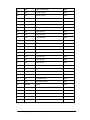
Pluscom Technologies
3.5 Network Storage
35NAS-RDC3282
User Manual
All brand names and trade makers are the properties of their
respective holders. Specifications are subjected to change
without any prior notice.
Copyright © 2008 Pluscom Technologies Limited
Table of Contents
NTRODUCTION ------------------------------------------------------------------- 1
1.1 Foreword ----------------------------------------------------------------------- 1
1.2 Product in Brief ---------------------------------------------------------------- 1
1.3 System Requirements --------------------------------------------------------- 1
1.4 Features and Specification at a glance --------------------------------------- 2
1.5 Check the Package Content --------------------------------------------------- 3
HARDWARE INSTALLATION ---------------------------------------------------- 3
2.1 Application Diagram ----------------------------------------------------------- 3
2.4 Hardware Installation Steps --------------------------------------------------- 4
CONFIGURING THE NETWORK ATTACHED STORAGE----------------------- 4
3.1Search Storage ----------------------------------------------------------------- 4
3.1.1 Search Disk ------------------------------------------------------------------ 4
3.2 Web Admin --------------------------------------------------------------------- 5
3.2.1 Status page ------------------------------------------------------------------ 5
3.2.2 System Information --------------------------------------------------------- 5
4.1.2 Network Information -------------------------------------------------------- 6
4.1.3 Service Information --------------------------------------------------------- 6
4.1.4 Disk information ------------------------------------------------------------- 7
4.2 IP Config ----------------------------------------------------------------------- 7
4.2.1 Auto IP ----------------------------------------------------------------------- 7
4.2.2 Static IP ---------------------------------------------------------------------- 7
4.3 Maintenance-------------------------------------------------------------------- 7
4.3.1 Firmware upload ------------------------------------------------------------- 7
4.3.2 System Reboot--------------------------------------------------------------- 8
4.3.3 Factory default --------------------------------------------------------------- 8
4.4 SMB Server--------------------------------------------------------------------- 8
4.4.1 Configure SMB Server ------------------------------------------------------- 8
4.4.2 Setting up Windows XP Computer ------------------------------------------ 9
4.5 FTP Server --------------------------------------------------------------------- 13
4.5.2 Using FTP within Internet Explorer 7 --------------------------------------- 15
4.6 Bit Torrent ---------------------------------------------------------------------- 16
4.6.1 What is bit Torrent ----------------------------------------------------------- 16
4.6.3 Using Bit Torrent client ------------------------------------------------------ 16
4.7 Disk Utility --------------------------------------------------------------------- 17
4.8 Printer Server ------------------------------------------------------------------ 17
4.9 Media Server ------------------------------------------------------------------- 21
4.9.1 Share media from Storage (Media server) with Xbox 360(Media Player)- 21
4.9.2 Share media from Storage (Media server with PS3 (Media Player) ------- 22
4.9.3 Share media from Storage (Media server with iTunes (Media Player) ---- 4
APPENDIX A: 5 Printer Compatibility list ------------------------------------ 25
Copyright © 2008 Pluscom Technologies Limited
INTRODUCTION
1.1 Foreword
Congratulations on your purchase of 35NAS-RDC3282! Before using and configuring the
product, please read this manual carefully so that you should get acquainted with the product
and configure it with ease.
1.2 Product in Brief
35NAS-RDC3282, the Network attached storage (NAS) system is storage devices that can be
accessed over a computer network, rather than directly being connected to the computer
(such as an external USB hard drive). This enables multiple users to share the same storage
space at once.
is the best storage solution for home or small business networks,
requiring no network experience. With capacities up to 2 Terabyte (2048 GB, Test on
35NAS-RDC3282
1.5 TB)
and with support of SATA, your valuable documents, photos, music files or
presentations can be accessed anytime by any computer on your network!
With 35NAS-RDC3282, you no longer need to set up an ftp server through home computer.
This device is more than a portable external enclosure and has an easy to configure ftp server
from its user friendly web interface; it's beyond portability in the way that users get to store and
restore data at remote location using the ftp server capability. It is a powerful mini server that
takes up to 1TB capacity, enough to meet your high storage need. 35NAS-RDC3282also have
too many other useful functions like Print server , SAMBA server on LAN , BT Download,
Supports iTunes,PS3,Xbox,USB 2.0 Storage and DHCP.
1.3 System Requirements
• TCP/IP Protocol must be installed in your PC.
• Connect NAS to a switch/hub port to connect your network.
• Basic environment for setting up this device, a local Area Network
• Available USB port (for use as a personal backup device)
• CD-ROM or DVD ROM drive
• Windows 98/2000/XP/Vista
• MAC/Linux
Copyright © 2008 Pluscom Technologies Limited
1
1.4 Features and Specification at a glance:
• Ethernet & USB2.0 combination interface
• Supports 3.5" SATA HDD
• Supports FTP and DHCP
• UPNP AV: XBOX 360 / PS3 / iTunes
• Supports Bit Torrent download
• Supports Print Server
• Supports SAMBA Server on LAN
• USB 2.0 Storage
• Throughput: Read ±9MB/s, Write ±10MB/s
• Data transfer is twice as fast as competing models
• Compatible with DSL routers/modems
• Supports DHCP server, DHCP client or fix IP
• Data Transfer rate: Ethernet up to 100Mbps, USB 2.0 up to 480 Mbps
• Supports one 10/100Mbps Ethernet port under network environment
• Password management provides secure access to HDD and web management
• Hot USB available for external enclosure, disk and HUB devices
• Drive enclosure made of aluminum alloy good for heat dissipation
• Power Activity LED light
• USB host can connect to another USB enclosure, easy to expand storage
• Software: Web based disk access management software
• Supports Plug-play and Hot-plug
Specifications
• Interface
:1X 10/100 Base-TX Auto MDI/MDI-X; 2X USB2.0 Ports
• Data transfer rate
:Ethernet up to: 100Mbs; USB2.0 up to: 480Mbs
:3.5" SATA HDD
• Suitability
• Hot Plug
:Supports Plug-play and Hot-plug
• Power
:AC input: 100 - 240V ~50/60Hz
• DC output
• Material
: 12V/3A,36W
:Pain Aluminum
• OS Compatibility
:Windows XP (SP3), Vista/ MAC OS X (10.5.X)/Linux (Samba 3.X)
Copyright © 2008 Pluscom Technologies Limited
2
1.5 Check the Package Content
Before using this product, please check the package compliance with below. If
any of these items are missing or damaged, please contact the local dealers Immediately.
Accessories:
• NAS Caddy
• User’s Manual
• LAN Cable
•USB A-B Cable
• AC UK Cable
• CD Driver
• Screwdriver
• Power Adapter
• Plastic Stand
2 Hardware Installations
2.1 Application Diagram
Below is the application diagram FIG1.1 of the product. You can use this device in various
connections as elaborated in the diagram.
FIG1.1
Copyright © 2008 Pluscom Technologies Limited
3
2.2 Hardware installation Steps
Please follows the steps below to install and configure your hardware correctly.
•
Disconnect the screws from the rear cover and Open the Caddy by pulling the I/O port
side (iron
bracket) of the caddy out.
•
Install 3.5 SATA hard disk into the case.
•
Fix the hard disk with screws from mounting hole on the side.
•
Now slides the PCB with the hard drive into the caddy's grooves right below the
groove for the screws carefully, avoid using force as you may damage the PCB.
•
Secure the face plate by screwing it to the Screw's Grooves by provided Screws in the
Package
•
Connect one end of RJ45 cable to 35NAS-RDC3282 and other end to your PC
network card, to configure it first time or to DSL Router to connect to the network.
•
Connect one end of the USB cable to USB 2.0 port on 35NAS-RDC3282 and other
end to Your computer USB port to access the HDD inside the NAS caddy. (Optional)
•
Connect any external storage device like USB memory stick, any 2.5 or 3.5 or 5.25
Caddy or printer to USB Host port on the NAS caddy (Optional).
•
Connect one end of power code to the NAS caddy and other end to the power
Socket.
•
Turn the power switch ON.
3. CONFIGURING THE NETWORK ATTACHED STORAGE
3.1 Search Storage
3.1.1 Search Disk
Note: If your PC doesn't install Java Runtime Environment, please open CD file
j2re-1_4_2-windows-i586 or from http://www.java.com/ download update file. You must install
this file. Restart your computer then
Execute "SDisk" Utility from PC then click
the “Connect” button to brows the setup web.
You will see a pop authentication dialog box asking you for User name and
password.
Default user name and password "admin/admin"
Copyright © 2008 Pluscom Technologies Limited
4
3.2. WEB Admin
3.2.1 Status page
Display storage current status
3.2.2 System Information
3.2.2.1 Host Name / Group Name
Double click status -> host and group name field -> “Change” button to get
into Identification page
Host Name: default value is STORAGE-XXXX. The last 4 digital xxxx depend
on storage MAC address.
3.2.2.2 Administrator
Double click status -> administrator field -> “Change” button to get into
administration page
Administrator field: default is “admin”, and this field can’t change by user
Password field : default is “admin”, this field will change logon WEB
password by user
Verify password
: confirm password
After input password and double click “ok” button, browser will re-login, and
pop login dialog
Copyright © 2008 Pluscom Technologies Limited
5
3.2.2.3 Date/Time
Double click status -> Date/Time field -> “Change” button to get into Date and
Time page
Date: set manual Date (yyyy/mm/dd)
Time: set manual Time (hh:mm:ss)
SNTP: enable/disable SNTP client
Time server: locate time server
Time Zone: click your current time zone in the list, and then click OK.
3.2.2.4 Firmware version
Display firmware and loader current version
4.1.2 Network Information
4.1.2.1 IP Address
Display storage IP address
4.1.2.2 MAC Address
Display storage MAC address
4.1.2.3 DHCP Server
Enable / Disable DHCP server.
Enable DHCP server, Storage default IP is 169.254.0.1
Disable DHCP server with no DHCP server environment, the storage IP is
169.254.X.X
Disable DHCP server with DHCP server environment, the storage get the IP
from DHCP server
4.1.3 Service Information
SAMBA Service: Disable / Enable SAMBA server
Copyright © 2008 Pluscom Technologies Limited
6
FTP Service: Disable / Enable FTP server
4.1.4 Disk Information
Display Hard Disk model / Free Size / Total Size information
4.2 IP Config
You can select Static IP or Dynamic IP, when you use Ftp server and printer server,
you must use Static IP address.
4.2.1 Auto IP
If your network environment have DHCP server: Storage will get the IP
from DHCP server.
If your network environment has no DHCP server: Storage automatically
open DHCP server itself. When your computer setup AUTO Assign IP, your
computer will get IP 169.254.0.X, storage IP is 169.254.0.1.
4.2.2 Static IP
IP address: this is the IP address assigned by your Router for your Storage.
You shall specify the IP address of the storage here. e.g. 192.168.1.123
Subnet Mask: an address code that determines the size of the network; this is
the subnet mask of the storage, when seen by external users on the Internet
(including your ISP). The subnet mask is provided by your ISP.
e.g.255.255.255.0
Gateway IP Address: an IP address forwards Internet traffic from your local
area network (LAN). e.g. 192.168.1.1
DNS Server IP address: you must specify DNS server IP address here if your ISP has
the said address.
4.3 Maintenance
4.3.1 Firmware Upload
You can select new firmware to upload. Please don't turn off the power and
close the web browser when the firmware is uploading
Copyright © 2008 Pluscom Technologies Limited
7
4.3.2 System Reboot
Click the Reboot button to have the device perform a software restart. The SYSTEM
LED will blink as the device restarts and then remain on if the restart is successful.
Please wait about a minute before refreshing your browser before logging in again
4.3.3 Factory Default
Click the "Reset" button to clear all configuration and restore to default settings.
Please don't turn off the power and close the web browser when the system is
changing the settings. Please click "Reboot" button after reset.
4.4 SMB server
Samba is software that can be run on a platform other than Microsoft Windows,
for example, UNIX, Linux, IBM System 390, OpenVMS, and other operating
systems. Samba uses the TCP/IP protocol that is installed on the host server.
When correctly configured, it allows that host to interact with a Microsoft
Windows client or server as if it is a Windows file and print server.
Share one or more directory trees
Share one or more Distributed file system (Dfs) trees
Assist clients with network browsing
Provide or assist with Windows Internet Name Service (WINS)
name-server resolution
Share printers installed on the server among Windows clients on the network (not
support)
Authenticate clients logging onto a Windows domain (not support)
2.4.1 Configure SMB Server
Connect to storage SMB page ,the page as bellow:
Copyright © 2008 Pluscom Technologies Limited
8
NEW: create SMB share account (folder) and password ,
account :guest password: null
Modify:
default
this page can modify as bellow
password: password of SMB account
access control : read only / read and write access control of SMB account
folder sharing: Folder List is all of exist folder on storage , Sharing List is
share folder of SMB account . If you want to share some folder , select this
folder from Folder List and add to Sharing List .
folder manage :create / rename /delete folder
Enable/ Disable :this button can enable/disable SMB account
Delete: delete SMB account
4.4.2 Setting up Windows XP Computers
Although Windows XP is very similar to Windows 2000, it has a very different
user interface, and there are a number of subtle differences. For example,
getting to the Control Panel is different than in any previous version of
Windows—one must click the Control Panel item from the Start menu (there is
no Settings item in the Start menu in XP). By default, XP will display the
Control Panel in Category View mode. If you see this, click the Switch to
Classic View item in the upper-left corner of the window. All of our directions
are for using the Control Panel in Classic View mode.
You should perform the following steps as the Administrator or another user in
the Administrators group.
Copyright © 2008 Pluscom Technologies Limited
9
Networking Components
Go to the Control Panel and double-click the Network and Dial-up Connections
icon. You should see at least one Local Area Connection icon. If there is more
than one, identify the one that corresponds to the network adapter that is
connected to your Samba network. Right-click the Local Area Connection icon
and click the Properties button. (Or double-click the Local Area Connection
icon and then click the Properties button in the dialog box that comes up.) You
should now be looking at the Local Area Connection Properties dialog box, as
shown in bellow
You should see at least the following two components:
•
•
Client for Microsoft Networks
Internet Protocol (TCP/IP)
If you do not see either Client for Microsoft Networks or Internet Protocol (TCP/IP) in
your list, you will need to add them. For either, the method is to click the Install... button,
click the type of component (Client or Protocol), and then click the Add... button. Next,
click the component you want to add, and click the OK button. You should see the
component added to the list with the others.
Configuring TCP/IP
Now click Internet Protocol (TCP/IP) and then click Properties to open the
Internet Protocol (TCP/IP) Properties dialog box, shown in bellow
Copyright © 2008 Pluscom Technologies Limited
10
If you are using DHCP on your network to assign IP addresses dynamically, select the
"Obtain IP address automatically" radio button. Otherwise, select the "Use the following
address:" radio button, and fill in the computer's IP address and netmask in the spaces
provided. You or your network manager should have selected an address for the client on
the same subnet (LAN) as the Samba server. For example, if the server's address is
192.168.1.1 and its network mask is 255.255.255.0, you might use the address
192.168.1.12 (if it is available) along with the same netmask. You can also fill in the IP
address of the default gateway.
Computer and Workgroup Names
From the Control Panel, double-click the System icon to open the System
Properties dialog box. Click the Computer Name tab, and your System
Properties dialog box will look similar to:
To give your system computer a name and a workgroup, click the Change...
button, which will bring up the Computer Name Changes dialog box, as in
bellow
Copyright © 2008 Pluscom Technologies Limited
11
You need to identify your computer with a name and change the workgroup to
the one you specified in the web page of your Samba server. Don't worry that
Windows forces the workgroup to be all capital letters; it's smart enough to
figure out what you mean when it connects to the network.
Connecting to the Samba Server
Now for the big moment. Your Samba server is running, and you have set up
your Windows XP client to communicate with it. In the Start menu, select My
Computer to open the My Computer window. Click My Network Places, in the
Other Places box in the left part of the window. You should see a folder icon for
the test directory, as shown in bellow
Now click View workgroup computers in the Network Tasks box at the left of
the window. You should see your Samba server listed as a member of the
workgroup. Double-click its icon, and you will see a window that looks like
Copyright © 2008 Pluscom Technologies Limited
12
If you don't see the server listed in the workgroup, don't panic. Select Run...
from the Start menu. A dialog box appears that allows you to type the name of
your server and its share directory in Windows format. For example, you would
enter \\toltec\test, as shown in bellow, and use your server's hostname instead
of "Toltec".
If it works, congratulations! Try copying files to and from the server by dragging
their icons to and from the Samba server's test folder. You might be pleasantly
surprised how seamlessly everything works.
4.5 FTP server
File Transfer Protocol (FTP) is a network protocol used to transfer data from
one computer to another through a network, such as over the Internet.
FTP is a file transfer protocol for exchanging files over any TCP/IP based network to
manipulate files on another computer on that network regardless of which operating
systems are involved (if the computers permit FTP access).
The objectives of FTP, as outlined by its RFC, are:
Copyright © 2008 Pluscom Technologies Limited
13
1. To promote sharing of files (computer programs and/or data).
2. To encourage indirect or implicit use of remote computers.
3. To shield a user from variations in file storage systems among different
hosts.
4. To transfer data reliably, and efficiently2.5.1 Configure FTP server
Connect to storage SMB page ,the page as bellow:
FTP port: configure port number, port range is 1025 to 65500 and default
port is 21. If you behind firewall ,remember to open port number
mapping FTP port
FTP code page: configure FTP server code page
Code page as bellow:
Central Europe (CP1250)
Croat, Czech, Hungarian, Polish, Romanian, Slovak, Slovene and Sorbian.
Cyrillic (CP1251)
Bulgarian, Belorussian, Macedonian, Moldavian, Russian, Serbian and
Ukrainian.
Latin I (CP1252)
Albanian, Danish, Dutch, Faroese, Finnish, French, German,
Icelandic, Irish, Italian, Norwegian, Portuguese, Spanish and Swedish.
Baltic (CP1257)
Estonian, Latvian, Lithuanian.
NEW: create FTP share account and password ,default account is
Copyright © 2008 Pluscom Technologies Limited
14
"guest"
Modify:
this page can modify as bellow
password: password of FTP account
access control : read only / read and write access control of FTP account
folder sharing: Folder List is all of exist folder on storage , Sharing List is
share folder of FTP account . If you want to share some folder , select this
folder from Folder List and add to Sharing List .
folder manage :create / rename /delete folder
Enable/ Disable :this button can enable/disable FTP account
Delete: delete FTP account
4.5.2 Using FTP within Microsoft Internet Explorer 7
1.Open Internet Explorer 7
2.In the address bar, type the following command:
ftp:// IP address ex: ftp://10.130.xxx.xxx
3.IE 7 will display a list of files and folders from the FTP domain
4.To quickly save a file locally, right-click the file and select "Save Target As..."
5.To manage the remote and locals files more completely, click the 'Page'
Copyright © 2008 Pluscom Technologies Limited
15
menu button on the right-hand side of the IE 7 browser window and select the
option, "Open FTP Site in Windows Explorer"
5.you can now drag-n-drop the files from remote FTP server to local file
system easily
4.6 Bit Torrent
4.6.1 What is Bit Torrent
Bit Torrent is a peer-to-peer file sharing (P2P) communications protocol. Bit
Torrent is a method of distributing large amounts of data widely without the
original distributor incurring the entire costs of hardware, hosting, and
bandwidth resources. Instead, when data is distributed using the Bit Torrent
protocol, each recipient supplies pieces of the data to newer recipients,
reducing the cost and burden on any given individual source, providing
redundancy against system problems, and reducing dependence on the
original distributor.
4.6.3 Using Bit Torrent client
1. Login BT forum and download torrent file to PC
2 Double click BitTorrent page
3. Browse and select torrent file to upload Download Queue
Copyright © 2008 Pluscom Technologies Limited
16
4. After few minutes, BT client will connect to the other BT client in internet and
start to download data
5. When torrent downloads percentage show 100%, the data will store in
download path
6. You can access file from SMB client or FTP client on the PC
7. Information and configuration:
System ID: torrent ID
Number of the Downloads: number of torrent active
Server Port: BT server uploads port
Upload Limit: BT server upload throughput control
8. Mail Notification: when user stop or remove torrent, storage will send the
mail alarm to administrator email box
4.7 Disk Utility
Format Disk: the format utility ,it will erase all data on Hard Driver
Sleep Time: configure the time Hard Driver get into sleep mode
Scan Disk :the scan disk utility , it will check error data in Hard Driver
4.8 Print server
1. Plug printer to USB host first
2. Ensure that Add Print Services is installed from WEB page
Note: The network printer or device will need a static IP address to be seen
on your network by the computer
3. Click Start and select Printers and Faxes.
Copyright © 2008 Pluscom Technologies Limited
17
4. Under Printer Tasks, click Add a Printer. Click Next.
5. Select the Local Printer attached to this computer radio button.
6. Uncheck the automatically detect and install my Plug and Play
printer check box.
7. Click Next.
8. Select the Create New Port radio button.
9. From the Type of port: drop down list choose Standard TCP/IP Port.
Click Next.
Note: You will now be prompted for 2 items: the Name or address of
server providing lpd and the Name of printer or print queue on that
Copyright © 2008 Pluscom Technologies Limited
18
server. The 1st item is the Static IP address that has been assigned to the
device. The 2nd item is the Queue Name that you found in the device's
documentation.
10. In the Name or address of server providing lpd box, enter the IP
Address of the device.
11.
Select configuration
12. Setup protocol LPR and queue name
Copyright © 2008 Pluscom Technologies Limited
19
Note: If you receive an error message saying that the "LPD server did not
respond as expected ...", click Cancel. Attempt to reenter the IP Address or
Print Queue name. Click OK again. If this process fails, the device may not
support LPR printing. You should stop now and contact the manufacturer
for further assistance.
13. If Step 10 completed successfully, you are now ready to install the
driver. Click Have Disk. Click Browse.
14. Locate and select the .INF file for the device. You may need to browse
to the CD or to the folder on your computer where you have the device
driver downloaded.
15. When ready, click Next.
Note: If you are prompted to replace or keep existing driver, click on Keep
Existing Driver. Click Next.
16. When asked to print a test page, click No. Click Next. Click Finish.
Note: At this point, you should have the device listed in the Printers and
Faxes folder. You can attempt to use it as a printer.
Copyright © 2008 Pluscom Technologies Limited
20
4.9 Media Server
o
o
o
o
1.Select Media Server sharing folder
2.Double click set button
3.Make sure media server (storage) is same subnet with media
player (X box 360 PS3 and iTunes)
4.Browse content from iTunes (music only) , Xbox 360 and PS3
(music ,photo video )
4.9.1 Share Media from Storage (Media server) with Xbox
360(Media player)
To access media files—including audio, video and pictures—from storage, you
need to connect an Ethernet cable from the Ethernet port on the back of your
Xbox 360 console to your Storage.
1. Connect your console to your storage as described above.
2. Click Media Server page of storage, and set up sharing list (photo, music,
and video)
3. When setup is complete, Media Server of storage should automatically
Copyright © 2008 Pluscom Technologies Limited
21
start.
4. XBOX360 will search for devices on your network.
5. On your Xbox 360 console, in the Media area of the Xbox Dashboard,
select Music, Pictures, or Video.
6. Select STORAGE.
7. Find the media content that you want to play, and then select Play.
4.9.2 Share Media from Storage(Media server) with
PS3(Media player)
On your Storage:
Click Media Server page of storage, and set up sharing list (photo, music, and
video)
On your PS3:
1. Go into the PS3's Settings menu and navigate to Network Settings - Media
Server Connection, and select Enabled. This allows the PS3 to detect
networked device running Universal Plug and Play (UPnP) server software.
Copyright © 2008 Pluscom Technologies Limited
22
2. When you turn on the PS3™ system,
Media Servers on the same
network are automatically detected and icons for the detected servers are
displayed under
(Photo),
(Music), and
(Video).
3. Select the icon of the DLNA Media Server that you want to connect to under
(Photo), (Music), or
(Video) in the home menu. All available folders
and files that can be played by the PS3™ system will be displayed.
4. Select the file that you want to play.
Hints for PS3
•
The PS3™ system must be connected to a network. For details on
network settings, see
(Settings) >
(Network Settings) > [Internet
Connection Settings] in this guide.
•
When the method of allocating IP addresses has been changed from
AutoIP to DHCP under the settings for the network environment,
Copyright © 2008 Pluscom Technologies Limited
23
perform another search for servers under
(Search for Media
Servers).
•
The DLNA Media Server icon is only displayed when [Media Server
Connection] is enabled under
•
(Settings) >
(Network Settings).
The folder names that are displayed vary depending on the DLNA
Media Server.
•
Depending on the DLNA Media Server, some files may not be playable
or operations that can be performed during playback may be restricted.
•
You cannot play copyright-protected content.
•
File names for data that is stored on servers that are not compliant with
DLNA may have an asterisk appended to the file name. In some cases,
these files cannot be played on the PS3™ system. Also, even if the files
can be played on the PS3™ system, it might not be possible to play the
files on other devices.
4.9.3 Share Media from Storage (Media server) with
iTunes (Media player)
1. You need to connect an Ethernet cable from the Ethernet port on the back
of your iTunes to your storage
2. Make sure storage media server enable (music)
3.select storage on shared class
Copyright © 2008 Pluscom Technologies Limited
24
4. Find the music that you want to play
5. APPENDIX A: 9 Printer Compatibility list
USB Printer Compatibility List
No.
Brand
Type
Result
1.
Canon
BJ F9000
PASS
2.
Canon
PIXMA IP1880
PASS
3.
Canon
PIXMA IP3300
PASS
4.
Canon
PIXMA IP4200
PASS
5.
Canon
PIXMA IP5000
PASS
6.
Canon
PIXMA MP130
PASS
7.
Canon
PIXMA MP145
PASS
8.
Canon
PIXMA MP180
PASS
9.
Canon
PIXMA MP450
PASS
10.
Canon
PIXMA MP730
PASS
11.
Canon
PIXUS IP2500
PASS
12.
HP
PSC 1210
PASS
13.
HP
PSC 1350
PASS
14.
HP
PSC 1410
PASS
15.
HP
PSC 1610
PASS
16.
HP
Color LaserJet 1500L
PASS
Copyright © 2008 Pluscom Technologies Limited
25
17.
HP
Color LaserJet 2550L
PASS
18.
HP
DeskJet D2360
PASS
19.
HP
DeskJet 1180C
PASS
20.
HP
DeskJet 5652
PASS
21.
HP
DeskJet 1220C
PASS
22.
HP
LaserJet 1010
PASS
23.
HP
LaserJet 2300
PASS
24.
HP
LaserJet 2420
PASS
25.
HP
LaserJet 3330
PASS
26.
HP
LaserJet P2015
PASS
27.
HP
LaserJet 1022
PASS
28.
HP
LaserJet 2200D
PASS
29.
HP
LaserJet 1012
PASS
30.
HP
LaserJet 1015
PASS
31.
HP
LaserJet 1200
PASS
32.
HP
LaserJet 1300
PASS
33.
HP
LaserJet 4350
PASS
34.
HP
Officejet 5610
PASS
35.
HP
Officejet 5510
PASS
36.
HP
Photosmart C3180
PASS
37.
HP
Photosmart C3110
PASS
38.
HP
Photosmart 7150
PASS
39.
HP
Photosmart 7830
PASS
40.
HP
Photosmart D5160
PASS
41.
Lexmark
P4350
PASS
42.
Lexmark
P6250
PASS
43.
Lexmark
Z705
PASS
44.
Lexmark
Z55
PASS
45.
Lexmark
Z43
PASS
46.
Lexmark
E120
PASS
Copyright © 2008 Pluscom Technologies Limited
26
47.
Lexmark
E230
PASS
48.
Lexmark
C510
PASS
49.
Samsung
ML1710
PASS
50.
Samsung
ML1750
PASS
51.
Samsung
ML1520LP
PASS
52.
Samsung
ML1740
PASS
53.
Samsung
ML2010
PASS
54.
Samsung
SCX4016
PASS
55.
Epson
Stylus Photo 830U
PASS
56.
Epson
Stylus Photo 915
PASS
57.
Epson
Stylus Photo RX630
PASS
58.
Epson
Stylus Photo RX530
PASS
59.
Epson
Stylus Photo RX510
PASS
60.
Epson
Stylus Photo 1270
PASS
61.
Epson
Stylus Photo 1390
PASS
62.
Epson
Stylus Photo R230
PASS
63.
Epson
Stylus Photo R270
PASS
64.
Epson
Stylus Photo R350
PASS
65.
Epson
Stylus Photo R800
PASS
66.
Epson
Stylus CX 5505
PASS
67.
Epson
Stylus CX 4900
PASS
68.
Epson
Stylus CX 3900
PASS
69.
Epson
Stylus CX 3500
PASS
70.
Epson
Stylus CX 2900
PASS
71.
Epson
Stylus C45
PASS
72.
Epson
Stylus C59
PASS
73.
Epson
Stylus C60
PASS
74.
Epson
Stylus C63
PASS
75.
Epson
Stylus C67
PASS
76.
Epson
Stylus C79
PASS
Copyright © 2008 Pluscom Technologies Limited
27
77.
Epson
Stylus C83
PASS
78.
Epson
Stylus C88
PASS
79.
Epson
Stylus C90
PASS
80.
Epson
Aculaser C3800
PASS
81.
Epson
Aculaser C9100
PASS
82.
Epson
EPL-5800
PASS
83.
Epson
LQ-300+II
PASS
84.
Epson
LP-2500
PASS
85.
Epson
LP8900
PASS
86.
Epson
Picture Mate PM250
PASS
Copyright © 2008 Pluscom Technologies Limited
28