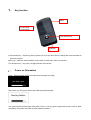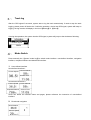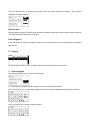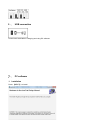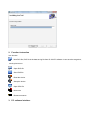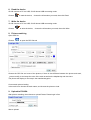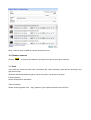
1
..
MOTORader
TM
GPS Data Logger
And Location Finder
User Manual
Ver01
1、
Key function
Menu
Power/mode
Power/mode
Five direction key
USB jack
Power/ Mode key----Press long time to power on/ off. Press short time to change the mode and back to
previous interface.
Menu key---Open the menu interface, and to back to main menu from any interface.
Five direction key----Up, down, left right direction and confirm.
2 、 Power on Orientation
Press 【Power/ Mode key】5 seconds enter the power on image.
GPS Data Logger
After power on, the system start to get GPS signal automatically.
Searching Satellites
The system finish the first signal fixing after 3 mins, if can not get the signal will continue until fix. After
orientation, the system will enter the user defined interface1.
3
、 Track log
After the GPS signal fix succeed, system start to log the track automatically. If need to stop the track
logging, please power off the device. If while the operation, device lost GPS signal, system still keep on
logging, the log records will display in the list of【History】of 【Menu】
If during the operation, the system lost the GPS signal, system will jump out the window as following:
Information
System
Lost GPS signal!
Yes
Units
4、
Mode Switch
Press menually the 【power/ mode key】to switch mode interface: user-defined interface, navigation
interface, compass interface and altitude fall interface.
1. User-defined interface
User-defined interface1:
Current Speed
Current Altitude
Current Time
User-defined interface 2:
Current Speed Current Altitude
Elapsed Distance
Current Time
Users can define the interface items and pages, please reference the instruction of user-defined
interface
2. Directional navigation
Next Distance
Current Speed
Display the distance to next direction, current speed, next waypoint direction(● means your place, X
means the direction to next waypoint.)
Next distance:the beeline distance to next waypoint
Traveled distance: the distance from the start point.
Directional navigation is a simple navigation function realized by setup the waypoint and track in PC
software. (Please reference the instruction of Track Planning for detail).
Directional Navigation has two modes: waypoint navigation and track navigation. The difference is
waypoint navigation is only using one point, track navigation is combined by many waypoints.
During track navigation, once you arrive to the diameter range of 30 meters of the point, the device will
move to the next point direction.
Once during navigation, the user missed one point or deviation from the right place, the pointer of device
in the interface will point to the nearest point.
When arrive to the last waypoint, the system will inform the user: Arrive to the destination.
Arrive Destination
Current Speed
3. E-compass
In this interface, there are Compass, Current altitude, and current temperature information.
N
Current Altitude
Current Temp.
W
E
S
4. Altitude Fall information
Press the 【Five direction key】to adjust the altitude and the distance of each metre. Altitude range is
50M~100KM,distance range is 200M~10000KM
5. setup
5
、 Menu
Choose 【Navigation】enter the navigation interface
Navigation
History
Waypoint
Basic
There ware Navigation, History, Save waypoint, Basic setting, Satellite status
1. Navigation
Choose the 【Navigation】 enter the navigation interface
By Route
By Waypoint
Back to Start
Finish Navi.
Navigation interface have different modes. By route, by waypoint, Back to start etc.
By Route
Route planning is done in the PC software. It combined many way points.
track
track
Choose the route name and press five direction key to enter the list
The user can choose any waypoint as start. Use five direction key to choose and confirm enter the point
information interface. Then choose navigation to start navigation
Navi.
Back
Delete
By Waypoint
Choose waypoint to enter the list
Use five direction key to choose and confirm enter the point information interface. Then choose
navigation to start navigation
Navi.
Back
Delete
Back to start
During waypoint logging, if need to back to the start, please choose this function. Back to start will set up
the start point as the direction to navigate.
End navigation
If the user needs to stop the navigation, please use the five direction key to choose the stop navigation
and confirm.
2. History
track
track
This is the list of tracks. If need to delete, please use the five direction key to delete.
3. Save waypoint
Use the five direction key to choose save waypoint
Yes
No
This interface has waypoint name, current time, and coordinates information.
Use Five direction key to choose the waypoint name and enter the capitalize keyboard input interface.
Del.
Blank
Save
Use five direction key to enter small letter input
Dial the five direction key to
back to capitalized letter input
Dial five direction key to choose coordinates and enter numbers input
Save
Dial
to N and choose
to switch to S,and also use
to E and choose
to switch W。
4. Basic setting
Setup the information display, system, backlight, unit, time, track and GPS MOD
Information
System
Display
Unit
Info display
Current Speed Current Altitude
Current Speed
Self define
Self define
urrent Time
Choose the user define to setup the interface. Maximun there are 4 parts.
System setup
Language
Language
Altitude calibration
Compass calibration
Altitude Correction
Language
Alitude calibration
Compass calibration
Compass calibration
Current Speed
Current Altitude
Current Time
Current Temp.
Elapsed Time
Elapsed Dist.
Language
Altitude Calibration
Compass Calibration
显示设定
Display setup,
Setup the back light time
Backlight
Always
Unit setup
Temperature
F
Distance
Metric
Time setup
Time Format
24 hours
Time Zone
Track setup
Setup the mode of track logging
Record format
Smart record
Record Time
Sec.
Smart mode: only log in moving
Timing mode: always logging
GPS mode
Normal
5. Satellite Info
Sat.Statues
6 、 USB connection
Connect the USB cable to charging and using PC software
7、
PC software
1. Installation
Press 【NEXT】 to install
2. Function instruction
Icon function
New DLG file, DLG file is the data saving file from GL100 PC software. It can save the waypoints,
tracks, pictures etc.
Open DLG file
Save DLG file
Read the device
Setup the device
Open GPX file
New route
Distance measure
3. PC software interface
4. Mark the waypoint
Choose
, right click the map, choose new waypoint, then set up the name and icon.
5. Route planning
Choose
, right click the map, to choose new route. Plan the first point, then right click the map, to
add more waypoints.
Double click the point, it shows the information of this point.
6. Read the device
GL100 connect to PC via USB, GL100 shows USB connecting mode.
Choose
to read the device, choose the information you need, then click Read.
7. Write the device
GL100 connect to PC via USB, GL100 shows USB connecting mode.
Choose
to write the device, choose the information you need, then click Write
8. Picture matching
Open GPX file
Choose
to open the GPX file tool
Choose the GPX file and route of the pictures, if there is time different between the picture and track,
youcan modify it. And setup the color of the track as well as the diaphaneity and time zone
The picture will display on the map in the matched waypoint
Current track picture loading.
In the track list to choose the track name, and choose the picture to load.
9. Upload to PICASA
After picture matching, then choose to upload Picasa. Please login in first.
Start to upload
Note: If need to save as KMZ file, please choose the route.
10. Distance measure
Choose
to measure the distance, left click the mouse on the map to measure.
11. Track
In the track list, select the track name, the altitude fall , photo matching, track data are showing in the
right lower corner.
Show the altitude and distance gap fig, choose any point, can shows in the map.
Picture matching
Shows all the picture information
Track information
Shows all the waypoints, edit (copy, paste etc ) the waypoint and save it as GPX file.