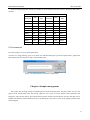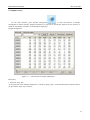
1
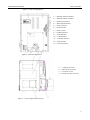
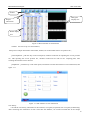
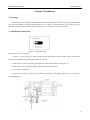
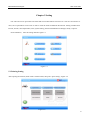
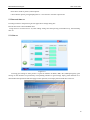
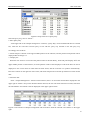
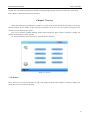
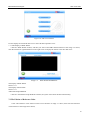
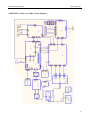
Operator Manual
Auto Hematology Analyzer
Hem-o-test 18RT
BioGenTechnologies GmbH
Von-Langen-Weg 10
D-48565 Steinfurt
Tel.: 02551/4090 Fax.: 02551/1298
www.biogentechnologies.de
e-mail: [email protected]
BGT BioGenTechnologies
Hem-o-test 18RT
Contents
Chapter 1 Profile ........................................................................................ 4 1.1 Overview ..................................................................................................................................................... 4 1.2 Detection Principle ...................................................................................................................................... 7 1.3 Performance introduction .......................................................................................................................... 13 1.4 Structure and operation .............................................................................................................................. 16 Chapter 2 Installation ............................................................................... 22 2.1 Package ...................................................................................................................................................... 22 2.2 Installation requirement ............................................................................................................................. 22 2.3 Machine installation................................................................................................................................... 23 Chapter 3
Blood Analysis ................................................................... 26 3.1 Operational Readiness ............................................................................................................................... 26 3.2 Boot Process .............................................................................................................................................. 27 3.3 Count Interface .......................................................................................................................................... 27 3.4 Sampling .................................................................................................................................................... 29 3.5 sample counting ......................................................................................................................................... 31 3.6 Power off ................................................................................................................................................... 36 Chapter 4
Maintenance ....................................................................... 38 Chapter 5 Setting ...................................................................................... 39 5.1 Printing Setting .......................................................................................................................................... 39 5.2 Date and time set ....................................................................................................................................... 40 5.3 Gain set ...................................................................................................................................................... 40 5.4 System settings .......................................................................................................................................... 41 5.5 Password setup .......................................................................................................................................... 42 5.6 Reference value ......................................................................................................................................... 42 5.7 User name set............................................................................................................................................. 43 Chapter 6 Sample management................................................................ 43 6.1 Sample review ........................................................................................................................................... 44 Chapter 7 Service ..................................................................................... 47 7.1 A/D wave ................................................................................................................................................... 47 7.2 The Edition of Reference Value ................................................................................................................. 48 7.3 Packaging Service ...................................................................................................................................... 49 7.4 The Exchange of Hemolysin...................................................................................................................... 49 7.5 Add Pre-diluents Liquor ............................................................................................................................ 49 7.6 Detecting Head Soak ................................................................................................................................. 49 7.7 Strong Enzyme Liquor Soak ...................................................................................................................... 49 7.8 The Exchange of Diluents.......................................................................................................................... 50 2
BGT BioGenTechnologies
Hem-o-test 18RT
Chapter 8 Quality Control Calibration ..................................................... 50 8.1 The Preparation of Calibration .................................................................................................................. 51 8.2 Whole Blood Parameter Setting ................................................................................................................ 51 8.3 Pre-diluents Parameters Setting ................................................................................................................. 52 8.4 Automatic Calibration ................................................................................................................................ 52 8.5 LJ Quality Control ..................................................................................................................................... 52 8.6 XB Quality Control.................................................................................................................................... 53 8.7 Restore Default Settings ............................................................................................................................ 53 APPENDIX 1: Hem-o-test 18RT Series Packing List ..................................................................................... 54 APPENDIX 2:Hem-o-test 18RT MENU ...................................................................................................... 55 APPENDIX 3: Hem-o-test 18RT Circuit Diagram .......................................................................................... 56 APPENDIX 4: Hem-o-test 18RT Power Panel Schematic Diagram ............................................................... 57 APPENDIX 5: Copyright Statement ............................................................................................................... 58 APPENDIX 6: Brief Operation Instruction and Notice ................................................................................... 59 3
BGT BioGenTechnologies
Hem-o-test 18RT
Chapter 1 Profile
1.1 Overview
The user's manual, including Hematology analyzer operation and general maintenance instructions, in order
to maintain optimum performance of the machine, follow the manual instructions.
●
Name and Scope
Instrument name is "Hem-o-test 18RT Automatic Hematology Analyzer."
It is used to detect blood of red blood cells, white blood cells, platelet count and HGB three
categories.
The instrument is mainly used for quantitative measurement of blood parameters of 19 and 3
Histogram:
1
2
3
4
5
6
7
8
9
10
11
12
13
14
15
16
17
18
19
20
21
22
●
WBC
Ly#
Mid#
GRan#
Ly%
Mid%
GRan%
RBC
HGB
HCT
MCV
MCH
MCHC
RDW-cv
RDW-sd
PLT
MPV
PCT
PDW
WBC Histogram
RBC Histogram
PLT Histogram
Product Classification
Instrument classification standard description:
4
BGT BioGenTechnologies
Hem-o-test 18RT
According to Chinese Medical Equipment Management Classification: Belonging to the blood
analysis system of Clinical Laboratory analytical instruments(6840), the management category
for class II.
Classification by electric shock: Class Ⅱover-voltage transients, rated pollution degree 2.
Classification by character of service: Continuous operation equipment.
●
Reagents, quality content and standard content
Reagents, quality content and equipment constitute a system, must be used as a whole to ensure that all
products have received the test of manufacturer.
Recommend the company’s assorted reagents, referring to special reagents exclusively for the Hematology
Analyzer, these reagents have been tested with this instrument and all qualified, do not use different quality
content or reagents provided by other suppliers ,otherwise will not achieve its performance targets, without the
test reagents may provide unreliable data.
Each reagent before use must be checked, container damage may affect the quality of reagents. If the box is
damaged, check for if have leaks or moisture within the interior. If yes, do not use the reagents. The use of
chemical reagents needed to understand the use of precautions. Reagents should be used and stored at room
temperature.
Attention
In order to properly and safely use the kit, please refer to the
label on the box and valid data sheet.
◆ Dilution
Dilutions in dilute the blood samples at the same time provide the similar environment with plasma for
blood cells to ensure a certain period of time to maintain the volume of blood cells do not change, and provide a
conductive environment for the blood cell count.
◆ Hemolytic Reagent
Hemolytic reagent can rapidly destroy the red cell membrane, and let cell debris to reduce the volume to not
interfere with the analysis of white blood cells. Thus, white cell can be classified by three groups.
Hemolysis agent can and hemoglobin to form stable compounds, this complex absorbency and hemoglobin
5
BGT BioGenTechnologies
Hem-o-test 18RT
concentrations are concerned.
For the correct White blood cells three classification, PL - 6A hemoglobin and White blood cells analysis
hemolysis reagent must with PL - 6A series dilutions supporting the use.
◆ probe solution
It is an enzyme-based cleaning solution and wetting agents. For the sampling needle, piping and count pool
cleaning, the probe solution is a specific reagents, the solution will not damage the road part of the analyzer.
◆ cleaning fluid
◆ HB enzyme concentration cleaning fluid
HB containing enzyme cleaning solution is a kind of isotonix cleaning fluid based on enzymatic cleaner and
wetting agents. Used for cleaning tube and count pool. This cleaning solution is a kind of special reagents, not
damage the analyzer of liquid road section.
For machine maintenance
◆ Quality Control Substance
Quality control substance used to calibrate and quality inspection.
Quality control substance is a commercial production of whole blood products for the testing equipment
functioning properly or not. Quality control substance is with a low, medium and high value of three. Every day
three quality control substances can be used to check the machine running condition, ensuring the veracity and
reliability of measurement results.
●
A Note of Caution
• Hem-o-test 18RT Automatic Hematology Analyzer only for in vitro analysis of human blood, no other specific
uses.
•Only allow the use of special reagents mentioned in this manual, or they will not guarantee the reliability of
measurement data.
• Please read this manual carefully before operating equipment and save it for later use.
• If the equipment has the odor or smoke, immediately cut off the power, and contact with the company’s
after-sales engineer, continue to use the equipment may cause fire, electric shock or injury.
• If the liquid inflow into the instrument, or equipment leak, cut off the power immediately and contact the
company after-sales engineers, continue to use the equipment may cause fire, electric shock or injury.
•Do not block vents of after the case, as they are for ventilation to ensure reliable operation of the instrument.
• For your safety and reliable operation of equipment, the machine used must have a good grounding power
lines.
• Please abide by all the health and safety standards, including (but not limited to) the operation and
maintenance of the equipment should be equipped with protective goggles, gloves, and appropriate
experimental equipment.
●
Safety Symbols:
Full text of this book will prompt these symbols where necessary to warn of potential dangers.
6
BGT BioGenTechnologies
Hem-o-test 18RT
Indicates the presence of biological risk
Ignore this signal or misoperation equipment will
cause operators to death, serious injury
Ignore this signal or misoperation equipment will
cause operators to death, serious injury
Expressed the hope that the information you need
know to keep instrument performance
● Additional information
The company will occasionally send operation, maintenance additional information of the machine, please read
the manual and add it to inspection.
● Maintenance Services
If the equipment does not work, please refer to the manual instructions in Chapter VII.
If according to the instruction of Chapter VIII, still can’t trouble removal, please contact with the company
after-sale technical service department (contact see annex I).
1.2 Detection Principle
Cell counting principles
The blood sample is measured by the instrument need to be diluted by the specified dilution ratio to measure
WBC, RBC, PLT and HGB and other parameters.
The dilution samples of WBC, RBC counting chamber under negative pressure, separately through their
respective counting pore, the amount of fluid flowing through the fenestral is the sample volume of the
instrument for analysis.
This machine uses impedance measurement to test quantity and size of WBC, RBC and PLT. Electrodes
insert in the liquid on both sides of the counting hole and build a field environment, under the blood cells of
non-conductive nature, when a cell by counting the pores, it will lead to changes in impedance, changes in the
size of the impedance and cell volume is proportional .As Image 1-1
7
BGT BioGenTechnologies
Hem-o-test 18RT
Image 1-2 A small electrical pulse produced by Blood cells
Instrument calculates each cell and classifies them according to size. In this way, the instrument measured
the number of cells more than the manual method of measuring the number of cells under a microscope and to
overcome the manual count of the impact of human factors and subjective to reduce the statistical error, to fully
enhance the accuracy of the count.
Control of the test sample
● Volume measurement
A certain amount of diluted sample respectively flows through the RBC 70μm and WBC 70μm aperture
diameter pores were counted, using the time to calculate the volume of the instrument, the vacuum in certain
circumstances, the amount of fluid flowing through the hole and time is proportional to.
Sample dilution
In the blood, all kinds of cells overlap so that it can not be accurately counted and measured the size of the
volume, so the use of diluents on blood samples need to be diluted, the diluted blood cells of a single hole
through the hole, while providing conductive environment for the count, To completion of cell number and
volume measurement.
In the condition of whole blood, mixed with 13uL whole blood and 3.5mL dilution, the sample will be
1:270.
The 1:270 diluted sample into two parts.
Take 15.6uL the 1:270 diluted sample and 3.9mL of the diluted solution mixed,to form 1:45000 sample
and to measure and count red blood cell and platelet
Leukocyte will dilute 0.5Ml the rest of the hemolytic plus 1mL diluted mixed, form 1:385 sample and to
measure and count Leukocyte.
8
BGT BioGenTechnologies
Hem-o-test 18RT
In the pre-diluted mode, take 20uL Peripheral blood and 1.1mL Diluted mixed(outside dilution),to forma
1:81 sample.
Suck 0.7ml’s 1:81 sample and mix in WBC pool。Then Add 1.1ml Dilution into WBC pool to form 1:263
sample.
The 1:263 diluted sample into two parts。
Take 15.2uL 1:263 diluted sample and 3.9mL of the diluted solution mixed,to form 1:45000 sample and
to measure and count red blood cell and platelet
The rest of 1:263 sample and 0.5mLHemolytic mixed then plus 0.5mLDilution ,to form 1:378 sample and
to measure and count Leukocyte.
After the second dilution and before count,Hemolytic agent will be added into WBC to dissolve the red cell
membrane samples, usually erythrocytes 1000 times more than leukocytes 1000 time, before measure white
blood cell, red blood cell must be eliminated its interferencered firstly,Red blood cells are usually without
nuclei, Hemolytic agents can play elimination of white blood cells diluted the role of red blood cells.
Relative to the dilution, the cell impedance is much greater, and this is the mechanism of the counting process,
when cells by counting the holes, it will generate higher than the original instantaneous dilution resulting
impedance. The size of the impedance change is proportional to the volume of the cell, the instrument will
change the impedance caused by the amplification of pulses and recorded,As image 1-2。
● Cell Size
Cells by counting the holes, the resulting electrical pulse amplitude and its volume are proportional to the
size of the larger cells to produce electrical impulses by a big margin. Cells by hemolytic agents and the role of
diluent, the volume distribution are as follows:
WBC: 30~400
fL
RBC: 25~250
fL
PLT:
fL
2~30
As the volume difference, the instrument can be counted in the same pool according to the level of
electrical pulses, respectively, of RBC and PLT counts.
In Image 1-2,A representative of PLT plus signal, B and D representative of RBC signal, C compared with
the PLT pulse signal is too small and considered a circuit instrument noise or cell debris, collected in the normal
threshold setting, A as to be PLT count, C have been removed.
It seems that the volume of PLT and RBC are significantly different, in fact, each cell has a range of
volume distribution, forming a bell curve, they cross the curve close to each other, sometimes crossing the curve
a large extent, be used special measures to distinguish between RBC and PLT. The instrument approaches with
9
BGT BioGenTechnologies
Hem-o-test 18RT
floating boundary markers to distinguish between RBC and PLT to improve the accuracy of measurement
results.
●White blood cell (WBC) unit
Structure
Image 1-3 WBC cell structure
● White blood cell (WBC) unit
Obtained by direct measurement of pulse number。
WBC = n × 10 9 / L
● WBC classification
WBC according to the size of the volume, it has a variety of forms, while the volume of the size of various
forms of WBC is not fixed, as diluent, hemolysis and hemolytic agents on the time of the volume of parts will
be changed. In certain procedures under the control of chemical reactions can reveal WBC three categories lymphocytes, intermediate cells and neutrophils.
Lymphocytes is the smallest white blood cell, after the reagents, they are mainly distributed in the volume of the
size range of 30fL ~ 85fL.
Lymphoid and myeloid cells are intermediate between: eosinophils, basophils, mononuclear cells. Add a
hemolytic agent, they are mainly distributed in the volume of the size range of 85fL ~ 125fL.
Neutrophils are the largest white blood cells, after mixed the hemolytic agent, cell membrane damage, the
release of the cytoplasm, the residual cytoplasmic particles are compressed between the nucleus and cell
membrane damage. In general, after the hemolytic agent, the volume of neutrophils distribute within the 125fL.
By direct measurement of cells through the holes when the pulse height distribution of holes to get WBC
size distribution histogram obtained by the following formula for the percentage of classification:
PL
Ly %= PL + PM + PG ×100%
10
BGT BioGenTechnologies
Hem-o-test 18RT
PM
Mid %= PL + PM + PG ×100%
PG
Gran %= PL + PM + PG ×100%
PG = The cell number in the neutrophil cell region
Ly#、Mid#、Gran #
can be obtained by calculating of the following formula:
Lymph% × WBC
100
Ly#=
Mid % × WBC
100
Mid#=
Gran% × WBC
100
Gran#=
●
Hemoglobin(HGB)unit
After being added to hemolytic agent for the diluted blood samples, the red blood cells will be dissolved,
and release hemoglobin, Hemoglobin combined with hemolytic agent can form complex, the monochromatic
light with wavelength 540nm measured the intensity of this compound in WBC count pool, we can get the
hemoglobin concentration of the samples(blank refers to the stats of WBC count pool when there is only dluent)
after compared the through intensity with the empty state of the through intensity. The equipment will complete
the two testing process automatically and then calculate and show the print results (in unint of G / l).
Light transmission intensity of the blank
The sample transmittance intensity of )
HGB= Constant × Log 10 (
● Red blood cell(RBC)unit
● Structure
Image 1-4 RBC structure
11
BGT BioGenTechnologies
Hem-o-test 18RT
●Red blood cell(RBC)amount
Obtained by direct measurement of pulse number
RBC = n × 1012 / L
●Mean volume of red blood cells (MCV)
The equipment will count the electrical pulse that generated when every cells passed the RBC probe, and
then classified and summaried by the size volume size, finally they will be corrected by the microprocessor to
calculate the average volume MCV of all RBC.
●Hematocrit(HCT)、Mean corpuscular hemoglobin concentration(MCH)and Mean corpuscular hemoglobin
concentration (MCHC)
Calculate the HCT、MCH、MCHC by the following formula:
RBC × MCV
10
HCT(%)=
HGB( g / L)
RBC (/ L)
MCH(pg)=
HGB( g / L)
HCT (%) × 100
MCHC(g/L)=
● Red blood cell distribution width coefficient of variation (RDW)
It is obtained from the RBC histogram. The percentage can express volume distribution coefficient of
variation.
●Platelet(PLT)amount
It is obtained by direct measurement of pulse number.
PLT = n × 109 / L
●Mean platelet volume (MPV)
It is obtained by PLT histogram calculation, unit fL.
●Platelet distribution width (PDW)
It is obtained by PLT histogram. Geometric standard deviation for platelet volume distribution(10 GSD).
● Monitoring block hole
Human blood contains proteins and other particles. The proteins and particles will stick on the count holes
and pipes during the sample counting process and this will affect the result of measurement after a long time
accumulation.
Holes blocking can be avoided by high-voltage ignition after each sample collection and the daily and
12
BGT BioGenTechnologies
Hem-o-test 18RT
weekly maintenance. On the other hand, the equipment has the function of block hole monitoring. When the
counting time is out of range, the equipment will emit an alarm to warn the users of the hole blocking problem.
1.3 Performance introduction
Equipment structural classification:
Model
Structure and Function
8-inch 800 × 600-TFT color LCD screen, panel-type thermal printer, built-in puncture
sampling and dilution devices , intelligent bar code scanning , Intelligent volume
Automatically send samples,automatic mixing device,automatic intelligent maintenance
system,automatic cleaning, automatic
Hem-o-test
18RT
rule out the block and automatic maintenance of enzyme cleaning solution)、reagents
automatic temperature control system, intelligent Fault Alarm System,Micro-computer
keyboard and mouse, Precision screw drive mechanism、Support on line network data
transmission, support serial data communications、Intelligent voice prompt system.
8-inch 800 × 600-TFT color LCD screen, panel-type thermal printer, built-in puncture
sampling and dilution devices , intelligent bar code scanning , Intelligent volume
Automatically send samples,automatic mixing device,automatic intelligent maintenance
system,automatic cleaning, automatic
Hem-o-test
18RT
rule out the block and automatic maintenance of enzyme cleaning solution)、reagents
automatic temperature control system, intelligent Fault Alarm System,Micro-computer
keyboard and mouse、Graphical touch screen operation、Precision screw drive mechanism、
Support on line network data transmission, support serial data communications、Intelligent
voice prompt system.
●Count and volume calculation principle
Small hole resistance method
● Parameter explanation
Parameter
Abbreviation
Unit
Basic parameters:
13
BGT BioGenTechnologies
Hem-o-test 18RT
Number of white blood cell
WBC
109/L
Number of red blood cell
RBC
1012/L
Hemoglobin
HGB
g/L
Number of platelets
PLT
109/L
Results obtained by histogram:
Lymphocyte percentage
Ly%
%
Intermediate cell percentage
MO%
%
Neutrophil percentage
GR%
%
Mean red blood cell Volume
MCV
fL
Red blood cell distribution width standard deviation
RDW-sd
fL
Red blood cell distribution width coefficient of variation
RDW-cv
%
Mean platelet volume
MPV
fL
Platelet distribution width
PDW
%
Platelet hematocrit
PCT
L/L
Results obtained by calculation:
Number of lymphocyte
Ly#
109/L
Number of intermediate cell
MO#
109/L
Number of neutrophil
GR#
109/L
Red blood cell hematocrit
HCT
L/L
Mean corpuscular hemoglobin
MCH
pg
Mean corpuscular hemoglobin concentration
MCHC
g/L
●Hemoglobin measurement principle
Absorbance of hemoglobin
Central wavelength
540nm
●Sample characteristics
puncture sampling
Sample volume required for each analysis
Whole blood sample (venous)
13μL
Pre-diluted sample(peripheral blood )
Volume calculation
20μL
400μL add hemolytic agent diluent/each time WBC measurement
300μL the second diluent/each time
RBC and PLT measurement
Hemolytic agent volume
1mL(whole blood),1mL(peripheral blood)
Dilution ratio
WBC/HGB
RBC/PLT
Whole blood
1:270
1:45000
Periphery blood
1:263
1:45000
14
BGT BioGenTechnologies
Hem-o-test 18RT
Micropore size
WBC micropore size: 70um (Diameter), 70um (Length)
RBC micropore size: 70um (Diameter), 60um (Length)
Test time: less than 60s/once.
● Performance Index
Parameter
Indication
range
Comparability
Linearity
Range
Linearity Error
Repeatabili
ty(CV%)
WBC(109/L)
0.0-99.9
≤±5%
0.5-10.0
≤±0.5×10⁹/L
≤1.5
10.1-99.9
≤±5%
0.00-1.00
≤ ±0.05×10¹²/L
1.01-8.00
≤±5%
10-100
≤±10×109/L
101-999
≤±10%
20-70
≤±2g/L
71-300
≤±3%
——
——
RBC(1012/L)
PLT(109/L)
HGB(g/L)
MCV(fL)
●
0.0-9.99
0-999
0-300
0-999
≤±2.5%
≤±8%
≤±2.5%
≤±3%
≤1.2
≤4
≤1.1
≤0.5
Indication
8inch TFT colourful LCD, resolution ratio is: 640 by 480;
●
Input and output
One RS232/C interface: Use this interface to connect the computer for serial communication and upload
the data, and transmit the computer control order.
One standard PC network interface: Use this interface to connect the computer for network communication
and upload the data, if necessary the software transporting is available.
One PS2 keyboard interface: This interface can be used to connect the standard keyboard to transport the
data.
One PS2 mouse interface: It is used to connect the standard mouse.
One print interface: Standard collateral print interface, can connect the EPSON LQ-300K and the outside
stylus printer.
Two USB interface: After setting the driver programs it can be used to connect the printer outside which
has a USB interface. It also can be used to import and export the data.
●
Built-in thermal record instrument: Beijing Wei Huang WH-A76R90
●
Outside printer: EPSON LQ-300K+
●
Reagents
Dilution solution: PL-6A dilution solution
Hemolytic agent: PL-6A Haemoglobin and White cell analyzer Hemolytic agent.
15
BGT BioGenTechnologies
Hem-o-test 18RT
HB strong enzyme washing solution: HB Probe washing solution.
●
Power Supply
Voltage: AC 110V-240V 47 Hz-63 Hz
Power Supply: 150VA
Fuse: AC 250V F2AL
●
Work environment
Environment temperature range: 10℃~35℃
Relative humidity range: ≤85%
Atmospheric pressure range: 70.0~106.0kpa
Power supply: AC 110V-240V
47Hz~63Hz
Environment limitation condition for transportation and storage
Storage temperature range: -10℃~+40℃
Storage humidity range: ≤93%
Atmospheric pressure range: 50.0Kpa~106.0Kpa
●
Appearance size:
40cm(L)*39cm(W)*46cm(H)
●
Weight: 25KG
●
Optional configuration: There are some optional accessories for you to choose, and if you choose it, the
additional charge will be paid by your-side, pls see the below table:
1
bucket
optional
Service manual
1
book
optional
3
Data wire
1
pc
optional
4
Software CD
1
pc
optional
5
Printer
1
pc
optional
1
Blood taken pipe
2
20μL
EPSON LQ-300K+
1.4 Structure and operation
The machine is made up of sample dilution and assign unit, sample test unit, low noise magnify circuit,
photoelectricity test system, touch screen and keyboard control system, microprocessor control system, LCD
display, sample result output system and power supply system. Kindly pls see below detail:
●
Mainframe
16
1 ---- Touch/Display
BGT BioGenTechnologies
Hem-o-test 18RT
Figure 1-5 The front appearance
1 ---- Washing solution interface
2 ---- Dilution solution interface
3 ---- Hemolysin interface
4 ---- Waste liquid interface
5 ---- Power interface
6 ---- Earth terminal
7 ---- Power switch
8 ---- Parallel interface
9 ---- Serial interface
10 ---- USB interface
11 ---- Network interface
12 ---- PS2 interface
13 ---- Printer interface
Figure 1-6The back appearance
1 ---- Analog mu-circuit
2 ---- Built-in micro printer
3 ---- Governor circuit
4 ---- Pump valve driven circuit
Figure 1-7 circuit clapboard sketch map
17
BGT BioGenTechnologies
Hem-o-test 18RT
Figure 1-8 Mask button
●Touch screen
Among “Hem-o-test 18RT auto hematology analyzer”, Hem-o-test 18RT is touch screen, Hem-o-test 18RT
is not touch screen, non-touch screen model use mouse and keyboard to operate.
According to the content which appear on the screen, touch the related place to finish the related function.
After open the system and self-checking, which appear the main menu like figure 1-9.
18
BGT BioGenTechnologies
Hem-o-test 18RT
Figure 1-9 main menu
Above have seven submenu:[measure],[set up],[maintain],[service],[sample],[quality control],[shut down].
[measure]:built a window of [sample data setup] to manage the information of patient and doctor, select of
take blood mode, print the test result, etc.
[set up]:built [print setup],[plus setup],[ password management],[factory setup],[time setup],[date
setup],[system setup] to set up the system.
[Maintain]:can finish the work of wash pipeline, detect electric motor.
[service]:buit nine options to finish the hole voltage test, A\D waveform testing, reference value edit,
packaged service, add prediluent, dip probe solution, dip dense enzyme solution, change diluent, change
hemolysin.
[Sample]: built [list review],[ histogram review] to inquire sample data.
[Quality control]: built seven options to correct the various parameters.
[Shut down]: to shut down the machine.
●Button panel
Three panel button finish the rapid operation of hematology analyzer, [Emergency] button is to enter the
emergency mode, [start]button is to test rapidly,[Power]button is to open , shut down the machine rapidly.
●screen display
19
BGT BioGenTechnologies
Hem-o-test 18RT
Toolbar
Histogram
Display area
Sample
information
Result display
area
Figure 1-10host interface of measurement
Toolbar:this area set up six control button;
Setup area of sample information: ID number, number, bar code number and service position No.;
[measure]button:push this key on the touch panel, machine would ask for inputting the service position
No., after inputting the service position No., machine would scan bar code on the
scanning the machine start to measure.
sampling plate, after
[edit]button:push this key on the touch panel, would enter into the edit interface of case information, like
figure 1-11
Figure 1-11 edit interface of case information
Case history
Can edit the case history information in this interface, can input by keyboard, also can input by handwriting.
After measuring this information is been stored into the database, can consult recorded data in the sample
20
BGT BioGenTechnologies
Hem-o-test 18RT
management, please refer to §6.1 sample review.
[print]button:push the print button can start to print.
[Mode selection]: press this key to enter into test mode as per figure 1-12, this interface can perform test mode
setting. Grey background means functioning.
Figure 1-12 test mode setting interface
[Backspace]: Press this key can back to main menu interface
Counting area: this area display all the parameter's test value and reference value and warning etc
●Menu display
Figure 1-15 Main menu
21
BGT BioGenTechnologies
Hem-o-test 18RT
Chapter 2 Installation
2.1 Package
Check machine outer package carefully and see whether the package was broken during transportation and
then open the machine to check machine's packing list. If there is anything missed or not comply with per
packing list, Please contact with our after-sales service or our distributor in your local market.
2.2 Installation requirement
Figure 2-1 Right door lock
● Attention on first case opening
In order to avoid damage for infeed needle during transportation, please cut the nylon's belt between
motor M2 and rotation board. Detail procedures are as below:
1, Push the key as arrow's direction, open right side panel of the machine as per figure 2-1
2, Find the belt where positioned between motor M2 and rotation board.
3, Use scissor to cut the belt
4, Prepare all necessary reagent such as dilution, hemolysin, waste liquid container etc. for machine's
commissioning use.
22
BGT BioGenTechnologies
Hem-o-test 18RT
Figure 2-2 Sample needle assembly
●Installation environment
Environment should be as clean, no mechanical vibration, no major noise source and power supply
interference, do not near the brush-type motors, fluorescent lights flicker and electrical contact devices. Avoid
direct sunlight or near a heat source and air source.
●Space requirement
Caution
Machine and reagent should be positioned on the same level
This machine should be placed on lab desk and the desk should big enough to place necessary reagent.
Power requirement
This machine required a AC220V power supply. The supply voltage fluctuation is required from AC110V
to AC240. The machine's frequency is 50Hz.
Machine should connect with correct voltage and should install proper fuse
Caution
Machine should connect with correct voltage and
should install proper fuse
2.3 Machine installation
Risk of biological contamination
Samples, reagents, quality control materials, standard
materials and biological waste have potentially infectious
hazards. Standard laboratory protective clothing should be worn,
wear gloves, as to comply with the safe operation rules of
laboratories.
Warning
There are potential biological infectious on the sharp
sampling needle, it is necessary to avoid to contact with sampling
23
BGT BioGenTechnologies
Hem-o-test 18RT
●Connect with liquid pipeline
Dilution's connection
Remove the dilution rubber tube from attached bag. Take out the barrel which filled with dilution, put one
end of liquid guide tube into dilution barrel as per figure 2-3 and then screw the barrel lid clockwise. Connect
another end of liquid guide tube with "dilution" connector (white color) then screw it tightly clockwise.
Figure 2-3 Dilution's connection
● Hemolytic Agent Connection
Take out the hemolysin hose component from the annex bag.
Let one end of the guide liquid tube connect with hemolytic agent bottle and he other end connect the back of
the instrument “hemolytic agent” liquid road connector (yellow), clockwise tighten.
Figure 2-4 Hemolytic Agent Connection
● Waste liquid catheters connection
Take out the waste liquid catheters from the annex bag.
Let the red fluid catheters road junction connect with the back of the instrument “waste liquid” liquid road
connector (red), clockwise tighten.
24
BGT BioGenTechnologies
Hem-o-test 18RT
Waste barrels with the instrument placed on the same level as high as or lower than the location of this
instrument.
Put the other end of the waster catheters into waste barrels.
● Connection of the distilled water
Take out the distilled water rubber hose component e from the annex bag.
Let one side of the catheter connect with the distilled water bottle, and the other side clockwise screws
with connectors (from up to down, the first one or the blue one) of distilled water on the back of the instrument.
Wastewater treatment
Risk of biological contamination
Samples, reagents, quality control materials, standard materials and
waste liquor etc have potentially Bio communicable dangerous.
Should wear standard laboratory protective clothing; wear gloves, to
comply with the provisions of the safe operation of laboratory.
Warning
User obligation to abide by local, national waster water discharge of the
relevant provision
Recorder Paper Installation
Click the recorder button on the recorder top right, open the recorder door.
The rolls of paper being put into the paper feed port, print face-up, face the thermal head; paper head above
the door edge, close the recorder door.
Press the green light button, green out, press the red light button, goes a paper. Paper to go the end, the
normal recording paper installed.
Press the green light button, the green light comes on, recorder in working condition.
■
Printer
If the system is equipped with printer, use the printer cable connect the printer with the instrument printer
interface before the instrument boot.. After the device boot, open the printer power supply, when operating
[print], the result data is automatically output to an external printer.
For the specific installation, use of the printer, see the printer manual
25
BGT BioGenTechnologies
Hem-o-test 18RT
Chapter 3
Blood Analysis
This chapter contains six elements:
Operational Readiness、Power On、Count interface、Blood Sample Collection、Blood Count、Power off
3.1 Operational Readiness
Before the power is turned on, the operator shall check according to following steps, these steps will
ensure that the system is ready, completion of these checks will help the normal operation of this instrument.
●Check diluents, hemolytic agent
The dosage of the various reagents:
PL-6A
Diluents
PL-6A
Hemoglobin and
Leukocyte
Analysis
of
Hemolytic Agent
Washing liquid
(distilled water)
Power on Wash
70
5
/
Single Time
30
1
/
Auto Wash
80
5
15
Power off Wash
80
5
15
20
/
/
12
4
/
Model
Operation
Block
-removing/wash
up
Replace or Priming
●Check the waste barrels
Users bring their own waste barrels; discard the waste liquid in the waste barrels.
Risk of biological contamination
Samples,reagents, quality control materials, standard materials and
waste liquid etc have the risk of potentially biological infectious. Should
wear standard laboratory protective clothing, gloves, and comply with the
Warning
User obligation to abide by local, national waster water discharge of the
relevant provision
26
BGT BioGenTechnologies
Hem-o-test 18RT
●Check fluid lines and cables
Check diluents, hemolytic agent, waste water pipe is bent, the connection is reliable.
Check if the power plug of the instrument is connected the socket safely.
●Check Recorder, Printer
Check the papers of Recorder, Printer are adequacy, the installation is in place, check whether the printer
power supply into power outlet, whether the printer cable to connect with the host is ready.
Note: when power supply of the external printer is open, the instrument will auto identify test report need to be
printed to an external printer, inner thermal printer is invalid, need to be printed in the inner thermal printer,
please turn off the external printer power supply.
3.2 Boot Process
If equipped with an external printer, press the printer power on, verify the printer is ready.
●Host Boot Process
1、Open this instrument host power
2、Self-test screen display will be shown as Figure 3-1, the system automatically detect the hardware,
cleaning pipes, doing this at the end of measurement.
3、 After the self-test process into the counting interface.
Figure 3-1
3.3 Count Interface
Press “Count Instrument” on the main menu to enter the count interface. And press “Back” to main menu
(see figure 3-2)
27
BGT BioGenTechnologies
Hem-o-test 18RT
Toolbar
Histogram
Display area
Sample
information
Result display
area
Figure 3-2
● State indication area
In the lower left quarter of the screen, from left to right: sampling type, measurement mode, system state, see
picture 3-2
Sampling type: BATCH and SINGLE sampling optional
Measurement mode: WHOLE BLOOD and PRE-DILUENT optional
System state: READY
Enter MODE SET in measurement interface to set the mode
Figure 3-3
Press the relevant button, the selected item indicates dark gray, return to the measurement interface after set,
the state set succeed at the same time.
● Background detection
Background detection should be run when power on, cleansing, and when next item No. is 0.
Background range as followed:
28
BGT BioGenTechnologies
Hem-o-test 18RT
parameter
Background range
WBC
≤
0.2 × 10⁹ / L
RBC
≤
0.02 × 10¹²/ L
HGB
≤
1g/L
PLT
≤
10 × 109 / L
If the background test result is out of range, see it as malfunction.
3.4 Sampling
Risk of biological contamination
samples, reagents, quality control materials, standard materials and waste
fluid have potentially biological infectious hazards. Standard laboratory
protective clothing should be worn, wear gloves, to comply with the
provisions of the safe operation of laboratories.
Warning
Don’t touch the patient’s sample directly!
operators in blood samples of patients to maintain adequate care operations in order to avoid infectious
diseases.
To wear hand-held surgical gloves when taking blood samples of patients
● blood anticoagulant
recommended K2EDTA anticoagulants, the content defined as 1.5-2.2 mg / mL blood. K2EDTA is an ideal
anticoagulant, it can maintain the red blood cells and white blood cell count in the detection and classification
of morphological stability.
● configuration of peripheral blood samples
1. choose PRE-DILUENT mode
29
BGT BioGenTechnologies
Hem-o-test 18RT
Figure3-4
Press MODE SELECT, choose pre-diluent in measurement set. Return to measurement interface after set.
See picture 3-5.
Figure3-5
2、Add diluent:
Take a clean test tube on the injector, press [with liquid] key to enter with liquid interface as shown in
Figure 3-6, each instrument adding 1.6mL diluent.
30
BGT BioGenTechnologies
Hem-o-test 18RT
Figure3-6
Select the liquid position in this interface, push the start with liquid instruments automatically fun the
function of pre-dilution.
3. configuration sample:
① Use the 20μL blood sampler to collect sample, be careful not to squeeze hard tissue fluid mixed with blood
samples from fingertips to create the results inaccurate.
② use clean paper towels, lint attached to the outer wall of the blood in the tube.
③ Inject the sample immediately into sampling cup filled with 1.6mL dilution.
④ fully mix the sample
⑤test the samples after placed about 2 minutes.
Caution:
①diluted sample after place for too long can not guarantee the accuracy of counting.
②Avoid any contamination into the diluent.
3.5 sample counting
whole blood batch measurement operation
Do the following operation under WHOLE BLOOD mode.
31
BGT BioGenTechnologies
Hem-o-test 18RT
Figure3-7A
Press the button “Mode setting”, and enter the interface like Picture.
Set it as “Batch Mode”, and return to measurement interface.
Open the sample device, and take out sample disk. First shake the blood samples manually to an average
state, and then put them into sample devices one by one. Be careful that the bar code of blood sample should
face the groove of sample disk, so it’s convenient to scan. Shake blood samples to an average state by sample
disk, so it’s helpful to the accuracy of the measurement results. Put sample disks to sample devices, and close
the cover.
Press button “Measure”, it begins to scan bar code, measure and clean. After the measurement, it will show
all the results and histograms. These data is recorded in the database. In “sample management”, measurement
record can be looked up.
Measurement for Emergency Diagnostics:
In batch measurement, if the case is emergent, press button “Emergency diagnostics”, the dialog for
emergency diagnostics will appear in Picture 3-7B.
Figure3-7B Selection Picture of Emergency Diagnostics Position
32
BGT BioGenTechnologies
Hem-o-test 18RT
Select emergency diagnostics position, press “OK” button, and enter emergency mode. And the station
column shows as: emergency position, 10. See the following picture 3-7C:
Figure 3-7C Emergency position measurement
Emergency position measurement begins after the present measurement finished. The following
measurement continues after emergency measurement.
Single Measurement for Whole Blood:
Press button “mode setting”, and enter the interface as following:
Set it as “single mode”, and return to measurement interface.
Open the sample device, and take out sample disk. First shake the blood samples manually to an average
state, and then put them into sample devices one by one. Be careful that the bar code of blood sample should
face the groove of sample disk, so it’s convenient to scan. Shake blood samples to an average state by sample
disk, so it’s helpful to the accuracy of the measurement results. Put sample disks to sample devices, and close
the cover.
Press button “measure”, the following picture 3-7D will appear:
33
BGT BioGenTechnologies
Hem-o-test 18RT
Picture 3-7D Position Selection
Select position which is ready for measurement in dialog 1-18, and press “OK”. The dialog will close and
it begins to scan bar code, measure and clean. After the measurement is finished, it will show all the
measurement results and histograms.
The record will be kept in database. The records can be looked up in “samples management”.
Pre-dilute mode is the same as whole blood mode
Set printing methods:
Press 【set】in main menu, and enter the following interface as 3-8. Select printing settings as picture 3-8:
Picture 3-8
34
BGT BioGenTechnologies
Hem-o-test 18RT
Picture 3-9
As to printing form, there are four kinds to choose
Chinese parameters with histogram
Chinese parameters without histogram
English parameters with histogram
English parameters without histogram
If it needs to connect external printer, first confirm that the connection is all right, and then turn the printer on.
The device can recognize the external printer automatically. After blood analysis is finished, the external printer
will print the results automatically.
Operation of Counting
Counting operation:
Placed the the anticoagulant venous blood under sampling needle, Press [Start] button, counting began, when
hear the "beep" is heard, the sampling needle lift, remove exploitation of blood vessels, equipment start
processing samples. Counting process of "prompt zone" Show Count Process, Count of about 1 minute to
complete, instruments issued by a "beep" sound, the sampling needle back to the initial bits, counting results
showed that screen, "ID" number plus one automatically, then continuously test next sample.
Pre-dilution counting operation:
According to the previous pre-diluted sample solution prepared a good pre-diluted sample solution on the
sampling needle, press [Start] button, counting started. When the sampling needle lift, the removal of blood,
began to measure the working process with the whole-blood model.. About 1 minute later, the counting results
showed that screen, "ID" Number plus one automatic.
35
BGT BioGenTechnologies
Hem-o-test 18RT
Attention
Fine-needle aspiration samples in the sampling process, the sampling
needle to the bottom of the cup should not touch the sample cup to
maintain the interval, otherwise it may affect the accuracy of
smoke-like
●
After analysis, the results will be displayed on screen. If the "auto print" is set to "open", recorder, or
printer automatically output analysis results
●
In the counting process, if it fails, the fault information area will show alarm information
If the room temperature below 10 ℃ or above 35 ℃, blood analysis results at this time will not be
reliable.
●Results are displayed:
After the blood sample analysis, screen will show the results of 19 parameters and WBC, RBC, PLT three
histograms. Linear range of the parameters is as follows.
Screen display, record and print out a high limit the scope of the following:
Parameter
Display
Limit
Range
High
Parameter
Display
Limit
Range
WBC
99.9 × 10⁹/L
MCV
250.0 fL
Ly#
99.9 × 10⁹/L
MCH
999.9 pg
Mid#
99.9 × 10⁹/L
MCHC
999 g/L
Gran#
99.9 × 10⁹/L
RDW-sd
100.0 fL
Ly%
100.0%
RDW-cv
100.0 %
Mid%
100.0%
PLT
999 × 109/L
Gran%
100.0%
PDW
30.0 %
RBC
9.99 × 10¹²/L
HGB
300 g/L
HCT
100.0 %
PCT
MPV
High
99.9 × L/L
30.0 fL
3.6 Power off
Entering the main interface (figure 1-11),press power off button“
”or Power button (figure 1-10).
Instrument inhale 1.3ml E-Z liquid to soak the Counting Pool for 20 minutes, and then cleans the pipeline
automatically.
Users can press [Stop] button to end soaking early after 5 minutes` soak, and then clean the pipeline
36
BGT BioGenTechnologies
Hem-o-test 18RT
automatically.
● Processing waste
Risk of biological contamination
Samples, reagents, quality control substance, the standard
materials and liquid waste and other potentially infectious
biological risk.
Please wear Standard laboratory protective clothing, wearing
gloves, to comply with the provisions of the safe operation of
laboratory
Warning
User have the obligation to abide by local, national waste water
discharge of relevant provisions
● cleaning
Cleaning operations play a clean sample needle, WBC count pool, RBC count the role /replacement swabs
associated piping.
In the main menu touch [System maintenance] key, enter the system maintenance interface]. Touch [clean
pipe] key to enter the cleaning process
● Cleaning /replacement swabs
When the instrument work for 30 days or count accumulated up to 2000 samples, we recommend users to
clean swab
When the machines work 300 days or a total count of 30,000 samples, we recommend users to replace
swabs.
● Packing
When the instruments need more off-site of distant metastases, the need for the implementation of packaged
process equipment..
1. Emptying liquid Rd.
2. Washing with distilled water pipe.
3. Emptying pipe.
4. Fixed sampling needle up and down components, before and after exercise.
37
BGT BioGenTechnologies
Hem-o-test 18RT
Chapter 4
Maintenance
Make sure to operate this precise instrument as introductions and maintain it periodically for long-time
working and reliability.
The pollution caused by the overflow and leakage will not only impact on the analytical results, but also
the function of the instrument, therefore the overflow and leakage should be wiped immediately and air drying
is avoided. If there is leakage inside, ask operator or serviceman to repair it.
This chapter gives the maintenance of the pipelines and the detection method of other parts
System Maintenance has 9 parts including cleaning pipelines, excluding stoppages, emptying count pool,
high-voltage ignition, replacement of diluent, replacement of hemolysin, perfusion of counts pool, reset of
electric motor, valves/ pumps test, electric motors test, aging test, packaging, etc. figure 4-1
Figure 4-1
Press the button according to customer’s requirement.
38
BGT BioGenTechnologies
Hem-o-test 18RT
Chapter 5 Setting
Our sales and service personnel will install and test machine before customer use it. For the convenience of
users, lots of parameters can be reset in order to meet the needs of different laboratories. Setting includes Print
Format, Version, Time adjustment, Gain, System Setting, Password and Reference Ranges, totally 7 options.
Press OK button,enter the setting interface figure 5-1.
Figure 5-1
5.1 Printing Setting
After opening the machine, Print mode is manual mode, then press “print setting”, Figure 5-2
Figure 5-2
39
BGT BioGenTechnologies
Hem-o-test 18RT
Print choice :built-in printer ,external printer
Choose built-in printer,press[print]key,built-in heat-sensitive recorder output result.
5.2 Date and time set
In settings interface click[time set],at first appear hour settings dialog box
Present Time Zone: China Standard Time
Using mouse or touch screen to set, after ending settings and then pressing confirmation key, then finishing
time set
5.3 Gain set
Figure 5-4
Pressing gain settings to enter picture 5-4 gain set interface for WBC, RBC, PLT, HGB passageway gain
settings. In the interface to input directly corresponding number for gain settings. Paying much attention to is
that unauthorized personnel shall not engage in this operation, must input password and then can be set.
Figure 5-5
40
BGT BioGenTechnologies
Hem-o-test 18RT
● WBC passageway gain settings
Adjustment WBC passageway gain to be aimed at adjusting WBC column diagram shape.
Figure5-6
Figure5-7
When most blood samples as picture 5-8, illustrating WBC passageway gain is little ,so need to add WBC
passageway gain.
When most blood samples as picture 5-9, illustrating WBC passageway gain is large, so need to decrease
WBC passageway gain.
●RBC passageway gain settings
When MCV measured value of QC and set value have over 5% deviation, then need to alter
RBC
passageway gain to adjust MCV measured value.
Adjustment ratio as below:
MCV QC reference value: 90.0fL.
MCV QC measured value: 98.0fL.
Setting adjustment rate of RBC option to be most close to value of 91.8
●HGB passageway gain settings
By adjusting HGB passageway gain to change HGB background voltage.
To adjust HGB background voltage between 4.4-4.5V
5.4 System settings
In settings interface press [system setup] key, and then enter system setup operation interface as picture
5-8.
41
BGT BioGenTechnologies
Hem-o-test 18RT
Figure5-8
Clicking directly all kinds of parameters to set
5.5 Password setup
Figure5-9
In settings interface, pressing [password management]key and then enter into input password operation
interface like picture5-9.According to the requirement to input correctly and then can set password successfully.
5.6 Reference value
Laboratory is based on normal group settings normal reference value range see picture 5-10 to 5-14,if the
measured results is more than the scope, then will be considered a clinical abnormalities. The operator can reset
the top and bottom limitation of 19 parameters. Once the measurement results is more than range, then there
will be "H" or "L" marks in the measurement results back of display output, printer output or recorder output to
show the test results over range.
On the main interface, please press “Service”→ “Reference Edit”→ press “Category” to select the
reference you want, the selected reference will be the new reference, and then press “Back” to save the data and
exit.
42
BGT BioGenTechnologies
Hem-o-test 18RT
Press the related parameter directly and modify it, the chart below lists the relevant “Reference data chart”
selected
Normal
Parameter
Min
Max
Parameter
Min
Max
WBC
4.0
10.0
MCV
80.0
100.0
LY#
0.8
4.0
MCH
20.6
35.0
Mid#
0.1
1.5
MCHC
310
370
Gran#
2.0
7.8
RDW-cv
11.0
16.0
LY%
20.0
40.0
RDW-sd
34.0
54.0
Mid%
2.0
10.0
PLT
100
300
Gran%
50.0
70.0
MPV
7.4
12.5
RBC
3.50
6.00
PCT
10.0
22.0
HGB
110
170
PDW
0.100
0.260
HCT
0.3
0.5
5.7 User name set
Use name setting is to set up the hospital name.
As below 5-1 image showing, press “User name set” and then dialog box “pls enter hospital name”, please edit
the hospital in the box and press “OK” when finishing edit.
Kreiskrankenhaus Musterstadt
Figure 5-10 The dialog box to edit the hospital name
Chapter 6 Sample management
This model has the huge storage of 20,000 patient results with histogram; and the system can save the
patient result automatically after the testing. Operator can review all of the patient result parameter and
histogram, and print the data by the internal thermal printer and the external printer, and also the data can be
deleted and checked, and the checked result can be displayed in the form of a list or the singular patient result
with histogram.
43
BGT BioGenTechnologies
Hem-o-test 18RT
6.1 Sample review
On the main interface, press “Sample management
” to enter the interface of Sample
management as below showing. Sample management is purposed to provide the function for the operator to
check the stored data, calculate CV and histogram displaying.
Sample management
Figure 6-1 :The interface of sample management
Data Query
1. Select the query Way
At the upper left of the “Sample management ” interface, “Query Way” can be founded and its relate box below
can provide the query ways as below:
44
BGT BioGenTechnologies
Hem-o-test 18RT
Figure6-2 Drop-down box of Query Way
Select the query way, such as “ID No.”
2. Enter Query Way
At the upper left of the “Sample management ” interface, “Query Way” can be founded and there is a related
box, touch the box and enter relevant query in line with the query way selected on the left query way
accordingly such as ID No.
3. Touch and press “Search” in the upper middle position of the interface, and the patient result queried will be
displayed like the Image 6-2.
3.1 Display All
When the user wants to review all of the patient results in the data library, touch and press“Display All”in the
upper middle position of the interface, all of the patients results will be displayed. And all the data can not be
displayed in one screen when too much data has been stored, and the scroll bar is to produce automatically.
Press the scroll bar on the right size of the chart, and touch and press the scroll bar up and down to check all the
data
3.2 Print the data
Enter “ Sample Management ” from the main interface, there is no “Print the selected data” displayed in the
upper right or “Detail” .Only on the interface that the data list, the user can touch and select an result, and “Print
the selected data” and “Detail” both are displayed in the upper right as below:
Figure6-3 The interface of Sample management and two bottom “Print the selected” and “Detail” on the upper
right
45
BGT BioGenTechnologies
Hem-o-test 18RT
Touch and press “Print the selected” and start to print.
3.3 Patient Detail
Touch and press “Detail” to enter the interface of “Detail” as below:
Figure “Detail” Interface
“Detail” interface displays the selected stored data. The basic information such as name, gender is displayed
in the upper left, and the tested result is displayed in the below left; histogram of WBC,RBC, PLT shows on the
right size.
On the below right there are six buttons: “Previous”, “Next”, “Print”, “Back”, “Super User” and
“Modify
and Save”;
Press “Previous”,the data of the previous patient will be displayed;
Press “Next”,the data of the next patient will be displayed;
Press “Print”,the data of the selected patient will be printed;
Modify and Save the patient data;
Touch “Super User”, the dialog box will be popped to ask for the passwords, and enter the password and
press “Confirm”; when the passwords is valid, the user can modify the results and the button “Modify and
Save” is active, press it to save the modified result.
3.4 Calculate CV
As the image 6-1 showing the interface of sample management, there is a box on the left size of the chart,
please touch and select some results for calculation and press “Calculate CV” and the calculation is finished.
46
BGT BioGenTechnologies
Hem-o-test 18RT
And the user can check the calculation result by touching and pressing the scroll bar on the below of the chart.
Press “Back” to be back to the previous interface.
Chapter 7 Service
When the customer has purchased our product, our sales and post-sale personnels will help to set up and
test the machine for our clients. To provide more convenience to the user, our own system can support some
necessary service functions for option.
Our service function includes diluting, Probe liquid immersion, thick enzyme immersion, Change the
diluents and hemolytic or other optional.
On the main interface, press “Service” to enter the service interface.
Image 7-1 Service
7.1 A/D wave
Press “A/D wave” to enter the interface of A/D as the image7-2 shows. This interface is mainly to display the
tested data wave or A/D data acquisition.
47
BGT BioGenTechnologies
Hem-o-test 18RT
Figure 7-2 A/D wave interface
Used to display the measured data wave or the A/D data acquisition wave
7.1.1 The Display of WBC DATA
Click the “WBC DATA” bottom, and then you will see the WBC DATA interface as the image 7-3 shows,
click the leftward or rightward bottom in the right corner to display the former or the later data wave.
Image 7-3
WBC DATA INTERFACE
The Display of RBC DATA
Same as 7.11
The Display of PLT DATA
Same as 7.11
A/D DATA ACQUISITION
Click the “A/D DATA ACQUISITION” bottom, the system will collect the data automatically.
7.2 The Edition of Reference Value
Click “edit reference value” bottom on the service interface as image 7-1 shows, then enter edit reference
value interface as the image shows below,
48
BGT BioGenTechnologies
Hem-o-test 18RT
7-4
Item. inferior limit of the reference value, the superior limit of the reference value
Choose the classification then click the item of which to change the superior and inferior limit, you will see
a keyboard, enter the value you want to change to, then click “enter”. Others are the same as this method.
7.3 Packaging Service
This is used by the manufacturer or the maintainer; to avoid losing of the data, users please do not operate it.
7.4 The Exchange of Hemolysin
Press “exchange hemolysin” bottom, then you will see the progress bar, when the exchange is completed,
the progress bar will close itself.
7.5 Add Pre-diluents Liquor
Put the soft test-tube in the NO.1 work station, press “add pre-diluents liquor”, then you will see the
progress bar, the sampling probe will add quantitive diluents liquor , after that ,the progress bar will close itself.
7.6 Detecting Head Soak
Put the soft test-tube in the NO.1 work station which is full of detecting head soak liquor, but not too much
liquor. Then press “detecting head soak” bottom, the equipment will do it automatically and after that the
progress bar will close itself
7.7 Strong Enzyme Liquor Soak
Soak solution need apply the strong enzyme liquor; operation method is the same as the detecting head soak.
49
BGT BioGenTechnologies
Hem-o-test 18RT
7.8 The Exchange of Diluents
Clean the tube and the air bubble in it.
Press “exchange diluents” bottom, the equipment will exchange the diluents automatically, after that, the
progress bar will close itself.
Liquid waste disposal
Biological Pollution!
Sample、reagent、quality control staff、standard staff、and waste liquor
have the potential danger of biological infectivity. Users should wear
Warning!
。Users have the obligation to abide by the stipulation about the waste
liquor discharge.
Chapter 8 Quality Control Calibration
The quality control equipment is used to ensure the accuracy of the test value.
Press quality control bottom on menu interface, then come to the quality control interface as the image
below shows .there are 6 bottoms in it ,whole blood parameter setting 、pre-diluents setting 、automatic
calibration、LJ calibration、XB calibration and restore default value.
Figure8-1 Quality control calibration interface
50
BGT BioGenTechnologies
Hem-o-test 18RT
8.1 The Preparation of Calibration
Use the calibrated staff and quality control liquor offered by our company .the calibration will go
automatically.
This equipment includes whole blood mode and pre-diluents mode, two calibrated parameter will come out
automatically.
The equipment must have been checked whether it is in normal situation before the calibration. If any
problems emerge, stop the operation. Check whether the reagent and other auxiliary staff is enough
Check the samples and make sure the test value is reasonable.
Test the samples repeatedly and make sure the equipment in its accuracy range
Parameter
Repetitiveness(CV%)
WBC (7.0-15.0×10⁹/L)
RBC (3.5-6.0×10¹²/L)
HGB (110 – 180g/L)
MCV (80.0 – 110.0fL)
PLT (100 - 500×109/L)
≤ 1.5
≤ 1.2
≤ 1.1
≤ 0.5
≤4
Please get record of every calibration. records include: calibrated date、batch number of the calibrated
items、standard value of the calibration, the test value of WBC、RBC、PLT、HGB and MCV.
8.2 Whole Blood Parameter Setting
Press “whole blood parameter setting” on the quality control calibrated interface as image 8-1 shows ,then
come to the whole blood parameter setting interface as the image below shows .users can use whole blood
parameter setting to narrow the difference when there exists greater error. But this should be done by
professionals; otherwise the equipment will not work well.
Press the parameter that you want the change. You will see a number keyboard, input the figure then press
“enter” bottom.
HGB bottom is used to set the target value of the sample, after that press calibration bottom.
The equipment should be calibrated and in the best condition before leaving the factory and the set parameter
should be default values.
Pressing “restore default settings “bottom can bring you to the default values
51
BGT BioGenTechnologies
Hem-o-test 18RT
Figure8-2 whole blood parameter setting interface
8.3 Pre-diluents Parameters Setting
The operation method of pre-diluents parameters setting is the same as §8.2.
8.4 Automatic Calibration
Backup bottom
8.5 LJ Quality Control
Press LJ quality control bottom, then come to the LJ quality control interface as the image below shows.
Figure8-3 LJ QUANLITY CONTROL
52
BGT BioGenTechnologies
Hem-o-test 18RT
Get the blood sample ready, if the samples are new, press “setting” bottom in the right corner of the interface,
then come to the dialog box as the image below shows.
1. Press add bottom, add a record of the new blood sample in the dialog box, double click the relevant rank,
for example ”WBC” ,then input the target value .after that, press “back “bottom.
2.Put the blood sample on work station 1, then press “begin” bottom, the difference of measurement will
display on the image. The central line is the target value.
Image8-4 QUALITY CONTROL SETTING DIALOG
8.6 XB Quality Control
The operation of XB quality control is the same as LJ quality control, but XB quality control should take the
average value among three times of test.
8.7 Restore Default Settings
The equipment should be calibrated and in the best condition before leaving the factory and the set parameter
should be default values.
Pressing “restore default settings “bottom can bring you to the default values
Caution!
The data can be considered as available only after the equipment has been calibrated.
The using of sample and reagent is the QA (quality assurance) of the calibration. Users should adopt the ones
we recommend.
Store the samples correctly, use the reagent within the validity, before the calibration, restore the sample to room
temperature, and blend the sample until it is well-distributed.
The frequency of the calibration: after maintenance or deviation appears during calibration, in which condition,
calibration is required.
53
BGT BioGenTechnologies
Hem-o-test 18RT
APPENDIX 1: Hem-o-test 18RT Series Packing List
Hem-o-test 18RT PACKING LIST
NO.
ACCESSORY NAME
1
QTY
UNIT
PRODUCTS MANUAL
1
PCS
2
CERTIFICATE
APPROVAL
1
PCS
3
POWER WIRE
1
PCS
4
TYPING PAPER
57×35mm
1
PCS
5
MOUSE
OP-220
1
PCS
7
FUSE
2A
2
PCS
8
SAMPLE CUP
20
PCS
9
ANTI-FREEZING PIPE
5
PCS
10
SOFT TEST TUBE
20
PCS
1
SET
11
SPECIFICATION
OF
SILICONE TUBE
2mL
Φ12mm×80mm
12
PL-6A DILUENT
5L
13
PL-6AHEMOGLOBIN
&WBC
HEMOLYTIC
AGENT
500mL
14
HB DENSE ENZYME
WASHING LIQUID
50mL
15
HB PROBE WASHING
LIQUID
20mL
REMARKS
BARREL
CONTAINED
IN REAGENS
PACKAGE
1
BOTTLE
CONTAINED
IN REAGENS
PACKAGE
1
BARREL
CONTAINED
IN REAGENS
PACKAGE
BOTTLE
CONTAINED
IN REAGENS
PACKAGE
1
1
BGT BioGenTechnologies GmbH
HOTLINE:02551/4090
PHONE FOR REAGENT:02551/4090
SERVICE LINE:02551/4090
54
BGT BioGenTechnologies
Hem-o-test 18RT
FAX:02551/1298
ADD:Von-Langen-Weg 10 D-48565 Steinfurt
APPENDIX 2:Hem-o-test 18RT MENU
Hem-o-test 18RT MENU
55
BGT BioGenTechnologies
Hem-o-test 18RT
APPENDIX 3: Hem-o-test 18RT Circuit Diagram
56
BGT BioGenTechnologies
Hem-o-test 18RT
APPENDIX 4: Hem-o-test 18RT Power Panel Schematic Diagram
57
BGT BioGenTechnologies
Hem-o-test 18RT
APPENDIX 5: Copyright Statement
Copyright
BGT BioGenTechnologies GmbH 2010
Number of edition: 1.0
Date of publish: May 1st, 2010
Product instrument: Hem-o-test 18RT
License NO: Permission for medical device production issued by Jiangsu Food and Drug Administration
2001-0750
Register NO. Jiangsu Food and Drug Administration 2010 2400967
Standard operated NO, YZB/Su 0851-2010
Statement:
BGT BioGenTechnologies GmbH (BGT for short) possess the copyright of this non-public publish guidebook.
The guidebook is only used as common reference of operating, maintaining and repairing BGT’s Hem-o-test
18RT. Nobody is allowed to public the contents of this guidebook.
Some contents of this guidebook are proprietary protected by copyright law. Without permission of BGT, any
part of this guidebook can not be copied, reprinted and translated to other languages.
BGT does not have any obligation of the guidebook. And we are also not responsible for the errors of
information in the guidebook and the damage carried up by the guidebook’s supply.
The contents of the guidebook can be changed without any notice.
Obligation of Manufacturer
BGT will be responsible for the safe, reliability and performance of the machine only under the condition:
Installation, edition upgrading, system expansion, improvement and repair are all done by the ones confirmed
by BGT.
Please use the reagents designated by the manufacturer. We will not be responsible for the damage made by the
use of the non-designated reagents.
Warning
Hospitals and other institutions which use this instrument have to make maintenance schedule.
BGT will provide circuit diagram used in repair and the method of how to calibrate this instrument, when the
customers need it. It can help customers to repair some parts of this machine which can be repaired by
themselves under the permission of BGT.
BGT is not responsible for the damages made by customers’ incorrect operation.
Contact Us
BGT BioGenTechnologies GmbH
Von-Langen-Weg 10
D-48565 Steinfurt
Tel.: 02551/409 Fax.: 02551/1298
Web: www.biogentechnologies.de
E-mail: [email protected]
58
BGT BioGenTechnologies
Hem-o-test 18RT
APPENDIX 6: Brief Operation Instruction and Notice
Operation Instruction
1. Prepare before start up
Check whether the reagents are enough or not, and check whether the reagents is good or not.
Make sure the reagent pipeline is ok, and empty the waste liquid bottle.
2. Start Up
ress the power switch in the back of instrument to the position of “1”, then the machine automatic starts up
and begins power-on self-test. If everything is OK, the screen will display the count interface.
3. Background Count
Press the “start” button, the instrument begins to count
the result is as below:
WBC≤0.2 RBC≤0.02 HGB≤1
PLT ≤ 10
4. Whole Blood Test
Press the “Menu” button, choose the “Mode” button, and set the mode to “Whole Blood”.
Use EDTA2K as ticoagulant to make blood specimen ( the quantity of EDTA2K, 1.5~2.2mg/ml blood). Make
the specimen well-distributed, and then press the “Start” button to test.
5. Peripheral Blood Test
Press the “Menu” button and choose the “model”, then set the model to “Prepare Dilute”. Press the
“0/Dilute” button and then press the “start” button. It makes the automatic sampling needle take 1.1ml diluted
liquid,. Then press the “Menu” button to return. Use capillary pipette to take 20ul peripheral blood, and then put
the blood specimen into diluted liquid quickly to make diluted blood specimen. ( Needle should be stung deeply,
and use paper towel to wipe the first drop blood.) Shake the specimen well-proportioned, lay it still for 5
minutes and then shake it again. Put specimen down the sample needle, and then press the “Start” button to
begin,
6. Shut Down
After a day’s test, “Shut Down” program must be operated by HB Wash Liquid
Wait for about one minute, the power supply can be turned off when you see the prompt in the screen,
NOTICE
Environment Requirement
Environment is dustproof.
Power code should be earth connected well, ground voltage is less than 0.5V.
Temperature should be between 10~35 , and air conditioner is needed.
2. Handling Troubles
If plugging holes, (Voltage of the small hole rises), please press the key "Clean" on the small keyboard to
drainage; if the situation is still, please turn to "Menu" for "Maintenance" and take the order of "Calcination
gem hole", "drainage" to back-flush gem hole, and then start background count again; if plugging hole seriously,
please make the operation mentioned above over times; if the problem still can not be solved, please contact our
post-sale staff.
3. Maintenance
If specimens tested everyday is over 100, HB the head of test liquid dip for washing is operated once per day.
If specimens tested everyday is less than 100, HB contain enzyme liquid dip for washing is operated every
three days.
59
BGT BioGenTechnologies
Hem-o-test 18RT
If the instrument has been working for 24 hours, HB contain enzyme liquid dip for washing should be done in
a day.
Add the silicon-oil hibricant path every 2 months in order to make the instrument work for a long time.
Dishlled water washes the bottle of hemolysin and the groupware of the cover of the bottle every 2 months in
order to protect pollution.
4. Restart
If the instrument is shut down by power cut, please restart the machine after 30 seconds.
Transportation, Storing and Description of Biological Hazard
1 Obligation of transporter
Instruments can be transported by common vehicle, and should be avoid to be exposed to sun and rain.
2 Description of lifting and carrying the instrument
As a precision lab device, this instrument should be lifted up with two hands from bottom to move. When it is
carried, the instrument should be put into a packing chest, which is surrounded by anti-vibration pad.
3. Placement of the instrument
The instrument should be placed to prevent dust, sunshine, big noise, mechanical shock and power interference.
And it should be put to a place which is far away form electric-motor, origin of hot, origin of wind, fluorescent
lamp, and electric instruments which are turned on and shut down frequently.
The lab table should be large enough to be placed the instrument and reagents, and it is convenient for the
doctor to operate.
The instrument is not allowed to be placed in the position where the operator can hardly press the power switch.
Environment the instrument should be placed under
Environment temperature: 10℃ -35℃
Relative humidity: ≤85﹪
Atmospheric pressure: 70.0kpa—106.0kpa
Voltage of power supply; AC110v ~AC240v
Frequency of power supply: 47Hz-63Hz
4. Description of instrument’s biological hazard
Operator should prepare a special vessel for the waste liquid. And the waste liquid can only be put into the
vessel. Operator should handle the waste liquid vessel as the ruler of the lab.
Specimen, reagent and waste liquid have the potential danger of biological hazard,. So the operator should wear
protect clothes and love, and the operator should do the experiment as the lab’s rulers.
Requirement of instrument’s repair
If there is any trouble, please call our company’s after-service department. Without our company’s permission,
the repairman, not confirmed by our company, can not repair the instrument. Otherwise, our company will not
be responsible for any damage.
All the components, except print paper, cuvette and some other consumptive material, should be provided by
our company. Otherwise, our company will not be responsible for any damage.
The type of fuse: X-1, 5×20, Capacity: AC250v F2Al or AC120V F3Al
60