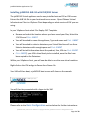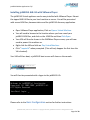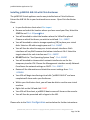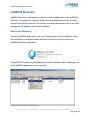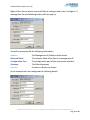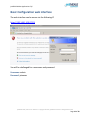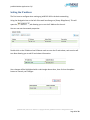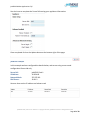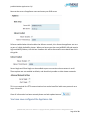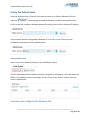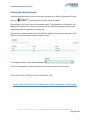
1
Installation Guide: ALB-VA jetNEXUS Solutions Limited Grove Business Park Cedar Court Waltham Road Maidenhead Berkshire Sl6 3LW Phone: 0870 382 5050 or International +44 (0) 1628 820 630 Fax: 0870 382 55 20 or International +44 (0) 1628 820 647 Author: Reviewed: Modified: Version: Created: Release Date: jetNEXUS Solutions Limited Gary Christie Gary Christie 2.4 (2.1 current) (1428) 10/05/2010 23/02/2012 jetNEXUS Makes Applications Fly! Copyright © 2005 - 2011 jetNEXUS, Inc. All Rights Reserved. © 2005-2011 jetNEXUS, Inc. All rights reserved. jetNEXUS and the jetNEXUS logo are registered trademarks of jetNEXUS, Inc... jetNEXUS, Inc. reserves all ownership rights for the jetNEXUS ALB/ALB-X product line including software and documentation Limitations: This document and all of its contents are provided as-is. jetNEXUS has made efforts to ensure that the information presented herein are correct, but makes no warranty, express or implied, about the accuracy of this information. If any material errors or inaccuracies should occur in this document, jetNEXUS will, if feasible, furnish appropriate correctional notices which Users will accept as the sole and exclusive remedy at law or in equity. Users of the information in this document acknowledge that jetNEXUS cannot be held liable for any loss, injury or damage of any kind, present or prospective, including without limitation any direct, special, incidental or consequential damages (including without limitation lost profits and loss of damage to goodwill) whether suffered by recipient or third party or from any action or inaction whether or not negligent, in the compiling or in delivering or communicating or publishing this document. Microsoft Windows is a registered trademark of Microsoft Corporation in the United States and other countries. All other trademarks and service marks are the property of their respective owners. VMware is a registered trademark of VMware Inc in the United States and other countries. All other trademarks and service marks are the property of their respective owners. jetNEXUS ALB/ ALB-X User Manual - Copyright © 2010, jetNEXUS Limited. All Rights Reserved Page 2 of 20 jetNEXUS Makes Applications Fly! jetNEXUS Introduction 1) Scope. 2) Recommended VMware Configuration for ALB-VA a) Installing jetNEXUS ALB-VA with ESX/ESXI b) Installing jetNEXUS ALB-VA with VMware Workstation. c) Installing jetNEXUS ALB-VA with VMware Player d) Installing jetnexus ALB-VA with Citrix XenServer 3) Basic Configuration 4) First Boot 5) jetNEXUS command line configuration 6) jetNEXUS Discovery 7) jetNEXUS web interface 8) jetNEXUS Help Scope The aim of the document is to provide assistance with the implementation of the Accelerating Load Balancer Virtual Appliance (here in referred to as the ALBX-VA) into a virtual network environment. It aims to give an overview of setting up the basic service but is not intended as a full user manual. Recommended VMware configuration for ALB-VA The ALB-X VA is suitable for VMware ESX Server, VMware Workstation & VMware Player. For the ALB-X VA, we would recommend a minimum of 512MB up to 4GB of allocated memory and 4GB of disk space. When caching is required, 1GB to 2GB memory is ideal. jetNEXUS ALB/ ALB-X User Manual - Copyright © 2010, jetNEXUS Limited. All Rights Reserved Page 3 of 20 jetNEXUS Makes Applications Fly! Installing jetNEXUS ALB-VA with ESX/ESXi Server The jetNEXUS Virtual appliance can be easy installed onto an ESX or ESXi server. Extract the ALB-VA file to your local machine or server. Open VMware Virtual Infrastructure Client or VSphere Client depending on what version of ESX you are using. In your VSphere client select File: Deploy OVF Template. Browse and select the location where you have saved your files, Select the .OVF file and Click NEXT You will be asked to name the appliance, Type and name and Click NEXT You will be asked to select a datastore your Virtual Machine will run from. Select a datastore with enough space and Click NEXT You will be told information about the product, Size, VM size Click NEXT Click NEXT) your VM is then Ready to be installed, once the files have been copied to the Datastore. Within your VSphere client, you will now be able to see the new virtual machine. Right click on the VM and go to Power then Power-On Your VM will then boot, a jetNEXUS boot screen will show on the console. You will then be presented with a logon to the VM. Please refer to the Basic Configuration section below for further instructions: jetNEXUS ALB/ ALB-X User Manual - Copyright © 2010, jetNEXUS Limited. All Rights Reserved Page 4 of 20 jetNEXUS Makes Applications Fly! Installing jetNEXUS ALB-VA with VMware Workstation The jetNEXUS Virtual appliance can be easy installed with VMware Workstation. Extract the zipped ALB-VA files to your local machine or server. You will be presented with several VM files documentation and the jetNEXUS discovery application. Open VMware workstation application; go to File Open. You will need to browse to the location where you have saved your jetNEXUS VM files, and click on the .VMX file and then click on open. Your VM will then be shown in the workstation screen; you will now need to power this machine on. You will then need to power on the virtual machine. Right click the VM and click on Power On. Your VM will then boot, a jetNEXUS boot screen will show on the console. You will then be presented with a logon to the jetNEXUS-VA. Please refer to the Basic Configuration section for further instructions: jetNEXUS ALB/ ALB-X User Manual - Copyright © 2010, jetNEXUS Limited. All Rights Reserved Page 5 of 20 jetNEXUS Makes Applications Fly! Installing jetNEXUS ALB-VA with VMware Player The jetNEXUS Virtual appliance can be easy installed with VMware Player. Extract the zipped ALB-VA files to your local machine or server. You will be presented with several VM files, documentation and the jetNEXUS discovery application. Open VMware Player application; Click on Open a Virtual Machine. You will need to browse to the location where you have saved your jetNEXUS VM files, and click on the .VMX file and then Click Open. Your VM will then be shown in the WMWare Player screen; you will now need to power this machine on. Right click the VM and click on Play Virtual Machine. Click “I copied it” when prompted. (This will only happen the first time the VA is booted). Your VM will then boot, a jetNEXUS boot screen will show on the console. You will then be presented with a logon to the jetNEXUS-VA. Please refer to the Basic Configuration section for further instructions jetNEXUS ALB/ ALB-X User Manual - Copyright © 2010, jetNEXUS Limited. All Rights Reserved Page 6 of 20 jetNEXUS Makes Applications Fly! Installing jetNEXUS ALB-VA with Citrix XenServer The jetNEXUS Virtual appliance can be easy installed onto a Citrix XenServer. Extract the ALB-VA file to your local machine or server. Open Citrix XenCenter Client. In your XenCenter client select File: Import Browse and select the location where you have saved your files, Select the .OVF file and Click OpenNext You will be asked to select the location where the VM will be placed. Choose on which XenServer you wish to install and Click NEXT You will be asked to select a storage repository (SR) to place your virtual disks. Select an SR with enough space and Click NEXT You will then be asked to map your virtual network interfaces. Both interfaces will say Eth0 however the bottom interface is Eth1. Select the target network for each interface and Click NEXT DO NOT tick the “Use Operating System Fixup”. Click NEXT You will be asked to choose which network interface to use for the temporary transfer VM. Choose the Management interface usually Network 0 and leave the network settings on DHCP. Click NEXT Review all the information and check the correct settings then. Click FINISH Your VM will begin transferring virtual disk “jetNEXUS ALB-X” and once complete will show under your XenServer. Within your XenCenter client, you will now be able to see the new virtual machine. Right click on the VM and click START Your VM will then boot, a jetNEXUS boot screen will show on the console. You will then be presented with a logon to the VM. Please refer to the Basic Configuration section below for further instructions: jetNEXUS ALB/ ALB-X User Manual - Copyright © 2010, jetNEXUS Limited. All Rights Reserved Page 7 of 20 jetNEXUS Makes Applications Fly! Basic Configuration First boot On first boot jetNEXUS will boot and try to obtain an IP address via DHCP. If there is no DHCP server present it will boot with its default IP i.e. 192.168.100.100. On subsequent boots the DHCP client is disabled. You have 3 ways to setup the jetNEXUS ALB-VA VM Command line configuration jetNEXUS Discovery jetNEXUS Web interface The simplest way to initially configure the ALB–VA is via the jetNEXUS Discovery Application. The jetNEXUS discovery application will scan the local network looking for ALB’s and allow you to perform some basic configuration such as set a management IP/ default gateway etc. jetNEXUS ALB/ ALB-X User Manual - Copyright © 2010, jetNEXUS Limited. All Rights Reserved Page 8 of 20 jetNEXUS Makes Applications Fly! jetNEXUS Command line configuration Many of the configuration settings can be made via the jetNEXUS command line interface. However for initial configurations it may be useful to change some of the basic network setting via the CLI. Log into the console with the following credentials Username=admin Password=jetnexus Then run the following command: To change the subnet mask: You can check your changes by running the show command for example (show greenside IP) If you need to change the default gateway you need to run the following command. In this example it will change it to 192.168.10.1. Be careful when changing the gateway remotely as if you get it wrong you may have a long drive! To exit this CLI type exit Please refer to the ALB-X User Manual for further configuration details. jetNEXUS ALB/ ALB-X User Manual - Copyright © 2010, jetNEXUS Limited. All Rights Reserved Page 9 of 20 jetNEXUS Makes Applications Fly! jetNEXUS Discovery jetNEXUS Discovery is designed to make the initial configuration of the jetNEXUS ALB easy. The application can be installed onto a desktop and will scan the local network for jetNEXUS devices. Once found, essential information such as an initial management IP address can be easily assigned. How to use Discovery Copy the jetNEXUS application onto your desktop and run the installation. After the installation is complete double click on the Discovery Icon to launch the jetNEXUS discovery application. The jetNEXUS Accelerating Load Balancer Discovery will then open, showing you a list of jetNEXUS appliances in your network. jetNEXUS ALB/ ALB-X User Manual - Copyright © 2010, jetNEXUS Limited. All Rights Reserved Page 10 of 20 jetNEXUS Makes Applications Fly! Right click on the on device you would like to configure and select “configure”. A message box like the following below will then pop up. You will be prompted for the following information IP Address: Network Mask: Configuration Port: Gateway: Server Ref: The Management IP Address of the device The network Mask of the Device’s management IP The configuration port of the secure web interface The Default gateway A name to identify the device In this example we have configured the following details jetNEXUS ALB/ ALB-X User Manual - Copyright © 2010, jetNEXUS Limited. All Rights Reserved Page 11 of 20 jetNEXUS Makes Applications Fly! IP Address: Network Mask: Configuration Port: Gateway: Server Ref: 10.0.34.66 255.255.0.0 2736 -Default 10.0.0.1 jetNEXUS Prod 1 Once you click on the apply button you will be prompted for the password: Default password is: jetnexus Your Configured device with the new IP,Subnet and ServerRef will now show in the discoveryscreen. jetNEXUS ALB/ ALB-X User Manual - Copyright © 2010, jetNEXUS Limited. All Rights Reserved Page 12 of 20 jetNEXUS Makes Applications Fly! Double click on the ALB you would like to configure and it will load the web admin in a browser: Please refer to the ALB-X User Manual for further details on configuration. jetNEXUS ALB/ ALB-X User Manual - Copyright © 2010, jetNEXUS Limited. All Rights Reserved Page 13 of 20 jetNEXUS Makes Applications Fly! Basic Configuration web interface The web interface can be access via the following IP https://192.168.1.100:27376 You will be challenged for a username and password: Username: admin Password: jetnexus jetNEXUS ALB/ ALB-X User Manual - Copyright © 2010, jetNEXUS Limited. All Rights Reserved Page 14 of 20 jetNEXUS Makes Applications Fly! Setting the IP address The first item to configure when setting up jetNEXUS ALB is the basic networking. Using the Navigation bar on the left of the web interface go to (Setup Appliance). This will open the tab allowing you to set the IP Address for the unit. You can now set the network properties: Double click on the IP Address box & Subnet mask to enter the IP and subnet, each section will turn blue allowing you to add IP and subnet information Your changes will be highlighted with a red triangle above them, then click on the update button to commit your changes. jetNEXUS ALB/ ALB-X User Manual - Copyright © 2010, jetNEXUS Limited. All Rights Reserved Page 15 of 20 jetNEXUS Makes Applications Fly! You also have to complete the Server Ref naming your appliance information: Once completed click on the Update button at the bottom right of the page: jetNEXUS Example In this example we have configured the details below, and we are using a one-armed configuration Green side only. Server Ref: IP Address: Network Mask: DNS Server: jetNEXUS Prod 1 10.0.34.66 255.255.0.0 10.0.1.2 Here we have set the IP address and subnet mask jetNEXUS ALB/ ALB-X User Manual - Copyright © 2010, jetNEXUS Limited. All Rights Reserved Page 16 of 20 jetNEXUS Makes Applications Fly! Now set the serve ref appliance name and enter your DNS server Failover enabled when ticked enables the failover controls; this allows the appliance acts as a as part of a High-Availability cluster. When you have more than one jetNEXUS ALB and require high-availability failover, tick this box. However this will be discussed in more detail later on in this guide. Server Nagle and Client Nagle can be enabled to pace connections where content is small. These options are not enabled as default, and should only enable on older slower networks. This is not required for HTTP communications but can be beneficial with some protocols on a Layer 4 channel. Once all information has been entered please use both update buttons You have now configured the Appliance tab. jetNEXUS ALB/ ALB-X User Manual - Copyright © 2010, jetNEXUS Limited. All Rights Reserved Page 17 of 20 jetNEXUS Makes Applications Fly! Setting the Default Route Using the Navigation bar on the left of the web interface, go to (Setup Network) this will open the tab allowing you to add the Gateway and Static routing information. On this screen we configure a default gateway and routing, you must set a Gateway IP Address. In this example we have configured the Gateway IP of 10.0.0.1 on eth 0 once you have configured your gateway click the update button. Setting a Static route Static routes can be added by clicking on the “Add Route” button You will need the destination address and mask, the gateway and adapter. Once the details are filled in, click update to action the settings. A tick is shown in the “Active” column when the route is implemented. You have now configured the Network tab. jetNEXUS ALB/ ALB-X User Manual - Copyright © 2010, jetNEXUS Limited. All Rights Reserved Page 18 of 20 jetNEXUS Makes Applications Fly! Setting the network speed Using the Navigation bar on the left of the web interface, go to (Setup Hardware) This will open the tab allowing you to set the Interface speeds. The settings on this screen control the network access. The defaults are to fix speed at 100 Mbps and full duplex. This avoids any issue with certain networking devices that have autonegotiation which re-negotiates too frequently. The device can support speeds from 10 to 1000, for 1000 this should set to auto/auto. If this does not work, set the exact network hardware values. To change the values, click on Speed or Duplex. If you have changed any of these settings click the update at the top of the screen. You have now configured the Hardware tab. Please refer to the ALB-X User Manual for further details on configuration. jetNEXUS ALB/ ALB-X User Manual - Copyright © 2010, jetNEXUS Limited. All Rights Reserved Page 19 of 20 jetNEXUS Makes Applications Fly! jetNEXUS Help Troubleshooting Further help can be found on the jetNEXUS websites http://www.jetNEXUS.com/support.html http://forum.jetNEXUS.com/ Contact Us I hope you have found this Installation Guide informative, but if you need any clarification or further information, please do not hesitate to get in contact with jetNEXUS Support: E-mail [email protected] Support +44 (0870) 382 5529 Phone+44 (0870) 382 5550 Check out our blog http://jetNEXUS.blogspot.com/ jetNEXUS ALB/ ALB-X User Manual - Copyright © 2010, jetNEXUS Limited. All Rights Reserved Page 20 of 20