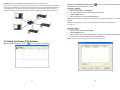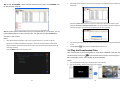
1
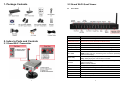
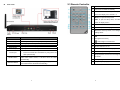
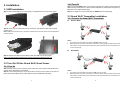
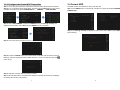
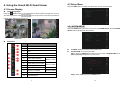
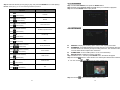
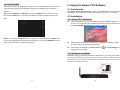
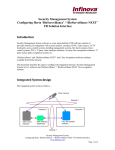
INDEX Grand Digital Wireless Security Kit (Color QUAD Processor / 802.11g Video & Audio Transmission / SATA HDD Storage) User’s Manual 08/11/08 1. Package Contents……………..…....…………………….. 2. Index to Parts and Controls……....……….……………... 2.1 Grand Wi-Fi Transmitter……..……………..……..…. 2.2 Grand Wi-Fi Quad Viewer…………………..……..…. 2.3 Remote Controller…………….……………..……..…. 3. Installation…………………………..………..……..……… 3.1 HDD Installation……………….……………..……..…. 3.2 Turn On/ Off the Grand Wi-Fi Quad Viewer……...…. 3.3 Grand Wi-Fi Transmitter Installation…..…………..… 3.4 Format HDD………………………….…..…………..… 4. Using the Grand Wi-Fi Quad Viewer……………….……. 4.1 Screen Display…………..…….……………….……... 4.2 Setup Menu………………………..………………..…. 5. Using the Viewer FTU Software…….……………………. 5.1 Introduction………………………..…………….……... 5.2 Installation………………………….………………..…. 5.3 Using the Viewer FTU Software…………………..…. 5.4 Play the Downloaded Files……….………………..…. 6. Troubleshooting…………...…..…………………………. 1 1 1 2 4 5 5 5 6 8 9 9 10 18 18 18 19 22 23 1. Package Contents 2.2 Grand Wi-Fi Quad Viewer Front Panel Name Sensor Window 2. Index to Parts and Controls 2.1 Grand Wi-Fi Transmitter SHDN (Shut Down) Menu OSD (On/ Off) Audio (On/ Off) Up/ Down ESC/ REW Pause/ Play FF/ Enter Stop Record Motion Detect Split Ready LED Power LED 1 Description Receives an infra-red signal from the remote controller Shut down the HDD immediately (you have to shutdown the HDD before turning off the Grand Wi-Fi Quad Viewer) Opens the setup menu Turn the channel number display on/ off Turn on/ off the live audio output in one-screen segmentation mode Move the cursor up/ down, or to change the setting values ESC: Exit the current menu or returns to the higher-level menu REW: Select Left/ Play backward (press the button repeatedly for faster backward play) Pause: Temporarily stops playback Play: Starts playing the video stored in hard disk FF: Select Right/ Play Forward (press the button repeatedly for faster forward play) Enter: Confirm selection Stops playback, and press the Stop button again to exit Starts or stops recording Motion Detection on/ off Shows Quad view for cameras ON if system is ready ON if system is power on 2 2.3 Remote Controller Rear Panel 1 Show Quad view for cameras 2 Shut down the HDD immediately Press one of the buttons (CH1~CH4) to see 3 full screen display from channel 1~4 Menu: To open the setup menu 4 ESC: To quit the setup menu, and directly return to display screen 5 Mute the sound 6 Go to the previous/ next page Moves the cursor up/ down, or to change the 7 setting values : Select Left/ Backward/ ESC (returns to Name Description Power Switch DC 12V Input NTSC/ PAL S-Video Output Video Output Audio Output Power On/ Off Insert the provided power adapter (DC 12V) Video signal (NTSC/ PAL) switch Output port for S-Video display Output port for Video display Output port for audio Live/Playback 1. Connect to PC for backup function 2. Connect to Grand Wi-Fi Transmitter by using the RJ-45 cable (wired mode). Restart the Grand Wi-Fi Quad Viewer (before restarting the Grand Wi-Fi Quad Viewer, it will shut down the HDD automatically) Reset all settings to the original (factory) setting (the Grand Wi-Fi Quad Viewer will restart automatically) RJ-45 Input RESET Button DEFAULT Button 3 8 the higher-level menu) : Select Right/ Forward/ Enter 9 Confirm selection/ Enter 10 Motion Detection on/ off 11 Turn the channel number display on/ off 12 Starts or stops recording Stops playback and returns to the beginning 13 of the file 14 Starts playing the video stored in hard disk 15 Temporarily stops playback 4 3.2.2 Turn Off 3. Installation 3.1 HDD Installation Step 1: Remove the HDD cover screws (2pcs), and separate the cover as shown below. Step 1: Press the SHDN button on the remote controller/ front panel to shut down the HDD before turning off the machine. (This procedure will park the storage HDD and protect your filesystem from unexpected damage.) Step 2: You might turn off the power after the READY LED is stop flashing. 3.3 Grand Wi-Fi Transmitter Installation 3.3.1 Connect the Grand Wi-Fi Transmitter Wireless Mode Step 2: Insert your 2.5” SATA HDD into the connector, and fasten the HDD with provided screws (4pcs). Notice: Makes sure that all pins are completely inserted into the connector socket and the HDD label is pointing outward. Notice: 1. The Grand Wi-Fi Transmitter must switch to WLAN mode on the side. 2. Before fixing the Grand Wi-Fi Transmitter on the wall or ceiling, please configure the Grand Wi-Fi Transmitter by the Grand Wi-Fi Quad Viewer and make sure all Grand Wi-Fi Transmitters are able to connect successfully. Wired Mode Step 3: Replace the HDD cover and fasten it with the HDD cover screws (2pcs). Notice: The HDD must be formatted when used for the first time (please refer to 3.4). 3.2 Turn On/ Off the Grand Wi-Fi Quad Viewer 3.2.1 Turn On Step 1: Before turning on the machine, please select the correct video format (NTSC/ PAL) on back of the Grand Wi-Fi Quad Viewer. Step 2: Connect the power (DC 12V) to the machine, and turn on the switch on back of the Grand Wi-Fi Quad Viewer (the machine will start up and initialization will begin). Notice: 1. The Grand Wi-Fi Transmitter must switch to LAN mode on the side. 2. Before fixing the Grand Wi-Fi Transmitter on the wall or ceiling, please configure the Grand Wi-Fi Transmitter by the Grand Wi-Fi Quad Viewer and make sure all Grand Wi-Fi Transmitters are able to connect successfully. 5 6 3.3.2 Configure the Grand Wi-Fi Transmitter 3.4 Format HDD Step 1: Connecting the Grand Wi-Fi Transmitters and Grand Wi-Fi Quad Viewer with power. Step 2: Turn on the Grand Wi-Fi Quad Viewer, and then press the MENU button on the remote controller/ front panel, and select SYSTEM SETUP → CAMERA → CAM1 SETTING. The HDD must be formatted when used for the first time. Step 1: Press MENU button on the remote controller/ front panel, and select STORAGE → FORMAT HDD. Step 3: Select ADD CAMERA and press the ENTER button, the warning message will appear as shown below, select YES and press ENTER to start configuring. Step 2: The warning message will appear as shown below, select YES and press ENTER to start formatting. Step 4: The screen will count down from 60 to 1 sec. Step 5: Press the CONFIG button on the Grand Wi-Fi Transmitter until the screen shows as following, and then release the button (it takes around 5 ~ 10 sec normally) and press the button to exit. Step 6: Add other cameras within the same processes. Step 7: After all Grand Wi-Fi Transmitters are added successfully, the Quad view will display the instant video of Wi-FI Transmitters. 7 8 4. Using the Grand Wi-Fi Quad Viewer 4.2 Setup Menu Press the MENU button to display the setup menu screen as shown below. 4.1 Screen Display Quad/ Single View Press the (QUAD) button on the panel button to switch to Quad or Single view. You can (CH1~CH4) buttons on the remote controller to also directly press one of the see full screen display from channel 1~4. 4.2.1 SYTEM SETUP Press the ENTER button when the cursor moves to SYSTEM SETUP, and the SYSTEM SETUP window will appear as shown below. Quad View Single View Status Bar Description No. 1 Year 2 Month 3 Date 4 Day 5 Time 6 Connected by Wireless 7 Motion Detection On 8 Connected by RJ-45 Cable 9 Recording On 10 Camera 3 Disconnected Camera 3 Status 11 Camera 4 not Added Camera 4 Status 12 PC Connecting (for backup function) 13 Free HDD Space TV MODE: Displays the video format (NTSC/ PAL). SYSTEM TIME: To set the system time. Step 1: Press the ENTER button when the cursor moves to SYSTEM TIME, and the warning message will appear as shown below. Camera 1 Status Camera 2 Status 9 Step 2: Select YES and press the ENTER button. 10 Step 3: Use the and buttons to adjust value, and use the and CAMERA: Use the and buttons to select camera 1~4 first. buttons to change setting items. Step 4: After finishing the system time setting, please use the cursor to the MONTH item, and then press the - ADD CAMERA: To configure the Grand Wi-Fi Transmitter (refer to 3.3.2 for more information). - V-FLIP: Flip the video vertically. - H-MIRROR: Mirror the video horizontally. - FREQ: Adjust to 50 or 60Hz, depend on your lighting. - ENVIRONMENT: Optimum parameter for indoor or outdoor condition. - MD SENSITIVITY: HIGH or LOW modes for triggering motion detection. button to move the button again to save and exit. WIRELESS: To set the wireless channel. LANGUAGE: To set system language. The Grand Wi-Fi Quad Viewer can broadcast on several different channels, similar to the way radio stations use different channels. In the United States and Canada, these 4.2.2 RECORD channels are 1, 6 and 11. Just like you’ll sometimes hear interference on one radio The Grand Wi-Fi Quad Viewer supports three recording modes: MANUAL, MOTION station while another is perfectly clear, sometimes one wireless channel is clear than DETECTION and SCHEDULE. others. Try changing your Grand Wi-Fi Quad Viewer channel to see if your signal Notice: strength improves. 1. Schedule Record is a top priority for recording. The Manual Record or Motion Detection Record cannot stop or effect to the planned Schedule Record. Step 1: Press the ENTER button when the cursor moves to WIRELESS. 2. The Manual Record or Motion Detection Record applied depends on which is the last event by keypad. 4.2.2.1 MANUAL RECORD Directly press the (REC) button on the remote controller/ panel button under Quad view, all the 4 cameras will start recording. Or press the (REC) button under single view, and the specific camera will start recording. Press the (REC) button again to stop recording. Notice: Step 2: Use the Step 3: Press the and buttons to select the wireless channel. button to save and exit. 11 1. While record is trigged, the Recording icon will indicate on the status bar. 2. A short cut to record specific camera under Quad view. - Press and then press (REC), only CH1 will start recording. - Press and then press (REC), only CH2 will start recording. - Press and then press (REC), only CH3 will start recording. - Press and then press (REC), only CH3 will start recording. 12 Step 3: Press the 4.2.2.2 MOTION DETECTION RECORD Directly press the button to make setting and exit. (MD) button on the remote controller/ panel button under Quad view, all the 4 cameras will start motion detection record. Or press the (MD) button under single view, and the specific camera will start motion detection record. Press the (MD) button again to stop motion detection record. Notice: 1. A short cut to start MD record of specific camera under Quad view. - Press and then press (MD), only CH1 will start motion detection record. - Press and then press (MD), only CH2 will start motion detection record. - Press and then press (MD), only CH3 will start motion detection record. - Press and then press (MD), only CH3 will start motion detection record. 4.2.2.3 SCHEDULE RECORD START TIME: To set the time when the Grand Wi-Fi Quad Viewer will start recording. DUARTION: To set the recording duration. WEEKLY SETTING: To set the week schedule (set the specific days for recording). Press the MENU button, and select RECORD, the screen will appear as shown below. 4.2.3 PLAYBACK Step 1: Press the ENTER button when the cursor moves to PLAYBACK. You can also press the (PLAY) button on remote control or the button on panel button to directly enter the PLAYBACK mode under Quad view. Step 2: Select the CH1 ~ CH4, and the file list will appear. SCHEDULE: To enable or disable the Schedule Record function. Step 1: Press the ENTER button, and then press the and buttons to select ENABLE or DISABLE. Step 2: Press the button to make setting. CH SETTING: To set the record mode. Step 1: Select ALL CHANNEL or individual channel “CHANNEL 1 ~ CHANNEL 4”, and then press the ENTER button. Remark: 1. ALL CHANNEL means all the 4 cameras will use the same settings 2. Other individual channel settings (CH1 ~ CH4) could be set separately. Step 2: Press the and buttons to set NONE, RECORD or RECORD+MD. Remark: 1. RECORD means pure record. 2. RECORD+MD means record while motion detection was trigged. 13 14 Step 3: Select the file that you are going to play, and press the ENTER button to start playing. Remark: While playing you can have followings additional operations Operation Press 4.2.3.1 FILE SEARCH Step 1: Select FILE SEARCH, and press the ENTER button. Step 2: Directly select Channel, Date and Time which you would like to playback. Step 3: Press the ENTER button to play the file. To (remote controller) Forward Press (panel button) Press (remote controller) Press (panel button) Press (remote controller) Press (panel button) Press (remote controller) Rewind Go to next event 4.2.4 STORAGE Go back to previous event Press Press (panel button) / (remote controller) Pause/ Play Press (panel button) Press (remote controller) Press (panel button) Stop Press (remote controller) Press (panel button) Press (remote controller) Press (panel button) Press (remote controller) Press (panel button) Go to previous file Go to next file OSD On/ Off Press (remote controller) Press (panel button) HDD SIZE: Display the remaining space and the total capacity of the HDD. OVERWRITE: To Enable/ Disable the overwrite function. For the limited disk space, an overwrite function is necessary to keep recording video files. The overwrite function will cover the oldest file and replace with newest one. FORMAT HDD: To format HDD (refer to 3.4 for more information). DELETE FILES: To delete the specific video files. Step 1: Select the CH1 ~ CH4 and press ENTER button, the file list will appear. Step 2: Press the Audio On/ Off Press ˇ. You can use the button to select the file to be deleted (the selected file is marked with and buttons to select multiple files). (remote controller) Exit Press (panel button) Step 3: Press the 15 button and select YES to delete the files. 16 4.2.5 SHUTDOWN You have to shut down the HDD before doing power off or reset the Grand Wi-Fi Quad Viewer 5. Using the Viewer FTU Software (This procedure will park the storage HDD and protect your filesystem from unexpected 5.1 Introduction damage). The Viewer FTU (File Transfer Utility) is a tool to download video file from Grand Wi-Fi Quad Viewer, and transfer files into AVI format that can be played on your computer. Step 1: Select REBOOT or TURN OFF, and press the ENTER button to execute, you can also press the SHDN button on the remote controller/ front panel to directly shut down the HDD. 5.2 Installation 5.2.1 Viewer FTU Installation Insert the included CD to your CD-ROM driver, and the installation program will auto-run. The first screen of the installation program will appear as shown below. Click the “Install VIEWER FTU Software” to start the installation. Step 2: If you select the TURN OFF item, you might turn off the power after the READY LED (in front of the Grand Wi-Fi Quad Viewer) is stop flashing. If you select the REBOOT item, the Grand Wi-Fi Quad Viewer will restart automatically. . Please follow the instructions of the wizard to complete the installation process (includes Viewer FTU program and DivX Player). After finishing the installation, the Viewer FTU icon and the DivX Player icon will appear on your desktop. 5.2.2 Hardware Installation Scenario 1: Directly connect the Grand Wi-Fi Quad Viewer to your PC by RJ-45 cable. (The Grand Wi-Fi Quad Viewer communicates with PC by TCP/IP protocol, that means Grand Wi-Fi Quad Viewer & PC must be under the same submask. Since there is no DHCP server exist, the IP address have to specific into static IP.) 17 18 Scenario 2: Connect the Grand Wi-Fi Quad Viewer to your PC via LAN. (The Grand Wi-Fi Quad Viewer can also connect to a local LAN, in this case, the PC can manage all the Step 2: Click the Network File Transfer icon Grand Wi-Fi Quad Viewers on the same network. If the DHCP server exists and distribute IP address to Quad Viewer that you are willing to connect. local network device, you didn’t have to assign IP address to Grand Wi-Fi Quad Viewer. However, if Scenario 1: Static IP DHCP server didn’t exist, a static IP address is necessary to assign to the Grand Wi-Fi Quad Viewer.) 1. , and then double-click the Grand Wi-Fi Select the radio button of STATIC IP. 2. Key-in the IP address that is same subnet with your PC. 3. Click Configure button. 4. After IP address is set, click the Connect button. Notice: If the Grand Wi-Fi Quad Viewer is connected with PC directly, the IP address of PC needs to be specified. Example: PC IP address: 192.168.1.100. Set the Grand Wi-Fi Quad Viewer IP address as: 192.168.1.101 Scenario 2: DHCP 1. Select the radio button of DHCP Mode. 2. Click Configure button. 3. After the Grand Wi-Fi Quad Viewer is assign IP address, double-click the Grand Wi-Fi Quad Viewer on the list and then click the Connect button. Notice: A DHCP server is necessary on the local LAN for this scenario. 5.3 Using the Viewer FTU Software Step 1: Double-click the shortcut icon to open the Viewer FTU Software. 19 20 Step 3: Click All CHANNEL, all the video files will list and sort by date. Click CHANNEL 1~4, 2. If download motion is failing as shown below, click the X in the upper-right corner to directly close the program. the files will list by channels. Execute the Viewer FTU program and connect to Grand Wi-Fi Quad Viewer again, and the message “Continue to download <xxxxxx.xav>” will pop-up. Please click the X to directly close the popup message, and re-select the recorded files in the list to download. Step 4: Double-click the selected file and save to a specified folder on your local PC. You can use the Shift or Ctrl key to select numerous files, and right-click and select Download to save files on your local PC. Notice: 1. When downloading recorded files, it will occupy system resources. In the case of might be 3. happened incomplete downloaded or break down, first please into to Grand Wi-Fi Quad Viewer setup menu before downloading file. (when into setup menu which Grand Wi-Fi Quad Viewer will The Grand Wi-Fi Quad Viewer will disconnect automatically, if there is no file downloaded after 1 minute. 4. The File Search can easy find the specified date and time record. continuing recording). Press the MENU button to into the setup menu. 5.4 Play the Downloaded Files Each video file that you download includes an .avi file and a subtitle file of time tab (.srt). Double-click the shortcut icon to open the DivX Player program, and then drag the video file into the display screen, and it will play the file automatically. Notice: 21 1. The (srt) subtitle file needs to be in the same folder of the video file. 2. The (srt) file needs to have the same name of the video file. 22 6. Troubleshooting Situation The Grand Wi-Fi Transmitter can’t connect with Grand Wi-Fi Quad Viewer successfully. If the Grand Wi-Fi Transmitter is nearby the Grand Wi-Fi Quad Viewer, but it still can’t connect successfully. Check Point The wireless connectivity might be out of range. Please move the Grand Wi-Fi Transmitter nearby the Grand Wi-Fi Quad Viewer. Please do the “ADD CAMERA” procedure to configure again (please refer to 3.3.2). 1. Change your wireless channel (refer to 2. Move the Grand Wi-Fi Quad Viewer off page 11). the floor and away from walls and metal objects (such as metal file cabinets). 3. Adjust the wireless antennas for better signal reception. Tips for improving Wireless connectivity 4. Reduce wireless interference (such as 2.4GHz Cordless phone, Microwave, Blue Tooth devices). 5. If the Grand Wi-Fi Transmitter location is far away from the Grand Wi-Fi Quad Viewer or under a noise condition, the LAN (Ethernet) can be considered as a solution (refer to 3.3.1). It means the system found an error of HDD. Displays SCANNING DISK on screen It attempts fix it. It will take around 15~20 minutes or longer depend on the hard disk size and the errors. Whenever you shutdown your system in some improper way or the system time is disorder (please check the battery of RTC), it will appear. Do not turn off the power while it is scanning. 23