1
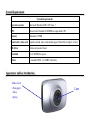
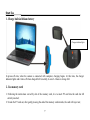
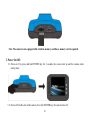
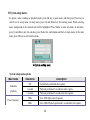
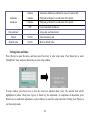
Product Manual F5B Functions Thank you for purchasing this camera. In virtue of high performance chip applied, this product features high definition video with strong continuous dynamic images. The images support AVI video format, and thus clear pictures can be achieved. This device adopts a unique and super portable design, which benefits a convenient, safe and colorful daily life for you in various fields. Please make sure to carefully read this manual and keep it properly for future reference. This manual is worked out based on updated information. Screen display and diagrams used in this manual are for detailed and visualized introduction for this digital camera. Because of technical R&D and product lots, the displays and diagrams may vary with the actual digital camera, and that is subject to the actual function of the camera. 1 Precautions Before using the camera, please carefully read the precautions to ensure a correct and safe use of the camera, and to achieve the best performance and a prolonged lifespan of it. Keep the camera away from direct sunlight, and keep lens of the camera away from directing sunshine. Otherwise, image sensor of the camera may be damaged; Please be careful with the camera to avoid water or sand entering the camera while using it on sand beach or by water. Water, sand, dust or particles containing salt may damage the camera; Keep the camera away from contacting dust and chemical materials. It is a must to keep the camera at a cool and dry place with god ventilation. Do not place the camera at a place with high temperature, humidity or with much dusts to prevent abnormal operation caused to the camera; During long-term storage, regular use of the camera is required. Before using it, please check if it can normally operate; In case of dirt or dust accumulated on the camera or lens, clean them with a piece of soft, clean and dry cloth. In case of sand on the camera or lens, it is to gently blow the sands off. Do remember not to clean it a piece of cloth. Otherwise, surface of the camera or lens may be damaged; To clean surface of the camera lens, it is firstly to blow off the sands on it, and then clean it with a piece of mop or paper suitable for optical instruments. If needed, please clean camera with cleanser. It is strictly prohibited to clean the camera with organic solution; Touching surface of the lens with finger is strictly prohibited; In case of the first time of using memory card of the camera, please firstly make a back-up of the data, and then format the memory card in a one-off way; External TF card is a precise electronic component. The followings may cause loss or damage of the data: 1. Improper use of the memory card; 2. Bended card, fallen cards or impact against the memory card 3. High temperature and humidity or direct sunlight; 2 4. Static field or electromagnetic field nearby; 5. Taking out the memory card or interference with the camera power supply during visiting the memory card with the camera or computer (meaning reading, writing or formatting); 6. Contact metal surface of the memory card with finger or metal article; 7. Beyond lifespan of the memory card (Please regularly purchase the new memory card). About the Product This product features compact size and easy installation; In virtue of high performance chip applied, the product features high definition video and strong continuous and dynamic images. Even under low illumination, video can be recorded, and it also supports AVI video format; Support VGA (640x480) and HD (1280x720) capturing; Three sizes (including 5M, 3M and 1M) of image are for option; This product supports time and date watermark function, and time and date can be synchronously displayed while recording; Support high-speed USB2.0; Support max. 32G TF card; This product adopts loop coverage recording method and the new recording can automatically cover the former images achieving an endless rolling recording; This product is equipped with on-site replay function. You may check the video recorded on-site with the display. It also supports replay with computer. 3 System Requirements System Requirements Operation system Microsoft Windows2000, XP, Vista, 7 CPU Above Intel Pentium III 800MHz or equivalent CPU Memory Minimum 512MB Sound card, video card Sound card and video card should support DirectX8 or higher version CD driver 4 times of speed of faster Hard disk Over 500MB free space Others 1 standard USB1.1 or USB2.0 interface Appearance and key introduction Mode switch: -Photograph -Video -Replay Lens 4 Power On/Off Shutter Operation indicator Charging indicator Up key LCD TFT OK key Down key Key/Indicator Power On/Off Shutter Up key Function Power the camera on or off. When opening the menu, switch over between normal (effect parameters and replay of image, video) and setup menu. In recording video mode, it is used to start/stop recording; in capture mode, it is used as a shutter; it is used to play the video (in replay mode); confirmation (when operating the menu). Digital zoom in (capture/video mode); menu selection (after opening the 5 OK key Down key Mode switch Operation indicator menu); pause, continue playing (when playing and recording video in replay mode) Open/exit from menu. Stop playing (when replaying video) Digital zoom out (capture/video mode); menu selection (after opening the menu); Switch over among modes of capture, video, replay The upper one is a charging indicator. The lower one is operation indicator. an 6 In power-off state, it keeps constant lighting when the charger is connected for charging. It flashes once during capturing, and it keeps constant lighting when connected with computer portable disk. Start Use _______ 1. Charge built-in lithium battery Charger indicator lights USB 线 In power-off state, when the camera is connected with computer, charging begins. At this time, the charger indicator lights and it turns off when charged full. Generally, it costs 2-4 hours to charge full. 2. Use memory card 1. Following the instructions carved by slot of the memory card, it is to insert FT card into the card slot till entirely inserted; 2. To take the FT card out, after gently pressing the end of the memory card inwards, the card will reject out; 7 Note: The camera is not equipped with a built-in memory, and thus a memory card is required. 3. Power On/Off: 3.1 Power-on: If to press and hold POWER key for 3 seconds, the screen starts up and the camera enters startup state; 3.2. Power-off: In idle state of the camera, if to click POWER key, the camera turns off; 8 Automatic power-off: When idle time set for the camera reaches, it automatically turns off to save power. The default time of the system automatic power-off is 5 minutes; 3.3. Power-off due to low battery: In case of extremely low battery, an icon of “ ”shown on the LCD screen. Please timely charge the battery. When the icon turns red and flashes, the camera will automatically power off. 4. Functional mode switchover The camera is equipped with three modes: capture, video and replay mode. After power-on, the modes can be switched over with MODE switch. Capture mode: Take pictures; Video mode: Record video and driving (5min, 3min and 1min for one phase are for option.); Playback mode: Picture and video file playback 5. Indicators Operation indicator: When the camera works (e.g. recording video, capturing or automatic screen turn-off), the operation indicator lights; Charger indicator: Constant lighting is to remind user that the camera is being charged. 6 Video mode When pushing Mode switch to video mode, click shutter in preview state to start recording video; to 9 stop video recording, it is to click it again. It will also automatically stop recording in case that no free room left in the memory card or the battery is over low: 1 00:00:01: time-meter, indicating 1 second left for recording (indicating 1 second recorded during recording); 2 3 : mode icon: indicates the current mode is video recording; :loop recording video time icon: indicates the current loop video recording time is 3 minutes; 4 5 6 : movie size: indicates the current movie size is 720P; : indicates currently a memory card is inserted; : magnification of digital zoom: press Up and down key to adjust zoom among 1x-4x; 7 8 9 : battery icon: indicates current battery level; : white balance icon: indicates the current white balance mode is automatic; :metering icon: indicates it is currently the pan overall perspective metering. Video menu setup In video mode, press OK key to open menu, and then press Up and Down key to select menu. When selecting menu, background of the selected item will be highlighted. Press Shutter to enter sub-menu. In sub-menu, press Up and Down key for selection, press Shutter for confirmation and back to main menu. In the main menu, press OK key to exit from the menu. 10 ▲Video menu Video menu options Main menu Video format Sub-menu 1280x720 640X480 Off 1min Recording int 3min 5min Metering mode Central metering Multi-point metering Description High resolution format Medium resolution format Power-off driving record Set driving record to 1 minute as a repeating phase. Set driving record to 3 minutes as a repeating phase. Set driving record to 5 minutes as a repeating phase. Metering subject to the central area Metering subject to multi-points 11 Point metering Automatic White balance Daylight Cloudy Fluorescent light Tungsten light Normal White and black Antique Special effect Date stamp Negative film Metering subject to one point Using automatic white balance, suitable for most cases; Suitable for daylight environment Suitable for cloudy environment Suitable for fluorescent light source environment Suitable for tungsten light source environment Normal effect White and black effect Retro effect Negative film effect Red Reddish effect Green Greenish effect Blue Bluish effect Off Turn off printing date/time on the file During capturing/recording video, print date on right bottom corner of the file During capturing/recording video, print date and time on right bottom corner of the file Date Date and time 12 7 Driving video recording: Push Mode switch to Video mode, open the menu, press Down key to select “Recording Int” menu, press Shutter key to enter sub-menu, “1min, 3min, 5min” recording loop mode are for free selection. After pressing OK key for confirmation, press OK key again to exit from the menu. When Shutter is pressed, it starts video recording. During video recording, the camera will automatically stop recording video based on 1min, 3min, 5min selected, and immediately starts next section of video recording (e.g. when 5min is selected in the menu, the camera will automatically stop when 5min recording reached, and starts next section of video recording). When the memory card is full, the earliest recoded section of file will be deleted for corresponding room for further recording, and it repeats in such a method. ▲Open video recording menu ▲Select loop recording time and press OK to confirm. ▲Exit from menu and press Shutter to start loop video recording Note: After selecting OFF in “Recording Int” menu, when existed from the menu, the camera turns to normal video recording. Normal recording is beyond the limit of time, and it will not stop until the memory card is full. 13 8 Capture mode: Push Mode switch to Capture mode. Press Shutter once in preview state or click center of LCD for a picture taken: 1 9999: Counter: indicates quantity of pictures taken or available to be taken; 2 3 4 5 6 7 : mode icon: indicates it is currently the mode of capture; : movie size: click this icon to select among 1M/3M/5M; : indicates currently a memory card is inserted; : magnification of digital zoom: press Up and down key to adjust zoom among 1x-4x; : battery icon: indicates current battery level; :Self-timer icon: indicates the current self-timer mode is set to 10 seconds; 8 9 : white balance icon: indicates the current white balance mode is automatic; :metering icon: indicates it is currently the pan overall perspective metering. Capture menu setup In capture mode, press OK key to open menu, and then press Up and Down key to select menu. When selecting menu, background of the selected item will be highlighted. Press Shutter to enter sub-menu. In sub-menu, press Up and Down key for selection, press Shutter for confirmation and back to main menu. In the main menu, press OK key to exit from the menu. 14 ▲Capture menu Capture menu options Main menu Image size Image quality Metering mode Sub-menu 2592x1944 2048X1536 1280X960 Excellent Good Normal Central metering megapixel resolution Point metering Automatic White balance Daylight Cloudy Fluorescent light Tungsten light Description 5 megapixel resolution 3 megapixel resolution 1 megapixel resolution Best quality image Good image quality General quality image Metering subject to the central area Metering subject to multi-points Metering subject to one point Using automatic white balance, suitable for most cases; Suitable for daylight environment Suitable for cloudy environment Suitable for fluorescent light source environment Suitable for tungsten light source environment 15 Exposure Capture mode / Off Use general single shot mode 2s Use 2sec. delay self-timer mode 10s Continuous shooting` Use 10sec. delay self-timer mode Use continuous shooting Normal White and black Antique Special effect Date stamp Use Left and Right key to adjust exposure compensation Negative film Normal effect White and black effect Retro effect Negative film effect Red Reddish effect Green Greenish effect Blue Bluish effect Off Turn off printing date/time on the file During capturing/recording video, print date on right bottom corner of the file During capturing/recording video, print date and time on right bottom corner of the file Date Date and time 16 9 Playback mode: 9.1 After power-on, push Mode switch back to Playback mode: 1 2 :mode icon: indicates it is currently the mode of playback; 3 4 : indicates that the current folder is locked; : indicates the current file is an AVI video file. : Indicates that there is one file in current folder/totally one folder; 9.2 Playback menu setup In playback mode, press OK key to open menu, and then press Up and Down key to select menu. When selecting menu, background of the selected item will be highlighted. Press Shutter to enter sub-menu. In sub-menu, press Up and Down key for selection, press Shutter for confirmation and back to main menu. In the main menu, press OK key to exit from the menu. ▲Playback menu 17 Playback menu options Main menu File lockup File deletion Slide show Sub-menu Lock/unlock this file Lock all Unlock all Description Lock/unlock this file Lock all files Unlock al files Delete this file Delete the current file Delete all Delete all files Start Interval Repeat Start playing slide show 1sec.~10sec. Yes/No 9.3 Play movie clips: During playing, press Shutter key to play, press Up key for pause, press Shutter key to stop playing. 18 9.4 Delete file: 1) After selecting the file to be deleted, open the menu, press Up and Down key to select “Delete…”. 2)Press Shutter key to enter, after selecting “One”, press Shutter key for confirmation ). “All” means to delete all files.) 3) After selecting “Yes”, press Shutter key to delete the file. When the file is deleted, press OK key to exit from the menu. 19 10 System setup menu: In capture, video recording or playback mode, press OK key to open menu, and then press Power key to switch over to setup menu. In setup menu, press Up and Down key for selecting menu. When selecting menu, background of the selected item will be highlighted. Press Shutter to enter sub-menu. In sub-menu, press Up and Down key for selection, press Shutter for confirmation and back to main menu. In the main menu, press OK key to exit from the menu. ▲System setup menu System setup menu options Main menu Sub-menu Automatic playback Off 1 second 3 seconds Power frequency Description No playback performed after capture Playback performed 1 second later after capture Playback performed 3 seconds later after capture 50Hz Se to 50Hz light source frequency 60Hz Set to 60Hz Playback performed 1 second later after capture 20 Automatic shutdown 1 minute 3 minutes 5 minutes Automatic shutdown performed in case of 1 minute idle Playback performed 3 seconds later after capture Playback performed 5 seconds later after capture OFF Cancel automatic shutdown Date and time / Set up date and time format Format Yes/No Format memory card Default value Yes/No Back to default value Setting date and time: Press OK key to open the menu, and then press Power key to enter setup menu. Press Down key to select “Date&Time” item, and press Shutter key to enter setup window. In setup window, press Power key to elect the item to be adjusted (Date, time). The selected item will be highlighted in yellow. Then press Up key or Down key for adjustment. At completion of adjustment, press Shutter key to confirm the adjustment, or press OK key to cancel the setup and return. Finally press PK key to exit from setup mode. 21 Application in PC _______ 1. Connect with PC The camera is equipped with function of plug and play. In power-in state, after connecting this device to the computer with USB cable, it can be switched over to portable hard disk mode. Portable hard disk icon will be shown in the window of “My Computer”. Images/video shot by you are stored in portable hard disk folder I:\DCIM\100MEDIA (“I” indicates equipment portable hard disk) Note: If to use portable hard disk function in Windows 2000 operation system or higher version, it is not needed to install driver. Technical Parameters Image sensor 1.3 megapixel (CMOS) Function mode Video, capture, car mode, portable disk, PC cam Lens F3.1 Digital zoom 4x Shutter Electronic shutter LCD display 1.77”TFT screen Image resolution 5M(2592×1944), 3M(2048×1536), 1M(1280×1024) f=6.5mm 22 Video resolution VGA: 640x480 (60 frame/second); 720P:1280x720 (30 frame/second) White balance Automatic /Sunny / Cloudy / Fluorescent light / Tungsten light Exposure Storage medium -2.0 ~ +2.0 Video AVI Image JPEG TF card (Max. support 32GB) USB interface High-speed USB 2.0 interface Power supply Built-in 3.7V chargeable lithium battery File format Dimensions (LxWxH) 67*48*29mm Weight Roughly 46.5g Standard package Camera User Manual USB cable 23