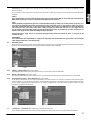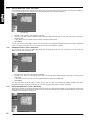
1
Dear Force Satellite System Owner
Congratulations on acquiring your new satellite receiver.
Our MISSION is: Easy access to infotainment
Our approach to business is a winning combination of user-friendly designs and well-proven experience where it matters most in terms
of technology.
We team up with advanced users to provide easy access to infotainment for the general public and value added solutions for today and
tomorrow.
Further, we partner with our distributors and customers to build our brand in the home market and in the professional market. Our
VISION is to thrill our users and the industry.
IMPORTANT!
This manual should only be considered as a guideline, given the fact that both software and user interface will be continuously
modified. Thus all graphics are also to be considered as guides only. Remember that you can always download the most recent,
updated manual in PDF format from our website: www.force.tv
We recommend, that you read chapter 1 concerning security, before connecting your receiver to the mains supply for the first time.
Force Electronics A/S
1
Caution:
To reduce the risk of fire or electric shock, protect the receiver from rain or other forms of moisture. Do not remove the
cover or rear panel. The receiver contains no parts that can be repaired by the end user. The receiver must be serviced by
qualified service personnel.
WARNING
AVIS
RISK OF ELECTRIC SHOCK
DO NOT OPEN
RISQUE DE CHOC ELECTRIQUE
NE PAS OUVRIR
Important information
Your new advanced Force receiver offers you the very best of the outstanding possibilities introduced by the new DVB
technology, and the software will be improved continuously.
Through the Force mail system, you will receive information on new software via satellite.
The update is made as follows:
•
•
•
•
•
Press MENU; go to SET UP. Press OK.
Go to SYSTEM. Press OK.
Go to UPDATE. Press OK.
Go to SOURCE and check that it is set to "Sat. Thor 1.0W" or "Sat. Astra 19.0E"
Go to START. Press OK.
The receiver will now start downloading new software directly from the satellite; this takes approx. 3 minutes.
The user interface will change
Be aware that your user interface (On Screen Menus) may be changing, - both in order to add new features, and to improve the
existing software.
You have acquired a software licence
You have not acquired software ownership, but a software user licence for one receiver unit. Thus, under no circumstances are you
entitled to copy the software whatever the reason. The only exception is a copy on a data media for private security reasons. Force
Electronics A/S reserves the right to modify the software continuously. Furthermore, features or services in addition to the ones for
which you have originally paid, may be based on subscription or other forms of payment. Force Electronics A/S reserves the right to use
the MAIL system or any similar system for sending out given advertising material. Force Electronics A/S reserves the right to charge a
nominal subscription fee for the channel update – this only applies for other satellite positions than the Scandinavian ones at 1° West
and 5° East. The channel information for the Scandinavian positions will continuously be maintained free of charge.
If you cannot accept the above conditions, you should not connect the receiver unit to the mains supply. Connection to
the mains will be considered as an acceptance of the above conditions. NOTE: the first use will be registered in the
receiver unit automatically. Changes in software and user interface may take place without warning.
Force Electronics A/S only guarantees correct functioning when Force accessories or Force approved accessories are used. Please check
our website for further information for accessories: www.force.tv
2
Table of contents
1
Security ............................................................................................................................................ 4
1.1
2
Support.................................................................................................................................................................................................... 4
Mounting the dish........................................................................................................................... 4
2.1
3
Physical requirements for receiving satellite signals (Set up) .............................................................................................................. 4
Connecting your receiver ............................................................................................................... 5
3.1
3.2
3.3
3.4
4
Content of receiver box ......................................................................................................................................................................... 5
TV connection ......................................................................................................................................................................................... 5
VCR (Video) connection ......................................................................................................................................................................... 5
Modulator connection ........................................................................................................................................................................... 5
Remote control................................................................................................................................ 7
4.1
5
Force universal remote control.............................................................................................................................................................. 7
Basic navigation .............................................................................................................................. 8
5.1
5.2
5.3
5.4
5.5
5.6
5.7
6
Using the remote control....................................................................................................................................................................... 8
Manual control ....................................................................................................................................................................................... 8
Programme cards.................................................................................................................................................................................... 9
Menu system ........................................................................................................................................................................................... 9
Shortcut buttons..................................................................................................................................................................................... 9
Info-bar ................................................................................................................................................................................................... 9
Channel selector ................................................................................................................................................................................... 10
Starting up..................................................................................................................................... 10
6.1
6.2
6.3
6.4
6.5
7
Select language (Starting up) .............................................................................................................................................................. 10
TV format (Starting up)........................................................................................................................................................................ 11
TV-Scart (Starting up > TV format)...................................................................................................................................................... 11
UHF channel (Starting up > TV Format) .............................................................................................................................................. 11
Satellite positions (Starting up) ........................................................................................................................................................... 11
Day-to-day operation:................................................................................................................... 11
7.1
7.2
7.3
7.4
7.5
7.6
7.7
7.8
7.9
8
Favourite Channels ............................................................................................................................................................................... 12
PVR – Recording broadcasts (models with hard disk: 1188S/1189S/1199S)....................................................................................... 13
Mail (Main menu) ................................................................................................................................................................................. 14
Update (main menu > set up > system) .............................................................................................................................................. 15
Reset receiver (Main menu > Set up > System)................................................................................................................................... 15
Sorting channels (Main menu > set up > Lists) ................................................................................................................................... 16
IR-Blast (Main menu > Set up > System > IR Blast) ............................................................................................................................. 16
EPG (Main menu).................................................................................................................................................................................. 17
Timer (Main menu)............................................................................................................................................................................... 18
Motor (Main menu > Set up > System > Motor) ......................................................................... 21
8.1
8.2
9
Preprogrammed Motors....................................................................................................................................................................... 22
Non-programmed Motors.................................................................................................................................................................... 22
Codes for programming TV-sets, VCRs and DVDs. ..................................................................... 23
9.1
9.2
9.3
10
TV-sets ................................................................................................................................................................................................... 23
VCR ........................................................................................................................................................................................................ 24
DVD ....................................................................................................................................................................................................... 24
Your codes ..................................................................................................................................... 25
3
1
Security
The Force receiver must be placed on a fixed and stable base in clean surroundings and at a suitable distance from any heat
source, e.g. other electronic devices, radiators, etc. The fins in the upper and lower part of the casing must not be covered and
there must be a free height of min. 5 cm above the Force receiver. Do not connect the receiver to the mains, before all other
connections have been made. This includes dish, TV, VCR and other equipment.
The Force receiver should always be in “standby” mode, when not used, as the various updating procedures will only take
place, when the receiver is in standby mode. Only in case of lightning, the receiver should be disconnected from the mains, as
it contains very sensitive components.
NOTE!
The warranty does not include damages, which are a direct or indirect consequence of lightning.
WARNING!
The cover must not be removed, as the receiver contains high voltage circuits. In case of unauthorized operation,
physical damage or abnormal use of the satellite receiver, the warranty will no longer apply.
1.1
Support
If you have questions regarding your Force product, please contact your Force dealer. To be allowed to use the title, Force
dealers are required to undergo product training given by Force.
You may reach us at the e-mail address [email protected]. If you do, please enclose your serial number as well as the name of
the Force dealer, from whom you purchased your receiver. Alternatively visit our website www.force.tv, where you might find
the answer to your question or ask the question yourself in the Frequently Asked Questions section (FAQ).
2
Mounting the dish
2.1
Physical requirements for receiving satellite signals (Set up)
Mount the dish either on a wall, an aerial mast or a freestanding pole. It is of no importance whether the dish is mounted at a
high or low position. However, it is important that it is mounted on stable material. Be aware that e.g. a wooden gable on a
house can be problematic, as it may eventually rot causing a weak fixing. There must be free sight towards south in front of
the dish (see fig. 1). Direct dish south and place it almost vertically. Tighten screws and bolts loosely in order to make fine
adjustment later.
A useful rule-of-thumb:
The distance to any obstacles should be twice
the height of those obstacles. In other words,
a 1 m high obstacle should be at a minimum
distance of 2 m.
Fig. 1
TIP:
You can paint your dish to blend in with the surroundings. Be aware however, that if you do this, of modify your dish in any
other way the warranty for the dish itself will no longer apply.
2.2
Connecting to existing dish (Set up)
If you already have a dish it may be possible to use it but you need to check the type of LNB mounted in the dish arm. The
‘universal LNB’ type is recommended. If your Force receiver has not been set up for the LNB type used, it will result in
following faults:
•
•
•
2.3
The EPG Menu may display the wrong channel name compared to the channel, which is displayed on your TV-set
Clock cannot be found
EPG does not work correctly.
Connecting to more dishes or LNB heads (Set up)
The satellite positions 1° West and 5° East are very popular.
You can put up two dishes to receive both these positions, or by using a special LNB holder, you can mount 2 LNB’s on the
same dish, and receive signals from both satellites at positions 1° West and 5° East.
However, signals from many satellites can be received without having to turn the dish itself.
You can use a DiSEqC switch, which gives you the possibility of having up to 16 LNB’s on one cable. Contact your dealer for
option details.
The receiver also supports a motorised dish, DiSEqC 1.2 and Force Sky Walker.
You will find an installation manual in the box for your Force motor.
Notice!
Force only guarantees correct functioning when Force accessories or Force approved accessories are used. Please
check our website www.force.tv for further information.
4
The illustration to the right shows, how you can combine signals from 2
dishes in one cable by using a DiSEqC switch. Of course, it could also be
2 universal LNB units mounted on the same dish. The Force receiver will
automatically shift between the two LNB units or dishes. This set-up also
works with other LNB units than the universal type.
NOTICE!
For a perfect result use only original
Force accessories.
Fig. 2
The alignment to the left shows how you can connect as many as 4 LNB units by just one cable.
The LNB units can be either standard or universal type. With the illustrated alignment, you may
receive 4 satellites ; e.g. 1° West, 5° East, 13° East and 19° East.
Fig. 3
2.4
LNB mounting (Set up)
Take care that the LNB is not exposed to bumps or impacts, as it contains very sensitive electronic parts. Place the LNB in dish
holder, so that LNB cable tap is vertical against ground. Now install a 5-7 mm quality cable with fixed inner conductor on LNB
by way of the F-plug (see below). Avoid sharp angles on cable, as this might lead to reduce picture quality.
2.5
Cable (Set up)
Use a 75 W cable of good quality. Remember that the signals fed through the cable are extremely high frequency. The cable
must be of the stiff inner conductor type. Be careful that the inner conductor is not short circuited (it carries power to the
LNB), as it may destroy the LNB as well as your Force receiver, and in such case, the warranty will not cover a repair. Normally,
you can run 50 m cable from dish to receiver without any problems. Contact your dealer, if you need a line amplifier.
Mounting of F-plug.
Be careful that the inner
conductor and the protective
Sheet (the wires around inner
conductor) do not short circuit.
Fig. 4
Notice!
The LNB F-plug must be protected against the weather. The best way to do this is to use a special, self vulcanised
cable tape (available at specialised dealer), or use grease, e.g. Vaseline. Never use hardening silicone.
3
Connecting your receiver
3.1
Content of receiver box
Your new receiver should be delivered in a clean and undamaged box. If not, contact your dealer immediately.
The box should contain the following:
•
•
•
•
•
Force receiver
Remote control
Two AA batteries
Manual
Coax male/female cable
3.2
TV connection
There are two ways of connecting your receiver to your TV-set. One is by EuroScart cable (RECOMMENDED). Use a fully
mounted 21-pin EuroScart cable, to reap the full benefit of your receiver. The second way is to use the built-in channel 21-69
modulator. In case you use the modulator, you will not enjoy stereo sound, and the picture will not be shown in so-called
RGB-mode, which gives the optimum picture on most modern TV-sets.
3.3
VCR (Video) connection
As for "TV" there are two ways of connecting a video to your receiver. You can either use EuroScart or modulator (see fig. 8
for different connection possibilities). If you have a stereo-video and want to record satellite stereo programmes from your
Force receiver, you should use a fully mounted EuroScart cable. By doing so, you will also get a better picture quality.
3.4
Modulator connection
This is the traditional way of distributing signals. The modulator in your Force receiver represents the newest PLL technology
and covers as wide a range as channel 21 to 69. This gives ample opportunity to find a frequency, which does not generate
any noise on overlapping or flanking channels. The modulator is of the ”loop through" type, in which the antenna signal can
be looped from e.g. VCR to SAT and on to TV, generally speaking without any loss and without any of the other units being
active. The modulator is set at channel 38 from the factory. See chapter 6.5 for information of setting up the modulator for
other channels.
5
3.5
S/PDIF OUT (Digital audio out)
Your Force receiver is equipped with an optical as well as phono plug output for digital equipment connection. For details,
check your hi-fi equipment manual.
3.6
Hi-Fi equipment connection
Your Force receiver comes equipped with two phono outputs for hi-fi connection. Most hi-fi equipment has an AUX-input to
which you can connect your receiver. For details, check you hi-fi equipment manual.
3.7
Modem connection
Some Force receivers come equipped with a modem, which may serve a number of purposes. The plug outlet is RJ11 type.
3.8
Connecting to dish
On the picture at page 5, you can see the tuner inputs. For a standard installation, you always connect the cable from the
dish/LNB to the upper input, marked A. The B-input is only used for very special set-ups, e.g. if you want to loop through to an
analogue receiver. (See fig. 6).
3.9
Power connection
This is used for connection to 230 V AC mains voltage. First insert the power cord in the receiver, then connect the mains plug
into your domestic mains socket outlet, and then turn on the power.
6
4
Remote control
The remote control is powered by two AA batteries, which are delivered with the receiver. Always take care that the batteries
are in good condition and do not leak. If the remote control is not used for a long period, take out the batteries. The range of
the remote control is highly influenced by the state of the batteries.
Fig. 7 Remote control
Operating EPG and menus (remote control)
This area of the remote control is also used for menu operation. Press EPG or menu button. Move
the red box on the screen by using the arrow buttons. When you want to access an item or
confirm, press OK. The coloured buttons are shortcut buttons, i.e. in some menus you can access
an item quickly, just by pressing the colour in question. The coloured buttons are also used
within teletext. Press OK, if you want to get the channel selector table on the screen.
Fig. 8 Navigational keys
4.1
Force universal remote control
The Force remote control is a universal remote. In addition to operate your Force receiver, it can replace two standard
infrared remote controls. It contains a database of codes to operate virtually any television and VCR/DVD. To identify the set ,
it must be pre-programmed with a 4 digit code. At the end of this user manual you find the codes for the different sets. The
remote can also be programmed to add basic functions of other devices.
The remote control changes between the Force receiver, the TV-set and e.g. the VCR by pressing one of mode-buttons on the
remote control. After pressing the TV key the LED will blink. To switch to the Force device press the lilac Force key.
Below you find a short description of programming the remote control. To see a more detailed description for the remote
control, please visit our website: www.force.tv
7
4.1.1
Setting up the TV-set
Make sure that your TV-set is switched on (not in stand-by).
Find the brand of your television in the code section (in the end of this manual) and select the first 4 digit code.
•
•
•
•
•
•
Press the TV key and release it.
Press and hold down the setup (shift), until the LED blinks twice.
Enter the 4-digit code for your television (the LED should blink twice after having entered the forth digit).
Press the POWER key and see if you are able to switch off your television.
Switch your television back on and check if all the functions are working correctly. Some devices need a number of
attempts to do this.
Repeat the procedure with the next 4-digit code if the first do not function.
Write down the code for your television on the inside of the battery cover.
4.1.2
Setting up your VCR/DVD
Repeat the procedure for the TV-set except for pressing the AUX key first.
4.1.3
Learning features from other remote controls
It might be necessary to add some features to the remote control from the original remote control. E.g. ”show view” key for a
VCR.:
Take your Force remote control and original remote control and put them on a flat surface and point the ends, which you
normally point at your device towards each other. Keep a distance of 2 to 5 cm.
•
•
•
•
•
Press the mode button you want to add functions. E.g. the AUX.
Press and hold down the SETUP key until the Led blinks twice.
Press 9 7 5. The LED will blink twice.
Press the button on the Force remote control to select the mode to which you want to copy the learned function. Press
e.g. EPG. The LED will flash constantly.
Press and hold down (e.g. show view) on the original remote control until the LED on the Force remote control blinks
twice.
If you want to copy other functions within the same mode, simply repeat steps 4 and 5, pressing the next key you want to
copy.
•
Press and hold down Set-up to store. The LED will blink 4 times.
5
Basic navigation
5.1
Using the remote control
You use the remote control for all day-to-day control. The receiver is turned on and off on the upper red button on the
remote control. When the receiver is turned off, a red LED lamp on the receiver front will be lit, and the time will be shown in
the display. When the receiver is turned on, the red LED lamp will turn off and a green LED will be lit instead. The receiver will
always start on the channel used, when it was turned off.
NOTICE!
Do not disconnect the receiver from the mains, as it will then not be able to receive updates, mail etc. However,
please refer to clause 1 concerning security.
5.2
Manual control
In the middle of the receiver front panel behind the lid you will find three buttons. The left one is channel down, the middle
one is on/off, and the right one is channel up.
8
5.3
Programme cards
Programme cards are inserted by opening the lid at the marked curve. Behind the lid in the left side, you will find two card
readers marked A and B, in the middle three contacts (see above), and in the right side 2 PC cards (Common Interface) marked
C and D. In card reader A and B the cards are inserted with the golden chip turned down and in towards the
receiver. The number of card readers varies with the model. On the left side the receiver, you can insert your CA modules.
The program cards that are inserted into CA modules should have their chip facing up. Be careful not to use too much power
when inserting the cards, as it might cause a non-repairable damage on the receiver, and this will not be covered by the
warranty.
Notice!
Never remove or insert programme cards while the receiver is turned on. Turn it off, take out the power cable,
remove or/and insert card, and connect to power again.
5.4
Menu system
To set the different parameters in your Force receiver, you enter the main menu, simply by pressing MENU on the remote
control. In the menus you select/activates menu items or functions by placing the red box on the item/function in question
using the arrow buttons, and then pressing OK at the remote control. At the picture below you see the main menu with the
red box placed in the menu item EPG.
5.5
Shortcut buttons
In the different menus/tables you enter the submenus by pressing the coloured button on the remote control, which
correspond to the colour of the menu shortcut button. Below is an example of such a menu. If, for example you want to enter
a new channel in this table, you just press the yellow button (check the colour in the menu on your screen).
Then you will pass on to the menu for entering new channels.
5.4 Main menu with red box
5.6
5.5 Menu with shortcut buttons
Info-bar
When you change to another channel using the arrow up/down buttons on the remote control, or pressing OK to enter the
channel selector, you will see an INFO-BAR of the new channel.
The INFO-BAR shows the name of channel, the title and starting time of the present programme, and a time bar, which
graphically shows the elapsed/remaining time of the programme. It also shows the title and starting time of the next
programme.
Notice!
The INFO-BAR always appears by pressing INFO, if pressing the
INFO button twice, an extended INFO will appear,(if information
is available).
Please note, that on some channels no information is present
and therefore cannot be displayed
5.6 Info bar
9
5.7
Channel selector
One of the most frequently used functions is the channel selector. When you are watching a TV programme (no matter which)
and want to switch to another you have three options: 1) Press arrow up/down or CH +/- on the remote control or to get a
better overview of the channels available. 2) Press OK. You will then enter the channel selector. 3) Finally, you can press the
actual channel number on the remote control. E.g. press 125 and wait a few seconds, then the receiver changes to channel
125. Or press the number and then OK for quick switching.
1.1.1
Navigation
To navigate in the channel selector, place the red box on the desired channel using the arrow up/down, and then press OK.
You change page in the table by the arrow right/left on the remote control (see chapter 4).
1.1.2
Channel sorting
You can decide yourself the order of channels in the channel selector. By pressing the blue shortcut button, you can sort the
channels by category, e.g. sport. Then you will only see the channels, which are characterised as sports channels. You also can
categorise the channels by language, package, position and text. In text you type your own text for search.
On the screen picture below all the Danish channels are listed first, then the Swedish ones etc. The basic order of languages
depends on the menu language chosen in “SET UP”(chapter 6.1). To change the order of languages, enter menu ”language”
and change the order of languages.
1.1.3
Favourites
By pressing the yellow shortcut button at the remote control you enter “FAVOURITES”, you choose your favourite list using
the arrow buttons at the remote control (see chapter. 4) and press OK.
1.1.4
Radio
By pressing the green shortcut button at the remote control you change between TV and radio channels. The radio channels
can also be sorted by category.
Another smart detail is the small TV window. When you press OK for the channel selector, the present TV channel will be
shown, until you select another channel.
5.7 Channel selector
6
Starting up
The first time – and only the first time, you turn on the receiver; you will see an installation wizard, which guides you through
the most important steps.
6.1
Select language (Starting up)
By selecting the flag of a certain country (e.g. Denmark), all menus will change to the language of this country. When, for
example, you choose the British flag by using the arrow buttons to place the red box over it, and pressing OK, you will see a
message in English, reading “please wait – reading set up”.
6.1 Select language
10
6.2 TV format
1.1.5
Accept license conditions (starting up)
When pressing OK, you accept the conditions related to the software, for which you have acquired a license. Refer to
“important information" at page 2.
6.2
TV format (Starting up)
For definition of the format of your TV-set: i.e. do you have a 4:3 TV-set or a Widescreen 16:9 TV-set. Activate the item by
pressing OK, use the arrow buttons and press OK to select.
6.3
TV-Scart (Starting up > TV format)
For selecting which output signal you want from the EuroScart plug. There are three possibilities: (It is very important for the
picture quality that you choose the right output)
1. CVBS/Video. This is the standard output signal, which can be used for all TV-sets with video input. Output type 2 and 3 are
special ones, however, they are resulting in better picture and sound.
2. RGB (recommended) and SVHS. Both type 2 and 3 need special inputs on your TV-set. Please check with your TV-instruction
manual. If possible feel you way.
6.4
UHF channel (Starting up > TV Format)
For selecting channels from 21 up to and including 69. With this wide spectrum you will always be able to find a channel,
which does not overlap or disturb flanking channels. Mark the item, press OK, and choose the channel desired in the list.
6.5
Satellite positions (Starting up)
For selecting which satellites your system is receiving. For a typical Nordic system with two LNB’s you should mark Thor and
Sirius. Use the arrow buttons and press OK to select. Press OK again if you have selected a satellite by mistake. Other satellite
positions then those shown here can be chosen in the setup menu (after installation is completed).
6.6 Positions
You complete the installation by marking SUBMIT and pressing OK. Now the time will be shown on the receiver
display, if you have a satellite signal from the dish.
7
Day-to-day operation:
The following sections of the manual go through the most commonly used functions in your Force receiver:
•
•
•
•
•
•
•
•
•
Favourite
PVR, Recording broadcasts
Mail
Updating software
Reset receiver
Sorting channels
EPG (Electronic program guide)
IR-Blast
Timer
11
7.1
Favourite Channels
On Force’s satellite receivers you can set up your own lists of favourite channels. The favourites lists differ from the main list in
that they are organised like charts in which you can choose a channel by moving through the chart both horizontally and
vertically using the arrow keys.
In the channel switch menu you can switch the favourites lists on and off by pressing the yellow shortcut key when you are in
the channel switch list (the OK button on the remote control). By pressing this, you switch between the main channels list and
the favourites lists. When you exit the menu, the receiver will remember whether you were in the main list or the favourites
lists the next time you go to the channel switch menu.
Favourites
Force receivers come with a selection of readymade “favourites charts” that you can use as the basis for making your own
lists.
7.1.1
General Operation
You put the channel selector in Favourites mode by pressing the yellow shortcut key, Favourites, when you are in the
channel selector. You will then go to the first favourites chart.
You move between the channels in the favourites chart by pressing the arrow keys on the remote control. Then press OK to
choose a channel. You can browse between the various favourites charts by pressing Ch+/ CH- on the remote control.
A grey square by the programme icon indicates that the channel is not broadcasting.
To return to the list of all channels, you press the yellow shortcut key when you are in the channel selection menu.
Tip:
If you want to edit your favourites charts the easiest way to do this is to press “menu” when you are in the favourites chart.
See section ?? on how to edit favourites charts.
7.1.2
Creating a New Favourites Chart
To create a new favourites chart, do the following:
•
•
•
•
•
•
•
•
Go to the menu Set up > Lists > Favourites
Press OK
You will now see a box in which you can choose between various actions: “Edit”, “Properties” “Create”, “Copy” and
“Delete”.
Choose “Create”
If you choose the “Name” field, a keyboard will appear on the screen. Use this if you want to give the chart a name.
If you choose “Icon” you can choose between a number of flags and symbols that can represent the chart you are
creating.
Choose Submit to create an empty chart.
To edit the chart, see the next section.
OK menu in favourites
12
7.1.3
Editing a Favourites Chart
The receiver comes with a number of readymade favourites charts. They can be a good basis for creating your own favourites
charts. To edit an existing favourites chart, do the following:
•
•
•
•
•
•
•
•
•
•
Choose the chart you want to edit and press OK.
You will now see a box in which you can choose between various actions: “Edit”, “Properties” “Create”, “Copy” and
“Delete”.
Choose “Edit”
To edit the chart, you use the shortcut keys on the remote control. The red shortcut key is “Delete”, the green shortcut
key is “Move”, the yellow shortcut key is “Cut” and the blue shortcut key is “From lists”.
You use the first three keys to move or edit channels within the chart. To add one or more channels from the long
channels list, you press the blue shortcut key “From lists”.
You can then choose between adding channels from “Radio channels”, “TV channels” or “Favourites” (other
favourites charts).
To add a TV channel, choose “TV channels”.
You can now press the yellow “insert” shortcut key in the list to select a channel for addition to the favourites chart you
are editing. Channels that are already in the favourites chart have an asterisk in front of the channel name. NB! You
cannot select more channels than there is room for on the favourites chart (24 channels).
Press the red “End” shortcut key to return to the chart you are editing.
Press Exit or Menu on the remote control to finish editing the chart.
Editing favourite charts
7.2
PVR – Recording broadcasts (models with hard disk: 1188S/1189S/1199S)
Force receiver models 1188S, 1189S and 1199S have a built-in 80 GB hard disk, enabling you to store up to 60 hours of
recordings. The available recording time will vary with the technical quality of the recorded broadcasts. You can program the
receiver to record a broadcast for you (timer record), or you can pause the current programme and then resume and watch
the programme with a delay (pause live TV function).
7.2.1
Remote control
In your daily use of the PVR, the following remote control buttons will be used:
Red
Green
Yellow
Blue
•
•
PVR
7.2.2
: Rewind
: Play
: Pause
: Forward
: Stop
: Record
: List of recordings
Recording
Pressing ”•” on the remote control the receiver will record the current programme. The recording is stopped by pressing ”•”.
You will find the recording in again in the PVR menu.
The recording can also be planned by using the timer function of the receiver. Enter the menu – (Main menu > timer > new)
and follow these steps:
•
•
•
•
•
•
In “Function” , select "PVR Timer"
Press OK in the “Channel” box and select the channel you want to record.
In "Text" you may write a text to help you remember the recording e.g. the name of the programme.
Press OK on “Day”, and select the date your programme starts. (Up to 301 days ahead)
Enter “start-time” and “end-time” for the programme
Choose SUBMIT, and press the OK button on your remote control.
You can also set a recording timer directly from the EPG. Mark the programme in the EPG and press the green shortcut button
(Extended info). By pressing the green shortcut button again, the programme will automatically be entered in the Timer-list.
IMPORTANT! If you switch channel during a recording the recording will be terminated.
13
7.2.3
PVR* (Main menu)
You enter the PVR-menu by pressing PVR on the remote control or by choosing PVR from the main menu. Here you will find a
list of the recordings available on the receiver. In this menu you can choose a recording for playing, change its name or delete
it. When highlighting a recording, the shortcut buttons will have these functions:
Red
: Edit – Change name on a recording. See title, date and playtime
Green : Play – Starts playback. The PVR buttons on the remote control are now active.
Yellow : Delete – Deletes a recording from the hard disk. You will be asked to confirm this. Deleting is final and
cannot be changed.
Blue
: Information – If EPG information was available for the recording, you will see both title and programme
information here.
Tip! (PVR)
By pressing ”OK” when you are in the PVR menu, a menu with the above choices will appear.
7.2.4
Playback
During playback, the buttons on the remote control have PVR functions. Also; by pressing “OK” during playback you will
bring up a control-panel, where the available actions on a recording can be chosen.
7.2.4.1
Winding
Fast forward and rewinding in a recording are possible in different speeds or in larger jumps. E.g. by pressing the rewind
button (••) the receiver rewinds in double speed, by pressing it once more the speed doubles (4 x speed).
You can also jump in larger steps during playback. To rewind e.g. 5 minutes in the recording, press the number “5” and then
the red shortcut button. (••) The receiver will then rewind the number of minutes you entered.
7.2.5
PVR maintenance (Main menu > settings > System > PVR maintenance)
In this menu you can see the space available for recordings on your hard-disk. You can see the total disk-space, how much of
it that’s used, and how much that’s available.
You may also reset the hard disk totally (formatting the Disk).To do so; press the “reset PVR” item. You then have the
possibility to go through with the reset or to abort it. The reset will take about 10 minutes.
Important! A full reset will delete all recordings on the receiver, and can not be reversed.
7.3
14
Mail (Main menu)
With the mail system we can keep you continuously informed on news. Further, the system can be used for sending out other
information. Select MAIL from the main menu and press OK. In the mail table, you mark an item and press OK to read the
specific mail.
7.2 Mail
7.3.1
New mail (Main menu > Mail)
When you have received new mail, you will see an “envelope” sign on your TV screen. Once all new mail has been read, the
“envelope” sign will disappear automatically, until more mail is received.
Note!
By pressing the "@" button on your remote control, you go directly to the mail table.
7.4
Update (main menu > set up > system)
The software in your Force receiver will be improved from time to time. Through the Force mail system you will receive
information on new software. If you want to upgrade your receiver with the new software, you need to update it as follows:
7.3 Update
•
•
•
•
Press MENU; go to SET UP. Press OK.
Go to UPDATE. Press OK.
Go to SOURCE and check that it is set to. Sat.Thor 1.0W" or "Sat. Astra 19.0E"
Go to START. Press OK.
The receiver will now start downloading new software directly from the satellite; this takes approx. 3 minutes.
7.5
Reset receiver (Main menu > Set up > System)
The existing channels and frequencies are being changed regularly, or new channels are established. When you update your
receiver, you will automatically get the latest channel and/or frequency changes, however, you have to reset the receiver in
order to make use of them. Enter the ”Reset receiver” menu, mark the items you want to reset, then mark the “reset” button
and press OK.
7.4 Reset Receiver
NOTICE!
When you reset your receiver, the channels will appear in the order chosen by Force. If you want to sort this
order, see point 10.
15
7.6
Sorting channels (Main menu > set up > Lists)
Choose TV or Radio. If you press the yellow shortcut the menu ” Set up channels” will appear. Choose ”sorter”. This gives you
the possibility of changing the channel order after 3 priorities (see fig. 10). For each priority you might choose ”none,
Position, Language or Category”. When you have set p your priorities, press ”SUBMIT”, and the list will be sorted according to
your choice.
7.5 Sorting channels
7.7
IR-Blast (Main menu > Set up > System > IR Blast)
IR-Blast is the infrared signals, which your Force receiver uses for communication with TV and Video. In order for the built-in
IBC (Infrared Blast Control) to work with your TV and video, the receiver must “learn” the codes that are needed to switch on,
record and switch off. This takes place by opening the front lid of the receiver and records the codes with the remote control.
Júst follow the instructions below.
Notice!
The Force receiver is not able to learn signals from a B&O® remote control, but the receiver is available in a
special B&O® compatible version. Ask your dealer for more information. Force IR-Blast is not able to control an
original B&O® video.
7.7.1
IR-Blast video (Main menu > Set up > System > IR Blast)
When a programme has been marked for video recording in the Video timer, the receiver sends a very powerful infrared
signal that activates the video at the right time. You can program 9 commands in every item, and they will then be activated
at a 2 sec. Interval.
7.6.1 IR-Blast deactivated
7.6.2 IR-Blast activated
Activate IR-Blast (Main menu > Set up > System > IR Blast)
Enter the “IR Blast” menu. Move the cursor to IR-Blast, press OK and select ”ON”. The field to the right of IR-Blast should now
read “ON”. Move the cursor to “END” and press OK to save.
Programming IR-Blast (Main menu > Set up > System > IR Blast)
Follow below instructions for all IR-Blast programming:
•
•
•
•
•
•
16
Move the cursor to ”Start”, press OK, and the "IR-Blast" menu appears. The following text will now be shown on the
screen “Now recording IR commands for “Start” and “0 commands recorded”.
Direct video remote control against Force receiver front at a distance of approx. 30 cm. If necessary shield the signal with
one hand so that the Force receiver does not receive any disturbances in the programming phase. Especially neon tubes
may disturb IR-Blast.
Shortly press the video remote control key, which turns on the video. Now the “0 commands recorded” will change to “1
command recorded”.
In order to end programming, press the left button on the receiver front or wait 10 seconds.
The receiver will now return to the ”IR Blast” menu, and write, “1 command recorded” to the right of “Start”. Repeat
the same procedure to program ”Record” and “Stop” functions.
Move the cursor to ”END” and press OK to save the recordings.
REMEMBER to put the video on the channel used for recording from the Force receiver, or program the IR-Blast to do so
before recording.
If you press one time to many at the remote control, you have to restart by moving the cursor the the item which should be
changed.
Notice:
Every key/function you programme from the video remote control must NOT be more than one command in IRBlast. If the key has two or more commands, the IR-Blast will not function.
TEST:
Having ended the programming process of each individual step by pressing one of the receiver front keys, you
may test if the IR-signals have been programmed correctly. Move the cursor to the function, which you want to
test. Then operate the blue key on the Force remote control. Notice that you might have to press the blue key
more than once. E.g. you want to test ”Start”. Make sure that your video will now turn on. You might have to
try more than once, before the signal has been programmed correctly. If possible, try to make variations as to
distance and length of time when operating the key in question.
Be patient and try again. This is an advanced and important procedure, but bear in mind – it only has to be
carried out once.
IMPORTANT!
Force cannot take the responsibility to support all, especially older VCR models. Our goal is that a Force receiver
must support about 95% of all VCR models.
7.8
EPG (Main menu)
EPG is an Electronic Program Guide, which enables a quick overview of the programmes presently presented. Entering the EPG
overview, you will see programmes for all the channels for which EPG data is available.
7.7 EPG
7.8.1
Update – yellow button (Main menu > EPG)
By pressing the yellow shortcut at the remote control, the receiver will collect the EPG data.
7.8.2
Search – blue button (Main menu > EPG)
By pressing the blue shortcut at the remote control, you can search for language; day or broadcasting time 4 days ahead.
7.8.3
Programme info menu – green shortcut (Main menu > EPG)
If you want to see details on one of the programmes in the EPG overview, you mark the programme and press the green
shortcut. (Notice: It is the programme provider, who decides the information to be shown). Now you have entered the menu
for this specific programme. From this menu you can order a programme up to four days ahead, for either viewing or video
recording. The options are as follows:
7.7.2 Seek box
7.8.4
7.7.3 Programme info menu box
"Change to" – red button (Main menu> EPG > Programme info menu)
If you press the red shortcut button on the remote control now, the receiver will go to the programme immediately.
17
7.8.5
"Back" - green button (Main menu > EPG > Programme info menu)
If you press the green shortcut button on the remote control, the receiver will return to the EOG table.
7.8.6
"TV-man" – yellow button (Main menu > EPG > Programme info menu)
If you press the yellow shortcut button on the remote control, the receiver will store the programme in the TV Manager, and
will then show it automatically at its starting time (check also chapter 13. Timer)
7.8.7
"Record" – Blue button (Main menu > EPG > Programme info menu)
If you press the blue shortcut button on the remote control now, the receiver will store the programme in the video timer,
and then automatically start and stop the video according to the programme timing (check also chapter 9; 13. Timer)
Notice!
The video timer will only work correctly if your receiver has been programmed to control your video. Read more
in the IR-Blast section, chapter 11.
7.9
Timer (Main menu)
Your Force receiver is able to perform different jobs at pre-set times in a very unique and simple way. In the main menu you
select TIMER, and you will see a table of the different jobs, which the timer may have been set to control (when any is
chosen). From the factory, the timer has been set to collect mail. To add a new job, press the green shortcut button on the
remote control (new timer). Mark the box next to ”function” and press OK. Now you will see a list of possibilities:
•
•
•
•
•
•
Video timer
TV Manager
Stand-By
Collect Mail
Collect EPG info
Card update
7.8 Timer function
7.8 Timer table
If you want to hide a timer function, mark the function and press the red shortcut button. Now the start time will be hidden.
If you want the timer to be active, press the red shortcut button again. Now the start time again will appear.
7.9.1
Video timer (Main menu > Timer > New timer)
Once your Force receiver has been programmed with the codes from the remote control of your video, you can set the
receiver to automatically start and stop a programme recording as per your choice. You do it like this:
7.8.1 Video Timer
•
•
•
•
•
•
•
18
Press OK in the “function” item and select “Video timer”
Press OK in the ”channel" item and select the channel for recording.
In the “Text” item you may write a text to help you remember the timer, e.g. the name of the programme to be
recorded.
Press OK in the ”Day” item and select the date your programme starts. (up to 30 days ahead)
In the "Start" item you indicate the time at which the programme begins.
In the "Stop" item you indicate the time at which the programme ends.
Press SUBMIT
You will now enter the timer table, in which you will see the timer job programmed (possibly together with other
programmed times). Your Force receiver will carry out the timer job once the time in question is reached.
7.9.2
TV Manager (Main menu > Timer > New timer)
You can set your Force receiver to automatically let you know when a specific programme starts. When the beginning time of
the programme is reached, the receiver will show a message on screen, and you must then choose to switch to the
programme or cancel.
7.8.2 TV Manager
TV Manager – Message when programme starts
You do like this: Select new timer (refer to chapter 13)
•
•
•
•
•
•
Press OK in the “Function” item and select "TV Manager"
Press OK in the “Channel” item and select the channel you want to watch
In the “Text" item you may write a text to help you remember the timer, e.g. the name of the programme to be shown
Press OK in the ”Day” item and select the date your programme starts (up to 30 days ahead)
In the "Start" item you indicate the time at which the programme begins
Press SUBMIT
You will now enter the timer table, in which you will see the timer job programmed (possibly together with other
programmed times). Your Force receiver will carry out the timer job once the time in question is reached.
7.9.3
Stand-By (Main menu > Timer > new timer)
With this timer you can set your receiver to automatically turn off, i.e. enter stand-by mode at a given point of time. This
might be sensible, if you forget to turn off the receiver yourself, as it saves power, and prolongs the life of the receiver. You
do it like this: Select new timer
(refer to chapter 9)
7.8.3 Stand-By
•
•
•
•
Press OK in the “Function” item and select "Stand-By"
Press OK in the “Day” item and select which date your receiver should enter stand-by (every day or a date up to 30 days
ahead)
In the "Start" item you indicate the time at which the receiver should turn off
Press SUBMIT
You will now enter the timer table, in which you will see the timer job programmed (possibly together with other
programmed times). Your Force receiver will carry out the timer job once the time in question is reached.
19
7.9.4
Get mail (Main menu > Timer > New timer)
From the factory your receiver has been set to collect mail, if any, every day, but you can set your own timing for collection –
e.g. if you want to collect twice a day. You do it like this: Select new timer (refer to chapter 9)
7.8.4 Get mail
•
•
•
•
Press Ok in the “Function” item and select “Get mail”
Press OK in the ”Day” item and indicate at which date your receiver should check for new mail (every day or a date up to
30 days ahead)
In the "Start" item you indicate the time at which the receiver should check
Press SUBMIT
You will now enter the timer table, in which you will see the timer programmed (possibly together with other programmed
times). Your Force receiver will carry out the timer job once the time in question is reached.
7.9.5
Get EPG (Main menu > Timer > New timer)
You can also set your receiver to update EPG information at specific points of time, e.g. at night time. You do it like this:
Select new timer (refer to chapter 13)
7.8.5 Get EPG
•
•
•
•
Press OK in the “Function" item and select “Get EPG”
Press OK in the ”Day” item and indicate which date your receiver should collect EPG data (every day or a date up to 30
days ahead)
In the "Start" item you indicate the time at which the receiver should collect EPG data
Press SUBMIT
You will now enter the timer table, in which you will see the timer job programmed (possibly together with other
programmed times). Your Force receiver will carry out the timer job once the time in question is reached.
7.9.6
Card update (Main menu > Timer > New timer)
This function updates your programme card/s at specific pints of time. This might be sensible if your programme cards are not
being updated, e.g. if you are away on holiday, or do not use your receiver for a long period for other reasons. You do it like
this: Select new timer (refer to chapter 13)
7.8.6 Card update
20
•
•
•
•
•
•
Press OK in the “function” item and select “Card update"
Press OK in the ”channel” item and select the channel used for updating programme card
In the “Day” item you indicate which date your receiver should update the card (every day or a date up to 30 days
ahead)
In the "Start" item you indicate the time at which the receiver should start
In the "Stop" item you indicate the time at which the receiver should stop
Press SUBMIT
You will now enter the timer table, in which you will see the timer job programmed (possibly together with other
programmed timers). Your Force receiver will carry out the timer job once the time in question is reached.
7.9.7
Editing the timer settings (Main menu > Timer)
If you want to change the programmed timer setting, you should do as follows: Enter the timer table (Main menu > Timer).
Mark the timer, which you want to edit and press OK. You will now enter the menu of this timer, and will be able to change
the different parameters.
7.9.8
Delete timer settings (Main menu > Timer)
If you want to delete a programmed timer setting, you should do as follows: Enter the timer table (Main menu > Timer). Mark
the timer, which you want to delete and press OK. You will now enter the menu of this timer. Mark “Delete” and press OK.
Now the timer will be deleted.
7.8.8/7.8.9 Editing/deleting timer
IMPORTANT!
If you delete the ”Get mail” timer, you will not get mail concerning new updates of software/channel list for the
receiver. If you by mistake delete ”Get mail” timer, you might set it up again (refer to chapter 13).
Notice!
To functioning the right way we recommend the video timer to have a 5 minute interval between the
programmed times.
8
Motor (Main menu > Set up > System > Motor)
The Force receiver can be set up to control a motorised satellite dish. However, to ensure that this works satisfactorily, a
number of settings must be carried out.
NB! It is not easy to install and adjust a motor and Force recommends that this work be left to experts.
To ensure the receiver’s motor control works, you must first tell the receiver that it must not use DiSEqC for any of the
satellite positions. The receiver cannot be set to use DiSEqC and a motor at the same time. The DiSEqC control is switched off
in the following menu: Main menu > Set up > Lists > Positions.
•
•
•
•
Choose a position by pressing OK
Set both DiSEqC selections to “None”
Choose Submit
Repeat for the other positions you want to use
In the list of positions, you should now see 0/0 in the column after the name of the satellite position.
To control the motor, the receiver’s motor control support must be activated. For a motor control to work, the motor must,
of course, be correctly installed and connected. Please refer to the motor’s installation instructions to do this correctly.
Fine adjustment of the motor’s positions is done in the following menu: Main menu > Set up > System > Motor.
Press OK to activate the motor.
Depending on the type of motor installed, you will have to carry out one or more of the settings in this menu for the system
to work.
21
Motor menu
8.1
Preprogrammed Motors
Some types of motor are preprogrammed for many different satellite positions.
The first thing you must do after having installed the motor so that you have perfect reception from a satellite position is to
tell the receiver that this position is your “zero position”. The most correct position to use as the zero position depends on
where you live. The supplier of your satellite system will be able to help you choose this position.
Do the following to fine-tune the zero position and tell your receiver this:
•
•
•
•
Tune the receiver to an unencrypted channel at the satellite position to be used (for example, 13°E).
Go to the Main menu > Set up > System > Motor menu and select “Adjustment of….”.
Make fine adjustments (in small steps at a slow pace) using the shortcut keys until you have achieved as good a signal
strength as possible.
Select and press the “Submit” button to save.
However, the extent to which the motor needs to move to be directed correctly at the various satellite positions also depends
on where you live. Therefore, you must make fine adjustments to tell the motor how much it must move. If the motor is
correctly installed, all positions will be right when the adjustment of the geographical displacement is carried out correctly.
To adjust the geographical displacement, do the following (in this example, the motor’s zero position is 13°E):
•
•
•
•
•
•
Tune the receiver to an unencrypted channel at, for example, 1°W (different from the zero position).
The motor will now move the dish to the west but will probably not produce a perfect picture for the channel selected.
Go to the Main menu > Set up > System > Motor menu and select “Geographical displacement”.
The motor can now be moved to the east or west using the shortcut keys. E-big means that the motor moves in big steps
(approximately 1°) and E-small means that it moves in small steps that are used for fine adjustment when you have found
the desired position. The same applies for the W keys (west).
Adjust the geographical displacement in small steps at a slow pace until the signal quality is as high as possible.
Select and press the “Submit” button to save.
You will now have taught the receiver how far it must move to move the dish from the starting position (in our case 13°E) to
the position selected (1°W).
8.2
Non-programmed Motors
On such motors all the satellite positions must be programmed individually but it will not be necessary to set any geographical
displacement. The positions are programmed as follows:
•
•
•
•
•
Tune the receiver to an unencrypted channel at the satellite position to be adjusted.
Go to the Main menu > Set up > System > Motor menu and select “Adjustment of….”.
Move the motor (in small steps at a slow pace) using the shortcut keys until you have achieved as good a signal strength
as possible.
Select and press the “Submit” button to save.
From the motor menu now select “Go to zero” and repeat the process for all the positions you want to use (but not for
the position already set as the system’s “zero position”).
“Position adjustment”
22
9
Codes for programming TV-sets, VCRs and DVDs.
The remote control supports more devices than listed here. Please find a complete list on our website: www.force.tv
9.1
TV-sets
Akai
Barco
Best
Blaupunkt
Crown
Daewoo
Dux
Finlux
Fujitsu
GoldStar
Grundig
Hitachi
ITT
JVC
Loewe
Luma
Luxor
NEC
Nokia
Nordmende
Panasonic
Philips
Pioneer
Saba
Salora
Samsung
Sanyo
Sharp
Sony
Tandberg
Telefunken
Thomson
Toshiba
0391 0238 0401 0067 0463 0221
0065 0039 0102 0248 0193
0546 0586 0578 0510 0247
0661 0246 0294
0410 0193
0367 0400
0221 0225 0230 0243 0357 0358
0348
0039 0400 0106 0067 0389 0609
0448 0238 0517
0039 0067 0246 0404 0248 0247
0067 0042
0135 0134 0067 0376 0247 0102
0193 0106 0546 0100 0117
0132 0441 0661 0522
0236 0102 0132 0247 0193
0067 0400 0039 0247 0277 0246
0193 0391
0225 0221 0517 0100 0106 0235
0267 0067 0586
0255 0066 0379 0503 0193 0373
0226 0228 0247 0336 0224
0546 0102 0067 0135 0586
0180 0578
0193 0510 0379 0391 0503 0578
0597 0376 0238
0683 0083 0066 0401 0248
0542 0067 0117 0400
0236 0067 0193 0289 0441 0404
0039
0224 0267 0510 0522 0379 0391
0238 0578 0193 0376
0066 0350 0485 0039 0404 0247
0067
0391 0193 0510 0379 0578 0522
0389 0503 0238 0404 0661 0376
0139 0531 0317 0429 0226 0373
0228 0243 0605 0590 0225
0067 0365
0256 0680 0280 0244 0243 0391
0267 0397 0546 0067 0193 0578
0586 0067 0042 0353 0221 0117
0373
0067 0458 0400 0373 0391 0139
0317 0243 0117 0429 0193 0139
0531 0546 0373 0391 0528
0226 0228 0365 0235 0655
0578
0224 0379 0193 0389 0391 0546
0578
0067 0586 0617 0039 0247 0400
0294 0246 0102 0238
0238 0187 0066 0041 0400 0102
0246 0247 0134 0243 0039
0193 0067 0585
1223 0123 0187 0066 0324 0683
0083
1535 1040 1681 0535 0040 0041
0030 0066 0132 0681 0104
0397 0441 0139 0367 0226 0391
0139 0531 0528 0501 0429 0317
0104 0114 0131 0365 0292
0336 0373 0226 0067 0655
0317 0429 0139 0531 0363 0501
0365 0226 0228 0235 0267
0373 0067 0520 0590 0655
0065 0538 0273 0066 0100 0132
0247
23
9.2
VCR
Aiwa
Akai
Blaupunkt
Crown
Daewoo
GoldStar
Grundig
Hitachi
ITT
JVC
Kenwood
LG
Luxor
Marantz
Mark
Mitsubishi
NAD
National
NEC
Nokia
Panasonic
Philips
Pioneer
Saba
Salora
Samsung
Sanyo
Sharp
Sony
Tandberg
Telefunken
Thomson
Toshiba
9.3
DVD
Akai
Denon
Grundig
JVC
Kenwood
Magnavox
Marantz
Micromega
Onkyo
Optimus
Panasonic
Philips
Pioneer
Samsung
Sony
Technics
Thomson
Toshiba
Yamaha
24
0337 0030 0071 0239 0378 0382
0067
0136 0345 0083 0071 0050 0382
0256 0111 0184 0257 0192 0036
0225 0433 0064
0308 0102 0050 0352
0308 0050 0075 0239 0382
0067 0030
0037 0225 0111 0377 0379 0256
0036 0433 0350
0072 0196 0071 0030 0270 0111
0034 0134 0433
0136 0071 0076 0414 0134 0270
0071 0097 0038 0236 0237 0414
0516
0071
0067 0030 0308
0136 0076 0073 0102 0134 0077
0078
0111 0068 0036 0239
0308 0050
0073 0097 0111
0134
0256 0192
0071 0068 0097 0134 0067
0134 0136 0345 0071 0308 0076
0270 0078 0072 0111
0192 0192 0256 0257
0111 0036 0433
0097 0111 0072
0071 0217 0327 0236 0237 0350
0351 0414 0524 0610
0076 0073 0136 0134
0270 0462
0134 0076 0077 0078
0078
0063 0064 0062 0041 0136 0062
0308
0217 0071 0327 0350 0351 0414
0523 0524 0559 0560
0071 0414 0350 0236 0351 0523
0524 0558
0075 0071 0414 0073 0111 0433
0641
0520 0664
0569
0588
0564
0533
0569
0569
0642 0533
0555
0520
0569 0533 0662
0555 0601 0662
0603
0563
0520
0581
0533
0520 0575
10
Your codes
For later reference, we recommend you to write down the code for your television and other devices to be controlled by the
Force remote control.
TV
AUX
25