1
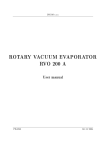
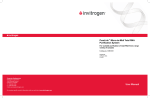
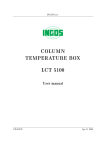
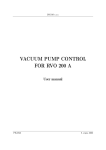
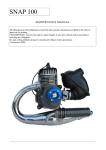
INGOS Ltd.
ROTARY VACUUM
EVAPORATOR
RVO 004
User manual
PRAGUE
INGOS Ltd. Laboratory Instruments division
April 11 2006
Page 1
Producer
:
Laboratory Instruments division of INGOS Ltd.
Supplier and service
:
INGOS Ltd.
K Nouzovu 2090
143 16 PRAGUE 4
CZECH REP.
Tel: +420 296 781 683
+420 296 781 692
Fax: +420 244 403 051
e-mail:[email protected]
[email protected]
(c) INGOS 2006
INGOS Ltd. Laboratory Instruments division
Page 2
INGOS Ltd. Laboratory Instruments division
Page 3
1. INTRODUCTION
1.1 Apparatus use and specifications
The RVO 004 Standard and RVO 004 Control rotary vacuum evaporator is used for
evaporation under low pressure at a preset temperature of the heating bath (if the bath is a
part of the delivery) and under permanent and in advance specified stirring of the evaporated
solution. The exhausted vapours condense in a vertical cooler and are collected in a flask.
This ensures that the evaporated solution cannot be damaged and therefore impaired.
RVO 004 Standard is equiped by water bath with the thermostatic temperature
control.
RVO 004 Control is equiped by water bath with the electronic temperature control.
1.2 Technical characteristics
Evaporating flasks ........................ 20 – 4000 ml
Rotation speed ........................... 10 to 200 rpm
Bath temperature Standard ...... 35°C - 95°C
Regulation accuracy ................... ±5°C
Bath temperature Control ........ from the ambient temperature +5°C – 100°C
Regulation accuracy Control ...... ±2°C
Power supply ................................230V, ±10%, 50Hz
Power input ................................ max.24 VA
Bath input .................................. max.2000 VA
Weight without glass ................. 8 kg
Dimensions (w x h x d) .............600 x 950 x 390 mm (including glass)
1.3 Symbol Explanation
- hot surface
INGOS Ltd. Laboratory Instruments division
Page 4
2. TECHNICAL DESCRIPTION
The instrument consists of a stand, head with rotating housing, cooler's holder, pipe, adapter of
the bulb condenser, flask with a ball joint, round-bottomed flask, inlet pipe with a valve, flexible
and fixed clamp.
For complete list of basic accessories see paragraph 7.1
1.
2.
3.
4.
5.
6.
Fitting –Vacuum connection
Fitting – Cooling water connection
Condenser (cooler)
Filling pipe with a valve
Fixed clip
Receiving flask 1000 ml with ball joint socket
8. Stand
9. Rotation controling
10. Rotation casing Head
11. Round bottom flask , joint NZ29/32
12. Fixing screw
13. Heating bath
Fig. 1. Location of individual parts of RVO
INGOS Ltd. Laboratory Instruments division
Page 5
3. STARTING OF OPERATION
3.1 Unpacking of the apparatus
Remove the instrument from the transport packing, check the instrument surface and all
the items according to the delivery note. Please contact the manufacturer or your dealer in case of
instrument damage or a missing part.
Notification: Coat the glass joints with silicone vaseline prior to assembly.
3.2 Apparatus assembly
1.
Screw the bar of the cooler's holder into the nut in the head with the rotating housing,
insert the housing with the openings and grooved nuts and the cooler's holder itself.
2. Insert the pipe into the head with the rotating housing from the side of the heating
bath until the pipe joint snaps behind the ring in the rotating housing. Insert the
arresting rod into the opening in the rotating housing and tighten the nut of the
housing.
3. There is a fixed housing with a nut on the opposite side of the head with the rotating
housing. Unscrew nut (2), insert on the recessed part of the ball adapter (1) and insert
securing ring (3) until it snaps behind the recessed part of the ball adapter. Check
if Gufero packing (4) coated with silicone vaseline is placed by the open side outside
the recess. Check if flat packing (5) is inserted in the housing and carefully insert
the ball adapter with Gufer and the nut on glass pipe (7). Insert the ball adapter
until the end stop and tighten it carefully with nut (2). The half-ball joint of the ball
adapter points downward.
4. Coat all the joints on the other glass parts finely with silicone vaseline.
5. Insert the cooler into the joint in the top part of the ball adapter and also into the
cooler's holder. The top cooler's outlet serves for connecting the subpressure source,
other outlets are for cooling water.
6. Attach the flask with the ball joint to the ball joint using the fixed clamp and tighten
it.
7. Insert the round-bottomed flask on the pipe and secure with the flexible clamp.
8. Insert the inlet pipe with the cock (cock is closed) into the ball adapter.
9. Connect the bushing.
10. Pour water into the heating bath; adjust the end stop of the stand for the roundbottomed flask being immersed in the liquid. The maximum amount of the liquid is
approximately 20 mm below the edge of the heating bath.
Notification: A glass part with a visible crack or another defect must not be used!
INGOS Ltd. Laboratory Instruments division
Page 6
1.
2.
3.
4.
Ball adapter
Nut
Bead-type securing ring
Gufero sealing 35/22/10
5. Flat sealing
6. Housing
7. Suck pipe
Fig. 2a. Ball adapter sealing
INGOS Ltd. Laboratory Instruments division
Page 7
1.
2.
3.
4.
Ball adapter
Nut
Bead-type securing ring
Gufero sealing 35/22/7
5. Flat sealing
6. Housing
7. Suck pipe
8. Scraper ring (chemical resistant)
Fig. 2b. Ball adapter sealing (chemical resistant )
INGOS Ltd. Laboratory Instruments division
Page 8
1.
1.
2.
3.
Ball adapter
Nut
Bead-type securing ring
PTFE sealing
5. -----6. Housing
7. Suck pipe
Fig. 2c. Ball adapter sealing (chemical resistant)
3.3 Apparatus control
The instrument is put into operation by connecting the network switch. The round-bottomed
flask starts rotation after turning on the switch. The speed of rotation is controlled by the rotary
knob.
The height of immersion into the heating bath is arrested with a bolt on the telescopic stand.
The bath temperature setting at version Standard is by using the thermostat scroll and at version
Kontrol by degrese scale.
4. MAINTENANCE
4.1 Apparatus maintenance
Do not leave the evaporator surface contaminated from corrosive substances. It could damage the
evaporator coating. Clean the contamined surface with a clean soft cloth. The cloth may be moistened
but not wet. It is also possible to use ordinary washing means for cleaning purposes. It is forbidden to
clean the heating bath with the means which could spoil its smooth surface. In case of sediments of
furning,impurities, particulates of water rusts ,use the cleaning compounds for cleaning of furning or
mellow solution of HCL. In process of cleaning use the protective means recommended by producer of
INGOS Ltd. Laboratory Instruments division
Page 9
applied cleaning compounds.
Caution: Disconnect the apparatus from the network while cleaning it with a wet cloth!
4.2 Sealing replacement
Disassemble the condenser, remove the releasing pipe with the valve, remove the ball-andsocket ground joint flask, release the nut of the ball adapter and carefully remove the actual adapter.
Release the gufero sealing, clean the ball adapter, slightly apply silicone Vaseline onto the new sealing
and mount it into the ball adapter. The sealing cavity faces out of the ball adapter. If necessary, replace
also the flat sealing between the ball adapter and the head fitted with a rotary casing. Perform the
assembly according to the point 3.2. Apply a light layer of silicone Vaseline to the gufero sealing
approximately after 80 operation hours (more often if necessary).
5. DEFECTS AND TROUBLESHOOTING
5.1 Leakage
The main cause of leakage is usually an incorrect sealing assembly. At first you should check that
all joints have been installed correctly. If it is the case, disassemble the glass and verify the condition of
the ball adapter sealing and flat sealing, if necessary replace them. Carefully assemble according to the
instructions, switch the rotation ON and start the vacuum pressure up.
5.2 Other failures
The instrument does not react after being turned on. Check the fuse or replace for a new one
of the same parameters, as appropriate. Check that the rotation is not hindered (turning by hand),
turn on and off the network switch.
The window of the rotation key is flashing, rotating parts are not moving. Ensure that Rotation
blocking knob is set to ”Unlock” and than press rotation key again. The window of the rotation key is
flashing. Check that there is not anything which could impede the flask from its rotation (manually),
switch the mains switch OFF and ON again.
The bath no warms.Put out the socket plug of the bath and let the bath cool down. Plug in again fill
up the water or oil and set required temperature.
6. SAFETY AND OPERATION CONDITIONS
6.1 Operation safety
Securing the rotation of the evaporated sample: Overcurrent protection of the
driving motor. If the resistance against rotation exceeds a specified limit, the power
supply of the driving motor is disconnected. Securing the bath heating: With thermal
fuse during overheating above 200°C.
INGOS Ltd. Laboratory Instruments division
Page 10
6.2 Operation conditions
The instrument is designed for work under standard laboratory conditions at
temperatures from 10 to 30°C and air humidity to 80°C.It is forbidden to handle a
bath heated to a temperature higher than 40°C.
Attention! Be especially careful when replacing a round-bottomed flask after
increasing the concentration of the evaporated sample. If the flask cannot be removed
easily from the cone, carry out further operation only after cooling the bath.
Caution! If you are replacing the round-bottom flask after the vaporized solution has become
thicker, pay particular attention and if it is not possible to remove the flask easily from the cone, carry
out any other handling only after the cooling of the bath.
Caution! If you use oil as the filling of the heating bath, the heating bath must be properly dried
before its being filled.
7. ACCESSORIES AND SPARE PARTS
7.1 Basic accessories (comes with evaporator)
Inlet cord Glass assembly
Round bottom flask (1000, 2000 ml) NZ29/32
Receiving flask (1000 ml) KS 35/20
Suck pipe
Ball adapter
Vertical condenser
Filling pipe with a valve
3 pieces of GL14 connection fitting
Sealing: gufero sealing 35/22/10 (Fig. 2a, pos. 4),
flat sealing (Fig. 2a, pos. 5)
7.2 Other accessories
7.2.1 Glass accessories (Fig. 3)
4SKL0021
4SKL0025
4SKL0022
4SKL0023
4SKL0004
4SKL0003
4SKL0012
4SKL0017
4SKL0024
4SKL0006
4SKL0034
4SKL0005
4SKL0033
Evaporating flask 50 ml, joint NZ29/32
Evaporating flask 100 ml, joint NZ29/32
Evaporating flask 250 ml, joint NZ29/32
Evaporating flask 500 ml, joint NZ29/32
Evaporating flask 1000 ml, joint NZ29/32
Evaporating flask 2000 ml, joint NZ29/32
Evaporating flask 4000 ml, joint NZ29/32
Receiving flask 250 ml, joint KS35/20
Receiving flask 500 ml, joint KS35/20
Receiving flask 1000 ml, joint KS35/20
Receiving flask 2000 ml, joint KS35/20
Vertical condenser
Diagonal condenser
INGOS Ltd. Laboratory Instruments division
Page 11
4SKL0020
4SKL0001
4SKL0002
4SKL0008
4SKL0009
4SKL0010
4SKL0019
4SKL0018
4SKL0011
4SKL0014
4SKL0015
4SKL0016
4SKL0035
RO3212
Dry ice trap
Filling pipe with a valve - short
Filling pipe with a valve - long
Ball adapter
Flask 100 ml, joint NZ14/23
Flask 250 ml, joint NZ14/23
Spider with 3 sleeves NZ14/23 (max. flask 250ml)
Spider with 5 sleeves NZ14/23 (max. flask 100ml)
Spider with 6 sleeves NZ14/23 (max. flask 20ml)
Foam trap NZ29/32 - NZ14/23
Foam trap NZ29/32 - NZ29/32
Test tube 20ml, joint NZ14/23
Adapter NZ29/32 - NZ14/23
Suck pipe
7.2.2 Spare parts, other accessories
RO1520
1TOO0007
1TG24524
1TOO0009
1TOO0010
1TOO0008
RO1080
RO1041
4SKL0026
4SKL0027
90000013
5HAD0003
90000036
90000044
Fuses:
Protection bath cover
Gufero sealing 35/22/10 (Fig.2a)
Flat sealing
Gufero sealing 35/22/7 (Fig.2b)
Scraper ring
Sealing PTFE (Fig.2c)
Fixed clip (for KS32/20)
Elastic clip (for NZ14/23)
Straight fitting GL 14
Cap nut GL 14
Tubing coupler
PA Vacuum tubing
Vacuum pump ( VM20D recomended)
Spare diphragms and sealing for VM20D
Heating bath stainless steel
T 200 mA
INGOS Ltd. Laboratory Instruments division
Page 12
Fig. 3. Glass accessories overview
INGOS Ltd. Laboratory Instruments division
Page 13
8. CONCLUSION
8.1 Carrying out of repairs
All warranty and after-warranty repairs shall be carried out by the manufacturer or
by the organization authorized by them. If the delivery note does not state otherwise,
contact the distributor for any repair requirements.
8.2 Warranty
A warranty will be provided for the product by the manufacturer for a period of
one year after handing it over to the buyer. The instrument may be used only in the
manner described in these instructions for use. The instrument must not be used in a
manner different from that indicated in these instructions, otherwise the safety of
operation may be affected. The manufacturer does not accept responsibility for
damage arising by non-fulfilment of the requirements of these instructions.
8.3 Waste disposal
When the instruments operating life is over dispose it in respect to valid
regulations, also it can be returned to the vendor or producer for liquidation.
Warning: Instrument contains parts (PCB’s) which are rated as hazardous waste.
INGOS Ltd. Laboratory Instruments division
Page 14
9. TABLE OF CONTENTS
1.
INTRODUCTION ....................................................................................................................
1.1 Instrument use and specification ...................................................................................
1.2 Technical information .......................................................................................................
1.3 Symbol Explanation ..........................................................................................................
2.
3.
TECHNICAL DESCRIPTION ................................................................................................ 5
PUTTING INTO OPERATION ............................................................................................... 6
4.
5.
6.
7.
8.
9.
4
4
4
4
3.1 Unpacking the instrument ............................................................................................. 6
3.2 Mounting the instrument ............................................................................................... 6
3.3 Operating the instrument ............................................................................................... 9
MAINTENANCE ....................................................................................................................... 9
4.1 Maintaining the instrument surface ............................................................................. 9
4.2 Replacing the packing .................................................................................................... 10
DEFECTS AND TROUBLESHOOTING .............................................................................. 10
5.1 Leak (required pressure is not obtained) .................................................................... 10
5.2 Other failures .................................................................................................................. 10
SAFETY AND OPERATION CONDITIONS ..................................................................... 10
6.1 Safe operation .................................................................................................................. 10
6.2 Operating conditions ...................................................................................................... 11
ACCESSORIES AND SPARE PARTS ................................................................................ 11
7.1 Basic accessories (comes with evaporator) .................................................................. 11
7.2 Other accessories ............................................................................................................ 11
7.2.1 Glass accessories .................................................................................................
7.2.2 Spare parts, other accessories ...........................................................................
CONCLUSION .........................................................................................................................
8.1 Carrying out of repairs ................................................................................................
8.2 Warranty..........................................................................................................................
8.3 Waste disposal ..............................................................................................................
TABLE OF CONTENTS .......................................................................................................
9.1 List of picturtes and tables ..........................................................................................
11
12
14
14
14
14
14
14
9.1 List of picturtes and tables
Fig. 1. Location of individual parts of RVO ..................................................................................... 5
Fig. 2. Ball adapter sealing - section view (a-c)........................................................................ 7-9
Fig. 3. Glass accessories overview .......................................................................................................... 13
INGOS Ltd. Laboratory Instruments division
Page 15