1
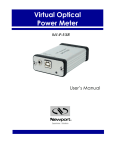
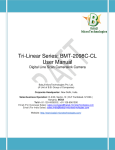
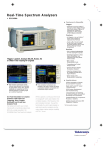
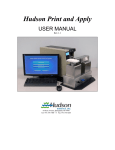
AvaTrace M60 User Manual Important Information The AvaTrace M60 is a sensitive electronic instrument. Every care has been taken to provide you with a robust instrument for use in the field. However, it contains sensitive components and must be handled with care. AvaTrace M60 is resilient to electromagnetic interference and approved for industrial environments, but care must be taken when the instrument is in the vicinity of heavy machinery, transformers, radio transmitters or other sources of severe electromagnetic interference. AVA Monitoring AB hereby declares that this measurement instrument complies with the essential requirements and other relevant provisions of the R&TTE Directive 1999/5/EC. The full Declaration of Conformity is held at: AVA Monitoring AB Vädursgatan 6 SE 412 50 Göteborg SWEDEN Rev A Page 2 AvaTrace M60 User Manual Contents 1. How to Read This Manual .......................................................................................................... 5 1.1 Symbols .................................................................................................................................. 5 1.2 Further Information ................................................................................................................. 5 2. Instrument Overview .................................................................................................................. 6 3. First Time Setup ......................................................................................................................... 8 Not Required - Hire Equipment 3.1 SIM Card Installation .......................................................................................... 8 4. Systems Overview .................................................................................................................... 10 4.1 AvaNet and AvaTrace M60 .................................................................................................. 10 4.2 Measuring Channels and Measuring Points ........................................................................ 10 4.3 Measurement, Triggering and Waveforms ........................................................................... 10 4.3.1 Triggering ....................................................................................................................... 10 4.3.2 Trigger Parameters ........................................................................................................ 11 4.3.3 Periodic Measurement ................................................................................................... 11 4.4 Modes, Sensors and Filter Profiles ...................................................................................... 12 4.5 Communication..................................................................................................................... 12 4.6 Data Storage......................................................................................................................... 13 4.7 Power Supply........................................................................................................................ 14 4.8 Buttons and Indicators .......................................................................................................... 15 4.8.1 Buttons ........................................................................................................................... 15 4.8.2 Indicators ....................................................................................................................... 16 5. Basic Operation ........................................................................................................................ 21 5.1 Prepare in AvaNet ................................................................................................................ 21 5.2 Installation in the Field .......................................................................................................... 21 5.3 Connecting to AvaNet Manually ........................................................................................... 21 5.4 Stop Measurement ............................................................................................................... 21 6. Configuration of AvaTrace M60 via AvaNet .......................................................................... 22 6.1 AvaNet Instrument Panel ..................................................................................................... 22 6.1.1 Main Settings ................................................................................................................. 23 6.1.2 Acquisition Settings ....................................................................................................... 24 6.1.3 Transfer Settings ........................................................................................................... 24 6.1.4 Ethernet Settings ........................................................................................................... 25 Additional Charges Apply 6.1.5 SMS Sender Settings .................................................................................................... 26 6.1.6 Download Settings ......................................................................................................... 27 6.1.7 Measurement Channel Settings .................................................................................... 28 6.1.8 Internal Measuring Channel Settings ............................................................................ 29 6.2 Log Events ............................................................................................................................ 29 7. Sensors ..................................................................................................................................... 30 Rev A Page 3 AvaTrace M60 User Manual 7.1 Geophones ........................................................................................................................... 31 7.1.1 Installing a Vertical Geophone....................................................................................... 31 7.1.2 Installing a Horizontal Geophone .................................................................................. 31 7.1.3 Installing a Triaxial Geophone ....................................................................................... 32 7.2 Airblast Microphone .............................................................................................................. 32 7.2.1 Installing an Airblast Microphone .................................................................................. 32 7.3 Accelerometer....................................................................................................................... 33 7.3.1 Installing an Accelerometer ........................................................................................... 33 8. Maintenance .............................................................................................................................. 34 8.1 Install or Replace Batteries .................................................................................................. 34 8.2 Maintenance Carried out by the User .................................................................................. 36 8.2.1 Cleaning ......................................................................................................................... 36 8.3 Storage ................................................................................................................................. 36 8.4 Update Software ................................................................................................................... 36 8.5 Calibration............................................................................................................................. 36 9. Technical Specification ........................................................................................................... 37 9.1 Measurement Standards ...................................................................................................... 37 9.2 Operating Time ..................................................................................................................... 37 9.3 Data Volume ......................................................................................................................... 38 Rev A Page 4 AvaTrace M60 User Manual 1. How to Read This Manual 1.1 Symbols CAUTION Indicates a hazardous situation that, if not avoided, could result in minor or moderate injury. NOTE Indicates information considered important but not hazard related, e.g. a situation that, if not avoided, could damage equipment or cause equipment malfunction or loss of data. SENSITIVE COMPONENTS Indicates the presence of components sensitive to electrostatic discharge. Handling precautions are required in order to avoid equipment damage or malfunction. 1.2 Further Information For more information about our products please visit the AVA Monitoring Support Site where you can find tutorial videos, answers to frequently asked questions as well as technical specifications and guides. http://avamonitoring.com/support Rev A Page 5 AvaTrace M60 User Manual 2. Instrument Overview Overview Left Hand Side Outer Lid Serial Number Battery Hatch Battery Compartment 4 3 2 1 Battery Pack Air Pressure Valve Sensor Connectors Rev A Page 6 AvaTrace M60 User Manual Overview Right Hand Side Serial Number Panel Calibration Label External Power Connector Ethernet Connector Serial Number Rev A Page 7 AvaTrace M60 User Manual 3. First Time Setup First unpack the AvaTrace M60 and its accessories. Make sure that the instrument has not been damaged during transport. For new instruments, a SIM card must be installed in the instrument. This is described in the following section. For rental instruments, the AvaTrace M60 is delivered with a preinstalled SIM card. 3.1 SIM Card Installation NOT REQUIRED - HIRE EQUIPMENT Equipment Needed: SIM card set up according to ”Mobile Network Operator Guide” (see AVA Monitoring Support Web Site) T-20 Torx screwdriver Antistatic wrist strap Equipment used to install SIM card 1. Connect yourself via the wrist strap to one of the sensor connectors. 2. Turn the panel screws half way until the panel can be removed. Make sure that no gaskets fall off. 3. Lift the panel with one hand, take care with the attached cables. CAUTION SENSITIVE COMPONENTS Take great care when the instrument is open. Avoid touching the circuit boards. Rev A Page 8 AvaTrace M60 User Manual 4. While holding the panel insert the SIM card with the other hand as shown below. Inserting SIM card NOTE NOT REQUIRED - HIRE EQUIPMENT 5. When the panel is refitted, start with the screws from the middle. See numbering in picture below. Take care with the attached cables. Refit Panel with the screws in the correct order 6. Install batteries according to 8.1 Install or Replace Batteries. 7. When installation is completed continue with 5 Basic Operation. Rev A Page 9 AvaTrace M60 User Manual 4. Systems Overview 4.1 AvaNet and AvaTrace M60 The AvaTrace M60 is a field instrument for unattended measurement of vibration and airblast overpressure. Combined with AvaNet and the accompanying sensors, it creates a complete measuring system. The AvaTrace M60 has a simple panel where AvaNet connection can be initiated and measurements can be started and stopped. However, all instrument settings for communication and measurement are made in AvaNet. There, you also get information about the status of the instrument. The instrument settings are transferred to the AvaTrace M60 every time the instrument is connected to AvaNet. When measurement is started, the instrument continuously collects measurement data according to the configured settings. The collected data is transferred to AvaNet where it is saved. The measurement data is then immediately available for the user. 4.2 Measuring Channels and Measuring Points The AvaTrace M60 is equipped with four external and independent channels with individual filter and sensor configuration. In addition to these channels, the AvaTrace M60 is equipped with internal measuring channels for the instrument temperature and instrument battery voltage. These channels cannot be configured in the same way as the external channels, but can be connected to measuring points and alarm groups. In AvaNet the instrument channels are connected to measuring points. A measuring point in AvaNet is tied to a physical measuring point in the field, not to a specific instrument or sensor. When measurement values are transferred to AvaNet, they are saved not only in the instrument measuring channels but also in the measuring points connected to the channels. This means that the measuring points can be easily connected to a new instrument seamlessly if a problem should occur without loss of earlier measurement values. In addition to the collected measurement values, AvaNet also saves metadata that identifies the instrument, channel and sensor used for the measurement. This gives great traceability for each measurement value in the measuring point, if instruments or sensors are replaced during the course of the project. 4.3 Measurement, Triggering and Waveforms 4.3.1 Triggering During triggered measurement, AvaTrace M60 continuously monitors the measurement values for every active channel. Triggering occurs when the measurement value reaches or exceeds the configured trigger level on one of the channels. Rev A Page 10 AvaTrace M60 User Manual p1 trg p2 trg trg -p3 p4 trg ttrig Record Pretrigger trg = trigger level Triggered Measurement When triggering occurs, waveforms are recorded for all active channels and peak values (see px in figure above) are calculated for each channel. The recorded waveforms contain a section of pretrigger data recorded before the trigger event. The total waveform length and the pretrigger length can be configured in AvaNet. In most cases, the peak values for the different channels do not occur simultaneously. Note that waveforms can overlap with waveforms from previous trigger events. 4.3.2 Trigger Parameters To avoid overload and ensure that the instrument can handle all collected measurement data, the number of trigger events permitted in a specific time is limited. Normally the AvaTrace M60 can trigger repeatedly three times in direct succession before the instrument pauses triggering for a few minutes. Note that this does not affect the collection of periodic measurement data. In this case it is possible to obtain a periodic measurement value that is higher than the highest triggered measurement value during the same time. When triggering is temporarily disabled, this is indicated by the measurement status indicator flashing fast, intermittently. This is also reported to AvaNet and available in the instrument event log. 4.3.3 Periodic Measurement During periodic measurement, the measurement period, the time from the start to the end of measurement, is divided into intervals according to the specified storage interval. Time intervals are aligned so that measurement records are generated at even hour or minute times, e.g. at the turn of each hour. The first and last intervals are therefore usually shorter than the specified storage interval. After each interval, a periodic measurement value is generated containing the highest measurement value for each active channel during the entire time interval. In AvaNet, periodic measurement values are marked with the letter “P”. Rev A Page 11 AvaTrace M60 User Manual P 13:52:20 14:00:00 start P P P P 14:30:00 15:00:00 15:30:00 15:39:20 end 14:00:00 14:30:00 15:00:00 15:30:00 15:39:20 1.0 mm/s P 4.2 mm/s P 5.3 mm/s P 4.1 mm/s P 6.7 mm/s P Periodic Measurement 4.4 Modes, Sensors and Filter Profiles Mode can be used to quickly set some of the measurement settings to predefined values, such as the storage interval. It also limits the availability of options for other settings such as the filter profile. There are a number of different filter profiles to choose from for each mode. Measurement is normally performed according to a measurement standard and the selection of filter profile is determined by the choice of measurement standard. A correct combination of sensor type and filter profile is essential in order to ensure that the measuring system fulfils the requirements of the selected measurement standard. It is very important that the correct filter profile and sensor type are selected before measurement is started so that the measurement is performed according to the desired standard. When mode is set to “adapted mode” the instrument can be configured with more flexibility, but with less guidance. When measurement settings are configured, you must first select the correct mode and then select sensor type and finally the correct filter profile. When setting up an instrument using the guide for new measuring points these settings will normally be set to suitable values based on the selections made. It is recommended to always verify the instrument settings when changes have been made. 4.5 Communication The AvaTrace M60 communicates with AvaNet via the Internet. The instrument is either connected to AvaNet using a mobile network (GPRS) or using the Ethernet port. When using Ethernet there are many different solutions to choose from in order to provide Internet access, for example using a direct connection to a fixed network or using an external mobile router with support for other types of mobile networks. The AvaTrace M60 is normally configured to connect to AvaNet at regular intervals according to a preconfigured connection schedule. The instrument can also be configured so that it connects to AvaNet when a trigger level has been reached or when the start/stop button is used to start or stop the measurement. The instrument always connects to AvaNet when the connect button is pressed. If a problem occurs while the instrument tries to connect to AvaNet new attempts are made automatically. In the event of repeated problems the attempts are made less frequently to save Rev A Page 12 AvaTrace M60 User Manual the batteries. Only a limited number of attempts will be made and if the problems persist, the instrument eventually returns to its normal connection schedule. The instrument is usually connected to AvaNet until all instrument settings and all data requested by AvaNet are transferred. The selection of collected measurement data that is automatically transferred to AvaNet is determined through a number of settings in the instrument panel under the Transfer tab. In order to save batteries in case of incorrect instrument configuration, it is possible to specify a maximum connection time. In that case, the instrument is forced to disconnect even though there are settings and data that have not been transferred when the maximum connection time has been reached. It is also possible to disable automatic disconnect in order to keep the AvaTrace M60 connected for a longer period even though there is no new data to communicate. This can be useful if you want to interact directly with the instrument, for example if you want to examine the effects of different settings in real time. The maximum connection time is then ignored. However, the instrument cannot be connected for longer than approximately two hours at a time. It is important not to forget to reset the auto disconnect setting when you are done or the instrument will quickly discharge the batteries. 4.6 Data Storage The AvaTrace M60 uses circular buffers for data storage. Separate buffers are used for trigged measurement data periodic measurement data environment measurement data (internal sensors) event log records. When a buffer is full (for any type of data listed above) the oldest recorded data is replaced by new data. This ensures that you can always record new data without having to reset the instrument or otherwise free up resources. The size of storage buffers are designed so that, in normal operation, no data is overwritten before it has been transferred to AvaNet. For example, if you measure vibration levels with a triaxial geophone, using one hour periodic measurement and if the instrument triggers five times a day, the AvaTrace M60 will record waveforms for 17 days without overwriting any waveform data. It will also be able to record peak and periodic values for several months. During normal operation, the AvaTrace M60 automatically transfers data regularly to AvaNet according to your settings. When data has been transferred to AvaNet, it is stored reliably and will not be overwritten or deleted unintentionally. AvaTrace M60 Data Storage Limitations Number of waveforms Number of periodic measurement records (each record contains data for all four channels) Number of trigged measurement records (each record contains data for all four channels) Rev A 255 4000 1000 Page 13 AvaTrace M60 User Manual 4.7 Power Supply The AvaTrace M60 is normally powered by six alkaline, 1.5V, LR20/D-cell batteries, but can also be connected to an external power source such as a power supply unit. When the AvaTrace M60 is operated using batteries we strongly recommend that you use premium batteries intended for high power drain. Otherwise the battery time can be significantly shortened. When measurement has been switched off for a long time the instrument automatically goes into low power mode in order to save battery power and extend battery life. When the instrument is woken from low power mode, using any button, all indicators light up until the instrument has been fully initialized. The AvaTrace M60 reports for how long the batteries have been in operation and displays the operating time along with the battery voltage level in the AvaNet instrument panel. The operating time is reset automatically at battery replacement. The battery operating time counter and the battery voltage level, which decreases slowly as the batteries are discharged, gives you a good basis for determining when batteries need to be changed. Battery life depends on a number of factors including how often the instrument is connected to AvaNet, the prevailing radio conditions at the location, the amount of data transferred to AvaNet and the ambient temperature. When the AvaTrace M60 is operated with external power, a high quality power supply unit with low interference should be used in order not to affect the measurement. It is strongly recommended to use a power supply unit approved by AVA Monitoring. When the instrument is connected to a power supply unit it must still be equipped with batteries to avoid problems in the event of power failure. Rev A Page 14 AvaTrace M60 User Manual 4.8 Buttons and Indicators The buttons are used to wake the unit, connect to AvaNet, start/stop measurement and to check the battery status. The indicators display the current connection status, measurement status and battery status. If the unit is in low power mode press any button to wake the unit. All indicators light continuously to indicate that the unit has woken from low power mode. 4.8.1 Buttons A short press on the button is used to request connection to AvaNet. A long press on the button (more than 5 seconds) is used to request activation of the unit’s CLI interface. Starts or stops measurement on all active channels. To start measurement, press the button briefly. To stop the measurement, the button must be pressed for at least 5 seconds. Used to check the battery voltage status. The result is indicated by the battery status indicator (see below and section 8.1 for detailed information). Rev A Page 15 AvaTrace M60 User Manual 4.8.2 Indicators Connection status The indicator at the far left of the “connect” button displays the current AvaNet connection status. A slow flashing indicator indicates that connection is in progress. A continuous light indicates that the unit is connected to AvaNet or that the CLI port is activated. Note that the duration of the AvaNet connection can vary significantly, from a fraction of a second to several minutes. If the AvaNet connection fails or is terminated in an uncontrolled way, this will be indicated by fast flashing for 30 seconds. Rev A Page 16 AvaTrace M60 User Manual Measurement status The indicator at the left side of the “start/stop” button displays the current measurement status. Slow flashing indicates that measurement is in normal progress. Waveform recording is indicated by a continuous light for the entire record duration. Fast flashing indicates that a fault has been detected during the self-test. See more information about the fault in AvaNet. A continuous light occurs during the self-test procedure until measurement starts or is resumed. Intermittent flashing indicates that measurement is active but triggering cannot currently be performed. Rev A Page 17 AvaTrace M60 User Manual Battery status When using the “check” button, the current battery status is displayed during 10 seconds. A continuous light indicates that the battery voltage level is OK. Fast flashing indicates that the voltage level is insufficient and the battery pack should be replaced. Intermittent flashing indicates that the voltage level is very low or the battery pack is disconnected so that no data processing can be performed. The battery pack must be replaced as soon as possible. Rev A Page 18 AvaTrace M60 User Manual Data processing The “data processing” indicator displays the current status of the data processor. A continuous light indicates that data processing is in progress. (Do not unplug the battery pack.) Intermittent flashing indicates that data cannot be processed due to insufficient power supply. The battery pack should be replaced. NOTE Never unplug batteries when the data processing indicator is lit. Rev A Page 19 AvaTrace M60 User Manual Signal strength The three indicators directly to the left of the “connect” button displays the current GPRS signal strength when connecting using GPRS. The signal strength is indicated as long as the GPRS connection is established. A continuous light with: three indicators lit indicates very good signal strength. two indicators lit indicates good signal strength. one indicator lit indicates moderate signal strength. Fast flashing with one indicator, indicates no or insufficient signal. Other indications All indicators will be lit continuously when the unit wakes from low power mode. The indicators return to normal mode when the unit has been initialized. The data processing and battery status indicators are lit continuously during firmware upgrade. Fast flashing with all indicators for a period of 30 seconds indicates that a serious fault has been detected. Should this occur, please contact your local support. Rev A Page 20 AvaTrace M60 User Manual 5. Basic Operation 5.1 Prepare in AvaNet Before the AvaTrace M60 can be used in a project, it must be configured and connected to one or many measuring points in the project. This is done using AvaNet, which is a web application. The easiest way to do this is to create a new project in the project overview and then follow the guide. Please refer to the AVA Monitoring Support Web Site for more details (e.g. details explained in the tutorial videos and the FAQ). Make sure that all settings are transferred to the instrument by connecting the AvaTrace M60 to AvaNet using the connect button. Wait until the connection status indicator has been turned off. Check the instrument panel in AvaNet to make sure that no settings are marked red or yellow before installing the instrument in the field. 5.2 Installation in the Field 1. Mount sensors and connect them to the AvaTrace M60. 2. Press “start/stop”. The AvaTrace M60 performs a self-test on all active channels and starts measuring. The measurement indicator will now flash slowly. Fast flashing indicates self-test failure. Check AvaNet for more information about the detected problems. In event of self-test problems, a new self-test can be performed when the problem has been resolved by stopping and restarting the measurement using the start/stop button. This step is not mandatory but is recommended in order to make sure that the problem has been resolved. 5.3 Connecting to AvaNet Manually For manual connection to AvaNet. Performed when needed. 1. Connect by quickly pressing the connect button. 2. The connection status indicator first flashes slowly during connection establishment and is then permanently lit during the period of time when the connection is established. Note that the time that the indicator is permanently lit varies from a fraction of a second to several minutes. If connection fails, the connection indicator will fast flash for 30 seconds. If connection fails repeatedly, try moving the AvaTrace M60 a few meters. In many cases this can enhance the reception of the signals from the mobile network. Large objects close to the AvaTrace M60 can also reduce the mobile signal. 5.4 Stop Measurement 1. Press the start/stop button for more than 5 seconds until the measurement status indicator is turned off. 2. Disconnect the sensor from the AvaTrace M60. The measurement can also be stopped from AvaNet by unchecking the checkbox Sampling. The measurement will be stopped the next time the instrument connects to AvaNet. Rev A Page 21 AvaTrace M60 User Manual 6. Configuration of AvaTrace M60 via AvaNet 6.1 AvaNet Instrument Panel The AvaNet instrument panel is the central point for all the instrument settings and at the same time gives you a good overview of the instrument status. The instrument panel is divided into a number of tabs that can be expanded and collapsed by clicking the headings in order to get a better overview. To change a value click the double arrow (») next to the field you want to change, edit the field and then confirm the change by clicking the green tick symbol. If the setting has to be transferred to the instrument, the field will be highlighted in yellow to indicate that the setting has been updated but not yet been sent to the instrument. The information in the instrument panel is automatically updated every 15 seconds so there is no need to manually refresh the page when the instrument is connected to AvaNet. Like everything else in AvaNet, the instrument panel is controlled by the user rights. Most changes can only be carried out by project administrators. The user rights also determine the contents of the instrument panel. Some of the fields are not visible for all users. Rev A Page 22 AvaTrace M60 User Manual 6.1.1 Main Settings Example of AvaNet Main Settings AvaTrace M60 T4 The title of the main settings panel is the instrument type and variant. Instrument ID The unique identifier for this instrument. Connected This indicator is green when the instrument is connected to AvaNet. Comm. Error This indicator is red when a communications error has occurred. Spec Free-form text field for any kind of information related to the instrument. Auto Disconnect When this option is selected the instrument will be disconnected from AvaNet as soon as measurement values and settings have been transferred. Otherwise, the instrument will be connected for as long as possible. This option is normally enabled since otherwise batteries are discharged quickly. This is used when you wish to keep the instrument online to make settings more interactively. Acknowledge Acknowledge communication errors. Indicate to other stakeholders in your project that you have noticed the error and are handling it. Project The project where the instrument is currently used. Last Connection The time and date of the last connection to AvaNet. External power supply This indicator is green when the instrument is connected to an external power supply. Version The current hardware and software version of the instrument. Battery 1 Current battery level and number of days the battery pack has been used. Rev A Page 23 AvaTrace M60 User Manual Reset Battery 1 Time Counter Reset the usage time counter to zero. This is usually done automatically when the battery pack has been replaced. 6.1.2 Acquisition Settings Example of Acquisition Settings Sampling Turn measurement on/off. Mode The mode field sets other settings such as storage interval to predefined values and limits the set of available options for, for example, filter profile in order to simplify configuration. Storage Interval Setting a non-zero storage interval enables periodic measurements. For instance, if the storage interval is set to 1h the instrument will record a peak periodic measurement value for each active channel every hour regardless of the trigger level. Record Duration Specifies the length of the waveforms recorded when the trigger level is reached. This value includes the pretrigger length. Pretrigger Specifies the amount of time to be recorded in waveforms before the trigger level is reached. Log Indices Counters for the different types of recorded measurement data. These values should not normally be changed. Reset Remove all recorded values in the instrument. 6.1.3 Transfer Settings Example of Transfer Settings Rev A Page 24 AvaTrace M60 User Manual Call Up Rate Schedule the interval (e.g. daily, hourly) at which the instrument will connect to AvaNet regardless of triggered connections. Call Up Time Specifies at what time, within the above set interval, the instrument will connect to AvaNet. Call Delay Call delay determines how long the instrument should wait before connecting to AvaNet for triggered connections. Typically used when a large number of instruments are used in the same area in order to avoid mobile network overload. Fetch Data Set if recorded data (measurement values etc.) should be transferred to AvaNet. Should normally be enabled. Auto Send Log Specifies if the instrument should connect to AvaNet when a triggered measurement has been recorded. Should normally be enabled. Waveform Threshold Threshold for automatic waveform transfer. Max. Conn. Duration Maximum time for an AvaNet connection. A way to limit how much data is sent to AvaNet during a single connection. Only used if Auto Disconnect is set. TCP Server Specifies the AvaNet server address used by the instrument during AvaNet connection. This setting should normally not be changed TCP Port Specifies the AvaNet port used by the instrument during AvaNet connection. This setting should normally not be changed Communication interface Select if the instrument should connect to AvaNet using GPRS or Ethernet connection. Normally this should be set to GPRS (mobile network). 6.1.4 Ethernet Settings Example of Ethernet Settings These settings affect how the instrument communicates using Ethernet. They affect both connections to AvaNet and to CLI. These settings should not normally be changed. If the settings are incorrect the instrument will not be able to contact AvaNet. DHCP mode Select if the instrument should act as a DHCP server, DHCP client or not use DHCP at all when communicating over Ethernet. IP address Rev A Page 25 AvaTrace M60 User Manual Specifies the IP address used by the instrument. Not used in DHCP client mode. Subnet mask Specifies the subnet mask used by the instrument. Not used in DHCP client mode. DNS Specifies the IP address of the DNS server. Not used in DHCP client mode. Gateway Specifies the default gateway to be used. Only used when DHCP is turned off. 6.1.5 SMS Sender Settings Example of SMS Sender Settings These settings affect alarm messages sent directly from the instrument. In some cases this is a simple way to add a few recipients in small projects, but we strongly recommend that you use alarm groups in AvaNet instead. First/Second Recipient Telephone numbers to the two SMS recipients. Must include country prefix. IMPORTANT NOTE: SMS MESSAGING IS NOT INCLUDED IN THE DAILY HIRE RATE IF THIS IS ENABLED YOU WILL BE INVOICES FOR THE MESSAGE COSTS AT THE END OF THE CONTRCT HIRE PERIOD. THE CURRENT CHARGE IS £1.25 PER MESSAGE Rev A Page 26 AvaTrace M60 User Manual Enable The recipient will only receive alarm messages when enabled. Recipients are disabled by default when the instrument is moved to another project. Message Header A header text included in each message. The default setting is the project name. Due to the limited number of characters in SMS messages you should keep this brief. Channel N, Message A text appended to the message for each active channel that emits an alarm. The default setting is the measuring point name. Due to the limited number of characters in SMS messages you should keep this brief. Alarm level The level for which an alarm is sent. Must be equal to or above trigger level. Only applicable for triggered measurements. 6.1.6 Download Settings Example of Download Settings These settings affect the instrument’s software and not all settings are available to all users. Perform automatic software upgrades If enabled the instrument will automatically download and upgrade to the latest software version as soon as a new version is available. This setting should normally be enabled unless the instrument is used in an especially sensitive project, for instance measuring comfort during both night and day. Enable firmware download This setting makes the instrument install the software specified by the given filename the next time the instrument connects to AvaNet. Filename URL to the instrument software install package. Rev A Page 27 AvaTrace M60 User Manual 6.1.7 Measurement Channel Settings Example of Measurement Channel Settings The AvaTrace M60 has individual settings for each of the instrument’s four measuring channels. Measuring Point The measuring point in AvaNet that this instrument channel is connected to. Measurements The number of recorded measurements on this instrument channel. Trigger Level When the signal reaches or exceeds this level, the AvaTrace M60 will record a measurement value and a waveform on all active channels. Time Last Sample The time of the last measurement transferred to AvaNet. Last Sample The value of the last measurement transferred to AvaNet. Filter profile Combined with the sensor type, the filter profile ensures that the measurement system has the correct characteristics for the selected measurement standard. Sensor The sensor identifier. Used for traceability. Specified by the user. Sensor Type The type of sensor used. This setting will affect which filter profiles you can use and how measurement is performed in the instrument and it is therefore vital to set the correct type. Active Set to enable measurement on this channel. Rev A Page 28 AvaTrace M60 User Manual 6.1.8 Internal Measuring Channel Settings Example of Internal Measurement Channel Settings Each AvaTrace M60 comes equipped with two internal measuring channels for temperature and battery voltage. These channels contain fewer fields than the external measuring channels, but those are the same as for the external measuring channels. These channels are always active. 6.2 Log Events For further information about the instrument, view the instrument’s event log. The event log contains among other things information about when the instrument connected to AvaNet, when settings were changed and not least if any problems have occurred. The event log can be accessed by selecting the Log Events menu in the AvaNet instrument panel. Rev A Page 29 AvaTrace M60 User Manual 7. Sensors The AvaTrace M60 has a number of supported sensors. Sensors other than those approved by AVA Monitoring cannot be used with the AvaTrace M60. The following sensors can be used: Vertical Geophone Horizontal Geophone Triaxial Geophone Airblast Microphone Accelerometer Rev A Page 30 AvaTrace M60 User Manual 7.1 Geophones Geophones are supplied in different tolerance classes for use with different standards. The geophones are marked with a tolerance class and you should make sure that you use the correct class for your measurement standard (see technical specification). Note that geophones are designed to be sensitive only to the component of velocity along their own longitudinal axis. Depending on which axis you wish to measure you must select the correct geophone type. The triaxial geophone measures vertically and in two horizontal directions at the same time (x, y, z). The geophone can be mounted to a measurement object in a number of ways including: Bolted directly to a wall or floor Bolted to a base plate Using ground spikes (triaxial geophone only) When installing geophones it is very important that the sensor is mounted completely straight in the direction of measurement. Use a spirit level to make sure it is mounted straight and in level. It is important that the geophone always is tightly coupled with the measurement object. Any bolts should be fastened tightly in order to avoid mounting resonance. When geophones are attached to a concrete, brick or stone structure we recommend that you bolt the sensor firmly using an MSA 6 Brass Anchor (M6 thread, 24mm length, 8 mm borehole diameter) together with an M6x30 HZP screw (M6 thread, 30 mm length, socket head cap screw with a flat screw head underside). When geophones are attached to a ground plate provided by AVA Monitoring, we recommend that you use an M6x30 HZP screw or similar. 7.1.1 Installing a Vertical Geophone Install the sensor with the cable upwards as illustrated below. Installed Vertical Geophone 7.1.2 Installing a Horizontal Geophone Install the sensor with the cable to the side as illustrated below. Installed Horizontal Geophone Rev A Page 31 AvaTrace M60 User Manual 7.1.3 Installing a Triaxial Geophone Install the sensor with the cable to the side as illustrated below. It is important to connect the triaxial geophone cables to the AvaTrace channels in the correct order. To facilitate this, both cable couplings and sensor elements are marked with color and text labels. AvaNet Triaxial Measuring Points will be assign by default according to: Channel 1 to Horizontal Transversal direction (cable coupling marked T on red background and sensor marked with a red dot) Channel 2 to Vertical direction (cable coupling marked V on black background and sensor marked with a black dot) Channel 3 to Horizontal Longitudinal direction (cable coupling marked L on green background and sensor marked with a green dot) Installed Triaxial Geophone 7.2 Airblast Microphone The Airblast Microphone for AvaTrace. For proper handling please refer to the Airblast Microphone manual. Airblast Microphone 7.2.1 Installing an Airblast Microphone For reflected airblast overpressure measurement the microphone should be mounted on a wall facing upwards as close to the wall as possible. Please refer to the applicable standards for detailed mounting requirements. For free field measurement the microphone can be attached to a standard tripod for easy deployment in the field. Rev A Page 32 AvaTrace M60 User Manual 7.3 Accelerometer AvaTrace can be used with the Monitran 1020/MF accelerometer. Monitran Accelerometer with mounting stud 7.3.1 Installing an Accelerometer The accelerometer can be mounted in any direction using the mounting stud, which can be glued or otherwise attached to the measurement object. Ensure that the accelerometer is electrically isolated from the measurement object. Rev A Page 33 AvaTrace M60 User Manual 8. Maintenance 8.1 Install or Replace Batteries 1. Press the AvaTrace check button to indicate the current battery status. Batteries should be replaced if the AvaTrace battery status indicator flashes quickly indicating insufficient battery level (7.5 V or less). The battery voltage can also be checked using the instrument panel in AvaNet. When the battery voltage is 7.5 V you need to replace the current batteries within approximately 7 days in normal operating mode. 2. Prepare the supplementary battery pack with six fresh batteries in the battery pack. Do not mix old and new batteries. Do not use batteries of different type, size or make. Ensure that the new batteries are correctly inserted and in the correct direction. The equipment may appear to work properly even if one battery is inserted incorrectly. Use LR20/D-cell Alkaline 1.5 V batteries and ensure that the velcro strap is properly tightened around the batteries in order to secure the position of the batteries. If a battery slips out of position from the battery holder this could cause a power loss and instrument malfunction. 3. Open the battery hatch. AVATrace M60 with open Battery Hatch 4. Make sure that the data processing indicator is off, so that no data processing is performed during battery replacement 5. Remove and disconnect the battery pack. AVATrace M60 with disconnected Battery Pack Rev A Page 34 AvaTrace M60 User Manual 6. Connect the battery connector to the new battery pack and insert the battery pack into the battery compartment. AVATrace M60 with closed Battery Hatch 7. Close the battery hatch. If the data processing indicator is turned on or flashes while the battery pack is disconnected, the battery replacement procedure should be completed as normal. This is not a problem. Remove the batteries from the positive side first, in order not to damage the spring. Ensure that the batteries are disposed of in an environmentally friendly way. We recommend that you use the AvaTrace battery limit setting in AvaNet (free of charge) to alert the project administrator by email when the battery voltage reaches the set limit. Note that this AvaNet function will run automatically and continuously but will be performed only once a week. It’s also possible to add a measuring point to the AvaTrace internal battery measuring channel to be used solely to monitor the battery voltage. Then you can add the measuring point to an alarm group to alert one or more recipients by email and/or SMS. Note that this measuring point could be charged additionally. NOTE Use high quality batteries for best results. See AVA Monitoring Support Site for recommendations. Before unplugging batteries always make sure the data processing indicator is off. Replace all six batteries at the same time. Do not mix old and new batteries. Do not use batteries of another size or type. Do not mix different makes of batteries. Tighten the Velcro strap around the batteries. CAUTION If the batteries are leaking make sure that the battery holder and battery compartment are cleaned in an environmentally safe and correct way. Use protective gloves to avoid skin contact. Use an acid solution, for instance lemon juice, to neutralize the alkaline residue. Use dry paper towels. Work in a well-ventilated area. Rev A Page 35 AvaTrace M60 User Manual CAUTION Risk of explosion if the battery is replaced with an incorrect type or in the wrong direction. NOTE Dispose of used batteries according to local instructions. 8.2 Maintenance Carried out by the User The following maintenance can be carried out by the user. All other maintenance must be carried out by AVA Monitoring or a service provider authorized by AVA Monitoring. If you carry out other maintenance it may invalidate the warranty. 8.2.1 Cleaning Instrument Clean the instrument as necessary. Rinse the outside of the box, with the outer lid firmly closed, using a normal shower nozzle (do not use a high pressure washer). Use a dish brush or similar. Wipe the panel with a damp cloth. Use alcohol to remove stains. Avoid using any type of cleaning cloth that can scratch the panel. Do not use strong solvents as they can damage the instrument. Sensors Clean the sensors as necessary. Rinse the outside of the sensor using a normal shower nozzle (do not use a high pressure washer). Use a dish brush or similar. For Airblast Microphone first remove the microphone before cleaning the box. The microphone can be wiped with a damp cloth. Do not use strong solvents as they can damage the sensors. Do not subject the sensors to knocks or impacts when cleaning. 8.3 Storage When the instrument is to be stored it is important that measurement is switched off. This means that, after a time, the instrument goes into low power mode to save battery power. Store the instrument indoors in a cool place and out of direct sunlight. 8.4 Update Software Software is updated automatically via AvaNet. Updates are usually carried out at night. No measurement is performed during software upgrade when the data processing indicator and battery status indicator are lit. Software upgrade may take up to 15 minutes. Periodic measurement is suspended during upgrade. If you do not want to update the instrument software automatically, e.g. when the instrument is used in a project where measurement cannot be interrupted, uncheck the Upgrade software automatically box in AvaNet. We strongly recommend that this option is enabled. 8.5 Calibration In order for the instrument and sensor to measure correctly they must be calibrated regularly at a laboratory approved and authorized by AVA Monitoring and according to the procedures prescribed by AVA Monitoring. We make demands of the equipment used and how calibration must be related to the national measurement standards. This is important, particularly in the event of any disputes where the accuracy of the measurement results are questioned. The calibration frequency requirement is often stated in the measurement standards that you wish to use, although AVA Monitoring recommends a maximum calibration interval of two years for the AvaTrace M60 and one year for sensors. Rev A Page 36 Rev A • • • • • Piling BS 7385-1 DIN 4150-3:1992 1-80 Hz (partial) DIN 4150-3:1992 1-315 Hz (partial) DIN 4150-3:1992 4-80 Hz (partial) DIN 4150-3:1992 4-315 Hz (partial) Piling 1-80 Hz 1-315 Hz 4-80 Hz 4-315 Hz • • • • • Blasting BS 7385-1 Blasting ¹Only support for amplitude and phase response requirements DIN 4150-3:1992¹ BS 7385-1:1990 • • Blasting AS 2187.2-2006 AS 2187.2-2006 • • Blasting DGMS 1997-07 DGMS 1997-07 • • • Air Blast Air Blast • • • • • Blasting NS 8141-1:2012 +A1:2013 Blasting Piling NS 8141-2:2013 Air Blast Air Blast NS 8141-2:2013 NS 8141-1:2012 +A1:2013 Blasting NS 8141-1:2012 Blasting Air Blast SS 02 52 10:1996 • • • • • • • • • • • • • • AvaAirBlast NS 8141-1:2012 Comfort Piling 5 hz 5 Hz SS 460 48 61:1992 Piling 2 hz • Geophone TC0 2 Hz Blasting Filter Profile Geophone TC1 SS 02 52 11:1999 Variant Geophone TC2 SS 460 48 66:2011 Standard Sensors AvaTrace M60 User Manual 9. Technical Specification The full technical specification for AvaTrace M60 can be downloaded from the AVA Monitoring Support Web Site. 9.1 Measurement Standards The measurement standards supported by AvaTrace M60 and the required sensor and filter profile combinations are listed in the table below. Table of applicable combinations of Measurement Standards, Sensors and Filter Profiles Page 37 AvaTrace M60 User Manual 9.2 Operating Time Approximate operating time for AvaTrace M60 with different sensors under normal operating conditions. 0–50 C -20–0 C 1-4 Geophones or Air Blast Microphones 4–5 months 3–4 months 1-4 Accelerometers 1–4 months 1–3 months Operating Times at varying Temperatures 9.3 Data Volume The values below are an indication of how much data is typically sent to and from an AvaTrace M60. How much data that is actually transferred depends on how often the instrument connects to AvaNet and other AvaNet data acquisition settings. Typical monthly data transfer size (send and receive) 0.5–10 Mbyte Maximum waveform data size (uncompressed) 8.4 Kbyte/second of waveform Typical waveform data size (compressed) 3 Kbyte/second of waveform Periodic measurement size 230 byte/measurement (four channels) Typical Data Volume Four 3 second waveforms every day of the month on all four channels 5 Mbyte/month Periodic measurement on all four channels every hour. 10 Kbyte/month Data transfer examples © Copyright AVA Monitoring Rev A Page 38