1
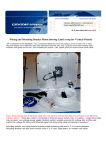
PREMIER AL PANEL PRINTER MANUAL
Installation, Commissioning and Operating
Manual for the A1599 24 and 40 Column
Printer
Warning: Fire alarm control panels contain dangerous voltages. To prevent electric shock fully open the outer door
when working on the printer and do not touch any parts inside the enclosure backbox. For servicing contact suitably
qualified personnel.
Printer fits onto the A1580 Display PCB board on the inner door
panel of Premier AL. Con 3 Printer Socket
1. Installation on Premier AL FACP
1
Open the outer door.
2
Switch off the mains supply to the panel and disconnect the batteries.
3
Remove the printer cover plate from the rear of the display plate. This is retained by three M3 studs with
nuts, spring washers and full washers.
4
Fit the printer to the rear of the plate using two M3 nuts, washers and spring washers at the hinged side of the
printer body.
5
Connect the 16 way ribbon cable to the printer connector socket on the display board as shown below:
6
Hinge the printer to the display plate passing the paper through the slot in the outer door.
7
Fit the plastic thumbnut to the remaining stud.
8
Switch on the mains supply to the panel and reconnect the batteries. Observe that the power up message is
printed correctly.
2. Operation
Normal operation of the printer requires no direct action on the printer. See the relevant panel documentation for
details on printer functionality.
2.1 Replacing The Paper Roll
1
Open the outer door.
2
Remove the paper roll and spindle from the paper holder by prising apart the arms of the roll holder and
removing the spindle.
3
Replace the empty roll with a new roll and refit the spindle to the paper roll holder.
4
Remove the thumbnut from the printer housing and swing the printer away from the back of the door.
5
Insert the end of the paper roll into the slot at the bottom of the mechanism. This is shown in Figure 1.
6
Press the paper feed button on the printer PCB while gently pushing the end of the paper into the mechanism.
The paper will be drawn into the mechanism. Release the paper feed when about 10mm of paper has been ejected
from the mechanism.
7
Hinge the printer to the display plate passing the paper through the slot in the outer door.
8
Replace the plastic thumbnut on the appropriate stud.
Figure 1 – Side view of printer mechanism
2.2 Replacing the printer ribbon
1
Open the outer door of the panel.
2
Remove the thumbnut from the printer housing and swing the printer away from the back of the door.
3
The printer ribbon casing will be visible fixed to the bottom printer mechanism.
4
Press the left hand edge of the printer ribbon casing to release the ribbon from the mechanism.
5
Remove the ribbon casing and fit the new ribbon ensuring the fabric ribbon is above the paper. The casing is
clipped into position on the mechanism by applying pressure at both sides of the ribbon casing.
6
Turn the notched wheel on the printer casing to take up the slack in the printer ribbon.
7
Hinge the printer to the display plate passing the paper through the slot in the outer door.
8
Replace the plastic thumbnut on the appropriate stud.
9
Operate the printer test switch and check that the printer outputs text correctly.
2.3 Printer Test
Pressing the printer test button on the printer PCB will cause the printer to generate a sample output of text in several
styles. The current printer configuration will also be displayed. If the test does not complete correctly check the
ribbon cables connecting the printer to the display board.
3. Technical specification
Physical
Size: Height: 90mm including paper roll
Width: 133mm overall
Depth: 75mm Weight: 15kg Operating temperature: -5ºC to
40ºC Operating humidity: 5% to 95%
Electrical
Supply voltage: 5V DC +/- 10% Quiescent current: 20mA @ 5V Load
on standby battery: 5mA @24V Active current: 1.5A peak
Paper type
Paper width: 57.5 ± 0.5mm Maximum roll diameter: 50mm
Mechanical - 24 column printer
Number of columns: 24 Character size: 1.7mm wide x 2.4mm high (standard font) Character dot matrix size: 5 x 7
dots Print speed: 0.7 lines/s
Mechanical - 40 column printer
Number of columns: 40 Character size: 1.1mm wide x 2.4mm high (standard font) Character dot matrix size: 5 x 7
dots Print speed: 0.4 lines/s
4. Printer Connections In Parallel Mode
Pin
Function
1
Force low for parallel mode Note: this pin is internally pulled low by 10k resistor.
2
Busy signal output, active high.
3
D6
4
Not connected
5
D5
6
0V
7
D4
8
0V
9
D3
10
5V
11
D2
12
5V
13
D1
14
Not connected
15
D0
16
Data strobe Note: this pin is internally pulled low by 10 k resistor
In asynchronous serial mode
Pin
Function
1
Force high for serial mode Note: this pin is internally pulled low by 10k resistor.
2
Busy signal output, active high.
3
Baud rate bit 1
4
Not connected
5
Baud rate bit 0
6
0V
7
Not used
8
0V
9
Not used
10
5V
11
Not used
12
5V
13
Not used
14
Not connected
15
D0
16
Serial data Note: this pin is internally pulled low by 10k resistor
Baud rates for serial communications are set by pins 3 and 4 as follows
Baud rate
Bit 1 – pin 5
Bit 0 – pin 3
150
0
0
300
0
1
1200
1
0
2400
1
1