1
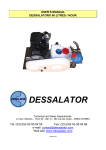
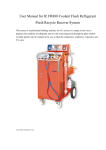
USER’S MANUAL
INSTALLATION OF A DESSALATOR 440 TO 1,000 LITRES / HOUR
IN 400 V
BEWARE: DO NOT LIFT BY CHASSIS!
DESSALATOR
Technical and sales departments:
Z.I des 3 Moulins – « Euro 92 » – Bât. D – rue des Cistes – 06600 ANTIBES
Tel: (33) (0)4 93 95 04 55
Fax: (33) (0)4 93 95 04 66
Email: [email protected]
Web Site: www.dessalator.com
DESALINATOR 440 TO 1,000 LITRES / HOUR
CONTENTS
1. Installation diagrams:
Integrated control – Compact version
page 1
2. Components supplied by DESSALATOR
page 2
3. Installation instructions:
3.1
Pre pump
3.2
Membranes
3.3
Control panel
3.4
Motor unit
3.5
Connection plan
page
page
page
page
page
4. Instructions for use
page 8
5. Reverse osmosis principle
5.1. The membranes
page 9
page 10
6. Maintenance:
6.1
Cleaning the membranes
6.2
Sterilizing the membranes
page 11
page 12
3
4
5
6
7
7. Filters and power supply
7.1 Basket pre filter
7.2 Filter unit
7.3 Power supply on terminals
page 13
8. Troubleshooting
page 14
2. COMPONENTS SUPPLIED BY DESSALATOR
ACCORDING TO THE CHOOSEN MODEL:
Pre pump:
It enables water to flow through the pre filters to
the HP motor unit.
Pre-filters:
Stainless steel pre filter - multi cartridges 25 µm 10 Inch
(x5): it allows a first filtration. It is supplied with an anode in its
cover.
Stainless steel pre filter - multi cartridges 5 µm 10 inch
(x5): it allows a filtration up to 5µm; It is supplied with an anode
in its cover.
Motor unit:
HP motor, fixed on a frame with silent blocks.
Control panel
HP motor unit
Control panel:
The control panel manages the functions of the water maker.
Page 2
.
WATER MAKER - 440 TO 1,000 LITRES / HOUR
3.1 Installation instructions
Pre pump:
The pre pump with its rinsing valve3 and its pre
filter should be installed in charge and the
pressurized fresh water should be connected to the
valve.
Beware: Please check the rotating direction of the
pre pump when starting up the machine.
THE PRE PUMP SHOULD NOT BE PLACED WHERE THERE IS A
RISK OF WATER SPRAY.
Pre pump cable case 400V
Pump cable case 400V
LP Pump
(three-phased motor 240 / 400)
Beware: Check the direction of rotation
HP pump
(Motor 400 / 660V)
Phase 1
Phase 1
Phase 2
Phase 2
Phase 3
Phase 3
Earth
Earth
CAUTION: POWER SUPPLY SHOULD BE SWITCHED OFF BEFORE
WORK IS CARRIED OUT.
PLEASE DO NOT FORGET TO CONNECT THE CHASSIS TO EARTH
ON THE SCREW LOCATED ON THE FRONT PANEL!
Page 3
.
WATER MAKER - 440 TO 1,000 LITRES / HOUR
3.2 Installation instructions
Membrane(s), according to desired water flow:
2 membranes for 440 litres / hour
water production.
3 membranes for 660 litres / hour
water production.
4 membranes for 1000 litres / hour
water production.
The number of membranes used depends on the desired water flow. Le
nombre de membranes est fonction du débit souhaité. Hose from the HP
pump should join the membranes at the red ring1.
1
Recommendation: To facilitate the attachment to the HP stainless steel joins2, it is
possible to rotate the heads through 90°, by unscrewing the grey production
connectors. Remove the nut covers and loosen the 12 nuts maintaining the unit. Then
remove the rod to obtain access, and rotate the membrane end cap using a box
wrench to join the stainless steel connector. Reinstall the rod and tighten the unit.
Page 4
.
WATER MAKER - 440 TO 1,000 LITRES / HOUR
3.3 Installation instructions
Panel pictures:
4
8
13
3
12
Beware: The handle is in the electric
connection box (Security for shipment)
Front panel
Back panel
6
Figures for each connection are as follows:
- N°8 (blue): HP piping exiting the membranes.
- N°6 (blue hose 8/10mm diameter): Production hose exiting the
membranes.
- N°3: Production hose from panel to tanks. A 15mm inner diameter
Tricoflex length will be required which should be connected either to
the fresh water tanks or before the fresh water pump, provided there
is no constricting valve.
- N°12: Waste outlet: 15 mm inner diameter Tricoflex.
- N°4: 4mm capillary hose to be connected to the exiting side of the
HP stainless steel 5 µm pre filter HP; it indicates on the low pressure
gauge the dirtiness of the stainless steel pre filter (6m are provided).
- N°13 : 4mm capillary hose to be connected to the entry side of the
stainless steel pre filter; it indicates the dirtiness of the sand pre
filter.
In the case of installing a mineralizing filter, it should be located on
the production hose to the tanks.
Page 5
.
WATER MAKER - 440 TO 1,000 LITRES / HOUR
3.4 Installation instructions
HP motor unit:
There are two water connections to the pump head:
- A ¾ diameter pipe1 from the pre filters.
- A 19 mm diameter HP hose2 to the membranes.
- Two capillary hoses are connected to the stainless steel pre filter; To
disconnect them, please push the black collar and pull the hose at the
same time. The HP unit should always be installed horizontally. Do not
place it where there is a risk of water spray. The connection should be
done as on the scheme below.
2
1
Page 6
.
.
Page 7
.
WATER MAKER - 440 TO 1,000 LITRES / HOUR
4. Instructions for use
1. Ensure the valves are open before starting up the water maker.
2. If the water maker has not been run for several days, rinse it manually with the
three-way valve on the pre-pump and start the pre pump. This should be carried
out while the water maker is idle and with the pressure regulator open (fully anticlockwise).Rinse for two minutes. Purge in the same time stainless steel prefilters.
3. To start the water maker, the pressure regulator must be open.
Switch on. The low pressure pump will run for one minute, after which the HP
pump will start automatically. Please check the rotating direction of the pre pump
when starting (arrow on the bronze pre pump body).
The control panel has two inverters. The one on the left is for rinsing and engages
only the low pressure pump (please do not forget to place the pre filter valve on
the “rinsing” position before starting it). The other position allows starting the
water maker.
The manual position allows a continuous working.
4. Turn the pressure regulator dial to the right, until the HP gauge reading is in the
green zone.
5. Fresh water quality and flow into the tank is automatically monitored by the
electronic controller.
6. If pressure becomes too high the water maker will cut out and the red indicator
will light up. If this occurs, reduce pressure and restart the water maker.
7. If the water maker is not used for extended periods of time, it should be rinsed
preferably once a month while starting the pre pump. If not in use for more than
two months, remember to sterilize the membranes (with our special sterilization
cartridge) for a storage.
Note : Fresh water production depends on the temperature of the sea water and
on the cleanliness of the pre-filters, together with the right voltage of the
generating unit.
Page 8
.
DESALINATOR 440 TO 1,000 LITRES / HOUR
5. REVERSE OSMOSIS PRINCIPLE
What is the reverse osmosis principle used in your
desalinating system?
Sea water is forced at high pressure through the membranes which act as
“molecular sieves”, only allowing pure fresh water to pass through. Most
dissolved solid particles will not penetrate the membranes. This waste,
along with remaining saline solution, will flow on the surface of the
membranes and will be rejected. Not all particles dissolved in sea water can
be eliminated. The system is designed to reject 99% of the TDS (Totally
Dissolved Solids), approximately 2% of the 35.000 ppm / TDS will pass
through the membranes.
This guarantees drinking water with a TDS value of 500 (average). Please
note that the drinking water with produced by your reverse osmosis system
is essentially sterile, however, your fresh water storage should be treated
periodically with a slight dose of chlorine (or iodine) to ensure it remains
consumable. Pay attention not to allow pure chlorine (or a too high dose of
chlorine) into the desalination system, as this could damage the device.
How does your water maker work?
Sea water enters the inlet valve which penetrates the hull. The sea water is
then routed by the pre-pump through the 25µm pre-filters. The filters water
is forced through the membrane by the HP pump (operating pressure 60 to
65 bars). The pressurized water passes through the surface holes of the
membranes depositing the salt and minerals, which are then rejected into
the sea with the remaining solution. The now fresh water flows over a
detector which measures its salt content: if the desalination achieved is
satisfactory, the three-way valve automatically directs the fresh water to the
tank. If the salinity values measured by the salinity probe are too high
(conductivity >1.000 siemens), the valve will reject the water produced into
the sea. The volume of drinking water being treated at any time is
monitored by a flowmeter on the control panel. Capacities of drinking water
production are giving for a 25°C temperature of sea water. Performances
are reduced of 2.5 to 5% for one °C of lower temperature.
Page 9
.
DESALINATOR 440 TO 1,000 LITRES / HOUR
5.1 THE MEMBRANES
MEMBRANES, DELICATE COMPONENTS
Reverse osmosis membranes must be carefully maintained as they are the
most delicate elements of the reverse osmosis system. We recommend that
the maintenance instructions are carefully followed to prevent the
membranes from damage and to ensure the guarantee is not invalidated.
Maximum production capacity of the water maker is achieved with sea
water temperature of 25°C. The functioning of the membranes will vary
depending on the temperature of the sea water and on the sailing area.
Output drops by approximately 2.5 to 5% for each degree below 25°C.
Extreme temperatures:
The membranes should not be exposed to temperatures below
0°C.Overpressure due to expansion caused by freezing can rupture the
membranes and prevent the salt from being filtered out. The membranes
must not be exposed to temperatures above 60°C, as high temperatures
may also prevent salt from being removed.
Drying out of the membranes:
The membranes should be permanently immersed in liquid, either sea
water before treatment, fresh water provisionally stored or sterilizing liquid,
if the water maker is not used for extended periods of time (Sterilizer is
effective for six months and must be replaced after this period of time).
Recommendations for use:
The various quality and salinity grades of sea water affect both membrane
efficiency and the working of the water maker in Marinas. The system is not
recommended for use in muddy or polluted water (briny water, river, Red
sea), which can clog and damage the membranes.
However, if the water maker has to be used in such conditions, only run it
for very short periods and as soon as clean sea water becomes available
clean the membranes and run the system without pressure for 5 minutes
with the pressure regulator open.
Page 10
.
DESALINATOR 440 TO 1,000 L/ HOUR
6.1 MAINTENANCE : Cleaning the membranes
CAUTION: IN FREEZING CONDITIONS,
EMPTY THE GAPMETER ON THE CONTROL PANELS,
DISCONNECTING THE PRODUCTION PIPE AND BLOWING OR
INJECTING AIR IN THE PIPE.
CLEANING THE MEMBRANES:
When should the membranes be cleaned? On average after 800 hours
working.
Under normal conditions, the membranes may be contaminated by mineral
residues or biological matter. These residues reduce both the volume of
drinking water produced and the amount of salt filtered out. The
membranes should be cleaned whenever the volume of water produced is
10 to 15% lower than initial volume. This volume comparison can be made
over the first 24 or 48 hours of operation, or when the detector indicates low
quality after the probe has been cleaned. If the drinking water produced
falls below the normal working specifications : sea water containing a TDS
of 35,000 ppm, sea water temperature of 25°C and pressure of 65 bars in
green zone, and if production is not improved by rinsing the membranes,
then the membranes have to be replaced.
Please take in consideration that the volume of drinking water produced is
dependent on ideal sea water temperature and pressure in system.
Therefore if the volume of drinking water produced falls, it does not mean
necessarily that the membranes need to be replaced.
Membranes cleaning procedure:
1.
2.
3.
4.
5.
6.
Open the regulator valve fully (turning anti-clockwise).
Close the inlet and outlet hull valves.
Disconnect the inlet and outlet hoses, and place them in a bucket
containing 10 litres of fresh water and the cleaning solution.
Run the water maker without pressure for 10 minutes and then switch
off.
Repeat three times then rinse with fresh water for at least 15 minutes.
Reconnect the hoses.
Page 11
.
DESALINATOR 440 TO 1,000 LITRES /HOUR
6.2 MAINTENANCE: STERILIZING THE MEMBRANES
STERILIZING THE MEMBRANES
When should the membranes be sterilized?
Normally, regular monthly rinsing of the membranes may be all that is required to
maintain the membranes. If this is not possible, sterilization will be necessary. Sterilizing
efficiency doesn’t exceed 6 months. Membranes don’t be sterilized more than twice a
year. Between these two operations membranes must be rinsed with fresh water.
Abusive concentration of sterilizing can corrode membranes head. Non-observance of
these recommendations and the using of other sterilizers cancel all guarantees.
Membranes sterilizing procedure:
1. Rinse the water maker with fresh water while placing the three-way valve of the prepump on the side of fresh water then unscrewing to the maximum the regulator (5
minutes).
2. Place sterilizing doses in the pre-filter cartridge, then close again the pre-filter and
rinse 2 minutes.
6.3. High Pressure Pump
The HP pump is half filled of oil up to the level indicated on the gauge. Normally, the
lubrication is made for 500 hours. In case of replacement, use a multi-grade oil 20W40
and do not exceed the level located on the oil dipstick.
Caution: The scotch tape placed on the red stopper of oil filling of the HP pump is just
here for the transport: it must be removed before the use.
6.4. Mineralizing
If a mineralizing cartridge is provided, this one have to be placed on the circuit of water
to the tanks.
To obtain one dose, use three packets.
Page 12
.
DESALINATOR 440 TO 1,000 LITRES /HOUR
7. Filters and power supply
7.1 Basket pre filter
Sea water
position: Normal
functioning
Fresh water
position: Rinsing
Waste
oulet
Fresh water
position
Sea water
7.2 Pre filter unit
The red valves allow purging the filters.
25 µm cartridge filter
5 µm cartridge filter
7 .3 POWER SUPPLY ON TERMINALS
1,2,3: 400V power supply; 4,5,6: High pressure motor connection; 7,8,9 : Low pressure pump connection;
11, 12: pressure switch; 13,14: Quality probe; 15,16: Fresh water solenoid valve;
Page 13
.
DESALINATOR 440 TO 1,000 LITRES /HOURS
7. TROUBLESHOOTING
PROBLEM
No reading on the low
pressure gauge
Noisy HP pump
Variations in speed of
the electric motors.
L-shaped valve
CAUSE
Valve closed
Pre-pump impeller
stuck
Dirty pre-filters
Reduce water inlet
or air inlet in the
system.
Residues in the
pump valves.
Generating unit too
weak.
Voltage error
Wrong frequency
Dirty fuel filter.
No rinsing
No sea water
Handle incorrectly
mounted.
SOLUTIONS
Check valves
Turn the pump fan
with a screwdriver or
clean the pump
body.
Change the filters.
Insure correct size
of pipes (diameter),
clips and filters
secure filters clean.
Open the pump
head and clean the
6 valves.
Service the
generating unit and
address
adjustments
and maintenance.
Fix the handle
correctly.
Page 14
.