1
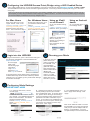
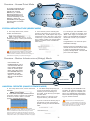
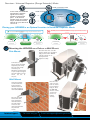
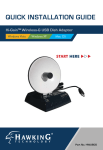
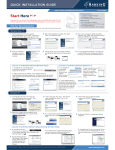
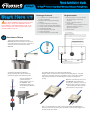
Quick Installation Guide HOD45B Start Here i This Quick Installation Guide provides a quick and easy way to set up the HOD45B in Access Point, Bridge or Universal Repeater mode. If you need to use the other modes, please refer to the manual located on the CD. 1 Hardware Setup 1) Plug the provided antennas into the HOD45B. One antenna will be connected to an L-Shaped antenna connector. Screw the 2 antennas onto the bottom panel of the HOD45B. Hi-GainTM Outdoor Dual-Band Wireless-N Access Point/Bridge Package Contents • 1x Outdoor Dual-Band Wireless-N Access Point/Bridge • 2x 5dBi Hi-Gain Dual-Band Dipole Antennas • 1x L-Shaped Antenna Connector • 1x Power-Over-Ethernet (PoE) Adapter • 1x Power Cable and Power Transformer • 1x Waterproof Gasket • 1x Three foot Ethernet Cable • 1x Setup CD-ROM • 1x Quick Installation Guide (QIG) Requirements • Ethernet Cable is required (length will depending on mounting location) • Wired or Wireless Internet Connection • A Wired or Wireless Network Device (Tablet, Smartphone, Mac or Windows Computer • Power Outlet Reset Button Reset to manufacturer settings - Unscrew cover and use a long, thin object to press for a minimum of 15 seconds, unplug the power for a few seconds then plug it in Ethernet/Power Port Connects to PoE adapter for power and for wired connections Antenna Connectors Two RP N-Jack Antenna Connectors 2) Installing the Waterproof Gasket. Using a network cable, please attach the waterproof gasket in the following order. Connect the Ethernet cable first into the Ethernet/Power port on the HOD45B. Then tighten the bottom cap on the Waterproof Gasket to secure. 3) Installing the Power-over-Ethernet (PoE) Adapter Plug the other end of the Ethernet Cable into the PoE Adapter. It should go into the port labeled “Power + Data Out”. Connect the power adapter and power transformer to the PoE Adapter and into an available AC Socket. Optional: If you wish to connect to O the th HOD45B using an Ethernet cable from a computer, connect an ca Ethernet cable to the port labeled Et “LAN” and plug the other end into “L your yo computer. Skip to Step 3. Note: An outdoor Ethernet cable is not included with the HOD45B and must be purchased serperately. The maximum recommended length if 150 Feet for the Ethernet Cable. 2 Configuring the HOD45B Access Point/Bridge using a WiFi Enabled Device Using a WiFi enabled device, access the HOD45B by connecting to the network named Hawking_HOD45B_ 2.4GHz or 5GHz. The HOD45B transmits both 2.4GHz and 5GHz signal frequencies. Connecting to either frequency will bring you to the same setup page. Note: If your device does not support 5GHz frequency, the “Hawking_HOD45B_5GHz” network will not be displayed. However you can still complete your setup using the Wireless 2.4GHz frequency or Wired Connection. For Wired Connections, please plug your computer into the PoE Adapter port labeled “LAN”, then go straight to Step 3. For Mac Users For Windows Users Click on the Wi-Fi icon in the “Apple” toolbar. Click on the “Hawking_HOD45B_2.4GHz” or “Hawking_HOD45B_5GHz.” network from the drop-down menu. Then Continue to Step 3. On the lower right corner, go to your wireless network select. Click on “Hawking_HOD45B_2.4GHz” or “Hawking_HOD45B_5GHz.” Then Continue on to Step 3. Using an iPad® or an iPhone® Using an Android device Go to your wireless setting, select “Hawking_HOD45B_2.4GHz” Network. Then, go to Step 3. On your mobile device, locate the “settings” menu. Hawking_HOD45B_2.4GHz (Make sure JavaScript is ON. To check your settings, go to Settings > Select Safari > then scroll down to view Javascript.) Select “Wireless & Networks” Click “Turn on Wi-Fi” and then click on the “Wi-Fi Settings” option. Look for “Hawking_HOD45B_2.4GHz”. Select it to connect. Then Continue to Step 3 Hawking_HOD45B_2.4GHz 3 4 Login into the HOD45B Using the same device, open a web browser and type in the following web address in the web address bar: http://192.168.1.230 Once the page loads, enter the following login information: Login: admin Password: 1234 Click Login to continue. If the page doesn’t load, please check if JavaScript is enabled. Generally, this should be enabled by default. However, if it’s not, please go into your Browser Settings and enable JavaScript. 5 Choosing your Mode In the drop down box, please select your mode of operation for the HOD45B. This quick installation guide will outline the basic Access Point, Station Infrastructure (Bridge) and Universal Repeater modes. For other modes and features, please refer to the manual on your CD. Configuring Mode Settings ACCESS POINT MODE A. In the drop down menu, choose “Access Point” The ESSID will be the wireless name of your network. The HOD45B transmits in both 2.4GHz and 5GHz. The default wireless broadcast names: 2.4GHz: Hawking_HOD45B_2.4GHz 5GHz: Hawking_HOD45B_5GHz. Click “Next”. B. Hawking recommends you choose a security setting to protect your network from unauthorized users. In the drop down box, please select “WPA (pre-shared key)”. In the pre-shared key field, please type in a password of at least 8 characters of your choice. If you prefer to use a different type of security or to have an open network, you can choose your selection from the drop down menu. Click “Apply”. C. The HOD45B will ask you if you wish to apply these settings. Click “Apply”. Now use an Ethernet Cable to connect the HOD45B to your router through the LAN port (on the PoE adapter and the Router). Congratulations, you have completed setup in Access Point Mode. Overview : Access Point Mode wired connection In Access Point Mode, the HOD45B broadcasts WiFi Signal from a wired Network (i.e. a wired Router) and allows your WiFi enabled devices to connect wirelessly to your Network. Note: The HOD45B must be plugged into the router or network after setup. wireless connection STATION INFRASTRUCTURE (BRIDGE MODE) A. In the drop down menu, choose “Station (Infrastructure)” ( ) B. Click on “Select Site Survey” A new window will pop up. Select your network, click “Done”. C. If the network you are selecting has security, it will prompt you to put in a wireless security key. It will skip this step if your network has no key. (Be sure to type in the correct key! If you are unsure of what your key is, please contact your network administrator or wireless router manufacturer. Click “Next”.) D. The setup of your HOD45B is now complete. To make any changes, click “Back”. Click “Apply” to complete your setup. The HOD45B will automatically reboot and connect to your wireless network. Congratulations! You have set up the HOD45B as a Bridge. Please connect the HOD45B into your network devices with an ethernet cable in order for the HOD45B to function properly in Bridge Mode. Use the LAN port on the PoE adapter. i The 2.4GHz networks will appear in blue and 5GHz networks will appear in orange. While you can select a 2.4GHz network, if available we recommend connecting to a 5GHz network to optimize your speed and throughput. Overview : Station Infrastructure (Bridge) Mode In this mode, the HOD45B allows you to connect wired devices to an existing wireless router or access point. Note: Using this mode, the HOD45B does not broadcast any WiFi signal. It can only link directly to the wireless source. wireless connection Ethernet switch UNIVERSAL REPEATER (RANGE EXTENDER MODE) A. In the drop down menu, choose “Universal Repeater” B. Click ‘Scan’ to find your wireless Internet connection. Select a network you would like to extend, 2.4GHz or 5GHz. It should appear in the SSID field below. i The 2.4GHz networks will appear in blue and 5GHz networks will appear in orange. While you can select a 2.4GHz network, if available we recommend connecting to a 5GHz network to optimize your speed and throughput. (If the signal strength is low or your network does not appear, you may need to adjust the location of your HOD45B. Click ‘Scan’ to try again.) C. The Quick Setup will prompt you to enter a security key only if the network you are connecting to is encrypted. Enter the key if prompted and click ‘Next’. Note: If there is no security on the original network, just click ‘Next’ D. The setup of your HOD45B is now complete. To make any changes, click “Back”. Click “Apply” to complete your setup. The HOD45B will automatically reboot and start repeating and extending your wireless network. If you do not know the security key of the network you are connecting to, please consult your network administrator. i After the reboot, the HOD45B will join the original network. It will automatically be renamed to your original wireless network, unless it was specified during the set up process. If you wish to modify this name, please refer to the user’s manual. Overview : Universal Repeater (Range Extender) Mode wired or wireless router In this mode, the HOD45B will repeat the wireless signal of an existing wireless router/access point. It will act as a wireless relay and create a larger, seamless wireless network for your devices to connect to. wired connection w wireless cconnection Placing your HOD45B in an Optimal Location in Universal Repeater Mode DO NOT place the HOD45B outside the range of your wireless source. Place the HOD45B within the range of your wireless source. Home Router or AP Access Point or Router 6 Home Router or AP HOD45B Home Router or AP Home Router or AP Wireless Device (Laptop) Access Point or Router HOD45B Wireless Device (Laptop) Mounting the HOD45B on a Pole or a Wall ll Mount Place the nuts and secure ecure the bolts as shown. Do not tighten fully yet. Place the HOD45B into the sockets on the back panel and tighten securely. Pole Mount To mount unt on a pole, please e use the included adjustable able pole clamp. Place the pole clamp aroud the pole. Match the mount bracket to polee clamp and tighen the pole ole clamp to secure the mount ount bracket onto the pole. Wall Mount Place the e nuts and secure ure the bolts as shown. Do not tighten ighten fully yet. Place the HOD45B D45B into the sockets on the back ack panel and d tighten securely. Using the available screws and mounting bracket, first drill two holes into the wall you wish to mount the HOD45B. Place the provided wall anchors into holes. Match the mount bracket to the wall anchors and secure the mount bracket with the provided screws. Technical Support Tel: 1.888.202.3344 E-mail: [email protected] HOD45B- QIG 01152013 © 2013 Hawking Technologies, Inc. All rights reserved. All trademarks herin are the property of their respective owners. Apple, Mac, iPad, and iPhone are registered trademarks of Apple Computer, Inc. No Affiliation implied or expressed.