1
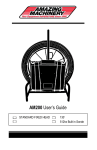
Viztrac 2014
AM200 User’s Guide
Page 1 of 12
Viztrac 2014
TABLE OF CONTENTS
Diagram & Equipment Specifications…………………………………
Equipment Specifications & Safety Instructions……………………..
Control Panel…………………………………………………………….
AM200…………………………………………………………………….
AM200 Sonde Operation……………………………………………….
AM200 DVR Operation…………………………………………………
Trouble Shooting………………………………………………………..
Warranty Information…………………………………………………...
3
4
5
6
6
6
7
11
Page 2 of 12
Viztrac 2014
DIAGRAM & SPECIFICATIONS
A. Camera Head
B. Cable Guide
C. Powder Coated Frame
D. Heat Treated Epoxy Sealed SV Cable
E. Rubber Feet
F. Control Box
Included But Not Pictured: 7” LCD Color Monitor, 512 hz Built in Sonde
Page 3 of 12
Viztrac 2014
EQUIPMENT SPECIFICATIONS
• AM200 Standard Fixed Head
Dimension: 1.38” Diameter
Pipe Size: 2“ Pipe + (2” Pipe Depends on Condition of Pipe)
• High Tension Inspection Cable Push Capacity:
100’ – 500’ (depending on condition of line)
• Powder Coated Steel Reel
20” in Diameter
• Camera Material
Stainless Steel
• Depth Rated
Submersible to 25’
SAFETY INSTRUCTIONS
1.) Keep all buttons, handles, switches clean of oils & grease. Please
avoid setting monitor directly in water.
2.) Prior to use inspect all buttons, handles, switches to make sure they
are in working order. If equipment is malfunctioning please do not
operate. See trouble shooting guidelines in back of manual.
Page 4 of 12
Viztrac 2014
CONTROL PANEL
Diagram 1.A:
Dimmer Control – Dim LED Lights as Needed
Video Out Put
Sonde – Turn on to activate 512 Hz Sonde
Power Switch – Turns on the main power to the entire system
Page 5 of 12
Viztrac 2014
AM200
AM200 Inspection Camera
Once you have inspected all components to make sure that they are not
damaged or broken, plug the unit into an outlet. At that time the LED
indicator light on the power switch will be red. Press the power switch and
it will turn green turning the power on to the unit. You may need to press
the power switch on the monitor if this is the first time the system has
been started. You do not need to power the monitor off after use as the
main power switch will do this for you.
Check to see if the lights on your camera head are on. If they are proceed
to the next step, if they are not check your power receptacle and refer to
the trouble shooting section of your manual.
SONDE Option:
Your camera came equipped with a 512 Hz transmitter, built inside the
camera head. Please refer to the previous diagram 1.A to activate the
built in transmitter. Simply press the sonde switch located on the main
control panel. The switch will light up red. You will need to be sure to have
your locator set to 512Hz or you will not be able to locate the transmitter.
•
NOTE when sonde is activated you will have a scrambled video
signal or no signal at all.
DVR Option:
Your camera also came with a DVR. This will allow you to record the
image that you see. You will need a 2-32GB SD card to capture the video.
Insert the SD card. Press the V2 Button on your monitor (please refer to
your monitor manual), and follow the on screen instructions.
Page 6 of 12
Viztrac 2014
TROUBLE SHOOTING
The trouble shooting guide lines below are designed to help you out in the
field. If you cannot figure out the problem or fix it without voiding your
warranty, please call the number listed in the back of your manual to
speak with a repair technician.
LIGHTS TURN ON – NO VIDEO
Possible problems:
-Monitor Not Functioning
-Faulty Video Cable
-Broken or loose connection in Camera Head
TRY THIS:
First plug the camera system into another monitor or standard television
that accepts standard RCA connections. If you get a picture then you
know the problem is located in your monitor.
If you still have no picture on another monitor try changing the video cable
that goes from your reel to your monitor. Any standard RCA adapter will
work with your camera system.
If you have no picture with a new cable and another monitor then the
problem is located with the camera system. Call the repair department to
get the proper instructions on how to have the equipment
diagnosed.
VIDEO WORKS–LIGHTS DON’T TURN ON
Possible Problems:
-Lights Burnt out
-Dimmer Control Switch Turned Down
-Dimmer Control Switch Broken
-Broken or loose connection in Camera Head.
TRY THIS:
Turn dimmer control all the way down and then all the way back up.
Check to see if GFCI is working properly with the camera system. If
problem still persists please contact the repair department to have unit
diagnosed.
Page 7 of 12
Viztrac 2014
NO LIGHTS - NO VIDEO
Possible Problems:
-Broken or damaged control box.
-Damaged or faulty connection with in camera head
Please call the repair department for instructions on how to have the
equipment diagnosed.
HORIZONTAL WAVY LINES ACROSS SCREEN
Possible Problems:
-512 Hz Transmitter Built in Head is in the ON position.
-Faulty Video Cable
-Dirty Monitor
TRY THIS:
If the transmitter that is built inside the camera head is in the ON position,
the frequency that it puts out interferers with the camera head frequency,
and will create wavy lines across your monitor. Inspect your pipe and then
locate to avoid picture distortion.
If your equipment is not equipped with a transmitter built in the head or
you have lines across your screen while it is in the OFF position try
changing the video cable that goes from your reel to your monitor. Any
standard RCA adapter will work with your camera system.
If the suggestions above have not eliminated the problem there is a
possibility that your MONITOR or RECORDING DEVICE is dirty and
needs to be cleaned. See Monitor Instruction Booklet for cleaning
instructions. If problem persists please contact a repair technician
at Amazing Machinery.
Page 8 of 12
Viztrac 2014
“NO SIGNAL” FLASHING ON MONITOR
Possible Problems:
-Wrong setting set on Monitor or Recording Device
-Faulty Video Cable
-Broken or damaged monitor or recording device
-Broken or loose connection in camera head or control box.
TRY THIS:
Read Monitor or Recording Device instruction manual to make sure you
are on the proper settings. Be sure to check the batteries in all remote
controls.
If you are on the proper settings plug the camera system into another
monitor or standard television that accepts standard RCA connections. If
you get a picture then you know the problem is located in your monitor.
If you still have no picture on another monitor try changing the video cable
that goes from your reel to your monitor. Any standard RCA adapter will
work with your camera system.
If you can play back on the Monitor or Recording Device and none of the
solutions above have worked, the equipment will need to be diagnosed by
a technician please call the repair department.
BLURRY OR SCRAMBLED PICTURE
Possible Problems:
-Monitor Broken or Damaged
-Seal broken or compromised
-Moisture in head
-Camera Head Fried
-Faulty Video Cable
TRY THIS:
First plug the camera system into another monitor or standard television
that accepts standard RCA connections. If you get a clear picture then
you know the problem is located in your monitor. (See monitor
instructions)
If you still have a blurry or scrambled picture on another monitor try
changing the video cable that goes from your reel to your monitor. Any
standard RCA adapter will work with your camera system.
Look at camera head and check for any type of moisture. If head has
Page 9 of 12
Viztrac 2014
been tampered with or abused a seal may have broken and allowed
moisture into the head. This would cause a blurry or scrambled picture.
Camera System should then be diagnosed by a repair technician.
COLORFUL IMAGES DISTORTED COLORS
Possible Problems:
-Monitor Broken or Damaged
-Seal broken or compromised
-Moisture in head
-Camera Head Fried
-Faulty Video Cable
TRY THIS
First plug the camera system into another monitor or standard television
that accepts standard RCA connections. If you get a clear picture then
you know the problem is located in your monitor. (See monitor
instructions)
If you still have a distorted or bright colorful images on another monitor try
changing the video cable that goes from your reel to your monitor. Any
standard RCA adapter will work with your camera system.
Look at camera head and check for any type of moisture. If head has
been tampered with or abused a seal may have broken and allowed
moisture into the head. This would cause the camera head to fry and
create strange distorted colors to form on the screen. Camera System
should then be diagnosed by a repair technician.
Page 10 of 12
Viztrac 2014
WARRANTY INFORMATION
LIMITATION OF LIABILITY
NOTE - All Warranties offered by or passed through Amazing Machinery
to you the customer include parts and labor. Freight charges will NOT be
accepted under warranty claims.
NOTE -All Amazing Machinery and Factory Warranties are not
transferable.
NOTE -The warranty contained herein is in lieu of all other warranties
express or implied, including any implied warranty of fitness for particular
purpose.
NOTE - It is understood that a manufacturers limited warranty pertains to
equipment used in its prescribed manner, without abuse, and does not
include wear and tear.
NOTE - All freight charges incurred on warranty situations are the
responsibility of the customer.
NOTE - Amazing Machinery and Equipment Manufacturer liability for
special, incidental, or consequential damages is expressly disclaimed. In
no event shall any liability exceed the purchase price of the product in
question.
NOTE - Specifications, Warranties and Pricing are subject to change
without notice.
Manufacturer will, at its option, replace or repair* without charge to the
original purchaser, any part or parts manufactured by it and found, upon
examination, to be DEFECTIVE IN MATERIAL AND/OR WORKMANSHIP
if received for such examination within the stated warranty period (1
YEAR), which begins on the date of original purchase.
Damage resulting from accident, abuse, or neglect are conditions under
which warranty cannot be claimed. Nor will warranty apply to damage
resulting neither from failure to follow the manufacturer's instruction for
operation and maintenance nor from the improper selection of a particular
application.
Page 11 of 12
Viztrac 2014
All transportation charges on, and damage and loss incurred in
connection with the transportation of parts submitted for replacement or
repair under this WARRANTY shall be borne by the purchaser.
No other warranties, guarantees, or liabilities, either implied or expressed,
will be the responsibility of Amazing Machinery.
For warranty or service work please contact Amazing Machinery. Read
the following information for contact details.
Amazing Machinery, Inc.
2160 South Lee Hwy.
Cleveland, TN 37311
1 (800) 504-7435
*Refund does not include shipping/handling fees. No refund will be given for
installation kits. Customer is responsible for lost or misdirected packages. It is
recommended that the customer insure the package for its full retail value. This
warranty does not cover or include any damage as a result of acts of God,
improper installation, alteration, negligence or abuse.
Page 12 of 12