1
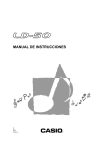
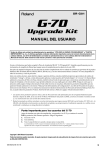
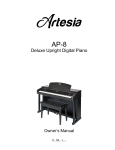
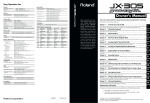
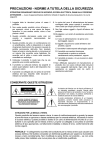
HD-5 ELECTRONIC DRUM SET
USER’S MANUAL
V M I
irgin
usical
nstruments
WELCOME
We would like to express our appreciation and congratulate you for purchasing this HITMAN Electronic
Drum Kit. You will find the drum set’s features and functions listed within this owners manual. Please take
a few minutes to read the following pages of instruction, and retain this manual for future reference.
INCLUDED IN THE BOX
1 DRUM SOUND MODULE
1 BASS DRUM WITH STAND
1 BASS DRUM KICK PEDAL
1 HI-HAT PEDAL
1 EIGHT INCH SNARE DRUM HEAD DUAL-ZONE
3 EIGHT INCH TOM DRUM PADS
1 TWELVE INCH CRASH CYMBAL WITH CHOKE
1 TWELVE INCH RIDE CYMBAL
1 EIGHT INCH HIGH HAT CYMBAL WITH OPTICAL SENSOR FOOT PEDAL
1 DURABLE LIGHT WEIGHT DRUM FRAME COMPLETE WITH MOUNTING HARDWARE
1 KIT WIRING HARNESS CONNECTION CABLE
1 PAIR STEREO HEADPHONES
1 DRUM THRONE STOOL
(1) DRUM KEY
(2) DRUMSTICKS
(1) DRUMSTICK HOLDER BAG
(8) VELCRO STRIPS
(1) ASSEMBLY INSTRUCTIONS/INSTRUMENT GUIDE
FCC STATEMENTS
This equipment has been tested and found to comply with the limits for a Class B digital device, pursuant to Part 15 of the FCC Rules. Also, this equipment has been tested and found to comply with the
limits for the following standard:
EN55022-2006
EN55024:1998/+A1:2001:/+A2:2003
EN55013:2001/+A1:2001:/+A3:2006
EN6100-3-2:2006
EN6100-3-3:1995/+A1:2001/+A2:2003
These limits are designed to provide reasonable protection against harmful interference in a residential installation. This equipment generates uses, and can radiate radio frequency energy and, if not
installed and used in accordance with the instructions, may cause harmful interference to radio communications. However, there is no guarantee that interference will not occur in a particular installation.
If this equipment does cause harmful interference to radio or television reception, which can be determined by turning the equipment off and on, the user is encouraged to try to correct the interference by
one of more of the following measures:
Reorient or relocate the receiving antenna.
• Increase the separation between the equipment and receiver.
• Connect the equipment into an outlet or a circuit different from that to which the receiver is
connected.
• Consult the dealer or an experienced radio/TV technician for help.
TAKING CARE OF YOUR DRUM KIT
SERVICE AND MODIFICATION
Do NOT attempt to open the unit or make any
change in the circuits or parts of the unit. This
product should be serviced by a qualified service
personnel when:
• The power supply cord of the plug of
the adapter has been damaged.
• Liquid has been spattered into the unit
or it has been exposed to rain.
• The instrument does not appear to
operate normally or exhibits a marked
change in performance.
• The instrument has been dropped or
damaged.
.
POWER
This drum set contains digital circuitry and may
cause interference if placed too close to radio or
television receivers. If interference occurs, move
the drum set farther away from the affected
equipment
• Only use the attached power adapter.
• Turn the power switch to off when the
drum is not in use.
• To avoid damage to the drum and
other devise to which it is connected,
turn the power switches of all related
devices off prior to connection or disconnection of audio cables.
• Turn the power off if the main cable of
the power adapter is damaged or the
instrument is exposed to liquid.
• Do not switch the unit on and off in
quick succession, this places an unexpected load on the electronic components.
• Unplug the AC power cord during an
electrical storm.
• Avoid plugging the AC adapter into the
same AC outlet as appliances with high
power consumption, such as electric
heaters or ovens.
LOCATION
To avoid deformation discoloration or more serious
damage, do not expose the drum set to the following conditions;
• Direct sunlight (or near a window),
• High temperatures (near a heat
source, outside, or in a care during the
daytime)
• Rain or excessive humidity
• Excessive dust
• Strong vibration.
• Do not expose the unit to water or
other liquids.
•
HANDLING AND TRANSPORT
•
•
•
•
Never apply excessive force to the
controls, connectors, pads or other
parts of the instrument.
Always unplug cables by gripping
the plug firmly, NOT by pulling on the
cable.
Physical shocks caused by dropping
bumping or placing heavy objects on
the instrument can result in scratches
and/or more serious damage.
Carefully check the amplifier volume
control before starting to play. Excessive volume can cause permanent
hearing loss.
CLEANING
•
Only clean the unit with a dry of damp
soft cloth. Do not use chemicals or
polishes
TABLE OF CONTENTS
SOUND MODULE............................................................................................................................ 6
CONTROL PANEL.......................................................................................................................... 6
BOTTOM PANEL............................................................................................................................ 8
PLAYING THE PADS....................................................................................................................... 9
DRUM KIT.......................................................................................................................................11
KIT SELECT.................................................................................................................................11
KIT EDIT..................................................................................................................................... 12
CHANGE THE VOICE AND VOLUME OF THE PAD............................................................................ 12
PATTERN....................................................................................................................................... 13
PRACTICE THE PATTERN........................................................................................................... 13
METRONOME............................................................................................................................. 14
RECORDING.................................................................................................................................. 15
RECORDING............................................................................................................................... 15
STOP AND SAVE......................................................................................................................... 17
PLAYBACK.................................................................................................................................. 17
USB & MIDI.................................................................................................................................... 18
VOICE LIST.................................................................................................................................... 19
SPECIFICATIONS.......................................................................................................................... 20
SOUND MODULE
CONTROL PANEL
HITMAN HD-5 Electronic Drums.
Listed below please find a list of the easy to use buttons on the
2
3
1
4
1
CLICK
TEMPO
MASTER
VOLUME
HITMAN
1
HD-5
KIT
5
1
CRASH
6
1
RIDE
HI-HAT
TOM 1
TOM 2
VOICE
TOM 3
HI-HAT PEDAL
PATTERN
SNARE
VOLUME
7
1
KICK
STOP
DRUM OFF
8
1
PLAY
9
1
RECORD
SAVE
1 DISPLAY The display is a 3-digit 7-segment LED showing information such as kit number,
voice number and other parameters.
2 CLICK The CLICK button toggles the metronome on and off.
3 TEMPO The TEMPO button changes the tempo of the metronome, it is also used for
recording and pattern playing.
4 MASTER VOLUME Rotate this knob clockwise to increase the master volume and
counter-clockwise to decrease the master volume.
5 KIT Press the KIT button to enter the drum kit selection mode.
6 PATTERN Press the PATTERN button to enter the pattern play mode.
7 VOICE Press the VOICE button to enter the voice assignment mode.
8 VOLUME Use the VOLUME button to enter the volume adjustment mode.
9 DRUM OFF Pressing the DRUM OFF button will mute the drum sound in the pattern.
6
SOUND MODULE
CONTROL PANEL
Listed below please find a list of the easy to use buttons on the Hitman HD-5 Electronic Drums.
HITMAN
HD-5
CLICK
15
1
TEMPO
KIT
MASTER
VOLUME
PATTERN
CRASH
RIDE
HI-HAT
TOM 1
TOM 2
VOICE
TOM 3
HI-HAT PEDAL
SNARE
14
1
VOLUME
DRUM OFF
KICK
STOP
PLAY
RECORD
10
1
11
1
12
1
SAVE
13
1
1 STOP Use the STOP button to stop the pattern playing or to stop recording.
2 PLAY Use the PLAY button to play a pattern or a recorded performance.
3 RECORD Press the RECORD button to enter the record mode.
4 SAVE Press the SAVE button to save a recording or settings you have changed.
5 – BUTTONS + Use these – BUTTONS + to adjust and select options in the kit and pattern
modes, the volume settings and wherever needed.
6 PAD SELECT BUTTONS: These buttons have dual functions. When engaged in the kit
mode use these buttons to select or edit a pad.
When in the pattern play mode these buttons are used to display pad performance.
♫Please note, to reset the drum set, press and hold down both – buttons + while turning
on the power until “rSE” appears on the display. The factory settings will be restored and
POWER
any recorded contents erased.
OFF ON
7
SOUND MODULE
BOTTOM PANEL
The connector panel is found on the bottom of the drum set control module.
POWER
OFF ON
DC 9V
USB
TRIGGER
1
2
3
4
HEADPHONE LINE OUT LINE IN
5
6
7
1 POWER OFF ON The POWER switch turns the sound module on and off.
♫Please note, after you turn the power off, do not turn it on immediately. Wait at least
five seconds so that the electronic circuits can be properly reset.
2 POWER IN JACK Plug the DC cable of the attached adapter in the jack.
3 USB JACK The USB connector allows you to connect the drum set directly to your computer’s
USB port. The USB interface is compatible with Windows XP/VISTA, Windows & and
MAC. The computer will recognize the drum as an audio device.
4 PAD TRIGGER CONNECTOR Each pad and the Hi-Hat control pedal have their own
labeled cables. All cables are merged into a single connector. Put the appropriate
cable into the jack of the corresponding component, and then plug the merge
connector in here.
5 HEADPHONE JACK The drum kit has a stereophonic headphone jack. You can play in
relative silence without disturbing others in the room by plugging a set of headphones
into this jack.
6 LINE OUT JACK There is no built-in speaker for the drum set. Line out of the stereo audio
output will deliver the drum set’s output signal to external amplification, such as home
stereo, PA system or other stand-alone amplifiers.
If you connect to an external mono system, a stereo/mono adapter is recommended.
7 LINE IN JACK Line in of the stereo audio input jacks will mix the supplied signal with the
internal drum sound. It can be used to connect to items such as CD players, MP3
players and the like.
8
PLAYING THE PADS
TURN ON THE POWER
1
2
3
4
Turn down the volume.
Turn on the POWER button, don’t strike pad or press the Hi-Hat control pedal.
Turn on any connected external devices.
Strike the pad and adjust the volume to the proper level.
♫Please note, all the pads have a striking force sensitivity feature. Strike the pad harder for a
higher volume and strike the pad softer for a lower volume.
PAYING THE TOM DRUM
1 Strike the central area of the pad to create the tom drum sound.
PLAYING THE CYMBAL
1 Strike the rubber area of the crash and ride pad to create a cymbal sound.
2 The crash has a choke feature. Strike the crash pad, it’s sound will sustain.
3 Squeeze the edge portion, and the sound will mute.
PLAYING THE SNARE DRUM
1 Strike the central position (head) of the pad to make head sound.
2 Strike the rim of the pad to make a rim sound.
PLAYING THE HI-HAT
1 Strike the Hi-Hat control pedal to make an open Hi-Hat sound.
2 Strike the Hi-Hat pad while fully pressing the Hi-Hat control pedal to make a closed Hi-Hat sound.
3 Strike the Hi-Hat pad while pressing the Hi-Hat control pedal gradually down, the open sound will
progressively change to a closed sound.
4 Press the Hi-Hat pedal down quickly to make a Hi-Hat pedal sound.
PLAYING KICK DRUM
1 Press the kick drum pedal to make a kick drum sound.
MASTER VOLUME
1 Rotate the MASTER VOLUME knob to turn the master volume up or down.
2 Rotate the knob clockwise to increase the volume.
3 Rotate the knob counter-clockwise to decrease the volume.
MASTER
VOLUME
9
PLAYING THE PADS
SNARE DRUM
HEAD
TOM DRUMS
HEAD
CYMBALS
10
RIM
DRUM KIT
This drum set has 20 preset drum kits to choose from. Each kit is a combination of different instrument
voices that are assigned to a specific pad. The voices within a selected kit give the performance a
uniform style. Any of the kits can be edited, and those edits saved.
When the drum set is turned on, the kit mode is engaged automatically, the KIT button is lit and the Kit
number is shown on the display.
In other operation modes, pressing the KIT button will return the drum set to the kit mode.
HITMAN
HD-5
CLICK
TEMPO
KIT
MASTER
VOLUME
PATTERN
CRASH
RIDE
HI-HAT
TOM 1
TOM 2
TOM 3
HI-HAT PEDAL
SNARE
VOICE
VOLUME
DRUM OFF
KICK
STOP
PLAY
RECORD
SAVE
KIT SELECT
1 Press the KIT button if not already engaged.
2 Use the – BUTTONS + to select the desired kit from ranging from 01-20. Please see the list
of available kits below. The default kit number is 01. When reentering the kit mode, the kit
number will be the one last assigned.
KIT
KIT LIST
Kit
No.
Kit Name
Kit
No.
Kit Name
01
Pop
11
Heavy Beat
02
Electric
12
Metal
03
Jazz
13
Rock
04
Beat Box
14
Punk
05
808
15
Carbon
06
Fireball
16
Disco
07
Magnet
17
Tight Rope
08
Dry
18
Smashing
09
Machine
19
Largeness
10
Room
20
Funky
11
DRUM KIT
KIT EDIT
After selecting a kit, you can change the voice and its volume on each pad and save the changes.
KIT
PATTERN
CRASH
RIDE
HI-HAT
TOM 1
TOM 2
TOM 3
HI-HAT PEDAL
SNARE
VOICE
VOLUME
DRUM OFF
KICK
CHANGE THE VOICE OF THE PAD
1 Before editing, select a pad by pressing the desired PAD SELECT button. The selected pad
2
3
4
5
button will light up and blink, and the assigned voice can be heard.
The snare has head and rim parts and hi-hat has open and closed voices. Press the corresponding PAD SELECT button twice to select an alternate part of these pads and the light
color of the button will change to blue.
♪Please note, an easy way to select is to hit the pad or press the Hi-Hat pedal directly. The
corresponding button will light up and blink, striking too softly will not trigger a selection.
Press the VOICE button to assign a voice to the pad, the pressed button will light up and blink,
and the current voice number of that pad will appear on the display..
While the PAD SELECT button and the VOICE button blink use the – BUTTONS + to change
the voice number ranging from 1-184. Holding down the + or – BUTTON will change the data
consecutively. Press the – BUTTONS + simultaneously to restore the original voice.
Please see the VOICE LIST at the back of this manual for all assignable voices.
You can change the voice of another pad by pressing the voice’s PAD SELECT button.
Press the blinking VOICE button again to exit and return to the kit select mode. The indicator
will turn off.
♪Please note, settings will be lost when the power is turned off.
TOM 1
VOICE
CHANGE THE VOLUME OF THE PAD
1 Before editing, select a pad
2 Press the VOLUME button, the button will light up and blink, the display will show the current
volume.
3 Adjust the volume of the pad by using the – BUTTONS + to change the volume ranging from
0-127. Press the blinking VOLUME button again to exit and return to the kit select mode. Its
indicator will turn off.
♪Please note, settings will be lost when the power is turned off.
♫Please note, to reset the drum, press and hold down both + and – buttons and turn on the
power until “rSE” appears on the display. The factor settings will to restored and recorded
contents erased.
12
PATTERN
There are 50 built-in patterns for you to enjoy and use for practice exercises.
HITMAN
HD-5
CLICK
TEMPO
KIT
MASTER
VOLUME
PATTERN
CRASH
RIDE
HI-HAT
TOM 1
TOM 2
TOM 3
HI-HAT PEDAL
SNARE
VOICE
VOLUME
DRUM OFF
KICK
STOP
PLAY
RECORD
SAVE
LISTEN TO THE PATTERN
1 To engage the pattern mode press the PATTERN button and it will light up. The pattern number
with “P” in front of it will appear and blink on the display.
2 Use the – BUTTONS + to select a pattern from 01-50.
3 Press the PLAY button to start playing, the display will show the measure number.
4
5
The PAD SELECT buttons will flash to indicate which pad is performing. When the pattern is
finished, it will restart from the beginning. During play, you can change the pattern by pressing
the – BUTTONS +, the new pattern number will appear on the display and will start playing from
the first measure.
Press the STOP button to stop the playing.
Press the KIT button or press the PATTERN button again to exit and return to the kit mode.
PATTERN
PRACTICE WITH THE PATTERN
PLAY
STOP
While listening to the pattern you can drum on the pads. All the patterns consist of a percussion and
orchestral background music. You can mute the percussion sound and drum to the pattern, accompanied by the background music.
1 To engage the pattern mode pressing the PATTERN button.
2 Use the – BUTTONS + to select a pattern from 01-50.
3 Press the DRUM OFF button to mute the percussion sound, the button will light up.
4 Press the PLAY button to start playing, the display will show the measure number.
The PAD SELECT buttons will flash to indicate which pad you should be drumming. When the
pattern is finished, it will restart from the beginning. During the play, you can change the pattern
by pressing the – BUTTONS +, the new pattern number will appear on the display and will start
playing from the first measure.
5 Press the STOP button to stop the playing.
6 Press the KIT button or press the PATTERN button again to exit and return to the kit mode.
PATTERN
DRUM OFF
PLAY
STOP
13
PATTERN
HITMAN
HD-5
CLICK
TEMPO
KIT
MASTER
VOLUME
PATTERN
CRASH
RIDE
HI-HAT
TOM 1
TOM 2
TOM 3
HI-HAT PEDAL
SNARE
VOICE
VOLUME
DRUM OFF
KICK
STOP
PLAY
RECORD
SAVE
ADJUST THE VOLUME
1 The volume of the pattern is adjustable.
2 Press the VOLUME button, the button will light up and blink while the current volume will be dis-
played. Use the + or – buttons to adjust the volume. Wait 3 seconds or press the VOLUME button
again and the display will recover the measure.
VOLUME
METRONOME
1 Press the CLICK button to activate the metronome, its indicator will light up and flash in time with
2
the current tempo. The speed of the metronome is determined by the tempo value. To adjust the
tempo value, please refer to Adjusting the Tempo.
♪Please note, during pattern play, the metronome cannot sound but the CLICK button will flash if
the metronome is engaged.
Press the CLICK button again to stop the metronome.
CLICK
ADJUST THE TEMPO
During the playing you can change the tempo.
1 Press the TEMPO button, its indicator will light up and blink. The current tempo will appear on the
display and blink.
2 Use the + or – buttons to change the tempo ranging from 40-240 bpm.
3 Press both the – BUTTONS + simultaneously and the tempo will recover the original value. Wait
3 seconds or press the TEMPO button again and the display will recover to the measure display.
TEMPO
14
RECORD
This drum has the ability to record one performance and save it as Pattern 51. The recording can be
accompanied by a pattern.
HITMAN
HD-5
CLICK
TEMPO
KIT
MASTER
VOLUME
PATTERN
CRASH
RIDE
HI-HAT
TOM 1
TOM 2
TOM 3
HI-HAT PEDAL
SNARE
VOICE
VOLUME
DRUM OFF
KICK
STOP
PLAY
RECORD
SAVE
RECORDING
There are two ways to start recording.
Automatic Start
After pressing the record mode, recording begins immediately after a four beat count-in.
♫Please note, even if you stop the recording before the pattern is over, the remaining measure of the
pattern will be in your recorded.
Synchronized Start
The recorder is put on standby and will start recording as soon as any pad on the drum set is struck.
Using the sync start you can record in the following ways:
• You can record your with the pattern background music and percussion adding your performance to the pattern. The pattern will play repeatedly until you stop the recording.
• You can turn off the percussion of the pattern and record with just the background accompaniment.
• Or you can turn off the pattern to record a pattern-free performance of just your playing on
the drum set..
AUTO START
1 Before recording prepare the desired settings, including selecting the drum kit, the metronome
tempo setting and the pattern selection volume and tempo.
2 Press the RECORD button to enter the record mode.
3 Press the RECORD button again, after four beats count-in, the record will start immediately
whether you strike the drum pad or not.
4 When a recording starts, the RECORD button stops blinking and remains lit. If engaged, the
metronome will sound as soon as recording starts. The metronome sound is for reference only,
it is not recorded. The recording measure will appear on the display.
5 Press the RECORD button again or press the STOP button to terminate the recording The
RECORD button blinks and is ready for the next recording. The new recording over-writes the
contents of the previous recording in units of measure. In the way, you can edit your recording.
♪Please note, the Auto Start mode is recommended to over-write and record with the pattern.
RECORD
RECORD
15
RECORD
HITMAN
HD-5
CLICK
TEMPO
KIT
MASTER
VOLUME
PATTERN
CRASH
RIDE
HI-HAT
TOM 1
TOM 2
TOM 3
HI-HAT PEDAL
SNARE
VOICE
VOLUME
DRUM OFF
KICK
STOP
PLAY
RECORD
1 SYNC START
SAVE
Before recording prepare the desired settings, including selecting the drum kit, the metronome
tempo setting and the pattern selection volume and tempo.
2 Press the RECORD button to enter the record mode. The button will light up and blink to indicate the recorder is on standby.
3 Press the CLICK button, to put the metronome on standby, the button will flash
• The PATTERN button will light up automatically so that you can record your performance with a pattern the display shows the current pattern number. Select a different
pattern by using the – BUTTONS +.
• If you do not want the drum sound in the pattern, press the DRUM OFF button to mute
it.
• If you don’t want to use the pattern at all, press the PATTERN button so that its indicator turns off and “OFF” will appear on the display.
4 Recording will start as soon as you strike on any of the pads. When a recording starts, the RECORD button stops blinking and remains lit. If engaged, the metronome will sound as soon as
recording starts. The metronome sound is for reference only, it is not recorded. The recording
measure will appear on the display.
5 Press the RECORD button again or press the STOP button to terminate the recording The
RECORD button blinks and is ready for the next recording. The new recording over-writes the
contents of the previous recording in units of measure. In the way, you can edit your recording.
RECORD
CLICK
DRUM OFF
PATTERN
16
RECORD
HITMAN
HD-5
CLICK
TEMPO
KIT
MASTER
VOLUME
PATTERN
CRASH
RIDE
HI-HAT
TOM 1
TOM 2
TOM 3
HI-HAT PEDAL
SNARE
VOICE
VOLUME
DRUM OFF
KICK
STOP
PLAY
RECORD
SAVE
STOP AND SAVE
STOP
When finished with the recording, while the RECORD button blinks, press the STOP button to
discard the current recording. The RECORD button turns off and the PATTERN button stays lit. The
display shows the pattern number you selected before the recording.
♫Please note, your current recording will be lost.
Press the KIT button at anytime, the recording will be terminated and the drum will return to the Kit
mode. Your current recording will be lost.
STOP
SAVE
When you are finished recording and while the RECORD button is blinking, press the SAVE button
to save it as Pattern 51. The RECORD buttons light turns off, and the PATTERN button stays lit.
The display shows “P51”. Your recording will be saved even after the power is turned off.
SAVE
PLAYBACK
1 To hear your recorded performance, enter the pattern mode by pressing the PATTERN button.
2 Select P51, using the – BUTTONS +. Please refer to the Pattern section of this manual for help.
3 Press the PLAY button to play back your recording.
PATTERN
PLAY
17
USB AND MIDI
MIDI
MIDI stands for Musical Instrument Digital Interface. This is a worldwide standard communication interface that enables electronic musical instruments and computers to communicate with each other so
that instructions and other data can pass between them. This exchange of information makes it possible to create a system of MIDI instruments and devices that offers far greater versatility and control
than that is available with isolated instruments. Whether you interface with computers, sequencers,
expanders or other equipments your musical horizons will be greatly enhanced. For example, you
could edit your playing in the computer or play back MIDI songs from the computer while playing the
drum.
USB
The USB connector allows you to connect the drum directly to your computer. It can be connected
without driver installation under the Windows XP, Windows Vista & MAC OSX environment. The drum
will be recognized as a USB Audio device to receive and transmit the those same MIDI messages.
MIDI APPLICATION CHART
Function
Transmitted
Recognized
Basic Channel
10
1-16
Note Number
0-127
0-127
Velocity: Note On
1-127
0-127
Velocity: Note Off
64
0-127
Major Controls: B9h 04h xxh
Yes
X
Remarks
Hi-Hat pedal control
Major Controls: Bxh 79h 00h
Yes
Yes
Reset All Controller
Major Controls: Bxh 7Bh 00h
Yes
Yes
All Notes Off
Program Change
X
Yes*
System Exclusive
Yes
Yes**
RPN
X**
Yes**
NRPN
Yes
Yes**
*Channel 10 support Bank 0 only
** If you need detailed information about Exclusive, RPN and NRPN, please see your vendor
TRANSMITTED NOTE THROUGH CHANNEL 10 FROM EACH PAD IS FIXED
18
Pad
Note
Pad
Note
Tom1
48
Ride
51
Tom2
45
Hi-Hat Open
46
Tom3
41
Hi-Hat Close
42
Snare
38
Hi-Hat Pedal
44
Snare Rim
37
Kick
36
Crash
55
VOICE LIST
001
002
003 004 005 006
007
008
009
010
011
012
013
014
015
016
017
018
019
020
021
022
023
024
025
026
027
028
029
030
031
032
033
034
035
036
037
038
039
040
041
042
043
044
045
046
047
048
049
050
051
052
053
GM
High Q
Slap
ScraPush
ScraPull
Stick
SquarClick
MetroClick
MetroBell
KickDrum2
KickDrum1
SideStick
SnareDrum2
HandClap
SnareDrum1
LoFloTom2
CloseHH
LowFloTom1
PedalHH
LowTom
OpenHiHat
LowMidTom
HiMidTom
CrashCymb1
RHighTom
RideCymb1
ChCymbal
RideBell
Tambourine
SplashCymb
Cowbell
CrashCymb2
VibraSlap
RideCymb2
HiBongo
LowBongo
MuteConga
HiConga
LowConga
HighTimbal
LowTimbal
HiAgogo
LowAgogo
Cabasa
Maracas
ShortWhist
LongWhist
ShortGuiro
LongGuiro
Claves
HiW-Block
LoW-Block
MuteCuica
OpenCuica
054
055
056
057
058
059
060
061
MuteTriang
OpenTriang
FullCabasa
Shaker
Belltree
Castanets
MuteSurdo
OpenSurdo
062
063
064
065
066
067
068
069
070
071
072
073
074
075
076
077
078
079
080
KICK
Kick 1
Kick 2
Kick 3
Kick 4
Kick 5
Kick 6
Kick 7
Kick 8
Kick 9
Kick 10
Kick 11
Kick 12
Kick 13
Kick 14
Kick 15
Kick 16
Kick 17
Kick 18
Kick 19
081
082
083
084
085
086
087
088
089
090
091
092
093
094
095
096
097
098
099
100
101
102
103
SNARE
Snare 1
Snare 2
Snare 3
Snare 4
Snare 5
Snare 6
Snare 7
Snare 8
Snare 9
Snare 10
Snare 11
Snare 12
Snare 13
Snare 14
Snare 15
Snare 16
Snare 17
Snare 18
Snare 19
Snare 20
Snare 21
Snare 22
Snare 23
104
105
106
107
108
109
110
111
112
113
114
115
Snare 24
Snare 25
Snare 26
Snare 27
Snare 28
Snare 29
Snare 30
Snare 31
Snare 32
Snare 33
Snare 34
Snare 35
150
151
Hi Tom 7
Hi Tom 8
152
153
154
155
156
157
158
159
MID TOM
Mid Tom 1
Mid Tom 2
Mid Tom 3
Mid Tom 4
Mid Tom 5
Mid Tom 6
Mid Tom 7
Mid Tom 8
116
117
118
SIDE STICK
SideStick 1
SideStick 2
SideStick 3
119
120
121
122
123
124
125
126
127
128
129
130
CLOSED HI-HAT
Closed Hi-Hat1
Closed Hi-Hat2
Closed Hi-Hat3
Closed Hi-Hat4
Closed Hi-Hat5
Closed Hi-Hat6
Closed Hi-Hat7
Closed Hi-Hat8
Closed Hi-Hat9
Closed Hi-Hat10
Closed Hi-Hat11
Closed Hi-Hat12
160
161
162
163
164
165
166
167
LOW TOM
Low Tom 1
Low Tom 2
Low Tom 3
Low Tom 4
Low Tom 5
Low Tom 6
Low Tom 7
Low Tom 8
168
169
170
CRASH
Crash 1
Crash 2
Crash 3
131
132 133
134
135
136
137
138
139
140
141
142
143
OPENHI-HAT
Open Hi-Hat1
Open Hi-Hat2
Open Hi-Hat3
Open Hi-Hat4
Open Hi-Hat5
Open Hi-Hat6
Open Hi-Hat7
Open Hi-Hat8
Open Hi-Hat9
Open Hi-Hat10
Open Hi-Hat11
Open Hi-Hat11
Open Hi-Hat13
171
172
RIDE
Ride 1
Ride 2
144
145
146
147
148
149
HI TOM
Hi Tom 1
Hi Tom 2
Hi Tom 3
Hi Tom 4
Hi Tom 5
Hi Tom 6
PERCUSSION
177
Percussion 1
178
Percussion 2
179
Percussion 3
180
Percussion 4
181
Percussion 5
182
183
184
PEDAL HI-HAT
Pedal Hi-Hat 1
Pedal Hi-Hat 2
Pedal Hi-Hat 3
19
SPECIFICATIONS
20
CONFIGURATION
3 X 8” Tom (without rim),
12” Crash cymbal (with choke feature),
12” Ride cymbal,
8” Hi-Hat,
6” Kick,
Hi-Hat pedal
Voice
184
Drum Kit
20 Preset Kits
Pattern
50, Full and Mute drum mode
Pad Button
play drum sound with led blink
Tempo
default 120; range 40-240
Metro
On/Off
Record
1 editable song in overwrite mode
Easy Reset
holding button + and button - when power on
Display
3 X 7 LED
Power
9V DC
Aux. Socket
Headphone, Line In/Out, USB, Power In DC9V
Virgin Musical Instrument Company Inc
P O Box 2908
La Mesa, CA 91943
PH: 619 244-0006
E-mail: [email protected]
www.virginmusicalinstrumentcompany.com