1
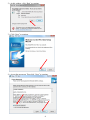
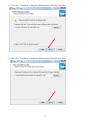
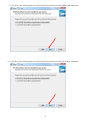
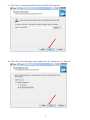
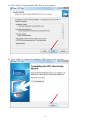
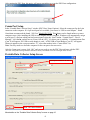
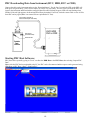
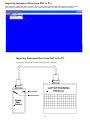
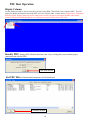
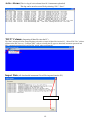
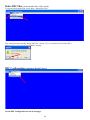
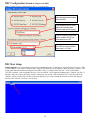
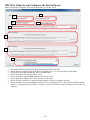
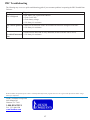
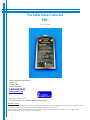
Portable Data Collector
PDC
User’s Manual
Heath Consultants Incorporated
Houston, TX
713-844-1300
Fax: 713-844-1309
1-800-HEATH-US
www.heathus.com
HPN 77R91-XXXX, rev A
©COPYRIGHT 2011-2015, Heath Consultants Incorporated
Proprietary Notice
The contents of this manual are proprietary to Heath Consultants Incorporated. Reproduction of this manual, in whole or in part,
is prohibited without the express written consent of Heath Consultants Incorporated.
Heath Consultants Incorporated operates under a continual product improvement program and reserves the right to make
improvements and/or changes without prior notification.
Table of Contents
Table of Contents ............................................................................................................................ 2
PDC Features .................................................................................................................................. 3
PDC Host Software notes ............................................................................................................... 3
PDC Host Installation notes ............................................................................................................ 3
PDC Host Software Installation ................................................................................................... 3-9
Comm Port Setup (Serial communications port setup)................................................................... 9
PDC Downloading Data from Instrument .................................................................................... 10
Starting PDC Host Software ......................................................................................................... 10
Importing Instrument Data (from PDC to PC) ............................................................................. 11
PDC Host Operation ..................................................................................................................... 12
“Display” Column ......................................................................................................................12
Identify PDC...........................................................................................................................12
List PDC Files ........................................................................................................................12
Active Alarms.........................................................................................................................13
“Run” Column ............................................................................................................................13
Import Data.............................................................................................................................13
Delete PDC Files ....................................................................................................................14
PDC Configuration (Configures the PDC device) ........................................................... 14-15
“Setup” Column (Options)(Portable Data Collector Setup) ................................................. 15-16
PDC Host Configuration (Configures the Host software)................................................ 15-16
Troubleshooting .............................................................................................................................17
2
PDC Features
•
•
•
•
•
•
•
The PDC downloads: Profiler, IOR & Alarm reports from HDR, HVC, CDR & RVC devices.
Replaces the laptop for downloading instrument data.
Downloads all files by pushing the download button.
LED indicator shows PDC battery status & instrument download status (Red/Yellow/Green).
Stores 166 full HDR profiler downloads or 300+ full HVC profiler downloads.
Powered by (2) “AA” batteries (easily field replaceable).
Easy to upload instrument data to PC.
PDC Host Software notes:
PDC Host is the companion software interface to the PDC device. The application program provides for data
import/collection from the PDC to the computer, active Alarm log from this data, listing the data files stored on the
PDC, deleting all files on the PDC and configuring the PDC as well as the PDC Host.
This install will work in Windows operating systems for Win XP, Win Vista, Win 7 & Win 8.
PDC Host Installation notes:
1. It’s recommended to install the HDR Host or HVC Host software FIRST, then install the PDC Host software (so the
directory preferences will be correctly initialized).
2. PDC Host software should be started from the HDR Host or HVC Host/ "Tools/ Import PDC Data" menu item.
3. During the installation you will be asked to select where the data log files are to be saved: “HDR Host Profiler and logs
directories” or the “HVC Host Profiler and logs directories”, depending on which of these hosts have already been
installed. OR the data log files can be saved to the PDC Host log directory. In the event that both the HVC and the
HDR Hosts are already installed, you will be given the choice to save the HVC data in the HVC Host Profiler and logs
directories and in the HDR Host Profiler logs directory as well as the option of saving the data in the HVC Host
Profiler and logs directories or all data from both HVC and HDR can be saved in the PDC Host log directory.
Note 1: The PDC Firmware 4.00 will download: HDR/CDR/HVC/RVC. The older (2.XX-3.XX) firmware will only download the CDR
& RVC. If a PDC has the older firmware and needs to be upgraded, send it to Heath Consultants for upgrade.
Note 2: The PDC gray cable (HPN 77R61-0080) is ONLY used for downloading the HDR/CDR or HVC/RVC to the PDC. It’s not
recommended for downloading the instrument directly to the PC.
Note 3: The standard comm cable (P/N: 77R61-0070) is recommended for ALL DIRECT PC communication with any electronic device
(HDR/HVC/CDR/RVC/LVC/XVC).
---------------------------------------------------------------------------------------------------------------------------------------------------
PDC Host Software Installation
To install the PDC Host software, locate the file “PDC Host Setup4.00.exe”. Double-click the file to start the
installation. Follow the instructions to complete the installation process. After the software is installed, you will need to
configure the com port to directly connect to the PDC. Com 1 is very common; however, many newer computers are not
equipped with a 9-pin connector for direct connect with the standard com cable. A “USB to Serial adapter” may be
required. Follow the instructions included with the USB to serial adapter. After the adapter is installed and connected to
the PC, go to “Start”/ Control Panel/ System/ Hardware/ Device Manager/ “Ports” (click the “+” to the left of “ports”)
Look for “USB to Serial Bridge (com xx)” Enter this port number in the PDC Host (Setup/ Options)/ “Comm Select”.
Click the down arrow to get a list of available comm ports. Select the port connected to the PDC. Any port from 1-255
can be chosen. Note: Only the available ports will be listed in PDC Host/ Setup/ Options “Com Select” dropdown.
1) Double-click PDC Host Setup filename to start the installation process.
3
2) At this window, click “Run” to continue.
3) Click “Next” to continue.
4) Accept the agreement. Then click “Next” to continue.
4
5) Click “Next” to continue or change the default location of the PDC Host files.
6) Click “Next” to continue or change the default location of the PDC data files.
5
7) Click “Next” after choosing where you want to put the files retrieved from the HDR & CDR instruments.
8) Click “Next” after choosing where you want to put the files retrieved from the HVC & RVC instruments.
6
9) Click “Next” or change the default location of the PDC Host shortcut.
10) Click “Next” after choosing to create desktop icons for “Current user” or “All users”.
7
11) Click “Install” to begin installing PDC Host on your computer.
12) Click “Finish” to complete the installation of PDC Host on your computer.
8
After running the PDC Host, this notice will appear reminding to set up the PDC Host configuration.
Comm Port Setup
In the “Portable Data Collector Setup” window (PDC Host/ Setup/ Options), Select the comm port for the 9-pin
connector on the computer. If a 9-pin serial port isn’t available, you can use a “USB to serial adapter”. Heath
Consultants recommends the brand, “I/O Gear” Model GUC232A. This adapter can be found online or at most
computer stores. After installing the USB to serial adapter into the computer, Windows will automatically assign
a serial port. To find out which port has been assigned, select the “Start” button /“Control Panel”/ “Device
Manager”, click the ► symbol next to “Ports (Com & LPT)”. If a direct port is available, “Communications Port
(Com X) will appear. If a USB to serial adapter is used, “ATEN USB to Serial Bridge (Com X)” will appear.
Whatever appears as the com port number “X”, select that number in the “Comm Select” list.
Note: You may need to re-boot the computer for the com port to become active.
After the Comm port is setup, click “OK” and you are ready to use the PDC Host software with the PDC.
(The other configuration settings should be defaulted correctly and shouldn’t need to be changed unless needed).
Portable Data Collector Setup Screen
Comm port selection for the PC.
Click “OK” when finished
More details on the “Portable Data Collector Setup” screen on page 16
9
PDC Downloading Data from Instrument (HVC, HDR, RVC or CDR)
Connect the cable to the instrument and press the “Download button”. For the first 5 seconds the LED on the PDC will
blink green for good battery, yellow for low battery or red for very low battery. The next several seconds the PDC will
logon to the instrument and download the configured data files until finished, the green LED will stop blinking when
finished. If the red light appears, the download failed. Retry download. If still red, check the comm cable or erase all files
from PDC and try again (Make sure wanted files are uploaded to PC first).
Comm Cable is proprietary to
Heath Consultants (PN: 77R61-0080)
HVC/ HDR/
RVC or CDR
LED Indicator
(Green/Red/Yellow)
Download button
Portable
Data
Collector
Starting PDC Host Software:
PDC Host can be opened by going to “Tools” on either the HDR Host or the HVC Host, then selecting “Import PDC
Data”.
Note: After the PDC has been uploaded to the PC, the PDC can be disconnected and the reports can be generated using
HDR Host or HVC Host/ “Data”/ “Print Profiler”.
10
Importing Instrument Data (from PDC to PC):
After selecting “Import PDC data” from the “Tools” column, the Portable Data Collector Host screen will appear.
The “Display” column will allow viewing of PDC items: Identify PDC, List PDC files and Active alarms.
Importing Instrument Data from PDC to the PC
PDC cable is female/female “Null” cable(9-pin serial) Heath P/N: 77R65-0002
PDC Cable
PDC Cable
LAPTOP RUNNING
PDCHost
LED Indicator
Download button
Portable
Data
Collector
11
PDC Host Operation
Display Column
To start, connect the PDC to the PC using the 9-pin Null Cable (HPN: 77R65-0002). Select “Identify PDC”. This will
display the Model and Firmware date of the PDC itself. (See “Identify PDC” window below). Note: If error: “Instrument
Response Failed” appears, make sure the PC comm. port is correct (see page 9), disconnect the PDC cable & then
reconnect. The green LED should light for 4 seconds when properly connected to the PDC Host.
Identify PDC: Displays PDC Model & Firmware date. Also, viewing this screen confirms proper
communication with the PDC).
Click when finished
List PDC Files (All downloaded instruments will be listed here)
Click when finished
12
Active Alarms (This is a log of active alarms from ALL instruments uploaded).
This log can be saved as a text file by selecting “File”/ “Save”.
“RUN” Column: (Importing all data files into the PC)
The “Run” column will allow: Importing data (select this to import all data files into the PC), “Delete PDC Files” (deletes
all data on the PDC forever), “Configure PDC” (Allows selecting the file types to download, instrument password and
PDC communication baud rate between PDC and PC (these must match!)
Import Data (All downloaded instrument files will be imported into the PC)
Click when finished
13
Delete PDC Files (All downloaded files will be erased)
To erase all files from the PDC, select “Run”, “Delete PDC Files”
This is the screen after selecting “Delete PDC files”. (Select “Yes” to erased ALL files from the PDC)
Note: No data is removed from the HDR/HVC memory.
PDC Configuration (Configures the PDC device)
See the PDC Configuration screen on next page.
14
PDC Configuration Screen (Configures the PDC)
Note: Computer must be connected to the PDC to view this screen.
The selected files will be
collected when downloaded
from the PDC
This password will be used
when downloading data.
Default password is [logon]
This ID number is only used
when multiple PDC’s are
connected to one PC.
This baud rate must match
the PDC baud rate. Default
baud rate is 115,200
PDC Host Setup
Setup/ Options: This screen allows selecting the communication port- “Comm Select” (typically Com 1, however “USB
to serial adapters” may require a different port). “Host to PDC Baud” this is the baud rate of the “PDCHost” software. This
setting must match the baud rate configured in the PDC (“Run”/ “Configure Data Collector”/ “PDC to Host Baud”
(115,200 is default). “Scan for Multiple devices is for several PDC’s to be imported simultaneously. “Path for Log files” is
the place where the “Import Audit log” and the “Alarm logs” are located. “Path for Profiler files” is the place where the
“Profiler” files are located. The “Profiler is the main data log. If you wish to change the location of where the data gets
directed, click “Browse” to select a new location.
15
PDC Host Setup Screen (Configures the Host software)
Note: Computer does not need to be connected to the PDC to view this screen.
#2
#1
#3
#4
#5
#6
#7
#8
1.
2.
3.
4.
5.
6.
7.
8.
Sets baud rate between Host & PDC (Host baud must match PDC baud rate).
Sets the ID when communicating to the PDC & uploading files. (“63” will work with any instrument).
Only used for uploading multiple PDC devices simultaneously.
Sets the path where PDC log files will be saved.
Sets the path where imported HDR/ CDR data files will be saved.
Sets the path where imported HVC/ RVC data files will be saved.
Sets the file name when files are imported. (Serial Number, Site ID, Site Address- Default).
Sets the filenames when downloading the Profiler file (Uses: Site address line #1, Serial number or Meter numberwhatever is configured in the instrument’s “Config 2” screen will be used to create the filename that’s saved in the
computer).
16
PDC Troubleshooting
The following may serve as a quick troubleshooting guide if you encounter problems in operating the PDC Portable Data
Collector:
Symptom
PDC LED light red
Diagnosis
• PDC battery low, replace PDC batteries.
• Check Com Cable
• Check battery voltage
• Call factory for assistance
PDC fails to upload to • Make sure the baud rate in PDC Host matches the baud rate configured in the PDC
• Call factory for assistance
PC
PDC fails to
• Delete all files on the PDC & retry download (All data on the PDC will be erased).
Download Instrument • Call factory for assistance
data
Heath Consultants Incorporated operates under a continual product improvement program and reserves the right to make improvements and/or changes
without prior notification.
Heath Consultants Incorporated
9030 Monroe Rd.
Houston, TX. 77061
1-800-HEATHUS
Fax: (713) 844-1398
www.heathus.com
17