1
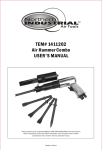
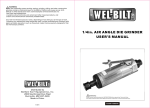
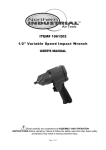
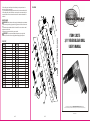
3.When drilling metals, mark the point to be drilled using a centre punch to assist in
starting the hole in the correct place.
4.To prevent damage to drills, apply some coolant to the bit, but do not wet the tool itself.
5.When drilling wood, plastic, hard rubber or cast iron no lubricant is needed. Use light
mineral oil for brass or bronze, kerosene for aluminum. For steel and other metals use
soluble oil.
DIAGRAM
MAINTENANCE
WARNING! Always disconnect the air supply before attempting any maintenance.
Air Tools
After disconnecting the air supply, squeeze the trigger to make sure no air remains in the
unit.
1.After each use, wipe down the drill with a lint-free cloth. Do not use solvents or harsh
detergents to clean the tool.
2.Make sure the air inlet is clean of dirt, grease, or debris.
WARNING! If you encounter a problem with operation, stop using the tool
immediately. Disconnect tool from air supply before attempting any adjustment.
ITEM# 139275
3/8" REVERSIBLE AIR DRILL
USER'S MANUAL
PART LIST
Part#
Description
Qty.
Part#
Description
Qty.
1
Housing
1
19
Pin
4
2
O-ring
1
20
Front Plate
1
3
O-ring
1
21
Washer
1
4
Valve Stem
1
22
Gear
1
5
O-ring
3
23
Gear
6
6
Bushing
1
24
Pin
6
7
Trigger Spring
1
25
Gear Plate
1
8
Trigger
1
26
Gear
1
9
Trigger Screw
1
27
Work Spindle
1
10
Pin
1
28
Tread Ring Gear
2
11
Muffler Cover
1
29
Bearing
2
12
Screw
2
30
Clamp Nut
1
13
Air Inlet
1
31
Washer
1
14
Bearing
2
32
Chuck
1
15
End Plate
1
33
Chuck Screw
1
16
Rotor
1
34
Handle
1
17
Rotor Blade
5
35
Brass Ring
1
18
Cylinder
1
36
Chuck Key
1
Read carefully and understand all ASSEMBLY AND OPERATION INSTRUCTIONS before operating.
Failure to follow the safety rules and other basic safety precautions may result in serious personal injury.
Made in China
4 of 5
5 of 5
For technical questions and replacement parts, please call 1-800-222-5381.
Thank you very much for choosing a NORTHERN TOOL + EQUIPMENT CO. Inc., Product!
For future reference, please complete the owner's record below:
Model: _______________ Purchase Date: _______________
Save the receipt, warranty and these instructions. It is important that you read the entire
manual to become familiar with this product before using it.
This machine is designed for certain applications only. Northern Tool + Equipment
strongly recommends that this machine is not modified and/or used for any application
other than that for which it was designed. If you have any questions relative to a particular
application, DO NOT use the machine until you have first contacted Northern Tool +
Equipment to determine if it can or should be performed on the product.
Before using this product, please read the following instructions carefully.
TECHNICAL SPECIFICATIONS
Item
Description
Item
Description
Chuck Size
3/8"
Air Inlet Diameter
1/4"- 18NPT
Free Speed
1800 RPM
Min. Hose Size
3/8"
Air Consumption
6 CFM
Max. Air Pressure
90 PSI
SAVE THIS MANUAL
You will need this manual for the safety warnings and precautions, assembly, operating,
inspection, maintenance and cleaning procedures, parts list and assembly diagram. Keep
this manual and invoice in a safe and dry place for future reference.
WARNING!
Some dust created by power sanding, sawing, grinding and other construction
activities contains chemicals known to cause cancer, birth defects, or other
reproductive harm. Some examples off these chemicals are:
Lead from lead-based paints Crystalline silica form bricks, cement and other
masonry products Arsenic and chromium from chemically treated lumber
Your risk from these exposures varies, depending now how often you do this type of
work. To reduce your exposure to these chemicals: work in a well-ventilated area,
and use approved personal protective equipment, such as dust masks that are
specially designed to filter out microscopic particles.
WARNINGS AND SAFETY RULES
1.Keep work area clean. An untidy and cluttered work area increases the risk of
accidents.
2.Use personal protection equipment. Always use safety glasses or goggles. A
facemask should also be worn when dust is generated. A respirator should be worn when
spray painting, even when using outdoors.
3.Wear suitable work clothes. Don't wear loose fitting clothes or jewelry. They can be
caught in moving parts and may cause injury. For outdoor work rubber gloves and nonslip footwear are advised. Wear a protective hair net to contain long hair.
4.Take precautions with compressed air. Do not disconnect air hoses or tools when the
line is under pressure. Close off air supply and release pressure first. Do not point tools or
direct compressed air at people or animals.
5.Observe work area environment. Do not expose air tools to rain or wet conditions. Do
not use air tools in close proximity to flammable liquids or gases. The work area should be
well lit and ventilated.
1 of 5
6.Keep pets, untrained operators and children away. Children should be kept away
from the work area. Do not permit them to handle the tool or tool cable.
7.Secure the work pieces. Use clamps or a vice to hold work. This will free up both hands
to operate the tool, which is safer.
8.Don't overreach when working. Keep a balanced footing at all times. Avoid abnormal
stances and awkward body positioning.
9.Do not overload or force tools. Tools operate better in the specified performance
ranges. Forcing the tool may cause motor damage.
10.Check for damage. Before further use always check the protection guards carefully to
ensure proper operation and performance. Check for alignment of moving parts, binding
of moving parts, breakage of parts, mountings and any other condition that may effect the
tools operation. If the tool suffers severe impact, a crack or damage may occur do not use
a tool if a crack develops or if air is escaping.
11.Recommended use Use the right tool. Only use air tools for their intended purpose.
Do not force a small tool or accessory to do the job of a heavy-duty tool. Do not exceed
recommended air pressure.
12.When changing tools or accessories. Always close off air supply and release
pressure before attempting to loosen any connection.
13.Beware of temperature extremes. The expanding air causes the air tools to run very
cold. Light gloves are advisable for operator comfort. Conversely, the cylinder head and
air delivery pipe of the compressor tank will run quite hot, avoid contact with these.
14.Maintain tools with care. For efficient and safe operation tools should be kept clean.
Check the connections and hoses. If damaged they should be replaced.
15.Avoid unintentional triggering. Do not carry tool or connect them with your finger on
the trigger.
16.Don't abuse hoses. Do not carry tools by the hose or use the hose to drag the
compressor. Protect hoses from heat, oil and sharp objects. Avoid draping the hose over
the compressor cylinder head.
17.Storage. When not in use, your air tools should be stored in a dry area, which is not
accessible to children.
18.Stay alert. Do not use the tool when you are tired or under the influence of alcohol and
drugs. Use common sense and watch what you are doing or serious injury will occur.
19.Remove keys and spanners. Do not forget to remove any adjustment keys, spanners
and wrenches before switching on the tool.
20.Don't leave unattended. Do not leave the compressor operating while unattended for
extended periods of time. If you have finished using the compressor and associated tools,
switch off supply and remove the plug.
21.Use only compressed air. This tool is intended for use with compressed air only.
Never attempt to operate the tool using compressed bottled oxygen or combustible gases.
PARTICULAR SAFETY INSTRUCTIONS
1.Shut off air supply and release pressure when changing bits.
2.Only operate this tool within the recommended pressure range 60 90 PSI. Use outside
this range will cause poor performance, excessive wear and possible danger.
3.Safety glasses must always be worn for eye protection. Hearing protection is strongly
recommended when operating for long periods.
NOTE: The warnings, cautions, and instructions discussed in this instruction
manual cannot cover all possible conditions and situations that may occur. It must
be understood by the operator that common sense and caution are factors that
cannot be built into this product but must be supplied by the operator.
NOTE: READ ALL INSTRUCTIONS BEFORE USING THIS PRODUCT
SET UP
Fig. 1
NOTE: If you are not using an automatic oiler system, before operation, add a few
drops of Pneumatic Tool Oil to the airline connection. Add a few drops more after
hour of continual use.
1.You will need to prepare a 1/4" air connector (not included) to connect to the air inlet on
the cutoff tool. First, wrap the 1/4" air connector with pipe thread seal tape (not included)
before threading it into the inlet. Connect the 3/8" ID air source hose (not included) to a
quick-disconnect coupler (not included) and then to the cutoff tool.
2.Set the air pressure on your compressor to 90 PSI. Do not exceed the recommended air
pressure of 90 PSI.
3.Check the air connection for leaks.
4.Disconnect from the air hose until next instructed to reconnect.
OPERATING CONTROLS
CHUCK
When mounting a drill bit in the chuck, insert bit so that the full shank of the bit is held in
the chuck. Tighten the chuck securely by inserting the chuck key into one of the side holes
in the chuck and turning the key clockwise. Before attempting to drill, check that the bit is
held centrally in the chuck jaws and ensure the chuck key is removed. To release the
chuck, insert the key and turn it counterclockwise.
FORWARD/REVERSE SELECTOR
Push the selector to the "F" position to select normal clockwise rotation. Always drill in
this direction. Push the selector to the "R" position to select counterclockwise rotation. Do
not change direction while drill is in motion.
TRIGGER
Depressing the trigger will allow the drill to rapidly begin rotation in the selected direction.
Release to stop.
TO USE
1. Run compressor, adjust compressor regulator for correct operating range of 6090 PSI.
2. Open outlet tap of compressor to connection of drill.
3. Select direction of rotation and press trigger to operate.
4. When changing bits, shut off air supply to tool and release pressure first, to avoid
inadvertent operation.
OPERATIONAL HINTS
1.Always ensure that the workpiece is firmly clamped, so that you can use 2 hands to
guide and control the drill.
2.When drilling wood, to prevent splintering on the reverse face when the drill breaks
through, clamp a scrap piece of wood beneath the point where you are drilling.
2 of 5
3 of 5