1
End
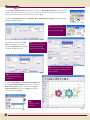
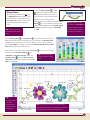
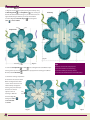
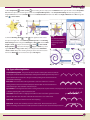
11. Digitize the other flower by first placing the underlay using
and Straight Line
the Running Stitch
tools. Starting on
Underlay
the left side of the flower working in a parallel direction to the
color
47
96
55
56
44
right side finishing the underlay to the top of the flower
as shown (Fig. 20) . Select the object
48 51 52
32
and change the
to Isacord 4643.
31
28 27
63 66 67
35
38
39
42 43
34
59
71
58
72
33
End
73
30
Start
Complex Fill
29
3 6 7 10
2
70
62
69
68
76 77
80 81
84
11
85
87
1
4
86
78 79 82
5
95
8 9
12
13
24
14
15 20 23
16 19
Start
25
18 21 22
89
88
92
40
17
83
26
93
41
94
60
37
36
61
64
91
65 74
75
90
45
49
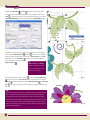
Fig. 20
Exit Point
Fig. 21
and Arc
12. Take the Complex Fill
50 53 54
57
Tip:
tools and digitize the outer flower shape
starting at the top. Place the Exit Point directly opposite the starting point. When
finished, add a Lock Stitch
58
46
Slope
Direction
Underlay serves three main purposes.
1. Attaches the fabric to the backing.
2. Provides stability for the top stitches.
.
3. Provides loft and dimension to the embroidery.
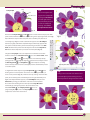
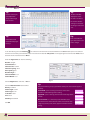
13. Continue creating complex fills
for the other two sections of the
flower ending with the center
section. These sections do not
Exit Point
need underlay. Change the
starting, exit point and slope
direction on all these
objects so the are
stitching in different
directions (Fig. 22) .
End
Start
Slope
Slope Direction
Direction
1
2
Exit
Point
3
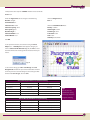
Change the colors
3
to Isacord 3652
1
2
Start
and 3770.
End
Fig. 22
6
Fig. 23