1
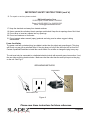
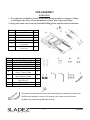
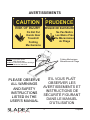
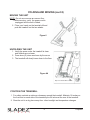
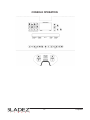
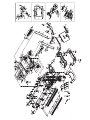
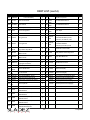
Conquest
Folding Treadmill
OWNER’S MANUAL
IMPORTANT: Read all instructions carefully before using this product. Retain this owner’s
manual for future reference.
BH North America Foothill Ranch , California 92610
Tel.: 949 206-0330 Fax.: 949 206-0013 www.bhnorthamerica.com
TABLE OF CONTENTS
Safety Instructions . . . . . . . . . . . . . . . . . . . . . . . . . . . . . . . . . . . . .. . . . . . .
2
Assembly . . . . . . . . . . . . . . . . . . . . . . . . . . . . . . . . . . . . . . . . . . . . . . . . . . . .
5
Folding and Moving . . . . . . . . . . . . . . . . . . . . . . . . . . . . . . . . . . . . . . . . . . . .
9
Maintenance. . . . . . . . . . . . . . . . . . . . . . . . . . . . . . . . . . . . . . . . . . . . . . . . . .
10
Lubricating and adjusting the belt. . . . . . . . . . . . . . . . . . . . . . . . . . . . . . .
11
Removing and washing the bottle holder . . . . . . . . . . . . . . . . . . . . . . . . . .
13
Fitness and Exercise . . . . . . . . . . . . . . . . . . . . . . . . . . . . . . . . . . . . . . . . . . .
14
Troubleshooting . . . . . . . . . . . . . . . . . . . . . . . . . . . . . . . . . . . . . . . . . . . . . . .
15
Computer Console . . . . . . . . . . . . . . . . . . . . . . . . . . . . . . . . . . . . . . . . . . . . .
16
Exploded View Drawing. .. .. .. .. .. .. . . . . . . . . . . . . . . . . . . . . . . . . . . . . . . . . . . .
Part List. . . . . . . . . . . . . . . . . . . . . . . . . . . . . . . . . . . . . . . . . . . . . . . . . . . .
Warranty . . . . . . . . . . . . . . . . . . . . . . . . . . . . . . . . . . . . . . . . . . . . . . . . . . . .
22
23
26
1
Conquest
IMPORTANT SAFETY INSTRUCTIONS
WARNING! Avoid injuries - keep your hands away from the treadmill
folding points and the incline mechanism
User Safety
1. Users should pass a full medical examination before they begin an exercise program. Work at the
recommended exercise level. Do not over exert yourself. If you feel any pain or discomfort, stop
exercising immediately and consult your doctor.
2. Do warm up stretching exercises before using the unit.
3. Verify that all of the parts are attached and th at the nuts, bolts, rails and handle bars are correctly
tightened before use.
4. Do not wear loose clothing, leather soled shoes or high heels. Tie up shoe laces.
5. The maximum weight of a user is 286 lbs. (130Kg).
6. Keep hands away from moving parts.
7. To avoid any danger, close supervision is necessary when this treadmill is used by persons lack of
product experience and knowledge. Keep it out of the reach of children.
8. The owner is responsible for explaining safety Instructions to each user.
9. The unit can only be used by one person at a time.
Unit Safety
1. For safety, maintain a minimum clearance aroundthe unit. Maintain 18 inches on the front and on
each side of the unit plus 24 inches at the rear of the unit.
2. Install and use the unit on a flat, stable surface, with some type of protection for the floor or carpet.
Do not place it alongside walls or furniture. Check the unit before each use.
3. Please read all of the instructions before assembling or using this unit.
4. To reduce the dangers and risk of electric shock always unplug the unit from its electrical power
immediately after using, before cleaning, opening, disassembling or doing maintenance.
5. Do not place sharp objects near the exercise equipment.
6. Do not use the exercise equipment if it is not working correctly.
7. Do not lean against the computer console.
8. Do not start the treadmill when someone is standing on the running belt.
9. Connect this treadmill to a properly grounded 110-120V, 15 or 20 Amp dedicated outlet only.
WARNING: To reduce the risk of fire, electric shock, injury to persons or inflicting the harm of a burn:
10. Turn all the controls to the off position, prior to removing the electrical plug from the outlet.
11. The unit should never be left unattended when plugged in. Unplug the unit from the electrical power
before leaving the room when not in use and before adding or removing parts.
12. Do not operate the unit under a blanket or pillow. Excessive heating can occur and cause fire,
electric shock, injury to persons or inflict the harm of a burn.
13. Use the unit only as described in this manual. Only use attachments recommended by the
manufacturer.
14. Never operate this unit if it has a damaged electrical cord or plug. Do not operate this unit if it is not
working properly. Do not operate this unit if it has been dropped or damaged. Do not operate this
unit if it has been immersed into water. Return the unit to a service center for examination and repair.
15. Do not pull or carry the unit by the electrical cord or use the cord as a handle.
2
Conquest
IMPORTANT SAFETY INSTRUCTIONS (cont’d)
16. For repair or service, please contact:
BH North America Corp.
20155 Ellipse, Foothill Ranch, CA 92610
Phone: 949-206-0330; Fax: 949-206-0013
Email: [email protected]
17. Keep the electrical cord away from heated surfaces.
18. Never operate the unit when the air openings are blocked. Keep the air openings free of lint & hair
19. Do not drop or insert any objects into any openings.
20. Do not use outdoors or near water.
21. Do not operate where aerosol (spray) products are being used or where oxygen is being
administered.
Power Cord Safety
The power cord has a polarized plug (one blade is wider than the other) and grounding pin. This plug
will fit only one way into a polarized outlet. If the plug does not fully fit into the outlet, do not force it in
Contact a qualified Electrician to install the correct outlet. Do not alter or change the plug in any way.
The unit must only be connected to a dedicated electrical circuit with an earth ground connection. If not,
the user risks receiving electric shocks. Make sure that the outlet has the same pin layout as the plug
on the unit. See Fig. A.
GROUNDING METHODS
GROUNDED
GROUNDING PIN
Figure A
Please save these instructions for future references.
3
Conquest
IMPORTANT SAFETY INSTRUCTIONS (cont’d)
SAFETY BREAKER
This model is equipped with an electronic circuit breaker to protect the electronic Figure B.
The circuit breaker will automatically trigger if the unit is subjected to abnormal electrical condition.
Should this occur:
1. Set switch (L), located on the main body, to the “0” (OFF) position.
2. Press the circuit button (C) to reset the unit.
3. Next, set switch (L) to the “I” (ON) position and the unit will be ready for use again.
Should the circuit breaker trip repeatedly then the most probable causes are:
-Abnormal working conditions,
-Treadmill belt in need of lubricant,
-Solvent based lubricants used (use BH type),
-Belt is too tight.
Plug the unit into a dedicated 110-120V,
15 or 20 Amp circuit with a ground terminal.
4
Figure B
Conquest
PRE-ASSEMBLY
WARNINGS!
1- Never put the treadmill on its side at any time during assembly or transport. Doing
so will impair the safety release mechanism and may lead to personal injury.
2- Keep your hands away from the treadmill folding points and the incline mechanism
ITEM
Description
Qty
A
Assembled Frame
Bottle
1
B
C
D
E
F
ITEM
a
b
b1
b2
c
d
e
f
g
h
Right Decoration Cover
Left Decoration Cover
Wheel Protecting
Cover(Right)
Wheel Protecting
Cover(Left)
Description
Allen Bolt M8xP1.25x20
Allen Bolt M10xP1.5x35
Screw Sleeve NT-2158
Flat Washer Ø10x Ø 20x2.0t
Plastic Handle
Hex Wrench + Screwdriver
5mm x 70mm x70mm
Allen Wrench
6mm x80mm x 80mm
Truss Philips Screw
M5x P0.8x15
Power Cord
SILICONE
1
1
1
1
1
Qty
4
2
2
2
2
1
1
8
1
1
This machine can also detect the user’s heart rate wirelessly and displays the reading in the
PULSE window during the exercise if a chest strap, not included, is worn by the user
(available for purchase through BH North America).
5
Conquest
AVERTISSEMENTS
CAUTION
PRUDENCE
RISK OF INJURY
RISQUE DE BLESSURE
Ne Pas Mettre
Les Mains Près
du Mécanismes
de Pliage
Do Not Put
Hands Near
Treadmill
Folding
Mechanisms
Folding Mechanisms
Mécanismes de Pliage
Caution: Finger pinch points
- Keep hands away
Prudence: Points de pincement des doigts
- Garder les mains loin
S'IL VOUS PLAÎT
PLEASE OBSERVE
OBSERVER LES
ALL WARNINGS
AVERTISSEMENTS ET
AND SAFETY
INSTRUCTIONS DE
INSTRUCTIONS
SÉCURITÉ FIGURANT
LISTED IN THE
DANS LE MANUEL
USER’S MANUAL
D'UTILISATION
6
Conquest
ASSEMBLY
Figures 3 & 4
1. One person rotates the Uprights in
the direction shown while the second
secures the Uprights to the frame
with Allen Bolt (a).
WARNING:
Be careful and keep hands away from
pinch points during assembly and
while in folding motion
Uprights
1) Raise the Computer and tighten
with Plastic Handles (c) underneath.
2) Lower the Handrails onto the uprights and then tighten with Sleeve
(b1), Washer (b2) and Bolt (b).
3) Install the Right and Left Decorative
Cover (C, D) with Screw (f).
4) Install the Right and Left Wheel
Protecting Cover (E, F) with Screw
(f).
7
Conquest
FOLDING AND MOVING
FOLDING UP THE UNIT
The Treadmill can be folded for storage. Follow the steps below before folding the treadmill:
1. Stop the treadmill.
2. Lower the elevation to the minimum.
3. Unplug the electrical connector
4. Lift the unit until lever (O) clicks into place. Do not touch lever (O).
Step on to release latch to unfold
Raise the deck until latched on
Figure 5A
Do not hit or knock on the cylinder. The cylinder is under high pressure. If knocked or hit on, the
cylinder could get damaged and the treadmill may not fold properly.
Do not hit the cylinder
Figure 5B
8
Conquest
FOLDING AND MOVING (cont’d)
MOVING THE UNIT
NOTE: Do not move across an uneven floor.
1. Before moving, verify the power cord is
unplugged and the unit is folded.
2. Place your hands on the handrails tilt and
push the treadmill on the two wheels.
Figure 6
UNFOLDING THE UNIT
1. Verify the space under the treadmill is clear
and children are not near.
2. Press lever (O) down as shown by the arrow.
3. The treadmill will slowly lower down to the floor
Figure 6A
Step on to release latch to unfold
POSITION THE TREADMILL
1. For safety, maintain a minimum clearance around the treadmill. Maintain 18 inches on
the front and on each side of the treadmill plus 24 inches at the rear of the treadmill.
2. Store the unit in a dry place away from direct sunlight and temperature changes.
9
Conquest
MAINTENANCE
LUBRICATION
Figure 7. Use the bottle of lubricant (h) to lubricate the inside of the belt in order to keep your
unit in top condition and to ensure that friction between the belt and the board is kept to a
minimum (due to different running styles, always apply more lubrication to the area where you
place your feet during the exercise). It is advisable to lubricate the base of the belt every 3-12
months, depending on how often it is used. Do not use solvent based lubricants.
Table I
Operating Speed
1 to 3.7 miles (1 to 6 km) per hour
3.7 to 7.4 miles (6 to 12 km) per hour
7.4 to 9.9 miles (12 to 16 km) per hour
Recommended lubrication period
for home use
1 year
6 months
3 months
ADJUSTING THE BELT
Figure 7
Figure 8
m
If your unit is not seated evenly on the the floor with its footing, this may cause the belt shown on
Figure 8, area (X) to shift sideways. The belt was rigorously tested and set at the factory.
However, due to weight differences and individual styles of running, the belt may shift sideways.
If the belt does shift to the left or right, stop the machine and adjust the belt.
NOTE: Over tightening of the belt can lead to a loss of speed on the machine and even stretch
the belt itself. One turn of the right screw (R) in a clockwise direction has the same effect on
the position of the belt as one turn of the left screw (L) in a counterclockwise direction.
Consequently, in the event of excessive belt movement you can use either of the two screws in
order to avoid over tightening the belt.
10
Conquest
MAINTENANCE (cont’d)
BELT SHIFTED TO THE RIGHT (Figure 8)
1. Turn off and unplug the treadmill each time before using the hex wrench.
2. Use the hex wrench to turn the right hexagonal head socket a 1/4 turn clockwise.
3. Turn on treadmill for a few minutes at a speed of 2.5 mph (4 km/h) and check belt location.
4. If the belt is still not centered, then turn the left hexagonal head socket a 1/4 turn
counterclockwise.
5. If the belt is not centered, then repeat the steps above.
BELT SHIFTED TO THE LEFT (Figure 8)
1. Turn off and unplug the treadmill each time before using the hex wrench.
2. Use the hex wrench to turn the left hexagonal head socket a 1/4 turn clockwise.
3. Turn on treadmill for a few minutes at a speed of 2.5 mph (4 km/h) and check belt location.
4. If the belt is not centered, then turn the right hexagonal head socket a 1/4 turn
counterclockwise.
5. If the belt is still not centered, then repeat the steps above.
TREADMILL CLEANING
Switch the unit off and unplug the power cable. Use a damp cloth or towel to clean the dust off
the treadmill, especially the side bars and the electronic console. Do not use solvents.
NOTE: Unplug the treadmill before using a vacuum near the treadmill.
Use a vacuum cleaner to carefully vacuum around the visible components (belt, structure,
etc.). You can vacuum the underside of the unit by folding up the unit.
TIGHTENING THE FASTENERS
Check the connections and tighten all the parts on your unit every three months.
Use of this machine with worn parts, e.g. the drive belt, running belt or rollers, may cause the
user injury. If you are unsure about the condition of any part, we recommend that you replace it
with original spare parts. The use of other spare parts may cause injuries or affect the
performance of the machine.
11
Conquest
MAINTENANCE (cont’d)
REMOVING & WASHING THE BOTTLE HOLDER
To check if the Bottle Holder is held loosely, gently push the Bottle Holder up from beneath. If
this does not release the Bottle Holder, then remove as follows:
RIGHT BOTTLE HOLDER REMOVAL:
Gently grasp the Bottle Holder from beneath or on the rim. Turn it clockwise to unfasten.
Once the Holder is loosened, lift the holder up and out of the hole.
To install a Bottle Holder into the right hole:
Move away the wires.
Insert the Holder into the hole and gently turn counterclockwise to fasten.
LEFT BOTTLE HOLDER REMOVAL:
Gently grasp the Bottle Holder from beneath or on the rim. Turn it counter-clockwise to
unfasten.
Once the Holder is loosened, lift the Holder up and out of the hole.
To install a Bottle Holder into the left hole:
Move away the wires.
Insert the Holder into the hole and gently turn clockwise to fasten.
Bottle Holder
Left Bottle Holder hole
Bottle Holder
Right Bottle Holder hole
BOTTLE HOLDER WASHING
Please wash the Bottle Holders by hand only. The Bottle Holders cannot be placed into the
dishwasher or microwave.
12
Conquest
FITNESS AND EXERCISE
FITNESS
All doctors agree that regular exercise is a good way to control our weight, make us more fit
and help us to relax. Before starting any exercise program, it is advisable to consult your
doctor. You will achieve better results based on his/her advice or suggestions. Exercise
programs vary depending on age and physical condition.
ADVANTAGES OF EXERCISE
Regular exercise below a certain level for 15-20 minutes becomes aerobic. Aerobic exercise is
basically exercise that uses oxygen. Normally, this is a continuous exercise without pauses. In
addition to sugars and fats, the body also needs oxygen. Regular exercise improves the body’s
ability to supply oxygen to all of the muscles and at the same time improves lung function, the
heart’s pumping capacity and better blood circulation. In short, the energy produced during
exercise burns kilocalories (known as calories).
EXERCISE & WEIGHT CONTROL
The food we eat is transformed into, among other things, energy (calories) for our body. If we
take in more calories than we burn then the result is an increase in weight and vice versa, if we
burn more calories than we eat, we lose weight. When resting the body burns around 70
calories per hour to keep our vital functions active. The table shows approximate energy use
for an average person doing various activities.
Table II
ACTIVITY
Walking, moderate pace
Housework
Swimming (400 m/h)
Dancing
Walking, brisk (6 km/h)
Tennis
Cycling (30 km/h)
Squash
CALORIES USED PER HOUR
140
150
300
350
370
420
500
690
EXERCISE PROGRAM
Regardless of whether your goal is to become more fit, control your weight or for physiotherapy, always remember that your exercise should be gradual, planned, varied and not too
demanding. We recommend that you should exercise 3 to 5 times per week.
Before beginning a session it is important to do a warm-up for 2-3 minutes at low speed. This
will help condition your muscles and prepare your cardio respiratory system.
The next stage will last 15-20 minutes at a pulse rate of between 65 to 75%, or between 75 to
85% for those already accustomed to exercise. At a later stage, once you have become more fit,
divide this time between both levels but always remembering that the pulse rate must not
exceed 85% (aerobic) and never reach the maximum heart rate limit that corresponds to your age.
When finished, it is important to relax the muscles. This is done by walking at a low speed for
2-3 minutes until the heart rate drops below the 65% line. This will prevent muscle pain, after an
intense session. It is better to finish the program with some relaxation exercises on the floor too.
13
Conquest
TROUBLESHOOTING
PROBLEM
1. The console does
not switch on.
2. The treadmill does not
work.
3. Walking motion is jerky
on the treadmill.
4. The treadmill belt skews
off center.
5. Error Signal Display:
Error 1:The treadmill can’t
read the speed value.
Error 6:Incline motor
doesn’t run.
Error 7:Incline is too high
or too low (exceed the
range).
CHECKS
1a) Make sure that the
machine is plugged in and the
ON/OFF switch is in
position I.
1b) Verify that the console
electric supply cable is
connected.
Check if the electrical outlets
fuse or circuit breaker has
shut off.
3a) Check if the belt is
lubricated.
3b) Check the tension on the
running belt.
3c) Check the tension on the
AC motor drive belt drive belt.
4a) Check if the machine is
level on the floor.
4b) Check if the machine
wobbles.
4c) Check alignment of the
front and rear rollers.
5a) Check if the speed sensor
is plugged in
5b) Check the speed sensor
functionality
5c) Calibrate the incline motor
14
SOLUTIONS
1a) Plug the machine into the
power supply. Set the switch
to position I.
1b) Connect the console
electric supply cable.
Replace fuse or circuit breaker.
Contact a qualified electrician
if required. Plug the treadmill
into a dedicated 110-120V, 15
or 20 Amp outlet to ensure the
treadmill receives the
appropriate amount of current
to function correctly. The
outlet must not supply
electricity to any other device.
3a) Lubricate the sliding belt.
3b) Adjust the belt tension.
3c) Adjust the drive belt
tension.
4a, 4b) Level the machine.
4c) Align the front and rear
rollers.
Contact BH Fitness Customer
Service. See Warranty pages
at the end of this Manual.
Conquest
CONSOLE OPERATION
15
Conquest
CONSOLE OPERATION (cont’d)
SAFETY KEY & CLIP
This BH treadmill is equipped with a safety key that will disable the treadmill if it is disengaged
You should attach the clip end to your clothing.
If at any time you need to stop the treadmill quickly, simply pull the safety key to disengage
This will cut all power to the treadmill and it will come to a complete stop. To resume your
workout, push the lower portion of the Emergency button inward. You will need to program
your workout again.
BEFORE STARTING
Straddle the running belt and stand on the side rails. Engage the safety key and attach the rope
to your clothing. Do not stand on the walking belt while the belt is moving.
KEY FUNCTIONS
UPPER CONTROLS:
ENTER – This key is used to input changes to programs.
These keys are used to change values during program setup. They cannot be used
to adjust the speed and incline while a program is operating.
TIME – This will display the workout time left in preset program that you have selected except
for “9 HOLE” and “QUICKSTART”. In “9 HOLE” and “QUICKSTART” it will display the
time accumulated from the beginning of the workout.
CALORIES – This displays the amount of calories burned during your workout.
As with all pieces of exercise equipment, this is an estimated value.
INCLINE – Displays the rise in percentage
PULSE – Displays heart rate detected in Beats Per Minute (BPM).
SPEED – This is how fast you are moving in terms of Miles Per Hour (MPH) or kilometer per hour.
DISTANCE – Total distance accumulated from the beginning
16
Conquest
CONSOLE OPERATION (cont’d)
INSTANT SPEED/INCLINE KEYS –
You can change the speed or incline of the treadmill by pressing one of the Instant Key buttons
in either Miles Per Hour Each key represents the assigned value (MPH) or percent grade.
NOTE:
Additional information about Incline:
1. When the safety key is disengaged and engaged, the position of the incline stays the same
as before the stop. Only after the QuickStart key is pressed, would the incline return to zero.
2. When the user turns off power and then turns it back on, the position of the incline stays the
same. Only after the QuickStart key is pressed, would the incline return to zero.
3. During a program, if you press the Stop to PAUSE, the incline will return to zero.
FAN – Press this key to turn on the fan. Press again to turn off.
LOWER CONTROLS:
QUICKSTART – This key is used to begin any treadmill program
STOP – This key is used to stop the treadmill at any time. Press the STOP button and hold for
3 to 5 seconds and the computer controls will end the program and permit the
selection of the next program.
These keys are used to adjust the speed of the treadmill.
These keys are used to adjust the incline of the treadmill.
TO STOP
1. First, hold on to the handrails; step off the running belt and onto the side rails.
2. Press STOP. The running belt will stop.
NOTE: To stop immediately, pull on the safety key and the treadmill will cut power and the
treadmill will come to a stop.
NOTE: Press and hold STOP for 3 to 5 seconds to end the program.
17
Conquest
CONSOLE OPERATION (cont’d)
USING HEART RATE
HANDPULSE – To periodically check your heart rate, grasp the sensors on the cross handlebar
The PULSE LED will flash and after about 9 seconds your heart rate will be shown in the
pulse window.
CHEST BELT – Using a wireless chest belt - not included (such as T41 Polar Transmitter), your
heart rate is constantly displayed during the workout. The heart rate strap will send your heart
rate to the console. The transmitter is more effective if worn on moist skin. As optional
accessories, the chest belt is available for purchase through BH North America.
HEART RATE CALCULATION
Before beginning any test, calculate your maximum heart rate. The maximum number of
heartbeats that a person must not exceed is referred to as the maximum heart rate and this
value drops with age. A simple formula to calculate this is to subtract your age, in years, from
the number 220. To ensure that you are exercising correctly, try to keep between 65% and
85% of your maximum heart rate value.
For example, the maximum heart rate that a 30 year old user must not exceed is:
220 – 30 = 190 heart beats per minute (BPM).
190 x 0.65 = 123 heart beats per minute.
190 x 0.85 = 161 heart beats per minute. Do not exceed 85%.
So the heart rate exercise range for a 30 year old is between 123 and 161 BPM.
Stop exercising if your pulse is 85% of your maximum heart rate.
CONSOLE INSTRUCTIONS
Your BH FITNESS treadmill will provide both manual controlled and factory installed preset
workout programs.
In MANUAL and QUICK START, you control the speed and/or incline at your discretion.
In PRESET programs, the speed and/or incline will change in accordance with the program’s
profiles. There are 30 segments in each preset program, first 3 segments are for WARM UP
and the last 3 segments are for COOL DOWN (no warm up or cool down in 9-Hole).
In any program, pressing the STOP key will PAUSE the current program. To resume the
current program press the QUICKSTART key. To exit the current program press and hold the
STOP key for 3 to 5 seconds. Refer to heart rate calculation above.
18
Conquest
CONSOLE OPERATION (cont’d)
STARTING
1. Stand on the side rails. Turn on the POWER.
2. The window will display a scrolling message ‘PRESS WEIGHT BUTTON TO SET WEIGHT’
Press WEIGHT. A blue and back colored LCD displays “LBS”. Press the + or – keys
on the upper controls to enter your weight. Press
. A blue backlit colored LCD
displays an profile of a heartbeat. The scrolling message in the window displays ‘SELECT
PROGRAM OR PRESS QUICKSTART’.
MANUAL PROGRAM SET UP
1.
2.
3.
4.
Stand on the side rails.
Press Manual program button in the upper left corner of the controls.
An LED will light up to indicate the program selected.
Time will be flashing.
5. Adjust time with the
6. Press
or
keys at the upper controls.
on the upper console to confirm and start.
7. Adjust speed with instant speed keys or
at the lower controls.
8. Adjust Incline with instant incline keys or
at the lower controls.
9 HOLE PROGRAM SETUP
1. Stand on the side rails.
2. Press 9 HOLE program buttons located at the upper left corner of the controls. An LED will
light up indicating the program selected.
3. Resistance level L-01 will flash on the display.
4. Adjust level using the
or
keys on the upper controls.
5. Press
on the upper controls to confirm and begin. As the accumulated distance
reaches 2.18 Miles (the length of a 9 hole golf course), the program will end.
19
Conquest
CONSOLE OPERATION (cont’d)
HRP – Heart Rate Program Setup
NOTE: Chest Belt - not included, must be worn throughout this program
NOTE: See Page 19 for Target Heart Rate calculation instructions.
1. Stand on the side rails.
2. Press HRP button and the LED will light up.
3. Age will be flashing, adjust Age with the
4. Press
or
keys on the upper controls.
key on the upper controls. Time will be flashing.
7. Adjust theTime with the
8. Press
keys on the upper controls.
key on the upper controls.
.
Pulse (BPM) will be flashing
5. Adjust the Pulse (BPM) with the
6. Press
or
or
keys on the upper controls.
at the upper controls to accept and begin.
CUSTOM PROGRAMS (4 Custom programs)
1. Stand on the side rails.
2. Press one of the C1 or C2 or C3 or C4 buttons located on the upper left corner of the
controls. An LED will light up indicating the program selected.
3. Time will be flashing in the display window.
4. Adjust theTime with the
5. Press
or
keys on the upper controls.
on the upper controls. SE01 (Segment #1) will display.
6. Adjust the speed of this segment with the
7. Adjust the incline of this segment with the
keys on lower controls.
keys on lower controls.
8. Press
on the upper controls; SE02 (Segment #2) will display.
9. Repeat steps 6 and 7 for up to SE30 (30 segments).
10. Press QUICKSTART at any time to begin.
NOTE: Custom programs will be stored in the system for easy retrieval unless you reprogram
the segments of the custom program.
20
Conquest
CONSOLE OPERATION (cont’d)
REMAINING PRESET PROGRAMS
1. Stand on the side rails
2. Press a program button located at the upper left corner of the upper controls. An LED will
light up indicating the program selected
3. Resistance level L-01 will flash on the display.
4. Adjust resistance level using the
5. Press
or
keys on the upper controls.
and Time will flash on the display.
6. Adjust time using the
7. Press
or
keys on the upper controls.
to begin.
QUICKSTART
1. Stand on the side rails.
2. Press QUICKSTART on lower controls.
3. Adjust speed with instant speed keys or
on the lower controls.
4. Adjust Incline with instant incline keys or
on the lower controls.
The table below details the parameters associated with appropriate programs
Program
Manual
9 Hole
Hill Climb
Endurance Run
HRC
Interval
Rolling
Weight Loss
Custom 1
Custom 2
Custom 3
Custom 4
Level
Range
Preset 1 1 - 10
Preset 1 1 - 10
Preset 1 1 - 10
Preset 1 1 - 10
Preset 1
Preset 1
Preset 1
Time
Preset 30 min.
N/A
Preset 30 min.
Preset 30 min.
Preset 30 min.
1 - 10 Preset 30 min.
1 - 10 Preset 30 min.
1 - 10 Preset 30 min.
Preset 30 min.
Preset 30 min.
Preset 30 min.
Preset 30 min.
Range Age
Range Pulse
Range Segments
20 - 99
N/A
20 - 99
20 - 99
20 - 99 Preset 30 30 - 80 Preset 30 30 - 240
20 - 99
20 - 99
20 - 99
20 - 99
30
20 - 99
30
20 - 99
30
20 - 99
30
21
Conquest
23
NO
Orig
Description
PART LIST
Qty
NO
Orig
1
HTF144A
Computer Assembly
1
32 SCE4-10
2
SDA8-45I
Truss Hex Screw M8xP1.25x45
2
33
3
SOC8
Nylon Nut M8xP1.25
14
34
P-2534
Plastic Handle
2
35
5
6
7
NT-2149
JTFE002
HTFB020
HTFB021
2
1
1
1
36
37
38
39
8
SAI3-25
Plastic Handle Screw
Stuff Holder Assembly
Hand Pulse Plastic Set(Upper)
Hand Pulse Plastic Set(Lower)
Round Head Philips Self Tapping
Screw Φ3x25
Upper Control Box Cover
4
40
1
41
Control Box Board APM KB1004
1
42 SCE5-10
11 SAI3-8
Round Head Philips Self Tapping
Screw Φ3x8
14
12 P-2307
Lower Control Box Cover
4
9
P-2342
XEK-16110
002
43
Description
Round Head Philips Screw
M4xP0.7x10
Qty
10
XRA-013Computer Board AMP
017F
Round Head Philips Self Tapping
SAK3-8
Screw Φ3x8
XEK-151Key Board APM KB2008
002
XL-419
10PIN Wire
XL-836A Control Wire(Upper)
XL-729B Control Wire(Lower)
XL-792A Hand Pulse Wire(Upper)
XEK-028Hand Pulse Board
260
XL-792B Hand Pulse Wire(Lower)
XHBRV510
1
44 XL-793A
Truss Philips Screw M5xP0.8x10
Wireless Pulse Receiver
Control Board Connecting
Wire(Upper)
Control Board Connecting
Wire(Lower)
Lower Computer Cover
Computer Decoration Cover
Safety Switch Button
1
33
1
1
1
1
1
1
2
12
1
1
6
45 XL-793B
14 P-2344
15 P-2345
16 P-2535L
Truss Philips Self Tapping Screw
Φ5x20
Upper Stuff Box Cover
Lower Stuff Box Cover
Upper Stuff Box Protecting Cover(L)
1
1
1
46 P-2336
48 P-2337
49 P-2300
17 P-2535R
Lower Stuff Box Protecting Cover(R)
1
50 XEM-011A Safety Switch Sensor
1
51 NS-228
Flex Spring
1
2
1
1
1
52
53
54
55
Safety Switch Base
Safety Switch Slip Base
Upright Assembly(Left)
Upright Assembly(Right)
1
1
1
1
8
56 SDA8-55I Truss Hex Screw M8xP1.25x55
4
1
57 SDA8-20I
P-215658
ABS
BAA080059
200-15
P-131460
ABS
Truss Hex Screw M8xP1.25x20
4
Upper Motor Cover
1
Foam Sticker 80mmx20mmx1.5t
Single Sided Tape Black
2
Lower Motor Cover(Black)
1
Cylinder
CKS Hex Screw
CKS Hex Screw
1
1
1
13 SCI5-20
24 P-2338
Truss Philips Self Tapping Screw
Φ4x16
Bottle
PU Handrail(Left)
PU Handrail(Right)
Upper Computer Cover
Truss Philips Self Tapping Screw
ø4x12
Fan Cover
25 P-2339
Fan Adjustment Plastic
1
26 P-2311
Vent Rubber
1
18 SCI4-16
19
20
21
22
P-2305
P-2343L
P-2343R
P-2334
23 SCK4-12
27 PO-040-20 O-Shaped Ring Φ4xΦ2
28 SCK4-10
29 P-1845L
30 P-1845R
31 XEK-030
Truss Philips Self Tapping Screw
ø4x10
Vessel(Left) Explorer
Vessel(Right) Explorer
Right Turbofan
24
2
14
1
1
1
P-2328
P-2329
JTCA046
JTCB038
1
1
1
61
62 NCY-018
63 SK-413
64 SK-436
23
1
Conquest
PART LIST (cont’d)
NO
Orig
Description
Qty
NO
Orig
Description
Qty
65 JTBC003A Incline Base Assembly
1
100 CB00001B Running Belt
1
66 P-1721
67 SK-430
4
6
Front Roller
CKS Hex Screw M8xP1.25x55
1
3
Washer ø8ø16x1.5t
3
Rear Roller
1
68 SOC10-8T Nylon Nut M10xP1.5x8t
10
69 SK-431
10
101 NRL-008
102 SGA8-55I
SPA080103
160-15
104 NRL-008A
2
105 P-2137C
Plastic Pedal
2
R Pin
2
106 P-1034
Pedal Fixing Plastic(Black)
8
Incline Motor
Plastic Washer
1
2
107 P-2138L
108 P-2138R
74 SK-439L
CKS Hex Screw(BK)
1
75 SAA5-10GZ
Round Head Philips Screw
M5xP0.8x10 (Galvanization)
3
70 NT-1379
SQC10020
72 XM-227A
73 P-1720
71
Plastic Post Pad
Truss Hex Screw
Washer
Incline
Base
Iron
Flex
ㄇ-shaped
Plate Pin
Rear End Cap(Left)
Rear End Cap(Right)
Round Head Philips Drilling Screw
109 SAN4-20
M4xP0.7x20 Fine Pitch Thread
Washer Drilling Philips Screw
110 SMN4-16
M4xP0.7x16 Fine Pitch Thread
1
1
2
6
A2B027E0
Fixing Post
260-001
77 SK-416
CKS Hex Screw
78 XM-192A Motor
1
111 JTBA021
2
1
112 SOF8A
113 P-1151
79 SCA4-40
Truss Philips Screw M4xP0.7x40
2
Iron Core Ring
1
115
P-320
Wheel
2
Computer Panel Decal
Spring Washer M8
Truss Philips Drilling Philips Self
Tapping Screw ø4x16
1
6
116
117
SK-288
SOC10
Truss Hex Screw
Nylon Nut M10xP1.5
4
4
2
118
JTBZ006
Fixing Bushing Assembly
1
CKS Hex Screw M8xP1.25x20
1
4
119 NO-3232
120 SDA6-8
Pedal
Truss Hex Screw M6xP1.0x8
1
1
Washer ø8xø19x3t
4
121 NO-3231
Folding Fixing Plate
1
CKS Hex Screw M8xP1.25x15
CKS Hex Screw M8xP1.25x45
Nut M8xP1.25
2
1
2
122 SDA6-45L
123 NT-1465
124 P-1707
Truss Hex Screw M6xP1.0x45 BK
Bushing Shaft
Block
4
1
1
Controller
1
125
Rear Fixing Block
1
Computer Shelf Assembly
Wheel
1
2
126 SCA5-40
127
SOC5
Truss Philips Screw M5xP0.8x40
Nylon Nut M5xP0.8
2
2
Flat Washer ø10xø20x2t
2
128
Spring
1
Screw Sleevelet
2
129
2
130 NO-3900
1
131
76
XEJT35X23
81 RCA-004
82 SPB8
80
83 SCM4-16
84 NO-2741
86 SGA8-20I
SPA08087
190-30
88 SGA8-15I
89 SGA8-45I
90 SOA8
XRB-01391
005
92 JTFA036
93 P-1145
SPA10094
200-20
95 NT-2158
96 SMM4-16
99 CA-230J8
Washer Drilling Philips Self
Tapping Screw ø4x16
Drive Belt
24
Base Assembly
1
Allen Bolt M8xP1.25
Foot Pad(Black)
Washer Drilling Philips Self
114 SMM4-20
Tapping Screw ø4x20
2
4
P-1708
NS-096
SCA6-25LTruss Philips Screw M6xP1.0x25 BK
002
SK-432
8
1
Incline Connecting Board
4
Truss Hex Screw
4
Conquest
PART LIST (cont’d)
NO
Orig
Description
Qty
NO
Frame Assembly
1
176
1
177
134 XEA-A002 Power Switch
1
178
135 XEM-002
Sensor Cylinder shaped
1
179
136 P-2231
Sensor Fixing Base
1
180
137 XLT-TM
Power Cord
1
181
138 P-1301A
Fixing Cushion
6
139 MB-028
Running Board
1
132 JTAA033A
133
142
143
144
145
146
147
148
149
150
151
152
153
154
155
171
172
173
174
175
XEH-003001
Power Cord Socket
BAA13480- Foam Sticker 1348mmx20mmx3t
200-30
Single Sided Tape Black
Counter Sink Hex Screw
SIA8-30I
M8xP1.25x30
Counter Sink Hex Screw
SIA8-35I
M8xP1.25x35
P-1368A Small Backboard
Washer Drilling Philips Self
SMM4-12
Tapping Screw ø4x12
SCE6-8
Truss Philips Screw M6xP1.0x8
SPA060Washer ø6xø13x1t
130-10
XEG-15Circuit Breaker
001
SEA8-15IL Allen Bolt BK M8xP1.25x15
RCA-007 Computer Control Box Decal
JTFC001
Control Box Iron Plate Assembly
SDA10-35I Truss Hex Screw M10xP1.5x35
PEC-UCWire Clip Knob
0.5
PEC-UC-1 Wire Clip Knob
Extension Wire(White)
XLT002
14AWGx90x2T
Extension Wire(Black)
XLT001
14AWGx90x2T
Extension Wire(White)
XLT003
14AWGx170x2T
Extension Wire(Black)
XLT004
14AWGx170x2T
Extension Wire(Kelly)
XLT036
14AWGx130mmx1T1R
Orig
PEC-HC25
BJ-36163B
BJ-48330B
BE-1500
DEC-201100
PM-001
Description
Qty
KSS Wire Clip Base
5
Belt 3.6x163mm Black
6
Belt 4.8x330mm Black
2
Guide Thread
2
Nylon Rope
1
Clip
L-shaped Hex Wrench + Screwdriver
SSH570183
5mmx70mmx70mm (Cross)
70M
chromium, vanadium, steel
L-shaped Hex Wrench
SSA6-80184
6mmx80mmx80mm
80M
chromium,vanadium,steel
BD-001185
Bottled Silicon DC-1000
30
1
6
186 XL-831
Safety Switch Connecting Wire
1
2
187 SOD8
Nylon Nut M8xP1.25
2
1
188 PK-L-027
Water Bottle
1
24
189 P-1918L
Left Decorative Cover
1
4
190 P-1918R
Right Decorative Cover
1
4
191 P-2020L
Wheel Cover(Left)
1
1
192 P-2020R
Wheel Cover(Right)
1
4
1
1
2
Truss Philips Screw M5xP0.8x15
Hand Grip Tube Assembly(Left)
Hand Grip Base Plastic(Left)
Hand Grip Tube Assembly(Right)
8
1
1
1
2
193 SCE5-15
JTFB003L
195
P-2341L
JTFB003R
196
P-2341R
Hand Grip Base Plastic(Right)
1
4
208 SCE6-10
Truss Philips Screw M6xP1.0x10
9
2
1
1
1
1
2
1
1
1
25
Conquest
WARRANTY
USA / CANADA Warranty
Warranties may vary in other countries. See your local BH Fitness Dealer.
WARRANTY SUBMITTAL
Please have the following information available when contacting your dealer or BH for
warranty support.
A copy of the dated purchase receipt or credit card statement.
An explanation the problem/malfunction or parts that are missing or damaged.
Owner ’s name, address and phone number.
Model (Conquest) and Serial Number
Forward your information to BH North America by
FAX: (949) 206-0013
E-mail: [email protected]
Mail to: 20155 Ellipse, Foothill Ranch, California 92610, USA
For troubleshooting assistance or to confirm your claim please phone:
(949) 206-0330
BH FITNESS extends the following exclusive, limited warranty. Any other use of the unit
shall void this warranty.
FRAME – Lifetime (Home Warranty)
BH Fitness warrants the Frame against defects in workmanship and materials for
Lifetime from the date of original purchase, so long as it remains in the possession of the
original owner for home use.
DRIVE MOTOR – TEN (10) Years Home Warranty
BH Fitness warrants the Drive Motor against defects in workmanship and materials for
TEN years from the date of original purchase, so long as the unit remains in the possession
of the original owner for home use.
26
Conquest
WARRANTY (cont’d)
LABOR – 1 Years – (Home Warranty)
BH Fitness shall cover the labor cost for the repair of the unit for a period of one years from the
date of original purchase, so long as the unit remains in the possession of the original owner
for home use. Labor warranty does not include the travel time and or expense that may result
from the unit being outside of the seller or repair technician’s normal service zone.
ELECTRONICS & PARTS
– TEN (10) Years Home Warranty
BH Fitness warrants the Electronic components and all original parts (other than the
Drive Motor) against defects in workmanship and materials for a period of TEN (10)
years from the date of original purchase, so long as the unit remains in the possession
of the original owner for home use.
EXCLUSIVE REMEDY
The exclusive remedy for any of the above warranties shall be repair or replacement ofdefective parts,
or the supply of labor to cure any defect, provided that labor shall be limited as detailed above. All
labor shall be supplied by the local retailer and the product must be located within the retailer’s
service area. Labor warranty does not include the travel time and or expense that may result from
the unit being outside of the seller or repair technician’s normal service zone.
EXCLUSIONS AND LIMITATIONS
This warranty applies only to the original owner and is not transferable. This warranty is expressly
limited to the repair or replacement of a defective Frame or defective part and is the
sole remedy of the warranty. The warranty does not cover normal wear and tear.
BH FITNESS expressly disclaims all other warranties, express or implied, including but not limited
to all warranties of fitness for a particular purpose or of merchantability. This warranty gives you specific
legal rights and your rights may vary from state to state.
WARRANTY REGISTRATION
Your warranty card must be completed and sent to BH FITNESS before a warranty claim can
be processed.
27
Conquest