1
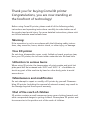
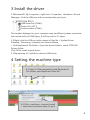
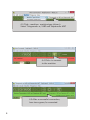
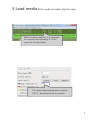
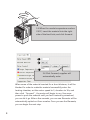
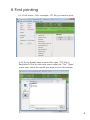
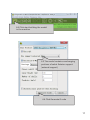
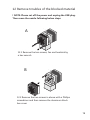
3D Printer Guide
More technological improvements and lower prices,
To create the world's most cost-effective 3D printer
www.come3d.com
Thank you for buying Come3D printer
Congratulations, you are now standing at
the forefront of technology!
Before using Come3D printer, please read all of the following safety
instructions and operating instructions carefully to make better use of
the product and avoid injury. For more detailed instructions, please visit
our official website: www.come3d.com
!Warning:
If the operation is not in accordance with the following safety instructions, may cause fire, burns, electric shock, or other injury or damage.
! Use 3D printer
Do not drop, disassemble, open, crush, folded on board, puncture, tear,
burn your 3D printer, do not insert other materials into the feed hole.
! Attention to serious burns
When using 3D printer, the temperature of print nozzles and print hot
plate parts will be increased over 200℃ and 100℃. It’s forbidden to
touch any part of the machine by hand or other body parts to avoid
severe burns.
! Maintenance and modification
Do not attempt to repair or modify a 3D printer by yourself. Disassembling 3D printer (including the removal of external screws) may result to
the damage beyond the scope of warranty.
! Out of the reach of children
3D printer contains a small component may cause choking hazards, and
other unexpected danger to young children. Please place 3D printer and
its accessories in the position out of the reach of children.
Technical parameters
Positioning accuracy: 0.1mm
Print precision: 0.1-0.3mm
Layer thickness: 0.3mm
Speed: 15cm3 / hour
Build Size: 120 × 120 × 120mm
Material Type: ABS filaments
Material colors: white, green, red, blue, yellow, black, transparent
Material Specifications: 1.7-1.8mm in diameter
Nozzle Quantity: 1
Nozzle aperture: 0.4mm
Recommended nozzle temperature: 230 °C
(the maximum can be set to 260 °C)
Heating plate temperature: 100-120 ℃
(proper winter warming and summer appropriate cooling)
Best ambient temperature: ≥ 25 ℃
Power requirements: 220V300W, ATX
The file print format: STL, GCODE
Compatibility: Windows, Linux, Mac OX
CE, CSA specifications: CE, CSA
Device weight: 8kg
Equipment size: 300 × 300 × 400mm
Package size: 400 × 400 × 500mm
1
Check the packing list
! Note:
After your receiving of the product, please open the packaging and
check the packing list carefully. The absence of any of the items
listed, please do not hesitate to contact us.
3D printer ×1
USB data cable ×1
1.8m power cord ×1
3mm hex wrench ×1
5mm hex wrench ×1
3 * 16 hex bolt ×5
3 * 10 hex bolt ×2
3mm nut ×8
Ceramic insulation cotton ×1
0.4mm nozzle clean-up drill ×1
Installation CD ×1
User's Guide ×1
Aftermarket warranty card ×1
2
Recognization of Come3D printer
▲Point:
Come3D printer has three movement direction, X-axis, Y-axis and Z-axis. Taking
a moment to familiar with these directions may avoid lots of trouble later.
!Warning:
Do not tear up the yellow tape on the hot plate,
it’s for resistant film.
Z+
The feed apertures
Sprinkler head
Nozzle
Heating plate
ZY-
USB jack
X+
X-
Y+
3
1 Install the software
Open the disc, find “ install” folder or download printer installed file
on our official website: http:// www. Come3d.com/download to fulfill
the following steps accordingly.
1.1 Install Java
Without installing this file, you can not run 3D printer program
ReplicatorG. Some of the user’s computer already installed software
is no need to install it again.
1.2 Install Python (! Must be installed to the
default path)
Python is a programming language, it can convert your 3D model
into the print path.
1.3 Installing Python acceleration components
Can speed up the running speed of the python program
1.4 Extracting ReplicatorG (simply extract is no
need to install)
ReplicatorG is a computer program, it can pretreat digital files to be
printed, control and test your Come3D printer.
2 Connecting the 3D printer
2.1 Plug in the power cord and turn on the power switch.
2.2 Plug in the USB cable, and connect to the computer.
4
3 Install the driver
3.1WindowsXP: My Computer> right-click> Properties> Hardware> Device
Manager> find the USB port with an exclamation point port
Port (COM & LPT)
USB Serial Port (COM3)
Printer Port (LPT1)
Communication (COM1)
The number displayed on your computer may be different, please remember
the number behind COM figure. It will be used in 4.2 steps.
3.2 Right-click the USB port with a sense of Han No.> Update Driver
Software> Browse my computer for driver software
> Find ReplicatorG file folder> Open the drivers folder> select FTDI USB
Drivers folder
Click OK to install a good driver.
3.3 Repeat step 3.2, install the relevant USB driver.
4 Setting the machine type
4.1 Open 1.4 Step unpacked good ReplicatorG
The Folder, open ReplicatorG.exe file.
4.2 Click> machines> connect (serial)
> Select and consistent step 3.1 port.
5
4.3 Click> machine> machine type (driver)>
Select Thingomatic w / HBP and Stepstruder MK7
4.4 Click> to connect
to the machine
4.5 After a successful connection,
here turns green, Is connected.
6
5 Load media (If the media is loaded, skip this step)
Before loading material, it is necessary
to complete the following: 5.1 Click
open the Control Panel.
230
5.2 nozzle target temperature is set to
230 ℃, And press Enter to confirm.
7
5.3 When the nozzle temperature reaches
230℃, insert the material into the right
side of the feed hole, and click forward.
230
5.4 Click Forward, supplies will
automatically enter.
When some of the material inserted for a short distance, it will be
blocked. In order to make the material successfully enter the
heating chamber, set the motor speed to 3, duration to 10s, and
then click “forward”, the motor will begin to run. Use some
power to push the material until you feel it seized by wirewheel,
you can let it go. After a few seconds, you can see filaments will be
automatically spited out from nozzles. Once you see the filaments,
you can begin the next step.
8
6 First printing
6.1.1 Click menu> File> example> STL file you want to print.
6.1.2 If you already have a model file, open "STL" file in
ReplicatorG Click on the main menu under the "File" "Open"
menu item, select the model you want to print documents.
View:
Computer
Local Disk(C:)
Local Disk(D:)
Desktop
Local Disk(E:)
My Documents
My Computer
File name:
Open
File Type:
Cancel
9
6.2 Click “move”, a toolbar will pop up, you can move the model
inside. Click the “center” and place it on the platform, that can
ensure the model will be printed in the correct position.
6.3 Click "proportion" in the toolbar, you can adjust the model scale.
10
6.4 Click start building the model
in the machine
6.5 The model contains overhanging
portions of select Exterior support
(external support)
6.6 Click Generate G code
11
6.7 After generation, the nozzle will automatically warming
up. During 2-3 minutes, when the nozzle temperature
reaches 200℃ to 230℃, Workbench reach 98℃-105℃,
printing is beginning.
6.8 If no temperature display, click Menu> File>
Parameter settings> check the temperature of the
building processing monitoring.
Quick Start Guide This is the end!
12
The following advanced techniques:
7 how to modify the print temperature?
7.1 use Notepad to open replicatorg extract the directory the
following path: skein_engines\skeinforge-35\skeinforge_application\prefs\SF35-Thingomatic-HBP-Mk7\alterations
\ start.gcode
7.2 find the following code:
M104 S220 T0 (set extruder temperature)
M109 S105 T0 (set heated-build-platform temperature)
7.3 The respective meaning is:
Set the nozzle temperature of 220 ℃.
Setting the temperature of the heated bed was 105 ℃.
7.4 Set the S220 and S105 to the temperature you want, such as
S210 or S100 , save the document.
7.5 set of skills:
Different materials need different nozzle temperatures, typically
200-300℃. According to different external temperatures, the
temperature of the bed is between 100-120℃. If some shedding
phenomenon happened during the printing process, it means the
heating temperature of the bed is not enough, it needs to raise
the temperature slightly.
13
8 On how to calibrate the machine
8.1 Revolve the Z-axis of the screw, fall the platform slowly by hand
until the nozzle just touches the heating plate so that the nozzle is
substantially aligned with the center of the heating plate.
8.2 Select correction script on the above picture
8.3 Click the image above the build button.
14
Yes
No
Select "yes."
8.4 and X-axis will move to the right(viewed from the front),
Y-axis move backwards(from the front), and when confronted with
the limit switch will be stopped respectively. When three axes
stopped, a dialogue box will be shown in the figure below.
Finish
8.5 Select “Finish”
The correction values have been calculated, each axis correction value
will be calculated and saved to the storage space of the circuit board,
it is no need to adjust after then.
15
9 manual modify the board parameters
Cross-section
9.1 a suitable substrate, the model will not fall off during the
printing process, the printing is complete Very easily peeled off
from the substrate, there is no need to modify the parameters
of the circuit board.
Cross-section
9.2 a flat substrate is difficult to peel from the substrate after the
printing completed, it need to reduce the Z-axis height(usually
decremented 0.2mm)
Cross-section
9.3 an excessive substrate, the model is easy to fall off during the
printing process to shift, need to increase the Z-axis height (usually
in increments of 0.2mm) Note: After you make these changes, do
not forget to re-generate G-code when you use it next time,
otherwise they would not have any change.
16
9.4 method to reduce or increase the height of the Z-axis
9.5 select motherboard parameter settings shown above, a dialog
box poped up shown below
9.6 by modifying the "Z back to
zero offset To fine-tune the height
of the nozzle. After you modify
Values, click "Submit modify.
Yes
No
9.7 Select”yes”, the motherboard will be restarted, the new offset value
will take effect. Note: do not forget to re-generate G-code when you use
it next time, otherwise they would not have any change.
17
10 How to add or replace materials
10.1 Cut the end of the original materials into flat with scissors and
insert new materials slowly into the feed hole after the old material
moving down.
11 How to replace the nozzle
11.1 Set the temperature in the software to 220-230℃. When material
melted, use a wrench to turn the old nozzle unscrewed, then tighten
the new nozzle clockwise.
18
12 Remove troubles of the blocked material
! NOTE: Please cut off the power and unplug the USB plug.
Then move the nozzle following below steps.
A
12.1 Remove the two screws, fan and heatsink by
a hex wrench
B
12.2 Remove the two screws in above with a Phillips
screwdriver and then remove the aluminum block
box cover
19
C
12.3 Cut material from above.
D
12.4 Remove the material from the gear.
20
E
12.5 Turn on the power and plug in the USB plug to
connect the printer, set the temperature in the software
(refer to 5.2) to 220-230℃, and when temperature
reached and material. Once thawed, take the material
out of the box.
F
12.6 Installation Lvhe.
G
G2
G1
12.7 Install the remaining components, be careful
not to forget to complete the nuts and washers
on map G1 and G2.
21
Ruian Maitian Network Technology Co., Ltd.
Website: www.come3d.com
Store: come3d.taobao.com
Add: 4Floor, HuaDu Hotel, RuiGuang DaDao No.28,
RuiAn City, Zhejiang, China.
Tel :150-6822-7335
E-mail: [email protected]
QQ group: 262392619
Skype: come3d.printer